Bei WPBeginner nutzen wir das große, schnelle CDN von Cloudflare, um unsere Website für Benutzer auf der ganzen Welt schneller zu machen. Dies hat uns geholfen, die Leistung von WordPress erheblich zu steigern, weshalb wir unseren Besuchern Cloudflare oft empfehlen.
Cloudflare ist einer der besten WordPress CDN-Dienste auf dem Markt. Sie bieten ein kostenloses CDN, das Ihre Website beschleunigt, und leistungsstarke Funktionen für die Sicherheit von Websites kleiner Unternehmen.
Allerdings kann die Ersteinrichtung von Cloudflare für neue Benutzer schwierig sein.
In diesem Leitfaden führen wir Sie durch eine komplette Cloudflare-Einrichtung in WordPress, damit Sie die Geschwindigkeit Ihrer Website verbessern können.
Was ist ein CDN?
Ein CDN oder Content-Delivery-Network ist ein System verteilter Server, das dazu beiträgt, dass die Dateien Ihrer Website den Nutzern je nach ihrem Standort schneller zur Verfügung stehen.
Normalerweise bedient ein Webhosting-Dienst die Besucher Ihrer Website von einem einzigen Standort aus. Alle Nutzer greifen auf denselben Server zu, unabhängig davon, wo sie sich befinden.
Dies kann zu einer Verzögerung bei der Bereitstellung von Inhalten für Nutzer führen, die weiter vom zentralen Hosting-Server Ihrer Website entfernt leben.
Aus diesem Grund richten CDNs mehrere Edge-Server an verschiedenen Standorten rund um den Globus ein.
Diese CDN-Server speichern Kopien der statischen Inhalte vom Ursprungsserver Ihrer Website und präsentieren sie den Benutzern, wenn sie Ihre WordPress-Website besuchen.
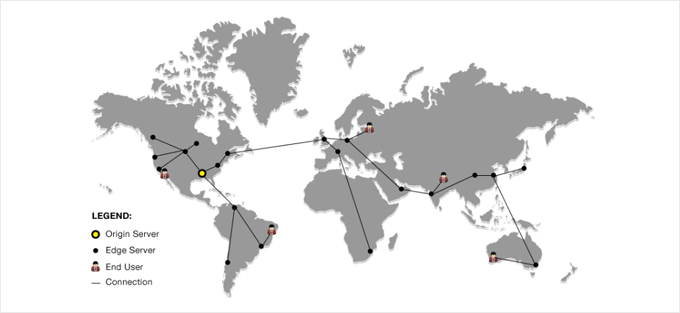
Bei einer Benutzeranfrage wird der CDN-Server, der dem Standort des Benutzers am nächsten ist, diese bearbeiten.
Wenn beispielsweise jemand in den USA auf eine im Vereinigten Königreich gehostete Website zugreifen möchte, wird ein CDN-Server in den USA diese Anfrage bearbeiten, nicht der Hauptserver im Vereinigten Königreich.
Bei einem CDN werden alle Benutzeranfragen von den nächstgelegenen CDN-Servern bearbeitet. Dadurch wird die physische Entfernung zwischen den Besuchern und dem Server Ihrer Website verringert.
Dadurch verbessert ein CDN die Leistung und Geschwindigkeit Ihrer Website für alle Nutzer, unabhängig von ihrem geografischen Standort.
Eine schnellere Website verbessert auch die Benutzerfreundlichkeit und kann Ihrer Website einen leichten Schub in den SEO-Rankings geben. Die Verwendung eines CDN reduziert auch die Belastung Ihres Primärservers und schützt ihn vor Abstürzen bei Verkehrsspitzen.
Wenn Sie mehr erfahren möchten, lesen Sie unseren Leitfaden darüber, warum Sie ein CDN für Ihren WordPress-Blog benötigen.
Was ist Cloudflare CDN?

Cloudflare ist einer der beliebtesten kostenlosen CDN-Anbieter im Internet. Es handelt sich um ein großes Netzwerk von weltweit verteilten Servern, die automatisch statische Inhalte in den Cache stellen und dynamische Inhalte schnell ausliefern.
Cloudflare ist nicht nur ein CDN-Dienst, sondern auch eine cloudbasierte Website-Firewall und ein verteilter Proxy Server. Das bedeutet, dass es den gesamten eingehenden Datenverkehr zu Ihrer Website überwacht und verdächtigen Datenverkehr blockiert, noch bevor er Ihren Server erreicht.
Es bietet einen kostenlosen Basisplan, der sich für kleine Unternehmenswebsites und Blogs eignet, sowie kostenpflichtige Pläne ab 20 US-Dollar pro Monat.
Cloudflare ist eine ausgezeichnete Wahl für kleine Unternehmen, die nach einem kostenlosen CDN suchen. Wenn Sie jedoch alle Funktionen von Cloudflare in vollem Umfang nutzen möchten, benötigen Sie den Business-Plan, der 200 US-Dollar pro Monat kostet.

Verwandt: Siehe unseren Beitrag darüber, warum WPBeginner von Sucuri zu Cloudflare gewechselt hat.
Schauen wir uns also an, wie man Cloudflare Free CDN in WordPress einrichtet. Sie können die Quicklinks unten verwenden, um zu den verschiedenen Teilen des Tutorials zu springen:
Einrichten Ihres Cloudflare Kontos
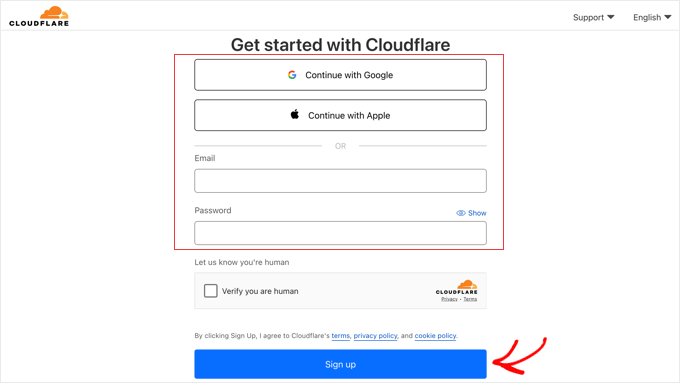
Um zu beginnen, müssen Sie die Cloudflare-Website besuchen und auf den Button “Start for free” klicken.

Auf der nächsten Seite müssen Sie Ihre E-Mail-Adresse und Ihr Passwort eingeben, um ein Cloudflare-Konto zu erstellen. Alternativ können Sie sich auch mit Ihren Google- oder Apple-Anmeldedaten anmelden.
Geben Sie einfach die erforderlichen Informationen ein und klicken Sie dann auf die Schaltfläche “Anmelden”.
Wenn Sie die Anmeldung abgeschlossen haben, können Sie Ihre Website verbinden, um Ihren Internetverkehr über Cloudflare zu leiten. Sie müssen nur Ihre Website in das Feld “Enter an existing domain” eingeben.
Achten Sie darauf, dass Sie nur den Domänennamen Ihrer Website eingeben, z. B. example.com. Sie brauchen weder die vollständige URL noch zusätzliche Zeichen einzugeben.
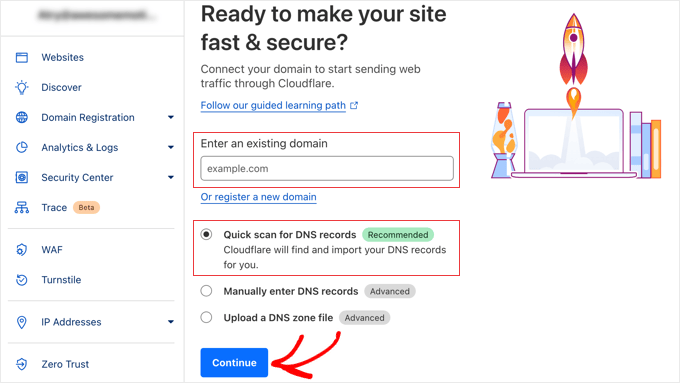
Vergewissern Sie sich, dass die Option “Schnellsuche nach DNS-Einträgen” ausgewählt ist, und klicken Sie dann auf den Button “Weiter”.
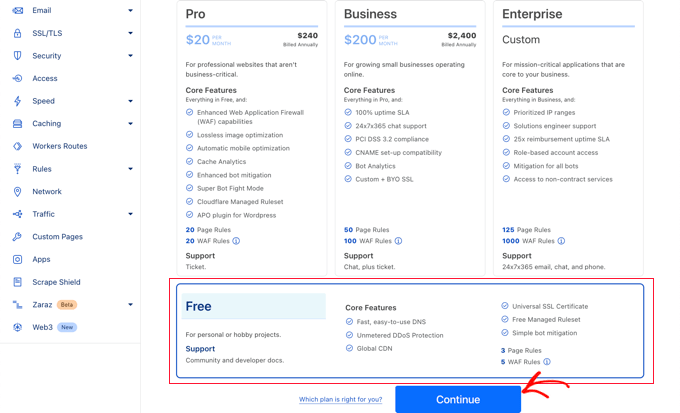
Auf der nächsten Ansicht werden Sie aufgefordert, die Art des Cloudflare-Tarifs auszuwählen, den Sie wünschen. Für dieses Tutorial werden wir den kostenlosen Cloudflare-Tarif wählen. Klicken Sie dann auf den Button “Weiter”.
Danach zeigt Ihnen Cloudflare eine Liste aller DNS-Einträge, die ihr System gefunden hat. Dazu gehören auch Ihre Subdomains.
Die DNS-Einträge, die durch Cloudflare geleitet werden sollen, sollten ein orangefarbenes Wolkensymbol haben, während die DNS-Einträge, die Cloudflare umgehen sollen, ein graues Wolkensymbol haben.
Sie müssen die Liste überprüfen, um sicherzustellen, dass Ihre primäre Domain bei Cloudflare mit einem orangefarbenen Wolkensymbol aktiv ist. Klicken Sie einfach auf den Kippschalter “Proxy-Status”, um den Status zu ändern.
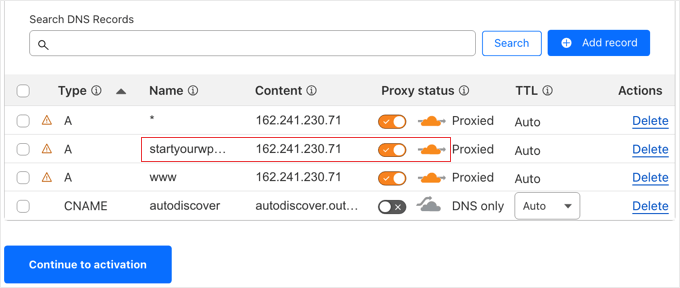
Sobald Sie Ihre DNS-Einträge überprüft haben, klicken Sie einfach auf den Button “Weiter zur Aktivierung”.
Im nächsten Schritt Ihrer Einrichtung werden Sie von Cloudflare aufgefordert, Ihre Nameserver zu aktualisieren. Sie werden aufgefordert, Ihre Nameserver auf neue, von Cloudflare zugewiesene Nameserver zu ändern.
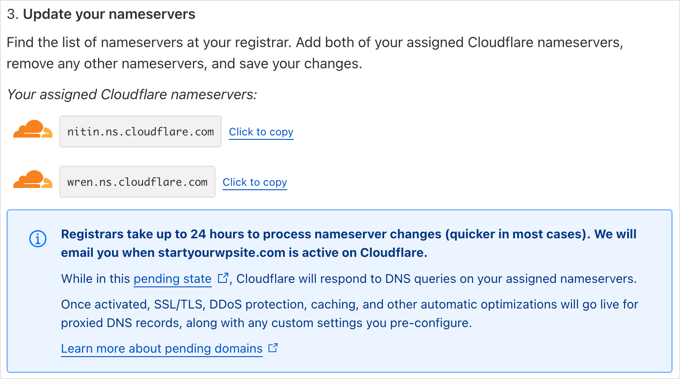
Hinweis: Es kann einige Zeit dauern, bis sich Änderungen an den Nameservern im Internet verbreitet haben. Während dieser Zeit kann Ihre Website für einige Benutzer unzugänglich sein.
Sie können die Nameserver über Ihr Konto bei der Domänenregistrierungsstelle, z. B. Domain.com, ändern.
Wenn Sie eine kostenlose Domain von Ihrem Hosting-Anbieter erhalten haben, müssen Sie die Nameserver ändern, indem Sie sich bei Ihrem Hosting-Konto anmelden.
In diesem Tutorial zeigen wir Ihnen, wie Sie die Nameserver über das Bluehost-Kontrollpanel ändern können.
Der Vorgang ist bei allen Hosting-Anbietern ähnlich, aber Sie können Ihren Hosting-Anbieter jederzeit nach detaillierten Anweisungen für sein Control Panel fragen.
Sobald Sie in Ihrem Bluehost-Dashboard eingeloggt sind, gehen Sie zum Abschnitt “Domains” und klicken Sie auf die Schaltfläche “Einstellungen” neben Ihrem Domainnamen.

Als Nächstes müssen Sie zum Abschnitt “Erweiterte Einstellungen” scrollen und diesen durch Klicken auf den Pfeil am rechten Bildschirmrand erweitern. Hier werden die DNS-Einstellungen Ihrer Website, einschließlich der Nameserver, angezeigt.
Neben “Nameserver (DNS)” sollten Sie auf die Schaltfläche “Verwalten” klicken.
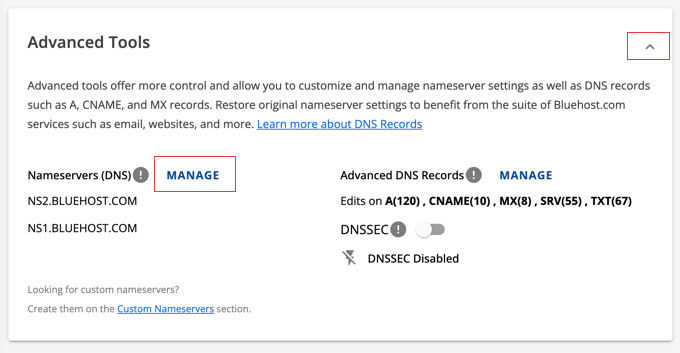
Daraufhin wird eine Warnung angezeigt, dass nur fortgeschrittene Benutzer ihre Nameserver aktualisieren sollten.
Sie müssen auf die Schaltfläche “Weiter” klicken, um dies zu bestätigen und mit dem nächsten Schritt fortzufahren.
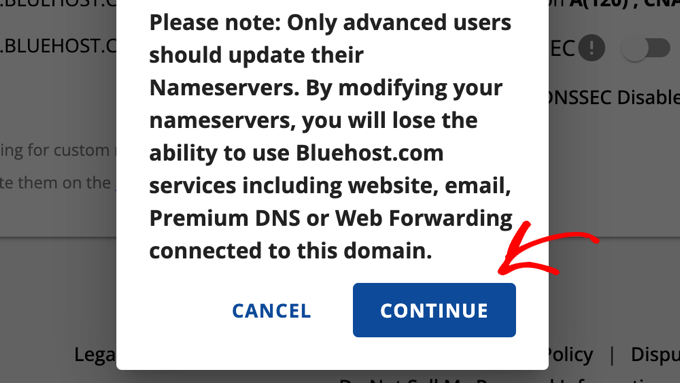
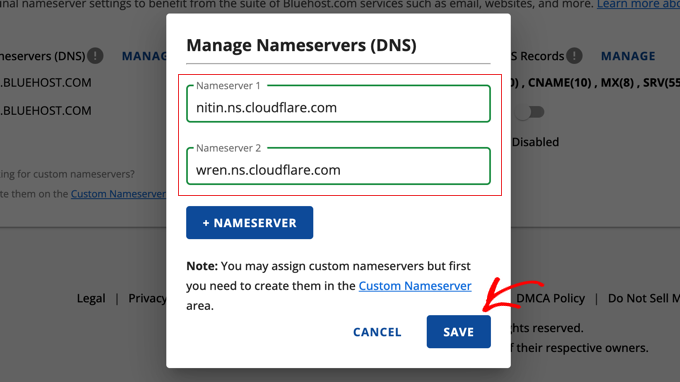
Als nächstes müssen Sie die von Cloudflare bereitgestellten Nameserver eingeben.
Klicken Sie dann auf die Schaltfläche “Speichern”.
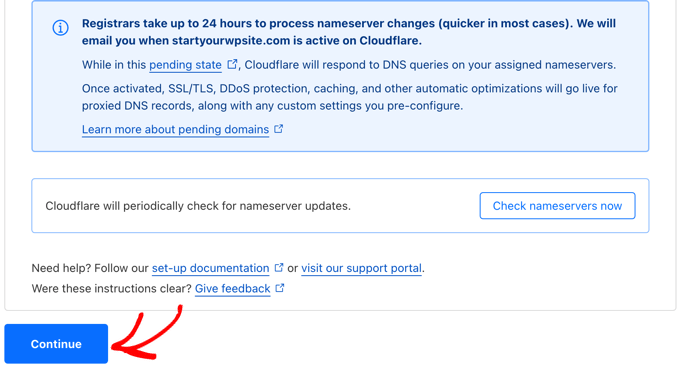
Danach müssen Sie zurück auf die Cloudflare-Einrichtungsseite gehen und auf den Button “Nameserver jetzt prüfen” klicken. Cloudflare wird nun Ihre Nameserver regelmäßig überprüfen und Ihnen eine E-Mail schicken, sobald sie aktiviert sind.
In der Zwischenzeit können Sie auf den Button “Weiter” klicken, um die Einrichtung abzuschließen.
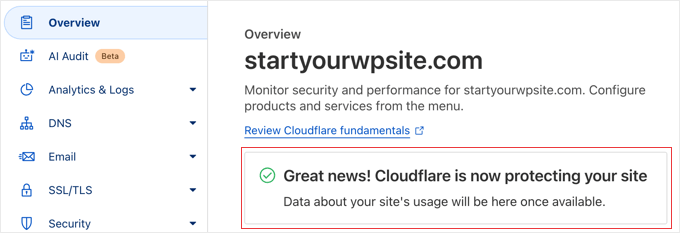
Das war’s! Es dauert ein paar Minuten, um Ihre Domain-Nameserver zu aktualisieren und Cloudflare zu aktivieren.
Nach der Aktivierung sehen Sie die Erfolgsmeldung in Ihrem Cloudflare Dashboard.
Hinweis: Die oben abgebildeten Screenshots zeigen das Bluehost-Kontrollfeld. Ihre Nameserver-Einstellungen können anders aussehen, wenn Sie einen anderen Hosting-Anbieter verwenden.
Konfigurieren einer wichtigen Cloudflare-Einstellung
Während Cloudflare jetzt Ihre Website schützt, müssen Sie eine wichtige Einstellung konfigurieren, während Sie noch auf der Cloudflare-Website sind. Sobald dies erledigt ist, installieren Sie das Cloudflare Plugin auf Ihrer WordPress-Website, um den Einrichtungsprozess abzuschließen.
Wir empfehlen, Cloudflare mit Seitenregeln so zu konfigurieren, dass Ihr WordPress-Verwaltungsbereich nicht über Cloudflare läuft. Dadurch werden potenzielle Caching-Probleme vermieden, die die Verwaltungsfunktionen beeinträchtigen können.
Mit Cloudflare können Sie drei kostenlose Regeln für Seiten einrichten. Wenn Sie weitere Seiten-Regeln hinzufügen möchten, müssen Sie $5 pro Monat für 5 zusätzliche Regeln bezahlen.
Zunächst müssen Sie im Menü links auf der Seite auf die Option Regeln ” Seitenregeln klicken. Danach können Sie auf den Button “Seiten-Regel erstellen” klicken.
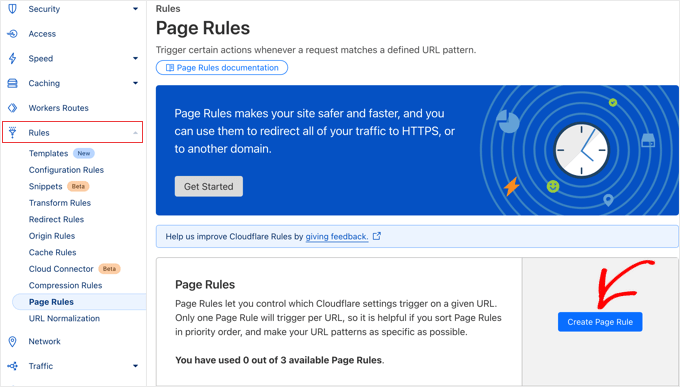
Nun müssen Sie die folgenden Einstellungen in die Regel eingeben. Sie können auf den Button “+ Einstellung hinzufügen” klicken, um neue Zeilen für zusätzliche Einstellungen hinzuzufügen:
- Seiten-URL: beispiel.com/wp-admin*
- Cache-Ebene – Bypass
- Leistung deaktivieren
- Apps deaktivieren
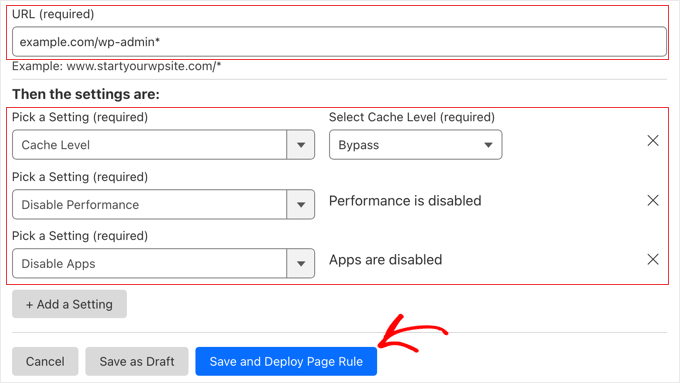
Wenn Sie fertig sind, klicken Sie auf “Speichern und bereitstellen”, um die neue Regel hinzuzufügen.
Sobald dies geschehen ist, schließen Sie die Einrichtung von Cloudflare mit dem offiziellen Cloudflare WordPress Plugin ab.
Optimierung von Cloudflare für WordPress mit einem Plugin
Cloudflare bietet ein spezielles WordPress Plugin für WordPress-optimierte Einstellungen mit nur einem Klick. Es integriert die Funktionen von Cloudflare nahtlos in WordPress, um die beste Kompatibilität und Funktionalität zu bieten.
Mit dem Plugin können Sie Cloudflare schnell auf Ihrer WordPress-Website einrichten, Regelsätze für die Web Application Firewall (WAF) hinzufügen, den Cache automatisch leeren und vieles mehr.
Um loszulegen, installieren und aktivieren Sie das Cloudflare-Plugin auf Ihrer Website. Weitere Details finden Sie in unserer Schritt-für-Schritt-Anleitung für die Installation eines WordPress-Plugins.
Hinweis: Obwohl dieses Plugin seit einiger Zeit nicht mehr aktualisiert wurde, haben wir es getestet, und es funktioniert immer noch einwandfrei. Weitere Informationen finden Sie in unserem Leitfaden darüber , ob es sicher ist, veraltete WordPress Plugins zu verwenden.
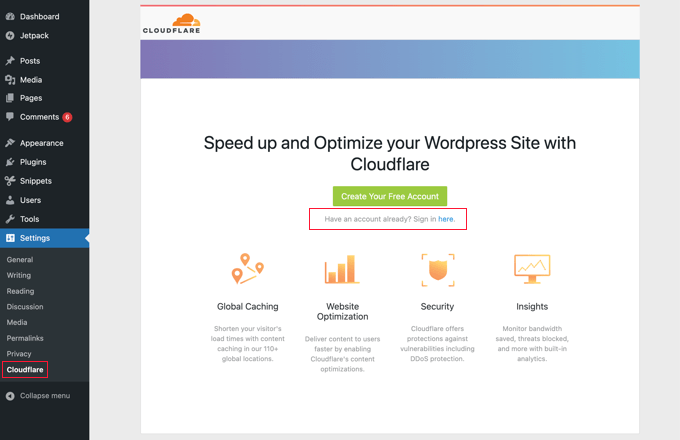
Danach müssen Sie in Ihrem Administrationsbereich Einstellungen ” Cloudflare aufrufen, um die Cloudflare-Einstellungen zu konfigurieren.
Auf der Einstellungsseite finden Sie die Schaltfläche “Erstellen Sie Ihr kostenloses Konto” und eine Anmeldemöglichkeit für bestehende Konten. Klicken Sie einfach auf den Link “Hier anmelden”.
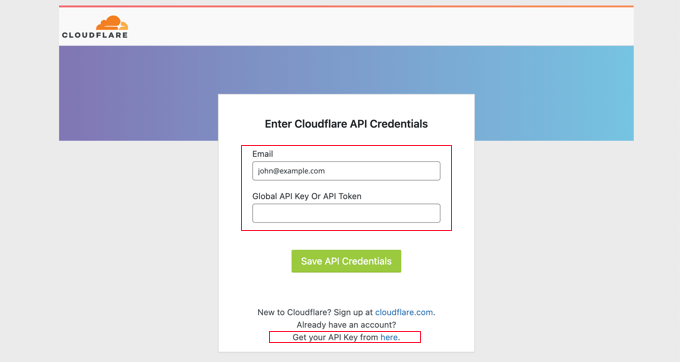
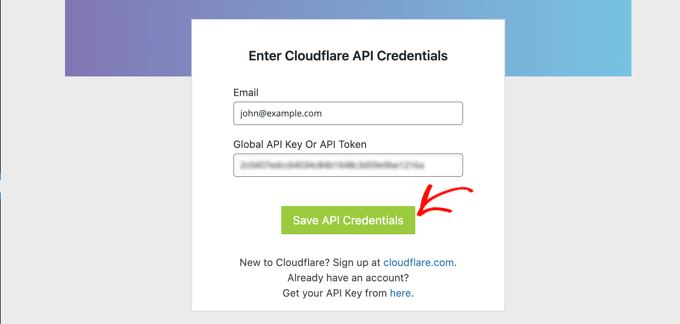
Auf dem nächsten Bildschirm müssen Sie Ihre Cloudflare-E-Mail und Ihren API-Schlüssel eingeben.
Klicken Sie auf den Link “Holen Sie sich Ihren API-Schlüssel von hier”.
Daraufhin erscheint ein Popup-Fenster für Ihren Kontobereich auf der Cloudflare-Website.
Vergewissern Sie sich, dass Sie sich auf Ihrer Seite “Mein Profil” befinden, und klicken Sie dann auf die Registerkarte “API-Token” in der linken Seitenleiste.
Gehen Sie dann zum Abschnitt “Globaler API-Schlüssel” und klicken Sie auf die Schaltfläche “Anzeigen”.
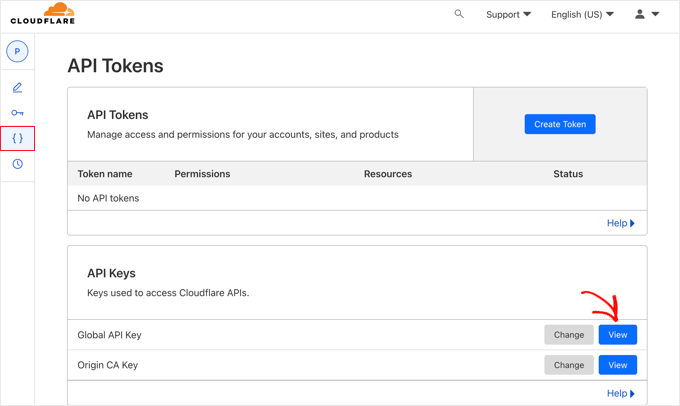
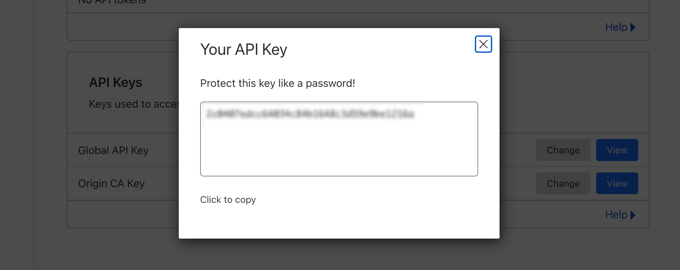
Daraufhin wird ein Popup-Fenster geöffnet und Ihr API-Schlüssel angezeigt.
Klicken Sie einfach auf die Taste, um sie zu kopieren.
Als nächstes müssen Sie zu Ihrem WordPress-Dashboard zurückkehren und Ihre E-Mail-Adresse und Ihren API-Schlüssel eingeben.
Klicken Sie dann auf die Schaltfläche “API-Zugangsdaten speichern”.
Danach werden die Cloudflare-Einstellungen in Ihrem Dashboard angezeigt.
Von hier aus können Sie eine WordPress-Optimierung mit einem einzigen Klick durchführen, den Cache leeren, den automatischen Cache aktivieren und vieles mehr.
Um Ihre WordPress Website zu optimieren, klicken Sie auf den ‘Apply’ Button neben ‘Apply Standard Settings’. Dadurch werden einige Konfigurationsänderungen durchgeführt, die Cloudflare für eine optimale WordPress-Leistung empfiehlt.
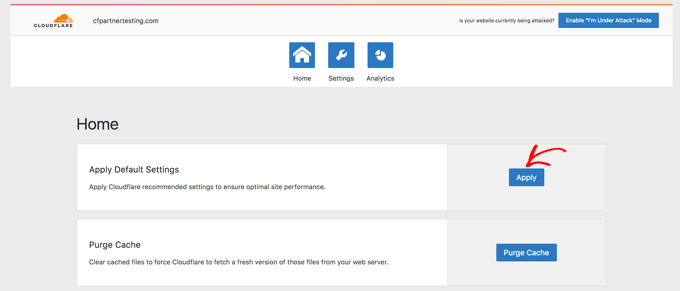
Klicken Sie anschließend auf den Menüpunkt “Einstellungen”.
Hier finden Sie weitere Einstellungen zur Website-Optimierung.
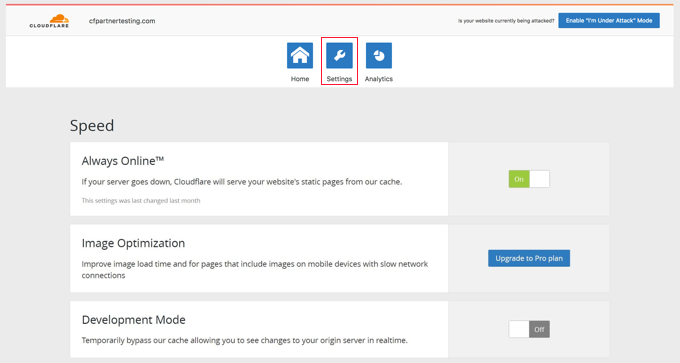
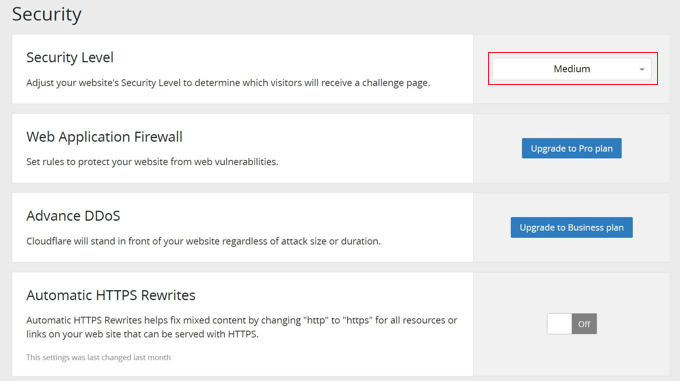
Sie können auf diesem Bildschirm nach unten scrollen, um den Abschnitt “Sicherheit” zu finden.
Die Sicherheitsstufe ist standardmäßig mittel. Um die Sicherheit Ihrer Website zu verbessern, können Sie “Hoch” aus der Dropdown-Liste auswählen.
Und das war’s! Sie sind fertig.
Wir hoffen, dass dieser Artikel Ihnen geholfen hat, zu erfahren, wie Sie das kostenlose Cloudflare CDN in WordPress einrichten können. Vielleicht interessieren Sie sich auch für unseren ultimativen Leitfaden zur Steigerung der Geschwindigkeit und Leistung von WordPress und unsere Expertenauswahl für die besten WordPress Caching Plugins.
Wenn Ihnen dieser Artikel gefallen hat, dann abonnieren Sie bitte unseren YouTube-Kanal für WordPress-Videotutorials. Sie können uns auch auf Twitter und Facebook finden.


Andrew Hansen
My hosting plan through Host gator says it has cloudflare installed. Is that good, or should I uninstall it through the hosting plan and manually add it so i can customize my options?
WPBeginner Support
It would depend on how Cloudflare is set up on your account, if you have access to cloudflare’s settings then you can continue to use what is on your account without worrying.
Admin
Andrew Hansen
I do not have control over settings.
WPBeginner Support
Jus to be safe, check with your host as there may be a hidden settings area for Cloudflare in the hosting settings.
Andrew Hansen
I checked the information regarding cloudflare through Hostgator. you can manage what level caching (assets only, assets and web pages, or assets and web pages extended) and you can clear the cache, but hostgator says under the cons of using it “No option to customize – Currently, you cannot customize cache settings (for example, which content gets cached, the cache timing, etc.) for the CDN.”
Jiří Vaněk
I use Cloudflare DNS along with their CDN. The integration of Cloudflare CDN into the WP Rocket plugin, which I use for caching, is fantastic. The CDN can be linked with the caching plugin, allowing for the simultaneous clearing of both the website cache and the CDN cache with a single button in WP Rocket.
WPBeginner Support
Connections like that to help simplify the process are very helpful
Admin
Ralph
I plan on making website from europe server (cheaper) to US users and this guide is godsend! Even better it is possible to do it for free. Thank you for this detailed guide. It will definitely help me setting everything up as I never really understood how to do this. Every other guide was lacking details and was too general.
WPBeginner Support
Glad to hear our guide was helpful
Admin
Salman
Hi, I use the “WPS Hide Login” plugin. While creating a page rule for the login page should I use the default login URL or the new login URL which I am using with the help of the plugin?
WPBeginner Support
If the login page is on a different URL you would want to set the page rule for the active login page that users would visit.
Admin
Neal Umphred
Thanks for another useful how-to article!
Regarding the ‘Always Use HTTPS’ option, you wrote: “Some users have reported issues when using this setting with Cloudflare.”
What are those issues?
WPBeginner Support
The errors vary between sites so we don’t have a specific list of errors to point to at the moment.
Admin
Sohil Jain
If I setup comment on my main domain wil it will be setup automatically to subdomain too? Because I don’t want cloudflare setup to apply to subdomain as I only want on main domain. So where to click so that it will not apply to subdomain
Thanks
WPBeginner Support
There is an option in Cloudflare to exclude a subdomain so you wouldn’t need to worry about that.
Admin
Evindu Shavinda
I added Cloudflare to my website today. So, I had to remove my hosting’s nameservers & replace them with Cloudflare nameservers from my domain registrar.
This is the question – 1. So, how my hosting account still works? I have removed its nameservers from the domain registrar
Aftab
Don’t worry about hosting. Cloudflare doesn’t modify or change your hosting configuration. Your site will be hosted on your current host only. The reason why cloudflare asks you to change the nameserver because it passes your site through their DNS. It routes your web traffic through the Cloudflare network. So they can proxy your traffic through their network. Cloudflare offers security, ddos protection to all the sites that are configured with their nameservers. You don’t need to spend a single penny to configure your site through network. It’s a part of the free plan. No matter how many sites you have.
Nina Cen
When I tried to add the page rules for my wordpress login page, I got message “Not Acceptable! An appropriate representation of the requested resource could not be found on this server. This error was generated by Mod_Security.”
Is anything I did wrong? Or I just need to wait for a little while to try again?
WPBeginner Support
You would want to check with your hosting company for that specific error as that normally means they have a security rule set to prevent certain things on your site.
Admin
Shyam
I s there a way to turn off the second loading screen for security verification purposes and that CAPTCHA page which you have mentioned in the Cons of Cloudflare?
WPBeginner Support
You should be able to change the settings to remove that if you wanted but you would want to check with CloudFlare for the current method.
Admin
Lou
I’m setting up Cloudflare – thanks to your article! I’ve already got W3 super cache plugin – do I need both? Are they going to confuse each other? Total newb question I know!
WPBeginner Support
They have slightly different functions and there is an integration so the two can work with each other without an issue.
Admin
Faith Nte
Thank you for this guide. It helped me reduce the time my page loads
WPBeginner Support
Glad our guide was helpful
Admin
Muntaha
What if someone mistakenly adds the wrong parameters in page rules and then deployed it. Is there any way back to change page rules after deploying it?
WPBeginner Support
You can change your settings after setting them if you need to.
Admin
bali kratom
thanks for sharing this content
WPBeginner Support
You’re welcome
Admin
Will
Probably a noob question, but I have a lot of existing video and photo files on my site. Will they all be migrated to Cloudflare’s CDN or do I have to do that manually? I followed the setup steps, but my content still takes forever to load, and when I view its URL, it’s still showing my site’s URL and path.
WPBeginner Support
You shouldn’t need to transfer your content, for the slow loading you may want to reach out to CloudFlare for them to take a look
Admin
Brooke
Thanks so much for this, helps a lot!
Just to be clear, even though I’ve added my site to cloudflare, I still need to get an SSL cert separately? Cloudflare does not supply ssl cert?
Thanks again!
WPBeginner Support
You would want to take a look again under the Configuring Most Important Cloudflare Settings section for CloudFlare’s SSL
Admin
Ibraham Aali
Admin, kindly answer these question like
After changing the DNS, who is actually will my hosting provider? The hoster OR cloudflare and all editing can be done by same cpanel?
WPBeginner Support
Your hosting provider would still be your hosting provider.
Admin
Soumya
thank you very much, I was looking for a proper step-by-step Cloudflare set up! and TA DA!! you guys are savior.
It would be great if you publish about the best of cloudflare settings, from the plugin.
WPBeginner Support
Glad you found our article helpful
Admin
Alabura
Thank you for such a great publications, it really help me set up my cloud flare account easily. Keep the good work.
WPBeginner Support
You’re welcome, glad our guide was helpful
Admin
Bryan Wagar
Very helpful information and with the pictures for verification i could confirm everything instead of guessing, thankyou very much for compiling this! It is BRILLIANT
WPBeginner Support
You’re welcome, glad our guide could be helpful
Admin
PKV
superb guide, easy to follow thanks
WPBeginner Support
Glad our guide was helpful
Admin
randhir singh
I want to know which is the best CDN ? cloud Flare or max
WPBeginner Support
Hi Randhir,
At WPBeginner, we recommend MaxCDN. However, if you want to use the free CDN, then Cloudflare can be a good solution.
Admin
anurag saxena
If i will use cloudfare free version and will change the nameserver then it means my website will run on cloudfare server then how i can edit my website? through cloudfare or my present hosting provider? pls tell me detail.
andy
The only reason I use cloudflare because you can hide where you hosting the site.
Mehmet
i am wondering..
for cloudflare, we need to point the DNS to theirs..
so how we gonna use custom email set up using our own domain (which also need to point the DNS to the email provider) ?
as far as i know, we can’t use two DNS .. (actually we can, but it is expensive)
Aqib
I am using custom email and cloudflare. Cloudflare doesn’t affect my custom email working.
Abhi
If my domain is from go daddy and hostino is from inmotion hosting and I change my domain name server to my hosting now I want to join cloudfare to it then what can I do?
andy
I try to help answer. from godaddy change nameserver to cloudflare, and from cloudflare, set up your DNS and point to your in motion hosting ip address.
Syed Shan
After Setting Our Host DNS To Cloudfare DNS, Which bandwidth and storage will be used from our local hosting plan e.g godaddy, namecheap etc or Cloudfare ?
Haydrion Rayel
The reasons why I don’t use cloudflare is because of changing the nameservers and second like in this article : it blocks some of the legitime users and that is what I really hate.
I don’t use third party websites where I don’t have full control of it. I saw a couple of times there are you human google click on pictures and it takes forever.
MaxCDN is the only option because you only have to add a cname .. but still ..
Haydrion Rayel
The reasons why I don’t use cloudflare is because of changing the nameservers and second like in this article : it blocks some of the legitime users and that is what I really hate.
I don’t use third party websites where I don’t have full control of it. I saw a couple of times there are you human google click on pictures and it takes forever.
MaxCDN is the onlly option because you only have to add a cname .. but still ..
abhishek purohit
My site is on wordpress and running on godaddy vps server with ssl certificate but it has lots of page load time, now, should I go for cdn cloud flare free account if yes than what about all static IP given with vps account , they will not useable and is vps based site need cloud flare ?
Munna Hossain
Page loading time is an important issue to get good user experience. This LoudFlare helps us to increase the page loading. Can you tell me which one is better to improve page speed, plugin or CDN?
Iain
HI
Just to let you know
I have had a joomla website working on the Free plan and SSL
Not sure if your previous post is now outdated but it is possible.
Regards
Mircea Pop
You can use the provided Cloudflare SSL but you are unable to use your own SSL on free account
koushil
bro can we use this for blogspot blog ?
King Rayhan
of course why not
Ikechukwu
This was very helpful. Thanks.
munetsi
i am actually caught in between-
which provider should i choose for my site,
between cloudfare or maxcdn
Editorial Staff
We use MaxCDN for our sites.
Admin
SOTHEA
This is truly awesome tip. Anyways, I have a question. If my website contents and domain name are hosted in different hosting companies. In this case, I need to change Name Servers to CloundFlare for both. Am I correct?
Anubhav
Did you find the solution for this as i have different hosting provider and domain name provider is different .If you know the solution then please let me know
Ummi Mental
after changing the DNS, who is actually will my hosting provider? The hoster OR cloudflare and all editing can be done by same cpanel?
Captain Asif
Really very helpful article i have setup my wordpress site with cloudflare
Joe
What minification services do you recommend that work well with Cloudfare? This is for a WordPress site that may have potentially high traffic spikes out of the blue. Thanks
bobzyouruncle
I live at the bottom of Africa (Cape Town) with none of their servers close to me am I correct in thinking that Cloud Flare will slow down my website. Most of my traffic is local. I have the same issues with CDNs none of them are close to my location, Europe is the closest. Is my thinking correct?
Damon Billian
CloudFlare would add a little latency because we currently don’t have any data centers in SA just yet (being looked at). Visitors from SA would currently hit a data center in Europe.
On the other hand, if you have visitors from a lot of other locations (EU, America, Asia, etc.), then the site would be faster for them.
munetsi
was just checking ,looks like they have servers in johannesburg.
Adesanmi Adedotun
I have heard about cloudflare but have not tried to make use of it, bout talking about the fact that my site might be down during the propagation of my name server,how long could this take?
WPBeginner Support
It varies, it can take a few hours to a full day.
Admin
Einstein
You will not experience any downtime while you switch to Cloudflare if you do it correctly.
Damon Billian
You should not have any downtime at all switching to CloudFlare’s nameservers.
Robby McCullough
I am a huge fan of CloudFlare. At my shop, we do a lot of sites for professional photographers. CF does an amazing job at making image heavy pages load in a snap!
One tip, don’t forget about CF’s developer mode when you’re making changes. I’ve bashed my head against the wall for some time when my CSS changes weren’t showing up — CF was serving a cached page!
Boby
When my website has ‘heavy load’ CloudFlare will make the users access screenshot of the website.
Abhisek
Cloudflare breaks my site’s design. I have a off-canvas menu and Cloudflare’s rocketloader and minification breaks ,y site’s design. So, I have to stick with basic W3 Total cache. Besides Cloudflare actually speeds up your site.
Damon Billian
Those features are actually optional and easy to turn off. If you’re using a minify service already, then you don’t want to turn ours on as well (something eventually will break running two minify options at the same time). Rocket Loader would have the potential to impact JavaScript and jQuery & would generally impact something like widgets.
Joe
What WordPress theme were you using? That way we can know to avoid using that theme with Cloudfare.