Planen Sie den Umzug Ihrer WordPress-Website zu einem neuen Hosting-Unternehmen oder einem anderen Server? Das ist eine wichtige Entscheidung, und verständlicherweise haben Sie wahrscheinlich einige Bedenken wegen möglicher Datenverluste und Ausfallzeiten.
Unserer Erfahrung nach sind dies definitiv die größten Risiken beim Wechsel des Webhostings oder bei der Migration einer Website. Sie können jedoch gefahrlos auf einen neuen Hoster oder Server umziehen, ohne Kompromisse bei der Benutzerfreundlichkeit oder Betriebszeit einzugehen.
Tatsächlich haben wir die WPBeginner-Website im Jahr 2020 von HostGator auf SiteGround umgestellt. Wir haben diesen Prozess also selbst erfolgreich durchlaufen, ohne unsere Leser negativ zu beeinflussen.
In dieser Schritt-für-Schritt-Anleitung zeigen wir Ihnen, wie Sie Ihre WordPress-Website sicher und ohne Ausfallzeiten zu einem neuen Hoster migrieren können. Außerdem beantworten wir häufig gestellte Fragen zum Umzug einer WordPress-Site zu einem neuen Hosting-Anbieter.
Wichtig: Bevor wir beginnen, möchten wir Sie darauf hinweisen, dass viele WordPress-Hosting-Unternehmen einen kostenlosen Migrationsdienst anbieten. Möglicherweise ist er nicht auf der Website aufgeführt, Sie müssen also nur danach fragen. In der Regel ist er kostenlos, aber manche verlangen eine kleine Gebühr.
Schauen wir uns also die Schritte an, die wir für den Umzug von WordPress auf einen neuen Hosting-Server (ohne Ausfallzeiten) durchführen werden:
Sind Sie bereit? Dann fangen wir an.
Schritt 1: Wählen Sie Ihren neuen WordPress-Host
Wenn Sie auch nach der Optimierung der WordPress-Geschwindigkeit und -Leistung mit einem langsamen Webhoster nicht weiterkommen, ist es an der Zeit, Ihre WordPress-Website auf einen neuen Hoster zu verlagern, der Ihren wachsenden Datenverkehr bewältigen kann.
Bei der Suche nach einem neuen WordPress-Hosting-Anbieter ist es wichtig, sorgfältig auszuwählen, damit Sie nicht so bald wieder umziehen müssen.
Hier sind unsere Empfehlungen:
- Für zuverlässiges Shared Hosting empfehlen wir Bluehost. Sie werden offiziell von WordPress.org empfohlen. Mit unserem Bluehost-Gutschein erhalten WPBeginner-Nutzer bis zu 75% Rabatt und einen kostenlosen Domainnamen.
- Für schnelleres Shared Hosting empfehlen wir Hostinger. Sie gehören zu den besten WordPress-Hosting-Unternehmen und bieten schnellere Server mit hervorragendem Kundensupport.
- Wenn Sie auf der Suche nach Cloud-Hosting oder standortspezifischen Anbietern sind, dann empfehlen wir Ihnen, SiteGround zu besuchen. Das Unternehmen verfügt über Rechenzentren auf drei verschiedenen Kontinenten.
- Wenn Sie auf der Suche nach verwaltetem WordPress-Hosting sind, dann empfehlen wir Ihnen, sich WP Engine anzusehen. Sie sind der beste und bekannteste Anbieter in der Branche.
Nachdem Sie Ihr neues Hosting gekauft haben, sollten Sie WordPress NICHT installieren. Das werden wir in einem späteren Schritt tun.
Ihr neues Webhosting-Konto sollte zunächst leer sein und keine Dateien oder Ordner in Ihrem Hauptverzeichnis enthalten.
Schritt 2: Duplicator für eine einfache Migration einrichten
Als Erstes müssen Sie das Duplicator-Plugin auf der Website, die Sie verschieben möchten, installieren und aktivieren. Weitere Details finden Sie in unserer Schritt-für-Schritt-Anleitung für die Installation eines WordPress-Plugins.
Duplicator ist das beste WordPress-Migrations-Plugin auf dem Markt. Es kommt auch mit automatisierten geplanten Backups, Cloud-Speicher-Unterstützung, 1-Klick-Wiederherstellung und intelligente Migrationen.
Hinweis: Duplicator hat auch eine kostenlose Version namens Duplicator Lite. Sie kann zum Verschieben Ihrer Website verwendet werden, hat aber im Vergleich zur Pro-Version nur eingeschränkte Funktionen.
Sobald Sie Duplicator installiert und aktiviert haben, gehen Sie zur Seite Duplicator ” Backups in Ihrem WordPress-Adminbereich.
Als nächstes müssen Sie auf die Schaltfläche “Neu hinzufügen” in der oberen linken Ecke klicken.
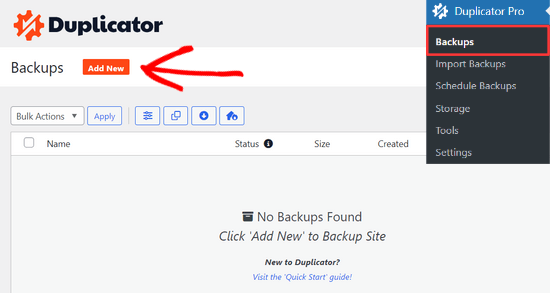
Dadurch wird der Backup-Assistent von Duplicator gestartet.
Auf dem nächsten Bildschirm können Sie einen Namen für Ihr Backup eingeben oder die dynamischen Tags verwenden, um automatisch ein Namensformat zu erstellen, wie das Datum und den Titel Ihrer Website.

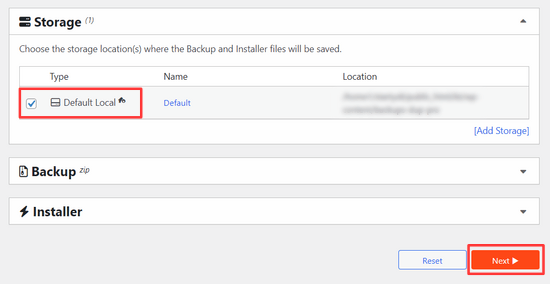
Dann können Sie den Abschnitt “Speicher” erweitern, um einen Speicherort auszuwählen. Für dieses Tutorial verwenden wir den Standardspeicherort, aber Sie können einen neuen Speicherort wie Dropbox oder Google Drive hinzufügen, indem Sie auf den Link “Speicher hinzufügen” klicken.
Klicken Sie einfach auf die Schaltfläche “Weiter”, um fortzufahren.
Als Nächstes überprüft Duplicator Ihr System, um sicherzustellen, dass alles in Ordnung ist, um das Paket vorzubereiten.
Vergewissern Sie sich, dass die Scanergebnisse stimmen (alles sollte “Gut” sein), und klicken Sie dann auf die Schaltfläche “Backup erstellen”.
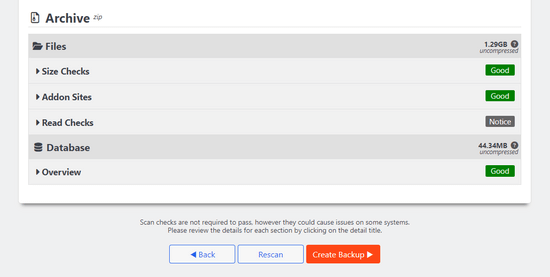
Der Vorgang kann einige Minuten dauern, lassen Sie also die Registerkarte geöffnet, während das Plugin seine Arbeit erledigt.
Sobald der Vorgang abgeschlossen ist, sehen Sie Download-Optionen für das Installationsprogramm und das Archivpaket. Klicken Sie auf die Schaltfläche “Herunterladen” und wählen Sie dann die Option “Beide Dateien”.
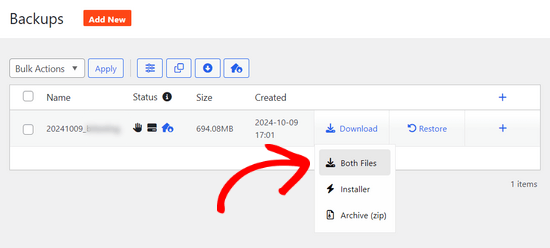
Die Archivdatei ist eine Kopie Ihrer kompletten Website, und die Installationsdatei automatisiert den Installationsprozess für Sie.
Schritt 3: Importieren Sie Ihre WordPress-Site auf den neuen Host
Nachdem Sie nun sowohl das Archiv als auch die Installationsdateien heruntergeladen haben, müssen Sie sie auf Ihren neuen Webhost hochladen.
Dazu können Sie sich per FTP mit Ihrem neuen Webhost verbinden.
Wenn Sie das noch nie gemacht haben, lesen Sie unseren Leitfaden für Anfänger zum Hochladen von Dateien per FTP in WordPress.
Normalerweise geben Sie bei der Verbindung mit Ihrem FTP-Client den Domainnamen Ihrer Website als Host ein.
Da Ihr Domänenname jedoch immer noch auf Ihren alten Host verweist, müssen Sie die IP-Adresse oder den Hostnamen Ihres Servers eingeben, um eine Verbindung herzustellen.
Sie finden diese Informationen im Dashboard Ihres neuen Hosting-Accounts.
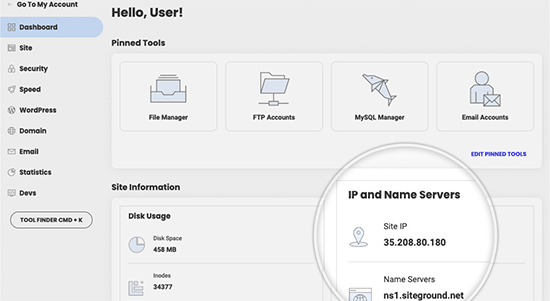
Wenn Sie diese Informationen nicht finden können, können Sie Ihr neues Webhosting-Unternehmen um Unterstützung bitten, und es wird Ihnen weiterhelfen.
Mit dem FTP-Client müssen Sie sowohl die Datei installer.php als auch Ihre Archiv-.zip-Datei in das Stammverzeichnis Ihrer Website hochladen.
Dies ist normalerweise der Ordner /username/public_html/.
Auch hier gilt: Wenn Sie sich nicht sicher sind, fragen Sie Ihr Webhosting-Unternehmen.
Vergewissern Sie sich, dass Ihr Stammverzeichnis völlig leer ist. Einige Webhosting-Unternehmen installieren WordPress automatisch, wenn Sie sich anmelden.
Wenn Sie WordPress in Ihrem Stammverzeichnis installiert haben, müssen Sie WordPress zuerst löschen.
Danach müssen Sie sowohl die Zip-Archivdatei als auch die Datei installer.php in das Stammverzeichnis Ihrer Website hochladen.
Schritt 4: Ändern Sie die Hosts-Datei, um Ausfallzeiten zu vermeiden
Sobald Sie beide Dateien auf Ihren neuen Host hochgeladen haben, müssen Sie die Datei installer.php in einem Browser aufrufen.
Normalerweise kann auf diese Datei über eine URL wie die folgende zugegriffen werden:
http://www.example.com/installer.php
Diese URL führt Sie jedoch zu Ihrem alten Webhost, und Sie erhalten einen 404-Fehler. Das liegt daran, dass Ihr Domänenname immer noch auf Ihren alten Webhoster verweist.
Normalerweise raten Ihnen andere Anleitungen, die Nameserver Ihrer Domäne zu ändern und sie auf Ihr neues Hosting-Unternehmen zu verweisen, aber das ist falsch.
Wenn Sie dies jetzt tun, werden Ihre Besucher bei der Migration eine defekte Website sehen.
Wir zeigen Ihnen, wie Sie Ihre neue Website vorübergehend auf Ihrem Computer aufrufen können, ohne dass Ihre alte Website beeinträchtigt wird.
Dies geschieht über die Hosts-Datei auf Ihrem Computer.
Die Hosts-Datei kann verwendet werden, um Domänennamen bestimmten IP-Adressen zuzuordnen. Mit anderen Worten: Sie können Ihrem Computer vorgaukeln, dass die Website umgezogen ist, obwohl sie es nicht ist.
Sehen wir uns an, wie Sie einen Eintrag für Ihren Domänennamen in der Hosts-Datei hinzufügen, damit er auf Ihr neues Hosting-Unternehmen verweist.
Wenn Sie diese Änderungen vornehmen, können Sie auf die Dateien auf Ihrem neuen Hoster unter Ihrem eigenen Domänennamen zugreifen, während der Rest der Welt weiterhin über den alten Hoster auf Ihre Website zugreift. Dies gewährleistet eine 100%ige Betriebszeit.
Als Erstes müssen Sie die IP-Adresse Ihres neuen Webhosting-Servers ermitteln.
Um dies herauszufinden, müssen Sie sich in Ihrem cPanel-Dashboard anmelden und auf den Link “Statistiken erweitern” in der linken Seitenleiste klicken. Die Adresse Ihres Servers wird als “Shared IP Address” aufgeführt.
Bei Hostinger zum Beispiel finden Sie Ihre Server-IP-Adresse unter den Details Ihres Hosting-Angebots.
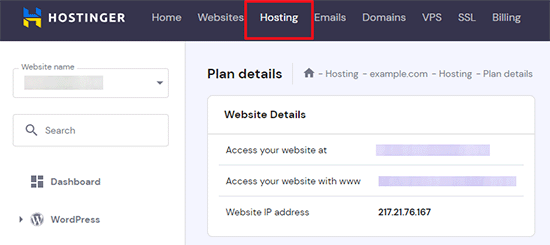
Wenn Sie einen Windows-PC verwenden, müssen Sie die Notepad-App mit Administratorrechten öffnen.
Klicken Sie einfach auf die Schaltfläche “Start” und suchen Sie dann nach der Anwendung “Notepad”. Klicken Sie mit der rechten Maustaste auf das Symbol der Notepad-App und wählen Sie dann “Als Administrator ausführen”.
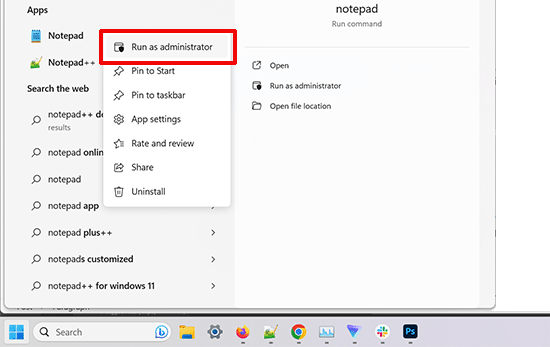
Es erscheint eine Windows UAC-Eingabeaufforderung, und Sie müssen auf “Ja” klicken, um Notepad mit Administratorrechten zu starten.
Gehen Sie auf dem Notepad-Bildschirm auf Datei ” Öffnen und navigieren Sie dann zum Ordner C:\Windows\System32\drivers\etc. Wählen Sie in diesem Ordner die Datei hosts aus und öffnen Sie sie.
Wenn Sie einen Mac verwenden, müssen Sie die Anwendung Terminal öffnen und diesen Befehl eingeben, um die Datei hosts zu bearbeiten:
sudo nano /private/etc/hosts
Sowohl bei Windows- als auch bei Mac-Benutzern müssen Sie am Ende der Hosts-Datei die kopierte IP-Adresse und dann Ihren Domainnamen eingeben. Etwa so:
192.168.1.22 www.example.com
Stellen Sie sicher, dass Sie die IP-Adresse durch die aus dem cPanel kopierte Adresse und example.com durch Ihren eigenen Domainnamen ersetzen.
Wenn Sie fertig sind, speichern Sie Ihre Änderungen.
Sie können nun über Ihren Domänennamen auf Ihrem Computer auf Ihre Dateien auf dem neuen Host zugreifen.
Wichtig! Vergessen Sie nicht, die Änderungen, die Sie an der Hosts-Datei vorgenommen haben, nach Abschluss der Migration rückgängig zu machen (Schritt 6).
Schritt 5: Erstellen der MySQL-Datenbank auf Ihrem neuen Host
Bevor wir das Installationsprogramm auf dem neuen Host ausführen, müssen Sie eine MySQL-Datenbank auf Ihrem neuen Hosting-Account erstellen. Wenn Sie bereits eine MySQL-Datenbank erstellt haben, können Sie mit dem nächsten Schritt fortfahren.
Erstellen einer Datenbank in cPanel
Gehen Sie zum cPanel-Dashboard Ihres neuen Hosting-Accounts, scrollen Sie nach unten zum Abschnitt Datenbanken und klicken Sie auf das Symbol “MySQL-Datenbanken”.
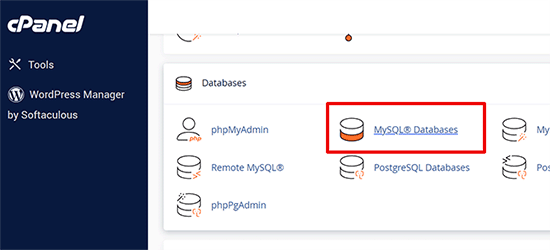
Sie sehen ein Feld zum Anlegen einer neuen Datenbank.
Geben Sie einen Namen für Ihre Datenbank ein, und klicken Sie auf die Schaltfläche “Datenbank erstellen”.

Nachdem Sie die MySQL-Datenbank erstellt haben, müssen Sie zum Abschnitt MySQL-Benutzer scrollen.
Geben Sie dann einen Benutzernamen und ein Passwort für Ihren neuen Benutzer ein und klicken Sie auf die Schaltfläche “Benutzer erstellen”.
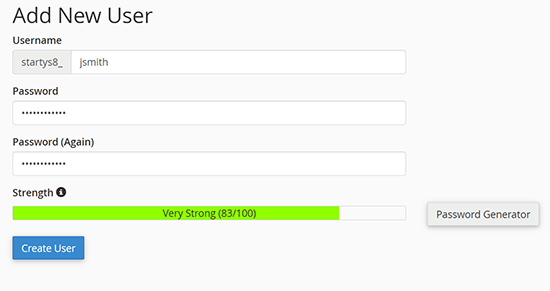
Danach müssen Sie diesen Benutzer zu Ihrer Datenbank hinzufügen. Dadurch erhält der soeben erstellte Benutzername alle Berechtigungen für die Arbeit an dieser Datenbank.
Blättern Sie dazu nach unten zum Abschnitt “Benutzer zu einer Datenbank hinzufügen”. Wählen Sie einfach den von Ihnen erstellten Datenbankbenutzer aus dem Dropdown-Menü neben dem Benutzer aus, wählen Sie dann die Datenbank und klicken Sie auf die Schaltfläche “Hinzufügen”.
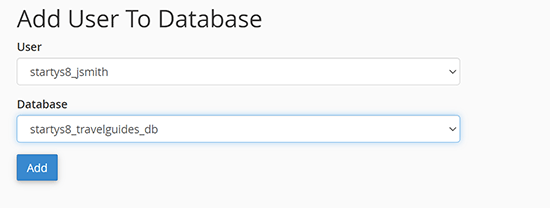
Ihre Datenbank ist nun bereit, mit WordPress verwendet zu werden. Notieren Sie sich unbedingt den Namen der Datenbank, den Benutzernamen und das Passwort. Sie werden diese Informationen im nächsten Schritt benötigen.
Schritt 6: Beginnen Sie den Duplicator-Migrationsprozess
Jetzt können wir das Installationsprogramm ausführen. Rufen Sie in Ihrem Browserfenster die folgende Adresse auf und ersetzen Sie example.com durch Ihren Domänennamen:
http://www.example.com/installer.php
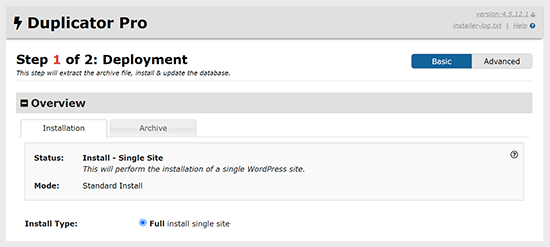
Das Installationsprogramm führt einige Tests durch und zeigt neben den Archiv- und Validierungstests “Pass” an.
Aktivieren Sie das Kontrollkästchen “Allgemeine Geschäftsbedingungen” und klicken Sie auf die Schaltfläche “Weiter”.
Nun werden Sie aufgefordert, den MySQL-Host, den Datenbanknamen, den Benutzernamen und das Passwort einzugeben.
Ihr Host wird wahrscheinlich localhost sein. Danach geben Sie die Details der Datenbank ein, die Sie im vorherigen Schritt erstellt haben.
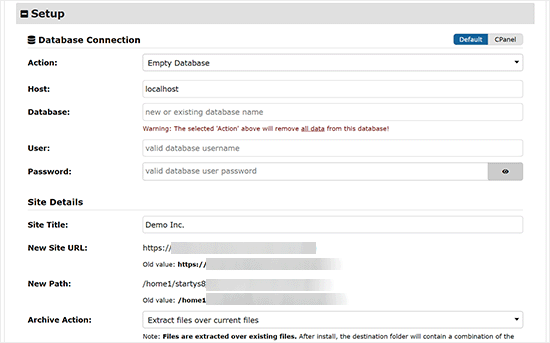
Als nächstes muss der Duplicator prüfen, ob er eine Verbindung zur Datenbank herstellen und die Installation ausführen kann.
Klicken Sie auf die Schaltfläche “Validieren” am unteren Rand, um fortzufahren.

Wenn Duplicator eine Verbindung herstellen kann, werden die Testergebnisse als bestanden angezeigt.
Sie können nun das Kontrollkästchen “Bedingungen und Hinweise” aktivieren und auf die Schaltfläche “Weiter” klicken.
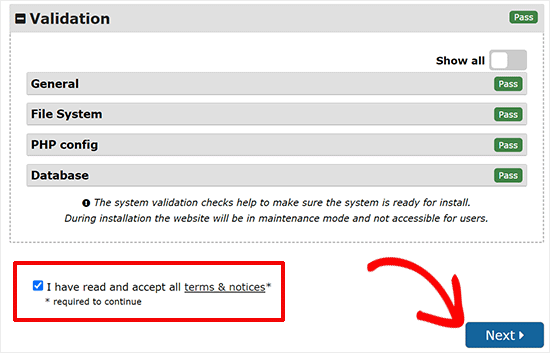
Klicken Sie auf die Schaltfläche “Weiter”, um fortzufahren.
Duplicator importiert nun Ihre WordPress-Datenbank aus dem Zip-Archiv in Ihre neue Datenbank.
Als nächstes werden Sie aufgefordert, die URL oder den Pfad der Website zu aktualisieren. Da Sie keine Domänennamen ändern, brauchen Sie hier nichts zu ändern.
Klicken Sie einfach auf die Schaltfläche “Weiter”, um fortzufahren.
Duplicator führt die letzten Schritte aus und zeigt Ihnen die Anmeldeschaltfläche an.
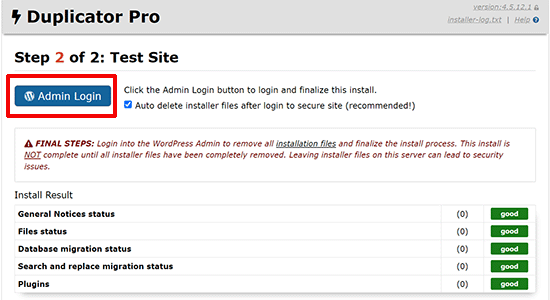
Sie können sich nun bei Ihrer WordPress-Website auf dem neuen Host anmelden, um sicherzustellen, dass alles wie erwartet funktioniert.
Schritt 7: Aktualisieren Sie Ihre Domain Name Servers (DNS)
Zu diesem Zeitpunkt haben Sie eine vollständige Kopie Ihrer WordPress-Datenbank und -Dateien auf Ihrem neuen Hosting-Server erstellt, aber Ihre Domain verweist immer noch auf Ihr altes Webhosting-Konto.
Um Ihre Domäne zu aktualisieren, müssen Sie Ihre DNS-Nameserver wechseln. Dadurch wird sichergestellt, dass Ihre Nutzer zum neuen Standort Ihrer Website geleitet werden, wenn sie Ihre Domain in ihren Browser eingeben.
Wenn Sie Ihre Domain bei Ihrem Hosting-Provider registriert haben, ist es am besten, die Domain zu einem neuen Hoster zu transferieren.
Wenn Sie hingegen einen Domain-Registrar wie Domain.com, GoDaddy oder Network Solutions verwenden, müssen Sie Ihre Nameserver aktualisieren.
Sie benötigen die DNS-Nameserver-Informationen von Ihrem neuen Webhost. Dies sind in der Regel mehrere URLs, die wie folgt aussehen:
ns1.hostname.comns2.hostname.com
In diesem Leitfaden zeigen wir Ihnen, wie Sie die DNS-Nameserver bei GoDaddy ändern können.
Für andere Hosting-Provider werfen Sie einen Blick auf unseren Leitfaden zum Ändern von Domain-Nameservern.
Je nach Domain-Registrierungsstelle oder Webhost können die Screenshots anders aussehen. Das Grundkonzept ist jedoch dasselbe.
Sie müssen den Bereich für die Domainverwaltung und dann die Nameserver suchen. Wenn Sie Unterstützung bei der Aktualisierung Ihrer Nameserver benötigen, können Sie sich an Ihr Webhosting-Unternehmen wenden.
Bei GoDaddy müssen Sie sich in Ihr GoDaddy-Konto einloggen und dann auf “Domains” klicken.
Danach müssen Sie auf die Schaltfläche “Verwalten” neben dem Domänennamen klicken, den Sie ändern möchten.

Gehen Sie zum Abschnitt “Zusätzliche Einstellungen”.
Dann müssen Sie auf “DNS verwalten” klicken, um fortzufahren.
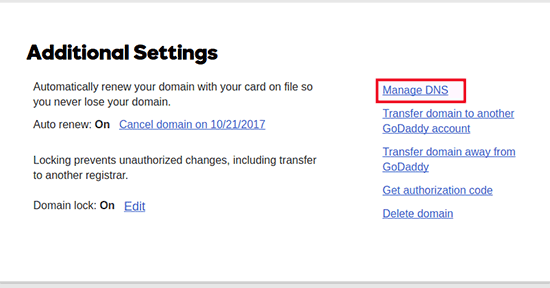
Als Nächstes müssen Sie nach unten zum Abschnitt “Nameserver” blättern.
Klicken Sie hier auf die Schaltfläche “Ändern”.
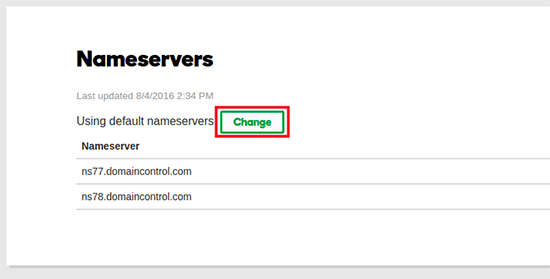
Zunächst müssen Sie das Dropdown-Menü für den Nameserver-Typ von “Standard” auf “Benutzerdefiniert” umstellen.
Danach können Sie unter Nameserver die Daten Ihres neuen Hosting-Anbieters eingeben.
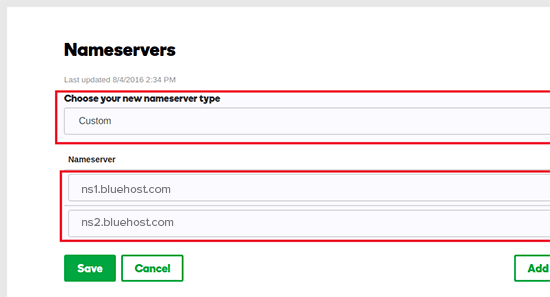
Vergessen Sie nicht, auf die Schaltfläche “Speichern” zu klicken, um Ihre Änderungen zu speichern.
Sie haben die Nameserver für Ihre Domäne erfolgreich geändert. Es kann 4 bis 48 Stunden dauern, bis DNS-Änderungen für alle Benutzer übernommen werden.
Da Sie denselben Inhalt auf Ihrem alten und dem neuen Host haben, werden Ihre Nutzer keinen Unterschied feststellen. Ihre WordPress-Migration wird nahtlos und ohne Ausfallzeiten verlaufen.
Um auf Nummer sicher zu gehen, empfehlen wir Ihnen, mit der Kündigung Ihres alten Hosting-Accounts bis 7 Tage nach der Migration zu warten.
Häufig gestellte Fragen
Hier sind ein paar Fragen, die viele unserer Benutzer stellen, wenn sie WordPress von einem Hoster zu einem anderen umziehen.
1. Wie migriere ich meine WordPress-Website zu einem anderen Hoster?
Sie können Ihre WordPress-Website migrieren, indem Sie Ihre WordPress-Dateien und Ihre Datenbank von Ihrem alten Hoster zum neuen Hosting-Anbieter verschieben.
Einige Hosting-Unternehmen bieten auch kostenlose Website-Übertragungsdienste an, aber da müssen Sie schon nachfragen. Alternativ können Sie es selbst tun, indem Sie die Dateien mit einem FTP-Client übertragen und die Datenbank über phpMyAdmin importieren.
2. Kann ich meine WordPress-Site zu einem anderen Hosting-Anbieter migrieren?
Ja, es steht Ihnen frei, Ihre WordPress-Website zu einem anderen Hosting-Anbieter zu migrieren.
3. Kann ich mich für das neue Hosting-Konto anmelden, ohne einen Domänennamen zu registrieren?
Ja, Sie können sich durchaus für ein Hosting-Konto anmelden, ohne einen Domänennamen zu registrieren.
Domainname und Hosting sind zwei verschiedene Dienstleistungen, und Sie müssen nicht unbedingt einen Domainnamen registrieren, wenn Sie sich bei einem neuen Hoster anmelden. Weitere Einzelheiten finden Sie in unserem Leitfaden über den Unterschied zwischen Domainnamen und Webhosting.
Einige Hosting-Provider fordern Sie auf, als ersten Schritt einen Domänennamen auszuwählen, wenn Sie Hosting erwerben. Sie können auch einen Domänennamen eingeben, wenn Sie bereits einen haben.
4. Muss ich meinen Domainnamen auf den neuen Hoster übertragen?
Nein, Sie müssen Ihren Domainnamen nicht auf den neuen Hoster übertragen. Die Übertragung Ihres Domainnamens auf Ihr neues Hosting macht es jedoch einfacher, ihn zu verlängern und unter demselben Dashboard wie Ihr neues Hosting-Konto zu verwalten.
Weitere Informationen zu diesem Thema finden Sie in unserem ultimativen Leitfaden über Domänennamen und deren Funktionsweise.
5. Wie kann ich den Fehler beim Herstellen der Datenbankverbindung in Duplicator beheben?
Wenn Sie einen Fehler beim Verbinden mit der Datenbank oder einen Fehler bei der Datenbankverbindung in Duplicator sehen, dann haben Sie wahrscheinlich falsche Informationen für Ihre Datenbankverbindung eingegeben.
Vergewissern Sie sich, dass Ihr Datenbankname, Ihr MySQL-Benutzername und Ihr Passwort korrekt sind. Einige Webhosting-Unternehmen verwenden nicht localhost als Host für ihre MySQL-Server. Wenn dies der Fall ist, müssen Sie den Support Ihres Webhosters bitten, Ihnen die richtigen Informationen zu geben.
6. Wie kann ich überprüfen, ob meine Website vom neuen Hoster geladen wird?
Es gibt mehrere Online-Tools, mit denen Sie feststellen können, wer eine Website hostet. Nachdem Sie Ihre Website auf den neuen Hoster übertragen haben, können Sie eines dieser Tools verwenden, das Ihnen den Namen des Webhosting-Unternehmens anzeigt, das Ihre Website hostet.
Wenn es noch nicht lange her ist, dass Sie Ihre Website migriert und Änderungen an Ihrem Domänennamenserver (DNS) vorgenommen haben, dann kann es sein, dass Ihre Website noch von Ihrem alten Hoster geladen wird. Es kann bis zu 48 Stunden dauern, bis Änderungen am Domänennamen vollständig übertragen sind.
7. Muss ich irgendwelche Dateien oder Daten vom alten Rechner löschen?
Wenn Sie den Hoster wechseln, empfehlen wir Ihnen, Ihre alte Website mindestens eine Woche lang zu behalten. Danach können Sie die Dateien bei Ihrem alten Webhoster löschen. Wenn Sie Ihr Konto kündigen, löscht Ihr Webhosting-Anbieter alle Ihre Daten gemäß seinen Richtlinien.
8. Wie lange sollte ich mein Konto auf dem alten Host aktiv halten?
Sobald Sie Ihre Website zum neuen Hoster migriert haben und wenn Sie keine anderen Websites bei Ihrem alten Webhoster gehostet haben, können Sie Ihr altes Webhosting-Konto kündigen.
In manchen Fällen haben Sie jedoch bereits für ein jährliches Hosting bezahlt. Sie sollten die Rückerstattungsbedingungen prüfen, um zu sehen, ob Sie bei einer Kündigung Anspruch auf eine Rückerstattung haben.
9. Wie ziehe ich eine WordPress-Site mit SSL/HTTPS um?
Sie müssen ein SSL-Zertifikat bei Ihrem neuen Hosting-Anbieter installieren. Danach können Sie die gleichen Schritte wie oben beschrieben durchführen. Achten Sie nur darauf, dass Sie HTTPS in den URLs verwenden, wie https://example.com
10. Bonus: Kostenlose Website-Migration durch Ihren neuen Hoster
Wenn Sie Ihr Webhosting wechseln möchten, aber die oben genannten Schritte zu kompliziert klingen, dann können Sie die folgenden Anbieter wählen, die Ihre Website für Sie migrieren.
SiteGround, Hostinger und WP Engine bieten kostenlose Website-Migration für WPBeginner-Nutzer.
Wir hoffen, dass diese Anleitung Ihnen geholfen hat, WordPress ohne Ausfallzeiten auf Ihren neuen Hoster umzuziehen. Wenn Sie bei Ihrer WordPress-Migration auf Probleme stoßen, sollten Sie sich auch unsere Expertenauswahl der besten günstigen WordPress-Hostings oder unseren Leitfaden zu den häufigsten WordPress-Fehlern und deren Behebung ansehen.
Wenn Ihnen dieser Artikel gefallen hat, dann abonnieren Sie bitte unseren YouTube-Kanal für WordPress-Videotutorials. Sie können uns auch auf Twitter und Facebook finden.


Shane
In the next step, Windows users need to go to Programs » All Programs » Accessories, right click on Notepad and select Run as Administrator. A Windows UAC prompt will appear, and you need to click on Yes to launch Notepad with administrator privileges.
On the Notepad screen, go to File » Open and then go to C:\Windows\System32\drivers\etc. Select hosts file and open it.
I’m having trouble with this step. Can anyone shed any light?
WPBeginner Support
Hi Shane,
You just need to open the Notepad app as an administrator so that you can edit the hosts file.
Admin
Shane
Oh, just microfosft simple wordpad and then “run as administrator”?
Is that all I have to do?
Muhammed Shabeer
Thanks for the wonderfull trick. Exactly the trick was intented to migrate WordPress to new host, but I used for migrating from root to subdomain/subfolder. It done successfully with the plugin. Thank for sharing the trick.
Kenneth Aycox
Thank you for a wonderful product! worked perfect.
James Crow
Briliiant! Thanks so much, I’ve just moved a few sites without any problem at all.
Max
Sadly, this didn’t work for me either. I deleted all the website files as directed , uploaded to the installer.php file and package but when I went to website.com/installer.php I was served a 404 error: Not Found
The requested URL /installer.php was not found on this server.
I think it’s easier to just transfer the website the old fashioned way, as others have mentioned. No need for any scripts that might not work.
Max
Please disregard my comment. I later noticed the root folder was set to httpdocs. So created a folder, named it httpdocs and put the package and installer.php in there. Then the website.com/installer.php worked no problem. All went very smoothly thereafter.
Nandan Jha
Hello Max,
Actually it did work for me in the end. I am guessing that you moved the installer and archive to your new host , correct ?
Please look up the IP address from cpanel or equiv of the new host and try accessing via the IP address
http://IPAddress/installer.phpKB
Seems like a good tutorial, but I had no luck with it. There are also a few steps/screens in the Duplicator sequence that were different from mine. The end result was, I got a 404 error upon clicking Site Login – Login to finalize the setup in Step 4 of 4 of the Test Site screen. This differs substantially from the above. Top right corner there’s a version number of 1.2.30. Fairly certain I have the most up to date version of the plugin. If I use File Manager to view the contents of public_html I don’t see the normal list of wp files that I think I should see aside from a wp-snapshots directory, a few web.config files, some installer files and the archive.zip…oh and database.sql. So something has clearly gone wrong, but I’m at a loss to understand what. So…there it is.
Stephen Duffield
Let me guess, you tried to move from a WordPress.com site? Duplicator & Duplicator Pro wont work for wp.com sites. Nothing works unless you use one of two host sites that they recommend. Duplicator after lots of help, ended up giving me a refund.
Rob
Hey, Just wanted to say thanks for this tutorial. Went perfectly smoothly and would use this duplicator again
Nandan Jha
Great article.
Friends, How do I make it work for an Addon Domain. I took a new plan with GoDaddy and now need to move my sites there. What entry do I make in my hosts file to navigate to install.php ? Thank you,
Nandan Jha
I tried it with my AddOn Domain. It worked for me over a couple of iterations. The thing to take care of is to supply the right ‘domain name’ at Step 3 (or Step 4). The default value which it picks is ‘primarydomain.com/addondomain’. Delete the default value and put addondomain.com
Thanks.
Sean
I recently switched hosts and my original hosting plan has expired. I failed to create a back up before it expired. I do have a local copy of my site on my computer (I use Dreamweaver for FTP). Is there any way to recreate the site with the local files?
Thanks.
Dave Porter
Hi Sean,
Try using WayBack Machine – it takes snapshots of websites over time…
You may be able to grab the source code, images etc… and recreate it from that. I’ve had to do that a few times for clients who have come to me after they have lost contact with their developer…
HTH, Dave
Miki
Hi there,
I have used the Wayback machine and was able to make a copy of my site. Unfortunately I have found myself involved with an unsavory company that had other plans for my business (selling their services on my site) without full disclosure in the beginning. I am now tasked with finding a new programmer to finish the site although it is in wordpress. I do not have wordpress at this time as I was not developing the site; however my understanding from these posts is that if I move the site to another host, I should be able to access wordpress. Is that correct?
WPBeginner Support
Hi Miki,
Yes you can move an existing WordPress website to any other host.
Michael
update…
it works….
be careful with IP address information…. you should read the information carefully…
Thanks
Michael
No luck..
After change the host file, my browser shows message:
This site can’t be reached
example.com took too long to respond.
Search Google for idea inspirations
ERR_CONNECTION_TIMED_OUT
I did flush dns, net stop, dan net start and restart my computer & modem, still not working…
Navajo
I have another question:
In the text it says:
“At this point, you’ve created a complete copy of your WordPress database and files on your new hosting server. But your domain still points to your old web hosting account.
To update your domain, you need to switch your DNS nameservers. This ensures that your users are taken to the new location of your website when they type your domain into their browsers.
If you registered your domain with your hosting provider, then it’s best to transfer the domain to the new host.”
I thought that when i buy a new hosting space, i also and immediatly have to name a doman name. As in: buying a hosting space is always linken to buying a domain. So the new ip addres which i have uploaded my old site to, and which i have to link to my old doman name, already HAS a (newly bought) domain name.
Or can i buy a hosting space, ánd get an IP address which i can use in this tutorial, without it already having a domain name?
Regards, Navajo
WPBeginner Support
Hi Navajo,
It is a common misconception. Hosting and domain name are two different services and you can buy them from two different companies. On the same page where hosting companies offer you to register domain name, they also show another option to indicate that you already have a domain name and you can continue without registering a new one.
For more details please see our detailed guide on What is a domain name and how do domains work?
Admin
Uldis
this is really profound stuff. I was just scratching my head how to migrate client’s site without interruption while changing name servers. Eternally grateful!
Shadat
Hello, I face the database connection failed problem.
can you plz help me? plz
see the screenshots
Dave Porter
Shadat – this is quite an old article now – and you don’t give very much to go on – I would seek help from your hosting company, or get onto a WordPress discussion forum where there are active people who may be able to help you.
But if you are getting a database connection error message, it is generally because the database name/user or password is incorrect
I would try one of the backup tools like Duplicator and see if that works better for you.
Slade
Did you set up a new database and user on your new host?
You must make sure the database name and user and password are all correct for the new host.
Usually a database connection error is a simple oversight like a mispelling or something simple like that.
Michael Goriany
Thanks for this excellent tutorial
If I have well understood, the hosts file (Step 4) is providing for 100% uptime only for the Webmanager but not for the public
How can the DNS switchover time be shortened, or how can the downtime for the public be avoided ?
Slade
Editing the host file allows you to see your site at your new host. Until you update your dns nameservers the public will go to the old host.
The time it takes for dns changes to updare (propagate) is not something that can be controlled. However this guide is correct in providing a no down time solution.
What is happening on the backend that the public does not see is that your website is being hosted at two hosts. The nameservers tell the public which host they are viewing the site on. During the dns update process the users will still view the site at the old host until the propogation is complete.
Once the dns change officially kicks in the public will then be viewing the site at your new host.
Again, to provide the no downtime transfer you would need to change your host file on your local machine (tells your computer you want to view the site at the new host).
This allows you to do the actual install of your website on the new host.
Hope that helps
Lydia
i had to move a client’s site off our subdomain into their own hosting overnight and this REALLY REALLY saved my life! Especially as the domain needed to be repointed seamlessly! I only had trouble with the FTP, i dunno what was wrong with all the logins but i couldn’t get it working. Thankfully my hoster always has an awesome file manager on cpanel.
So yes, very nearly seamless, i’m just testing out the contact forms now which seems to need the DNS switchover time in order to function properly…
And one thing to add, Duplicator has changed the SQL database setup to Step 2 in their latest version, which really made me freak out a bit there.
Thanks very much for the detailed and extremely godsent tutorial!
Kurt
I’m getting ready to follow this tutorial. One question: I am switching servers but also am switching domain names. Should I change my website address in the WP admin settings before running duplicator or after? (Does the order matter?) Thanks!
Johel Fernandez
This tutorial worked out perfectly by April, 2017. ¡Thank you so much!
Ravijit
Hey,
I used this plugin so many times. even, once i used it for too. I really like this plugin but, the problem is it do not extract the big package. We’ve to manually unzip it or need to upload unzipped data to the new hosting.
Any fix for that? Reply as soon as possible.
Archit
Duplicator doesn’t work properly with GoDaddy’s cPanel Linux Hosting service. Script gets terminated even if the settings in php.ini are changed. Please suggest what to do to make Duplicator work there? If not possible, what would be the best alternative?
Hernan
Hi Archit,
I’ve just migrated a site to godaddy and it worked just fine. Which part failed?
best
Hernán
Susan Taunton
This GREAT tutorial successfully guided me through my very first migration of a WordPress site to a different host! Especially life saving was the instruction about changing “sudo nano /private/etc/hosts” in Terminal – worked like a charm. wpbeginner.com has the most succinct, articulate and smart tutorials, which I have come to depend on.
Thank you!!!!
Susan
Prinze
hi, pls have been having issues uploading my site to s new server using FTP client, my hosting company tried to give tutorials on how to transfer with no result.
the tutorials am getting from your site is abt using a duplicate plugin. my site is down, i can’t access my wp-admin to install the plugin.
i use a backup plugin when my site is up so i have a backup file from the plugin i used n also i did a cpanel backup from my old server.
pls, i need a tutorial hoe to upload my backup files to my new server, which one is best to upload?
the plugin backup or the cpanel backup…
pls help!
Greg Draven
What backup plugin did you use?
Ritadrik Chowdhury
Hi Sir,
I am stuck up with 3rd part which is verification part. I have changed the permalinks and I can see the dashboard as usual but the site is not running. Whenever I am clicking on “TEST SITE” it returns error 404: File Not Found. I tried their help documents. Made changes as usual but no luck. Can you please help me out?
saurabh shelar
Hello Sir. I am saurabh from India. I love your website. I have a blog about software review. And I saw your posts and observe that you edited image in microscope effect. This is really fantastic. Can you please tell me how you do this or please make tuts for this please.
Thank you.
WPBeginner Support
Hi Saurabh,
Thanks for the kind words. There are actually tons of tutorials already. Try searching for how to add magnifying glass effect in Photoshop.
Admin
Brad
Hello,
I have a situation where it would be ideal to have the database on separate hosting. Just because the host of the current site does not offer mysql. I cannot move the site (for a company)
Can I install wordpress on current hosting in a sub domain and have the database on another host? I have never used anything except “localhost” in the wp-config file? Thank you!
Sachin
php not supported they are giving reason?? what to do??
Samuel
Does it work on addon domain?
Because there is this step
“Make sure that your root directory is completely empty. If you have WordPress installed in your root directory, then you need to delete WordPress first”
While my primary domain is already up and running
Cory
This is a well put together article, nice job guys!
Just as an FYI for users reading through the comments, any comment pre-dated 12-6-2016 does not pertain to the article above or the Duplicator plugin specifically.
This article was originally written using the Backup Buddy plugin and has since been updated and rewritten using the Duplicator plugin. This should help clear-up any confusion should some of the comments not really make sense or refer to topics not covered in the article.
Mark Rudder
This is an excellent tutorial.
I also believe this is the easiest and fastest way to to migrate a site.
Migrating DB files and tables with phpMyAdmin is the long way around.
Using Duplicator or BackupBuddy is way less work and you are less prone to mistakes that way.
You need to change DNS no matter what method you choose, so that aspect can’t be counted as far as which method is best.
Changing TTL settings to 1 hour (3600 seconds) as Dave Porter pointed out is the only missing piece of the puzzle. (even though that is not essential to success)
Augusto
Nice article, guys!
I feel that the most critical point migrating a site to another host is the email service. If the default email solution provided by host need to be replaced, a lot of work will came.
Anyone want to share your workflow to do this kind of thing?
Thanks!
Frans Kemper
hello,
Would this procedure also work for sub domains?
I have an add on domain to transfer with about 10 related sub domains.
Thank you
Dave Porter
A few days before I move a domain, I go into the DNS settings and change the TTL settings to 1 hour (3600 seconds), so that the site will move quickly (and do it overnight – so the new location will show for everyone in the morning)
(I was expecting this to be mentioned in the article when I saw the title!)
And to answer Dave’s question you can have as many entries in your Hosts file as you want – I have a reseller account with my hosting company and I’m often working on 2 or more sites I am working on that are located on a different server. You can’t specify a sub-directory in the entry – the one entry will point to all locations for that domain – to do what you want to do you are better using sub-domains – so for example example.com is the main location, then you can have play1.example.com as a sub domains that will have it’s own hosts entry.
Harindepreet singh
I think you should make a video or attach screenshots
David in Mississippi
Another article – directly related to this one, but sufficiently different to warrant its own separate article – would be “Replacing A Legacy Website with a Fully-Developed WordPress Website.”
This has happened to me several times already. I have clients with older, legacy-type (non-WordPress) websites, and they ask me to convert their site to WordPress.
I have two methods I use to do this, and one of them involves building the brand new WordPress site on a temporary development URL. When it is done, I then need to transfer it to the existing URL for the client.
In other words, I develop it at DevelopmentSite, and when it is done, I then move it to ExistingLegacySite
I should think it would be easier to do this than the procedure outlined in your article above, but it would still be helpful for you to do an article on this type of migration.
Thanks.
Dave
Correct me if I’m missing something, but this ‘hosts file change’ will only work if you have a just one site on your plan at that new IP address. I have several low-usage sites I’m hosting on one plan. They are in subdirectories under phulic_html.
So doing this:
192.168.1.22 http://www.example.com
in the hosts file will not specify which of your 5 sites to point to. And it seems the only thing you can specify in the hosts file is an IP address and a URL.
You can’t do something like this:
192.168.1.22/sitea http://www.example.com
Am I wrong?
Felipe
I think this is correct, it won’t work for shared domains.
It is better explained here: the voted answer says “If you have shared hosting, this will make your site inaccessible by direct IP. In a shared hosting environment, the host (GoDaddy) will have multiple websites living at the same IP address. When a browser requests a website, the server relies on the domain name to determine which of the many websites to serve. Without a domain name, the server has no way to tell what the browser actually wants so you don’t get your website. To avoid this situation, you will need a host to give you exclusive use of an IP address.”
I think this should be highlighted in the article.
WPBeginner Support
Once you have added your domain name to your new host, your webserver knows that it is hosting domain name example.com and it’s root directory (Doesn’t matter if it is also hosting other domains as well). However, DNS servers take time to propagate so instead of sending your request to your new webserver, they will be sending users to old location for a while. The hosts file allows you to send your request directly to the new server. Hope this clears the confusion.
Admin
Matt Davis
Correct me if I’m wrong, but I believe you can type in (directly in the browser’s address bar) the IP address followed by a slash (/) and then the sub-directory of whichever site you’re trying to access. I would avoid changing the hosts file altogether. Most hosting companies I’ve used will also usually assign temporary URLs to each new website as well, so if that’s the case you could use that instead of the IP or messing with the hosts file.
Niko
That’s correct MATT. Temporary using the IP address instead of altering the hosts file seems like a better approach. However, both work fine.
Vyse
hello. good article but what about wp multisite?
Tanisia
I’ve tried for four hours to make these instructions work. The result? Now I can’t access my site at my old host. I tried following the directions on this 2-year-old article (will there be an update, since BackupBuddy has evolved?) and now everything is messed up.
I used FTP to upload the files, and edited the host file as instructed, but the ImportBuddy PHP script won’t run. It just shows me the code. I tried contacting Bluehost for assistance, and they were no help. So I tried setting all my other settings back to where they were before I started this odyssey, and now I can’t see my site at all. Not the Admin panel, nothing.
WPBeginner Support
Tanisia, please refer to our guide on what to do when you are locked out of WordPress admin area.
Admin
Tanisia
I’m back in at my old host – my servers needed to re-propagage from Bluehost, and it took longer than I had anticipated. I’m still left with BackupBuddy not working the way it’s supposed to. Again, do you have updated instructions from 2014, since there have been several updates to BackupBuddy since this was written? When I did the Notepad update in Windows 10, it looked different from what was described here, so I couldn’t be sure if that trick worked.
Thank you for answering back.
Fahim
If it was a primary domain , can i follow this Process? I need to move and that domain is Main/primary domain, how can i move,will u plz help me?
Mark
Just stuck i step 4, can i just simply addon domain and change dns in new host, ? Following that, C:\Windows\System32\drivers\etc. , there is nothing in my etc, nothing like hosts file, btw great tutorial easy to fallow, thanks
Jacob
I was hoping there would be an easier way to do it with a third party service, but I’m not about to shell out 80 bucks just to do that.
Ash
The backupbuddy steps in the new version have changed quite a bit. Nothing to be afraid of though. I was able successfully migrate from t1.micro on aws to t2.small instance. So far so good.
David
A few questions for you:
1. Isn’t there a SIMPLE way to back up one site (themes, child themes, plugins, and post data), then restore it to another site?
It truly should be as simple as (a) Backup To (dropbox mysite.zip), then (b) Restore From (dropbox mysite.zip).
2. Is it possible, perhaps even EASY, to develop a client’s WP site on your development server, then use Backup Buddy (or some other backup/restore program) to migrate it to the client’s site?
3. Does Backup Buddy, or any other backup/restore program you know of, give you the ability to restore to an existing WP installation? In other words, can you set it to restore everything except the WP core files?
Thanks for this article.
David in Mississippi
WPBeginner Support
Actually, in the article we have shown how BackupBuddy does exactly what you are asking for. You simply backup your site, download an archive file and an importer file. Upload these files to the new location and run the script. Hope this helps.
Admin
Ash
@David, with backupbuddy you can choose which files to leave out while backing up. So you can leave out the core WP files.
Robert
hi guys,
A friend just make me a new wordpress website and uploaded it to my hosting account. Now, I want to change the domain and hosting account and want to upload the website to the new hosting account.
My friend sent me the archive with all files of the website including database. How is possible to upload the website to my new host?
I appreciate your answer.
thank you
Ricardo Clarke
I actually just went through this process yesterday and need to transfer another site today. This is hands down the most thorough walkthrough I’ve seen. The 4 to 48 timeframe really helped ’cause I thought something went wrong, but the transfer just needed time to propagate across the interwebs.
WPBeginner Staff
As soon as you figure out that your new domain has regained the search positions for your old site. We hope that you have setup 301 redireccts on old domain otherwise search engines wouldn’t know that your old content has moved to the new domain permanently.
WPBeginner Staff
What’s the shorter way of doing this?
Sebastien
Hi there, thanks for your tutorial, here’s an other way of doing it… free.
1. Tools > export posts and pages from admin panel. If you also need the DB phpMyAdmin export tables from the db. Import them in the new db. Check for the extension of the tables to be the same (_wp for instance)
2. edit your virtual host config file, add what follows between your server {}
allow your_public_ip;
deny all;
3. Access the site by its ip. (make sure you set the ip of your new server instead of the url in phpmyadmin > wp_options > siteurl and home options)
4. Tools > import posts and pages
5. Change your DNS records at the old host.
6. Done. Use another plugin like UpdraftPlus to backup for free.
Ash
Tried UpdraftPlus. Didn’t do anything at all.
Rachel Charles
Clean and modern and Easy to modify!
Kate_H
Great guide. I can confirm these steps work brilliantly as I recently moved a 5 year old WP site from one domain to another domain and swapped web hosts as well.
The only difference I did was redirect the old site to the new site via the .htaccess as I wasn’t migrating the old domain name over at the time.
Out of curiosity how long would you leave it before deleting all the old content from the old domain and setting up a permanent URL redirect via your registrar?
zimbrul
I really hate Backup Buddy. In 80% of cases I got errors and their support is not that good. I’d rather move a site with Duplicator free WordPress plugin
WPBeginner Staff
Zimbrul, Duplicator is a nice plugin too. However, we have moved many WordPress sites using BackupBuddy and it has always worked flawlessly for us. That’s why we recommend it.
Jim
Fully agree. Duplicator has never let me down and I have backed up and installed to many websites to count. No need for a paid plugin.
Dennis Does Cricket
That’s a ridiculously long winded way of doing it.
Jonathan
I was looking for this. This already assumes knowledge of FTP etc. so why not just:
1. Copy over all files (download locally, upload to new server).
2. Export the DB (you can use Migrate DB free version if you can’t access the old hosts phpmyadmin or such). Also, if you’re moving from a different domain it replaces the urls etc.
3. Create a new DB on your new host, import the DB.
4. Transfer the domain.
Same result, no fiddling with installer scripts and such.
Matt Davis
This is how I would do it.. In addition, you would also need to edit your wp-config.php file with the new DB info (Specifically the database host entry, as I believe importing the old database will create the same database name, user and password on the new one). Also, I would avoid editing your hosts file and instead either use the IP address directly in your browser’s address bar followed by your sub-directory name (if needed) or use the temporary URL most hosters provide when a new account is set up.
The steps in this article are good for someone that doesn’t want to touch configuration files in their WordPress folders, or who want an all-in-one solution that gets them their site and DB in one step.