Viele Benutzer von WordPress ziehen es vor, an ihren Websites über einen lokalen Server auf ihrem Computer zu arbeiten. So können Sie privat an Ihrer Website arbeiten, bevor Sie die Änderungen online zur Verfügung stellen.
Schließlich müssen Sie sie auf einen Live-Server verschieben, um sie für Online-Besucher zugänglich zu machen. Dieser Übergang ist wichtig, um sicherzustellen, dass Ihre Website auf der Live-Site ordnungsgemäß funktioniert.
Wir haben an vielen lokalen Websites gearbeitet und mussten daher lernen, wie man Inhalte am einfachsten auf Live-Websites übertragen kann.
In diesem Artikel geben wir Ihnen eine schrittweise Anleitung, wie Sie WordPress von einem lokalen Server auf eine Website umziehen können.
Warum WordPress von einem lokalen Server auf eine Live-Site verschieben?
Die Erstellung Ihres WordPress-Blogs auf einem lokalen Server ist ein sicherer Weg, um Änderungen an Ihrer Website zu testen, ohne die Besucher zu beeinträchtigen.
Wenn Sie Ihre Website perfektioniert haben, ist der nächste Schritt der Umzug von Ihrem lokalen Server auf eine Live-Site.
Wir zeigen Ihnen zwei Möglichkeiten, wie Sie Ihre Website von einem lokalen Server auf eine Live-Site übertragen können.
Die erste Methode verwendet ein WordPress-Migrations-Plugin und ist für Anfänger zu empfehlen.
In der zweiten Methode zeigen wir Ihnen, wie Sie WordPress manuell von einem lokalen Server auf eine Live-Site verschieben können.
Sie können die Methode wählen, die für Sie am besten geeignet ist:
Bevor Sie Ihre WordPress-Website migrieren
Um WordPress von einem lokalen Server auf einen Live-Server zu migrieren, müssen Sie einige Vorkehrungen treffen.
Zunächst gehen wir davon aus, dass Sie eine WordPress Website auf einem lokalen Server (auch localhost genannt) auf Ihrem Computer laufen haben und dass Sie vollen Zugriff darauf haben.
Als Nächstes benötigen Sie einen Domänennamen und Webhosting.
Wir haben unzählige Geschichten von Anfängern gehört, die mit schlechten oder kostenlosen Hosting-Anbietern angefangen und es bereut haben. Nach unserer Erfahrung ist die Wahl des richtigen Hosting-Anbieters entscheidend für den Erfolg einer Website.
Um Ihnen die Entscheidung zu erleichtern, empfehlen wir Bluehost. Bluehost ist ein offiziell empfohlener WordPress-Hosting-Anbieter und bietet WPBeginner-Nutzern einen exklusiven Rabatt sowie eine kostenlose Domain und SSL.
Im Grunde können Sie schon für 1,99 $ pro Monat einsteigen.
Wenn Sie eine gute Bluehost-Alternative suchen, können Sie sich Hostinger ansehen. Sie bieten auch einen exklusiven Rabatt für WPBeginner-Nutzer mit einem kostenlosen Domainnamen.
Wenn Sie es sich leisten können, ein wenig mehr zu bezahlen, dann schauen Sie sich SiteGround an. Sie haben auch ein spezielles Angebot für WPBeginner-Leser.
Wenn Sie Hilfe bei der Einrichtung Ihrer Website benötigen, folgen Sie unserer Schritt-für-Schritt-Anleitung für die Erstellung einer Website.
Schließlich benötigen Sie ein FTP-Programm und müssen wissen , wie Sie FTP verwenden, um Ihre lokale Server-Site auf die Live-Site hochzuladen.
Sind Sie bereit? Beginnen wir mit der Migration Ihrer WordPress-Website.
Video-Anleitung
Wenn Sie eine schriftliche Anleitung bevorzugen, dann lesen Sie einfach weiter.
Methode 1: Übertragen von WordPress vom lokalen Server auf die Live-Site mithilfe eines Migrations-Plugins (empfohlen)
Diese Methode ist einfacher und wird für Anfänger empfohlen. Wir werden ein WordPress-Migrations-Plugin verwenden, um WordPress vom lokalen Host auf eine Live-Site zu verschieben.
Schritt 1: Installieren und Einrichten des Duplicator-Plugins
Zunächst müssen Sie das Duplicator-Plugin auf Ihrer lokalen Website installieren und aktivieren. Weitere Einzelheiten finden Sie in unserer Schritt-für-Schritt-Anleitung für die Installation eines WordPress-Plugins.
Profi-Tipp: Es gibt auch eine Pro-Version von Duplicator, die sichere Backups, Cloud-Speicher, einfache Wiederherstellung von Websites und mehr bietet.
Nach der Aktivierung müssen Sie auf die Seite Duplicator ” Backups gehen und auf die Schaltfläche “Neu erstellen” klicken.
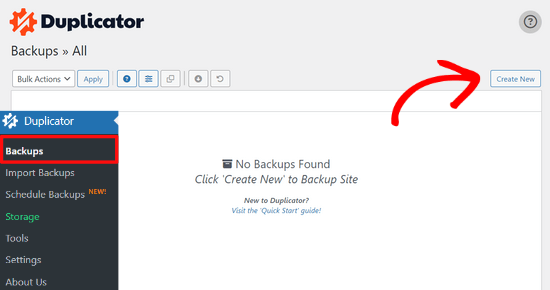
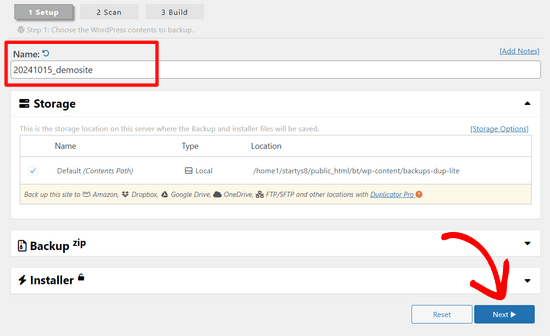
Daraufhin wird ein Bildschirm angezeigt, in dem Sie der Sicherung einen Namen geben können.
Klicken Sie dann auf die Schaltfläche “Weiter”.
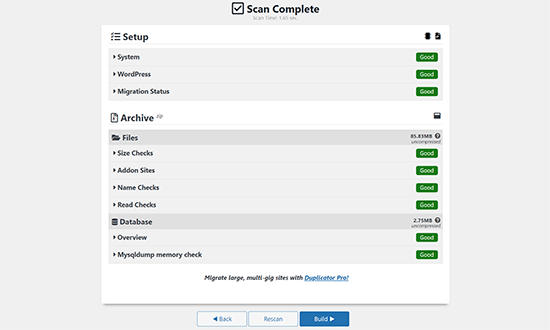
Duplicator führt nun einige Tests durch, um festzustellen, ob alles in Ordnung ist.
Wenn alle Punkte mit “Gut” markiert sind, klicken Sie auf den Button “Erstellen”.
Dieser Vorgang kann einige Minuten dauern, je nach Größe Ihrer Website. Sie müssen diesen Tab geöffnet lassen, bis er abgeschlossen ist.
Wenn Sie fertig sind, sehen Sie Download-Optionen für “Installer”- und “Archiv”-Pakete. Sie müssen auf die Schaltfläche “Beide Dateien herunterladen” klicken, um beide Dateien auf Ihren Computer herunterzuladen.
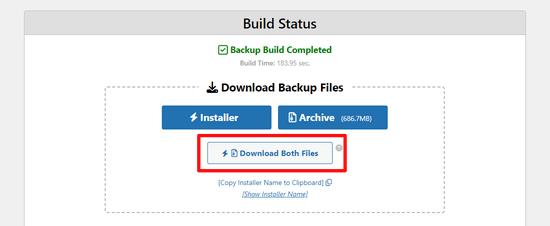
Die “Archiv”-Datei ist eine vollständige Kopie Ihrer WordPress-Website. Sie enthält alle WordPress-Kerndateien sowie Ihre Bilder, Uploads, Themes, Plugins und ein Backup Ihrer WordPress-Datenbank.
Die “Installer”-Datei ist ein Skript, das den gesamten Migrationsprozess automatisiert, indem es die Archivdatei mit Ihrer Website entpackt.
Schritt 2: Erstellen Sie eine Datenbank für Ihre Live-WordPress-Website
Bevor Sie das Installationsprogramm ausführen oder die WordPress-Website von localhost auf Ihren Hosting-Server hochladen können, müssen Sie eine MySQL-Datenbank für Ihre neue Live-Website erstellen.
Wenn Sie bereits eine MySQL-Datenbank erstellt haben, können Sie diesen Schritt überspringen.
Um eine Datenbank zu erstellen, müssen Sie das cPanel-Dashboard Ihres Hosting-Accounts aufrufen. Suchen Sie dann den Abschnitt “Datenbanken” und klicken Sie auf das Symbol “MySQL-Datenbank-Assistent”.
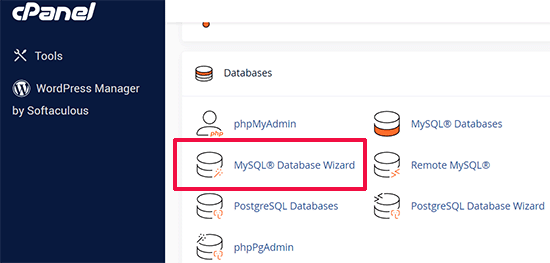
Auf dem nächsten Bildschirm gibt es ein Feld zum Erstellen einer neuen Datenbank.
Geben Sie einfach einen Namen für Ihre Datenbank ein und klicken Sie auf die Schaltfläche “Datenbank erstellen”.

cPanel wird nun eine neue Datenbank für Sie erstellen.
Danach müssen Sie einen Benutzernamen und ein Passwort für Ihren neuen Benutzer eingeben und dann auf die Schaltfläche “Benutzer erstellen” klicken.
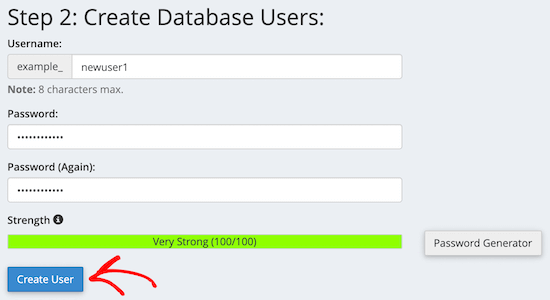
Als nächstes müssen Sie den soeben erstellten Benutzer zur Datenbank hinzufügen.
Klicken Sie zunächst auf das Kontrollkästchen “Alle Berechtigungen”.
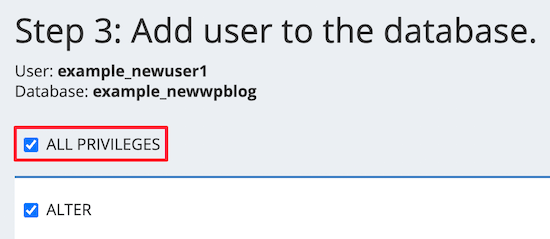
Blättern Sie dann nach unten und klicken Sie auf die Schaltfläche “Änderungen vornehmen”, um Ihre Änderungen zu speichern.
Ihre Datenbank ist nun bereit, mit Ihrer WordPress-Website verwendet zu werden. Notieren Sie sich unbedingt den Namen der Datenbank, den Benutzernamen und das Passwort. Sie werden diese Informationen im nächsten Schritt benötigen.
Schritt 3: Upload von Dateien vom lokalen Server auf die WordPress-Live-Website
Nun müssen Sie das Archiv und die Installationsdateien von Ihrer lokalen Website auf Ihr Hosting-Konto hochladen.
Stellen Sie zunächst mit einem FTP-Client eine Verbindung zu Ihrer Live-Website her. Vergewissern Sie sich nach der Verbindung, dass das Stammverzeichnis Ihrer Website völlig leer ist.
Normalerweise ist das Stammverzeichnis der Ordner /home/public_html/.
Einige WordPress-Hosting-Unternehmen installieren WordPress automatisch, wenn Sie sich anmelden. Wenn Sie dort WordPress-Dateien haben, müssen Sie diese löschen.
Danach können Sie die Dateien archive.zip und installer.php von Duplicator in Ihr leeres Stammverzeichnis hochladen.

Schritt 4: Ausführen des Migrationsskripts
Nachdem Sie die Migrationsdateien hochgeladen haben, müssen Sie die folgende URL in Ihrem Browser aufrufen:
http://example.com/installer.php
Vergessen Sie nicht, “example.com” durch Ihren eigenen Domänennamen zu ersetzen.
Dadurch wird der Duplicator-Migrationsassistent gestartet.
Das Installationsprogramm führt ein paar Tests durch und initialisiert das Skript.
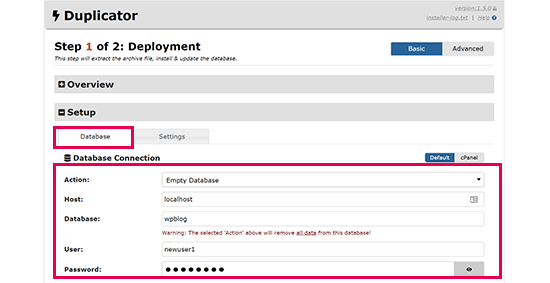
Im Abschnitt Setup werden Sie aufgefordert, den MySQL-Host, den Datenbanknamen, den Benutzernamen und das Passwort einzugeben.
Ihr Host wird wahrscheinlich ein lokaler Host sein. Danach geben Sie die Details der Datenbank ein, die Sie im vorherigen Schritt erstellt haben.
Klicken Sie dann auf die Schaltfläche “Validieren”, um sicherzustellen, dass die eingegebenen Daten korrekt sind.
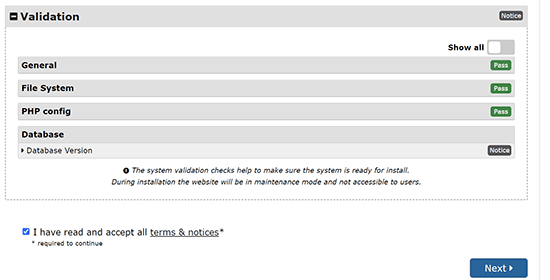
Klicken Sie anschließend auf die Schaltfläche “Weiter”, um fortzufahren.
Duplicator importiert nun die Sicherung Ihrer WordPress-Datenbank aus dem Archiv in Ihre neue Datenbank.
Außerdem werden die URLs aktualisiert, die auf die lokale Website und Ihre neue Website verweisen.
Sie können nun auf die Schaltfläche “Admin Login” klicken, um in den WordPress-Administrationsbereich Ihrer Live-Site zu gelangen.

Sobald Sie sich bei Ihrer Live-Site anmelden, bereinigt Duplicator automatisch die Installationsdateien.
Das war’s schon. Sie haben WordPress erfolgreich vom lokalen Server auf Ihre Live-Site verschoben.
Methode 2: Manuelle Übertragung von WordPress vom lokalen Server auf die Live-Site
In dieser Methode zeigen wir Ihnen, wie Sie WordPress manuell vom lokalen Server auf Ihre Live-Site verschieben können. Sie ist nützlich, wenn die erste Methode nicht funktioniert oder wenn Sie es lieber manuell machen möchten.
Schritt 1: Lokale WordPress-Datenbank exportieren
Als Erstes müssen Sie Ihre lokale WordPress-Datenbank exportieren. Wir werden dafür phpMyAdmin verwenden.
Wenn Sie damit nicht vertraut sind, sollten Sie einen Blick auf unsere Anleitung zur WordPress-Datenbankverwaltung mit phpMyAdmin werfen.
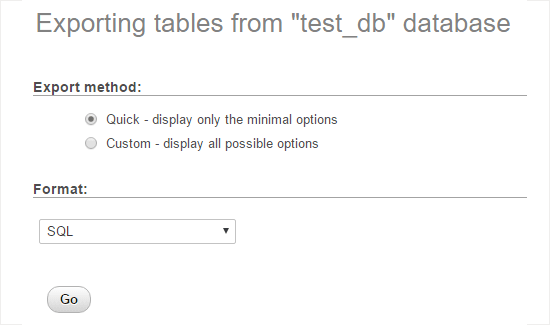
Gehen Sie einfach auf http://localhost/phpmyadmin/ und klicken Sie auf Ihre WordPress-Datenbank. Klicken Sie dann auf die Schaltfläche “Exportieren” in der oberen Menüleiste.

In der Option “Exportmethode:” können Sie “Schnell” oder “Individuell” wählen. Die Option “Individuell” bietet Ihnen mehr Optionen für den Export Ihrer Datenbank.
Wir empfehlen jedoch, “Schnell” zu wählen und dann auf die Schaltfläche “Los” zu klicken, um Ihre Datenbank herunterzuladen.
Schritt 2: WordPress-Dateien auf die Live-Site hochladen
Nun müssen wir alle Dateien Ihrer Website auf die Live-Site verschieben.
Um loszulegen, öffnen Sie Ihren FTP-Client und verbinden Sie sich mit Ihrem Webhosting-Konto.
Sobald Sie mit Ihrer Website verbunden sind, stellen Sie sicher, dass Sie die Dateien in das richtige Verzeichnis hochladen. Wenn Sie zum Beispiel möchten, dass die Website auf “yourite.com” gehostet wird, müssen Sie alle Dateien in Ihr Verzeichnis public_html hochladen.
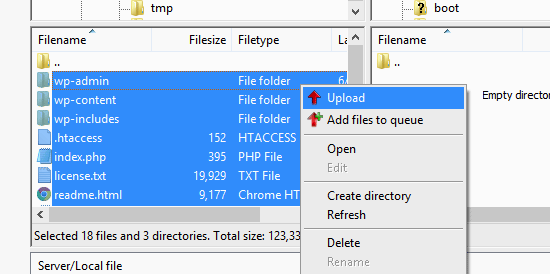
Wählen Sie nun Ihre lokalen WordPress-Dateien aus und laden Sie sie auf Ihren Live-Server hoch.
Schritt 3: Erstellen Sie eine MySQL-Datenbank auf Ihrer Live-Site
Während Ihr FTP-Client Ihre WordPress-Dateien hochlädt, können Sie damit beginnen, Ihre Datenbank auf den Live-Server zu importieren.
Die meisten Hosting-Anbieter von WordPress bieten cPanel zur Verwaltung Ihres Kontos an. Wir zeigen Ihnen, wie Sie eine Datenbank mit cPanel erstellen.
Melden Sie sich zunächst in Ihrem cPanel-Dashboard an und klicken Sie auf das Symbol “MySQL-Datenbank-Assistent”, das Sie im Abschnitt “Datenbanken” finden.

Auf dem nächsten Bildschirm können Sie eine neue Datenbank anlegen.
Geben Sie einen Namen für Ihre Datenbank ein und klicken Sie dann auf “Datenbank erstellen”.

cPanel wird nun automatisch eine neue Datenbank für Sie erstellen.
Als nächstes müssen Sie einen Benutzernamen und ein Passwort für Ihren neuen Benutzer eingeben und dann auf “Benutzer erstellen” klicken.
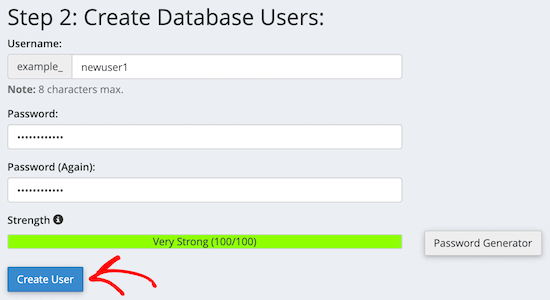
Danach müssen Sie den soeben erstellten Benutzer in die Datenbank aufnehmen.
Aktivieren Sie zunächst das Kontrollkästchen “Alle Berechtigungen”.
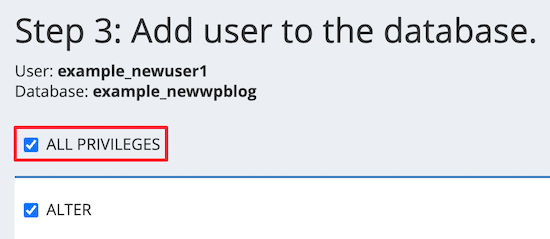
Blättern Sie dann nach unten und klicken Sie auf “Änderungen vornehmen”, um Ihre Änderungen zu speichern.
Sie haben erfolgreich eine neue Datenbank für Ihre Live-WordPress-Site erstellt.
Schritt 4: WordPress-Datenbank in die Live-Site importieren
Der nächste Schritt ist der Import Ihrer WordPress-Datenbank.
Gehen Sie zu Ihrem cPanel Dashboard, scrollen Sie nach unten zum Abschnitt ‘Datenbanken’ und klicken Sie auf ‘phpMyAdmin’.
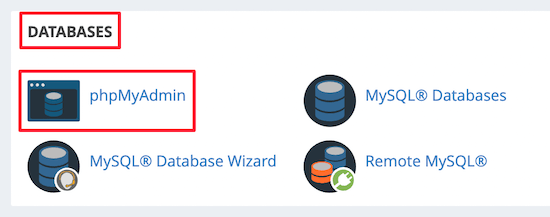
Dies führt Sie zu phpMyAdmin, wo Sie auf die Datenbank klicken, die Sie gerade erstellt haben. phpMyAdmin zeigt Ihre neue Datenbank ohne Tabellen an.
Klicken Sie dann im oberen Menü auf die Registerkarte “Importieren”. Klicken Sie auf der Importseite auf die Schaltfläche “Datei auswählen” und wählen Sie dann die Datenbankdatei von der lokalen Website, die Sie im ersten Schritt gespeichert haben.
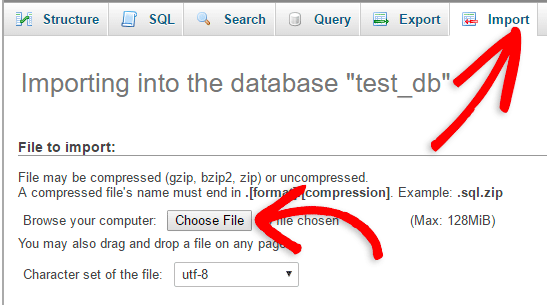
Klicken Sie anschließend auf die Schaltfläche “Go” unten auf der Seite. Ihre Datenbank wird automatisch in phpMyadmin importiert.
Schritt 5: Ändern Sie die URL der Website
Nun müssen Sie die Website-URL in Ihrer Datenbank ändern, damit sie sich mit Ihrer Live-WordPress-Site verbindet.
Suchen Sie in phpMyAdmin nach der Tabelle wp_options in Ihrer Datenbank, die Sie oben importiert haben.
Wenn Sie Ihr Datenbankpräfix geändert haben, könnte es statt wp_options {new_prefix}_options heißen.
Klicken Sie dann auf die Schaltfläche “Durchsuchen” neben wp_options. Oder klicken Sie auf den Link in der Seitenleiste, um die Seite mit einer Liste der Felder in der Tabelle wp_options zu öffnen.
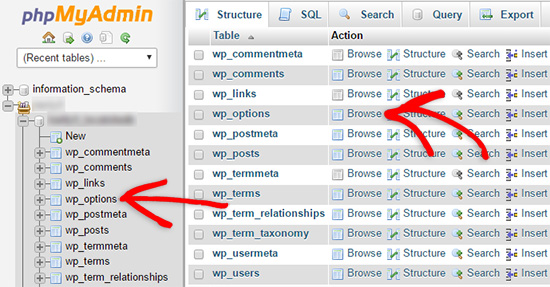
Dann müssen Sie in der Spalte options_name nach der Option siteurl suchen.
Klicken Sie dann auf das Symbol “Bearbeiten”.

Daraufhin öffnet sich ein Fenster, in dem Sie das Feld bearbeiten können.
Im Eingabefeld option_value sehen Sie die URL Ihrer lokalen Installation, die etwa http://localhost/test lautet.
In dieses Feld müssen Sie die URL Ihrer neuen Website eingeben, z. B. https://www.wpbeginner.com.
Anschließend können Sie das Feld speichern, indem Sie auf die Schaltfläche “Go” klicken.
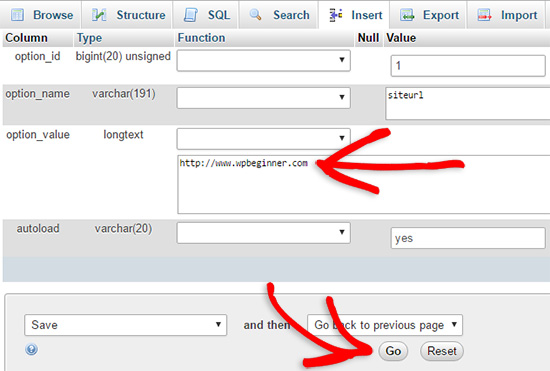
Als nächstes müssen Sie die gleichen Schritte wie oben für den Namen der Home-Option ausführen. Das Menü wp_options kann einige Seiten lang sein. Normalerweise befindet sich die Home-Option auf der zweiten Seite.
Aktualisieren Sie dann die Home-URL, damit sie mit der URL Ihrer Live-Site übereinstimmt.
Schritt 6: Einrichten Ihrer Live-Site
Nachdem Sie nun die Datenbank importiert und Ihre Inhalte hochgeladen haben, ist es an der Zeit, WordPress zu konfigurieren.
Zu diesem Zeitpunkt sollte auf Ihrer Website die Fehlermeldung“Fehler beim Herstellen einer Datenbankverbindung” angezeigt werden.
Um dies zu beheben, verbinden Sie sich mit einem FTP-Client mit Ihrer Website und öffnen Sie die Datei wp-config.php.
Sie werden nach den folgenden Codezeilen suchen:
1 2 3 4 5 6 7 8 9 | // ** MySQL settings - You can get this info from your web host ** ///** The name of the database for WordPress */define( 'DB_NAME', 'database_name_here' );/** MySQL database username */define( 'DB_USER', 'username_here' );/** MySQL database password */define( 'DB_PASSWORD', 'password_here' );/** MySQL hostname */define( 'DB_HOST', 'localhost' ); |
Sie müssen den Datenbanknamen, den Benutzernamen und das Passwort angeben, die Sie zuvor erstellt haben.
Speichern Sie anschließend die Datei wp-config.php und laden Sie sie zurück auf Ihren WordPress-Hosting-Server.
Wenn Sie jetzt Ihre Website besuchen, sollte sie live sein.
Danach müssen Sie sich in Ihr WordPress-Administrationspanel einloggen und zu den Einstellungen ” Allgemein gehen. Dann, ohne etwas zu ändern, scrollen Sie zum Ende und klicken Sie auf die Schaltfläche “Änderungen speichern”.
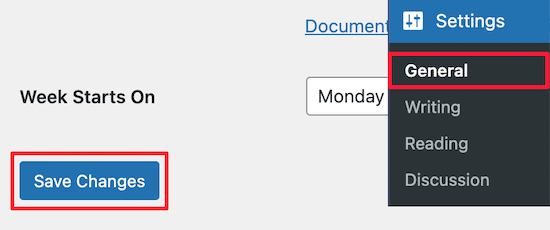
Dadurch wird sichergestellt, dass die URL Ihrer Website überall dort korrigiert wird, wo sie sein muss.
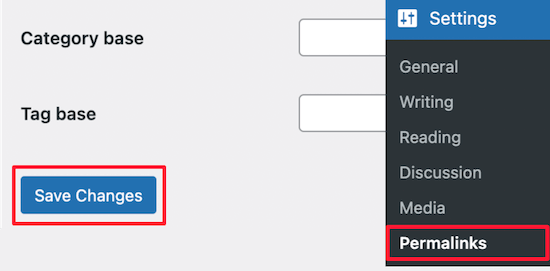
Wenn Sie das getan haben, gehen Sie zu Einstellungen ” Permalinks, scrollen Sie nach unten und klicken Sie auf “Änderungen speichern”, um sicherzustellen, dass alle Beitragslinks funktionieren.
Schritt 7: Bilder und defekte Links durch Aktualisierung der Pfade reparieren
Wenn Sie eine WordPress-Site von einer Domain auf eine andere oder von einem lokalen Server auf eine Live-Site verschieben, werden Sie mit defekten Links und fehlenden Bildern konfrontiert.
Wir zeigen Ihnen zwei Möglichkeiten zur Aktualisierung von URLs. Sie können diejenige wählen, die für Sie am besten geeignet ist.
1. URLs mit dem Plugin “Search & Replace Everything” aktualisieren (empfohlen)
Der sicherste Weg, dies zu beheben, ist die Verwendung von Search & Replace Everything. Dabei handelt es sich um ein leistungsstarkes WordPress Plugin, mit dem Sie problemlos Massenaktualisierungen auf Ihrer Website durchführen können, ohne komplexe Abfragen an die Datenbank zu stellen.
Zunächst müssen Sie das Plugin Search & Replace Everything installieren und aktivieren.
Gehen Sie nach der Aktivierung auf die Seite Werkzeuge ” WP Suchen & Ersetzen.
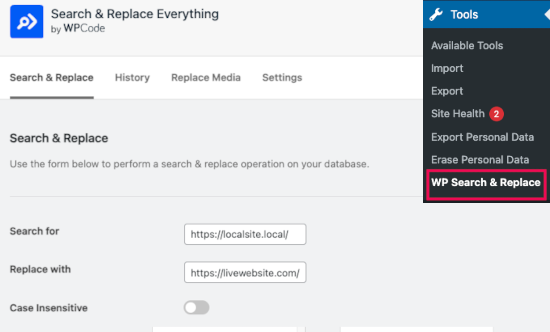
Hier müssen Sie die URL Ihrer lokalen Website in das Feld “Suchen nach” und die URL Ihrer Live-Website in das Feld “Ersetzen durch” eingeben.
Scrollen Sie ein wenig und klicken Sie unter den Tabellen auf “Alle auswählen”. Dadurch wird sichergestellt, dass das Plugin überall in der Datenbank nach der alten URL sucht.
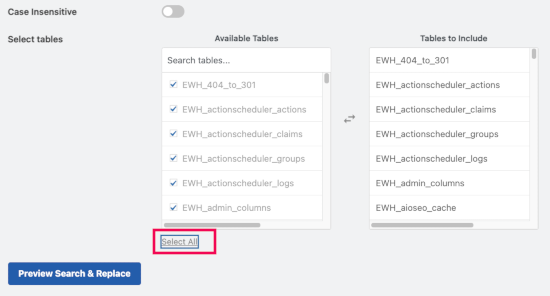
Klicken Sie nun auf den Button “Vorschau Suchen & Ersetzen”, um fortzufahren.
Das Plugin durchsucht Ihre Datenbank nach allen Instanzen der alten URL und zeigt dann eine Vorschau der Ergebnisse an.
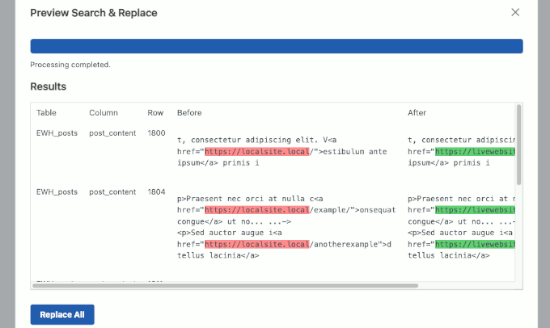
Wenn alles gut aussieht, klicken Sie auf “Alles ersetzen”, um die Änderungen zu speichern.
Sie erhalten eine Warnung über die Änderungen, die Sie vornehmen. Klicken Sie auf “Ja”, um fortzufahren.
Das Plugin wird nun die Datenbank aktualisieren und die lokalen URLs durch die aktuelle URL Ihrer Website ersetzen.
2. URLs manuell aktualisieren (Erweitert)
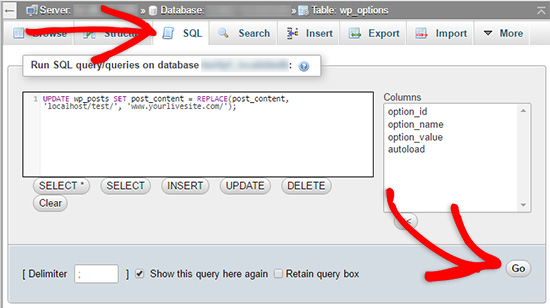
Eine andere Möglichkeit, die URLs zu aktualisieren, ist die folgende SQL-Abfrage:
1 | UPDATE wp_posts SET post_content = REPLACE(post_content, 'localhost/test/', 'www.yourlivesite.com/'); |
Gehen Sie einfach zu phpMyAdmin, klicken Sie auf Ihre Datenbank und dann im oberen Menü auf ‘SQL’ und fügen Sie die obige Abfrage hinzu.
Vergewissern Sie sich, dass Sie die URLs Ihrer lokalen Website und Ihrer Live-Website eingeben, und klicken Sie auf den Button “Go”.
Das war’s. Sie haben WordPress nun erfolgreich von Ihrem lokalen Server auf eine Live-Site migriert.
Hoffentlich funktioniert Ihre Live-Website jetzt reibungslos. Wenn Sie Fehler bemerken, können Sie unseren Leitfaden zu häufigen WordPress-Fehlern lesen, um Hilfe bei der Problembehandlung zu erhalten.
Wir hoffen, dass dieser Artikel Ihnen geholfen hat, WordPress von einem lokalen Server auf eine Live Website zu übertragen. Vielleicht interessiert Sie auch unser Leitfaden für den Umzug einer Live-Website auf einen lokalen Server oder die ultimative Checkliste für die Migration von Websites für praktische WordPress-Migrationsschritte.
Wenn Ihnen dieser Artikel gefallen hat, dann abonnieren Sie bitte unseren YouTube-Kanal für WordPress-Videotutorials. Sie können uns auch auf Twitter und Facebook finden.


Christian
In step 6, wpbeginner support said, need to update these lines in wp-config.php file for an answer of comment (In Nov 2, 2017 at 12:34 am). Here are lines.
define(‘WP_HOME’,’http://example.com’);
define(‘WP_SITEURL’,’http://example.com’);
My question is, After which line should i need to updates these lines in wp-config.php file?
Here is wp-config.php file without comments.
<?php
define('DB_NAME', 'db');
define('DB_USER', 'user');
define('DB_PASSWORD', 'pass');
define('DB_HOST', 'localhost');
define('DB_CHARSET', 'utf8');
define('DB_COLLATE', '');
define('AUTH_KEY', 'put your unique phrase here');
define('SECURE_AUTH_KEY', 'put your unique phrase here');
define('LOGGED_IN_KEY', 'put your unique phrase here');
define('NONCE_KEY', 'put your unique phrase here');
define('AUTH_SALT', 'put your unique phrase here');
define('SECURE_AUTH_SALT', 'put your unique phrase here');
define('LOGGED_IN_SALT', 'put your unique phrase here');
define('NONCE_SALT', 'put your unique phrase here');
$table_prefix = 'wp_';
define('WP_DEBUG', false);
if ( !defined('ABSPATH') )
define('ABSPATH', dirname(__FILE__) . '/');
require_once(ABSPATH . 'wp-settings.php');
WPBeginner Support
Hi Christian,
You can add them any where before the comment line that says:
/* That’s all, stop editing! Happy blogging. */
To be more precise, you can add these lines after:
define('WP_DEBUG', false)1-click Use in WordPress
Admin
Ian Billingham
Hi there.
Would somebody be able to tell me if this ‘how to’ would overwrite an existing established website? I’m guessing it would.
WPBeginner Support
Hi Ian,
Yes, it will overwrite an existing established website.
Admin
Ravishankar
You are awesome!!! Thank you so much, this was super helpful!
Kate
Hi
Thanks for this informative post. I followed all the instructions carefully and when I tried to see if the site was live at step 6, it came up with the same page that it was had originally. It says ‘Index of/’ as the heading and then has 2 options below (with details of date modified etc). The 2 options are cgi-bin which brings up a 403 error and wordpress which goes to a blank page. Any ideas on what I might have done wrong? I’m very new to this so might have got something confused!
Thanks
Ahmed
Thank you very much, this is very useful
Kritika
Nice and helpful. Thanks
Muhammad Azhar
Hi
i am trying to upload my localhost word press site to live.
I am stuck at where it said “error database connection” i edit the wp-config file and now the only white screen appearing on my web site. I am confused what to do next? “Next, you need to login to your WordPress admin panel and go to Settings » General. be.” I have to install word press at my hosting to perform this step. Please guide.
CK Cheung
Hi,
Many thanks for the instruction. I would like to ask is it possible that I just copy the exported database and upload to the FTP site?
Then I can keep the local host for the future upgrade and testing?
If yes, in future which file I should upload to the ftp and make it live??
Many thanks.
kathy
Hi, I wonder if you can help. I’ve got all the way to editing the config file and uploading i would now appear to be at a sticking point – any ideas on the below? Everything has gone fine to this point. I’ve amended the name, user and password as advised. Would really appreciate any pointers. Thanks
Server Error in ‘/’ Application.
Runtime Error
Description: An application error occurred on the server. The current custom error settings for this application prevent the details of the application error from being viewed remotely (for security reasons). It could, however, be viewed by browsers running on the local server machine.
Amelia
Hi There. I just want to thank you for such an informative site you are running. I feel like you guys literally held my hand the whole way through, and every glitch I had, you had an article about how to fix it.
I’m happy to say my site is now up and running, while I still have to do a few finishing touches though. Just a great big thank you, I could not have done it without following your website step by step.
Nick
I am having issues with step 6, mainly the part where it says “Next, you need to login to your WordPress admin panel and go to Settings » General. Without changing anything, scroll to the bottom and click the Save Changes button. This will ensure that the site URL is corrected anywhere else that it needs to be.
After that go to Settings » Permalink and click Save Changes to ensure that all post links are working fine”. I cannot go into the settings because I cannot login, I have gotten to the login page but it won’t let me login and I cannot create an account because the link is not connected. How would I get around this problem.
WPBeginner Support
Hi Nick,
You can update the URLs in wp-config.php file as well. Connect to your live website using an FTP client and then add these two lines:
define('WP_HOME','http://example.com');define('WP_SITEURL','http://example.com');1-click Use in WordPress
Don’t forget to replace example.com with your own URL.
Admin
Nisa
Thank you very much its was very helpful, I was moving WP files from one server to another.
But I cannot compete the 6th step latter part, I can type the Admin username and password, so the site shows I am logged in as the admin from right hand side corner up, but I cannot access the admin panel
I get the error message : “Sorry, you are not allowed to access this page.”
Judit
Hello,
I took ages to set up my website locally, and now I am ready to move it to a live site. However, when I go to I get an error message:
#1045 – Access denied for user ‘xxx'(my username)@’localhost’ (using password: YES)
I’m pretty sure my username and password are correct and yet I cannot log in or change my password.
Please help – I’m afraid that I invested so much time into setting up WP and now I cannot move it to a live site because of this issue.
WPBeginner Support
Hi Judit,
You will need to edit the phpmyadmin’s configuration file:
c:\wamp\apps\phpmyadmin4.1.14\phpmyadmin.conf
Try root for username and leave password field blank. Set ‘AllowNoPassword’ to true. Save your changes and restart WAMPSERVER
Admin
TH
Hi. I moved my site from my local host wamp to my hosting service.
I did all the steps 1-7 but am facing the following problems:
(I had deleted all my plugins to ensure no conflicts)
– when I login as admin, it shows me the login page instead of the homepage and the admin dashboard.
– header menu bar tabs are working OK except for the HOME tab. When I click on HOME it takes me to localhost. Other tabs take me to the right pages.
– Top bar menu tabs (Favorites, Notifications, Logout) are not working. When I click on Favorites it shows: domainname/login/?redirect_to=http%3A%2F%2domainname%2Fdashboard%2Fprojects%2F#favorites and still shows the login page.
– when I click on logout, it shows domainname/login/domainname/wp-login.php?action=logout&_wpnonce=942fbc8980
– when click on > domainname>dashboard it goes to : domainname/login/?redirect_to=http%3A%2F%2Fdomainname%2Fwp-admin%2F and still shows login page
1. What are the problems with the setup? How do I fix them?
2. Should I delete all the WP files and DB on the live server and try again?
Please help.
Thanks.
TH
WPBeginner Support
Hi,
You may want to follow the steps in our WordPress troubleshooting guide. It will help you figure out what’s causing the issue and how to fix it.
Admin
Tara Giltner
Hi,
I followed these directions, they were great. Thank you. My problem is that I still have an error establishing database. I realize it’s probably because the old website is still on the public_html files as well. Is it ok to delete them?
WPBeginner Support
Hi Tara,
Make sure you download the files as backup on your computer before deleting them.
Admin
Jheel
Kindly revert soon.
Jheel
i followed all the steps mentioned above. the website is blank. and i cant even log in my wordpress website i created offline. after doing all the steps when i try to see if the site is live. i get PAGE NOT FOUND & the page contains the home page without bimage & captions. Please tell me what am i suppose to do?
Klaas Cornelis
I Get the “Forbidden: PHP engine is disable” error after completing this steps, I recon i’ve done something wrong. Anyone has an idea of where the fault can be located?
Jolie King
Hello,
I will like to ask if it possible to upload my wordpress website files by zipping all the folders & files, using the upload button in the cpanel to upload it, and then unzipping it after the upload.
Has anyone tried this? Are there any problems encountered after doing this??
Thanks.
Jim Thorne
Jolie, yes…I Zipped my entire WordPress folder and uploaded it using cPanel and then decompressed it into the public_html folder. It worked fantastic.
alan
wow. i better do it again since this look so difficutl
Amirreza
Very useful. Thanks!
Abneer
Hi,
I successfully moved my website from localhost to live site (with a few exceptions). But i had to work on my localhost also so i used update options method given on Codex . I am able to use my admin panel on localhost and only the frontpage. if i click on any other page on the website i get the wamp configuration page. How can i resolve this issue?
Please help me soon!
Thankyou!
Vince
I could really use anyones help desperately; I spent 2 weeks putting a site together and now I can’t get MAMP to work!!!
I had everything working, built the site then had a power outage. Hadn’t used my computer over the weekend and when I came back had the MySQL Error #2002 in the browser window. None of the other windows had content in them as well.
I’ve tried even going back in my Time Machine and still can’t get it to work. When I start MAMP the Apache Server starts but the MySQL Server doesn’t. I even tried things like restarting Apache and MySQL in Terminal and clearing the cache, but still nothing. And I’ve tried fiddling with the preferences in MAMP.
I’ve used MAMP before, a few years ago without any issues or problems. Loved it!!! Worked Great!!!
I’m using Sierra 10.12.6. I first installed MAMP 4.1.1 then when I started having problems I tried to upgrade to 4.2 to see if that help, but no. Had a few problems at first, but did get it to work.
I have another computer running El Capitan and the MySQL Server just doesn’t start on that either. I thought maybe it was the version of PHP that runs on MacOS, so I ran an upgrade and still nothing!
I’m really despise because the site has a scheduled live date, and the customer will freak if it’s not up and running, not to mention my employer!!! Any help would be greatly appreciated!!!
Cheers, Vince
WPBeginner Support
Hey Vince,
It is a common issue with MAMP and you’ll find various solutions online that have worked for other users. The most common solution is to delete the log files located in MAMP/db/mysql directory and then restarting MAMP.
Admin
Sarah
Hello my web page is still showing blank after enabling WP-DEBUG to true
Chamini
I did every step and now my site is in live.
But now I have another two issues,
1.all of my styles and images were not in the site
2.When I’m trying to go to other menus I can’t go to them.It shows 500 Internal Server Error.
Please help me to get out from here
Chris
Hi, did you fix this? I’m having the same problem.
I’ve deleted .htaccess and created a new one. I’ve changed permalink structure to %postname%, I’ve used the velvet blues AND SQL links update but still get this error. Not sure where else to go from here…
Maiyo
I recommend changing the WP_DEBUG option to true value in the wp_option doc to see what errors are occurring if you have a blank page or HTTP 500 error message
Jordan
I followed the steps exactly, but when I got to step 6 when I loaded the website, it worked, but all the information and templates and pages I designed were not there.
I was still able to access my localhost website and I tried to use WP Migrate to transfer all the information across, but that didn’t work. So I followed this guys instructions:
Now my localhost website does not work anymore…..
I guess I’m just going to have to redesign the entire website online now.
WPBeginner Support
Hi Jordan,
Please review your database settings. Go to phpMyAdmin to compare your live site database with your local server database.
Admin
Nou Kanvanny
Hello sir my appearance dnt see tool option, pleas help me
thank you
Craig
I recieve this error when trying to import my database:
Error
SQL query:
—
— Database: `wordpress_test`
—
CREATE DATABASE IF NOT EXISTS `wordpress_test` DEFAULT CHARACTER SET utf8 COLLATE utf8_general_ci;
MySQL said: Documentation
#1044 – Access denied for user ‘craigpar4_root’@’%’ to database ‘wordpress_test’
Can someone help me?
Thanks
Liv
This seems to have worked, but only on my local computer. The new WordPress website shows up at the proper domain on my computer. But when trying the same domain on my phone or a different computer, the old website still pops up.
Patricia LaCroix
Did you clear the cache on those other computers? Sometimes, that’s the issue.
Susan Keogh
I’m failing at Step 1! I type in the phpmyadmin address – and nothing is found. What am I doing wrong?
MrPET
Dear,
everything you said worked for me. Had some problem with admin back end page but after deleted .htaccess file and refresh, everything is just fine.
Jason
Dear WPBeginner,
I had followed all your steps correctly but now my wp-admin page is gone! it says 404!
Even tho the wp-admin folder exsisted.
Please help
WPBeginner Support
Hi Jason,
Try refreshing your WordPress permalinks structure. Since you can’t access admin area, you will need to do it via FTP. Connect to your website, and locate .htaccess file. Download it to your computer as backup, and then delete the file from your server. Visit the homepage of your website and WordPress will regenerate the .htaccess file for you. You can then try to login.
Admin
Jason
Yeah, you are too late 19 days to respond to my comment…
I had moved my site with pain… that means re-install and copy and pasting stuff from old one to the new one T-T
WPBeginner Support
Hi Jason,
Our apologies for the late reply. We try to respond to comments and questions in a timely manner but due to large number of comments we can sometimes miss legit questions.
Tiernan
Many thanks for the very helpful advice that has really simplified an otherwise tricky process
Kariena
Hi, very useful thanks.
Just a question, when adding content to a plugin on my localhost wp-admin, do I need to import my database again to my live site in order to update changes. (I mean do I need to import my database every time I make changes ?)
Laura
Hello, thanks for the post, it’s super helpful!!! Quick question – should I create my XML sitemap and submit it to Google / Webmaster tools while my site is still on my local server or should I upload it to the live server first?
WPBeginner Support
Hey Laura,
Your would need to upload your site to a live server first.
Admin
jenny
Thank you this is very usefull thank you again
Kim Sofo
I am having problems with this. I think its step 2. Can you please clarify where I should be uploading the wordpress files from? Are they installed as part of WAMP? So thats where I would find them? Or are they elsewhere? Thanks
Rohit Gogoi
Can you make a video on this please…Some steps are not clear. Like the second step. I didn’t got it. Please help me out.
WPBeginner Support
Hey Rohit,
We will try to add a video soon. Meanwhile, you will need an FTP client for the step 2. Once you are connected to your website, you will then upload local WordPress files from your computer to the live website.
Admin
Collins
Thanks a lot, the write up was helpful. However after exporting my database and importing it to my live server, i lost some database files. Is there any possible means or tools to retrieve them back? Help please
Rizki Suciana
Very useful.. thank you so much!
Ari
Thanks for the outstanding post. It really was comprehensive and allowed me to successfully transfer my site from local to server!
The only part I had to be ‘externally resourceful’ on was the save settings when exporting my SQL database, to make sure it didn’t create a new one (as you correctly speculated, my ISP only allowed for one database).
Ritul
Is it safe to transfer website from localhost to live server??because I want to know whether I should start with live hostingOrLocal Server for making my blog??
Kirsty
Please helpppppp
When I changed my url from the .dev to .com it’s telling me 404 site not found and I can’t event get back to wordpress to fix it. :'(
WPBeginner Support
Please see our guide on how to fix 404 error in WordPress.
Admin
Tony Clarkson
Hello, I’m having trouble importing the localhost db content in to the new database, I’ve double checked the step-by-step and as far as I can see I’m doing the right thing but I’m getting this error when importing:
Error
SQL query:
—
— Database: `push_db`
—
— ——————————————————–
—
— Table structure for table `wp_commentmeta`
—
CREATE TABLE `wp_commentmeta` (
`meta_id` BIGINT( 20 ) UNSIGNED NOT NULL ,
`comment_id` BIGINT( 20 ) UNSIGNED NOT NULL DEFAULT ‘0’,
`meta_key` VARCHAR( 255 ) COLLATE utf8mb4_unicode_520_ci DEFAULT NULL ,
`meta_value` LONGTEXT COLLATE utf8mb4_unicode_520_ci
) ENGINE = INNODB DEFAULT CHARSET = utf8mb4 COLLATE = utf8mb4_unicode_520_ci;
MySQL said: Documentation
#1273 – Unknown collation: ‘utf8mb4_unicode_520_ci’
When I choose the custom option for exporting the local database, I’m assuming all the other settings remain as default, just change to ‘Save output to a file’
What do you think it could be?
Tony
Tony Clarkson
I got past this bit, the version of MySQL on the local site was newer then the server, however, I’ve come to a halt again at step 6. When I browse the site I just get an Http Error 500. Not sure where to start…
Peter Singh
Hi Tony,
I had a similar problem with another site that I had to get live a while ago. I found that the root of the http 500 error was due to insufficient memory allowance in the php.ini file. I know you cant really get in and change that about on a webserver. I found a little trick by defining it within the wp-config/php file. Just stick this in at the top line.
define( ‘wp_max_memory_limit’ ‘256m’ )
and bob’s your uncle.
Dawn
I tried this and there was no change… Still either a 500 error or a blank page. :'(
WPBeginner Support
Hey Dawn,
Please try these WordPress troubleshooting steps to figure out what’s causing the issue.
Victor
Hey, Tony. How do you managed the problem with MySQL version? I’m getting the same error here and have no idea where to start. Could you clarify this for me?
Victor
Hello, I managed to bypass this issue, but now I’m with a different one.
All my pages, including WP admin (login, dashboard etc) are showing in plain HTLM. As if there no layout and styling. What could it be?
goutam majumder
Thanks so much for this detail steps. You saved my day.
God bless you
Che Devert
Such a wonderful write up. Thanks.
H Finn
This tutorial is excellent. As long as you follow the steps, and you have no problems on your own end – it works like a charm.
Thank you for this post.
Mohanraj
Hello Friends,
I have done one WordPress project in Local Server. I need to upload wp project in a Sub-Directory. Tell me the Procedures
Stephanie
Hi
I transfered a local website to my live server and followed all steps. I just updated all the URL found with localhost:888 by my final URL
All pages are fine except one where I lost one slider and one table on the page.
Anyone to help me please?
Alex Hammerschmied
I also appreciate this post very much!
It becomes handy everytime i need to walk threw a migration…
Thx for that! And keep on the good work!
Best,
Alex
WPBeginner Support
Hey Alex,
We are glad you find it helpful Don’t forget to join us on Twitter for more WordPress tips and tutorials.
Admin