Viele Benutzer von WordPress ziehen es vor, an ihren Websites über einen lokalen Server auf ihrem Computer zu arbeiten. So können Sie privat an Ihrer Website arbeiten, bevor Sie die Änderungen online zur Verfügung stellen.
Schließlich müssen Sie sie auf einen Live-Server verschieben, um sie für Online-Besucher zugänglich zu machen. Dieser Übergang ist wichtig, um sicherzustellen, dass Ihre Website auf der Live-Site ordnungsgemäß funktioniert.
Wir haben an vielen lokalen Websites gearbeitet und mussten daher lernen, wie man Inhalte am einfachsten auf Live-Websites übertragen kann.
In diesem Artikel geben wir Ihnen eine schrittweise Anleitung, wie Sie WordPress von einem lokalen Server auf eine Website umziehen können.
Warum WordPress von einem lokalen Server auf eine Live-Site verschieben?
Die Erstellung Ihres WordPress-Blogs auf einem lokalen Server ist ein sicherer Weg, um Änderungen an Ihrer Website zu testen, ohne die Besucher zu beeinträchtigen.
Wenn Sie Ihre Website perfektioniert haben, ist der nächste Schritt der Umzug von Ihrem lokalen Server auf eine Live-Site.
Wir zeigen Ihnen zwei Möglichkeiten, wie Sie Ihre Website von einem lokalen Server auf eine Live-Site übertragen können.
Die erste Methode verwendet ein WordPress-Migrations-Plugin und ist für Anfänger zu empfehlen.
In der zweiten Methode zeigen wir Ihnen, wie Sie WordPress manuell von einem lokalen Server auf eine Live-Site verschieben können.
Sie können die Methode wählen, die für Sie am besten geeignet ist:
Bevor Sie Ihre WordPress-Website migrieren
Um WordPress von einem lokalen Server auf einen Live-Server zu migrieren, müssen Sie einige Vorkehrungen treffen.
Zunächst gehen wir davon aus, dass Sie eine WordPress Website auf einem lokalen Server (auch localhost genannt) auf Ihrem Computer laufen haben und dass Sie vollen Zugriff darauf haben.
Als Nächstes benötigen Sie einen Domänennamen und Webhosting.
Wir haben unzählige Geschichten von Anfängern gehört, die mit schlechten oder kostenlosen Hosting-Anbietern angefangen und es bereut haben. Nach unserer Erfahrung ist die Wahl des richtigen Hosting-Anbieters entscheidend für den Erfolg einer Website.
Um Ihnen die Entscheidung zu erleichtern, empfehlen wir Bluehost. Bluehost ist ein offiziell empfohlener WordPress-Hosting-Anbieter und bietet WPBeginner-Nutzern einen exklusiven Rabatt sowie eine kostenlose Domain und SSL.
Im Grunde können Sie schon für 1,99 $ pro Monat einsteigen.
Wenn Sie eine gute Bluehost-Alternative suchen, können Sie sich Hostinger ansehen. Sie bieten auch einen exklusiven Rabatt für WPBeginner-Nutzer mit einem kostenlosen Domainnamen.
Wenn Sie es sich leisten können, ein wenig mehr zu bezahlen, dann schauen Sie sich SiteGround an. Sie haben auch ein spezielles Angebot für WPBeginner-Leser.
Wenn Sie Hilfe bei der Einrichtung Ihrer Website benötigen, folgen Sie unserer Schritt-für-Schritt-Anleitung für die Erstellung einer Website.
Schließlich benötigen Sie ein FTP-Programm und müssen wissen , wie Sie FTP verwenden, um Ihre lokale Server-Site auf die Live-Site hochzuladen.
Sind Sie bereit? Beginnen wir mit der Migration Ihrer WordPress-Website.
Video-Anleitung
Wenn Sie eine schriftliche Anleitung bevorzugen, dann lesen Sie einfach weiter.
Methode 1: Übertragen von WordPress vom lokalen Server auf die Live-Site mithilfe eines Migrations-Plugins (empfohlen)
Diese Methode ist einfacher und wird für Anfänger empfohlen. Wir werden ein WordPress-Migrations-Plugin verwenden, um WordPress vom lokalen Host auf eine Live-Site zu verschieben.
Schritt 1: Installieren und Einrichten des Duplicator-Plugins
Zunächst müssen Sie das Duplicator-Plugin auf Ihrer lokalen Website installieren und aktivieren. Weitere Einzelheiten finden Sie in unserer Schritt-für-Schritt-Anleitung für die Installation eines WordPress-Plugins.
Profi-Tipp: Es gibt auch eine Pro-Version von Duplicator, die sichere Backups, Cloud-Speicher, einfache Wiederherstellung von Websites und mehr bietet.
Nach der Aktivierung müssen Sie auf die Seite Duplicator ” Backups gehen und auf die Schaltfläche “Neu erstellen” klicken.
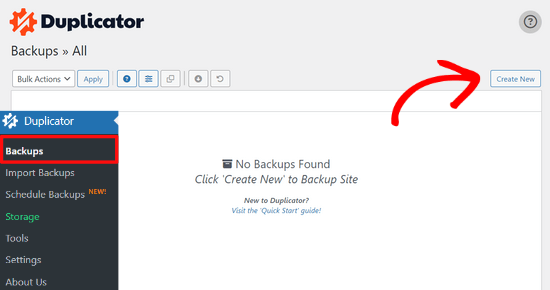
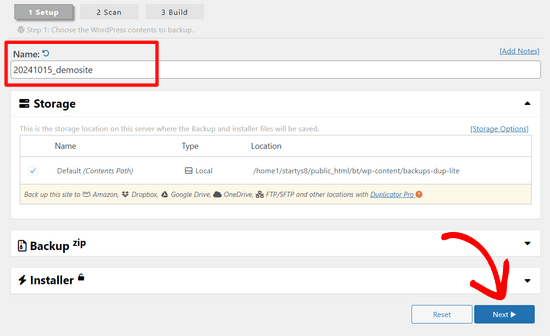
Daraufhin wird ein Bildschirm angezeigt, in dem Sie der Sicherung einen Namen geben können.
Klicken Sie dann auf die Schaltfläche “Weiter”.
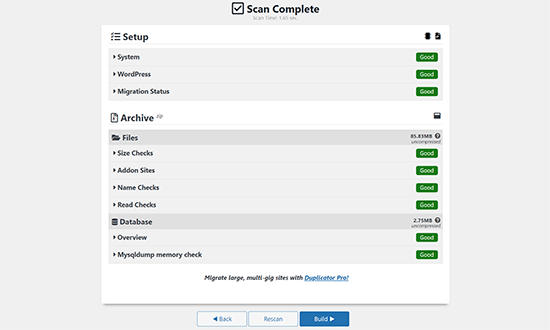
Duplicator führt nun einige Tests durch, um festzustellen, ob alles in Ordnung ist.
Wenn alle Punkte mit “Gut” markiert sind, klicken Sie auf den Button “Erstellen”.
Dieser Vorgang kann einige Minuten dauern, je nach Größe Ihrer Website. Sie müssen diesen Tab geöffnet lassen, bis er abgeschlossen ist.
Wenn Sie fertig sind, sehen Sie Download-Optionen für “Installer”- und “Archiv”-Pakete. Sie müssen auf die Schaltfläche “Beide Dateien herunterladen” klicken, um beide Dateien auf Ihren Computer herunterzuladen.
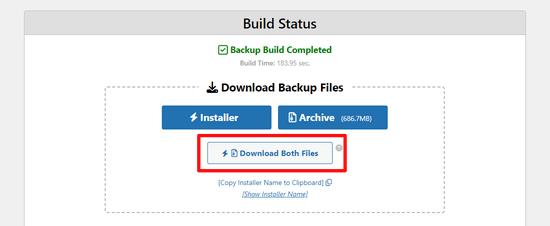
Die “Archiv”-Datei ist eine vollständige Kopie Ihrer WordPress-Website. Sie enthält alle WordPress-Kerndateien sowie Ihre Bilder, Uploads, Themes, Plugins und ein Backup Ihrer WordPress-Datenbank.
Die “Installer”-Datei ist ein Skript, das den gesamten Migrationsprozess automatisiert, indem es die Archivdatei mit Ihrer Website entpackt.
Schritt 2: Erstellen Sie eine Datenbank für Ihre Live-WordPress-Website
Bevor Sie das Installationsprogramm ausführen oder die WordPress-Website von localhost auf Ihren Hosting-Server hochladen können, müssen Sie eine MySQL-Datenbank für Ihre neue Live-Website erstellen.
Wenn Sie bereits eine MySQL-Datenbank erstellt haben, können Sie diesen Schritt überspringen.
Um eine Datenbank zu erstellen, müssen Sie das cPanel-Dashboard Ihres Hosting-Accounts aufrufen. Suchen Sie dann den Abschnitt “Datenbanken” und klicken Sie auf das Symbol “MySQL-Datenbank-Assistent”.
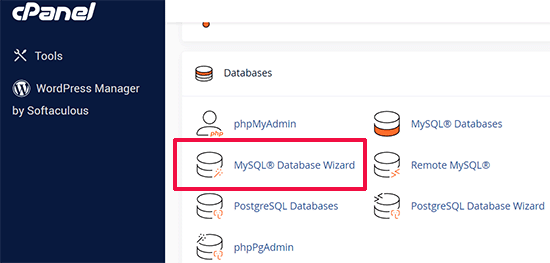
Auf dem nächsten Bildschirm gibt es ein Feld zum Erstellen einer neuen Datenbank.
Geben Sie einfach einen Namen für Ihre Datenbank ein und klicken Sie auf die Schaltfläche “Datenbank erstellen”.

cPanel wird nun eine neue Datenbank für Sie erstellen.
Danach müssen Sie einen Benutzernamen und ein Passwort für Ihren neuen Benutzer eingeben und dann auf die Schaltfläche “Benutzer erstellen” klicken.
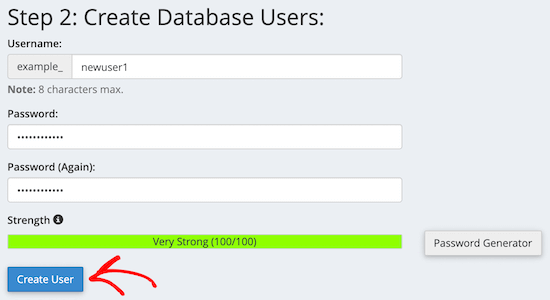
Als nächstes müssen Sie den soeben erstellten Benutzer zur Datenbank hinzufügen.
Klicken Sie zunächst auf das Kontrollkästchen “Alle Berechtigungen”.
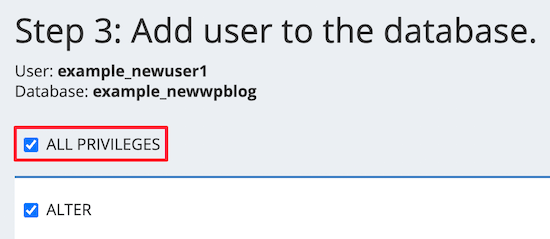
Blättern Sie dann nach unten und klicken Sie auf die Schaltfläche “Änderungen vornehmen”, um Ihre Änderungen zu speichern.
Ihre Datenbank ist nun bereit, mit Ihrer WordPress-Website verwendet zu werden. Notieren Sie sich unbedingt den Namen der Datenbank, den Benutzernamen und das Passwort. Sie werden diese Informationen im nächsten Schritt benötigen.
Schritt 3: Upload von Dateien vom lokalen Server auf die WordPress-Live-Website
Nun müssen Sie das Archiv und die Installationsdateien von Ihrer lokalen Website auf Ihr Hosting-Konto hochladen.
Stellen Sie zunächst mit einem FTP-Client eine Verbindung zu Ihrer Live-Website her. Vergewissern Sie sich nach der Verbindung, dass das Stammverzeichnis Ihrer Website völlig leer ist.
Normalerweise ist das Stammverzeichnis der Ordner /home/public_html/.
Einige WordPress-Hosting-Unternehmen installieren WordPress automatisch, wenn Sie sich anmelden. Wenn Sie dort WordPress-Dateien haben, müssen Sie diese löschen.
Danach können Sie die Dateien archive.zip und installer.php von Duplicator in Ihr leeres Stammverzeichnis hochladen.

Schritt 4: Ausführen des Migrationsskripts
Nachdem Sie die Migrationsdateien hochgeladen haben, müssen Sie die folgende URL in Ihrem Browser aufrufen:
http://example.com/installer.php
Vergessen Sie nicht, “example.com” durch Ihren eigenen Domänennamen zu ersetzen.
Dadurch wird der Duplicator-Migrationsassistent gestartet.
Das Installationsprogramm führt ein paar Tests durch und initialisiert das Skript.
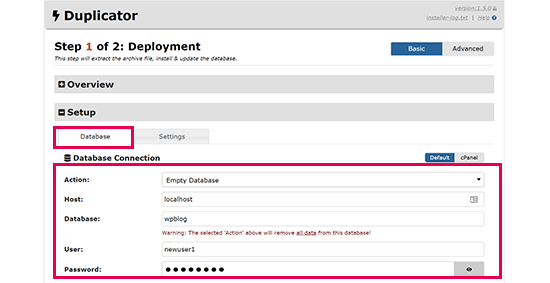
Im Abschnitt Setup werden Sie aufgefordert, den MySQL-Host, den Datenbanknamen, den Benutzernamen und das Passwort einzugeben.
Ihr Host wird wahrscheinlich ein lokaler Host sein. Danach geben Sie die Details der Datenbank ein, die Sie im vorherigen Schritt erstellt haben.
Klicken Sie dann auf die Schaltfläche “Validieren”, um sicherzustellen, dass die eingegebenen Daten korrekt sind.
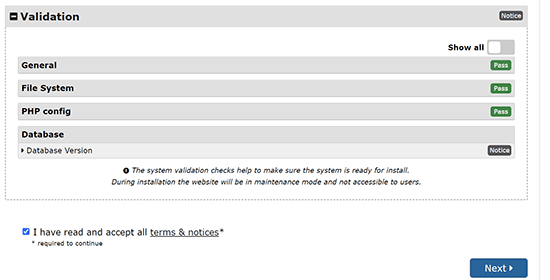
Klicken Sie anschließend auf die Schaltfläche “Weiter”, um fortzufahren.
Duplicator importiert nun die Sicherung Ihrer WordPress-Datenbank aus dem Archiv in Ihre neue Datenbank.
Außerdem werden die URLs aktualisiert, die auf die lokale Website und Ihre neue Website verweisen.
Sie können nun auf die Schaltfläche “Admin Login” klicken, um in den WordPress-Administrationsbereich Ihrer Live-Site zu gelangen.

Sobald Sie sich bei Ihrer Live-Site anmelden, bereinigt Duplicator automatisch die Installationsdateien.
Das war’s schon. Sie haben WordPress erfolgreich vom lokalen Server auf Ihre Live-Site verschoben.
Methode 2: Manuelle Übertragung von WordPress vom lokalen Server auf die Live-Site
In dieser Methode zeigen wir Ihnen, wie Sie WordPress manuell vom lokalen Server auf Ihre Live-Site verschieben können. Sie ist nützlich, wenn die erste Methode nicht funktioniert oder wenn Sie es lieber manuell machen möchten.
Schritt 1: Lokale WordPress-Datenbank exportieren
Als Erstes müssen Sie Ihre lokale WordPress-Datenbank exportieren. Wir werden dafür phpMyAdmin verwenden.
Wenn Sie damit nicht vertraut sind, sollten Sie einen Blick auf unsere Anleitung zur WordPress-Datenbankverwaltung mit phpMyAdmin werfen.
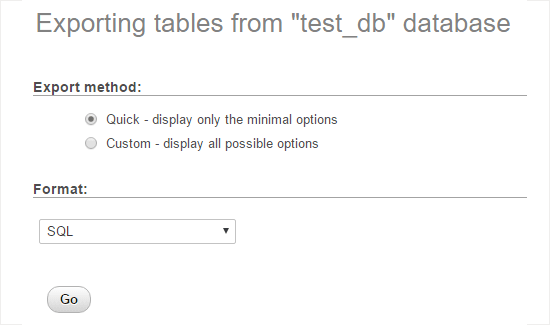
Gehen Sie einfach auf http://localhost/phpmyadmin/ und klicken Sie auf Ihre WordPress-Datenbank. Klicken Sie dann auf die Schaltfläche “Exportieren” in der oberen Menüleiste.

In der Option “Exportmethode:” können Sie “Schnell” oder “Individuell” wählen. Die Option “Individuell” bietet Ihnen mehr Optionen für den Export Ihrer Datenbank.
Wir empfehlen jedoch, “Schnell” zu wählen und dann auf die Schaltfläche “Los” zu klicken, um Ihre Datenbank herunterzuladen.
Schritt 2: WordPress-Dateien auf die Live-Site hochladen
Nun müssen wir alle Dateien Ihrer Website auf die Live-Site verschieben.
Um loszulegen, öffnen Sie Ihren FTP-Client und verbinden Sie sich mit Ihrem Webhosting-Konto.
Sobald Sie mit Ihrer Website verbunden sind, stellen Sie sicher, dass Sie die Dateien in das richtige Verzeichnis hochladen. Wenn Sie zum Beispiel möchten, dass die Website auf “yourite.com” gehostet wird, müssen Sie alle Dateien in Ihr Verzeichnis public_html hochladen.
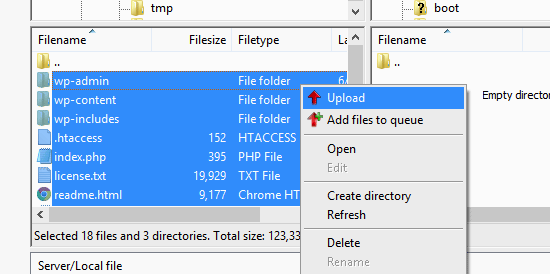
Wählen Sie nun Ihre lokalen WordPress-Dateien aus und laden Sie sie auf Ihren Live-Server hoch.
Schritt 3: Erstellen Sie eine MySQL-Datenbank auf Ihrer Live-Site
Während Ihr FTP-Client Ihre WordPress-Dateien hochlädt, können Sie damit beginnen, Ihre Datenbank auf den Live-Server zu importieren.
Die meisten Hosting-Anbieter von WordPress bieten cPanel zur Verwaltung Ihres Kontos an. Wir zeigen Ihnen, wie Sie eine Datenbank mit cPanel erstellen.
Melden Sie sich zunächst in Ihrem cPanel-Dashboard an und klicken Sie auf das Symbol “MySQL-Datenbank-Assistent”, das Sie im Abschnitt “Datenbanken” finden.

Auf dem nächsten Bildschirm können Sie eine neue Datenbank anlegen.
Geben Sie einen Namen für Ihre Datenbank ein und klicken Sie dann auf “Datenbank erstellen”.

cPanel wird nun automatisch eine neue Datenbank für Sie erstellen.
Als nächstes müssen Sie einen Benutzernamen und ein Passwort für Ihren neuen Benutzer eingeben und dann auf “Benutzer erstellen” klicken.
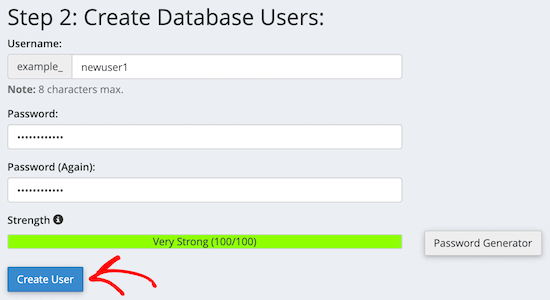
Danach müssen Sie den soeben erstellten Benutzer in die Datenbank aufnehmen.
Aktivieren Sie zunächst das Kontrollkästchen “Alle Berechtigungen”.
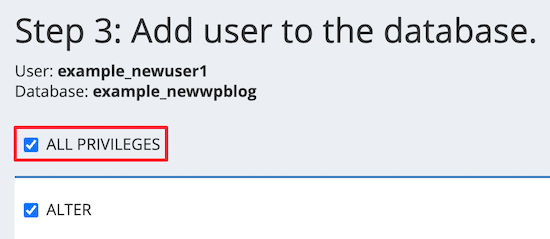
Blättern Sie dann nach unten und klicken Sie auf “Änderungen vornehmen”, um Ihre Änderungen zu speichern.
Sie haben erfolgreich eine neue Datenbank für Ihre Live-WordPress-Site erstellt.
Schritt 4: WordPress-Datenbank in die Live-Site importieren
Der nächste Schritt ist der Import Ihrer WordPress-Datenbank.
Gehen Sie zu Ihrem cPanel Dashboard, scrollen Sie nach unten zum Abschnitt ‘Datenbanken’ und klicken Sie auf ‘phpMyAdmin’.
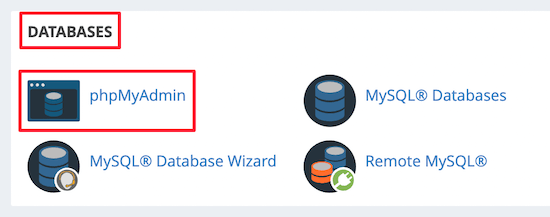
Dies führt Sie zu phpMyAdmin, wo Sie auf die Datenbank klicken, die Sie gerade erstellt haben. phpMyAdmin zeigt Ihre neue Datenbank ohne Tabellen an.
Klicken Sie dann im oberen Menü auf die Registerkarte “Importieren”. Klicken Sie auf der Importseite auf die Schaltfläche “Datei auswählen” und wählen Sie dann die Datenbankdatei von der lokalen Website, die Sie im ersten Schritt gespeichert haben.
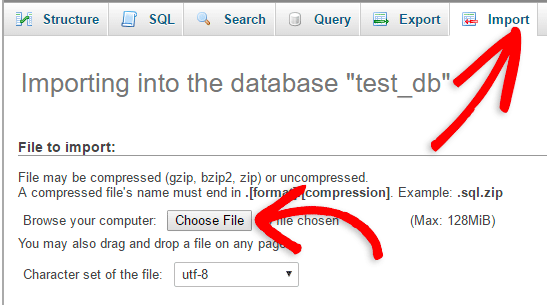
Klicken Sie anschließend auf die Schaltfläche “Go” unten auf der Seite. Ihre Datenbank wird automatisch in phpMyadmin importiert.
Schritt 5: Ändern Sie die URL der Website
Nun müssen Sie die Website-URL in Ihrer Datenbank ändern, damit sie sich mit Ihrer Live-WordPress-Site verbindet.
Suchen Sie in phpMyAdmin nach der Tabelle wp_options in Ihrer Datenbank, die Sie oben importiert haben.
Wenn Sie Ihr Datenbankpräfix geändert haben, könnte es statt wp_options {new_prefix}_options heißen.
Klicken Sie dann auf die Schaltfläche “Durchsuchen” neben wp_options. Oder klicken Sie auf den Link in der Seitenleiste, um die Seite mit einer Liste der Felder in der Tabelle wp_options zu öffnen.
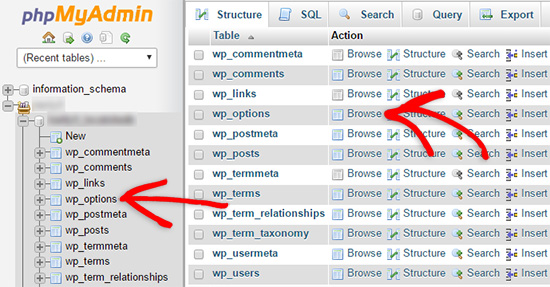
Dann müssen Sie in der Spalte options_name nach der Option siteurl suchen.
Klicken Sie dann auf das Symbol “Bearbeiten”.

Daraufhin öffnet sich ein Fenster, in dem Sie das Feld bearbeiten können.
Im Eingabefeld option_value sehen Sie die URL Ihrer lokalen Installation, die etwa http://localhost/test lautet.
In dieses Feld müssen Sie die URL Ihrer neuen Website eingeben, z. B. https://www.wpbeginner.com.
Anschließend können Sie das Feld speichern, indem Sie auf die Schaltfläche “Go” klicken.
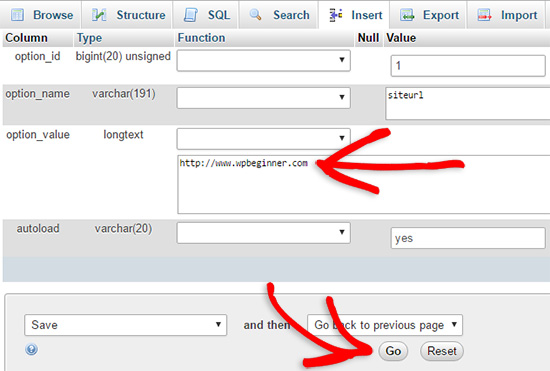
Als nächstes müssen Sie die gleichen Schritte wie oben für den Namen der Home-Option ausführen. Das Menü wp_options kann einige Seiten lang sein. Normalerweise befindet sich die Home-Option auf der zweiten Seite.
Aktualisieren Sie dann die Home-URL, damit sie mit der URL Ihrer Live-Site übereinstimmt.
Schritt 6: Einrichten Ihrer Live-Site
Nachdem Sie nun die Datenbank importiert und Ihre Inhalte hochgeladen haben, ist es an der Zeit, WordPress zu konfigurieren.
Zu diesem Zeitpunkt sollte auf Ihrer Website die Fehlermeldung“Fehler beim Herstellen einer Datenbankverbindung” angezeigt werden.
Um dies zu beheben, verbinden Sie sich mit einem FTP-Client mit Ihrer Website und öffnen Sie die Datei wp-config.php.
Sie werden nach den folgenden Codezeilen suchen:
1 2 3 4 5 6 7 8 9 | // ** MySQL settings - You can get this info from your web host ** ///** The name of the database for WordPress */define( 'DB_NAME', 'database_name_here' );/** MySQL database username */define( 'DB_USER', 'username_here' );/** MySQL database password */define( 'DB_PASSWORD', 'password_here' );/** MySQL hostname */define( 'DB_HOST', 'localhost' ); |
Sie müssen den Datenbanknamen, den Benutzernamen und das Passwort angeben, die Sie zuvor erstellt haben.
Speichern Sie anschließend die Datei wp-config.php und laden Sie sie zurück auf Ihren WordPress-Hosting-Server.
Wenn Sie jetzt Ihre Website besuchen, sollte sie live sein.
Danach müssen Sie sich in Ihr WordPress-Administrationspanel einloggen und zu den Einstellungen ” Allgemein gehen. Dann, ohne etwas zu ändern, scrollen Sie zum Ende und klicken Sie auf die Schaltfläche “Änderungen speichern”.
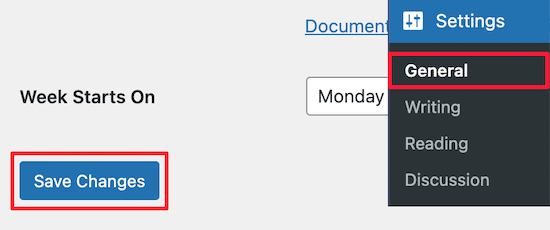
Dadurch wird sichergestellt, dass die URL Ihrer Website überall dort korrigiert wird, wo sie sein muss.
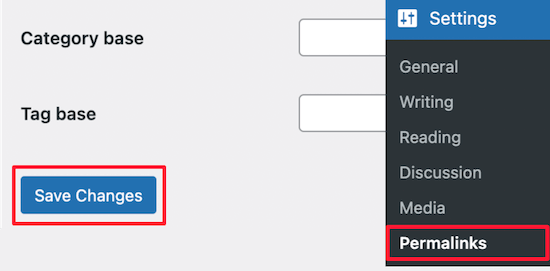
Wenn Sie das getan haben, gehen Sie zu Einstellungen ” Permalinks, scrollen Sie nach unten und klicken Sie auf “Änderungen speichern”, um sicherzustellen, dass alle Beitragslinks funktionieren.
Schritt 7: Bilder und defekte Links durch Aktualisierung der Pfade reparieren
Wenn Sie eine WordPress-Site von einer Domain auf eine andere oder von einem lokalen Server auf eine Live-Site verschieben, werden Sie mit defekten Links und fehlenden Bildern konfrontiert.
Wir zeigen Ihnen zwei Möglichkeiten zur Aktualisierung von URLs. Sie können diejenige wählen, die für Sie am besten geeignet ist.
1. URLs mit dem Plugin “Search & Replace Everything” aktualisieren (empfohlen)
Der sicherste Weg, dies zu beheben, ist die Verwendung von Search & Replace Everything. Dabei handelt es sich um ein leistungsstarkes WordPress Plugin, mit dem Sie problemlos Massenaktualisierungen auf Ihrer Website durchführen können, ohne komplexe Abfragen an die Datenbank zu stellen.
Zunächst müssen Sie das Plugin Search & Replace Everything installieren und aktivieren.
Gehen Sie nach der Aktivierung auf die Seite Werkzeuge ” WP Suchen & Ersetzen.
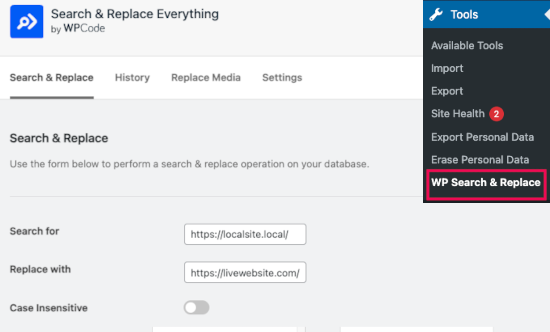
Hier müssen Sie die URL Ihrer lokalen Website in das Feld “Suchen nach” und die URL Ihrer Live-Website in das Feld “Ersetzen durch” eingeben.
Scrollen Sie ein wenig und klicken Sie unter den Tabellen auf “Alle auswählen”. Dadurch wird sichergestellt, dass das Plugin überall in der Datenbank nach der alten URL sucht.
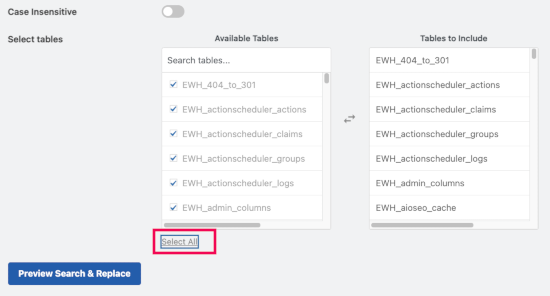
Klicken Sie nun auf den Button “Vorschau Suchen & Ersetzen”, um fortzufahren.
Das Plugin durchsucht Ihre Datenbank nach allen Instanzen der alten URL und zeigt dann eine Vorschau der Ergebnisse an.
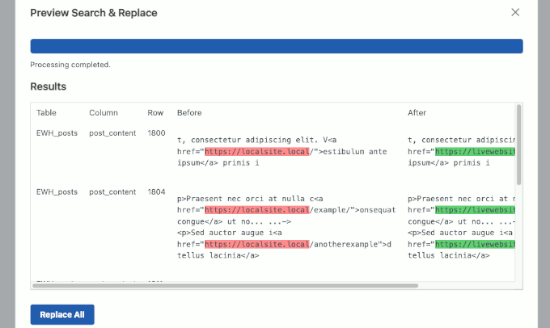
Wenn alles gut aussieht, klicken Sie auf “Alles ersetzen”, um die Änderungen zu speichern.
Sie erhalten eine Warnung über die Änderungen, die Sie vornehmen. Klicken Sie auf “Ja”, um fortzufahren.
Das Plugin wird nun die Datenbank aktualisieren und die lokalen URLs durch die aktuelle URL Ihrer Website ersetzen.
2. URLs manuell aktualisieren (Erweitert)
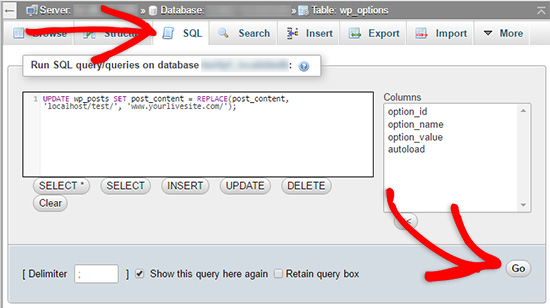
Eine andere Möglichkeit, die URLs zu aktualisieren, ist die folgende SQL-Abfrage:
1 | UPDATE wp_posts SET post_content = REPLACE(post_content, 'localhost/test/', 'www.yourlivesite.com/'); |
Gehen Sie einfach zu phpMyAdmin, klicken Sie auf Ihre Datenbank und dann im oberen Menü auf ‘SQL’ und fügen Sie die obige Abfrage hinzu.
Vergewissern Sie sich, dass Sie die URLs Ihrer lokalen Website und Ihrer Live-Website eingeben, und klicken Sie auf den Button “Go”.
Das war’s. Sie haben WordPress nun erfolgreich von Ihrem lokalen Server auf eine Live-Site migriert.
Hoffentlich funktioniert Ihre Live-Website jetzt reibungslos. Wenn Sie Fehler bemerken, können Sie unseren Leitfaden zu häufigen WordPress-Fehlern lesen, um Hilfe bei der Problembehandlung zu erhalten.
Wir hoffen, dass dieser Artikel Ihnen geholfen hat, WordPress von einem lokalen Server auf eine Live Website zu übertragen. Vielleicht interessiert Sie auch unser Leitfaden für den Umzug einer Live-Website auf einen lokalen Server oder die ultimative Checkliste für die Migration von Websites für praktische WordPress-Migrationsschritte.
Wenn Ihnen dieser Artikel gefallen hat, dann abonnieren Sie bitte unseren YouTube-Kanal für WordPress-Videotutorials. Sie können uns auch auf Twitter und Facebook finden.


Axel
I love this entry, I use it as a checklist every time I make a migration.
WPBeginner Support
Hey Axel,
Glad you find it useful Don’t forget to join us on Twitter for more WordPress tips and tutorials.
Admin
Gary
I keep getting stopped at step 4. when I import my datatbase I get the following error
#1231 – Variable ‘character_set_client’ can’t be set to the value of ‘NULL’
I only have limited sql knowledge and never done anything like this before. any help/guidance would be greatly appreciated
Andrew
Hello,
So I got to step 6 without any issues until my website failing to become live. I went into my wordpress general setting and my site url was still a localhost. Am I suppose to change the site url before I upload it into the ftp program and into my host, or can i leave that as localhost? Or, do i change the site url in wordpress after i’ve uploaded my files into my hosting site?
This page was super helpful, thanks!
Daneesh
Hi. Thanks so much for this, excellent tutorial. I seem to have got stopped at Step 6. I am still getting a “Error establishing database connection” error. DO i need to change the hostname field in the config.php too? and what do i change that to?
Simon
Amazing, it worked, thank you.
sornanun
Thank you very much.
Annete Momanyi
Thank you for the article. I have managed to sort my problem after following these steps.
Arash
Hello there,
I have two questions and I’d be grateful if you could help me!
1) Why do I have two ht-docs and wp-content folders inside my WordPress folder?
2) When I move my WordPress website from a localhost to the live host, It’s possible to remove my localhost or should I keep it forever?
Thanks in advance!
Matze
1) By installing WordPress on your hosted server, these docs/folders will be automatically added. I think while uploading your files from local to live via FTP __ht-docs__ and __wp-content__ just weren’t replaced.
But please check your local files which are normally located in the WAMP/MAMP folders unter __htdocs__ . Are there also two copies of the datas? Then you should find out, which one is the right one …
2) At the time uploading your files from local to live, the local datas are a backup. After some weeks, changing and editing your live site on the server you can delete the locals.
But you should create a backup regular and store the datas local (Quote: “If you are doing this on a regular basis, then we highly recommend that you get BackupBuddy because it will make your life easy. You will thank us for that later”)!
Hope it helps
Starfleet Nnaemeka
Wow! What a wonderful tutorial , seriously i really appreciate the effort you guys brought out to write these tutorial. Thanks it really helped me to set up my website build on wordpress from localhost on wampserver.
Leo Laroche
i have followed all the steps, but when i type in my website the old website comes up. Can someone help me please.
rachel asakome
i have followed steps 1-5, but i am not sure where my site is. sorry it sounds really dumb but i am not great with technology. I have uploaded the files, but when i type in my website the old website comes up
Justas
server DNS address could not be found.
ERR_NAME_NOT_RESOLVED
I changed everything accordingly, but still can’t connect.
Carrie
Could you please explain on how to do this with webmatrix? I have a PC and my wordpress install on my local PC was with webmatrix. I do not have a MAC. Where on webmatrix do I export? I am confused about this. Also, you have create a db in cpanel my sql. Where do I save this new db? On the cpanel someplace or on my local pc hard drive and under what name? I have a domain with go daddy and a web hosting I purchased. They said to do a brand new fresh install of wordpress from there site…. why would I do this? I already have my wordpress via webmatrix on my local pc this is where the website I built resides. How do I get this on my web hosting? Confused on the db stuff and how to get my local wp files/db to my web host. Thank you.
Neo An
Very clear!
Thank you very much!
Milica
This is a great tutorial. Thanks a lot!
Amber
I have followed all of these steps and when I view my site it is showing my content like words and links but none of the decorative stuff or plugins etc. My menus are showing up as just a list of words as if I created a page without any real CSS. My CSS files are not missing so I do not know where the mess up is happening. I tried to do the part about fixing broken links and I am not 100% of what I should put after the localhost part. I used the name of the folder that my entire wordpress database/files/etc are in. I cannot seam to figure out what is going wrong.
Abdul
@AMBER and all those struggling with the same issue, the problem with the deployment process of WordPress’ database is due to the empirical replacement of your local URI with the live site’s URI as explained in this article at Step 7. If you just execute the UPDATE SQL statement as shown, you, most of the time, end up corrupting your database. Why? The reason is simple: WordPress has a way of serializing some metadata for its own convenience. This post explains it pretty well: nacin.com/2010/04/18/wordpress-serializing-data
If you look at this array:
array( ‘apple’, ‘banana’, ‘orange’ ),
when serialized it looks like this:
a:3:{i:0;s:5:”apple”;i:1;s:6:”banana”;i:2;s:6:”orange”;},
where:
– a:3 stands for “array of size 3”
– i:0; i:1; i:2 stand for “integer index 0; integer index 1; integer index 2″ respectively
– s:5:”apple” stands for “string, length 5, data=apple”
– s:6:”banana” stands for “string, length 6, data=banana”, etc.
As you can see, any serialized string is stored along with information about it’s length. So when you do a simple search and replace in your tables, all occurrences will be replaced indeed but the string’s length metadata won’t.
In the case your local URL’s length equals your live site’s URL length, then you’re lucky; if they don’t match then you’re in trouble.
The question now is: “How do I fix this?”. I’m happy to say that, fortunately, there are many plugins that can help you with this but one that’s really simple and good at it is “Better Search Replace”.
Simply install this plugin in your local WordPress installation and proceed as explained in this article. The only place where you can safely replace your local URL is in the wp_options table as explained at Step 5.
Once you’re done installing the plugin, in the admin panel, go to “Tools, Better Search Replace”, in the “Search” text box type your local site’s URL (e.g. http://localhost:12345) and in the “Replace with” text box, type your live site’s URL (e.g. http://www.example.com) and you should be ready to go. Just make sure you don’t include any trailing forward slash “/” in the URL (at the end like http://localhost:12345/ or http://www.example.com/)
I hope this explanation was useful and please let me know if it helped.
Happy coding!
Simon
Hi,
Brilliant article and very easy to follow.
However, as a WordPress virgin I am struggling with the whole concept of having a separate database from the website. I have created everything locally on my PC. But the local PHP Admin will allow me to use however many characters i like in naming my database but my remote server/host (123-reg) will only allow 9 (my original had 11) so…. the database name locally is different from the database name remotely. I have exported the database tables and imported them in to the remote database, renamed my wp-config to point to the new shorter database name with the correct user name and password but i am still getting the ‘Error establishing a database connection’
message. Any suggestions?
Could the fact that the tables are exported from a database with a different name from the one they are being imported to make a difference?
Gabriel
Hello I made all of your steps but I can see only a white page. It doesn’t notify me an error.
I upload everything in a subdirectory of my website. It’s because of that? Is there a solution?
Patrick Hasch
Great article, if the upload of zipped files doesn’t work try uploading .sql files instead.
Tony
I also faced the same problem.
John James
Hello. From your step 6, you said we should change database name, user and password. Are we supposed to change the hostname too?
WPBeginner Support
See step 3 to find out your hostname and use that instead.
Admin
John
Step 3 says nothing about host names.
WPBeginner Support
When you are creating a database on your webhost, you will be able to see the hostname. If you don’t then this means you are using localhost.
Mohd Hasan
i followed all steps but going to install.php page , someone can help me , i really need your help
Gabor
Hello!
i have 500 internal error on server.
I think the problem is with .htaccess.
Can u help in this?
Dawn
I am having this same issue. I followed every step exactly, I fixed the wp-config.php file and re-uploaded it, but now when I go to my live site it says,
“This page isn’t working
[my site] is currently unable to handle this request.
HTTP ERROR 500”
Dawn
I should have said that that is the error I get when I try to go to my wp-admin. When I go to the site itself it’s blank.
Axel
The solution for image references is to execute the following scripts on your DB:
(I can’t write the real scripts because wpbeginner.com thinks I’m doing SQL injection :\ )
UPDATE wp_posts to set the value of column guid to the value of function REPLACE(guid, ‘http://old.site.url’, ‘http://new.site.url’)
AND
UPDATE wp_postmeta to SET the value of column meta_value to the value of function REPLACE(meta_value, ‘http://old.site.url’, ‘http://new.site.url’)
Also don’t forget to check permissions for wp-content/uploads to ensure you can add more images.
Aimy
Hi,
Thanks for this. I did everything as you described. It seemed that everything went well apart the front page that shows nothing but just the navigation menu.
When I go to the page builder of the front page it shows that there is nothing added there.
Any advice?
Krishna
Dear wpbeginner owner
Its working for me !
thank you very much!
Philippe
Damn I’m so lucky wpbeginner exists, I’ve finally managed to get my website to work thanks to this post, I had to fight my way trough (there is an older database-version on my webhosts server) but I did it thanks to you guys!
Umai Hassan
URL Changing
I have changed the URL in wp_option table but only home page loads correctly other pages links are still set to localhost/something ??
What should I do to change all links??
Cos
Brilliant article – thanks! Got through the process without a hitch first-off :-)))
Dan Odaka
Hey, after doing all that, when I go to my site I get a page that shows me the index of wordpress and not my site. what do I do?
WPBeginner Support
This could happen due to an incomplete file transfer. Try to upload your WordPress files again.
Admin
Sonja
Hi. thank you very much for this post. It seems to be very helpful and I’ve tried to follow every step, but now that I’m done, when I go to my URL I get a “Server not found” error (The host shows me a preview with “under-construction” and their logo, which was online before I uploaded the data and database – shouldn’t I at least get that?). Do you have any ideas where I might have gone wrong, and is it best to delete everything and start again from scratch, or overwrite it, or look for any particular errors?
Thank you for any help!
WPBeginner Support
You may have installed WordPress outside your public directory.
Admin
Hugues Pinsonneault
im wondering if you have any recommendation for developing locally new functionalities on a local dev install, while the client can still do updates on the real database.
shah
Hi
Thankyou for the details, but i am still not able to get the path of images correct inspite of the changes done … i have my folders in public_html and have my db created …my live website is working fine except for the pic / logos
zarna
My wordpress site went live but my images are not getting replicated and they aren’t visible. Can you please guide me what should be the images folder structure while uploading it to live ??
Your help and guidance would be appreciable.. Thank you.
Coil McCoy
Great post !!!
Only the last part doesn’t worked for me, the pictures and links still missing !
Any clue?
thank you
Vinish Chaudhary
Hello,
All great beside this You don’t have permission to access / on this server.Don’t know why it is showing when I try to access my site.I have done all steps like you said but getting this error can anyone please help me to solve this problem.
Sudais
Instead of this long way,I use a plugin called wp all in one migration,I just need to import a single file using a plugin when I go live and all done,no playing with databases,etc.I think everyone should do that saves alot of time and handywork.
hiren
can u put the demo ..
thanks.
hiren patel.
Paul
Great article ! But I’m still stuck at the last step. Images aren’t showing on my website.
Well in fact they does, but only on my PC. Everybody else is getting a buggy website.
Farooq Bashir
Wow .. Great Article sir
Its Perfect Working.
Thanks
Bikram Ray
Hi,
No doubt; a very useful article. But I got stuck in the last step. I ran the SQL update query but still having issues regarding image path.
Just one thing; while uploading the file through FTP, I did not upload the wordpress folder (the test folder) rather I uploaded whatever inside it.. So in the server there is only the folders and files directly placed under ‘public_html ‘
Regards,
Bikram
Kay
DIDN’T WORK!!
Error
SQL query:
—
— Database: `wordpress`
—
CREATE DATABASE IF NOT EXISTS `wordpress` DEFAULT CHARACTER SET utf8 COLLATE utf8_general_ci;
MySQL said: Documentation
#1044 – Access denied for user ‘ksalim’@’localhost’ to database ‘wordpress’
WPBeginner Support
Please check your database name, mysql username and password.
Admin
Damilola
A very awesome article, it really made a project i was working on for a client already on my local machine easy to move to his server, i mean i literally tried to develop the website all over again and it was such a pain in the ass….Thank you
WPBeginner Support
Glad you found it helpful. Don’t forget to join us on Facebook for more WordPress tips and tutorials.
Admin
Tim Vincent
Thank you so much for this guide. I struggled doing this for some time before finding this. I followed it word for word and all seems to work. I am very grateful!
WPBeginner Support
We are glad you found it helpful. Don’ forget to follow us on Twitter for more WordPress tips and tutorials.
Admin
sonu
hello! syed
i want to ask you to from where i get the best free wordpress simple attractive theme which laterly i planned to upload on the live server….any help would be much appreciated….thanks…
WPBeginner Support
See our list of 37 simple WordPress themes you should try.
Admin
sonu
hello! syed
i want to ask you when we upload the worpress site from locahost to live server….i just want to ask the wordpress having lot of files and inside the wp-content/themes/… having three different types of theme like twenty fourteen,twenty thirteen ,so is it needed to upload all these themes or not….help would be much appreciated…..thnks…..
Ridhik
No,u just upload the theme folder that currently activated in your site.
Andres Paz Soldan
Thank you! This was very useful!
WPBeginner Support
Hi Andres, glad you found it useful.
Admin
Lellys
First of, thank you!
I did everything and my site is working, but when I need to login on my wp-admin, it show me a blank screen and nothing happens. Any idea?
paddy lutaaya
thank you for this article i have followed the steps and uploaded my website to c panel but it has failed to work it brings internal error please help me solve this thank you
WPBeginner Support
Please see our guide on how to fix internal server error in WordPress.
Admin
Phillip Pilkington
Allgreat advise except step 6. I have not got past this stage, the advice is not clear. My website shows the Error Establishing Database Connection. This next part doesn’t explain anything to me.
“To fix this, connect to your website using an FTP client and edit wp-config.php file. Provide the database name, user and password you created earlier in Step 3. Save the wp-config.php file and upload it back to your server. Visit your website, and it should be live now. ”
I am connect via ftp, then just edit the file….no, nothing happens from here.I open the file in aneditor but I don’t make any changes because it does not show anything about whatis expalined.
Regards,
Tyler Hall
Hey, I am currently transferring the files as we speak. Not sure if you found a solution yet (hopefully you have its been 15 days) but you should probably change the hostname: /** MySQL hostname */
define(‘DB_HOST’, ‘ ‘ your hostname before should have been your localhost or similar.
Himanshu
Thanks for the post. Really helped solve my problem. Although I faced some issues with database importing. After much effort, updating the phpmyadmin version fixed it for me. If possible you could also include common errors in each section, so that a beginner doesn’t get lost. As it happens, most likely you are going to face some error here and there. Other than that great post. Thanks.
WPBeginner Support
@Himanshu Thanks for the Feedback, we really appreciate it.
Admin
Ola
Hi,
Thanks for this, the steps are so direct and you made WordPress uploading fun.
Andy
Hi. When I go to my website it says Welcome to: yourwebsite.com
This Web page is parked for FREE, courtesy of GoDaddy.com. Do I have to register my domain? I just thought of a random website name to put in for the changing site url step 5. Also when I enter the local host site I get the message the webpage could not be found. What should I do?