Viele Benutzer von WordPress ziehen es vor, an ihren Websites über einen lokalen Server auf ihrem Computer zu arbeiten. So können Sie privat an Ihrer Website arbeiten, bevor Sie die Änderungen online zur Verfügung stellen.
Schließlich müssen Sie sie auf einen Live-Server verschieben, um sie für Online-Besucher zugänglich zu machen. Dieser Übergang ist wichtig, um sicherzustellen, dass Ihre Website auf der Live-Site ordnungsgemäß funktioniert.
Wir haben an vielen lokalen Websites gearbeitet und mussten daher lernen, wie man Inhalte am einfachsten auf Live-Websites übertragen kann.
In diesem Artikel geben wir Ihnen eine schrittweise Anleitung, wie Sie WordPress von einem lokalen Server auf eine Website umziehen können.
Warum WordPress von einem lokalen Server auf eine Live-Site verschieben?
Die Erstellung Ihres WordPress-Blogs auf einem lokalen Server ist ein sicherer Weg, um Änderungen an Ihrer Website zu testen, ohne die Besucher zu beeinträchtigen.
Wenn Sie Ihre Website perfektioniert haben, ist der nächste Schritt der Umzug von Ihrem lokalen Server auf eine Live-Site.
Wir zeigen Ihnen zwei Möglichkeiten, wie Sie Ihre Website von einem lokalen Server auf eine Live-Site übertragen können.
Die erste Methode verwendet ein WordPress-Migrations-Plugin und ist für Anfänger zu empfehlen.
In der zweiten Methode zeigen wir Ihnen, wie Sie WordPress manuell von einem lokalen Server auf eine Live-Site verschieben können.
Sie können die Methode wählen, die für Sie am besten geeignet ist:
Bevor Sie Ihre WordPress-Website migrieren
Um WordPress von einem lokalen Server auf einen Live-Server zu migrieren, müssen Sie einige Vorkehrungen treffen.
Zunächst gehen wir davon aus, dass Sie eine WordPress Website auf einem lokalen Server (auch localhost genannt) auf Ihrem Computer laufen haben und dass Sie vollen Zugriff darauf haben.
Als Nächstes benötigen Sie einen Domänennamen und Webhosting.
Wir haben unzählige Geschichten von Anfängern gehört, die mit schlechten oder kostenlosen Hosting-Anbietern angefangen und es bereut haben. Nach unserer Erfahrung ist die Wahl des richtigen Hosting-Anbieters entscheidend für den Erfolg einer Website.
Um Ihnen die Entscheidung zu erleichtern, empfehlen wir Bluehost. Bluehost ist ein offiziell empfohlener WordPress-Hosting-Anbieter und bietet WPBeginner-Nutzern einen exklusiven Rabatt sowie eine kostenlose Domain und SSL.
Im Grunde können Sie schon für 1,99 $ pro Monat einsteigen.
Wenn Sie eine gute Bluehost-Alternative suchen, können Sie sich Hostinger ansehen. Sie bieten auch einen exklusiven Rabatt für WPBeginner-Nutzer mit einem kostenlosen Domainnamen.
Wenn Sie es sich leisten können, ein wenig mehr zu bezahlen, dann schauen Sie sich SiteGround an. Sie haben auch ein spezielles Angebot für WPBeginner-Leser.
Wenn Sie Hilfe bei der Einrichtung Ihrer Website benötigen, folgen Sie unserer Schritt-für-Schritt-Anleitung für die Erstellung einer Website.
Schließlich benötigen Sie ein FTP-Programm und müssen wissen , wie Sie FTP verwenden, um Ihre lokale Server-Site auf die Live-Site hochzuladen.
Sind Sie bereit? Beginnen wir mit der Migration Ihrer WordPress-Website.
Video-Anleitung
Wenn Sie eine schriftliche Anleitung bevorzugen, dann lesen Sie einfach weiter.
Methode 1: Übertragen von WordPress vom lokalen Server auf die Live-Site mithilfe eines Migrations-Plugins (empfohlen)
Diese Methode ist einfacher und wird für Anfänger empfohlen. Wir werden ein WordPress-Migrations-Plugin verwenden, um WordPress vom lokalen Host auf eine Live-Site zu verschieben.
Schritt 1: Installieren und Einrichten des Duplicator-Plugins
Zunächst müssen Sie das Duplicator-Plugin auf Ihrer lokalen Website installieren und aktivieren. Weitere Einzelheiten finden Sie in unserer Schritt-für-Schritt-Anleitung für die Installation eines WordPress-Plugins.
Profi-Tipp: Es gibt auch eine Pro-Version von Duplicator, die sichere Backups, Cloud-Speicher, einfache Wiederherstellung von Websites und mehr bietet.
Nach der Aktivierung müssen Sie auf die Seite Duplicator ” Backups gehen und auf die Schaltfläche “Neu erstellen” klicken.
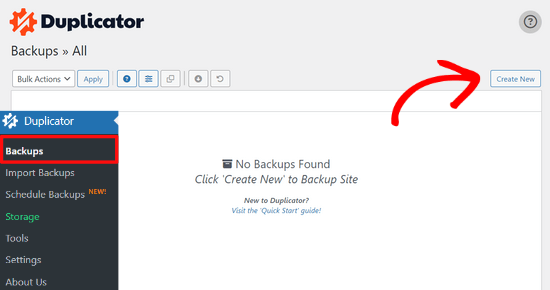
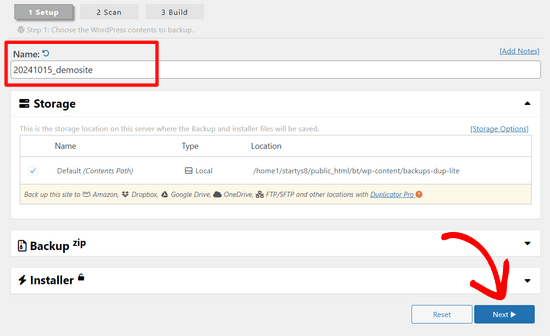
Daraufhin wird ein Bildschirm angezeigt, in dem Sie der Sicherung einen Namen geben können.
Klicken Sie dann auf die Schaltfläche “Weiter”.
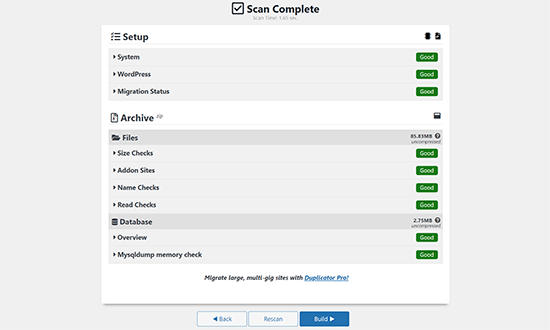
Duplicator führt nun einige Tests durch, um festzustellen, ob alles in Ordnung ist.
Wenn alle Punkte mit “Gut” markiert sind, klicken Sie auf den Button “Erstellen”.
Dieser Vorgang kann einige Minuten dauern, je nach Größe Ihrer Website. Sie müssen diesen Tab geöffnet lassen, bis er abgeschlossen ist.
Wenn Sie fertig sind, sehen Sie Download-Optionen für “Installer”- und “Archiv”-Pakete. Sie müssen auf die Schaltfläche “Beide Dateien herunterladen” klicken, um beide Dateien auf Ihren Computer herunterzuladen.
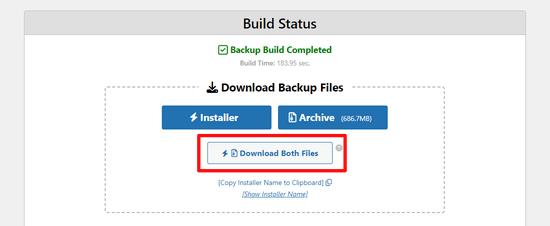
Die “Archiv”-Datei ist eine vollständige Kopie Ihrer WordPress-Website. Sie enthält alle WordPress-Kerndateien sowie Ihre Bilder, Uploads, Themes, Plugins und ein Backup Ihrer WordPress-Datenbank.
Die “Installer”-Datei ist ein Skript, das den gesamten Migrationsprozess automatisiert, indem es die Archivdatei mit Ihrer Website entpackt.
Schritt 2: Erstellen Sie eine Datenbank für Ihre Live-WordPress-Website
Bevor Sie das Installationsprogramm ausführen oder die WordPress-Website von localhost auf Ihren Hosting-Server hochladen können, müssen Sie eine MySQL-Datenbank für Ihre neue Live-Website erstellen.
Wenn Sie bereits eine MySQL-Datenbank erstellt haben, können Sie diesen Schritt überspringen.
Um eine Datenbank zu erstellen, müssen Sie das cPanel-Dashboard Ihres Hosting-Accounts aufrufen. Suchen Sie dann den Abschnitt “Datenbanken” und klicken Sie auf das Symbol “MySQL-Datenbank-Assistent”.
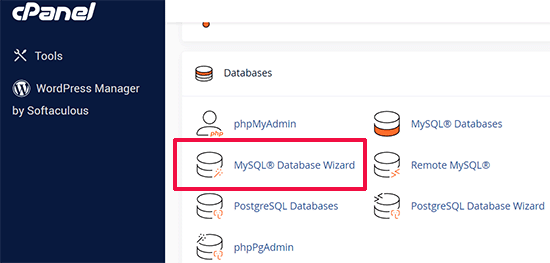
Auf dem nächsten Bildschirm gibt es ein Feld zum Erstellen einer neuen Datenbank.
Geben Sie einfach einen Namen für Ihre Datenbank ein und klicken Sie auf die Schaltfläche “Datenbank erstellen”.

cPanel wird nun eine neue Datenbank für Sie erstellen.
Danach müssen Sie einen Benutzernamen und ein Passwort für Ihren neuen Benutzer eingeben und dann auf die Schaltfläche “Benutzer erstellen” klicken.
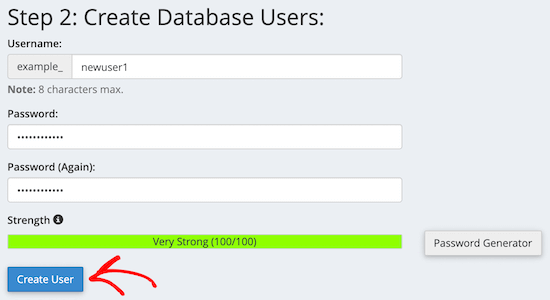
Als nächstes müssen Sie den soeben erstellten Benutzer zur Datenbank hinzufügen.
Klicken Sie zunächst auf das Kontrollkästchen “Alle Berechtigungen”.
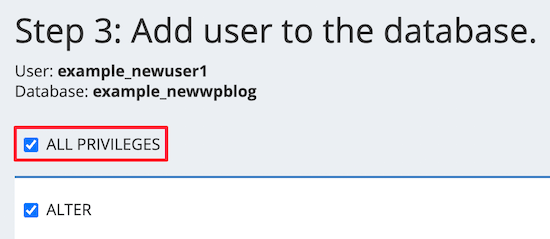
Blättern Sie dann nach unten und klicken Sie auf die Schaltfläche “Änderungen vornehmen”, um Ihre Änderungen zu speichern.
Ihre Datenbank ist nun bereit, mit Ihrer WordPress-Website verwendet zu werden. Notieren Sie sich unbedingt den Namen der Datenbank, den Benutzernamen und das Passwort. Sie werden diese Informationen im nächsten Schritt benötigen.
Schritt 3: Upload von Dateien vom lokalen Server auf die WordPress-Live-Website
Nun müssen Sie das Archiv und die Installationsdateien von Ihrer lokalen Website auf Ihr Hosting-Konto hochladen.
Stellen Sie zunächst mit einem FTP-Client eine Verbindung zu Ihrer Live-Website her. Vergewissern Sie sich nach der Verbindung, dass das Stammverzeichnis Ihrer Website völlig leer ist.
Normalerweise ist das Stammverzeichnis der Ordner /home/public_html/.
Einige WordPress-Hosting-Unternehmen installieren WordPress automatisch, wenn Sie sich anmelden. Wenn Sie dort WordPress-Dateien haben, müssen Sie diese löschen.
Danach können Sie die Dateien archive.zip und installer.php von Duplicator in Ihr leeres Stammverzeichnis hochladen.

Schritt 4: Ausführen des Migrationsskripts
Nachdem Sie die Migrationsdateien hochgeladen haben, müssen Sie die folgende URL in Ihrem Browser aufrufen:
http://example.com/installer.php
Vergessen Sie nicht, “example.com” durch Ihren eigenen Domänennamen zu ersetzen.
Dadurch wird der Duplicator-Migrationsassistent gestartet.
Das Installationsprogramm führt ein paar Tests durch und initialisiert das Skript.
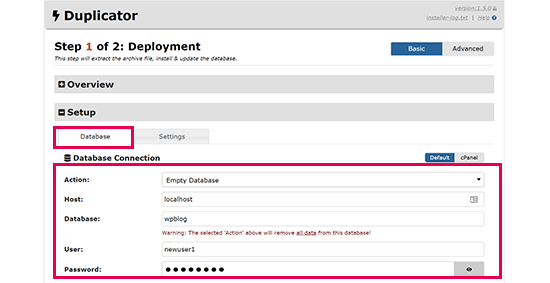
Im Abschnitt Setup werden Sie aufgefordert, den MySQL-Host, den Datenbanknamen, den Benutzernamen und das Passwort einzugeben.
Ihr Host wird wahrscheinlich ein lokaler Host sein. Danach geben Sie die Details der Datenbank ein, die Sie im vorherigen Schritt erstellt haben.
Klicken Sie dann auf die Schaltfläche “Validieren”, um sicherzustellen, dass die eingegebenen Daten korrekt sind.
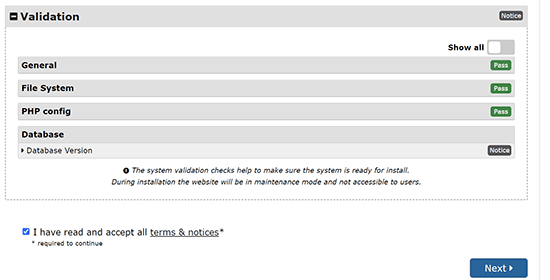
Klicken Sie anschließend auf die Schaltfläche “Weiter”, um fortzufahren.
Duplicator importiert nun die Sicherung Ihrer WordPress-Datenbank aus dem Archiv in Ihre neue Datenbank.
Außerdem werden die URLs aktualisiert, die auf die lokale Website und Ihre neue Website verweisen.
Sie können nun auf die Schaltfläche “Admin Login” klicken, um in den WordPress-Administrationsbereich Ihrer Live-Site zu gelangen.

Sobald Sie sich bei Ihrer Live-Site anmelden, bereinigt Duplicator automatisch die Installationsdateien.
Das war’s schon. Sie haben WordPress erfolgreich vom lokalen Server auf Ihre Live-Site verschoben.
Methode 2: Manuelle Übertragung von WordPress vom lokalen Server auf die Live-Site
In dieser Methode zeigen wir Ihnen, wie Sie WordPress manuell vom lokalen Server auf Ihre Live-Site verschieben können. Sie ist nützlich, wenn die erste Methode nicht funktioniert oder wenn Sie es lieber manuell machen möchten.
Schritt 1: Lokale WordPress-Datenbank exportieren
Als Erstes müssen Sie Ihre lokale WordPress-Datenbank exportieren. Wir werden dafür phpMyAdmin verwenden.
Wenn Sie damit nicht vertraut sind, sollten Sie einen Blick auf unsere Anleitung zur WordPress-Datenbankverwaltung mit phpMyAdmin werfen.
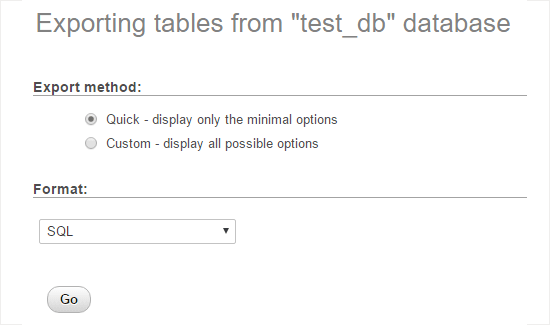
Gehen Sie einfach auf http://localhost/phpmyadmin/ und klicken Sie auf Ihre WordPress-Datenbank. Klicken Sie dann auf die Schaltfläche “Exportieren” in der oberen Menüleiste.

In der Option “Exportmethode:” können Sie “Schnell” oder “Individuell” wählen. Die Option “Individuell” bietet Ihnen mehr Optionen für den Export Ihrer Datenbank.
Wir empfehlen jedoch, “Schnell” zu wählen und dann auf die Schaltfläche “Los” zu klicken, um Ihre Datenbank herunterzuladen.
Schritt 2: WordPress-Dateien auf die Live-Site hochladen
Nun müssen wir alle Dateien Ihrer Website auf die Live-Site verschieben.
Um loszulegen, öffnen Sie Ihren FTP-Client und verbinden Sie sich mit Ihrem Webhosting-Konto.
Sobald Sie mit Ihrer Website verbunden sind, stellen Sie sicher, dass Sie die Dateien in das richtige Verzeichnis hochladen. Wenn Sie zum Beispiel möchten, dass die Website auf “yourite.com” gehostet wird, müssen Sie alle Dateien in Ihr Verzeichnis public_html hochladen.
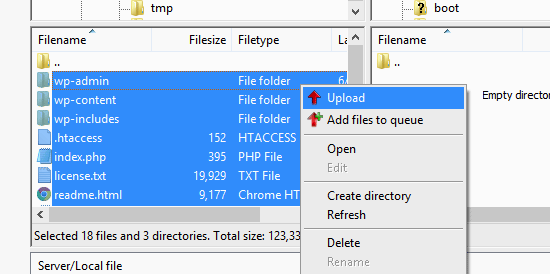
Wählen Sie nun Ihre lokalen WordPress-Dateien aus und laden Sie sie auf Ihren Live-Server hoch.
Schritt 3: Erstellen Sie eine MySQL-Datenbank auf Ihrer Live-Site
Während Ihr FTP-Client Ihre WordPress-Dateien hochlädt, können Sie damit beginnen, Ihre Datenbank auf den Live-Server zu importieren.
Die meisten Hosting-Anbieter von WordPress bieten cPanel zur Verwaltung Ihres Kontos an. Wir zeigen Ihnen, wie Sie eine Datenbank mit cPanel erstellen.
Melden Sie sich zunächst in Ihrem cPanel-Dashboard an und klicken Sie auf das Symbol “MySQL-Datenbank-Assistent”, das Sie im Abschnitt “Datenbanken” finden.

Auf dem nächsten Bildschirm können Sie eine neue Datenbank anlegen.
Geben Sie einen Namen für Ihre Datenbank ein und klicken Sie dann auf “Datenbank erstellen”.

cPanel wird nun automatisch eine neue Datenbank für Sie erstellen.
Als nächstes müssen Sie einen Benutzernamen und ein Passwort für Ihren neuen Benutzer eingeben und dann auf “Benutzer erstellen” klicken.
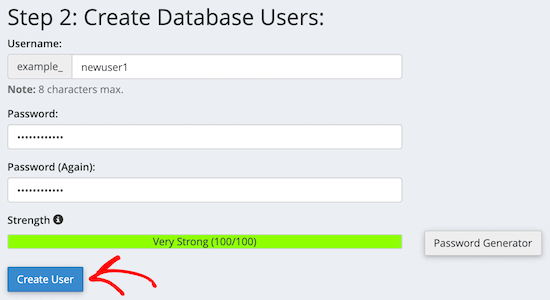
Danach müssen Sie den soeben erstellten Benutzer in die Datenbank aufnehmen.
Aktivieren Sie zunächst das Kontrollkästchen “Alle Berechtigungen”.
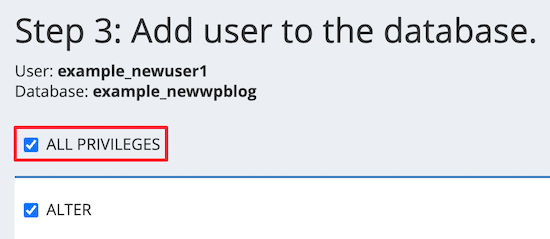
Blättern Sie dann nach unten und klicken Sie auf “Änderungen vornehmen”, um Ihre Änderungen zu speichern.
Sie haben erfolgreich eine neue Datenbank für Ihre Live-WordPress-Site erstellt.
Schritt 4: WordPress-Datenbank in die Live-Site importieren
Der nächste Schritt ist der Import Ihrer WordPress-Datenbank.
Gehen Sie zu Ihrem cPanel Dashboard, scrollen Sie nach unten zum Abschnitt ‘Datenbanken’ und klicken Sie auf ‘phpMyAdmin’.
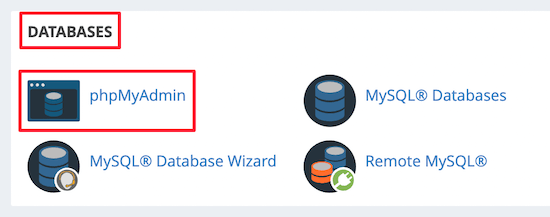
Dies führt Sie zu phpMyAdmin, wo Sie auf die Datenbank klicken, die Sie gerade erstellt haben. phpMyAdmin zeigt Ihre neue Datenbank ohne Tabellen an.
Klicken Sie dann im oberen Menü auf die Registerkarte “Importieren”. Klicken Sie auf der Importseite auf die Schaltfläche “Datei auswählen” und wählen Sie dann die Datenbankdatei von der lokalen Website, die Sie im ersten Schritt gespeichert haben.
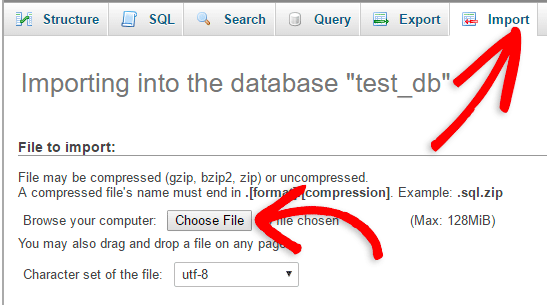
Klicken Sie anschließend auf die Schaltfläche “Go” unten auf der Seite. Ihre Datenbank wird automatisch in phpMyadmin importiert.
Schritt 5: Ändern Sie die URL der Website
Nun müssen Sie die Website-URL in Ihrer Datenbank ändern, damit sie sich mit Ihrer Live-WordPress-Site verbindet.
Suchen Sie in phpMyAdmin nach der Tabelle wp_options in Ihrer Datenbank, die Sie oben importiert haben.
Wenn Sie Ihr Datenbankpräfix geändert haben, könnte es statt wp_options {new_prefix}_options heißen.
Klicken Sie dann auf die Schaltfläche “Durchsuchen” neben wp_options. Oder klicken Sie auf den Link in der Seitenleiste, um die Seite mit einer Liste der Felder in der Tabelle wp_options zu öffnen.
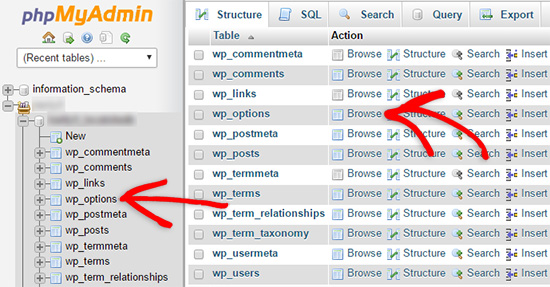
Dann müssen Sie in der Spalte options_name nach der Option siteurl suchen.
Klicken Sie dann auf das Symbol “Bearbeiten”.

Daraufhin öffnet sich ein Fenster, in dem Sie das Feld bearbeiten können.
Im Eingabefeld option_value sehen Sie die URL Ihrer lokalen Installation, die etwa http://localhost/test lautet.
In dieses Feld müssen Sie die URL Ihrer neuen Website eingeben, z. B. https://www.wpbeginner.com.
Anschließend können Sie das Feld speichern, indem Sie auf die Schaltfläche “Go” klicken.
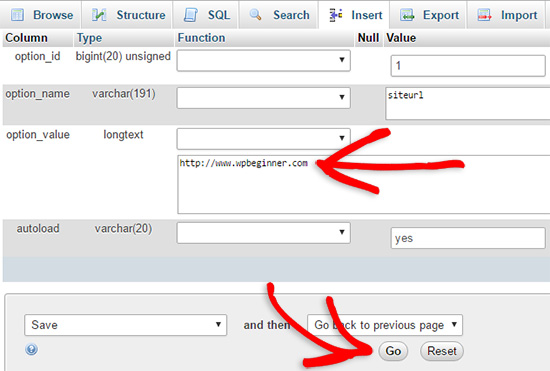
Als nächstes müssen Sie die gleichen Schritte wie oben für den Namen der Home-Option ausführen. Das Menü wp_options kann einige Seiten lang sein. Normalerweise befindet sich die Home-Option auf der zweiten Seite.
Aktualisieren Sie dann die Home-URL, damit sie mit der URL Ihrer Live-Site übereinstimmt.
Schritt 6: Einrichten Ihrer Live-Site
Nachdem Sie nun die Datenbank importiert und Ihre Inhalte hochgeladen haben, ist es an der Zeit, WordPress zu konfigurieren.
Zu diesem Zeitpunkt sollte auf Ihrer Website die Fehlermeldung“Fehler beim Herstellen einer Datenbankverbindung” angezeigt werden.
Um dies zu beheben, verbinden Sie sich mit einem FTP-Client mit Ihrer Website und öffnen Sie die Datei wp-config.php.
Sie werden nach den folgenden Codezeilen suchen:
1 2 3 4 5 6 7 8 9 | // ** MySQL settings - You can get this info from your web host ** ///** The name of the database for WordPress */define( 'DB_NAME', 'database_name_here' );/** MySQL database username */define( 'DB_USER', 'username_here' );/** MySQL database password */define( 'DB_PASSWORD', 'password_here' );/** MySQL hostname */define( 'DB_HOST', 'localhost' ); |
Sie müssen den Datenbanknamen, den Benutzernamen und das Passwort angeben, die Sie zuvor erstellt haben.
Speichern Sie anschließend die Datei wp-config.php und laden Sie sie zurück auf Ihren WordPress-Hosting-Server.
Wenn Sie jetzt Ihre Website besuchen, sollte sie live sein.
Danach müssen Sie sich in Ihr WordPress-Administrationspanel einloggen und zu den Einstellungen ” Allgemein gehen. Dann, ohne etwas zu ändern, scrollen Sie zum Ende und klicken Sie auf die Schaltfläche “Änderungen speichern”.
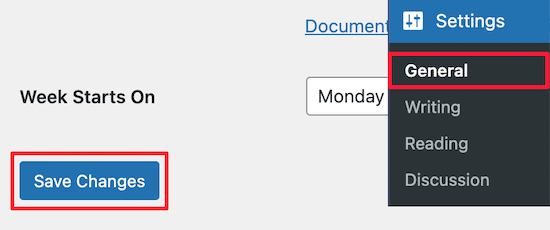
Dadurch wird sichergestellt, dass die URL Ihrer Website überall dort korrigiert wird, wo sie sein muss.
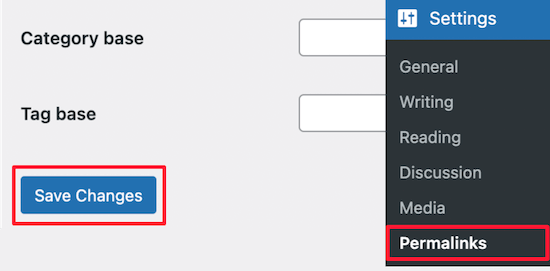
Wenn Sie das getan haben, gehen Sie zu Einstellungen ” Permalinks, scrollen Sie nach unten und klicken Sie auf “Änderungen speichern”, um sicherzustellen, dass alle Beitragslinks funktionieren.
Schritt 7: Bilder und defekte Links durch Aktualisierung der Pfade reparieren
Wenn Sie eine WordPress-Site von einer Domain auf eine andere oder von einem lokalen Server auf eine Live-Site verschieben, werden Sie mit defekten Links und fehlenden Bildern konfrontiert.
Wir zeigen Ihnen zwei Möglichkeiten zur Aktualisierung von URLs. Sie können diejenige wählen, die für Sie am besten geeignet ist.
1. URLs mit dem Plugin “Search & Replace Everything” aktualisieren (empfohlen)
Der sicherste Weg, dies zu beheben, ist die Verwendung von Search & Replace Everything. Dabei handelt es sich um ein leistungsstarkes WordPress Plugin, mit dem Sie problemlos Massenaktualisierungen auf Ihrer Website durchführen können, ohne komplexe Abfragen an die Datenbank zu stellen.
Zunächst müssen Sie das Plugin Search & Replace Everything installieren und aktivieren.
Gehen Sie nach der Aktivierung auf die Seite Werkzeuge ” WP Suchen & Ersetzen.
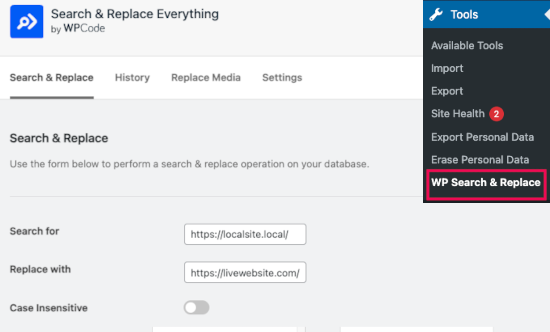
Hier müssen Sie die URL Ihrer lokalen Website in das Feld “Suchen nach” und die URL Ihrer Live-Website in das Feld “Ersetzen durch” eingeben.
Scrollen Sie ein wenig und klicken Sie unter den Tabellen auf “Alle auswählen”. Dadurch wird sichergestellt, dass das Plugin überall in der Datenbank nach der alten URL sucht.
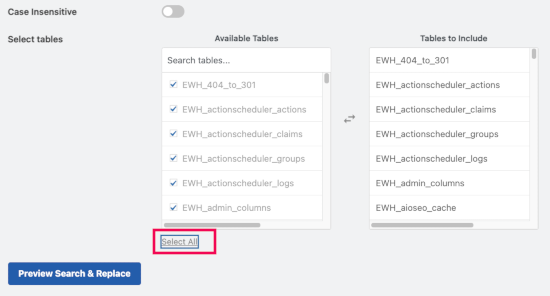
Klicken Sie nun auf den Button “Vorschau Suchen & Ersetzen”, um fortzufahren.
Das Plugin durchsucht Ihre Datenbank nach allen Instanzen der alten URL und zeigt dann eine Vorschau der Ergebnisse an.
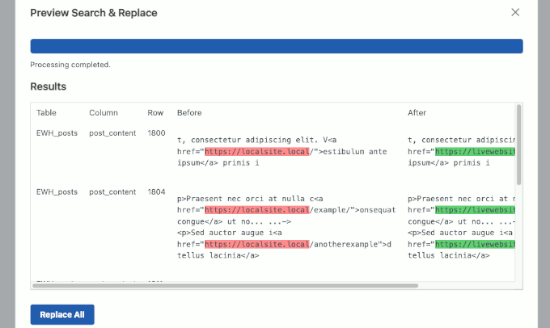
Wenn alles gut aussieht, klicken Sie auf “Alles ersetzen”, um die Änderungen zu speichern.
Sie erhalten eine Warnung über die Änderungen, die Sie vornehmen. Klicken Sie auf “Ja”, um fortzufahren.
Das Plugin wird nun die Datenbank aktualisieren und die lokalen URLs durch die aktuelle URL Ihrer Website ersetzen.
2. URLs manuell aktualisieren (Erweitert)
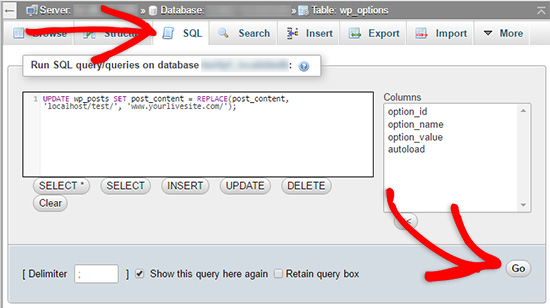
Eine andere Möglichkeit, die URLs zu aktualisieren, ist die folgende SQL-Abfrage:
1 | UPDATE wp_posts SET post_content = REPLACE(post_content, 'localhost/test/', 'www.yourlivesite.com/'); |
Gehen Sie einfach zu phpMyAdmin, klicken Sie auf Ihre Datenbank und dann im oberen Menü auf ‘SQL’ und fügen Sie die obige Abfrage hinzu.
Vergewissern Sie sich, dass Sie die URLs Ihrer lokalen Website und Ihrer Live-Website eingeben, und klicken Sie auf den Button “Go”.
Das war’s. Sie haben WordPress nun erfolgreich von Ihrem lokalen Server auf eine Live-Site migriert.
Hoffentlich funktioniert Ihre Live-Website jetzt reibungslos. Wenn Sie Fehler bemerken, können Sie unseren Leitfaden zu häufigen WordPress-Fehlern lesen, um Hilfe bei der Problembehandlung zu erhalten.
Wir hoffen, dass dieser Artikel Ihnen geholfen hat, WordPress von einem lokalen Server auf eine Live Website zu übertragen. Vielleicht interessiert Sie auch unser Leitfaden für den Umzug einer Live-Website auf einen lokalen Server oder die ultimative Checkliste für die Migration von Websites für praktische WordPress-Migrationsschritte.
Wenn Ihnen dieser Artikel gefallen hat, dann abonnieren Sie bitte unseren YouTube-Kanal für WordPress-Videotutorials. Sie können uns auch auf Twitter und Facebook finden.


Mark
Hi!
I’ve done until step 6 and was able to get the Error Database Connection and I was thrilled! when i changed the parameters the error changed to Error 500. And now I’m stuck.
My local MAMP DB is named “localdatabase” and the new one that I created in the live site have a prefix that I cannot edit so now my new database name in the live site is “web_localdatabase”
Question:
1. Should the my local database name be the same with the one in the live site?
2. If not, is there any other changes I need to do aside from the changes in Step 6?
Thanks!!!!!!!
Cindy
Hi there,
I thought I followed your steps to the letter. I accessed localhost through WAMP. cPanel is through StableHost. FTP using FileZilla. After the migration I looked at my site and saw that half of my most recent post was missing. It had never been published; it was the first post I created in localhost. (I recently moved from wp.com to wp.org. Had less than 20 posts at time of transfer. All of them migrated from localhost to live with no errors.) I had no ‘failed transfers’ during the FTP upload. No errors that I noticed.
After seeing the incomplete blog post, I tried to access localhost to view the original content using WAMP. That project name can no longer be displayed. I cannot access my blog content on localhost using the name I assigned prior to the migration. The folder is still present in www.
I must have done something right since part of a post that was never on my live site did make it there. Can you tell me what happened to my localhost? I don’t have anything in sub folders…it’s all pretty straight forward and I tried to keep it simple.
Troubleshooting:
Ran SQL query per your Step 7, message is: #1146 – Table ‘sxxxxx_wp574.wp_posts’ doesn’t exist. wp_574 is the database name I created in Step 3. Query was localhost name and website domain.
Restarted computer.
WAMP ‘Restart all services’ option.
Right now I’m completely confused! I not only do not know what to do next but am fearful of trying a Google suggestion for fear of really screwing things up. Can you help me? Any insight into the incomplete migration would be good to know too but I’m more freaked out about localhost at the moment. Thanks so much. You’re instructions are very easy to follow and understandable.
Kind Regards, cindy
Lea Jacta Est
Hello!
I have issues updating my links (step 7). It seems to be an URL match problem. Using Velvet Blues, I’m typing my old URL in the required field and I do the same for the new URL but there’s an error message showing every time I try.
Just to check :
– my old URL = my localhost URL which is in the general settings and which shows in the address bar when I go to my homepage
– my new URL : my brand new domain name which ends by .com
… right ?
Does the error comes from somewhere else or am I doing it this wrong ?
Thanks a lot for your help.
Jeff Bradbury
I currently have my live site at. I want to download it to MAMP (Mac) and begin the process of redesigning locally and then I want to put it back fresh.
1) When I’m ready to upload the new site, do I put it over top of the current folder? Do I create a new folder (or subdomain) and stick it in that directory and then move the domain/DNS to the new site?
2) I have a bunch of pretty links on the live site that I wish to download and begin working on … I think i’m correct in thinking that Pretty links just take the form of whatever the domain currently is.
3) Is this the best process if you want to constantly be working locally and updating your site on a daily/weekly basis? This appears to be a great method if you want a One and Done method of updating a site. If there is another way or method of working locally and then uploading the changes …. or even syncing a live/local site, I would love some help and advice. THANK YOU!
WPBeginner Support
1. Depends on what files you have changed and what changes you made that are stored in the database. We assume that you will be working on your theme and would probably make few changes that will be stored in database. In that case, you can just overwrite your theme files and update your database from a backup.
2. If by pretty links you mean the permalink settings, then we think that those will not be affected.
3. If you are planning on continuously working on your site, then this strategy would work but it is not the best solution. You need a solution that allows you to automatically sync your development site to your live site. For example, take a look at our tutorial on how to create a staging environment for your WordPress site. Subscribe to WPBeginner, we will soon cover this topic in an upcoming article with detailed instructions.
Admin
Felipe Stabile
THANK YOU GUYS!
Things went smooth after some problems and thinking, but it was because my host is a little different, and i´ve got problems uploading my files to the FTP using Filezilla. Serious docs got a failure message, but i solve that by doing the following:
If someone here is using smarterasp, you´d be better not using Filezilla, use the integrated (HostingControlPanel/MyWebsites//FileManager).
With your database clean, You have to zip your files from HTDOCS/wordpress, and then upload this zip file.
In the integrated File Manager you have the option for unzip. wait a little bit, until all folders and docs appear.
Then follow the tutorial above and you´ll be ok.
Mohit
Hey wpbeginner,
Thanks a lot for this tutorial. Its the best one I have came across.
Followed this step by step and got the expected results.
Keep up the good work !
Cheers!
Abhay
Many-many thanks bro. it worked very well.
Biniam
Thanks a million!!!
jay capulong
hi all is ok, but the others picture is not showing,
what do you mean localhost/test? (local site)
thanks
M3N
Hi. Thanks for this great tutorial.
One question though…
Following steps you described doesn’t cause problem with serialized data. I saw some tutorials recommended to use a script or other thing to avoid the problem with serialized data when changing file paths manually.
Any idea or suggestion ?
Mark
Hi, I don’t know if anyone suffered from a redirect to their local host when they ran wp-admin. I did but I found a post over at stackoverflow that sorted me out. Basically I had to update the filepaths in the WP-Options table.
Good luck.
MT
Mujtaba Zia
*** This is the best ever tutorial of my life ***
I know about html/css but never worked on wordpress, this tutorial helps me lot and have my site live by following every step and wordings of it. Thank you so so much!
Now very eager to learn more through this website.
Kathy
I’m encountering some serious problems when transferring to live server. Locally I have 2 sites using the same theme. Both running off separate databases and sites, both work perfectly locally. One site is uploaded and running fine and i’m in the process of uploading the second, here’s where it goes wrong. I’ve exported and created the database, working perfectly all images appear correct. I uploaded all the files and amended the config then ran in to problems. I appear to have no content loading and only half a theme along with the incorrect logo of the site. I tried to login in to amend all links but i am returning an ‘internal server error’ the sever encountered internal error or misconfiguration and was unable to complete your request.
I have rolled the site back to it’s previous look but i am at a complete loss as to next steps, can anyone help? I can not understand how we are working perfectly locally and then an epic fail on live.
Kathy
p.s. I have screenshots if that helps.
DaveJorg
Heads up that sometimes after the migration is complete only the home page works.
If this is the case visit Dashboard > settings > pemalinks and click save changes. I believe it updates the mod_rewrite and should fix the issue. It did for me.
RW
Please remove my email from the comments thread. I’ve tried to unsubscribe each time and it’s not working.
Carlo
Thanks for this guide. I’m a more than a beginner in this field. How can I proceed if I have a database already installed on my hosting. Do I have to delete it and make new one, cancel the tables or simply empty them? Thanks in advance for your help
WPBeginner Support
You can create a totally new database.
Admin
Nathan
I moved everything and it went smooth until I tried logging in to WP it keeps saying password incorrect. I even tried changing details in phpMyAdmin. Could the problem be that I ran your query before logging in to WP?
Nathan
I fixed the problem, i just signed in to WP and re-saved permalinks and whole site was update. Thanks for the great tutorial.
Angela
Unfortunately, I wasn’t able to move my site from localhost to online. I got to the login page and it wouldn’t accept my login information. Any idea what the problem could be? I don’t want to give up on it so I may try again.
Omar Zeidan
Hi Angela,
Well, you might forgot to import the DB files to your live server, did you ?
If nothing worked with you then try the following,
Access your DB admin panel, find the wp_users and manually add one there.
Hope this helps.
Pranesh
Excellent guide. Everything went fine. Thanks a lot !!
Ziga
Hello, i followed all steps, and at step #4, i choose .gzip file to import, and got the following error:
#1064 – You have an error in your SQL syntax; check the manual that corresponds to your MySQL server version for the right syntax to use near ‘?’ at line 2
Any help?
Justin
Everything works except my other pages…. Can’t figure it out
Matt
Similar issue for me. Have added it to a subfolder on another one of my domains, but when I navigate to it, I’m shown the Themes 404 page. When I try to go directly to any of the other pages, I get my hosts 404 page. Any ideas anyone?
Ryan
I’ve gone through all the steps, and my site ends up not looking at all like it did. It appears most of the CSS didn’t transfer over. I was using the Divi theme.
Here is what it looks like:
Any tips?
Amefon
HELLO
i got this error while trying to import my database onto the site
Error
SQL query:
—
— Database: `lcmi`
—
CREATE DATABASE IF NOT EXISTS `lcmi` DEFAULT CHARACTER SET latin1 COLLATE latin1_swedish_ci;
MySQL said: Documentation
#1044 – Access denied for user ‘lazarbwn’@’localhost’ to database ‘lcmi’
how do i solve this?
WPBeginner Support
Check your MySQL username, MySQL host, Database, and MySQL Password.
Admin
Amefon
i do not understand. Am I to change the MySQL details or what.
Mike Casile
Have not done this yet, but local site is looking good. I do have 2 questions (which may really be too big and may require follow-on articles).
1. If I go thru this and it comes out nice on the live site … but I want to continue doing new development locally, is there a similar process for incremental changes?
2. How will this be impacted if I use multiSite (which I’m NOT doing right now).
Thanks,
Roman
It depends on what your changes are affecting – if you have changed some css or php code in theme, you will need tu push changed files on server using FTP. If you change some wordpress settings, you only need to go through steps of copying your database.
Ameira
Thank you for this tutorial – after 2 weeks of trying everything under the sun finally found out what was missing. I have been able to access my website but images are missing and the layout is all over the place. I followed step 7 and it did improve the improve slightly but still quite a mess – any ideas on what else I can do?
Soo
Easy to understand and follow.
The best tutorial about”How to Move WordPress From Local Server to Live Site”.
Thank you
zavera
Hi WPBEGINNER SUPPORT, i have created custom wordpress site with some pages and used all the steps you mentioned here and all worked correctly but my pages urls are still localhost how to change these urls for pages?
WPBeginner Support
If you can access the admin area then go to settings -> General and change your WordPress URL and Site URL. Or look at the step 5 to do that through phpmyadmin.
Admin
Daniel Afriyie Gyimah
ples we need the information in a downloadable PDF format
Andres
Hello ! I tried using this method and I get the following error:
lessphp fatal error: load error: failed to find /Applications/MAMP/htdocs/breg/wp-content/themes/theme43776/bootstrap/less/bootstrap.lesslessphp fatal error: load error: failed to find /Applications/MAMP/htdocs/breg/wp-content/themes/theme43776/style.less
Warning: Cannot modify header information – headers already sent by (output started at /home/weliketo5/public_html/breg/wp-content/themes/CherryFramework/includes/less-compile.php:155) in /home/weliketo5/public_html/breg/wp-includes/pluggable.php on line 1207
Could anybody help me out?
Alfredo Garcia
While doing step #4: Import WordPress Database on Live Site, I get the following SQL error:
Error
MySQL said: Documentation
#1064 – You have an error in your SQL syntax; check the manual that corresponds to your MySQL server version for the right syntax to use near ‘?’ at line 105
Can you tell me what is wrong and how I can fix this?
WPBeginner Support
The backup file you are trying to import could be corrupt. Export a fresh copy and then try again. If this does not work, then ask your web hosting provider to update your MySQL version.
Admin
Alfredo Garcia
Thank you. I’ll try it tonight.
Ngabe R
I was missing step 5. Thanks a lot. Very helpful!
Adam
Do I need to install WordPress on my server before beginning this process, or do I just follow the steps as listed?
WPBeginner Support
No, please see step 2. You will upload WordPress files from your local server to the live server.
Admin
Adam
Thanks, I’ve got it all working now! This was a really, really helpful tutorial!
Rod
Thanks, very helpful ! Once I worked out the correct server name on the host et all went well.
Yonatan
Great article and really helpful.
Tnx!
Momodu Oladapo Abraham
it worked thanks, however there arre still some links connecting to the local server address most experienced on the posts and blogs…what do i do ..please help…every other thing has worked fine except the posts. Thanks
Natharza
Hey
Everything worked out but the post links are not working. I do run the sql query still links were broken with the error “No input file specified.”
Please help
Michael
Thanks for this article. It saves me from stress of redesign online
Sarah
Thanks for a great tutorial, followed every steps and nothing went wrong !
THUMBS UP +++
Fongoh Tayong
Man, you are the bomb.
It worked for me like charm.
More power to you to write more tutorials on this. I am newbee to wordpress.
Thanks again.
Louise
Hi,
With step 2, if you dont have a public_html directory where else can you upload the file under? as per Milos question. I have gone into file manager and to httpdocs file and uploaded it there.
Thanks
Max
Thank you for a really simple, easy to follow tutorial on how to migrate a database. I notice that you didnt’ state to update the DB_HOST name, but otherwise this was great.
Stefano
Hi! First of all thnx for the detailed guide.
I followed all the steps without problem. Anyways, the theme and all the plugins i had installed on localhost are missing causing the page looking completely different. What can i do to import all previous plug-in and settings? Thank you in advance for toyr reply
WPBeginner Support
You can upload them from your computer using an FTP client.
Admin
Junn
Hi thank you for this tutorial, It works for me! However, I cant find the pages I created locally and settings are not right. It did let me install a new wordpress.
What went wrong?
Monique
hello. thanks for this tutorial. but i have a problem at step 6. All first 5 steps are done. but when i reload my site after changing URL in database. there is no such message as “Error Establishing Database Connection error” and my site is still opening in local host. please help what i should do now
Alex
How to create MySql db on my actual site. My provider can help me?
WPBeginner Support
Yes they can help you.
Admin
Miloš
Hi, it is me again. Now I have a problem with step seven. I put that code with my own web page
in my sql but 2 of five pages still don’t work. I propably didn’t understand your instructions very well. What do you mean by ”but don’t forget to change it with your own local site and live site URLs. ”?
Nadeem
Hi
could you please check your menu under the appearance and then click one by one those menu which is not working properly. hopefully you’ll find the errors.
Nady
Nikhil
Hi,
Thanks for the help…
All the steps are working perfect….
But When I am trying to login or Click on Any link….
It show me following msg….
My Website :
Internal Server Error
The server encountered an internal error or misconfiguration and was unable to complete your request.
Please contact the server administrator at webmaster@ to inform them of the time this error occurred, and the actions you performed just before this error.
More information about this error may be available in the server error log.
Additionally, a 500 Internal Server Error error was encountered while trying to use an ErrorDocument to handle the request.
What’s the solution of this error…
Dwayne Smith
Hi NIKHIL I am having the same problem did you manage to figure out what the problem was. If so could you please let me know your solution
Cheers
Dwayne
Mustapha
Very helpful post
thank you
Milos
I have a problem with step 6 since that I don’t know how to edit wp-config.php. The thing is that when I click right mouse and open view/edit there are no options for entering database name, user and password.
Also in step 3 I uploaded my WP files in htdocs file because that’s the only folder that I see. I use FileZilla.
I would appreciate very much if you could answer me on my email.
Miloš B.
Andrej
Milose… When you open wp-config.php file, you need to open it as a notepad document, and find at the beggining of the text database name, user and password, edit text manually and then save again.
Matt
I ran into an sql error 1064 when importing using a compressed export. Finally got it working by exporting as an uncompressed .sql