Nach Jahren des Erstellens von WordPress-Websites haben wir gelernt, wie wichtig es ist, eine lokale WordPress-Einrichtung auf Ihrem Computer zu haben.
WordPress auf Ihrem persönlichen Rechner zu haben, ermöglicht es Ihnen, mit neuen Funktionen zu experimentieren, ohne Ihre Live-Website zu gefährden, tief in die WordPress-Entwicklung einzutauchen und sogar ganze Websites zu erstellen, bevor sie live gehen. Es ist wie eine private Sandbox für all Ihre WordPress-Projekte.
Wenn Sie ein Windows-Benutzer sind, gibt es zahlreiche Möglichkeiten, WordPress lokal einzurichten. Wir haben es jedoch auf die zwei einfachsten Methoden eingegrenzt. In dieser Anleitung zeigen wir Ihnen, wie Sie WordPress einfach auf einem Windows-Computer installieren, unabhängig von der verwendeten Version.
Warum Sie WordPress unter Windows installieren sollten?
Wenn Sie ein Windows-Benutzer sind, bietet die lokale Installation von WordPress auf Ihrem Computer mehrere Vorteile.
Eine lokale WordPress-Installation erstellt eine Testumgebung, die Ihre Live-Website nicht beeinträchtigt. Dieses Setup, oft als lokaler Server oder localhost bezeichnet, ist Ihr persönlicher Spielplatz für WordPress.
WordPress-Entwickler verwenden regelmäßig lokale Installationen für ihre Arbeit. Zum Beispiel können sie diese verwenden, um mit neuen Plugins oder Themes zu experimentieren oder die Website vor dem Update auf den Gutenberg-Block-Editor testen.
Aber es ist nicht nur für Profis. Wenn Sie neu bei WordPress sind, ist eine lokale Einrichtung perfekt zum Lernen. Sie können Funktionen erkunden, Themes und Plugins testen und frei experimentieren, ohne sich Gedanken über das Beschädigen einer Live-Website machen zu müssen.
Es ist wichtig zu beachten, dass nur Sie die Website sehen können, wenn Sie WordPress lokal unter Windows installieren. Wenn Sie eine öffentliche Website erstellen möchten, benötigen Sie einen Domainnamen und Webhosting.
Nun, technisch gesehen können Sie WordPress unter Windows mit XAMPP installieren, und wir haben bereits ein Tutorial dazu geschrieben.
Das gesagt, wir haben 2 noch einfachere Wege als XAMPP gefunden, um eine lokale WordPress-Umgebung einzurichten, was sie großartig für Anfänger oder Benutzer macht, die schnell eine lokale Website erstellen müssen. Sie können auf den Link unten klicken, um zu jeder Methode zu springen, an der Sie interessiert sind:
- Methode 1: WordPress unter Windows mit Studio installieren (schnell und einfach)
- Methode 2: WordPress unter Windows mit Local WP installieren (anpassbarer)
- Alternative: Use WordPress Playground to Test Themes, Plugins, and More
Methode 1: WordPress unter Windows mit Studio installieren (schnell und einfach)
Für die erste Methode verwenden wir Studio. Es ist eine lokale WordPress-Software, die von Automattic entwickelt wurde, dem Unternehmen, das WordPress.com verwaltet und betreibt, einem Website-Builder, der auf der WordPress-Software basiert.
Wir werden diese Methode zuerst besprechen, da sie viel schneller und einfacher zu befolgen ist und sich somit perfekt für absolute Anfänger eignet.
Zuerst müssen Sie die Website Studio by WordPress.com öffnen. Klicken Sie dann auf die Schaltfläche „Download for Windows“.
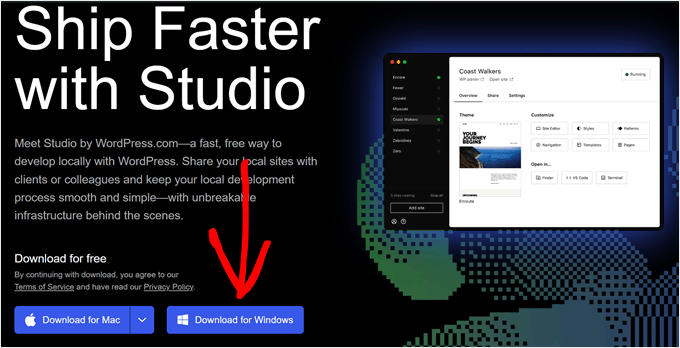
Sobald Sie das getan haben, öffnen Sie einfach die heruntergeladene Datei, um die Installation zu starten.
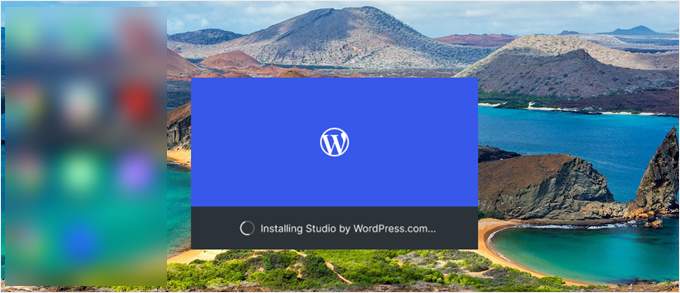
Ein Popup-Fenster wird nun angezeigt, das Ihnen zeigt, dass die Anwendung installiert wird.
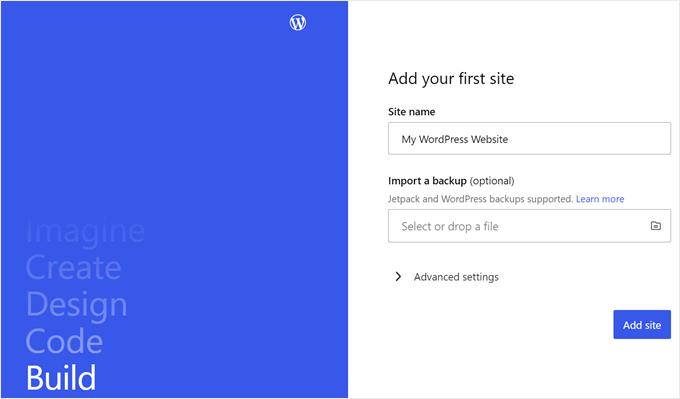
Wenn das erledigt ist, können Sie Ihre erste Website hinzufügen.
Um dies zu tun, geben Sie einfach den Namen Ihrer neuen lokalen WordPress-Website ein und klicken Sie auf „Website hinzufügen“. Sie können die Website beliebig benennen, solange sie Ihnen hilft, sie leicht zu identifizieren.
Sie sollten nun das Dashboard Ihrer lokalen WordPress-Site sehen.
Um auf Ihr WordPress-Dashboard zuzugreifen und Ihre Website zu bearbeiten, klicken Sie einfach auf die Schaltfläche „Start“ in der oberen rechten Ecke. Dadurch wird Ihre lokale Website auf Ihrem Computer für Sie zugänglich.
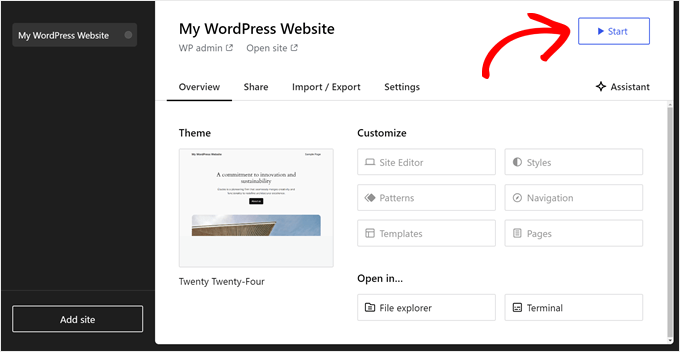
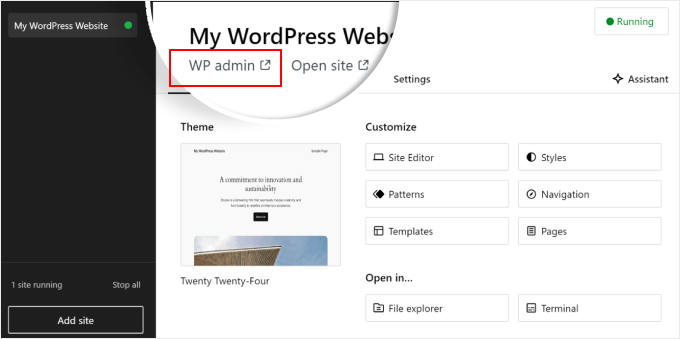
Sobald sich die Schaltfläche „Start“ in „Läuft“ ändert, können Sie oben links auf der Seite auf den Link „WP Admin“ klicken.
Dies bringt Sie zu Ihrer lokalen WordPress-Adminseite.
Und das war's so ziemlich mit der Einrichtung. Lassen Sie uns die anderen Einstellungen erkunden, die möglicherweise erforderlich sind, während Sie Ihre lokale Website erstellen.
Wie Sie im Tab „Übersicht“ sehen können, können Sie das Menü des WordPress-Website-Editors direkt vom Studio-Dashboard aus aufrufen. Sie können auch auf „Datei-Explorer“ klicken, um die Ordner und Dateien Ihrer WordPress-Website zu öffnen, und auf „Terminal“ klicken, um Ihre Website mit WP-CLI zu verwalten.
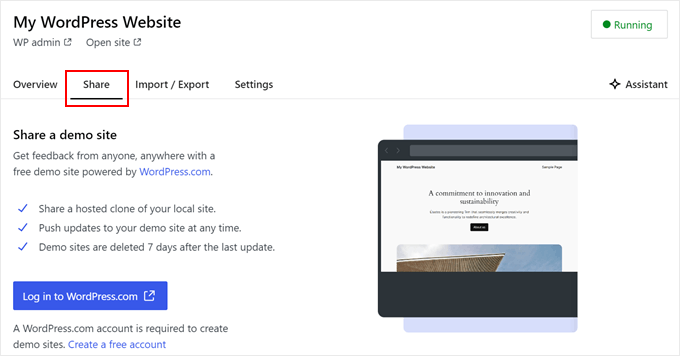
Wenn Sie zum Tab „Teilen“ wechseln, können Sie sich in Ihr WordPress.com-Konto einloggen, Ihre lokale Website klonen und sie auf die Server von WordPress.com hochladen. Dies macht die geklonte Website vorübergehend online, was nützlich ist, um Demo-Websites mit Ihren Kunden oder Teammitgliedern zu teilen.
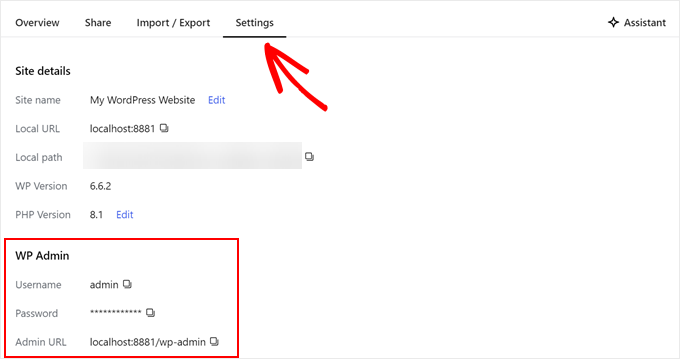
Manchmal möchten Sie sich direkt über Ihren Browser bei Ihrer lokalen Website anmelden, anstatt Studio zu verwenden. In diesem Fall müssen Sie Ihre wp-admin-Zugangsdaten kennen.
Um sie zu finden, können Sie zum Tab 'Einstellungen' wechseln und dort Ihren WordPress-Admin-Benutzernamen, Ihr Passwort und Ihre Login-URL finden.
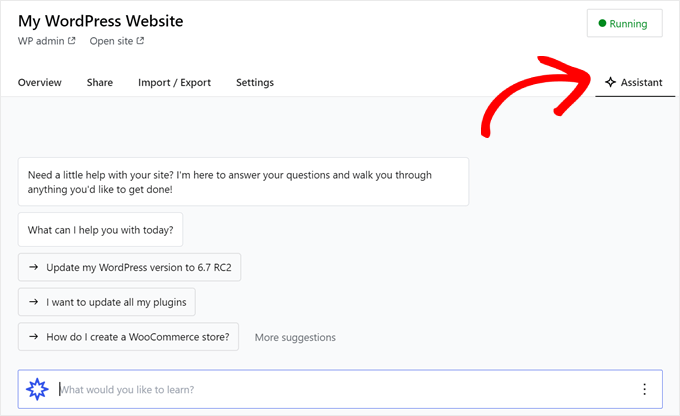
Eine weitere nette Funktion von Studio ist sein integrierter KI-Chatbot, mit dem Sie kommunizieren können, indem Sie auf die Schaltfläche „Assistent“ klicken.
Hier können Sie Studio um Hilfe bei Aufgaben bitten, wie z. B. die gleichzeitige Aktualisierung aller Ihrer Plugins, die Aktualisierung Ihrer Kern-WordPress-Version oder die Erstellung von Code für einen benutzerdefinierten Block.
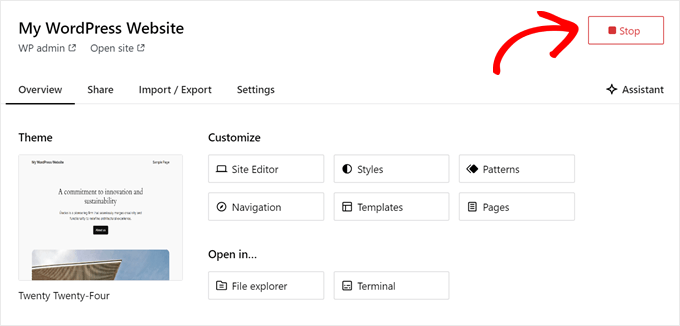
Wenn Sie mit der Arbeit an Ihrer lokalen Website fertig sind, fahren Sie einfach mit der Maus über die Schaltfläche „Running“ oben rechts, bis sie „Stop“ anzeigt.
Klicken Sie dann auf die Schaltfläche, um die Website zu stoppen.
Ein Nachteil von Studio ist, dass Sie die WordPress-Umgebung nicht nach Ihren Wünschen konfigurieren können. Das bedeutet, dass Sie die PHP-Version, den Webserver und die Datenbank verwenden müssen, die für Sie vorab ausgewählt wurden.
Dies kann ein Nachteil sein, wenn Sie Ihre Website oder Ihr Plugin mit spezifischen Serverkonfigurationen testen müssen.
Wenn Sie mehr Kontrolle über Ihre lokale WordPress-Umgebung benötigen oder Ihr lokales Setup mit einer bestimmten Live-Serverkonfiguration abgleichen müssen, können Sie die nächste Methode mit Local WP ausprobieren.
Methode 2: WordPress unter Windows mit Local WP installieren (anpassbarer)
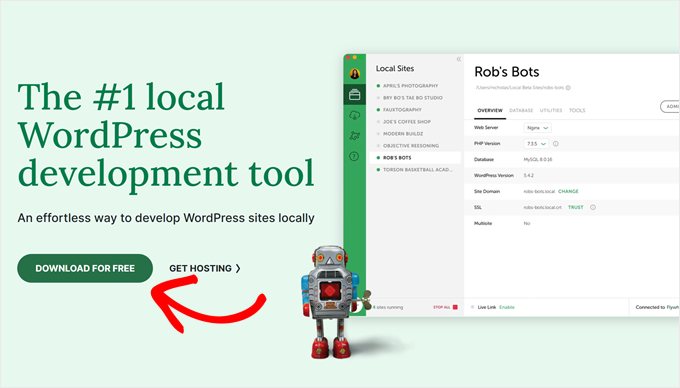
Zuerst müssen Sie die Local WP-Software auf Ihrem Windows-Computer herunterladen und installieren. Gehen Sie einfach auf die Local WP-Website und klicken Sie auf die Schaltfläche „Kostenlos herunterladen“.
Danach erscheint ein Popup-Fenster, in dem Sie Ihre Plattform auswählen müssen. Wählen Sie im Dropdown-Menü 'Windows'.
Als Nächstes können Sie Ihre Daten wie Vor- und Nachname, geschäftliche E-Mail-Adresse und Telefonnummer eingeben, um die Software herunterzuladen.
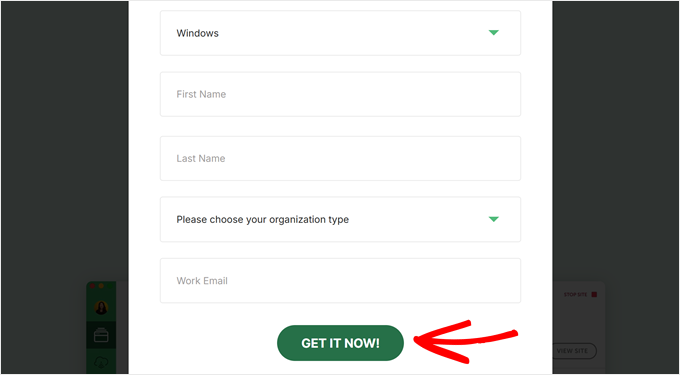
Nach Eingabe der Details klicken Sie einfach auf die Schaltfläche „Jetzt erhalten“.
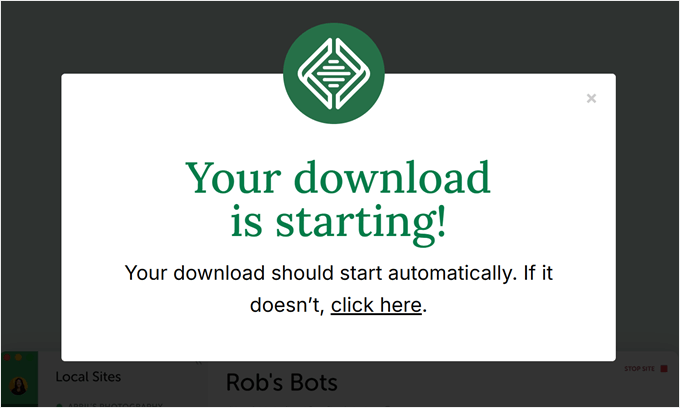
Danach wird die Software automatisch auf Ihren Computer heruntergeladen. Alternativ können Sie auf den Link 'Hier klicken' klicken, um den Download zu starten.
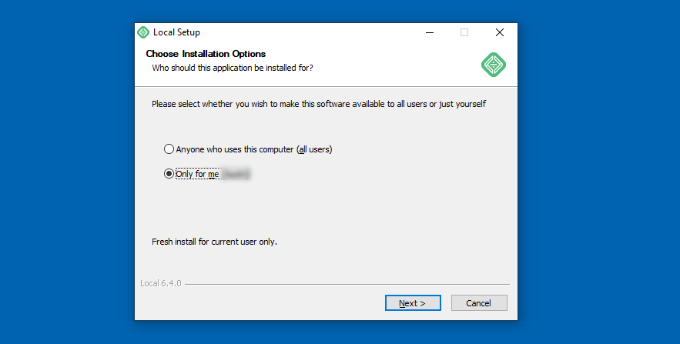
Sobald die Datei heruntergeladen ist, starten Sie den Einrichtungsassistenten.
Nun müssen Sie auswählen, ob Sie die Software für alle Benutzer oder nur für sich selbst installieren möchten.
Sobald Sie eine Option ausgewählt haben, klicken Sie auf die Schaltfläche „Weiter“.
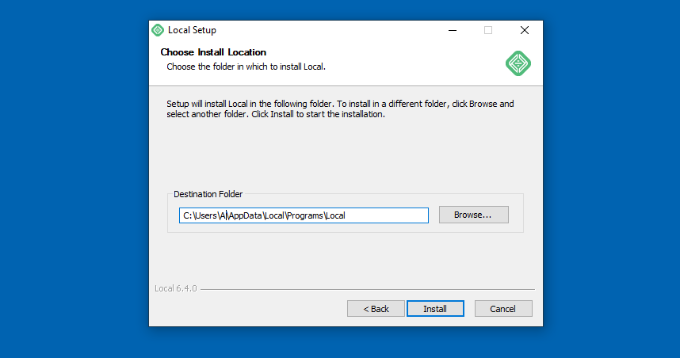
Im nächsten Schritt können Sie den „Zielordner“ auswählen, in dem die Software installiert wird.
Klicken Sie einfach auf die Schaltfläche „Durchsuchen“, um den Pfad festzulegen, und klicken Sie dann auf die Schaltfläche „Installieren“.
Die Local WP-Software wird nun auf Ihrem Windows-Computer installiert.
Sobald dies geschehen ist, können Sie das Kontrollkästchen „Lokal ausführen“ aktivieren und im Einrichtungsassistenten auf die Schaltfläche „Fertig stellen“ klicken.
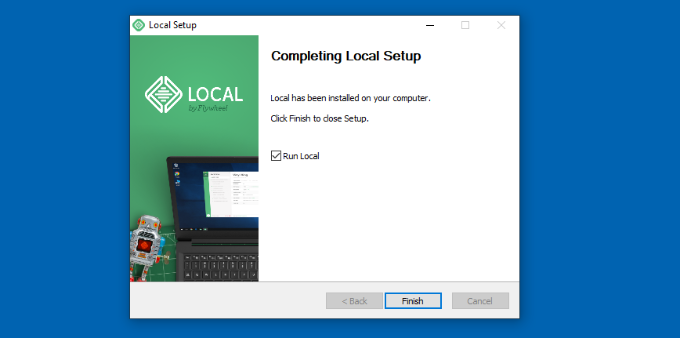
Die Software wird nun auf Ihrem Windows-Gerät gestartet.
Der nächste Schritt ist das Hinzufügen einer neuen lokalen Website. Klicken Sie dazu einfach auf das Pluszeichen '+' unten.
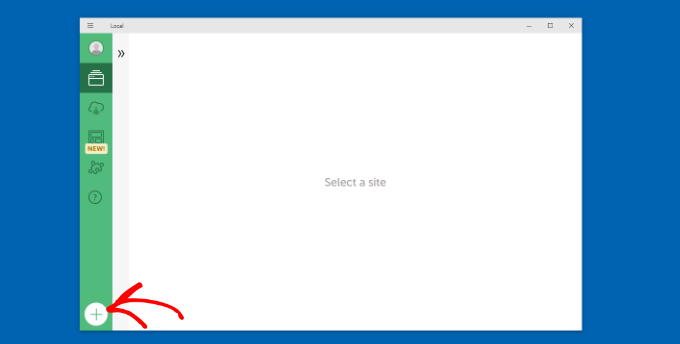
Danach können Sie eine Website in der Local-Software erstellen.
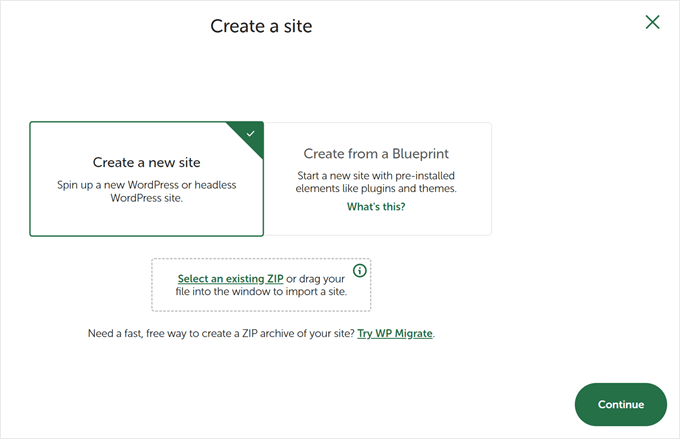
Wählen Sie die Option „Neue Website erstellen“ und klicken Sie auf die Schaltfläche „Weiter“. Es gibt auch Optionen, die Website aus einer Vorlage oder einer vorhandenen Website-Datei zu erstellen, aber wir wählen die erste Option zur Demonstration.
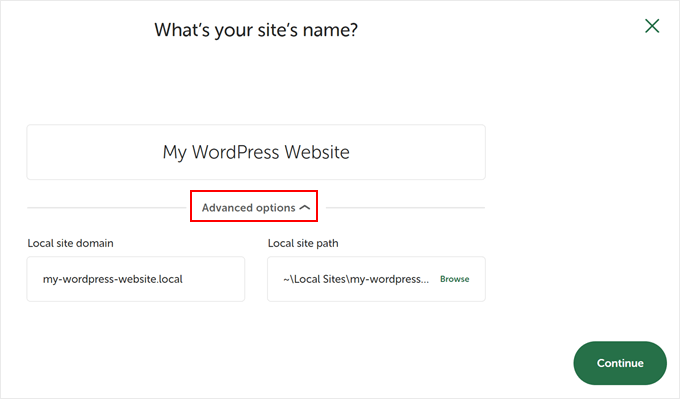
Als Nächstes können Sie einen Namen für Ihre lokale Website eingeben, z. B. 'Meine WordPress-Website'.
Es gibt auch erweiterte Optionen, bei denen Sie die Domain und den Pfad der lokalen Website eingeben können. Standardmäßig verwendet die Domain den Titel Ihrer Website, aber mit Bindestrichen getrennt.
Wenn Sie fertig sind, klicken Sie einfach auf die Schaltfläche „Weiter“.
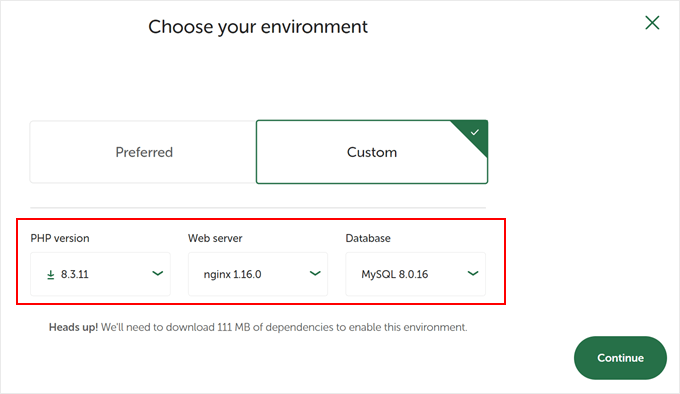
Danach müssen Sie eine Umgebung für Ihre lokale Website auswählen.
Sie können die 'Bevorzugte' Umgebung verwenden, in der die Software automatisch die PHP-Version, den Webserver und die MySQL-Version auswählt. Alternativ können Sie auch 'Benutzerdefiniert' wählen und die Umgebungsdetails eingeben.
Local WP bietet die neuesten PHP-Versionen. Als Webserver können Sie zwischen Nginx oder Apache wählen. Sie können auch zwischen MySQL oder MariaDB für die Datenbanken wählen.
Beachten Sie, dass einige PHP-, Webserver- und Datenbankversionen das Herunterladen einiger Abhängigkeiten erfordern, damit sie ordnungsgemäß funktionieren.
Als Nächstes können Sie einen WordPress-Benutzernamen und ein Passwort für Ihre lokale Website eingeben. Außerdem gibt es eine Option, eine WordPress-E-Mail-Adresse auszuwählen, an die Sie alle E-Mail-Benachrichtigungen erhalten.
Abgesehen davon gibt es eine erweiterte Option, bei der die Software fragt, ob Sie ein WordPress Multisite-Netzwerk haben. Wenn nicht, klicken Sie einfach auf „Nein“.
Nachdem Sie diese Details eingegeben haben, klicken Sie einfach auf die Schaltfläche "Site hinzufügen".
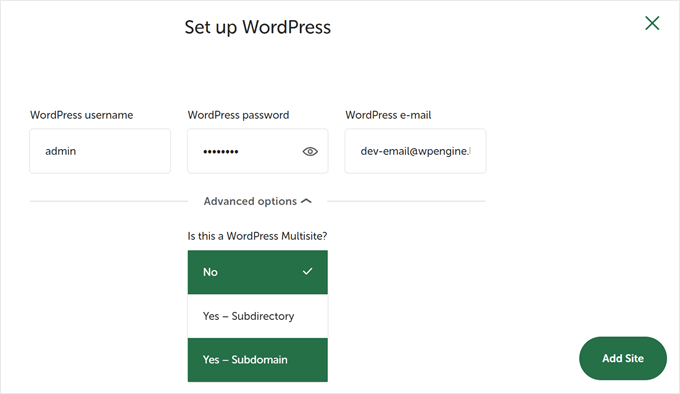
Die Software installiert nun WordPress und richtet Ihre Website ein.
Um die lokale Website zu starten, klicken Sie auf die Schaltfläche 'Site starten' in der oberen rechten Ecke.
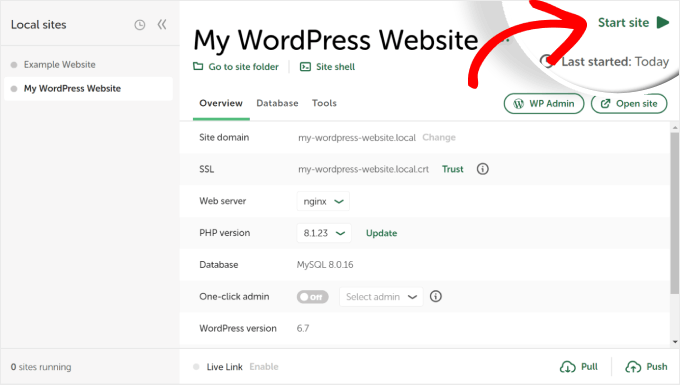
Klicken Sie dann auf die Schaltfläche „WP Admin“, und Sie sehen die WordPress-Admin-Anmeldeseite.
Geben Sie einfach den Benutzernamen und das Passwort ein, die Sie zuvor beim Einrichten der lokalen Website eingegeben haben, und klicken Sie dann auf die Schaltfläche „Anmelden“.
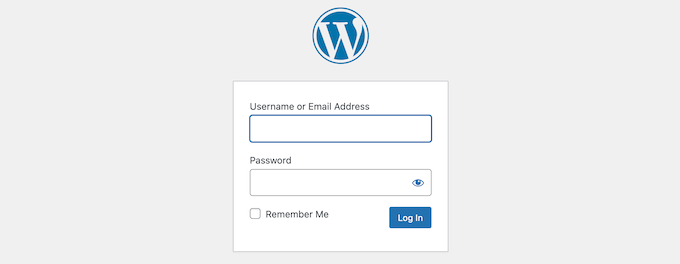
Sie können Ihre lokale Website jetzt auf Ihrem Windows-Computer bearbeiten.
Wenn Sie fertig sind, vergessen Sie nicht, die Website über die Local WP-Software zu stoppen, indem Sie auf die Schaltfläche „Site stoppen“ klicken.
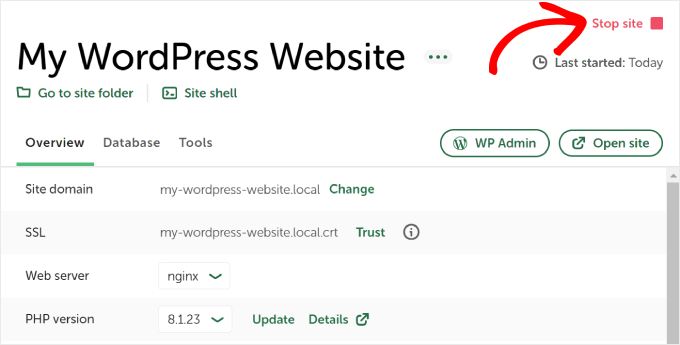
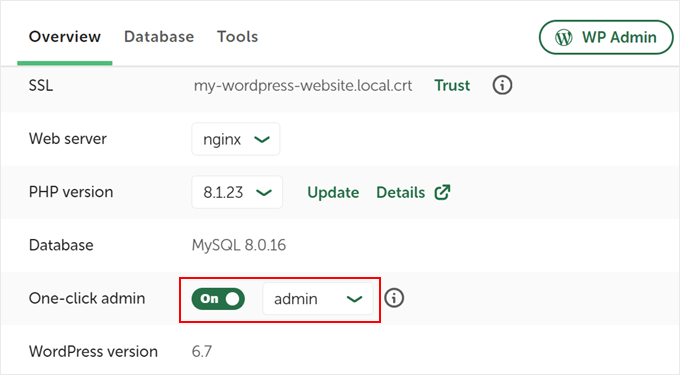
Profi-Tipp: Wenn Sie den Anmeldevorgang überspringen möchten, können Sie in Local WP eine Ein-Klick-Admin-Anmeldung aktivieren.
Um dies zu tun, gehen Sie einfach zurück zum Local WP-Dashboard und schalten Sie den Schalter „One-click admin“ um, bis er „On“ anzeigt. Wählen Sie dann im Dropdown-Menü den Admin-Benutzer aus, der diese Ein-Klick-Anmeldefunktion nutzen kann.
Alternative: WordPress Playground zum Testen von Themes, Plugins und mehr verwenden
WordPress Playground ist ein innovatives Tool, mit dem Sie mit WordPress direkt in Ihrem Webbrowser experimentieren können. Es ist eine virtuelle Sandbox, in der Sie neue WordPress-Themes, Plugins und Funktionen ausprobieren können, ohne eine echte Website zu beeinträchtigen.
WordPress Playground unterscheidet sich in mehreren wichtigen Punkten von einer lokalen WordPress-Umgebung.
Erstens erfordert es keine Installation auf Ihrem Computer und wird nach jeder Verwendung zurückgesetzt, im Gegensatz zu permanenten lokalen Setups. Sie können von jedem Gerät mit einem Browser darauf zugreifen, während lokale Installationen an einen Computer gebunden sind.
Während WordPress Playground ideal für schnelle Tests und zum Lernen ist, bietet eine lokale WordPress-Umgebung auf Ihrem Windows-Computer mehr Flexibilität für langfristige Entwicklungsprojekte.
Für eine detaillierte Anleitung lesen Sie unseren Leitfaden unter wie Sie WordPress Playground in Ihrem Browser verwenden.
Ich habe WordPress auf meinem Windows-Computer installiert, was nun?
Jetzt, da Sie WordPress auf Ihrem Computer haben, können Sie Folgendes tun:
- Lernen Sie grundlegende WordPress-Tipps und Tricks, um Ihre Website besser zu nutzen.
- Probieren Sie verschiedene WordPress-Themes aus, um zu sehen, wie Ihre Website aussehen kann.
- Installieren und testen Sie unverzichtbare WordPress-Plugins, um Ihrer Website neue Funktionen hinzuzufügen.
- Erfahren Sie, wie Sie häufige WordPress-Fehler selbst beheben können.
- Probieren Sie verschiedene Drag-and-Drop-Seitenersteller aus, um Ihre Website gut aussehen zu lassen.
- Erfahren Sie, wie Sie das WordPress-Admin-Passwort auf dem Localhost zurücksetzen, um wieder Zugriff auf Ihre Website zu erhalten.
- Automatisierte Workflows einrichten, um die Verwaltung Ihrer Website zu erleichtern.
- Erfahren Sie mehr über WordPress-Sicherheit, um Ihre Website vor Hackern zu schützen.
- Verschieben Sie Ihre lokale WordPress-Site auf einen Live-Server, wenn Sie bereit sind, sie mit allen zu teilen.
Wir hoffen, dieser Artikel hat Ihnen geholfen zu lernen, wie Sie WordPress lokal auf einem Windows-Computer installieren. Möglicherweise möchten Sie auch unseren Artikel über die Installation von WordPress lokal auf einem Mac-Computer und unseren ultimativen Leitfaden zur Erstellung einer WordPress-Staging-Site sehen.
Wenn Ihnen dieser Artikel gefallen hat, abonnieren Sie bitte unseren YouTube-Kanal für WordPress-Video-Tutorials. Sie finden uns auch auf Twitter und Facebook.


mike
WAMP installiert Apache/2.4.9 (Win32) PHP/5.5.12, WordPress heruntergeladen, wp-config konfiguriert, nichts, absolut nichts passiert.
Irgendwelche Gedanken?
Villi
Hey. So everything worked great and i have been playing around practicing. Now i am going to make another website but keep the practice website also, but i need them to be completely independent from each other since i dont want my “messing around” to affect the new one Should i install wordpress again and follow the same instructions (extract the wordpress folder to C:\wamp\www etc.) and make another database ?
Soll ich kurz gesagt genau den gleichen Prozess wie zuvor befolgen, außer dass ich WAMP offensichtlich nicht erneut herunterladen muss.
Danke
WPBeginner Support
Ja, Sie müssen die gleichen Anweisungen befolgen.
Admin
Wayne
Toller Artikel. Ich habe alles zum Laufen gebracht. Aber ich bin stecken geblieben, als ich versuche, ein Theme hochzuladen, das ich gekauft habe. Ich habe eine persönliche Live-Website mit WordPress. Aber ich wollte eine offline für meinen Arbeitsplatz erstellen, daher benutze ich phpAdmin. Haben Sie Ideen, wie ich gekaufte Themes auf einem Localhost bearbeiten kann?
WPBeginner Support
Das Installieren eines gekauften Themes unterscheidet sich auf einer lokalen Website nicht von einer Live-Website. Gehen Sie einfach zu Design > Themes auf Ihrer lokalen Website. Klicken Sie auf die Schaltfläche "Neues Theme hinzufügen" und dann auf die Schaltfläche "Hochladen". Klicken Sie auf die Schaltfläche "Datei auswählen", um die Theme-Zip-Datei von Ihrem Computer zu finden, und laden Sie sie dann hoch.
Admin
Manoj
Hi
Ich habe alles gemäß der Anleitung hier installiert und meine Website funktionierte einwandfrei. Heute habe ich jedoch versucht, mich bei localhost anzumelden, und es gab einen Fehler. Es heißt, diese Webseite ist nicht verfügbar. ERR_CONNECTION_REFUSED
Bitte helfen Sie
naveenraj
Hallo Herr,
Das Symbol ist orange und ich bekomme leere Seiten, wenn ich auf die Seite localhost/phpmyadmin/ gehe. Bitte helfen Sie mir, das zu lösen.
WPBeginner Support
Bitte siehe WAMP-Dokumentation und Support-Foren.
Admin
bella
„Gehen Sie zu C:\wamp\www und fügen Sie den WordPress-Ordner dort ein.“
Ich kann nirgends etwas finden, das meinen WordPress-Ordner akzeptiert. Hat jemand eine detailliertere Beschreibung, um diesen Schritt für mich zu erledigen? Vielen Dank für all Ihre Beiträge.
Ayesha
Hallo,
Sobald Sie zu wordpress.org gehen und WP installieren, haben Sie einen WordPress-Zip-Ordner. Extrahieren Sie dessen Inhalt, und es wird ein WordPress-Ordner erstellt. Öffnen Sie diesen Ordner und kopieren Sie den Ordner namens WordPress. Gehen Sie nun zu Ihrem WampServer-Ordner und öffnen Sie dann den Ordner www, der sich im WampServer-Ordner befindet. Fügen Sie den Ordner WordPress dort ein, d.h. in den Ordner www.
Sie müssen nur Ihren WordPress-Ordner kopieren und in den www-Ordner von WampServer einfügen.
Ich hoffe, das hilft!
Kush Singh
Wirklich, es ist eine sehr hilfreiche Seite für die Installation von WordPress.
Gute Arbeit, Leute, macht weiter so...
Satish Shihani
Hervorragend... Das gefällt mir wirklich
Schon bei meinem ersten Versuch habe ich die gesamte Installation fehlerfrei durchgeführt.
Vielen Dank für dieses Tutorial
Amir
Smooth and fun, worked like a charm. I had only one problem which was resolved by shutting down a certain Microsoft product…
Thank you.
Paul
Tolles Tutorial, froh, dass ich es gefunden habe, da ich gerade lerne, wie man WAMP und meinen lokalen Server zum Erstellen von WordPress-Websites verwendet. Ich möchte auch eine Live-WordPress-Website auf meinen lokalen Server kopieren, damit ich ein Theme ändern und es dann auf den Remote-Server hochladen kann, und ich frage mich, ob es ein Tutorial dazu gibt? Ich habe das Tutorial zum Hochladen einer Website von meinem lokalen Server auf den Remote-Server gefunden und gelesen, aber nichts zum Kopieren einer Live-Website auf den lokalen Server und zum Funktionieren. Ist das möglich und wenn ja, gibt es ein Tutorial, wie man es erfolgreich erreicht? Vielen Dank im Voraus.
Kvaibahv01
Hallo,
Ich hatte Anfang des Monats einen Wordpress-Blog erstellt und mein WAMP-Server wurde aus bestimmten Gründen deinstalliert…. Ich habe ihn neu installiert> alle gleichen Schritte ausgeführt> den Ordner 'wordpress' in 'site' umbenannt> localhost/site/wp-admin geöffnet, was Folgendes anzeigt:
Willkommen bei WordPress. Bevor Sie beginnen, ... bevor Sie fortfahren.
Datenbankname
Datenbankbenutzername
Datenbankpasswort
Datenbank-Host
Tabellenpräfix (wenn Sie mehr als ein WordPress in einer einzigen Datenbank ausführen möchten)
Wir gehen…………Wir haben es.
Alles in allem………… alles bereit…
Ich habe auf die Schaltfläche „Los geht’s“ geklickt, die „Setup config.File“ öffnete, meinen DB-Namen „site“ eingegeben, „Benutzername“ und „Passwort“ habe ich in „wp-config-sample.php“ bearbeitet und den Benutzernamen auf leer gesetzt und dasselbe mit dem Passwort> Klicken Sie auf Weiter und jetzt wird mir ein Fehler angezeigt: „Kann Datenbank nicht auswählen“:
Wir ... Datenbank.
Sind Sie sicher, dass es existiert?
Hat der Benutzer die Berechtigung, die Seitendatenbank zu verwenden?
Auf einigen Systemen wird der Name Ihrer Datenbank mit Ihrem Benutzernamen vorangestellt, sodass es wie benutzername_seite wäre. Könnte das das Problem sein?
Wenn Sie nicht wissen, wie Sie eine Datenbank einrichten, sollten Sie sich an Ihren Hoster wenden. Wenn alles andere fehlschlägt, finden Sie möglicherweise Hilfe in den WordPress-Supportforen.
Bitte helfen Sie!
WPBeginner Support
Besuchen Sie localhost/phpmyadmin, um zu bestätigen, dass der von Ihnen eingegebene Datenbankname korrekt ist.
Admin
Geraldine
Hallo. Ich hoffe, Sie können mir dabei helfen. Nachdem ich die Testseite erstellt habe, wie kann ich diese online mit meinem Freund teilen?
Rhian Williams
thank you so much for this I have been battling with localhost software all day and this worked first time for me
moneytechnicals
Ich habe WAMP unter Windows 7 32 Bit installiert. Und möchte WordPress verwenden. Aber es wird nicht angezeigt, um die Konfigurationsdatei zu erstellen. Es wird ein Fehler wie dieser angezeigt:
Warnung:
require(C:wampwwwwordpress-trunk/wp-blog-header.php): konnte nicht geöffnet werden
stream: Datei oder Verzeichnis nicht gefunden in
C:wampwwwwordpress-trunkindex.php in Zeile 18
Bitte helfen Sie mir, hier herauszukommen. Vielen Dank im Voraus.
Campbell Sinclair
Hallo und an alle, die diese Fehlermeldung googeln und wie ich feststecken,
Sie haben wahrscheinlich das ZIP-Installationsprogramm heruntergeladen und entpackt, vielleicht haben Sie es irgendwann abgebrochen, weil das Entpacken / Übertragen des Ordners im Inneren langsam war. Ich bin mir nicht sicher, was passiert ist, das ist auch nicht der Punkt.
Dieser Fehler tritt auf, wenn nicht alle Dateien vorhanden sind. Versuchen Sie, in Ihrem WordPress-Ordnerverzeichnis mit einer einfachen Suche nach wp-blog-header zu suchen. Die Indexseite (die zuerst von einem Browser geladen wird, wenn er ein Verzeichnis öffnet) fordert nur diese Datei an, aber sie wird einfach nicht dort sein, wenn sie im Verzeichnis ist. Index.php fordert wp-blog-header an und alle anderen sagten, ich bin nicht die Datei, die Sie suchen.
Ich habe die vorherige Version heruntergeladen und sie war vollständig, da ich die Installationsseite wie erwartet hatte. Dies ist die schnellste und sicherste Lösung. Wenn Sie dies tun, sollten Sie in der Lage sein, auf die neueste Version zu aktualisieren, sobald Sie sie installiert haben.
WPBeginner-Mitarbeiter
Ja, das können Sie.
ArtaGene
Da keine Spezifikationen aufgeführt waren, bin ich mir nicht sicher, ob mein alter Computer über genügend Speicher verfügt ... kann ich es auf einem tragbaren Laufwerk (per USB angeschlossen) installieren und auf diese Weise verwenden?
WPBeginner-Mitarbeiter
Es scheint, als ob WAMP nicht richtig auf Ihrem Computer installiert wurde. Versuchen Sie die Neuinstallation oder XAMP.
jerry
Ich erhalte diesen Fehler direkt am Ende der Installation.
httpd.exe – Systemfehler
Das Programm kann nicht gestartet werden, da MSVCR110.dll auf Ihrem Computer fehlt. Versuchen Sie, das Programm neu zu installieren, um dieses Problem zu beheben
Problem
nikhil
Ich habe Wamp Server installiert, aber wenn ich zu phpMyAdmin gehe, wird mir folgender Fehler angezeigt:
Verboten
Sie haben keine Berechtigung, auf /phpmyadmin/ auf diesem Server zuzugreifen.
Roshan Bagdiya
error
#1045 – Access denied for user ‘root’@’localhost’ (using password: NO)
beim Zugriff auf phpmyadmin
wie man es löst
WPBeginner-Mitarbeiter
Bitte stellen Sie sicher, dass das Wamp-Server-Symbol in Ihrer Taskleiste grün wird, bevor Sie auf phpMyAdmin klicken. Sie können auch versuchen, phpMyAdmin manuell aufzurufen, indem Sie diese URL in die Adressleiste Ihres Browsers eingeben: http://localhost/phpmyadmin/
Diviya
Habe Ihre Vorgehensweise Schritt für Schritt befolgt. Wenn ich jetzt versuche, die Datenbank für WordPress einzurichten, und auf phpMyAdmin klicke, erhalte ich die Fehlermeldung 'HTTP Error 404. The requested resource is not found'.
Syed Balkhi
Erledigt – danke für den Vorschlag.
Carrie
Zur Info, der „Skype“-Fehler tritt auch bei einem ähnlichen Programm namens Team Viewer auf. Eine ähnliche einfache Lösung besteht darin, das Programm aufzurufen und das Kontrollkästchen bezüglich der Ports 80 und 443 zu ändern. Ich stimme anderen zu, wenn nichts anderes, sollten Sie direkt nach der WAMP-Installation einen Link zu den Fehlerbehebungsinformationen im Artikel einfügen. Ich war frustriert, dass ich immer wieder einen Fehler bekam, und beschloss, die Kommentare durchzulesen, bis ich eine Lösung fand.
Anand Upadhyay
Vorgeschlagene Bearbeitung. Bitte ersetzen
C:wampwww
mit
C:wampwww
Aditya Pranav
Alles erledigt, aber wenn ich auf phpMyAdmin klicke, öffnet sich eine Fehlerseite im Browser und zwar:
HTTP-Fehler 404.0 – Nicht gefunden
Die gesuchte Ressource wurde entfernt, ihr Name wurde geändert oder sie ist vorübergehend nicht verfügbar.
Derick
Wie wäre es mit einem Tutorial, das von diesem ausgeht und erklärt, wie man mehrere Websites hinzufügt, die offline bearbeitet werden können, wie die obige?
Vijay
Vielen Dank dafür. Es hat bei mir funktioniert.
Meine einzige Beschwerde ist, dass der Skype-Fehler direkt nach dem WAMP-Installationsschritt hätte auftreten sollen. Ich habe viel Zeit damit verbracht, herauszufinden, wie ich das WAMP-Symbol von orange auf grün bekomme. Letztendlich stellte ich fest, dass IIS 8.5 Port 80 verwendete und ich die WWW-Publishing-Dienste von Services.msc stoppen und Apache auf WAMP neu starten musste, damit es funktioniert.
M♥ηyαηє Ramołło™
Tolles Tutorial
Jim
Great tutorial. Big thanks. Only you should post the info on Skype port before in the beginning, as I did everything by myself and changed the port number in wamp folder. Then here I found out that there was easier way doing it on Skype
lobsterhands
Tolle Tutorials. Vielen Dank, dass Sie so klar und prägnant sind.
Lis
Toller Artikel! Ich habe alles installiert und es funktioniert. Allerdings funktionieren zusätzliche Seiten, die ich über die Startseite hinaus erstelle, nicht. Ich erstelle die Seite in WordPress, aber wenn ich dem 'Anzeigen'-Link folge, erhalte ich eine 404. Irgendeine Idee?
pramod
Alles heruntergeladen. Wenn ich im Web schreibe http://localhost/mysite/, wird ein Fehler angezeigt
Die angeforderte URL /mysite/ wurde auf diesem Server nicht gefunden.
Monica
Sehr hilfreich, danke.
St. Buzo von C.O.B. ®
Bingo..!! Das war so hilfreich.!! Phase eins erledigt, ich habe installiert..!!
anbu
Sehr geehrter Herr,
dieser Blog ist sehr nützlich für mich..gemäß Ihrer Anweisung habe ich eine Website lokal erstellt. Aber wenn ich versuche, dieselbe Website von einem anderen Computer im selben LAN aus zu öffnen, kann ich das nicht. Bitte helfen Sie mir.
Ich habe es über die folgende Methode auf einem anderen Computer versucht
1.http://192.168.1.88/(sitename).
2.http://localhost/(sitename)
Die Seite öffnet sich nicht
anbu
Sehr geehrter Herr,
dieser Blog ist sehr nützlich für mich. Nach Ihrer Anweisung habe ich eine Website lokal erstellt. Aber wenn ich versuche, dieselbe Website von einem anderen Computer im selben LAN aus zu öffnen, kann ich das nicht. Bitte helfen Sie mir.
Ich habe es über die folgende Methode auf einem anderen Computer versucht:
1.http://192.168.1.88/(sitename).
2.http://localhost/(sitename)
Lyle Denman
http://forum.wampserver.com/read.php?2,121118
Dies sollte viele Ihrer Fragen beantworten. Beachten Sie, dass Sie auch die Optionen Ihrer Datenbank aktualisieren müssen (von localhost/phpmyadmin/). wp_options > siteurl und wp_options > home sollten von http://localhost/database_name zu http://your_local_ip_address/database_name geändert werden (zum Beispiel http://192.168.0.11/coolsite/).
Stellen Sie sicher, dass Sie c:/wamp/bin/apache/apache2.4.9/conf/httpd.conf öffnen
In dieser Datei, nach der Zeile: # onlineoffline tag – don’t remove, add the following 2 lines:
Require all granted
Require ip 192.168.0 (oder was auch immer die ersten 3 Gruppierungen Ihrer lokalen IPv4-Adresse sind)
Dann finden Sie in derselben Datei die Zeile: #Include conf/extra/httpd-vhosts.conf und entfernen Sie das # vom Anfang dieser Zeile.
Öffnen Sie dann die Datei c:/wamp/bin/apache/apache2.4.9/conf/extra/httpd-vhosts.conf und kommentieren Sie den dort vorhandenen Code aus (nur um die Standardeinstellungen zu behalten) und fügen Sie Folgendes ein:
ServerName localhost
DocumentRoot c:/wamp/www
AllowOverride All
Speichern Sie diese Dateien, starten Sie alle WAMP-Dienste neu und genießen Sie Ihre LAN-Entwicklung.
Lina
Dieser Beitrag war SEHR hilfreich!! Vielen Dank!
WPBeginner-Mitarbeiter
Zuerst müssen Sie Wampserver vollständig von Ihrem Computer deinstallieren. Laden Sie dann eine frische Kopie herunter und versuchen Sie, es neu zu installieren. Wenn dies nicht funktioniert, empfehlen wir Ihnen, XAMPP zu verwenden, eine alternative Software mit nahezu der gleichen Software (Apache, PHP, MySQL).
Jokerman
Ich habe auch EasyPhP ausprobiert, aber das hat auch nicht funktioniert. Habe gerade Xampp installiert und das scheint zu funktionieren. Vielen Dank für den Rat.
Jokerman
Ich habe es heruntergeladen und versucht zu installieren. Es hat nicht funktioniert, da mir eine DLL-Datei fehlte. Ich habe die notwendige Software von MS heruntergeladen und diesmal schien die Installation gut verlaufen zu sein… keine Fehlermeldungen und das Wampserver-Symbol ist wie gewünscht auf meinem Desktop erschienen. Wenn ich jedoch auf das Wampserver-Symbol klicke, fragt es: Möchten Sie, dass das folgende Programm von einem unbekannten Herausgeber Änderungen an Ihrem Computer vornimmt? (Programmname: wampmanager.exe) Wenn Sie auf Ja klicken, schließt sich dieses Fenster und dann passiert nichts. Haben Sie irgendwelche Hinweise, was ich als Nächstes versuchen könnte? Vielen Dank.
cmills
Die neueste Version von WAMP verwendet PHP 5.5.12, das nicht mit WordPress kompatibel ist!
WPBeginner-Mitarbeiter
Das liegt wahrscheinlich daran, dass Ihre Website unter 127.0.0.1, einer lokalen Loopback-Adresse, aufgerufen wird, während die andere IP-Adresse Ihre LAN-Adresse ist. Das sind zwei verschiedene Dinge.
Um das Teilen zu ermöglichen, müssen Sie diese Zeile zu Ihrer httpd.conf-Datei hinzufügen: Listen 192.168.1.4:80 Stellen Sie sicher, dass Ihr Computer eine statische IP-Adresse verwendet und diese auf die IP-Adresse eingestellt ist, die Sie in der Apache-Konfigurationsdatei eingeben.
Sie müssen auch sicherstellen, dass WordPress Ihre IP-Adresse als URL Ihrer Website speichert und nicht localhost. Um dies zu erreichen, müssten Sie WordPress von 192.168.1.4/mysite anstelle von localhost/mysite installieren.
Naresh
Vielen Dank.
archetypechris
Hallo und vielen Dank für die tolle Anleitung! Ich habe ein kleines
Problem. Alles hat gut funktioniert, als ich der Anleitung gefolgt bin und meine Seite wird
gut geladen, aber wenn ich versuche, von einem anderen Computer in meinem Haus aus darauf zuzugreifen mit der
Adresse: 192.168.1.4/mysite, sagt es, dass ich keine Berechtigung habe, die Seite anzuzeigen.
Weiß jemand, wie man das beheben kann? Danke!
WPBeginner-Mitarbeiter
Sie können das Duplicator-Plugin oder BackupBuddy für Website-Übertragungen verwenden.
Anji
Es ist das erste Mal, dass ich eine Website in WP erstelle, und dieser Beitrag war einfach und hat wie am Schnürchen funktioniert! Vielen Dank!
WPBeginner-Mitarbeiter
George,
Das WordPress, das Sie auf Ihrem lokalen Computer installieren, ist nur auf diesem Computer verfügbar.
Es gibt spezielle Software, mit der Sie Wampserver auf einem USB-Stick installieren können, den Sie dann zur Arbeit mitnehmen können.
George
Danke für die schnelle Antwort,
Heute habe ich Wamp auf meinem Arbeitslaptop installiert und über phpadmin meine SQL-Datenbank von meinem Heimcomputer exportiert und auf meinen Arbeitslaptop importiert.
Ich habe versucht, den obigen Prozess auf meinem Arbeitslaptop zu spiegeln und die Datenbank gleich zu benennen. Ich konnte auf meinem Arbeitslaptop auf meine Website zugreifen, aber es scheint, dass meine Plugins und mein Theme nicht übertragen wurden. Habe ich einen Schritt übersehen? Muss ich einen weiteren Ordner übertragen?
Ich plante, auf einem lokalen Server zu arbeiten und diese Übertragungssequenz zwischen Arbeit und Zuhause durchzuführen, und ich fragte mich, ob das überhaupt möglich ist (ich habe von URL-Verknüpfungsproblemen gehört). Eine kurze Checkliste oder Schritt-für-Schritt-Anleitung wäre sehr hilfreich.
Danke,
-George
rustomQ
excellent guide!!!!!! got everything up and running the first time!!! thank you oh so much!!!!
George
Das funktioniert wunderbar! Ich arbeite seit ein paar Tagen mit WordPress und habe am Wochenende einige Fortschritte gemacht.
Ein Problem:
Wie kann ich das, was ich auf meinem Heimcomputer habe, mitnehmen und an meinem Arbeitscomputer im Büro daran arbeiten? Kann ich das auf WordPress hochladen und von überall daran arbeiten? (Es ist mir egal, wenn ich während der Entwicklung eine URL wie http://www.website.wordpress.com habe) Welche Optionen habe ich, um nach dem oben genannten Prozess zu arbeiten und meine Entwicklungsarbeit zu zeigen.
Ich bin ein absoluter Neuling, aber bereit zu lernen. Ein kurzes Tutorial zu diesem Prozess und den Optionen wäre sehr willkommen. Tolle Arbeit bisher und vielen Dank für all die Ressourcen, die Sie uns zur Verfügung stellen.
Thomas
*facepalm* Es gibt einen Link direkt darüber, um das Problem zu lösen. Entschuldigung dafür! Nochmals vielen Dank für dieses großartige Tutorial!