Wir haben Ihnen gezeigt, wie Sie WordPress auf Windows und Mac installieren können. Kürzlich fragte jedoch einer unserer Nutzer, ob es möglich sei, dieselbe lokale WordPress-Installation sowohl auf der Arbeit als auch zu Hause zu verwenden. In diesem Artikel zeigen wir Ihnen, wie Sie WordPress mit XAMPP auf einem USB-Stick installieren können, so dass Sie Ihre lokale WordPress-Installation auf jedem beliebigen Computer verwenden können.
XAMPP ist ein Softwarepaket mit Apache-Webserver, PHP, MySQL und phpMyAdmin. Sie können es auf Ihrem Windows-, Linux- oder Mac-Betriebssystem installieren. Wir zeigen Ihnen, wie Sie es auf einem USB-Laufwerk installieren, das an einen Windows-PC angeschlossen ist, aber die Installationsmethode ist so ziemlich dieselbe, egal wo Sie es installieren.
Als Erstes müssen Sie XAMPP lite herunterladen. Gehen Sie auf die XAMPP-Download-Seite und klicken Sie dann auf Weitere Downloads.
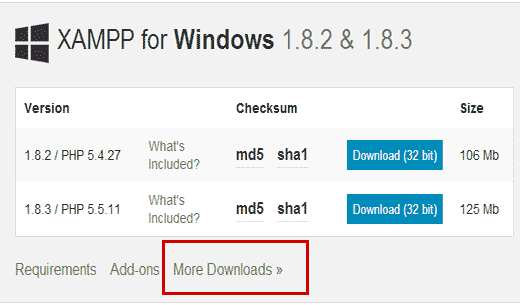
Sie werden auf die Sourceforge-Website weitergeleitet, wo Sie zunächst auf XAMPP für Windows und dann auf die neueste Version klicken müssen.
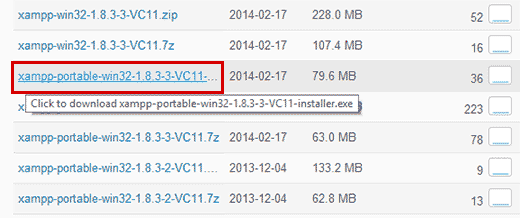
Auf dem nächsten Bildschirm wird eine Liste der für diese Version verfügbaren Dateien angezeigt. Scrollen Sie nach unten und suchen Sie die portable Version im .exe-Format. Klicken Sie auf den Dateinamen, um den Download zu starten.
Sobald Sie die portable XAMPP-Datei heruntergeladen haben, müssen Sie auf die Datei doppelklicken, um die Installation zu starten. Während der Installation werden Sie aufgefordert, den Ort zu wählen, an dem Sie XAMPP installieren möchten. Sie müssen auf das Ordnersymbol klicken und dann Ihr USB-Laufwerk auswählen.
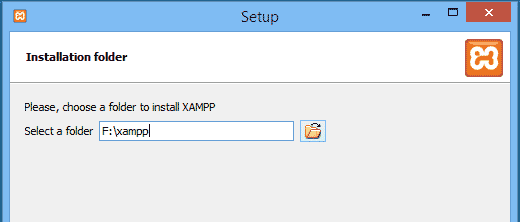
Klicken Sie auf Weiter, um die Installation fortzusetzen. Das Installationsprogramm wird nun XAMPP auf Ihrem USB-Laufwerk installieren. Nach der Installation müssen Sie zu Ihrem USB-Laufwerk gehen und dann den XAMPP-Ordner öffnen.
Um XAMPP zu starten, müssen Sie xampp-control.exe von Ihrem USB-Laufwerk ausführen. Daraufhin wird das XAMPP-Kontrollzentrum angezeigt, das wie folgt aussieht:
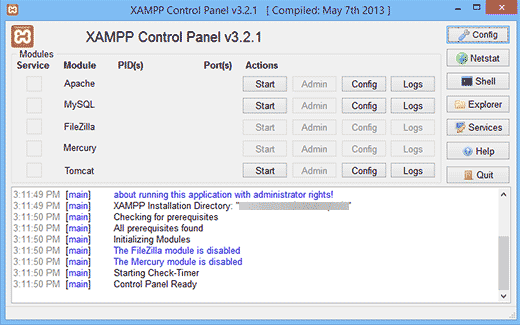
Sie müssen den Apache-Webserver und MySQL starten, indem Sie auf die Start-Schaltfläche neben den beiden Anwendungen klicken. Sie werden von der Windows-Firewall dazu aufgefordert, den Zugriff auf beide Anwendungen zu erlauben.
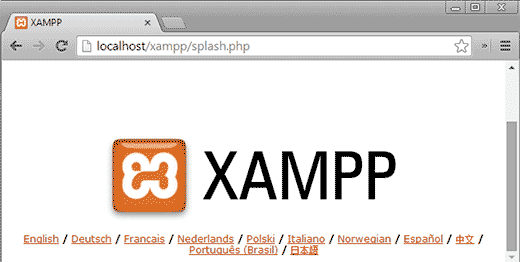
Öffnen Sie nun einen Webbrowser und geben Sie http://localhost/ in die Adressleiste ein. Sie werden von dem XAMPP-Startbildschirm begrüßt. Dies bedeutet, dass Sie XAMPP erfolgreich auf Ihrem USB-Laufwerk installiert haben.
WordPress auf einem USB-Stick installieren
Bis jetzt haben Sie erfolgreich den Apache-Webserver mit MySQL und PHP auf Ihrem USB-Stick installiert. Der nächste Schritt ist die Installation von WordPress selbst. Die Installation von WordPress auf dem USB-Stick unterscheidet sich nicht wesentlich von der Installation auf Ihrem Windows- oder Mac-Computer.
Zuerst musst du dein USB-Laufwerk öffnen und zum Ordner htdocs in deinem XAMPP-Installationsverzeichnis gehen. Erstellen Sie einen neuen Ordner in htdocs. Dieser Ordner wird deine lokale WordPress-Site sein. Du kannst ihn nach Belieben benennen. Für dieses Tutorial nennen wir ihn site1.
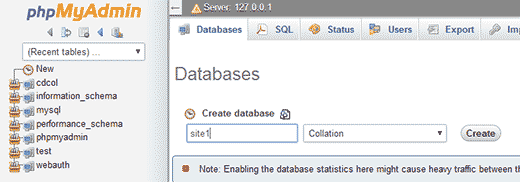
WordPress benötigt eine MySQL-Datenbank, um zu funktionieren, daher müssen Sie vor der Installation eine Datenbank erstellen. Um eine solche zu erstellen, müssen Sie einen Webbrowser öffnen und http://localhost/phpmyadmin in die Adressleiste eingeben. Daraufhin wird phpMyAdmin geöffnet, eine webbasierte Datenbankverwaltungssoftware. Klicken Sie in der oberen Menüleiste auf Datenbanken und geben Sie dann einen Namen für Ihre Datenbank ein, bevor Sie auf die Schaltfläche Erstellen klicken.
Jetzt brauchen wir WordPress. Besuchen Sie einfach WordPress.org und laden Sie eine neue Kopie von WordPress auf Ihren Computer herunter. Entpacken Sie die heruntergeladene .zip-Datei auf Ihren Desktop und öffnen Sie sie.
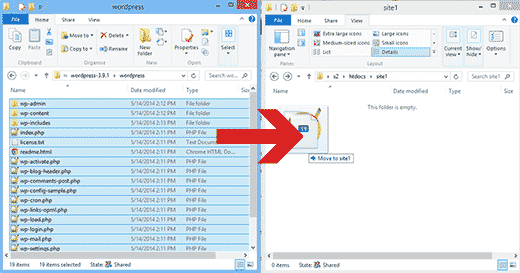
Kopieren Sie nun den Inhalt des Ordners wordpress und fügen Sie ihn in den Ordner /htdocs/site1 auf Ihrem USB-Laufwerk ein.
Sobald Sie die WordPress-Dateien kopiert haben, können Sie die WordPress-Installation starten, indem Sie Ihre Website unter http://localhost/site1 in einem Webbrowser aufrufen.
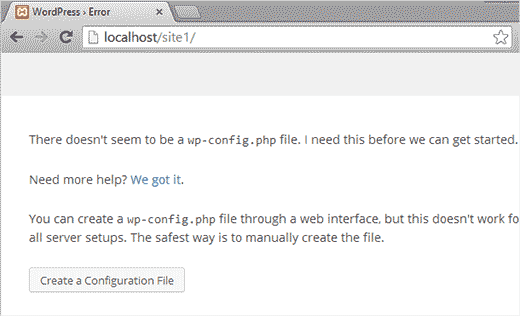
WordPress wird Sie darüber informieren, dass es die WordPress-Konfigurationsdatei nicht gefunden hat, so dass Sie eine erstellen müssen, indem Sie auf die Schaltfläche Konfigurationsdatei erstellen klicken.
Geben Sie auf dem nächsten Bildschirm den Namen der Datenbank an, die Sie zuvor erstellt haben. In das Feld Benutzername müssen Sie root eingeben und das Feld Passwort leer lassen. Klicken Sie auf die Schaltfläche Senden, um fortzufahren.
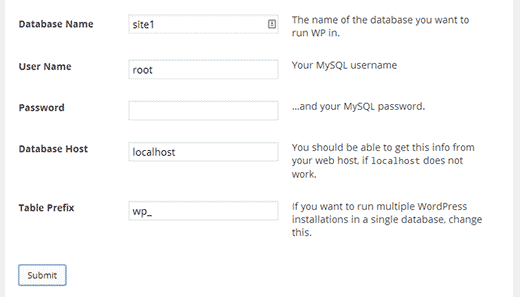
WordPress wird nun versuchen, eine Verbindung zu Ihrer Datenbank herzustellen. Wenn der Versuch erfolgreich war, wird eine Erfolgsmeldung angezeigt. Klicken Sie auf die Schaltfläche Run Install, um fortzufahren.
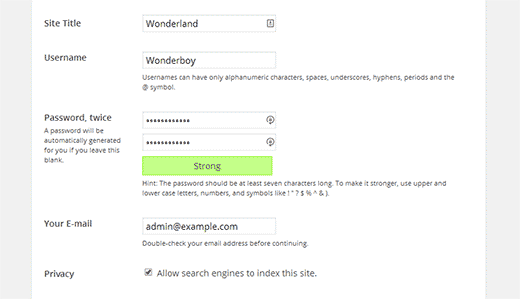
Sie werden aufgefordert, Ihre Website-Informationen anzugeben und einen Admin-Benutzernamen und ein Passwort zu erstellen. Dieser Admin-Benutzername und das Passwort werden für die Anmeldung im WordPress-Administrationsbereich verwendet. Außerdem müssen Sie eine E-Mail-Adresse angeben. Im Abschnitt “Datenschutz” können Sie das Häkchen bei ” Suchmaschinen die Indizierung dieser Website gestatten” entfernen. Wenn Sie fertig sind, klicken Sie auf die Schaltfläche Installieren am unteren Rand.
Das ist alles, Sie haben WordPress erfolgreich installiert. Sie können sich nun bei Ihrer Website anmelden und tun, was Sie wollen. Um eine weitere WordPress-Site auf demselben USB zu erstellen, erstellen Sie einfach einen weiteren Ordner im Verzeichnis htdocs und wiederholen Sie den Vorgang.
Wir hoffen, dass dieser Artikel Ihnen geholfen hat, WordPress auf einem USB-Stick zu installieren. Sie können diesen USB-Stick nun mitnehmen. Beachten Sie, dass Ihr USB-Stick nur mit Windows-Computern funktioniert. Vielleicht interessiert Sie auch unsere Anleitung zur Verwendung von WordPress in Ihrem Browser mit WordPress Playground oder unsere Expertenauswahl der besten Drag-and-Drop-WordPress-Seitenerstellungsprogramme.
Wenn Ihnen dieser Artikel gefallen hat, dann abonnieren Sie bitte unseren YouTube-Kanal für WordPress-Videotutorials. Sie können uns auch auf Twitter und Facebook finden.


martine
Hi,
Installed all in good order. When trying to login into wordpress I get the following error : One or more database tables are unavailable. The database may need to be repaired.
Clicking on the link for repair I get the below and I have to delete the last line referring to the repair. If I do this I get another pop up saying I need to add it again and try again. It is a continious circle with no end.
How to solve this?
The wp_users table is okay.
The wp_usermeta table is okay.
The wp_posts table is okay.
The wp_comments table is okay.
The wp_links table is okay.
The wp_options table is okay.
The wp_postmeta table is okay.
The wp_terms table is okay.
The wp_term_taxonomy table is okay.
The wp_term_relationships table is okay.
The wp_termmeta table is okay.
The wp_commentmeta table is okay.
Repairs complete. Please remove the following line from wp-config.php to prevent this page from being used by unauthorized users.
define(‘WP_ALLOW_REPAIR’, true);
WPBeginner Support
Hi Martine,
If this is a fresh WordPress install and you don’t have any content, then you may want to resinatll WordPress. If it does have content, then you may need to repair tables from PhpMyAdmin.
Admin
rajendra upadhyaya
sir
is there any way to install wordpress on usb with WAMP and how much memory it uses
Miran Potocnik
Hello,
We use WP on server. If I install Apache web server with MySQL and PHP on my USB stick and copy the contents of wordpress folder from server and paste it in the /htdocs/site1 folder on my USB drive. Does it mean that the web pages will be the same? How I can synchronize them?for example: If I change something WP on server side that will be changed on local side, when network be up.
Armando
I used (Microsoft) DISKPART in order to change my USB stick into a bootable disk (FAT32) to be used with XAMPP. Before, it would not install.
You may want to add this tip to the tutorials.
Thanks for your tutorial and best regards!
Jay
I’m not sure these steps still work – I have done the process before (year or so ago) and it worked. Now doing it again on a new drive, and with all updated components, step two of the wordpress installation is always (almost) blank. So something is going wrong. I have tried twice and same thing.
Any tips, based on updated components?
Joshua Harman
Is there any way you’d e willing to do this tutorial for Mac? I’ve been wracking my brain for hours trying to get it to work but don’t have a ton of experience
brainfreeze
hi joshua. i am wondering if you have found a way for Mac? if yes, please share. thanks.
Mahendra
can we run php file in another computer which does not have xampp using usb sticks
Amonza
I am not quite exactly sure what you are asking, but if you have xampp installed on a usb stick as described you should be able to take that stick to any computer and run the apache server and be able to serve php pages from the htdocs folder on the pen drive.
If you are running an IDE that needs the path to php.exe you could point it to the php folder on the pen drive.
Lisa
For those who have done this, what size USB drive do you suggest?
Ahmad Fahrurroji
Good idea, I’ve never used this option installing xampp on usb stick but It’s good to try. Thanks.
WPBeginner Staff
you can transfer your site using BackupBuddy (here is a tutorial) or using Duplicator.
Ian Delemare
I like the idea of having a portable version of WordPress and being able to develop a site in many locations. But what is the procedure to transfer a developed site (including images, posts plugins etc) from a USB stick to the web?
Bill Gibson
I had put a multisite version of WP on a USB stick a couple of years ago. I added a portable version of Firefox, and included the Mobile Barcoder plugin. The multiple sites could be used for classes, projects or presentations, and it was a nice organizational tool. Add text, links & images, and embed for videos or larger files. As long as you put your USB stick in an Internet connected device, you had a great presentation tool. The “Mobile Barcoder” app created QR codes, on the fly, so I could pull up a site from the Flash drive, and then generate a QR code to share links with the audience.
WPBeginner Staff
Yes there is, but we are not sure whether it works as a portable app or not
Zeeshan Asif
What about Mac ???
WPBeginner Staff
Unfortunately MAMP the mac alternative to XAMPP can not be run from an external drive. There is an alternative called AMPPS but we have not tried it.
DigitizedSociety
XAMPP has a mac version.
James B.
Great post. I’ve been using “Instant WP” for my local and USB stick installs of WordPress…but I may try XAMPP out! Thanks for the great work.