Wenn Sie WordPress auf Ihrem Mac installieren, können Sie seine Funktionen erkunden, ohne einen Web-Host zu benötigen.
Sie lernen die Funktionsweise von WordPress kennen und sehen, ob es für Ihr Projekt geeignet ist. Es ist auch ideal, um Themes und Plugins zu testen, bevor Sie Ihre Website live schalten. Außerdem gibt Ihnen das Experimentieren vor Ort die Freiheit, Fehler zu machen und zu lernen.
Wir haben viel mit lokalen Websites herumgespielt, sowohl auf Mac- als auch auf Windows-Computern. In diesem Tutorial zeigen wir Ihnen 2 einfache Methoden zur Einrichtung von WordPress auf Ihrem Mac.
Hinweis: Sie verwenden keinen Mac? Wir haben auch eine Anleitung, wie man WordPress lokal unter Windows installiert.
Warum WordPress lokal auf dem Mac installieren?
Normalerweise benötigen Sie für eine WordPress-Website ein Webhosting-Konto und einen Domainnamen.
Die Kernsoftware von WordPress kann jedoch kostenlos heruntergeladen und lokal auf Ihrem Computer ausgeführt werden. Diese lokale WordPress Website wird im Allgemeinen nicht im Internet verfügbar sein und kann nur auf Ihrem Computer angezeigt werden.
Der Vorteil dieses Ansatzes ist, dass Sie privat mit WordPress üben können, es ausprobieren und sehen können, welche Art von Websites Sie erstellen können.
Sie können diese lokale Installation auch verwenden, um verschiedene WordPress Themes und Plugins zu testen, bevor Sie sie auf Ihrer Live-Website installieren.
Was brauchen Sie, um WordPress lokal auf dem Mac zu installieren?
WordPress ist hauptsächlich in PHP geschrieben, einer serverseitigen Programmiersprache. Um PHP auszuführen, benötigen Sie eine Webserver-Software und ein installiertes MySQL-Datenbankmanagementsystem.
Nun, all diese Software unabhängig voneinander zu installieren und sie miteinander arbeiten zu lassen, klingt nach einer entmutigenden Aufgabe.
Glücklicherweise gibt es kostenlose Werkzeuge, mit denen die Installation auch für weniger technisch versierte Benutzer sehr einfach ist. In diesem Sinne finden Sie hier 2 Methoden zur einfachen lokalen Installation von WordPress auf einem Mac ohne spezielle Kenntnisse in der Server-Administration:
Sind Sie bereit? Bringen wir WordPress auf Ihrem Computer zum Laufen.
1. WordPress lokal auf dem Mac mit Local WP installieren (empfohlen)
Local WP ist ein WordPress-Entwicklungstool, mit dem Sie ganz einfach einen lokalen Server auf Ihrem Mac-Computer einrichten können. Sie können Local WP auch unter Windows und Linux verwenden, um WordPress einzurichten.
Zunächst müssen Sie die lokale Website besuchen und auf den Button “Herunterladen” in der oberen rechten Ecke der Ansicht klicken.
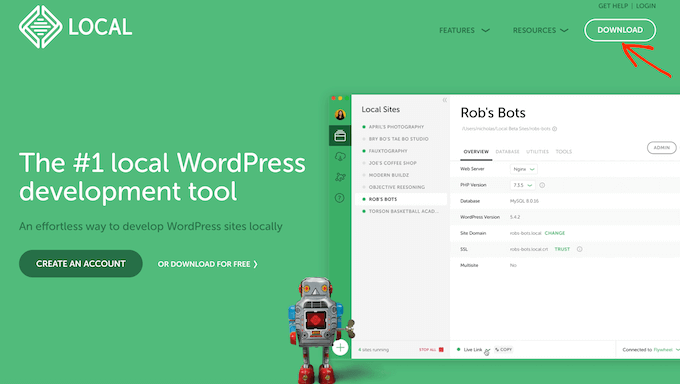
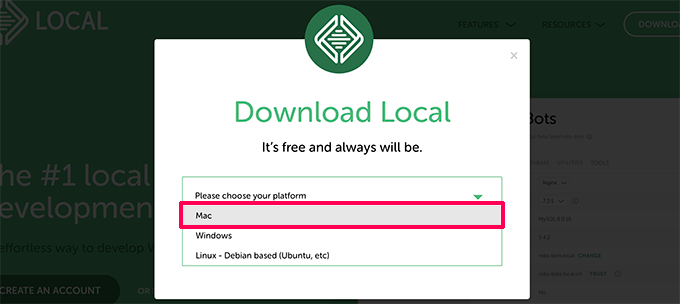
Daraufhin öffnet sich ein Popup-Fenster zum Herunterladen von lokalen Dateien.
Hier wählen wir Mac als Plattform.
Vor Ort werden Sie dann gebeten, ein kurzes Formular auszufüllen.
Nachdem Sie Ihren Namen, Ihre E-Mail-Adresse und Ihre Telefonnummer eingegeben haben, können Sie auf den Button “Jetzt anfordern” klicken.
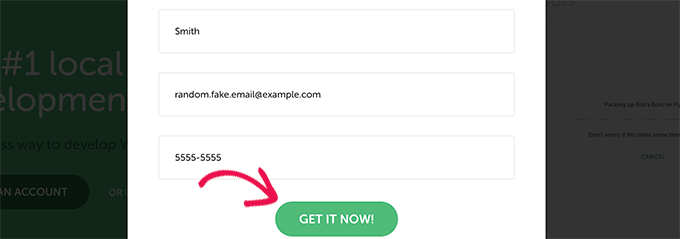
Dadurch wird die lokale Installationsdatei auf Ihren Computer heruntergeladen. Sie können die heruntergeladene Datei mit einem Doppelklick öffnen, sobald sie heruntergeladen ist.
Daraufhin wird ein Einrichtungsassistent angezeigt, der Sie durch den Installationsprozess von Local auf Ihrem Computer führt.
Mac Benutzer müssen die lokale Anwendung einfach in ihren Ordner “Programme” ziehen.
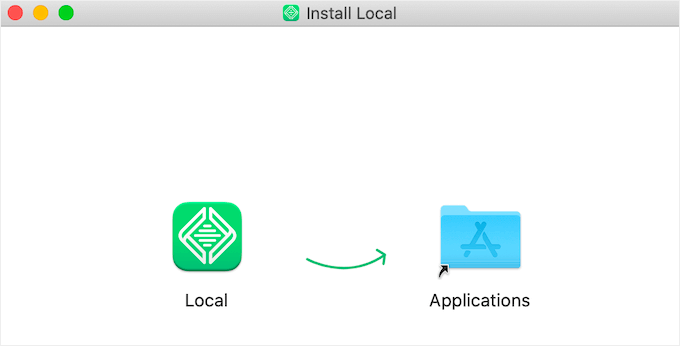
Sobald die Installation abgeschlossen ist, können Sie die lokale Anwendung aus dem Ordner “Programme” starten.
Beim ersten Start werden Sie möglicherweise aufgefordert, einige Fragen zu stellen und ein kostenloses lokales Konto zu erstellen. Diese Schritte sind optional und Sie können sie überspringen, wenn Sie möchten.
Erstellen einer WordPress-Website in Local
Local macht es sehr einfach, eine lokale Website zu erstellen und WordPress schnell zu installieren.
Klicken Sie einfach auf den Button ‘Neue Website erstellen’, um fortzufahren.
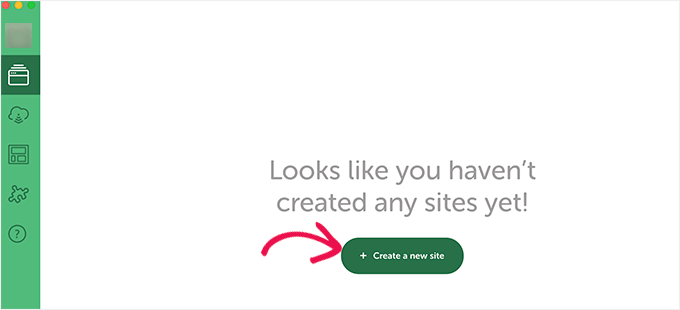
In der nächsten Ansicht müssen Sie den Namen Ihrer Website eingeben.
Klicken Sie anschließend auf den Button “Weiter”.

Als nächstes werden Sie aufgefordert, Ihre Plattform auszuwählen.
Local ermöglicht es Ihnen, die Version von PHP, Apache und MySQL auszuwählen, die Sie verwenden möchten.
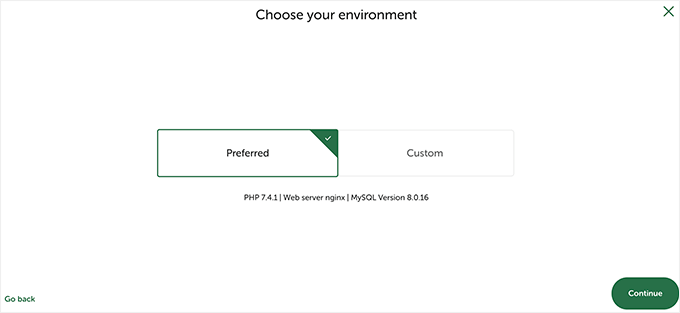
Wenn Sie unsicher sind, wählen Sie die “bevorzugten” Einstellungen und klicken Sie auf den Button “Weiter”.
Schließlich müssen Sie einen WordPress-Benutzernamen und ein Passwort eingeben. Dann können Sie auf den Button “Website hinzufügen” klicken.
Local wird nun WordPress herunterladen und installieren, um Ihre Website zu erstellen. Möglicherweise werden Sie aufgefordert, Ihren Mac-Benutzernamen und Ihr Passwort einzugeben, um Änderungen vorzunehmen.
Sobald Sie fertig sind, sehen Sie Informationen über Ihre neu erstellte Website mit Buttons, um den WordPress-Verwaltungsbereich zu besuchen oder Ihre lokale Website anzuzeigen.
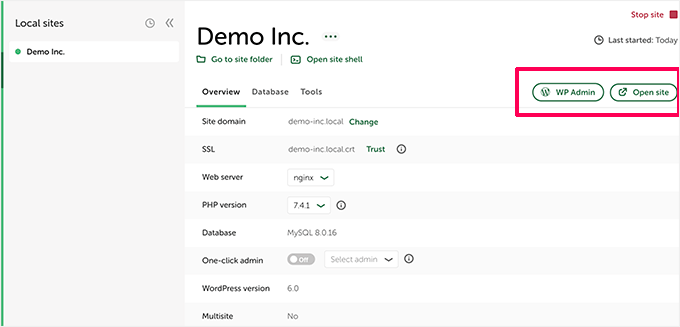
Sie können nun Ihre Website besuchen oder sich im WordPress-Verwaltungsbereich anmelden.
Von hier aus können Sie Ihre lokal gehostete WordPress Website genau so nutzen, wie Sie es von einer Live-Website gewohnt sind.
Sie können Plugins und Themes installieren und Ihre Website so gestalten, wie Sie es für richtig halten.
2. WordPress lokal auf dem Mac mit MAMP installieren
MAMP ist ein beliebtes Programm, mit dem Sie WordPress auf Ihrem Mac-Computer ausführen können.
Besuchen wir zunächst die MAMP-Website. Hier sollten Sie die neueste Version von MAMP & MAMP Pro sehen.
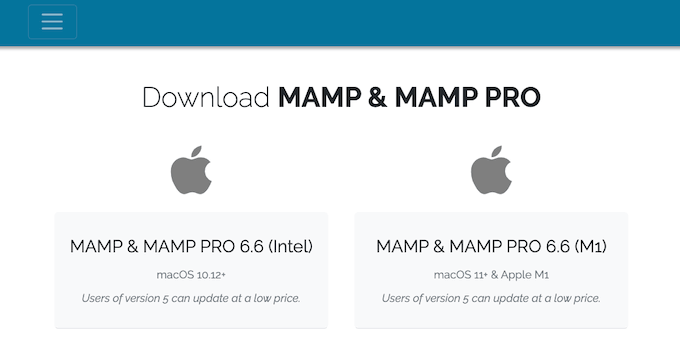
MAMP hat separate Downloads für verschiedene Versionen des macOS-Betriebssystems.
Sie sind sich nicht sicher, welche Version von macOS auf Ihrem Computer installiert ist? Um das herauszufinden, klicken Sie einfach auf das Apple-Symbol in der Werkzeugleiste Ihres Computers.
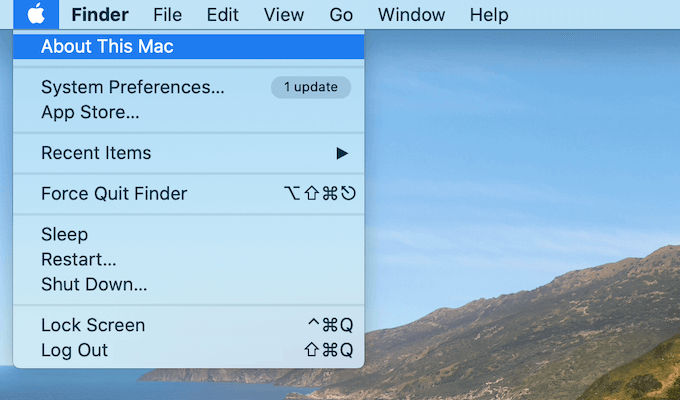
Klicken Sie dann auf die Option “Über diesen Mac”.
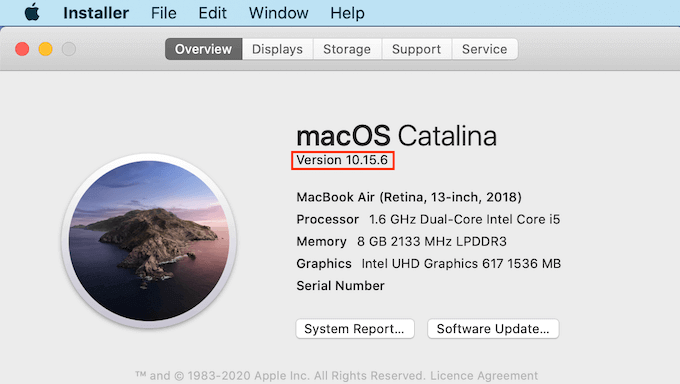
Daraufhin wird ein Popup-Fenster geöffnet, das viele Informationen über Ihren Computer anzeigt, darunter auch die Version von macOS.
Sie können nun die richtige Version von MAMP für Ihr Betriebssystem herunterladen.
Sobald der Download abgeschlossen ist, doppelklicken Sie auf die MAMP-.pkg-Datei. Dadurch wird das MAMP-Installationsprogramm gestartet.

Folgen Sie nun einfach den Anweisungen auf dem Bildschirm, um MAMP zu installieren.
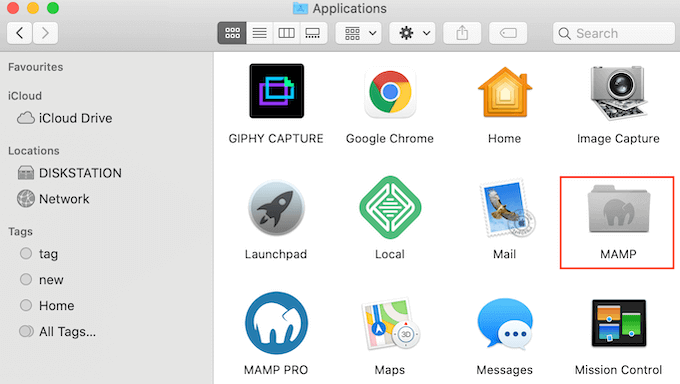
Nach der Installation dieses Programms starten Sie MAMP, indem Sie den Ordner “Anwendungen” Ihres Computers öffnen.
Hier finden Sie 2 Versionen von MAMP. MAMP Pro ist die kostenpflichtige Version, also stellen Sie sicher, dass Sie die kostenlose Version wählen.
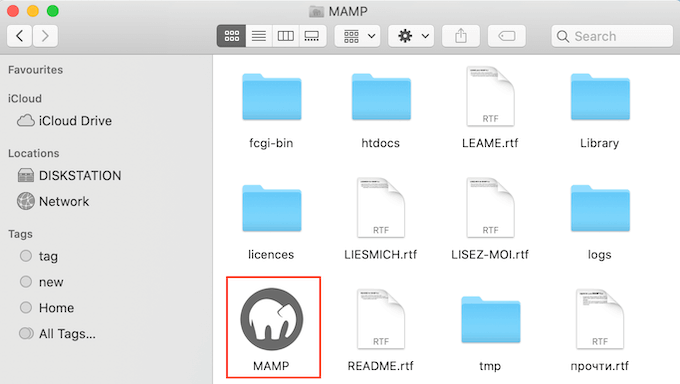
In diesem MAMP-Ordner finden Sie verschiedene Dateien und eine MAMP-Anwendung.
Ein Doppelklick genügt, um die MAMP-App zu starten.
Bevor Sie loslegen, empfehlen wir Ihnen, einige Einstellungen vorzunehmen, um Ihr MAMP-Erlebnis zu verbessern.
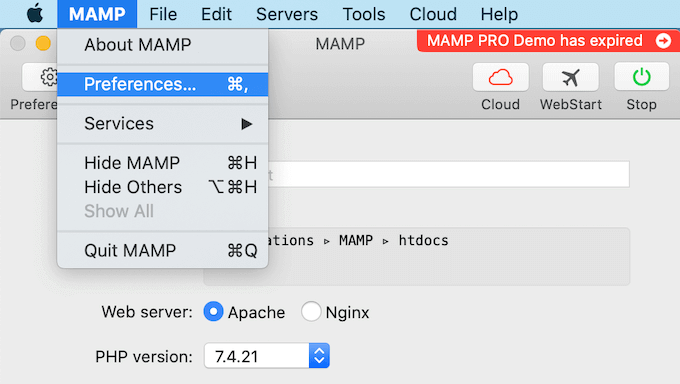
Um diese Änderungen vorzunehmen, klicken Sie in Ihrer Werkzeugleiste auf ‘MAMP’ und wählen Sie dann ‘Preferences….’.
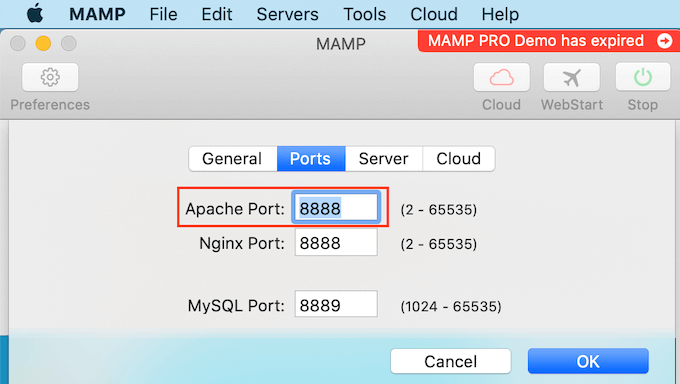
Wechseln Sie in dem Popup-Fenster auf den Tab “Ports”.
Sie können nun überprüfen, welchen Apache Port MAMP verwendet. Wir empfehlen, auf Apache Port 8888 zu wechseln, wenn MAMP diesen Port nicht bereits verwendet.
Der nächste Schritt ist die Einrichtung des Stammordners für Ihre Dokumente. Hier werden Sie alle Ihre lokalen WordPress-Websites erstellen und speichern.
Standardmäßig verwendet MAMP den Ordner /Applications/MAMP/htdocs/, aber Sie können diese Position beliebig ändern.
Klicken Sie in der Box “Einstellungen…” auf den Tab “Server”. Ihr Dokumentenstamm sollte jetzt sichtbar sein.
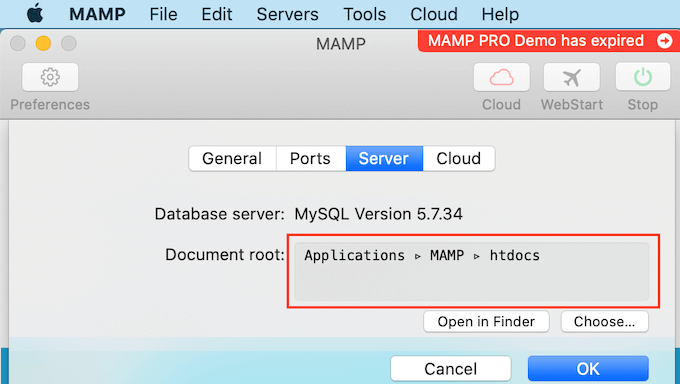
Wenn Sie Ihre Websites in einem anderen Ordner speichern möchten, klicken Sie auf den Button ‘Auswählen…’.
Daraufhin öffnet sich ein Popup, in dem Sie eine neue Position auswählen können. Vielleicht möchten Sie auch einen neuen Ordner erstellen, in dem Sie alle Ihre WordPress-Websites speichern.
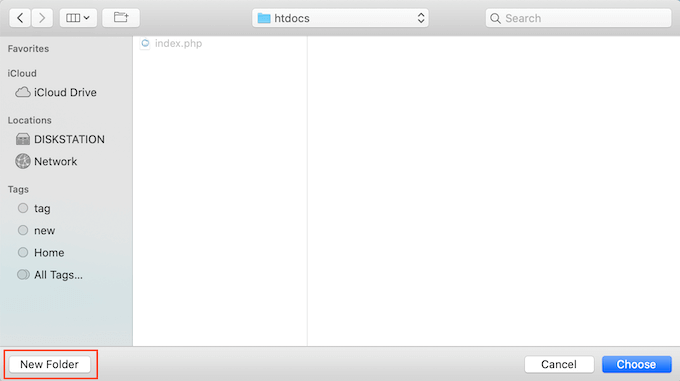
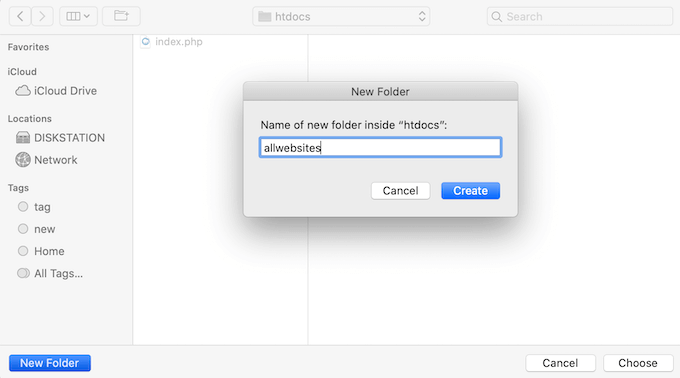
Sie können diesen Ordner nach Belieben benennen.
Für diesen Artikel werden wir unsere Websites in einem Ordner namens “allwebsites” speichern.
Installation von WordPress auf MAMP
Nachdem Sie MAMP eingerichtet haben, ist es nun an der Zeit, WordPress auf Ihrem Mac Computer zu installieren.
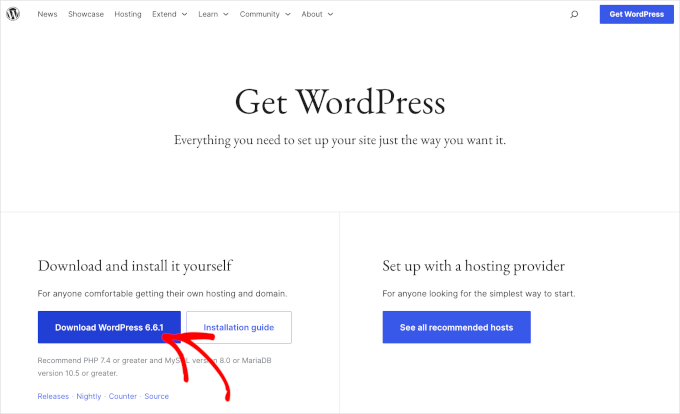
Zunächst müssen Sie die Website WordPress.org besuchen und die neueste Version von WordPress Core herunterladen.
HINWEIS: Es gibt zwei Versionen von WordPress. Weitere Einzelheiten finden Sie in unserem Artikel zum Vergleich von WordPress.com und WordPress.org.
Nachdem Sie die Datei von WordPress.org heruntergeladen haben, müssen Sie sie nur noch entpacken. Dadurch wird ein entpackter “wordpress”-Ordner erstellt.
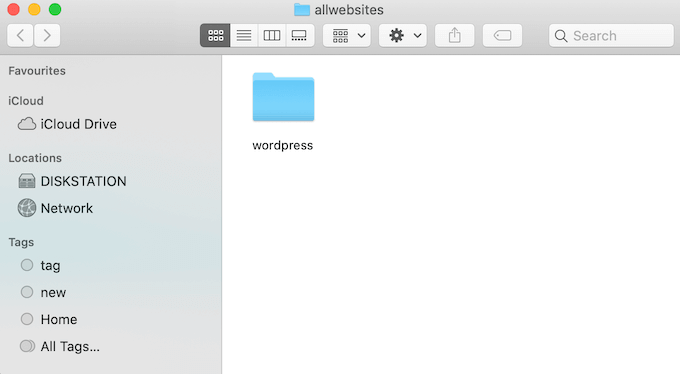
Kopieren Sie diesen Ordner nun einfach in Ihren MAMP-Dokumentenstammordner.
Da wir den Stammordner des Dokuments geändert haben, müssen wir “wordpress” in applications/MAMP/htdocs/allwebsites kopieren.
WordPress benötigt eine Datenbank, um alle Inhalte und Daten zu speichern. Sie müssen diese Datenbank erstellen, bevor Sie eine lokale Website erstellen können.
Keine Sorge – es ist nicht so schwer, wie es klingt.
Klicken Sie im MAMP-Fenster ‘Preferences…’ einfach auf den Button ‘OK’. Dies sollte die MAMP-Anwendung in einem neuen Browser Tab starten.
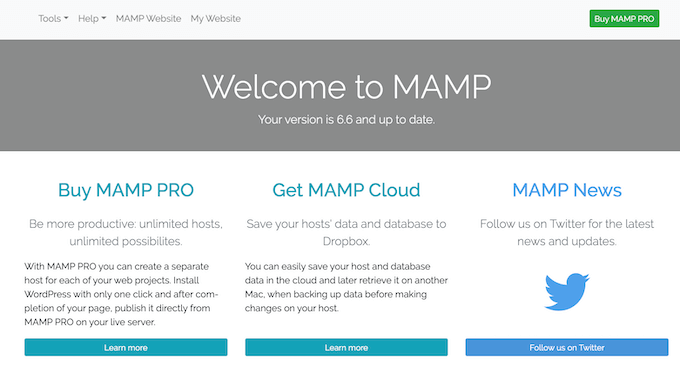
Als nächstes müssen Sie phpMyAdmin starten. Dies ist eine webbasierte Anwendung zur Verwaltung der MySQL-Datenbank Ihrer Website.
In der Werkzeugleiste navigieren wir zu Werkzeuge ” phpMyAdmin.
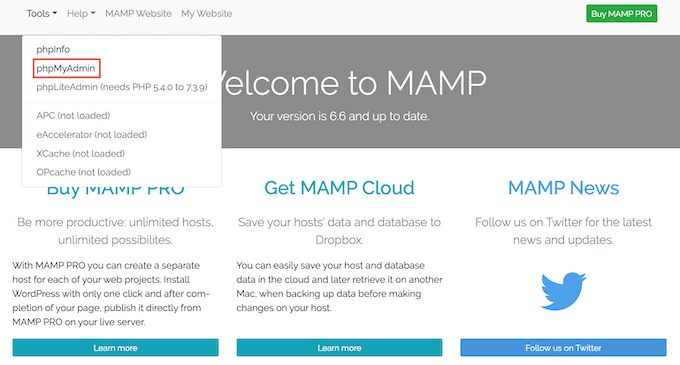
Dadurch wird phpMyAdmin in einem neuen Tab geöffnet.
Gehen Sie im Dashboard von phpMyAdmin auf den Tab “Datenbanken”.
Sie können nun einen beliebigen Namen für Ihre Datenbank in das Feld “Datenbankname” eingeben. Merken Sie sich den Namen gut, denn wir werden ihn im nächsten Schritt verwenden.
In diesem Lernprogramm nennen wir unsere Datenbank “test_db”.
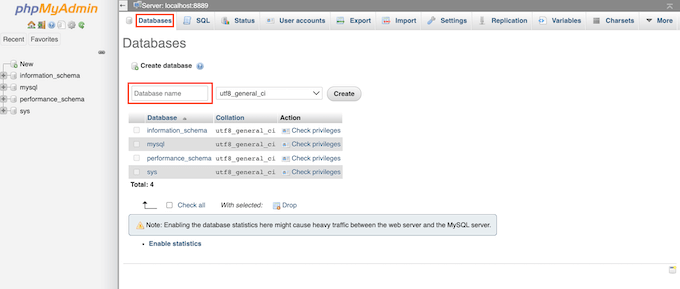
Nachdem Sie den Namen Ihrer Datenbank eingegeben haben, können Sie auf den Button “Erstellen” klicken.
PhpMyAdmin erstellt dann Ihre Datenbank.
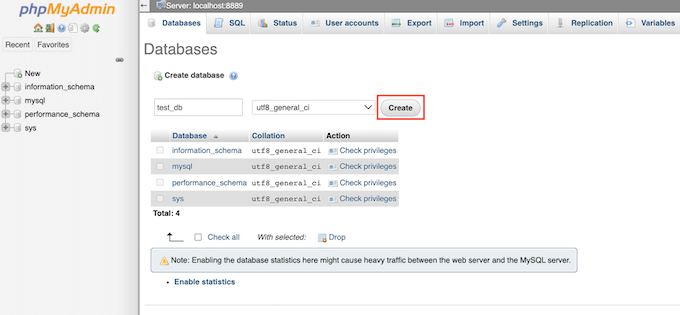
Jetzt ist es an der Zeit, WordPress zu installieren.
Rufen Sie in einem neuen Tab des Browsers die Seite http://localhost:8888/ auf. Wenn Sie einen anderen Port als 8888 verwenden, ändern Sie einfach diese URL, um Ihren Port anzugeben.
Sie sollten nun einen Link zu dem Ordner “WordPress” sehen, den Sie in Ihren Stammordner kopiert haben. Klicken Sie auf diesen Link. Dadurch wird der WordPress-Installationsassistent geöffnet.
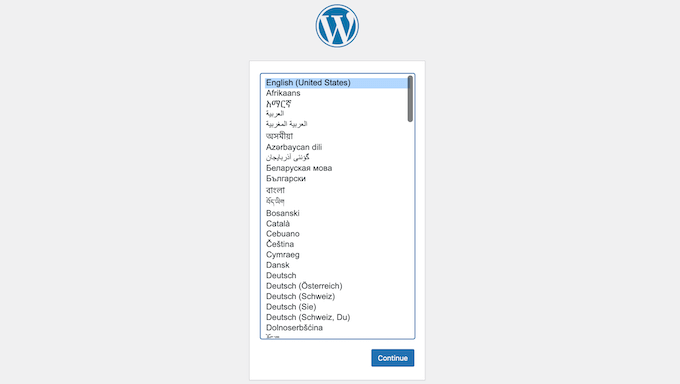
Der WordPress-Installationsassistent fordert Sie zunächst auf, eine Sprache auszuwählen. Nachdem Sie Ihre Wahl getroffen haben, können Sie auf den Button “Weiter” klicken.
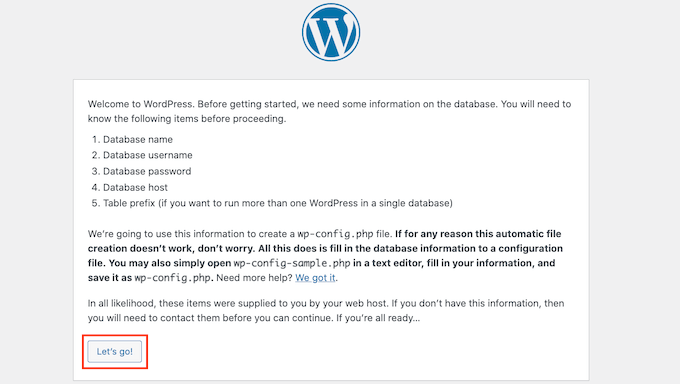
In der nächsten Ansicht zeigt WordPress eine Liste aller Informationen an, die es für die Installation benötigt.
Nachdem Sie diese Ansicht gelesen haben, klicken Sie auf den Button “Los geht’s”, um weiterzugehen.
Der Einrichtungsassistent fragt nun nach den Daten Ihrer WordPress-Datenbank. Geben Sie für den Datenbanknamen einfach den Namen ein, den Sie im vorherigen Schritt erstellt haben.
Für “Benutzername” und “Passwort” geben Sie einfach “root” ein.
Sie können dann “localhost” in das Feld “Database Host” eingeben. Localhost bedeutet, dass die Datenbank und die Website auf demselben Server gehostet werden, der in diesem Fall Ihr Mac Computer ist.
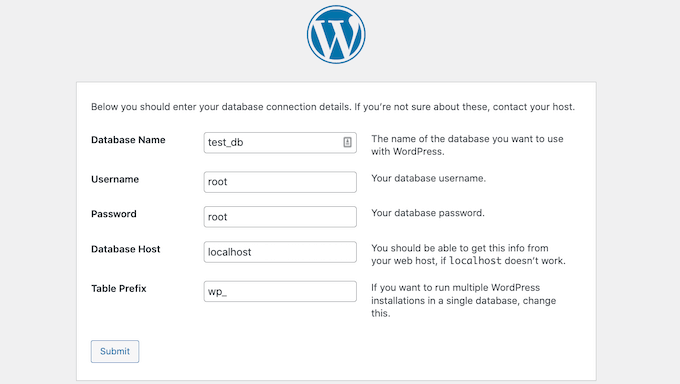
Nachdem Sie all diese Informationen eingegeben haben, klicken Sie einfach auf den Button “Absenden”.
WordPress wird nun eine Verbindung zu Ihrer Datenbank herstellen und eine Konfigurationsdatei für Sie erstellen. Sobald der Vorgang abgeschlossen ist, erhalten Sie eine Erfolgsmeldung.
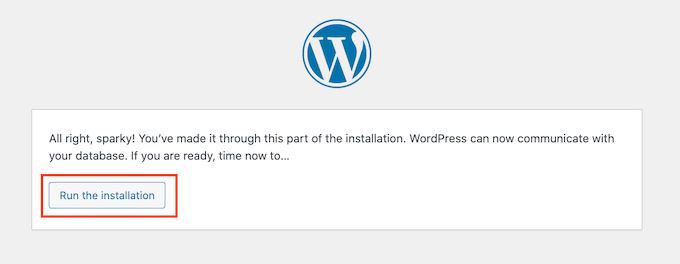
Um mit dem nächsten Schritt fortzufahren, können Sie auf den Button “Installation ausführen” klicken.
In der nächsten Ansicht fordert WordPress Sie auf, einen Titel für die Website anzugeben. Sie können zum Beispiel den Namen Ihres Unternehmens verwenden. Die meisten WordPress Themes zeigen diesen Titel ganz oben auf Ihrer Website an.
Wenn Sie sich über den Titel Ihrer Website unsicher sind, besteht kein Grund zur Panik. Sie können den Titel in Ihrem WordPress-Dashboard jederzeit ändern.
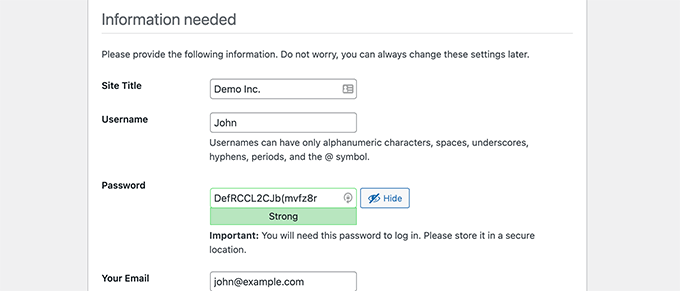
Anschließend müssen Sie einen Benutzernamen und ein Passwort erstellen. Dies sind die Anmeldedaten, die Sie für den Zugriff auf Ihr WordPress-Dashboard verwenden werden.
Sie können auch Ihre E-Mail-Adresse in das Feld “Ihre E-Mail” eingeben. An diese E-Mail-Adresse sendet WordPress alle E-Mails an seine Administratoren.
Nachdem Sie dieses Formular ausgefüllt haben, klicken Sie auf den Button “WordPress installieren”.

WordPress führt nun die Installation durch.
Nach ein paar Augenblicken sollten Sie die Meldung “Erfolg” sehen.

Um direkt zu Ihrer WordPress-Anmeldung zu gelangen, klicken Sie auf den Button “Anmelden”.
Sie können sich auch über die folgende URL bei Ihrer lokalen WordPress-Website anmelden: http: //localhost:8888/wordpress/wp-login.php
Hinweis: Wenn Sie einen anderen Apache-Port verwenden, müssen Sie den Teil “8888” in dieser URL ändern.
Sie können sich nun bei Ihrer WordPress Website anmelden, indem Sie den Benutzernamen und das Passwort eingeben, die Sie im vorherigen Schritt erstellt haben.
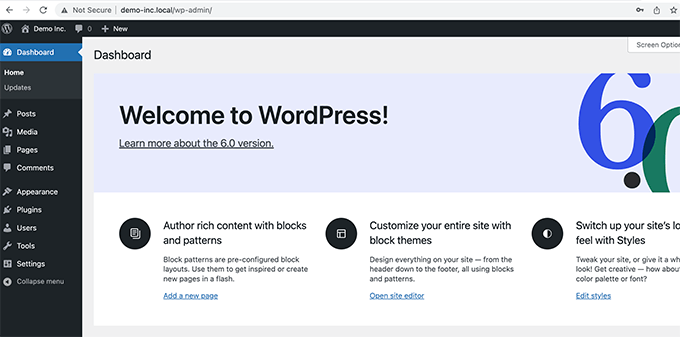
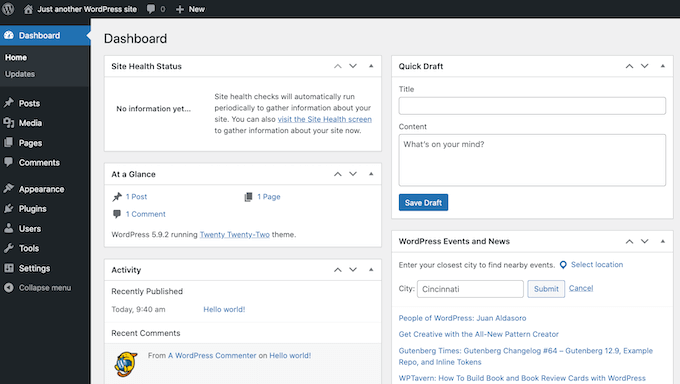
Dadurch gelangen Sie zum WordPress-Dashboard.
WordPress lokal auf dem Mac ausprobieren
Eine lokale Installation ist ideal, um WordPress auszuprobieren oder Websites auf Ihrem Computer zu entwickeln. Jetzt, wo WordPress lokal auf Ihrem Mac läuft, gibt es ein paar Dinge, die Sie vielleicht ausprobieren möchten:
- Experimentieren Sie mit den besten WordPress Themes.
- Versuchen Sie, Ihr perfektes WordPress Theme zu finden.
- Testen Sie wichtige WordPress Plugins lokal.
- Lernen Sie WordPress zu programmieren, indem Sie Ihre eigenen Plugins und individuellen Themes erstellen.
Verschieben Ihrer lokalen WordPress-Installation auf die Live-Website
Sobald Sie lokal mit WordPress gespielt haben, sollten Sie Ihre WordPress-Installation auf eine Live-Website übertragen. Dies ist die einzige Möglichkeit, wie andere Ihre Website sehen können.
Dazu müssen Sie einen Domänennamen und ein Webhosting kaufen.
Ein Domänenname ist die Adresse Ihrer Website im Internet, und Webhosting ist der Ort, an dem die Dateien Ihrer Website gespeichert sind. Sie können sich das Webhosting als das Zuhause Ihrer Website im Internet vorstellen.
Für das Webhosting empfehlen wir Bluehost. Sie sind einer der größten Hosts der Welt und werden auch offiziell von WordPress.org empfohlen.
Zum Glück bietet Bluehost den Benutzern von WPBeginner einen Rabatt auf das Hosting, ein kostenloses SSL-Zertifikat und einen kostenlosen Domainnamen. Im Grunde können Sie Ihre lokale WordPress-Installation für 1,99 $ pro Monat in eine Live-Website verwandeln.
Wenn Sie ein Hosting erworben haben, sollten Sie sich unseren Artikel darüber ansehen , wie man WordPress von einem lokalen Server auf eine Live-Website umzieht.
Wir hoffen, dieser Artikel hat Ihnen geholfen, WordPress lokal auf dem Mac zu installieren. Als Nächstes möchten Sie vielleicht auch unseren Leitfaden lesen, wie man eine Website mit WordPress erstellt, oder unseren Vergleich der besten Managed WordPress Hosts ansehen.
Wenn Ihnen dieser Artikel gefallen hat, dann abonnieren Sie bitte unseren YouTube-Kanal für WordPress-Videotutorials. Sie können uns auch auf Twitter und Facebook finden.


WPBeginner Staff
Since we don’t know what went wrong when you deleted the site earlier. We would recommend you to create a new site. Basically repeat the whole process all over again. Except this time create a new directory in your document root folder. Do the same with MySQL DB. Then install WordPress in the new directory using your new MySQL DB.
Steve
Great instructions! I was able to set up a site, but I needed to delete it and start over. I trashed the SQL database and the previous site folder. But when WordPress goes to install itself now, I get a huge error log in the browser saying that a ton of files, info “already exist.” Do I need to get rid of some other previously installed files and, if so, which ones?
Minyan
When I type in http://localhost/wordpress (I name the wordpress folder under the root folder of MAMP wordpress), it shows “404 not found. The requested URL /wordpress was not found on this server”. Can anyone tell me what I did wrong?
Schalk
Minyan,
Any luck with your “404 not found’ issue ??
ej
having the same problem. please help!
Ish
Instead of typing in ‘http://localhost/wordpress’,
just type in ‘localhost’ instead and it should bring you to the wordpress page.
Worked for me, hope it does for you!
ThankQ
Michelle Hamilton
These instructions are the best and easiest to follow out there. I actually used them to help my instructor set up WordPress on her new mac and I used them to set it up on the mac I use in my internship. Thanks so much!!!
Michelle Hamilton
These are the best and easiest to follow instructions out there. I actually used them to help my instructor install MAMP on her mac. I had already used them to do it for my internship that I am participating in. Great Job!!!
Julie Valin
Thank you very much for this great step-by-step tutorial! Very helpful for this first-time MAMP user, when at first I felt overwhelmed. Now I’m feeling informed and happy, and I always like to comment on those posts/tutorials that have really helped me. Kudos!
WPBeginner Staff
You can set up a staging environment for on a live server. Take a look at our guide on how to create staging environment for a WordPress site
Haley
Thanks for this tutorial – quick question for you: I’m designing a site for a client that I will have to build offline using MAMP, however I see the note about only being able to view it on my computer. Is there a way that my client (located in another state) can review the progress without making it live on their site?
Hannah
Oh god, thank you wpbeginner team so much. First time I’ve ever used MAMP and nothing seemed to say ‘Hey, for all you dummys, here’s how you install WordPress’- it just assumed we would know. *forever grateful*
Frank
Too easy guys, thanks a lot!
Alex Koch
Really appreciate your help. MAMP 3.0.3 comes with a slightly different interface and a different setup – you have to redirect Apache to /bin/phpMyAdmin/ in oder to setup your mysql database for wordpress and THEN redirect Apache to you actual root directory localhost/mysitewahtever/ where you put wordpress.
WordPress can access the db nevertheless.
Rich
Thank you for this easy to follow guide! I finally got the motivation up to move forward with a project I’ve almost completed and this guide really helped. Thanks again!
megan Dickson
This was AWESOME. SO EASY.
Thank you!
Tim Aldiss
Really useful, thanks
Tom Nguyen
Is it possible to receive emails from WordPress installed on a local server? I’m only asking because I had installed WordPress and forgot my administrator password. I click the Lost Your Password link to start the password reset process, but I never received an email.
I just ended up going to the local phpMyAdmin interface and reset the password that way.
Kate
I made an assumption when installing mamp/wordpress with my website name. The “website name” I used to set it up using your tutorial is not my website name my business currently owns and I am redoing. I thought if I used that one it would mess up the current site. So…..do I have to go back and put my “real” website name in the install files or can I just switch it over to my current domain name when I am done with the new wordpress site? Thanks!
Leigh
hey
followed steps ….up to setting up to part of .. new database – used test_db as per example
opening http://localhost/mysite in browser and getting 404 kicking out.
should be saying …
WordPress will notify you that it was unable to find wp-config.php file. !!!
…directory set cool , to mysite
///using default mamp ports
thanx for help in advance man !
smiles
Kate
I guess the issue was that I named my wp folder that contains all my wp files in hpdocs folder within MAMP using 2 words. Therefore I put a space in between and when I went to put the local host/mydomainname/wp-admin/ address to find my dashboard I apparently had to add a %20 due to the space. It seems to work now so I think I did it right! Thanks again for your sites guidance and prompt help. I really appreciate it and have added your site to my bookmarks and subscribed!
Kate
Well apparently it was so simple I was missing the part that I needed to put the _db after my new database I created Solved!
Kate
I am switching to wordpress from drupal and I appreciate and value your great resources and thorough steps coming from a newbie with no tech experience and knowledge!! I am having the same problem that Jen did above (12/12/2013). I’m using a Macbook Pro and got as far as trying to figure out whether the database that I set up in my wp-config file exists. I did the steps you recommended (it says all privileges are granted in my root user) , but maybe I’m doing it wrong cause I’m still getting the same error message as she did? Maybe I need another way of explaining the steps? I closed Skype and ensured websharing wasn’t on, but that didn’t change anything. Totally stumped!!
WPBeginner Support
Kate once you start MAMP, you need to go to http://localhost/phpmyadmin create a new database. Open your wp-config.php file and enter the database name on the line:
define('DB_NAME', 'YourDBNameHere');Let us know if this solved your problem.
Admin
Daniel
Thanks for the guide.
Now i have installed wordpress onto my mac, and have created a website. How do I go about starting a new website?
Thanks Dan
WPBeginner Support
Repeat the process by installing WordPress in a new directory (folder) and by creating a new database.
Admin
Syed
I am going through a nightmare. Thanks to your instructions, everything was running fine until today when I clicked on upgrade to the new MAMP version and went for an install, thinking that it will happen in the background.
It appears that the upgrade has either erased my data or has put it away. Incidentally, I had a full copy of the main drive on a different drive (the whole MAMP folder). I can see the folders and files in both places but when I try to start MAMP from the different drive where the old MAMP folders are placed, it still boots up with the new version and I can’t start my site.
I have no way to really know what to do next. Kindly help. Thanks
netyx
Thanks for the guide!
I have a problem though. I created a database and then MySQL server crashed. It’s not working anymore. Could you help me please anyone?
arzu
very helpful, thank you
Art
Yeah dude, this was very helpfull, thanks a lot!
Derek
Great tutorial. Thanks. It all worked fine for me until the very end. After I successfully installed wordpress I clicked on “View Site” and got a white splash screen that says “Your Website” followed by instructions on how to make it “live.” I don’t want to go live. I just want to work on building a theme locally. But for whatever reason, I’m just not able to view the site.
Help!
Thanks.
Ian
Perfect guide, much appreciated
Brandon
A breeze. Many thanks!
GH
Thank you so much. Very helpful explanation.
Jen
I just installed MAMP and my servers won’t start. Have you ever had this problem before? I tried restarting and re-reading the steps, thanks!
WPBeginner Support
check error logs in the directory where you installed MAMP
Admin
Jen
PLEASE HELP! I CANNOT FIND AN ANSWER AND IM ON A DEADLINE!
So everything was working until I clicked the ‘open start page’ button. Originally it just populated a web browser that only said:
It Works
Then, after refreshing it send me straight to the create config screen for wordpress and skipped the database start section. When I submitted the information your tutorial included it says :
“We were able to connect to the database server (which means your username and password is okay) but not able to select the (my database name) database.”
What do I do to fix this?? I was reading online and it says that there are some issues with Mac Mountain Lion, so I turned off the web sharing, which was the solution for this problem on all other sites. Please please please help!!
– Jen
WPBeginner Support
Jen, open your wp-config.php file which is located in your WordPress installation’s root directory. Look at the Database, database username and password sections. Go to phpmyadmin by typing
http://localhost/phpmyadminin the browser. Make sure that the database name in your wp-config file exists. Also check that the username used in wp-config file has all privileges by clicking on the Users tab in phpmyadmin.Admin
brad
i rescind my prior victory, when i finished working on my site, I stopped the servers and quit MAMP. When I restarted MAMP to work on a new project a few hours later I am unable to access any files in htdocs without a 404 error. MAMAP support forums have almost no responses to this issue, any one here have this issue? Any possible help? I’m not a tech person, just a designer so this is mostly greek to me.
Brad
Thanks for a simple and well explained tutorial! I got this up and running in under 15 mins!
Daniele
Thank you guys! Really helpful for a young Mac user like me!
jeroen faber
Great guide!
One thing: the following line in the guide:
“Open a new browser window and type http://localhost/mysite.”
didn’t take me to the WordPress installation screen, just typing “localhost” in the browser did.
Did i make some mistake in the configuration or….?
WPBeginner Support
seems like you have installed wordpress in your main www or htdocs or web directory under your Apache installation.
Admin
Dee
Thanks for this, it was really easy to follow and I had no problems at all!
Ton in 't Veld
I’ve made many sites already with Dreamweaver. Now I want to set up a WordPress blog for my wife. I installed MAMP. So far so good. In the preference I tried to start the servers. MySQL Server worked immediately, but the Apache server doesn’t go to green. I alreadyI switched off Skype (as advised before.
Many thanks for looking atmy problem.
WPBeginner Support
Sometimes skype is running in the background check in the activity monitor to make sure that skype is not running in the background.
Admin
George
Everything was going well until I got to, http://localhost:8888/wordpress. For some reason the Apache Server wouldn’t start with a port of 80. Please tell me what I’m not doing or doing wrong.
Thank you,
George
Editorial Staff
This is happening if you have Skype running. You need to change the port in Skype or quit skype while using Mamp.
Admin
Justin
That was exactly what I needed. One hang up I had was that “Web Sharing” was turned on in my Mac OSX “System Preferences.” It was causing a duplicate Apache server to run, which prevented phpmyadmin or the “Start Page” from running.
Editorial Staff
Thanks for sharing that with us Justin. Hopefully it will help others who read the comments
Admin
Jonas
Hi,
Followed your instructions an successfully installed WP. Many thanks
JaY Srivastava
Thanks for saving me real time, i knew how to do that on windows, but since i use my mac as my main work laptop it was getting difficult for me to test websites.
I have been always fan of wpbeginner but now i guess it has grown more.
Thanks Again !
RW
Been using my first install of mamp ever since I read this tutorial. The only thin that I’m struggling with is, porting it over to a live production site. I’m assuming I have to export my DB and then import it using phpmyadmin, but obviously, some things will have to change. Also have to manually upload all upload folders as well.
Does anyone have recommended workflow ideas?
Thanks,
Bob
Editorial Staff
If you have BackupBuddy, then you can easily create a full backup file and import that. To do it manually:
1. Install WordPress on new site and copy/paste the /wp-content/ directory from the old site.
2. Import all content using phpMyAdmin
3. Change the site_url and home_url options in wp_options to reflect the new site.
4. Login to the new site and go to Settings > General and click on the save button.
5. Go to Settings > Permalinks and click on the save button.
Admin
RW
perfect! thanks! never loved backupbuddy as it didn’t reliably work for me. the manual approach looks simple! thanks so much!
Bob
RW
I’ve been using MAMP for a week now and absolutely love it. Makes testing so much faster!
Thanks,
Bob
Gautam Doddamani
i have been using XAMPP from a long time and its serving me well…it has the same functionality as MAMP and perfectly runs on a mac
Raihan
this post is very useful to me. for this i saved this page
Gunstra
Great Tut, thank you.
Debbie
Finally, concise, step-by-step instructions on how to set-up WordPress. I have followed other instructions and still get lost on what to do. Thank you so much!!
Christopher Anderton
I’m using MAMP myself, however, there is a even simpler way to get up and running in notime using MAMP Stack (http://bitnami.com/stack/mamp) and the WordPress module (see the modules section at the page).
Luke
Definitely a useful process! I wish I had this article the first time I tried to set this up. It would have been a huge help!
What’s your opinion on modifying the hosts file to allow using a DNS name for the local site ( example.com instead of localhost )? Good practice? Bad practice?
I’ve personally found it helpful when transferring a site I’ve developed locally to a live server.
RW
That’s so helpful. I’ve read about doing this and I think it will save so much time working locally on sites. I guess it has to be configured (or reconfigured) for different sites?
Thanks,
Bob