Haben Sie schon einmal versucht, eine Datei auf Ihre WordPress Website hochzuladen und sind dabei auf eine Mauer gestoßen? Es ist super frustrierend, wenn Sie das Bild, Plugin oder Theme, das Sie brauchen, nicht hochladen können. Unsere Besucher bitten uns oft um Hilfe bei Problemen mit dem Upload von Dateien, weil sie Ihren Arbeitsablauf zum Erliegen bringen können.
Manchmal können diese Grenzen für den Upload von Dateien Sie unerwartet daran hindern, Ihrer Mediathek Inhalte hinzuzufügen oder größere Plugins und Themes zu installieren, die Sie benötigen. Das ist, als wären einem die Hände gebunden. Und es ist noch ärgerlicher, wenn man nicht weiß, wie man das Problem beheben kann!
Aber keine Sorge, wir sind hier, um zu helfen. Wir lieben es, dass WordPress eine so konfigurierbare Plattform ist und dass es oft mehrere Möglichkeiten gibt, das gleiche Problem zu lösen.
In dieser Anleitung zeigen wir Ihnen die einfachsten Möglichkeiten, die maximale Größe für Uploads in WordPress zu erhöhen. Wir helfen Ihnen, diese Einschränkungen zu überwinden, damit Sie sich wieder dem widmen können, was Sie lieben – dem Betrieb Ihrer Website!
Warum die maximale Datei-Upload-Größe in WordPress erhöhen?
Ihr WordPress Hosting-Anbieter legt einen Standard für die maximale Größe des Uploads von Dateien fest, wenn Sie sich anmelden und WordPress installieren. Ihr Hosting-Anbieter legt diese Grenze fest, die normalerweise zwischen 2 MB und 500 MB liegt.
Für die meisten Betreiber von WordPress-Websites ist dieses Limit mehr als ausreichend.
Es kann jedoch vorkommen, dass Sie diese Grenze anheben müssen, um Upload-Fehler zu vermeiden.
Zum Beispiel:
- Sie betreiben eine Fotografie-Website und müssen große Bilder hochladen.
- Ihr Design- oder Fotografie-Portfolio enthält große Bilder.
- Sie möchten ein größeres WordPress-Theme oder -Plugin installieren.
- Sie möchten digitale Produkte wie eBooks, Fotos, Videos und mehr verkaufen.
- Sie aktualisieren regelmäßig Inhalte und fügen Audio, Fotos und mehr hinzu, die über das aktuelle Limit hinausgehen.
In diesem Sinne zeigen wir Ihnen, wie Sie die maximale Datei-Upload-Größe auf Ihrer WordPress-Website erhöhen können.
Hinweis: Denken Sie daran, dass die Anzeige vieler großer Dateien auf Ihrer Website deren Geschwindigkeit und Leistung erheblich beeinträchtigen kann. Deshalb empfehlen wir in der Regel, keine Videos in WordPress hochzuladen.
Da die meisten Benutzer unterschiedliche WordPress-Hosting-Konfigurationen haben, werden wir die folgenden Punkte behandeln:
- How to Check Your Maximum File Upload Size Limit in WordPress
- Method 1: Contact Your WordPress Hosting Provider
- Method 2: Create or Edit an Existing php.ini file
- Method 3: Add Code to Your WordPress Theme functions.php File
- Method 4: Add Code to Your .htaccess File
- Method 5: Use a WordPress Plugin to Increase File Upload Size
Wie Sie die maximale Datei-Upload-Größe in WordPress überprüfen
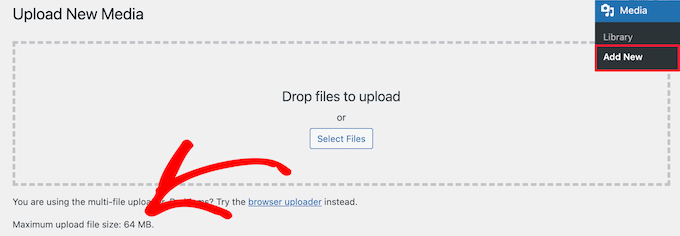
WordPress zeigt automatisch die maximale Dateigröße an, wenn Sie Bilder oder andere Medien hochladen.
Um dies zu überprüfen, gehen Sie einfach auf Medien ” Neu hinzufügen in Ihrem WordPress-Administrationspanel, und Sie werden die maximale Datei-Upload-Größe für Ihre WordPress-Website zu sehen.
Da Sie nun wissen, wie Sie das Größenlimit finden können, zeigen wir Ihnen, wie Sie die maximale Upload-Größe in WordPress erhöhen können.
Methode 1: Kontaktieren Sie Ihren WordPress-Hosting-Anbieter
Eine der einfachsten Möglichkeiten, die maximale Datei-Upload-Größe in WordPress zu erhöhen, besteht darin, sich an Ihren WordPress-Hosting-Anbieter zu wenden.
Dies ist eine relativ einfache Aufgabe für das Kundendienstteam und kann in wenigen Minuten erledigt werden.
Für Anfänger kann dies viel einfacher sein als das Hinzufügen von Code zu WordPress und das Bearbeiten von Serverdateien.
Gehen Sie einfach auf die Website Ihres Hosting-Anbieters, z. B. Bluehost, und melden Sie sich an.
Klicken Sie dann auf das Symbol “Chat” am unteren Rand der Ansicht. Sie können dann die Support-Mitarbeiter bitten, die Größe des Uploads von Dateien auf Ihrer WordPress Website zu erhöhen.
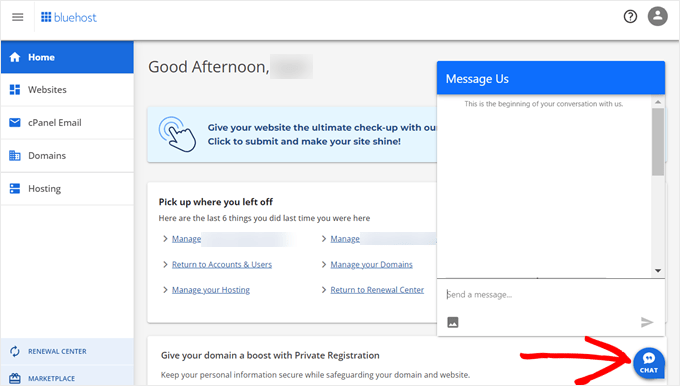
Sie können sich auch über das Dashboard Ihres Hosting-Kontos an den Support wenden.
Methode 2: Erstellen oder Bearbeiten einer vorhandenen php.ini-Datei
Eine weitere Möglichkeit, die maximale Datei-Upload-Größe zu erhöhen, besteht darin, eine Datei namens php.ini zu erstellen oder zu bearbeiten. Diese Datei steuert viele Einstellungen für Ihre WordPress-Hosting-Umgebung.
Die meisten WordPress-Hosting-Anbieter wie Bluehost bieten ein einsteigerfreundliches cPanel für die Verwaltung Ihrer Website.
Wenn Ihr Webhost über ein cPanel-Dashboard verfügt, können Sie die Größe der hochzuladenden Dateien mit den integrierten Tools erhöhen.
Hinweis: Die folgenden Angaben stammen aus dem Bluehost cPanel. Bei den meisten Shared-Hosting-Anbietern werden jedoch ähnliche Schritte durchgeführt.
Sie finden eine cPanel-Schaltfläche am unteren Rand der Registerkarte Hosting bei Bluehost.
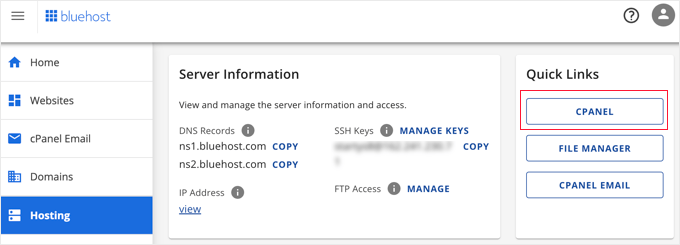
Wenn Sie auf diese Schaltfläche klicken, wird Ihr cPanel-Dashboard geöffnet.
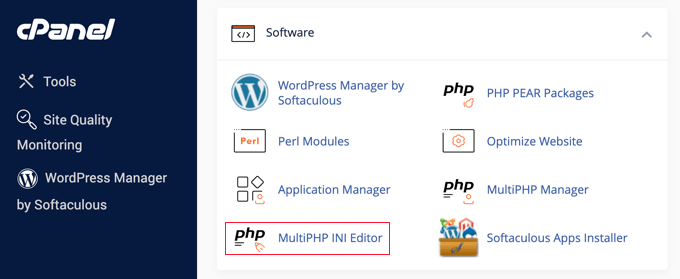
Nun müssen Sie zum Abschnitt Software scrollen und auf “MultiPHP INI Editor” klicken.
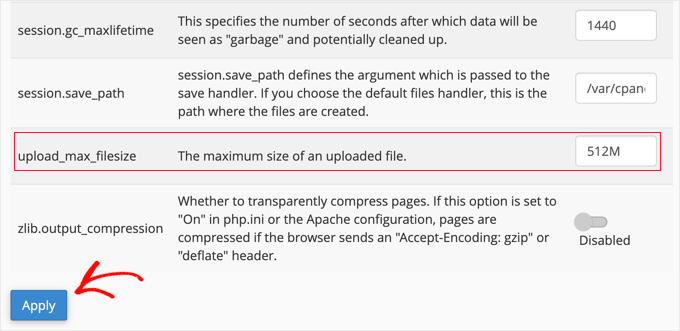
Blättern Sie dann nach unten zum Abschnitt “upload_max_filesize” und geben Sie eine neue maximale Dateigröße in das Feld ein.
Klicken Sie dann auf die Schaltfläche “Übernehmen”.
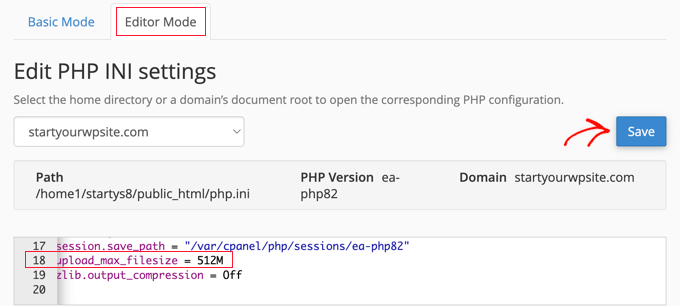
Alternativ können Sie auch auf die Registerkarte “Editormodus” klicken und dann die maximale Dateigröße direkt im Editor ändern.
Sie müssen den Abschnitt “upload_max_filesize” bearbeiten, um die Größe der hochgeladenen Dateien zu erhöhen.
Wenn Sie fertig sind, klicken Sie einfach auf die Schaltfläche “Speichern”.
php.ini durch Hinzufügen von Code bearbeiten
Wenn Ihr derzeitiger Hosting-Anbieter die cPanel-Option nicht anbietet, müssen Sie diese Datei manuell bearbeiten.
Dazu können Sie einen FTP-Client oder die Dateimanager-Option in Ihrem WordPress-Hosting-Kontrollpanel verwenden.
Wenn Sie ein gemeinsam genutztes Hosting-System verwenden, kann es sein, dass Sie die Datei php.ini nicht in Ihrem Hosting-Verzeichnis finden. Wenn Sie keine sehen, erstellen Sie einfach eine Datei namens php.ini und laden Sie sie in Ihr Stammverzeichnis hoch.
Fügen Sie dann den folgenden Codeschnipsel in die Datei ein:
1 2 3 | upload_max_filesize = 256Mpost_max_size = 256Mmax_execution_time = 300 |
Sie können die Grenze von 256M” an die Dateigröße anpassen, die Sie für Ihren WordPress-Blog benötigen.
Methode 3: Fügen Sie den Code in die Datei functions.php Ihres WordPress-Themes ein
Bei dieser Methode wird Code in die Datei functions.php Ihres WordPress-Themes eingefügt.
Anstatt die Datei direkt zu bearbeiten, empfehlen wir die Verwendung von WPCode. Es ist das beste Plugin für Codeschnipsel, mit dem Sie Code zu Ihrer Website hinzufügen können, ohne sie zu zerstören.
Wenn Sie dies noch nicht getan haben, lesen Sie unseren Leitfaden für Einsteiger, wie Sie benutzerdefinierten Code in WordPress hinzufügen.
Zunächst müssen Sie das kostenlose WPCode-Plugin installieren. Weitere Details finden Sie in unserer Schritt-für-Schritt-Anleitung für die Installation eines WordPress-Plugins.
Nach der Aktivierung sollten Sie zu Code-Snippets ” + Snippet hinzufügen navigieren.
Fahren Sie mit der Mauszeigerkontakt über die Option “Individuellen Code hinzufügen (neues Snippet)” und klicken Sie dann auf den Button “+ Individuelles Snippet hinzufügen”.

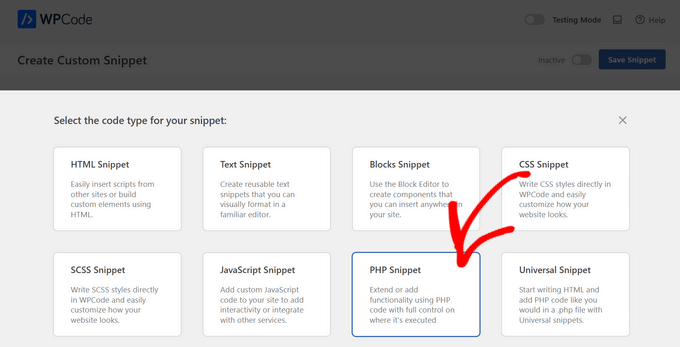
Als Nächstes müssen Sie in der Liste der Optionen den Codetyp “PHP Snippet” auswählen.
Geben Sie in der folgenden Ansicht einen Namen für Ihr neues Snippet ein, der so gewählt werden kann, dass Sie sich an den Code erinnern können.
Kopieren Sie dann den folgenden Codeschnipsel und fügen Sie ihn unter “Codevorschau” ein. Stellen Sie sicher, dass Sie “256M” in die maximale Dateigröße ändern, die Sie benötigen:
1 2 3 | @ini_set( 'upload_max_size' , '256M' );@ini_set( 'post_max_size', '256M');@ini_set( 'max_execution_time', '300' ); |
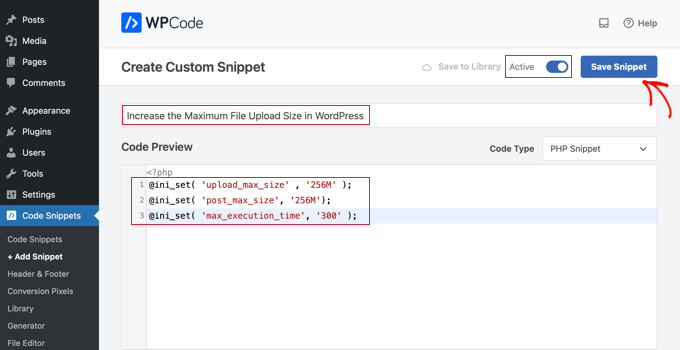
Schalten Sie schließlich den Schalter oben auf “Aktiv” und klicken Sie dann auf die Schaltfläche “Snippet speichern”. Der Code wird nun auf Ihrer Website ausgeführt.
Methode 4: Hinzufügen von Code zu Ihrer .htaccess-Datei
Eine weitere Möglichkeit, die maximale Dateigröße zu erhöhen, besteht in der Änderung der Datei .htaccess. Diese Datei steuert die übergeordneten Konfigurationseinstellungen für Ihre Website.
Dazu müssen Sie sich per FTP auf dem Server Ihrer Website anmelden. Wenn Sie dies noch nicht getan haben, lesen Sie unseren Leitfaden für Anfänger zum Hochladen von Dateien mit FTP auf WordPress.
Danach müssen Sie Ihre .htaccess-Datei im Stammverzeichnis Ihrer Website suchen.

Wenn Sie Ihre .htaccess-Datei nicht finden können, könnte sie von Ihrem Dateimanager oder FTP-Client versteckt worden sein. Weitere Informationen finden Sie in unserem Leitfaden zur Frage , warum Sie die .htaccess-Datei auf Ihrer WordPress-Website nicht finden können.
Als nächstes müssen Sie den folgenden Codeschnipsel in Ihre .htaccess-Datei einfügen:
1 2 3 4 | php_value upload_max_filesize 256Mphp_value post_max_size 256Mphp_value max_execution_time 300php_value max_input_time 300 |
Um die maximale Dateigröße noch weiter zu erhöhen, ändern Sie einfach den Wert “64M” auf die von Ihnen gewünschte Größe.
Methode 5: Verwenden Sie ein WordPress-Plugin, um die Datei-Upload-Größe zu erhöhen
Eine weitere Möglichkeit, die maximale Datei-Upload-Grenze zu erhöhen, ist die Verwendung des Plugins WP Increase Upload Filesize. Wenn Sie sich mit dem Hinzufügen von Code zu WordPress nicht wohlfühlen, dann könnte dies eine gute Option für Sie sein.
Als Erstes müssen Sie das Plugin installieren und aktivieren. Weitere Einzelheiten finden Sie in unserer Anleitung zur Installation eines WordPress-Plugins.
Navigieren Sie nach der Aktivierung zu Medien ” Upload-Limit erhöhen in Ihrem WordPress-Administrationsbereich.
Daraufhin wird ein Bildschirm angezeigt, auf dem Sie in der Dropdown-Liste “Maximale Dateigröße für den Upload wählen” eine neue Dateigröße auswählen können.
Klicken Sie dann auf die Schaltfläche “Änderungen speichern”.

Hinweis: Die maximale Dateigröße für den Upload wird von Ihrem Hosting-Anbieter festgelegt. Wenn Sie eine höhere Dateigröße als die in der Dropdown-Liste angegebene benötigen, müssen Sie sich an Ihren Hosting-Anbieter wenden und um eine Erhöhung des Limits bitten.
Video-Anleitung
Wenn Sie keine Lust haben, schriftliche Anweisungen zu befolgen, können Sie sich stattdessen unser Video-Tutorial ansehen:
Wir hoffen, dass dieser Artikel Ihnen geholfen hat, die maximale Größe für den Upload von Dateien in WordPress zu erhöhen. Vielleicht interessiert Sie auch unsere Anleitung, wie Sie zusätzliche Dateitypen zum Upload in WordPress hinzufügen können, sowie unsere Expertenauswahl an Plugins und Tipps zur Verbesserung des WordPress-Administrationsbereichs.
Wenn Ihnen dieser Artikel gefallen hat, dann abonnieren Sie bitte unseren YouTube-Kanal für WordPress-Videotutorials. Sie können uns auch auf Twitter und Facebook finden.


Abduaziz
Thanks a lot!!! Method 3 worked for me
WPBeginner Support
Glad our recommendation could help
Admin
Alexander Gartley
Thanks, this helped me troubleshoot an upload limit. I’m on a WordPress multisite network install, so it ended up being a setting in the Network Admin Settings.
I was confused at first, because my php settings were allowing larger uploads, but it was restricted in the Network Settings.
WPBeginner Support
Thanks for sharing what solved the problem for you
Admin
Ernesto
Would have been great if you have included the .user.ini method.
.user.ini uploaded in the root folder with the same value/text in your edited php.ini
Most of the time, only this method works for shared hosting.
ErnestPH
WPBeginner Support
The php.ini file should work the same as the user.ini file unless your specific host ignores the php.ini but thank you for sharing your recommendation
Admin
Mark
This is the only solution that works on my shared hosting server. Thanks Ernesto!
Tamir Davidoff
Not working for me.
I have followed this guide and double checked the php.ini file to make sure that the changed are in fact saved. changed htaccess file to increase limits. and also tried modifying the phpMyAdmin httpd-app.conf and php-settings.conf file. All of these files reflect max upload higher than 40m and my WP site does not reflect Any of these changes. Really frustrated here.
Please help me, thanks !
WPBeginner Support
If you haven’t already, you would want to reach out to your hosting provider to ensure there is not a setting on their end that is overriding what you are setting
Admin
rajesh
i have tried all 3 method none of them worked. i am trying to upload newspaper theme in my in my wordpress site. but every time it show that php.ini file upload max file size.
plz help me
WPBeginner Support
You would want to reach out to your hosting provider to ensure they don’t have a setting that is overriding the changes you made.
Admin
Adam Walsworth
Watchout for hidden php.ini files. In my setup I found 2 of them. The one which I found actually resolved the issue was found under
./etc/php/7.0/apache2/php.ini
modifying this file fixed my issue.
WPBeginner Support
Thanks for sharing your solution, with where that file is located we would recommend most users reach out to their hosting provider before looking in locations like that.
Admin
Rafiq khan
Thanks buddy i have solved my problem by adopting method 2 by editing my php.ini file
Thanks alot you are working great
WPBeginner Support
Glad our article could help
Admin
Carla
None of the above worked for me. A matter of fact, editing the htaccess file broke my site even after deleting the above code. Overwriting with a new file fixed the problem though.
I have a dedicated server on Bluehost. What worked for me was going in the WHM root, not cpanel nor FTP access. Search for MultiPHP INI Editor. Give it at least 5 minutes to load if you only see the title and icon. You can set you upload time, post size, etc. there. Works instantly, even if your site is using Cloudflare, without placing it in development mode or clearing the cache. I hope this helps someone.
WPBeginner Support
Thank you for sharing what worked for you, should other users be on a dedicated server, if they reach out and let BlueHost know the need to increase the upload size then BlueHost can normally edit that for them
Admin
Pezza
Great Stuff! .htaccess worked for me!
WPBeginner Support
Thank you, glad our guide could help
Admin
ReineR
htaccess metod worked for me, thanks!
WPBeginner Support
Glad our article could help
Admin
Ahmed
Work for me
3. htaccess Method
you need to click (show hidden files to view and edit this file).
WPBeginner Support
Glad our article could help
Admin
rahul
when i tried this
Unable to communicate back with site to check for fatal errors, so the PHP change was reverted. You will need to upload your PHP file change by some other means, such as by using SFTP.
this happened to me
whats the solution of this
WPBeginner Support
You would need to use FTP rather than WordPress itself to add the code: https://www.wpbeginner.com/beginners-guide/how-to-use-ftp-to-upload-files-to-wordpress-for-beginners/
Admin
Ephraim
I had been trying php.ini method but it never works please how will I set it..
Or you should please tell me the were to paste at function.php
WPBeginner Support
You would normally use a text editor to set the content in the php.ini file. For your functions.php it should go at the end normally so it can be removed later as needed. You may also want to check with your hosting provider if you are having trouble with these methods for if they can assist in increasing the file size for you.
Admin
Ivos G.
None worked for me. But this one fixed it – add to your .htaccess this line:
LimitRequestBody 104857600
WPBeginner Support
Thanks for sharing your solution for this issue
Admin
Achilleas
I am using Nginx and i had already setup properly the values for php in the php.ini but what fixed it was puting the same value in the server block with the variable client_max_body_size xxxM;
I am writing this hoping it will help someone.
Editorial Staff
Thank you for sharing this with us
Admin
RAHUL
That worked for me thanx
WPBeginner Support
Glad our tutorial could help
Admin
Adriana Sabo
None of the options worked for me. Nothing happened when I tried the first two, and the last one prompted an error 500. Any way you can help?
Carl
Very helpful, thank you!
Md. Rana
The third option is worked for me.
WPBeginner Support
Hey Rana,
Glad it worked out for you. Don’t forget to follow us on Facebook for more WordPress tips and tutorials.
Admin
Tom Allen
The above explanation is fine for hosted sites, bit what about us guys that locahost? I still can figure out the “upload_max_filesize” error when downloading Updfaftplus from WP Plugins or from a download zip file. I am a beginner and need hand-holding through this process. Help is appreciated.
crystal
hta access worked.
you guys must put the code before #END WordPress
if you put after #end wordpress then site goes to 500 internal server error in my experience with godaddy hosting
Luis Felipe Lino
Thanks.
Jaime Lopes
On most of the shared cPanel sites I’ve setup:
-changing .htaccess brings the whole site down (500 internal error)
-adding php.ini or php5.ini files does nothing
-there is no option to choose ‘Site Software’ in cPanel…
Joseph
Thanks so much. The .htaccess file worked for me
John S
Thanks so much. The .htaccess file worked for me!
Karina
Thanks you so much!!! The .htaccess version worked for me
Megan
Thank you! This was a huge help! I couldn’t even upload plugins because my limit was pre-set at 2MB…Now I’ve got it to 64MB and am able to work.
Thanks!
Okimi Solomon
Thanks a lot. The second option worked for me. God bless you
Benj
Modifying .htaccess file worked for me. Thanks a lot..
Martin Croker
On vidahost (now TSOhost).
Adding the following php.ini worked for me… however (and I’m still a bit confused why), just putting it at http root didn’t work – I had to duplicate the php.ini file inside wp-admin and wp-include directories within wordpress.
Kabelo
Very helpful. Thanks very much.
Dwayne S
I’m on HostGator and currently having issue with max execution time. It occurred a few weeks ago and HostGator support fixed the issue. It now reappeared and support is telling me that they can’t fix it because I’m on shared server. The agent even crashed my site by manually editing the htaccess file and didn’t verify if it was working or not. He did however recommend a plugin that would edit the htaccess file with code to increase the limit but it doesn’t work. I guess HostGator blocks it
Jessany
I added the code into the .php functions folder, and now WordPress will not load. How do I fix this problem??
WPBeginner Support
Hi Jessany,
You can delete the code you added by accessing your website via FTP or File Manager in cPanel.
Admin
bala
upload the above given code to .htaccess file it is working
Caleb
I have GoDaddy hosting and contacted them to help me increase my file upload size. It was a piece of cake — I didn’t have to create any files, add code to my theme, or anything like that. So for those of you who have GoDaddy or cPanel type controls, forget hacks and just use your admin settings.
Here’s what support had me do:
1. Go to your cPanel Admin (a similar hosting panel ‘might’ work somewhat the same)
2. Scroll down to the ‘Software’ and click on ‘Select PHP Version’
3. Click on ‘Switch to PHP Options’ in the top right And TADA! There’s all your PHP Options!
4. Just go down and change the ‘post_max_filesize’ and ‘upload_max_filesize’ to whatever you want, apply and save your changes, and you’re now a safe and happy non-coding website owner.
Good luck!
ZafB
Thanks that worked perfect
Alissa
Thank you for posting this! It worked great!
Alejandra
Thanks a lot! That worked indeed!!
Paul Palmer
Brilliant solution – worked perfectly and easily! Many thanks.
Rich Perozich
This worked for me but in order to even find these files, I had to call godaddy where I was walked through these steps or I never would have been able to navigate to the cpanel Admin without their help.
1. Sign on to godaddy
2. Click on my products upper left
3. Under web hosting click manage all
4. Click web hosting with C panel
5. Click C panel Admin icon
6. Scroll down to Software and click Select php version
7. Click on switch to php options
8. At bottom of page click on the number upload_max_filesize and select # you wish as the max filesize
9. Click apply. It works. Now file sizes can be uploaded to the selected max.
Chris Sandford
Multisite Users:
If your a dumb dumb like me, you may have tried everything to no avail.
Don’t forget if you’re using WordPress Multi-site, to change the upload settings for individual sites.
Network Admin > Settings > Max upload file size
You may still need to use the tips in this article, but without changing the upload settings for multi-site, you won’t know if it’s working.
Stef Thoen
You’re my hero. I’ve been researching this issue for way to long until I finally saw your post. Thanks so much.
Ron
Thank you for this! This should be in the body of this article!
Hitesh L.
WORKED! kudos to you!!!!!!!
Emanuel Pietri
Method 3 – with .htaccess – works fine for me with theme
Stefanos Kargas
Thanks!! I changed .htaccess file and it worked.
haadi
hi. thanks a lot. the 3rd one worked for me
Jim R
Option 2 worked good. Thanks for the info.
Tor Helge
It worked when I did the last one with .htaccess
mara
Anyone on here get this to work with Godaddy? There are very unhelpful. I know I need to create the php.ini file, (and I did), but none of the solutions you posted worked. Any help is appreciated.
WangTuanJie
after 3 method, i couldn’t see success.
Mahadi
Thanks man!! .htacces worked for me!
Lynn
Wish you wouldn’t assume everyone looking for this solution knows what you mean by our “Theme Functions File” – do you mean functions.php? I’m not an expert, and I’m really good at following precise directions, and don’t want to even put a toe in the water of editing files if I don’t know EXACTLY what file you’re talking about! No clues were provided, like what other code I might look for in the file to know I’m in the right place, etc. So…this didn’t help me at all
WPBeginner Support
Hi Lynn,
Yes you need to add it to your theme’s functions.php file.
Admin
Justin
Yea, but where does it go in the functions.php. At the top, bottom, in the middle? Inside the “”
WPBeginner Support
Hi Justin,
At the end.
jack
thank you all those steps helped me
Alex
Thank you, method 3 really worked for me
php_value upload_max_filesize 64M
php_value post_max_size 64M
php_value max_execution_time 300
php_value max_input_time 300
vikram
HI
Do you use shared hosting
shahrin
great! htaccess method work for me. I’m so relieve,guys! Thanks in advance
Samba Siva
.htaccess method worked for me
nelson
htaccess worked for me ,thank you
Sagar
php.ini is worked for me.
cheers.
thnks man !!
Mituka
This worked for me.
Open your .htacess file with notepad.
Skip everything you see and at the bottom.
Paste the following and save.
php_value upload_max_filesize 64M
php_value post_max_size 64M
php_value max_execution_time 300
php_value max_input_time 300
Thomas
Where exactly did you paste it?
# BEGIN WordPress
RewriteEngine On
RewriteBase /
RewriteRule ^index\.php$ – [L]
RewriteCond %{REQUEST_FILENAME} !-f
RewriteCond %{REQUEST_FILENAME} !-d
RewriteRule . /index.php [L]
# END WordPress
php_value upload_max_filesize 64M
php_value post_max_size 64M
php_value max_execution_time 300
php_value max_input_time 300
Is it before the #END WordPress statement? ( I get error when I do that)
Or should it be after the #END WordPress statement?
WPBeginner Support
Hi Thomas,
You need to paste it at the end of your .htaccess file after the #END WordPress line.
Admin