Haben Sie jemals versucht, eine Datei auf Ihre WordPress-Site hochzuladen und sind auf eine Wand gestoßen? Es ist super frustrierend, wenn Sie das benötigte Bild, Plugin oder Theme nicht hochladen können. Unsere Leser bitten uns oft um Hilfe bei Problemen mit dem Dateiupload, da diese Ihren Arbeitsablauf verlangsamen können.
Manchmal können diese Dateiupload-Limits Sie unerwartet daran hindern, Inhalte zu Ihrer Mediathek hinzuzufügen oder die größeren Plugins und Themes zu installieren, die Sie benötigen. Es ist, als ob Sie mit gefesselten Händen dastehen. Und es ist noch ärgerlicher, wenn Sie nicht wissen, wie Sie es beheben können!
Aber keine Sorge, wir sind hier, um zu helfen. Wir lieben es, dass WordPress eine so konfigurierbare Plattform ist, und es gibt oft mehrere Möglichkeiten, dasselbe Problem zu lösen.
In diesem Leitfaden zeigen wir Ihnen die einfachsten Möglichkeiten, die maximale Dateiuploadgröße in WordPress zu erhöhen. Wir helfen Ihnen, diese Einschränkungen zu überwinden, damit Sie sich wieder dem widmen können, was Sie lieben – dem Betreiben Ihrer Website!
Warum die maximale Dateiuploadgröße in WordPress erhöhen?
Ihr WordPress-Hosting-Anbieter legt eine standardmäßige maximale Dateiuploadgröße fest, wenn Sie sich anmelden und WordPress installieren. Ihr Hosting-Anbieter legt dieses Limit fest, und es liegt normalerweise zwischen 2 MB und 500 MB.
Für die meisten WordPress-Website-Besitzer wird dieses Limit mehr als ausreichend sein.
Es gibt jedoch Zeiten, in denen Sie dieses Limit erhöhen müssen, um Upload-Fehler zu vermeiden.
Zum Beispiel:
- Sie betreiben eine Fotografie-Website und müssen große Bilder hochladen.
- Ihr Design- oder Fotografie-Portfolio hat große Bilder.
- Sie möchten ein größeres WordPress-Theme oder -Plugin installieren.
- Sie möchten digitale Produkte wie eBooks, Fotos, Videos und mehr verkaufen.
- Sie aktualisieren regelmäßig Inhalte und fügen Audio, Fotos und mehr hinzu, die über das aktuelle Limit hinausgehen.
Das gesagt, zeigen wir Ihnen, wie Sie die maximale Dateiuploadgröße auf Ihrer WordPress-Website erhöhen können.
Hinweis: Beachten Sie, dass die Anzeige vieler großer Dateien auf Ihrer Website deren Geschwindigkeit und Leistung ernsthaft verlangsamen kann. Deshalb empfehlen wir normalerweise, niemals Videos auf WordPress hochzuladen.
Da die meisten Benutzer unterschiedliche WordPress-Hosting-Setups haben, werden wir Folgendes behandeln:
- So überprüfen Sie Ihr maximales Dateiuploadgrößenlimit in WordPress
- Methode 1: Kontaktieren Sie Ihren WordPress-Hosting-Anbieter
- Methode 2: Erstellen oder Bearbeiten einer vorhandenen php.ini-Datei
- Methode 3: Code zur functions.php-Datei Ihres WordPress-Themes hinzufügen
- Methode 4: Code zur .htaccess-Datei hinzufügen
- Method 5: Use a WordPress Plugin to Increase File Upload Size
So überprüfen Sie Ihr maximales Dateiuploadgrößenlimit in WordPress
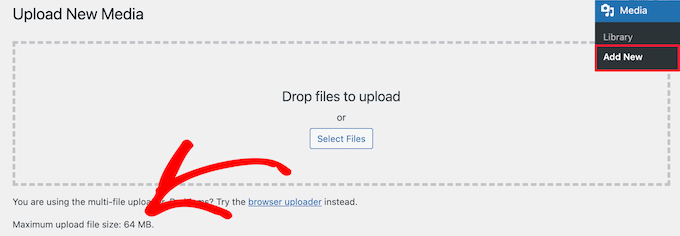
WordPress zeigt automatisch die maximale Dateiuploadgröße an, wenn Sie Bilder oder andere Medien hochladen.
Um dies zu überprüfen, gehen Sie einfach in Ihrem WordPress-Adminbereich zu Medien » Neu hinzufügen, und Sie sehen das maximale Limit für die Dateiuploadgröße für Ihre WordPress-Site.
Jetzt, da Sie wissen, wie Sie die Größenbeschränkung finden, zeigen wir Ihnen, wie Sie die maximale Upload-Größe in WordPress erhöhen.
Methode 1: Kontaktieren Sie Ihren WordPress-Hosting-Anbieter
Eine der einfachsten Möglichkeiten, die maximale Dateiuploadgröße in WordPress zu erhöhen, ist die Kontaktaufnahme mit Ihrem WordPress-Hosting-Anbieter.
Dies ist eine relativ einfache Aufgabe für ihr Kundenservice-Team und kann in wenigen Minuten erledigt werden.
Für Anfänger kann dies viel einfacher sein, als Code zu WordPress hinzuzufügen und Serverdateien zu bearbeiten.
Gehen Sie einfach auf die Website Ihres Hosting-Providers, wie z. B. Bluehost, und melden Sie sich an.
Klicken Sie dann auf das „Chat“-Symbol unten auf dem Bildschirm. Sie können das Support-Personal dann bitten, die Dateiuploadgröße auf Ihrer WordPress-Website zu erhöhen.
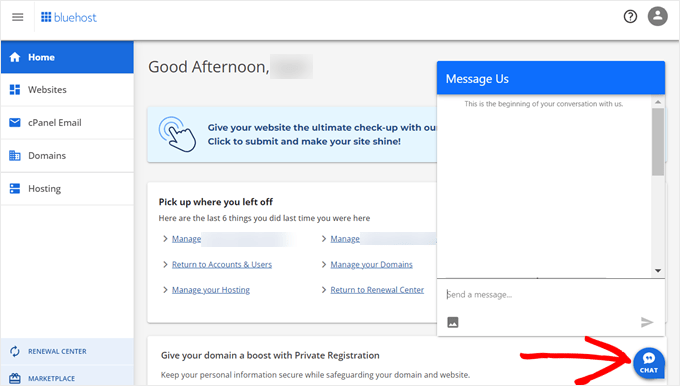
Sie können sich auch über das Dashboard Ihres Hosting-Kontos an den Support wenden.
Methode 2: Erstellen oder Bearbeiten einer vorhandenen php.ini-Datei
Eine weitere Möglichkeit, die maximale Dateiuploadgröße zu erhöhen, ist die Erstellung oder Bearbeitung einer Datei namens php.ini. Diese Datei steuert viele Einstellungen für Ihre WordPress-Hosting-Umgebung.
Die meisten WordPress-Hosting-Anbieter wie Bluehost verfügen über ein anfängerfreundliches cPanel zur Verwaltung Ihrer Website.
Wenn Ihr Webhost über ein cPanel-Dashboard verfügt, können Sie die Dateiuploadgröße über die integrierten Tools erhöhen.
Hinweis: Das Folgende stammt aus dem cPanel von Bluehost. Die meisten Shared-Hosting-Anbieter werden jedoch ähnliche Schritte haben.
Sie finden einen cPanel-Button am unteren Rand des Tabs „Hosting“ auf der Bluehost-Website.
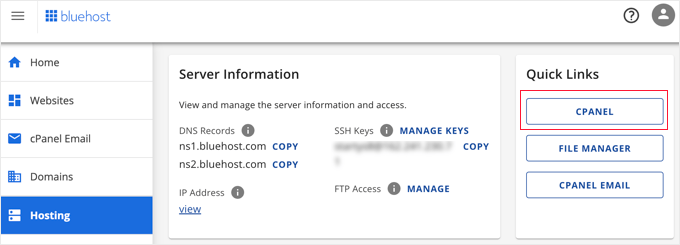
Durch Klicken auf diese Schaltfläche wird Ihr cPanel-Dashboard geöffnet.
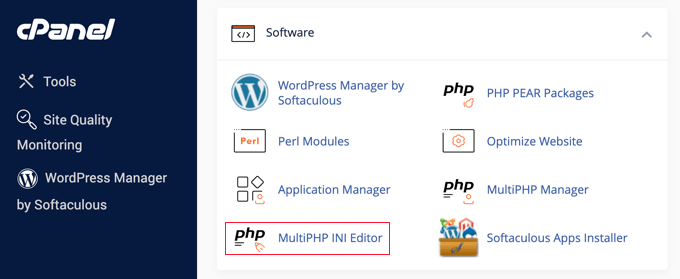
Jetzt müssen Sie nach unten zum Abschnitt Software scrollen und auf 'MultiPHP INI Editor' klicken.
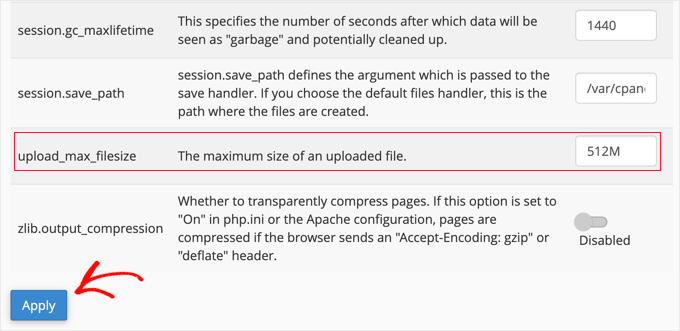
Scrollen Sie dann nach unten zum Abschnitt 'upload_max_filesize' und geben Sie eine neue maximale Dateigröße in das Feld ein.
Klicken Sie dann auf die Schaltfläche „Anwenden“.
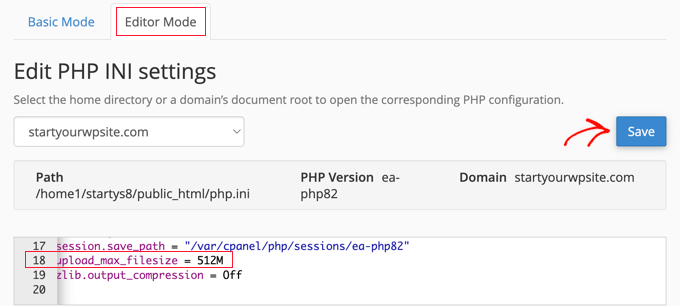
Alternativ können Sie auf den Menüpunkt „Editor-Modus“ klicken und dann die maximale Dateiuploadgröße direkt im Editor ändern.
Sie müssen den Abschnitt 'upload_max_filesize' bearbeiten, um Ihre Dateiuploadgröße zu erhöhen.
Wenn Sie fertig sind, klicken Sie einfach auf die Schaltfläche „Speichern“.
php.ini bearbeiten durch Hinzufügen von Code
Wenn Ihr aktueller Hosting-Anbieter nicht die cPanel-Option anbietet, müssen Sie diese Datei manuell bearbeiten.
Um dies zu tun, können Sie einen FTP-Client oder die Dateimanager-Option in Ihrem WordPress-Hosting-Kontrollpanel verwenden.
Wenn Sie Shared Hosting verwenden, sehen Sie die Datei php.ini möglicherweise nicht in Ihrem Hosting-Verzeichnis. Wenn Sie keine sehen, erstellen Sie einfach eine Datei namens php.ini und laden Sie sie in Ihr Stammverzeichnis hoch.
Fügen Sie dann den folgenden Code-Schnipsel zur Datei hinzu:
upload_max_filesize = 256M
post_max_size = 256M
max_execution_time = 300
Sie können das Limit von '256M' auf die Dateigröße ändern, die Sie für Ihr WordPress-Blog benötigen.
Methode 3: Code zur functions.php-Datei Ihres WordPress-Themes hinzufügen
Diese Methode beinhaltet das Hinzufügen von Code zu Ihrer functions.php-Datei in Ihrem WordPress-Theme.
Anstatt die Datei direkt zu bearbeiten, empfehlen wir die Verwendung von WPCode. Es ist das beste Code-Snippet-Plugin, mit dem Sie Code zu Ihrer Website hinzufügen können, ohne sie zu beschädigen.
Wenn Sie dies noch nie getan haben, lesen Sie unseren Leitfaden für Anfänger, wie Sie benutzerdefinierten Code in WordPress hinzufügen können, ohne Ihre Website zu beschädigen.
Zuerst müssen Sie das kostenlose WPCode-Plugin installieren. Weitere Details finden Sie in unserer Schritt-für-Schritt-Anleitung zum Installieren eines WordPress-Plugins.
Nach der Aktivierung sollten Sie zu Code-Snippets » + Snippet hinzufügen navigieren.
Sie müssen mit der Maus über die Option „Fügen Sie Ihren benutzerdefinierten Code hinzu (neuer Ausschnitt)“ fahren und dann auf die Schaltfläche „+ Benutzerdefinierten Ausschnitt hinzufügen“ klicken.

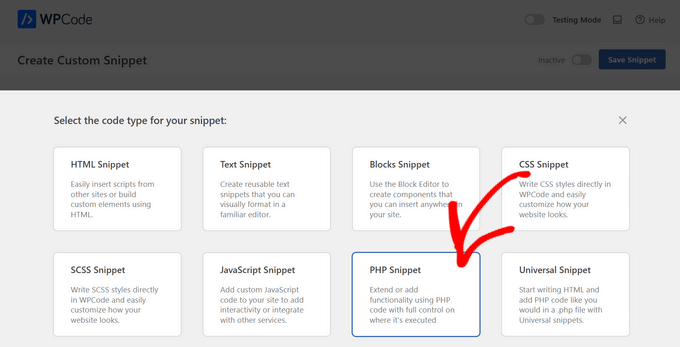
Wählen Sie dann aus der Liste der angezeigten Optionen 'PHP-Snippet' als Code-Typ aus.
Geben Sie auf dem folgenden Bildschirm einen Namen für Ihren neuen Snippet ein, der Ihnen helfen kann, sich daran zu erinnern, wofür der Code bestimmt ist.
Kopieren Sie dann den folgenden Code-Schnipsel und fügen Sie ihn unter ‘Code-Vorschau’ ein. Stellen Sie sicher, dass Sie ‘256M’ in die maximale Dateigröße ändern, die Sie benötigen:
@ini_set( 'upload_max_size' , '256M' );
@ini_set( 'post_max_size', '256M');
@ini_set( 'max_execution_time', '300' );
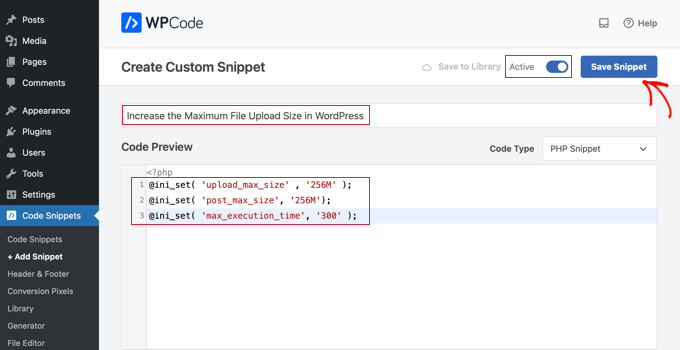
Schalten Sie schließlich den Schalter oben auf „Aktiv“ und klicken Sie dann auf die Schaltfläche „Snippet speichern“. Der Code wird nun auf Ihrer Website ausgeführt.
Methode 4: Code zur .htaccess-Datei hinzufügen
Eine weitere Möglichkeit, die maximale Dateigröße zu erhöhen, ist die Änderung der .htaccess-Datei. Diese Datei steuert die übergeordneten Konfigurationseinstellungen für Ihre Website.
Um dies zu tun, müssen Sie sich über FTP bei Ihrem Website-Server anmelden. Wenn Sie dies noch nie getan haben, lesen Sie unseren Leitfaden zur Verwendung von FTP zum Hochladen von Dateien für WordPress-Anfänger.
Danach müssen Sie Ihre .htaccess-Datei im Stammverzeichnis Ihrer Website lokalisieren.

Wenn Sie Ihre .htaccess-Datei nicht finden können, ist sie möglicherweise von Ihrem Dateimanager oder FTP-Client ausgeblendet. Weitere Informationen finden Sie in unserem Leitfaden warum Sie die .htaccess-Datei auf Ihrer WordPress-Site nicht finden können.
Als Nächstes müssen Sie den folgenden Code-Snippet zu Ihrer .htaccess-Datei hinzufügen:
php_value upload_max_filesize 256M
php_value post_max_size 256M
php_value max_execution_time 300
php_value max_input_time 300
Um Ihre maximale Dateiuploadgröße noch weiter zu erhöhen, ändern Sie einfach die ’64M’ in die von Ihnen benötigte Größe.
Methode 5: Verwenden Sie ein WordPress-Plugin, um die Dateiuploadgröße zu erhöhen
Eine weitere Möglichkeit, das maximale Upload-Limit zu erhöhen, ist die Verwendung des Plugins WP Increase Upload Filesize. Wenn Sie sich nicht wohl dabei fühlen, Code zu WordPress hinzuzufügen, dann könnte dies eine gute Option für Sie sein.
Das Erste, was Sie tun müssen, ist, das Plugin zu installieren und zu aktivieren. Weitere Details finden Sie in unserem Leitfaden zur Installation eines WordPress-Plugins.
Nach der Aktivierung navigieren Sie in Ihrem WordPress-Adminbereich zu Medien » Upload-Limit erhöhen.
Dies bringt Sie zu einem Bildschirm, auf dem Sie eine neue Dateiuploadgröße im Dropdown-Menü „Maximale Upload-Dateigröße wählen“ auswählen können.
Klicken Sie dann auf die Schaltfläche „Änderungen speichern“.

Hinweis: Die maximale Dateiuploadgröße wird von Ihrem Hosting-Provider festgelegt. Wenn Sie ein Dateigrößenlimit benötigen, das größer ist als das im Dropdown-Menü aufgeführte, müssen Sie sich an Ihren Hosting-Provider wenden und darum bitten, das Limit zu erhöhen.
Video-Tutorial
Wenn Sie keine schriftlichen Anleitungen mögen, können Sie sich stattdessen unser Video-Tutorial ansehen:
Wir hoffen, dieser Artikel hat Ihnen geholfen, die maximale Dateiuploadgröße in WordPress zu erhöhen. Möglicherweise möchten Sie auch unseren Leitfaden zum Hinzufügen zusätzlicher Dateitypen zum Hochladen in WordPress und unsere Expertenauswahl an Plugins und Tipps zur Verbesserung des WordPress-Adminbereichs sehen.
Wenn Ihnen dieser Artikel gefallen hat, abonnieren Sie bitte unseren YouTube-Kanal für WordPress-Video-Tutorials. Sie finden uns auch auf Twitter und Facebook.


Sushil Kumar
Danke Yasir Imran, es funktioniert bei mir über .htaccess
Pedro Viana
.htaccess Regeln! Danke.
Amit Kumar Gupta
Sehr nützlicher Artikel für mich. Danke wpbeginner
Steve S
Ich habe eine Problemumgehung gefunden, die keine Änderungen an php.ini, .htaccess, functions.php oder anderen Systemdateien erfordert. Alles, was ich getan habe, war Folgendes:
* FTP-Datei nach /wp-content/uploads/jahr/monat/dateiname.mp4 hochladen
* Neuer Beitrag –> Medien hinzufügen –> Von URL einfügen
* Die entsprechende URL ausschneiden und einfügen, basierend darauf, wo Sie die Datei hochgeladen haben.
* Auf "In Beitrag einfügen" klicken. Fertig.
kenny
Perfekt! PS Wenn Sie ein Bild als Folienhintergrund in Slider Revolution einfügen, verwenden Sie die Option 'Externe URL'.
vic
die .htaccess hat bei mir gut funktioniert. Vielen Dank
Anchal Singh
Meine Website hat dasselbe Problem, aber dank dieses Beitrags funktioniert sie jetzt perfekt
Matt
Danke. Ich möchte auch wissen, wie man ein Website-Portal mit WordPress erstellt. Jede Information von Ihnen wird sehr geschätzt.
marta
Thanks. For me htaccess Method did his job
Rifqi Arief
Danke Bro, es funktioniert auf meinem kostenlosen Hosting über .htacess
RT
Bitte versuchen Sie auch die folgenden Schritte, nachdem Sie die php.ini erstellt haben
(1) Gehen Sie im WordPress-Admin-Dashboard zu Meine Websites -> Netzwerkverwaltung -> Einstellungen.
Deaktivieren Sie das Kontrollkästchen für „Speicherplatz für Website-Uploads: Maximale Größe von hochgeladenen Dateien auf 10 MB begrenzen“ und speichern Sie die Änderungen.
(3) Fertig.
Mit freundlichen Grüßen,
-RT
Suika
Danke, ich hatte vergessen, dass es dort eine Einstellung dafür gab.
Abhishek
Ich bin bei Godaddy Hosting, keine der 3 Lösungen hat für mich funktioniert.
Aber einige Benutzer berichteten, dass die .user.ini-Datei bei Godaddy für sie funktioniert hat.
Kann mir jemand sagen, wohin ich diese Datei legen soll?
Ich habe es im Stammverzeichnis und im wp-admin-Verzeichnis versucht, aber nichts hat funktioniert.
Raman Gutyan
Die .htaccess-Methode funktioniert auf meinem lokalen Rechner hervorragend.
Danke fürs Teilen.
DVR
Wenn Sie auf eine Wand stoßen. Gehen Sie zu Ihrem Hoster. Erweiterte Einstellungen für PHP. Scannen Sie den Code nach max upload & file size. Ändern Sie es auf Ihre erforderliche Einstellung.
Erledigt.
Siehe NICOLAS' Antwort oben.
martin kendall
Hallo DVR, ich habe alles versucht und nichts hat funktioniert, auch nicht das, was hier gepostet wurde. Ich habe es mehrmals auf jede erdenkliche Weise versucht, um es zum Laufen zu bringen. Nichts, aber Ihr Beitrag hat mich zur richtigen Antwort geführt. Vielen Dank dafür.
Ok, das habe ich gemacht: Ich habe mich bei meinem Host-Server angemeldet, wo meine Website liegt. Der Host-Server läuft auf cPanel und das Theme ist paper_lantern. Es sollte keine Rolle spielen, was Ihr Server oder Ihr Theme ist. Wenn Sie keinen Zugriff auf diesen Bereich haben, müssen Sie Ihren Hoster bitten, die Änderungen vorzunehmen, indem Sie sich an Ihren technischen Support wenden.
Im Panel gibt es Kategorien wie = Dateien, Datenbanken, Domains, E-Mail usw. und was Sie suchen, ist Software, unter Software / Apps suchen Sie nach multiPHP INI Editor oder etwas Ähnlichem. Auf anderen Plattformen wird es anders sein, aber es sollte in diesem Bereich sein. Was Sie suchen, ist die Konfiguration der PHP INI Grundeinstellungen oder der Editor-Modus. Mir wurde Home-Verzeichnis oder mein Domainname angeboten. Ich habe den Domainnamen gewählt, aber vielleicht muss ich beides ändern, aber ich musste es nicht. Ich habe nach unten zu upload_max_filesize gescrollt und es auf 64M geändert, aber das hat nicht funktioniert, da Sie auch momory_limit auf 64M ändern müssen. Sie müssen die gleiche Zahl sein. Und dann wird es funktionieren.
Soweit ich verstehe, wenn Sie die Änderungen im WordPress-Code vornehmen. Die Anweisungen sprechen über Ihre Datenbank durch die PHP-Dateien und weisen die Server-Software an, die Datenbankeinstellungen zu ändern. Aus irgendeinem Grund hat es bei mir nicht funktioniert. Dieser Weg umgeht das und nimmt die Änderungen an der Server-Software vor und nicht an der WordPress-Software. In Zukunft werde ich diesen Weg gehen, da es wirklich schnell war. Ich hoffe, das hilft als letzte Möglichkeit. Martin p.s. dies war WordPress 4.8.1 und ich habe festgestellt, dass es nach dem Laden keine PHP.INI oder .htaccess Dateien hatte. Ich habe sie installiert, aber es hat keinen Unterschied gemacht und oder wo ich sie platziert habe.
Jeet Patel
THank you so much it’s working really
Silentnight
Vielen Dank… Ich habe meine Upload-Größe erhöht.
Gopi krishnan
Für mich funktioniert das nicht, aber ich habe es in der htaccess-Datei auf diese Weise gemacht,
php_value post_max_size 10M
php_value upload_max_filesize 40M
php_value memory_limit 500M
Das funktioniert!
agnieszka00
Vielen Dank!!!!!
Michael Serovey
Ich habe meine Websites bei GoDaddy gehostet und bisher hat KEINE der obigen Vorschläge funktioniert! Ich habe für dieses Plugin bezahlt und jetzt habe ich mein Geld verschwendet!
Paul
Hallo,
Um das Plugin-Upload-Limit zu umgehen, können Sie das Plugin einfach mit FileZilla in Ihr Plugin-Verzeichnis hochladen. Nach dem Hochladen können Sie die ZIP-Datei im Dateimanager entpacken und nachdem Sie dies getan haben, ist das Plugin in Ihrem Admin-Bereich -> Plugin-Panel sichtbar und einsatzbereit.
Ich hoffe, das hat geholfen.
Prost
Pooya
WOW! DANKE PAUL!!
Das hat bei mir perfekt funktioniert!
und es ist VIEL einfacher und zuverlässiger als jede dieser Methoden.
Gehen Sie einfach zu Dateiverzeichnis unter cPanel -> Public-html -> [Ihr Website-Ordner] -> wp-content -> themes oder plugins
Laden Sie dann die ZIP-Datei hier hoch und entpacken Sie sie.
Melden Sie sich in Ihrem wp-admin-Dashboard an. Und zack, Sie haben das Theme oder Plugin.
Tom
Gott sei Dank (Paul), das hat viel zu lange gedauert.
Nicolas
Gehen Sie einfach zu Ihrem Hosting-Kontrollfeld -> Erweitert -> PHP-Einstellungen -> upload_max_filesize (normalerweise 2M, Sie können es in meinem Fall bis zu 8M ändern... der Punkt ist, dass es nicht höher sein sollte als Ihr post_max_size)<br> Gern geschehen!
Jake
Beste Antwort bisher.
Steven Gliebe
functions.php ist nicht der beste Ort, um den Code einzufügen, da die Erhöhung des maximalen PHP-Upload-Größenlimits nichts mit einem bestimmten Theme zu tun hat. Benutzer sollten ohnehin keine Theme-Dateien direkt ändern. wp-config.php ist wahrscheinlich ein besserer Ort. Die .htaccess- oder php.ini-Methode ist noch besser (oder fragen Sie einfach den Hoster).
Stephanie
php.ini muss im wp-admin-Ordner sein. Dieser Artikel besagt, dass es im Stammverzeichnis sein muss, was ich versucht habe, aber es hat keinen Unterschied gemacht. Nur zur Info
Vielen Dank für die Informationen!
Aaron
Vielen Dank für Ihre Antwort Stephanie. Ihre Informationen waren genau das, was ich brauchte.
Mike Serovey
Bisher hat KEINE der obigen Vorschläge funktioniert. Mein Control Panel erlaubt mir NICHT, die PHP-Einstellungen zu ändern, die Änderung von .htaccess hat einen internen Serverfehler verursacht und die Änderung des Themes hat ebenfalls nicht funktioniert. Haben Sie weitere Vorschläge?
Mike Serovey
Mit GoDaddy Hosting habe ich festgestellt, dass ich die Codezeilen verwenden musste, die jemand für die Datei .user.ini gepostet hatte, und dann meinen Browser aktualisieren und das Plugin etwa dreimal erneut überprüfen musste, bevor es ENDLICH funktionierte!
Robert
Danke! Die ini-Datei muss in den wp-admin-Ordner hochgeladen werden.
Emmanuel Parbey
Danke.
Es hat perfekt funktioniert.
Somnath
@Stephnie Vielen Dank. Es funktioniert
Sorin
In wp-admin php.ini einfügen und es funktioniert
Angel Rodriguez
Das hat auch bei mir funktioniert.
shemmy
danke ..das funktioniert gut
Prabhat
ja, das ist hilfreich
Matt
Hat sofort funktioniert! Danke! Übrigens, falls es jemanden interessiert, mein Hoster ist BlueHost und ich benutze ein Genesis Theme.
Panagiotis Sakalakis
Bei der Verwendung der .htaccess erhielt ich einen internen Fehler, dann habe ich den Code einfach entfernt und es war behoben. Danach habe ich eine php.ini-Datei in /public_html/wp-admin erstellt, den Code eingefügt und gespeichert. Jetzt funktioniert alles wie am Schnürchen und ich kann meine Dateien problemlos hochladen.
Umesh Shejole
Ja, nützlich……
Subin Babukuttan
htaccess hat gut funktioniert. Danke für den Beitrag
hol
Hi
Weiß jemand, warum, wenn die PHP.INI-Datei wie erwähnt geändert wird, nichts passiert, wenn die Datei zu 100% abgeschlossen ist, und ein HTTP-Fehler angezeigt wird?
Ich kann kleine Dateien und kleine Videos hochladen.
Ich kann nichts Größeres als sagen wir 200 MB hochladen
Ich hatte das funktionierend und größere Dateien akzeptierend, dann wurde meine Website wiederhergestellt.
Ich habe die PHP.INI geändert...
Gibt es einen Grund, warum nur große Dateien nicht funktionieren?
Muss ich die Datei hta.access bearbeiten?
danke
Ian
Die .htaccess-Methode funktionierte bei Media Temple Grid Hosting, andere hatten keinen Einfluss, nur für den Fall, dass sich jemand fragt...
Jay
WENN IMMER NOCH NICHTS FUNKTIONIERT..
(In meinem Fall lag das Problem bei WP MULTISITES)..,
PRÜFEN SIE ZUERST FOLGENDES:
1. Überprüfen Sie Ihre Hosting-Limits (obwohl dies nicht mein Problem war). Stellen Sie sicher, dass Ihr Hosting das von Ihnen festgelegte Limit zulässt, d. h. bei Shared Hosting finden Sie möglicherweise ein Maximum von 64 MB.
HINWEIS: Die folgende Lösung kann auch dann zutreffen, wenn in WordPress die maximale Upload-Dateigröße auch nach Änderungen in der php.ini-Datei usw. nicht geändert wird.
Das 1-MB-Upload-Problem liegt an den Standardeinstellungen von WP MULTISITES!!
Um dies zu ändern, gehen Sie wie folgt vor, um die maximale Upload-Dateigröße in WP Admin zu ändern:
LOGGEN SIE SICH IN IHR ADMIN-DASHBOARD EIN:
1. Fahren Sie oben mit der Maus über Meine Websites und klicken Sie dann auf Netzwerkverwaltung.
2. Fahren Sie links mit der Maus über Einstellungen und klicken Sie dann auf Netzwerkeinstellungen.
3. Scrollen Sie zum Ende der Seite und ändern Sie die maximale Upload-Dateigröße auf den gewünschten Wert in KB.
4. Klicken Sie auf Änderungen speichern.
Hope this helps
Gregg
JA. Danke, Sir.
Milton
Danke Jay, du hattest den Nagel auf den Kopf getroffen für WP Multisites
Denis
Hat bei mir funktioniert. Die Website funktionierte früher und ich konnte nicht verstehen, warum sie es nicht mehr tat. Meine Umstellung auf Multisite war das Problem.
Sam
Erstaunlich!!! Das funktioniert!
Adam
Danke!!!! Verdammt, es gibt nicht viel Hilfe zu den Änderungen, die Multi-Site mit sich bringt!
Bhanu uday
Es hat wie am Schnürchen funktioniert. Vielen Dank.
AmanDeep Singh
Funktioniert!.Ich verwende die Methode „Create or Edit an existing PHP.INI file“ und nachdem ich die Einstellungen wie im Artikel erwähnt angewendet habe, kann ich jetzt Themes und Plugins hochladen, die groß sind. Danke für das Teilen der Lösung.
Judy
Ich bin neu bei WordPress, ich benutze normalerweise Joomla, aber ich habe einen neuen Kunden, der eine WordPress-Website möchte. Beim Versuch, Bilder hochzuladen, war die WordPress-Meldung, dass das Dateilimit 3 MB betrug. Ich habe Stunden damit verbracht, Websites nach einer Antwort zu durchsuchen. Ich benutze WAMP und localhost, um die Website zu erstellen. Über localhost phpinfo() konnte ich überprüfen, welche php.ini aktiv war, die in Apache. Ich hatte ein Dateilimit von 64 MB, aber WordPress hatte immer noch ein Limit von 3 MB. Diese Website gab die Anweisungen unter #3, um die .htaccess-Datei im WordPress-Ordner zu bearbeiten. Ich habe den Text kopiert und in diese Datei eingefügt und ES HAT FUNKTIONIERT! Danke wpbeginner.
KenSanDiego
Habe vergessen zu erwähnen, dass meine WP-Seite in einem Unterverzeichnis mit einem Domain-Pointer liegt. Powwebs PHP gilt für alles in allen Unterverzeichnissen. Wenn Sie also Installationen in Unterverzeichnissen haben, gilt die Änderung für alle Installationen.
Ugyen Zangmo
Erstellen Sie php.ini im wp-admin-Ordner
Fügen Sie in die Datei die folgenden 3 Zeilen ein:
upload_max_filesize = 2048M
post_max_size = 2048M
max_execution_time = 3000
Gehen Sie als Administrator zu Ihrer Website und überprüfen Sie die Seite zum Hochladen neuer Medien. Dort sollte nun die maximale Upload-Dateigröße: 2 GB angezeigt werden.
Danke an Yasir Imran für das Teilen deines Tipps!
Das hat bei mir funktioniert. Danke James für das Teilen des Tipps von Yasir Imran. Prost
sadiq
es funktioniert nicht, ich habe dasselbe getan
auf dem Godaddy-Server
Raton Miah
funktioniert!
Brendan
Das war ein toller Tipp… es hat für mich funktioniert.. danke!
Ben
Heiliger Bimbam! Vielen Dank, Mann, nach dem letzten WordPress-Update auf 4.3.1 wurde meine Upload-Größe auf den Standard von 50 MB zurückgesetzt, obwohl meine php.ini-, .htaccess- und wp-config.php-Dateien unverändert waren und immer noch eine maximale Upload-Größe von 512 MB widerspiegelten! Du bist ein Held!
Alain
Vielen Dank!
Ich habe ALLE drei Methoden ohne Erfolg ausprobiert.
Ich habe den Webhoster gefragt und sie haben das Limit auf 40 MB erhöht.
Dann habe ich endlich deine ausprobiert und es hat fantastisch funktioniert!
dominio público
post_max_size sollte größer als upload_max_filesize sein, um Platz für andere Informationen zu lassen. Die Standardwerte sind 2 MB maximale Dateigröße und 8 MB maximale Postgröße.
Aus der PHP-Dokumentation:
post_max_size Integer
Legt die maximal zulässige Größe von Post-Daten fest. Diese Einstellung wirkt sich auch auf den Datei-Upload aus. Um große Dateien hochzuladen, muss dieser Wert größer als upload_max_filesize sein.
Nori
Danke dafür! Habe die php.ini ausprobiert und bin ziemlich überrascht, dass es funktioniert hat und so einfach war
Dan
Die php.ini-Datei hat für mich perfekt funktioniert. Ich habe einfach die vorhandenen Werte auf 100M geändert. Alles gut. Danke für den Rat.
James
Erstellen Sie php.ini im wp-admin-Ordner
Fügen Sie in die Datei die folgenden 3 Zeilen ein:
upload_max_filesize = 2048M
post_max_size = 2048M
max_execution_time = 3000
Gehen Sie als Administrator zu Ihrer Website und überprüfen Sie die Seite zum Hochladen neuer Medien. Dort sollte nun die maximale Upload-Dateigröße: 2 GB angezeigt werden.
Danke an Yasir Imran für das Teilen deines Tipps!
Zain
Hallo,
Bitte nennen Sie mir die Namen der besten Themes für Software-/Download-Seiten?
Ich warte.
Danke,
Zain.
Markus Aurelius
Nichts von dem oben Genannten hat bei mir auf GoDaddy funktioniert, daher musste ich .user.ini anstelle von php.ini verwenden, und das hat gut funktioniert. Danke, dass Sie mich in die richtige Richtung gewiesen haben!
Keith
Vielen Dank. Ich bin bei GoDaddy und das hat funktioniert, während viele andere Methoden nicht funktionierten.
Raj Kothari
Hallo Keith, kannst du mir sagen, in welchem Ordner du diese Datei abgelegt hast? .user.ini
Hilfe benötigt
Oliver
Danke, .user.ini hat bei mir auf Godaddy funktioniert
sam
1:- öffnen Sie den Ordner „C:wampbinapacheapache2.4.9bin“ und finden Sie „php“, was eine Konfigurationsdatei ist, öffnen Sie sie in Ihrem Notepad und suchen Sie erneut nach „upload_max_filesize“ und „post_max_size“ und ändern Sie beide und speichern Sie.
2:- Öffnen Sie den Ordner „C:wampbinphpphp5.5.12“ und finden Sie „php“ und „phpforapache“, die Konfigurationsdateien sind, und öffnen Sie beide in Ihrem Editor und suchen Sie erneut nach „upload_max_filesize“ und „post_max_size“ und ändern Sie beide und speichern Sie.
3:- starten Sie schließlich alle Dienste von Wamp neu und genießen Sie... liebe euch alle
Dez
Hallo Leute, ich bin NEU hier, aber könnt ihr euch ansehen, was ich sehe, wenn ich auf Bearbeiten der .htaccess-Datei klicke – wo füge ich den Code ein? Am Anfang? Am Ende? Setze ich meinen Cursor am Anfang und drücke Enter (und füge ihn dann ein) ??? Bitte helft mir
Gerard ONeill
Deb, es wäre egal, wo du es hinzufügst; aber stelle sicher, dass es außerhalb eines Blocks ist. Um sicherzugehen, füge es einfach am Ende hinzu.
Der bessere Weg (seit php5.5) ist jedoch, die Datei .user.ini pro Verzeichnis zu ändern. Wenn Sie das Verzeichnis auf der obersten Ebene geändert hätten, würde dies für alle Unterverzeichnisse gelten (sofern nicht überschrieben).
http://php.net/manual/en/configuration.file.per-user.php
Und offensichtlich funktioniert die systemweite php.ini auch.
BenPDX
+1 für Alex' Lösung. Das Hochladen des php.ini-Ordners in den wp-admin-Ordner hat bei mir auf Lithium Hosting funktioniert. 30 Sekunden Google-Suche und 1 Minute zum Erstellen einer Textdatei und Hochladen auf den Server!
Dede Erik
Ich habe die dritte Methode gewählt und sie funktioniert für mich, vielen Dank
Hasan Tareq
.htaccess funktioniert für meine wpenigne-Website
Vineesh
Hallo Alex, du hast Recht. Die Datei php.ini sollte zum Ordner wp-admin hinzugefügt werden. Sie wird perfekt funktionieren... danke Alex
Rafael
Nur die php.ini-Datei in den wp-admin-Ordner einzufügen hat perfekt funktioniert!!! Danke!
chandan
danke Alex, das hat auch für mich funktioniert..
Tony_atf
Ich bekomme immer wieder HTTP-Fehler, auch mit Ihrem Vorschlag. Ich bin bei GoDaddy, ich habe eine Dateigröße von 300 MB, aber alles über 150 MB bricht zusammen. Es wird hochgeladen, bleibt ein paar Sekunden stehen und dann wird der HTTP-Fehler angezeigt. WordPress zeigt nie den Fehler an.
SunnyK
Bei mir dasselbe. Haben Sie schon eine Lösung gefunden?
WPBeginner-Mitarbeiter
Sie können sich mit einem FTP-Client mit Ihrer Website verbinden und die vorgenommenen Änderungen rückgängig machen.
Nitesh Magan
Hallo, ich habe den ersten Code zu meiner Theme-Funktionsdatei hinzugefügt, aber jetzt ist alles auf meiner Website leer. Ich kann nicht einmal auf mein wp-admin zugreifen!!
Bitte helfen Sie …
Chris
Wenn Sie nur versuchen, Dateien selbst im Admin-Panel (Medien) hochzuladen, erstellen Sie ein neues Nur-Text-Dokument und speichern Sie es unter einem beliebigen Namen (einschließlich Erweiterung) der großen Datei, die Sie hochladen möchten. Wenn Sie also versuchen, „files.zip“ hochzuladen, speichern Sie ein leeres Textdokument als files.zip. Laden Sie diese gerade erstellte leere Textdatei in WordPress hoch. Gehen Sie dann zu FTP oder Dateimanager, navigieren Sie zu wp-content/uploads/(aktuelles Jahr)/(aktueller Monat). Dort sollten Sie files.zip finden. Löschen Sie diese Datei (die nur eine reine Textdatei ist) und laden Sie dann die echte files.zip hoch, stellen Sie sicher, dass die Namen übereinstimmen. Wenn Sie dann zurück zu Medien gehen, wird es die richtige Datei sein.
Yasir Imran
Ich habe die htaccess-Methode ausprobiert und einen 500er internen Serverfehler erhalten, dann die php.ini mit den 3 angegebenen Zeilen in das Stammverzeichnis gelegt, wieder hat es nicht funktioniert. Dann habe ich sie in den wp-admin-Ordner gelegt und es hat funktioniert. Ich denke, der Autor sollte das erwähnen.
Alexandre
Das hat bei mir funktioniert, während alles andere versagt hatte. Danke fürs Teilen.
Mel
Ich hatte genau die gleiche Erfahrung und das hat bei mir funktioniert. Danke Yasir!
Les B
Danke Yasir Imran…deine Methode funktioniert, wo alle anderen, einschließlich .htaccess, versagen!
(Die php.ini muss sich im wp-admin-Ordner befinden.)
Les