Haben Sie schon einmal versucht, eine Datei auf Ihre WordPress Website hochzuladen und sind dabei auf eine Mauer gestoßen? Es ist super frustrierend, wenn Sie das Bild, Plugin oder Theme, das Sie brauchen, nicht hochladen können. Unsere Besucher bitten uns oft um Hilfe bei Problemen mit dem Upload von Dateien, weil sie Ihren Arbeitsablauf zum Erliegen bringen können.
Manchmal können diese Grenzen für den Upload von Dateien Sie unerwartet daran hindern, Ihrer Mediathek Inhalte hinzuzufügen oder größere Plugins und Themes zu installieren, die Sie benötigen. Das ist, als wären einem die Hände gebunden. Und es ist noch ärgerlicher, wenn man nicht weiß, wie man das Problem beheben kann!
Aber keine Sorge, wir sind hier, um zu helfen. Wir lieben es, dass WordPress eine so konfigurierbare Plattform ist und dass es oft mehrere Möglichkeiten gibt, das gleiche Problem zu lösen.
In dieser Anleitung zeigen wir Ihnen die einfachsten Möglichkeiten, die maximale Größe für Uploads in WordPress zu erhöhen. Wir helfen Ihnen, diese Einschränkungen zu überwinden, damit Sie sich wieder dem widmen können, was Sie lieben – dem Betrieb Ihrer Website!
Warum die maximale Datei-Upload-Größe in WordPress erhöhen?
Ihr WordPress Hosting-Anbieter legt einen Standard für die maximale Größe des Uploads von Dateien fest, wenn Sie sich anmelden und WordPress installieren. Ihr Hosting-Anbieter legt diese Grenze fest, die normalerweise zwischen 2 MB und 500 MB liegt.
Für die meisten Betreiber von WordPress-Websites ist dieses Limit mehr als ausreichend.
Es kann jedoch vorkommen, dass Sie diese Grenze anheben müssen, um Upload-Fehler zu vermeiden.
Zum Beispiel:
- Sie betreiben eine Fotografie-Website und müssen große Bilder hochladen.
- Ihr Design- oder Fotografie-Portfolio enthält große Bilder.
- Sie möchten ein größeres WordPress-Theme oder -Plugin installieren.
- Sie möchten digitale Produkte wie eBooks, Fotos, Videos und mehr verkaufen.
- Sie aktualisieren regelmäßig Inhalte und fügen Audio, Fotos und mehr hinzu, die über das aktuelle Limit hinausgehen.
In diesem Sinne zeigen wir Ihnen, wie Sie die maximale Datei-Upload-Größe auf Ihrer WordPress-Website erhöhen können.
Hinweis: Denken Sie daran, dass die Anzeige vieler großer Dateien auf Ihrer Website deren Geschwindigkeit und Leistung erheblich beeinträchtigen kann. Deshalb empfehlen wir in der Regel, keine Videos in WordPress hochzuladen.
Da die meisten Benutzer unterschiedliche WordPress-Hosting-Konfigurationen haben, werden wir die folgenden Punkte behandeln:
- How to Check Your Maximum File Upload Size Limit in WordPress
- Method 1: Contact Your WordPress Hosting Provider
- Method 2: Create or Edit an Existing php.ini file
- Method 3: Add Code to Your WordPress Theme functions.php File
- Method 4: Add Code to Your .htaccess File
- Method 5: Use a WordPress Plugin to Increase File Upload Size
Wie Sie die maximale Datei-Upload-Größe in WordPress überprüfen
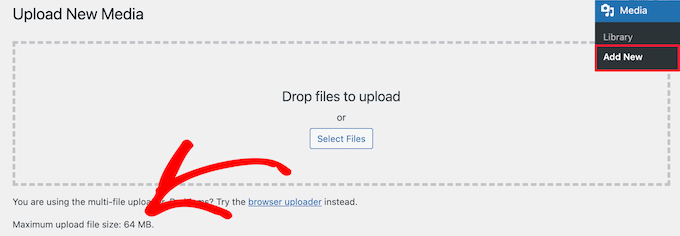
WordPress zeigt automatisch die maximale Dateigröße an, wenn Sie Bilder oder andere Medien hochladen.
Um dies zu überprüfen, gehen Sie einfach auf Medien ” Neu hinzufügen in Ihrem WordPress-Administrationspanel, und Sie werden die maximale Datei-Upload-Größe für Ihre WordPress-Website zu sehen.
Da Sie nun wissen, wie Sie das Größenlimit finden können, zeigen wir Ihnen, wie Sie die maximale Upload-Größe in WordPress erhöhen können.
Methode 1: Kontaktieren Sie Ihren WordPress-Hosting-Anbieter
Eine der einfachsten Möglichkeiten, die maximale Datei-Upload-Größe in WordPress zu erhöhen, besteht darin, sich an Ihren WordPress-Hosting-Anbieter zu wenden.
Dies ist eine relativ einfache Aufgabe für das Kundendienstteam und kann in wenigen Minuten erledigt werden.
Für Anfänger kann dies viel einfacher sein als das Hinzufügen von Code zu WordPress und das Bearbeiten von Serverdateien.
Gehen Sie einfach auf die Website Ihres Hosting-Anbieters, z. B. Bluehost, und melden Sie sich an.
Klicken Sie dann auf das Symbol “Chat” am unteren Rand der Ansicht. Sie können dann die Support-Mitarbeiter bitten, die Größe des Uploads von Dateien auf Ihrer WordPress Website zu erhöhen.
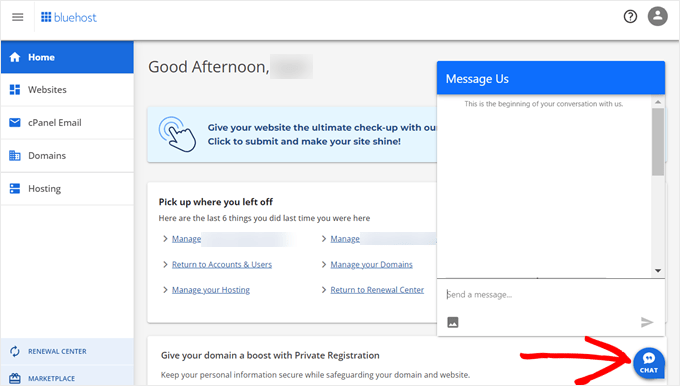
Sie können sich auch über das Dashboard Ihres Hosting-Kontos an den Support wenden.
Methode 2: Erstellen oder Bearbeiten einer vorhandenen php.ini-Datei
Eine weitere Möglichkeit, die maximale Datei-Upload-Größe zu erhöhen, besteht darin, eine Datei namens php.ini zu erstellen oder zu bearbeiten. Diese Datei steuert viele Einstellungen für Ihre WordPress-Hosting-Umgebung.
Die meisten WordPress-Hosting-Anbieter wie Bluehost bieten ein einsteigerfreundliches cPanel für die Verwaltung Ihrer Website.
Wenn Ihr Webhost über ein cPanel-Dashboard verfügt, können Sie die Größe der hochzuladenden Dateien mit den integrierten Tools erhöhen.
Hinweis: Die folgenden Angaben stammen aus dem Bluehost cPanel. Bei den meisten Shared-Hosting-Anbietern werden jedoch ähnliche Schritte durchgeführt.
Sie finden eine cPanel-Schaltfläche am unteren Rand der Registerkarte Hosting bei Bluehost.
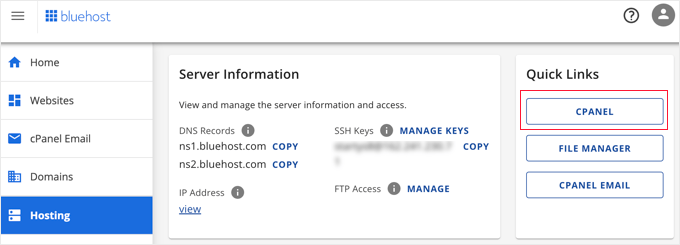
Wenn Sie auf diese Schaltfläche klicken, wird Ihr cPanel-Dashboard geöffnet.
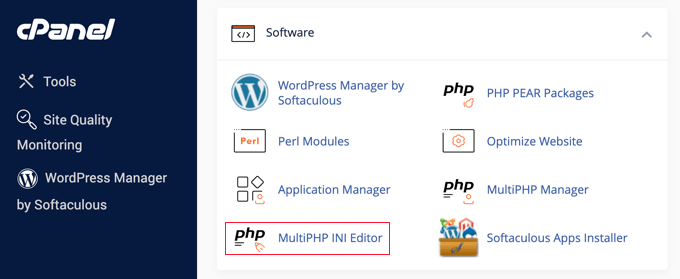
Nun müssen Sie zum Abschnitt Software scrollen und auf “MultiPHP INI Editor” klicken.
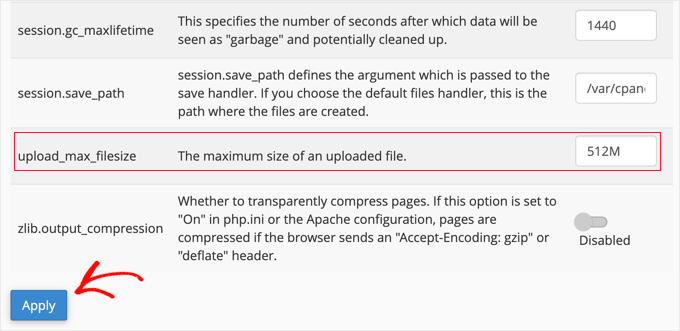
Blättern Sie dann nach unten zum Abschnitt “upload_max_filesize” und geben Sie eine neue maximale Dateigröße in das Feld ein.
Klicken Sie dann auf die Schaltfläche “Übernehmen”.
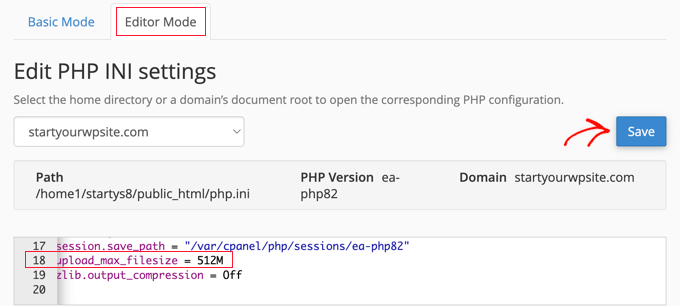
Alternativ können Sie auch auf die Registerkarte “Editormodus” klicken und dann die maximale Dateigröße direkt im Editor ändern.
Sie müssen den Abschnitt “upload_max_filesize” bearbeiten, um die Größe der hochgeladenen Dateien zu erhöhen.
Wenn Sie fertig sind, klicken Sie einfach auf die Schaltfläche “Speichern”.
php.ini durch Hinzufügen von Code bearbeiten
Wenn Ihr derzeitiger Hosting-Anbieter die cPanel-Option nicht anbietet, müssen Sie diese Datei manuell bearbeiten.
Dazu können Sie einen FTP-Client oder die Dateimanager-Option in Ihrem WordPress-Hosting-Kontrollpanel verwenden.
Wenn Sie ein gemeinsam genutztes Hosting-System verwenden, kann es sein, dass Sie die Datei php.ini nicht in Ihrem Hosting-Verzeichnis finden. Wenn Sie keine sehen, erstellen Sie einfach eine Datei namens php.ini und laden Sie sie in Ihr Stammverzeichnis hoch.
Fügen Sie dann den folgenden Codeschnipsel in die Datei ein:
1 2 3 | upload_max_filesize = 256Mpost_max_size = 256Mmax_execution_time = 300 |
Sie können die Grenze von 256M” an die Dateigröße anpassen, die Sie für Ihren WordPress-Blog benötigen.
Methode 3: Fügen Sie den Code in die Datei functions.php Ihres WordPress-Themes ein
Bei dieser Methode wird Code in die Datei functions.php Ihres WordPress-Themes eingefügt.
Anstatt die Datei direkt zu bearbeiten, empfehlen wir die Verwendung von WPCode. Es ist das beste Plugin für Codeschnipsel, mit dem Sie Code zu Ihrer Website hinzufügen können, ohne sie zu zerstören.
Wenn Sie dies noch nicht getan haben, lesen Sie unseren Leitfaden für Einsteiger, wie Sie benutzerdefinierten Code in WordPress hinzufügen.
Zunächst müssen Sie das kostenlose WPCode-Plugin installieren. Weitere Details finden Sie in unserer Schritt-für-Schritt-Anleitung für die Installation eines WordPress-Plugins.
Nach der Aktivierung sollten Sie zu Code-Snippets ” + Snippet hinzufügen navigieren.
Fahren Sie mit der Mauszeigerkontakt über die Option “Individuellen Code hinzufügen (neues Snippet)” und klicken Sie dann auf den Button “+ Individuelles Snippet hinzufügen”.

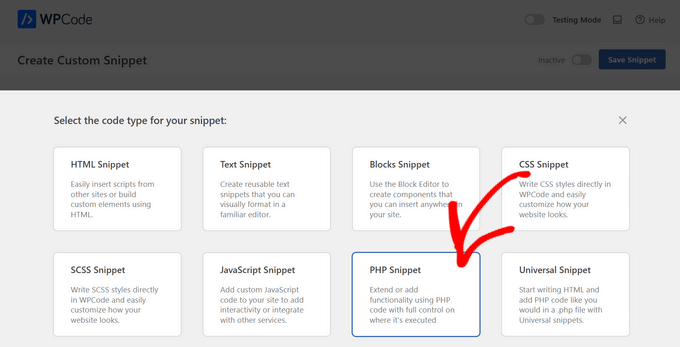
Als Nächstes müssen Sie in der Liste der Optionen den Codetyp “PHP Snippet” auswählen.
Geben Sie in der folgenden Ansicht einen Namen für Ihr neues Snippet ein, der so gewählt werden kann, dass Sie sich an den Code erinnern können.
Kopieren Sie dann den folgenden Codeschnipsel und fügen Sie ihn unter “Codevorschau” ein. Stellen Sie sicher, dass Sie “256M” in die maximale Dateigröße ändern, die Sie benötigen:
1 2 3 | @ini_set( 'upload_max_size' , '256M' );@ini_set( 'post_max_size', '256M');@ini_set( 'max_execution_time', '300' ); |
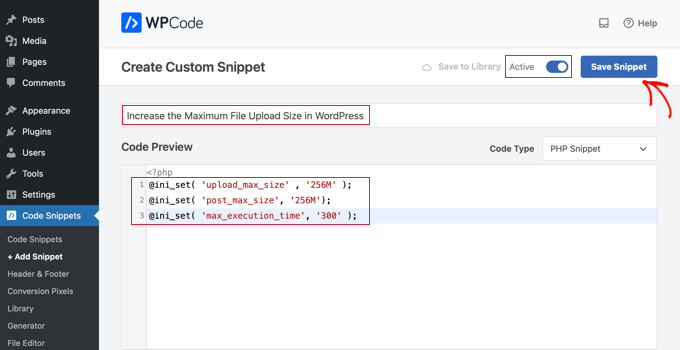
Schalten Sie schließlich den Schalter oben auf “Aktiv” und klicken Sie dann auf die Schaltfläche “Snippet speichern”. Der Code wird nun auf Ihrer Website ausgeführt.
Methode 4: Hinzufügen von Code zu Ihrer .htaccess-Datei
Eine weitere Möglichkeit, die maximale Dateigröße zu erhöhen, besteht in der Änderung der Datei .htaccess. Diese Datei steuert die übergeordneten Konfigurationseinstellungen für Ihre Website.
Dazu müssen Sie sich per FTP auf dem Server Ihrer Website anmelden. Wenn Sie dies noch nicht getan haben, lesen Sie unseren Leitfaden für Anfänger zum Hochladen von Dateien mit FTP auf WordPress.
Danach müssen Sie Ihre .htaccess-Datei im Stammverzeichnis Ihrer Website suchen.

Wenn Sie Ihre .htaccess-Datei nicht finden können, könnte sie von Ihrem Dateimanager oder FTP-Client versteckt worden sein. Weitere Informationen finden Sie in unserem Leitfaden zur Frage , warum Sie die .htaccess-Datei auf Ihrer WordPress-Website nicht finden können.
Als nächstes müssen Sie den folgenden Codeschnipsel in Ihre .htaccess-Datei einfügen:
1 2 3 4 | php_value upload_max_filesize 256Mphp_value post_max_size 256Mphp_value max_execution_time 300php_value max_input_time 300 |
Um die maximale Dateigröße noch weiter zu erhöhen, ändern Sie einfach den Wert “64M” auf die von Ihnen gewünschte Größe.
Methode 5: Verwenden Sie ein WordPress-Plugin, um die Datei-Upload-Größe zu erhöhen
Eine weitere Möglichkeit, die maximale Datei-Upload-Grenze zu erhöhen, ist die Verwendung des Plugins WP Increase Upload Filesize. Wenn Sie sich mit dem Hinzufügen von Code zu WordPress nicht wohlfühlen, dann könnte dies eine gute Option für Sie sein.
Als Erstes müssen Sie das Plugin installieren und aktivieren. Weitere Einzelheiten finden Sie in unserer Anleitung zur Installation eines WordPress-Plugins.
Navigieren Sie nach der Aktivierung zu Medien ” Upload-Limit erhöhen in Ihrem WordPress-Administrationsbereich.
Daraufhin wird ein Bildschirm angezeigt, auf dem Sie in der Dropdown-Liste “Maximale Dateigröße für den Upload wählen” eine neue Dateigröße auswählen können.
Klicken Sie dann auf die Schaltfläche “Änderungen speichern”.

Hinweis: Die maximale Dateigröße für den Upload wird von Ihrem Hosting-Anbieter festgelegt. Wenn Sie eine höhere Dateigröße als die in der Dropdown-Liste angegebene benötigen, müssen Sie sich an Ihren Hosting-Anbieter wenden und um eine Erhöhung des Limits bitten.
Video-Anleitung
Wenn Sie keine Lust haben, schriftliche Anweisungen zu befolgen, können Sie sich stattdessen unser Video-Tutorial ansehen:
Wir hoffen, dass dieser Artikel Ihnen geholfen hat, die maximale Größe für den Upload von Dateien in WordPress zu erhöhen. Vielleicht interessiert Sie auch unsere Anleitung, wie Sie zusätzliche Dateitypen zum Upload in WordPress hinzufügen können, sowie unsere Expertenauswahl an Plugins und Tipps zur Verbesserung des WordPress-Administrationsbereichs.
Wenn Ihnen dieser Artikel gefallen hat, dann abonnieren Sie bitte unseren YouTube-Kanal für WordPress-Videotutorials. Sie können uns auch auf Twitter und Facebook finden.


Being Stealth
Adding php.ini file in wp-admin folder worked for me. Yahoooo thanks.
Mouad Chafai
Thanks php.ini method worked perfectly.
i’ve created the php.ini
wp-adminphp.ini
add lines:
upload_max_filesize = 64M
post_max_size = 64M
max_execution_time = 300
thanks for the article.
Saleh Shaukat
Thanks .htaccess worked for me perfectly !!.
Dan Rosenberg
PHP.INI method worked perfectly. Thanks!
Ben Peacock
Sorry please find this instead Login to the root machine type the following command nano /usr/lib/php.ini
find ; Maximum size of POST data that PHP will accept.
post_max_size = 2M change this to 64
Save and exit and then you should be able to upload what you need hope this helps
QuangPham
Thanks for the instructions on how to fix.
Voicu Ioan Virgil
Thanks, great tutorial !
Maria McCarthy
Adding the php.ini file to my wp-admin folder SPECIFICALLY worked for me as well! Thanks everyone! Only took me almost 4 hours to find a page that had the info which would work for me – lifesavers!
pete
found the php.ini worked in wp-admin network php.ini
Tabassum Javaid
htaccess method works fine for me. thanks
Mike
with some host ( godaddy ) for example, there may be some additional steps.
And to what php you are running. For godaddy with php5, rename php.ini to php5.ini and remember if you have accuracies running, you will have to temp. end them before the file will even take over, or wait awhile for it.
System Processes / End all
jaymz
Many thanks for the article. For self-hosted there’s another way as methods 2 and 3 didn’t work for me as the .htaccess change had no effect and neither did adding a php.ini file in /wp-admin. It was simply a case of finding the existing php.ini file for Apache. On Ubuntu I ran;
sudo find / -name php.ini
This found my ini file in /etc/php5/apache2/
All that was needed was to locate the parameters and update the values for;
upload_max_filesize
post_max_size
max_execution_time
Thanks for getting me there!
D Winzell
Thanks for writing this. The php.ini does need to be in the wp-admin directory to function correctly. Just checked my host (Vaurent) and they allows up to 105M file uploads so I am going to find something that size and see if it makes it’s merry way up to my blog.
Matt
I just want to add, using godaddy you cannot use the htaccess method, it will throw you into a 500 internal service error.
You must use the php.ini method. Only difference will be you have to have a php.ini and a php5.ini and the lines must be added to both. The files need to be in the root directory of where the wordpress install is, not in the wp-admin folder, outside of it.
Also if you have multiple wordpress installations This has to be done and placed into each directory that each wordpress installation is located.
GSJha
Very Good Post.
sandeep
php_value upload_max_filesize 64M
php_value post_max_size 64M
php_value max_execution_time 1500
php_value max_input_time 1500
i use these values in .htaccess and it works !
thanks
Thyme
So I did all of those and changed the php.ini in the /etc folder (my site is on mediatemple’s grid-service) and nothing was working but then I vaguely remembered there was something I had to change in the network settings if my installation was multisite and there it was. Ugh.
So yeah, if you’ve got a WordPress network, go to your network settings and change the max file size upload near the bottom of the page.
Alex
This is the only thing that worked for me, I tried all the options, I’m on 1&1
memory_limit = 32M
upload_max_filesize = 32M
post_max_size = 32M
file_uploads = On
** Size can be anything
The key was the “file_uploads” line
Place this in the /wp-admin/ folder.
Kristina
Worked for me! I’m on Bluehost.
Thanks for your post
Brandon
this worked for me after everything else hadn’t. I’m so relieved!
I’m also on 1&1. Once I added the “file_uploads = On” line to my php.ini file it worked like a charm!!
thanks!
Hafeez Ansari
Thank you Alex, This works for me in /wp-admin/ folder. Problem solved.
Jordan Miller
Thank you so much
Mike
Awesome! thanks Alex. I was limited to 2mb…really useful.
Sam
Alex you are the great! Your solution worked for me! Many thanks!
Johnny T
Genius! This worked for me! Just to clarify. Create a php.ini file in the wp-admin folder and only add the lines of code in Alex’s post. FTP this to your server and you’re good to go. Thanks Alex. You are a genius!
Luan
Thanks you Johnny and Alex! It was really helpful.
vanniee
what is the name of the file?
Togi Tan
But, it’s not working on free hosting. All methods I’ve tried. I think this might depend on server.
Duncan
Wow wow wow wow! Thank you for that clear comment that helped me get it to work. You are a star.
Nomo
Alex – Your post continues to be helpful. Very much appreciated!
Noor
Worked by .htaccess method. Salute man.
Bogdan
Great advice. My upload limit was 8MB and I only tried the htaccess trick and it worked, it increased to 64MB. I tested it and it is owrking beautiful! Thank you so much for your great advice!
VoidnessMD
Important thing to note: Using the php.ini method requires that the file be located in the wp-admin folder, not the root of your WP installation.
DJ
THANKS!! This sorted it out for me on my end
David Connolly
Superb… clear and the final solution worked.
a big thank you
Bongo
This website is the coolest for learning WP! Keep up the good work guys…more please…more! lol
Editorial Staff
Thanks for the kind words
Admin
Ido Schacham
Finally, a post that clearly explains how to change the memory limit in WP. Thanks!
mostafa
hi.
i successfully did it with the third method. my upload size was 8 M, but now its 64 M. for me its more than enough.
Thanks a million.
by the way i’m from Iran.
Rowan Evenstar
The creating a php.ini file and popping it on the route sorted it straight away!
Cheers, much appreciated!
assassinateur
thnx, but i am in a shared hosting so nothing work, i did put the php.ini in wp-admin and in the blog folder and in the homefolder and dodnt work also .htaccess didnt work changed the theme and didnt work
Arvind Kukreti
Adding code in .htaccess file might throw you 500 Internal Error… the best way is create a php.ini file and upload it in wp-admin folder
Stephen Afije
Waooo that was brilliant one there all i did was to create php.ini and uploaded to the wp-admin folder it worked like no other thing thanks
leo
htaccess method works fine for me. thanks
Andrew Lilly
Hi,
I have done all of the above and still wont let me import an 11mb xml file. i need it as its got 1500 products on i need to import.
I have spoken to my virtual server provider 1and1 and they said all i need to do is add the code to the .htaccess file but it doesnt seem to work
Please someone help
Editorial Staff
If none of the above works, then the only person who can help you is your host.
Admin
Ali Amer
It may be related to MIME Type. In that case, resolve it from cpanel
Dominique
None of this worked for me. I tried them all. I am using WPEngine to host.
Any suggestions?
Editorial Staff
Ask WPEngine to increase the limit for you.
Admin
Thad
The htaccess method worked for me. Thanks for the post. Good info, well presented.
Richard
php.ini option worked for me but on the php.ini file in /wp-admin directory
Mike
perfect – worked a treat – set to 200MB and works fine.
Matheus M.
In localhost work the .htaccess. But in host only php.ini. Thanks for help.
dan
Yes, php.in works in /wp-admin. thanks
marin
Thanks htaccess worked for me appreciate it.
Makarand Mane
I have hosting on mediatemple. First two methods are not worked me. Only htaccess methos is worked for me.
Thanks.
Gavin
I found that php.ini was hidden in the cgi-bin folder which some shared servers have in their root directories. I amended this as above (AND added a php5.ini jut in case) but until I’d amended this, nothing else worked. Thanks for the VERY useful thread!
Cath
Thanks Gavin, none of the other methods worked for me then I saw your comment, there were php.ini and php4.ini files were in the cgi-bin folder. I found the relevant code in both files – post_max_size = , and upload_max_filesize = , amended these and now all works fine.
Jarod Billingslea
Thank you very much for this article!
Void lon iXaarii
thank you so much! had tried so many solution and your .htaccess finally worked
Anthony
The only thing that worked for me was to create/edit a php.ini file and add the following:
memory_limit = 100M upload_max_filesize = 100M post_max_size = 100M file_uploads = On
and uploading it to the wp-admin folder.
Alan
Option 2 worked perfectly fine, though I had to place the php.ini file into the wp-admin folder instead of the root directory.
phpinfo was detecting the php.ini file in the root, but not WordPress.
I currently have WP 3.2 installed…
RPaterson
Thanks for that extra tip, this is what finally worked for mine
arun
thanks anthony, your method saved me a lot.
Quest The Wordsmith
This is exactly what worked for me as well.
RamiAlloush
Thx
Snowboard
thx for this post , but what is the default limit ?
almb1111
64 MB
kat1111
It was 8MB, but I got it to 192 MB @almb1111
kat1111
Ty for responding, I finally got some help with it, I needed to change the PHP to PHP-5.
kat1111
I am evidently newer than most here, I don’t understand which is “root” directory, is it Editor under the Appearance tab? Also, I don’t undertand how to get to hcaccess. Any help is appreciated.
jameserie
htaccess method works for me. – cheers!
nycxs
If you are using PHP5 the file should be called php5.ini and be in the root of the shared folders.
MyDreamDinZ
What is the highest limit for upload
can i set it to 1024M ?
alexlee.cs
The .htaccess method works for me. Thanks.
rajkanuri
Thanks for the code.. it is really helpful for me..
pranjalgupta2009
Yes ! putting php.ini also in wp-admin works for me. thanks
Snipsley
Thanks, but neither of this worked for me.
But I found the solution!
I had to place that php.ini to /public_html AND /public_html/wp-admin and it works!
Biju Subhash
ya..the same thing works me too..
Thanks Snisley
Trond
Great! This worked for me as well I run WordPress on an MS Server 2008 with IIS 7.5 from my host provider, btw
kenseneff
Worked for me as well. Thanks!
Kiran
Thanks dude. It’s works for me.
Rollie Osayan
Yes. It is also working here. thanks
Kaushik Biswas
At the end of a post, I want to display recent posts from that specific category under that post – how can I do this?