Haben Sie schon einmal versucht, eine Datei auf Ihre WordPress Website hochzuladen und sind dabei auf eine Mauer gestoßen? Es ist super frustrierend, wenn Sie das Bild, Plugin oder Theme, das Sie brauchen, nicht hochladen können. Unsere Besucher bitten uns oft um Hilfe bei Problemen mit dem Upload von Dateien, weil sie Ihren Arbeitsablauf zum Erliegen bringen können.
Manchmal können diese Grenzen für den Upload von Dateien Sie unerwartet daran hindern, Ihrer Mediathek Inhalte hinzuzufügen oder größere Plugins und Themes zu installieren, die Sie benötigen. Das ist, als wären einem die Hände gebunden. Und es ist noch ärgerlicher, wenn man nicht weiß, wie man das Problem beheben kann!
Aber keine Sorge, wir sind hier, um zu helfen. Wir lieben es, dass WordPress eine so konfigurierbare Plattform ist und dass es oft mehrere Möglichkeiten gibt, das gleiche Problem zu lösen.
In dieser Anleitung zeigen wir Ihnen die einfachsten Möglichkeiten, die maximale Größe für Uploads in WordPress zu erhöhen. Wir helfen Ihnen, diese Einschränkungen zu überwinden, damit Sie sich wieder dem widmen können, was Sie lieben – dem Betrieb Ihrer Website!
Warum die maximale Datei-Upload-Größe in WordPress erhöhen?
Ihr WordPress Hosting-Anbieter legt einen Standard für die maximale Größe des Uploads von Dateien fest, wenn Sie sich anmelden und WordPress installieren. Ihr Hosting-Anbieter legt diese Grenze fest, die normalerweise zwischen 2 MB und 500 MB liegt.
Für die meisten Betreiber von WordPress-Websites ist dieses Limit mehr als ausreichend.
Es kann jedoch vorkommen, dass Sie diese Grenze anheben müssen, um Upload-Fehler zu vermeiden.
Zum Beispiel:
- Sie betreiben eine Fotografie-Website und müssen große Bilder hochladen.
- Ihr Design- oder Fotografie-Portfolio enthält große Bilder.
- Sie möchten ein größeres WordPress-Theme oder -Plugin installieren.
- Sie möchten digitale Produkte wie eBooks, Fotos, Videos und mehr verkaufen.
- Sie aktualisieren regelmäßig Inhalte und fügen Audio, Fotos und mehr hinzu, die über das aktuelle Limit hinausgehen.
In diesem Sinne zeigen wir Ihnen, wie Sie die maximale Datei-Upload-Größe auf Ihrer WordPress-Website erhöhen können.
Hinweis: Denken Sie daran, dass die Anzeige vieler großer Dateien auf Ihrer Website deren Geschwindigkeit und Leistung erheblich beeinträchtigen kann. Deshalb empfehlen wir in der Regel, keine Videos in WordPress hochzuladen.
Da die meisten Benutzer unterschiedliche WordPress-Hosting-Konfigurationen haben, werden wir die folgenden Punkte behandeln:
- How to Check Your Maximum File Upload Size Limit in WordPress
- Method 1: Contact Your WordPress Hosting Provider
- Method 2: Create or Edit an Existing php.ini file
- Method 3: Add Code to Your WordPress Theme functions.php File
- Method 4: Add Code to Your .htaccess File
- Method 5: Use a WordPress Plugin to Increase File Upload Size
Wie Sie die maximale Datei-Upload-Größe in WordPress überprüfen
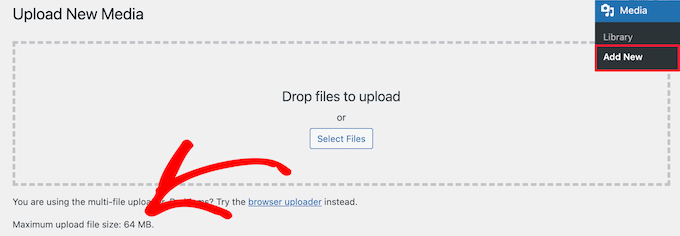
WordPress zeigt automatisch die maximale Dateigröße an, wenn Sie Bilder oder andere Medien hochladen.
Um dies zu überprüfen, gehen Sie einfach auf Medien ” Neu hinzufügen in Ihrem WordPress-Administrationspanel, und Sie werden die maximale Datei-Upload-Größe für Ihre WordPress-Website zu sehen.
Da Sie nun wissen, wie Sie das Größenlimit finden können, zeigen wir Ihnen, wie Sie die maximale Upload-Größe in WordPress erhöhen können.
Methode 1: Kontaktieren Sie Ihren WordPress-Hosting-Anbieter
Eine der einfachsten Möglichkeiten, die maximale Datei-Upload-Größe in WordPress zu erhöhen, besteht darin, sich an Ihren WordPress-Hosting-Anbieter zu wenden.
Dies ist eine relativ einfache Aufgabe für das Kundendienstteam und kann in wenigen Minuten erledigt werden.
Für Anfänger kann dies viel einfacher sein als das Hinzufügen von Code zu WordPress und das Bearbeiten von Serverdateien.
Gehen Sie einfach auf die Website Ihres Hosting-Anbieters, z. B. Bluehost, und melden Sie sich an.
Klicken Sie dann auf das Symbol “Chat” am unteren Rand der Ansicht. Sie können dann die Support-Mitarbeiter bitten, die Größe des Uploads von Dateien auf Ihrer WordPress Website zu erhöhen.
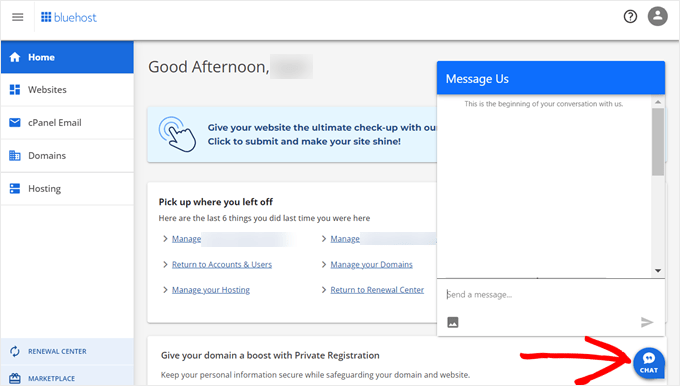
Sie können sich auch über das Dashboard Ihres Hosting-Kontos an den Support wenden.
Methode 2: Erstellen oder Bearbeiten einer vorhandenen php.ini-Datei
Eine weitere Möglichkeit, die maximale Datei-Upload-Größe zu erhöhen, besteht darin, eine Datei namens php.ini zu erstellen oder zu bearbeiten. Diese Datei steuert viele Einstellungen für Ihre WordPress-Hosting-Umgebung.
Die meisten WordPress-Hosting-Anbieter wie Bluehost bieten ein einsteigerfreundliches cPanel für die Verwaltung Ihrer Website.
Wenn Ihr Webhost über ein cPanel-Dashboard verfügt, können Sie die Größe der hochzuladenden Dateien mit den integrierten Tools erhöhen.
Hinweis: Die folgenden Angaben stammen aus dem Bluehost cPanel. Bei den meisten Shared-Hosting-Anbietern werden jedoch ähnliche Schritte durchgeführt.
Sie finden eine cPanel-Schaltfläche am unteren Rand der Registerkarte Hosting bei Bluehost.
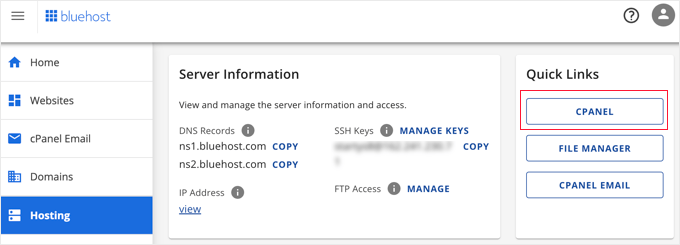
Wenn Sie auf diese Schaltfläche klicken, wird Ihr cPanel-Dashboard geöffnet.
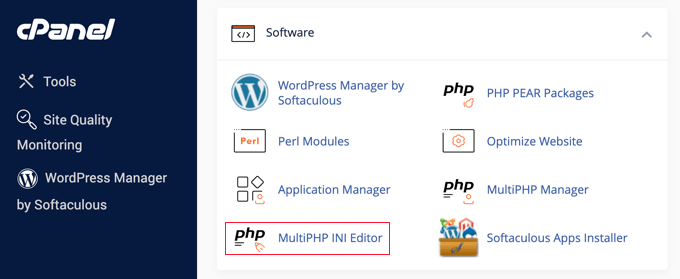
Nun müssen Sie zum Abschnitt Software scrollen und auf “MultiPHP INI Editor” klicken.
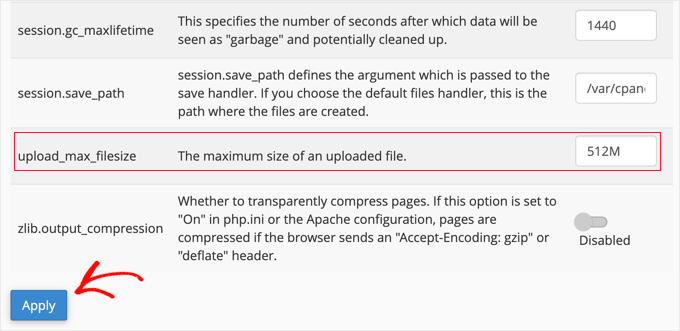
Blättern Sie dann nach unten zum Abschnitt “upload_max_filesize” und geben Sie eine neue maximale Dateigröße in das Feld ein.
Klicken Sie dann auf die Schaltfläche “Übernehmen”.
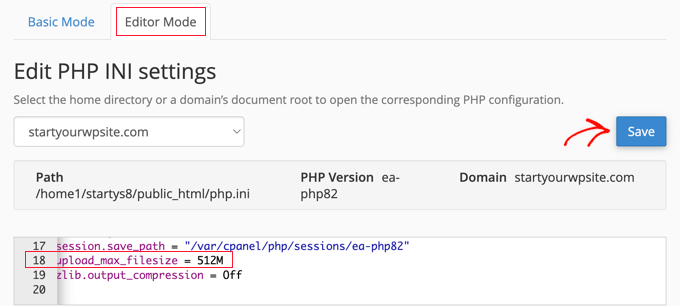
Alternativ können Sie auch auf die Registerkarte “Editormodus” klicken und dann die maximale Dateigröße direkt im Editor ändern.
Sie müssen den Abschnitt “upload_max_filesize” bearbeiten, um die Größe der hochgeladenen Dateien zu erhöhen.
Wenn Sie fertig sind, klicken Sie einfach auf die Schaltfläche “Speichern”.
php.ini durch Hinzufügen von Code bearbeiten
Wenn Ihr derzeitiger Hosting-Anbieter die cPanel-Option nicht anbietet, müssen Sie diese Datei manuell bearbeiten.
Dazu können Sie einen FTP-Client oder die Dateimanager-Option in Ihrem WordPress-Hosting-Kontrollpanel verwenden.
Wenn Sie ein gemeinsam genutztes Hosting-System verwenden, kann es sein, dass Sie die Datei php.ini nicht in Ihrem Hosting-Verzeichnis finden. Wenn Sie keine sehen, erstellen Sie einfach eine Datei namens php.ini und laden Sie sie in Ihr Stammverzeichnis hoch.
Fügen Sie dann den folgenden Codeschnipsel in die Datei ein:
1 2 3 | upload_max_filesize = 256Mpost_max_size = 256Mmax_execution_time = 300 |
Sie können die Grenze von 256M” an die Dateigröße anpassen, die Sie für Ihren WordPress-Blog benötigen.
Methode 3: Fügen Sie den Code in die Datei functions.php Ihres WordPress-Themes ein
Bei dieser Methode wird Code in die Datei functions.php Ihres WordPress-Themes eingefügt.
Anstatt die Datei direkt zu bearbeiten, empfehlen wir die Verwendung von WPCode. Es ist das beste Plugin für Codeschnipsel, mit dem Sie Code zu Ihrer Website hinzufügen können, ohne sie zu zerstören.
Wenn Sie dies noch nicht getan haben, lesen Sie unseren Leitfaden für Einsteiger, wie Sie benutzerdefinierten Code in WordPress hinzufügen.
Zunächst müssen Sie das kostenlose WPCode-Plugin installieren. Weitere Details finden Sie in unserer Schritt-für-Schritt-Anleitung für die Installation eines WordPress-Plugins.
Nach der Aktivierung sollten Sie zu Code-Snippets ” + Snippet hinzufügen navigieren.
Fahren Sie mit der Mauszeigerkontakt über die Option “Individuellen Code hinzufügen (neues Snippet)” und klicken Sie dann auf den Button “+ Individuelles Snippet hinzufügen”.

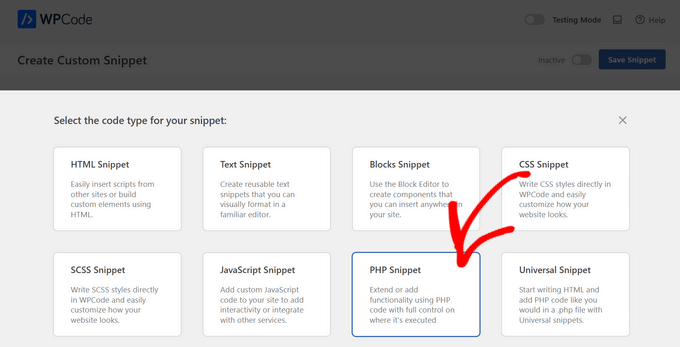
Als Nächstes müssen Sie in der Liste der Optionen den Codetyp “PHP Snippet” auswählen.
Geben Sie in der folgenden Ansicht einen Namen für Ihr neues Snippet ein, der so gewählt werden kann, dass Sie sich an den Code erinnern können.
Kopieren Sie dann den folgenden Codeschnipsel und fügen Sie ihn unter “Codevorschau” ein. Stellen Sie sicher, dass Sie “256M” in die maximale Dateigröße ändern, die Sie benötigen:
1 2 3 | @ini_set( 'upload_max_size' , '256M' );@ini_set( 'post_max_size', '256M');@ini_set( 'max_execution_time', '300' ); |
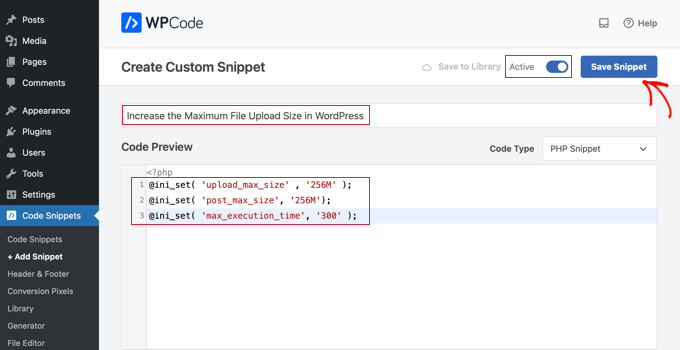
Schalten Sie schließlich den Schalter oben auf “Aktiv” und klicken Sie dann auf die Schaltfläche “Snippet speichern”. Der Code wird nun auf Ihrer Website ausgeführt.
Methode 4: Hinzufügen von Code zu Ihrer .htaccess-Datei
Eine weitere Möglichkeit, die maximale Dateigröße zu erhöhen, besteht in der Änderung der Datei .htaccess. Diese Datei steuert die übergeordneten Konfigurationseinstellungen für Ihre Website.
Dazu müssen Sie sich per FTP auf dem Server Ihrer Website anmelden. Wenn Sie dies noch nicht getan haben, lesen Sie unseren Leitfaden für Anfänger zum Hochladen von Dateien mit FTP auf WordPress.
Danach müssen Sie Ihre .htaccess-Datei im Stammverzeichnis Ihrer Website suchen.

Wenn Sie Ihre .htaccess-Datei nicht finden können, könnte sie von Ihrem Dateimanager oder FTP-Client versteckt worden sein. Weitere Informationen finden Sie in unserem Leitfaden zur Frage , warum Sie die .htaccess-Datei auf Ihrer WordPress-Website nicht finden können.
Als nächstes müssen Sie den folgenden Codeschnipsel in Ihre .htaccess-Datei einfügen:
1 2 3 4 | php_value upload_max_filesize 256Mphp_value post_max_size 256Mphp_value max_execution_time 300php_value max_input_time 300 |
Um die maximale Dateigröße noch weiter zu erhöhen, ändern Sie einfach den Wert “64M” auf die von Ihnen gewünschte Größe.
Methode 5: Verwenden Sie ein WordPress-Plugin, um die Datei-Upload-Größe zu erhöhen
Eine weitere Möglichkeit, die maximale Datei-Upload-Grenze zu erhöhen, ist die Verwendung des Plugins WP Increase Upload Filesize. Wenn Sie sich mit dem Hinzufügen von Code zu WordPress nicht wohlfühlen, dann könnte dies eine gute Option für Sie sein.
Als Erstes müssen Sie das Plugin installieren und aktivieren. Weitere Einzelheiten finden Sie in unserer Anleitung zur Installation eines WordPress-Plugins.
Navigieren Sie nach der Aktivierung zu Medien ” Upload-Limit erhöhen in Ihrem WordPress-Administrationsbereich.
Daraufhin wird ein Bildschirm angezeigt, auf dem Sie in der Dropdown-Liste “Maximale Dateigröße für den Upload wählen” eine neue Dateigröße auswählen können.
Klicken Sie dann auf die Schaltfläche “Änderungen speichern”.

Hinweis: Die maximale Dateigröße für den Upload wird von Ihrem Hosting-Anbieter festgelegt. Wenn Sie eine höhere Dateigröße als die in der Dropdown-Liste angegebene benötigen, müssen Sie sich an Ihren Hosting-Anbieter wenden und um eine Erhöhung des Limits bitten.
Video-Anleitung
Wenn Sie keine Lust haben, schriftliche Anweisungen zu befolgen, können Sie sich stattdessen unser Video-Tutorial ansehen:
Wir hoffen, dass dieser Artikel Ihnen geholfen hat, die maximale Größe für den Upload von Dateien in WordPress zu erhöhen. Vielleicht interessiert Sie auch unsere Anleitung, wie Sie zusätzliche Dateitypen zum Upload in WordPress hinzufügen können, sowie unsere Expertenauswahl an Plugins und Tipps zur Verbesserung des WordPress-Administrationsbereichs.
Wenn Ihnen dieser Artikel gefallen hat, dann abonnieren Sie bitte unseren YouTube-Kanal für WordPress-Videotutorials. Sie können uns auch auf Twitter und Facebook finden.


Lisha Van Nieuwenhove
This help was BRILLIANT. THANK YOU!
WPBeginner Support
You’re welcome!
Admin
Ray Konopka
Thanks for the tips. My site is hosted in BlueHost so I first tried Method 2. However, after changing the upload_max_filesize value, the Add New media page for my site still showed 64 MB. I went back into the MultiPHP INI Editor and looked at the other values. One other value stood out:
post_max_size
Sets max size of post data allowed. This setting also affects file upload. To upload large files, this value must be larger than upload_max_filesize. Generally speaking, memory_limit should be larger than post_max_size.
After I increased the post_max_size value as well, then the Add New media upload page showed the new limit. Perhaps you can update the post to include this tip.
WPBeginner Support
Thank you for sharing this, we’ll be sure to look into it and possibly add it to the article in the future
Admin
Mark
All my limits were increased as suggested, but I started getting ‘files are too big’ after a plugin update. After double checking everything server and email side, the solution was changing from 5M to 5120kb in Contact Form 7 settings. The plugin suddenly stopped recognizing M when trying to override the default 1024kb setting.
WPBeginner Support
Thanks for sharing this should someone else run into this issue!
Admin
devshah
Function.php method is not Working.
WPBeginner Support
It would depend on your host and what else is set up on your server for what will work. If nothing else works you can always reach out to your host for assistance.
Admin
Halil AHMAD
The .htaccess worked for me. Thank you
Muzoora Barnabas
The .htaccess worked for me. Thank you
WPBeginner Support
Glad our recommendation was able to assist
Admin
Muhammad Farooqi
You comments and thanks secion is almost 10 times longer..than the content of this page is guarantee of your amazing tips
WPBeginner Support
We’re happy we can help so many WordPress users
Admin
Jacob Alas
The only method that worked for me was: htaccess Method
Thank you.
WPBeginner Support
Glad one of our methods was able to work for you
Admin
Daniyar Nauryz
htaccess Method has worked for me.
WPBeginner Support
Glad our recommendation worked for you
Admin
furqan
its not working.
WPBeginner Support
If the recommendations are not working for you, we would recommend reaching out to your hosting provider and they should be able to assist if this is something they’ve set on their end.
Admin
Abdullah Ashraf
Thank you so much. I tried all the methods and the last method was helpful for me.
I would like to know should I undo the second last step that was php.ini?
WPBeginner Support
It is not required to remove that file but you can remove it if it is not working for your server.
Admin
Bradley
None work.
WPBeginner Support
If none of our recommendations work, we would recommend reaching out to your hosting provider to see if it is a restriction that they have set on their servers.
Admin
Ben
If you have access to the FTP, can I just upload the file in the wp-content/uploads/[year]/[month] folder?
WPBeginner Support
If you do that you would need a plugin to find the images, we have a guide on how to do that below:
https://www.wpbeginner.com/plugins/how-to-bulk-upload-wordpress-media-files-using-ftp/
Admin
naved ahmed
Thanks a lot
.htaccess method worked for me.
You saved my lot of time.
Thanks again.
WPBeginner Support
Glad our guide was able to help you
Admin
Adio Usman
Does this method works for restoring backup that is up to 3.5gb manually?
WPBeginner Support
It would depend on the method you are using but it could help with restoring a backup that large.
Admin
viren
method 3 is perfectly worked for me.keep inspiring us.great work man.thnks
WPBeginner Support
Glad our recommendation was helpful
Admin
ayman
.htaccess methode worked with me
WPBeginner Support
Glad our recommendation was helpful
Admin
Sanchit Setia
Does this work on free hosting?
WPBeginner Support
You would want to check with your hosting provider if you are concerned
Admin
bara
It works for me
WPBeginner Support
Glad our recommendation helped you
Admin
abc
nothing is working for lms
WPBeginner Support
If none of the recommendations worked we would recommend reaching out to your hosting provider for assistance.
Admin
Ahmad
I tried this but the size did not change… status is same please help what should I do know I am using localhost
WPBeginner Support
You would want to try restarting your localhost service just in case, otherwise, you would want to ensure you added/editied the php.ini correctly for the most common reason.
Admin
Vittorio
I think
@ini_set( ‘upload_max_size’ , ’64M’ );
should be
@ini_set( ‘upload_max_filesize’ , ’64M’ );
WPBeginner Support
upload_max_size currently increases that value as well as a few other things which is why we don’t use upload_max_filesize
Admin
MFoale
Thank you. The 3rd method worked for me. Very useful post and video.
WPBeginner Support
You’re welcome, glad we were able to help
Admin
Masud Rana
Wow !its work. Thanks
WPBeginner Support
Glad our guide could help you
Admin
Oliver
IT WORKS!!! THANKS
I made a file ini.php then uploaded it, then renamed it from ini.php.txt to ini.php and it worked.
thanks
WPBeginner Support
You’re welcome, glad our guide was able to help
Admin
Brad
None of these works
WPBeginner Support
If our recommendations do not work you would want to reach out to your hosting provider to ensure they do not have it as part of their settings.
Admin
Arivazhagan
Method 2 worked for me thanks a lot ive been struggling with this for two days …
WPBeginner Support
You’re welcome, glad our recommended solution was able to help you
Admin
Sujan Chakraborty
you are great.I fix my problem by reading you post.Tnx
WPBeginner Support
Glad our article could be helpful
Admin
Krakawid
Method 3 worked
WPBeginner Support
Glad our recommendation worked for you
Admin
Tung
Method 1 worked wonders for me. Thanks a bunch!
WPBeginner Support
You’re welcome, glad our recommendation worked for you
Admin
Trasadu
Thanks Method 3 really worked for me.
WPBeginner Support
Glad our recommendation was helpful
Admin
Asad
How can i increase the upload limit while i have the wordpress hosting also functions.php isn’t updating
WPBeginner Support
If the file will not update, you would want to reach out to your hosting provider and they should be able to assist
Admin
Chris
I want to increase the limit to 250mb but i dont know if this exposes my site to security treats, though am only using gravity form and I have also set to disable php execution on my upload folder. And have allowed only jpg, and mp3 files.
Please do you think this may affect my site load times as huge upload is coming from several users?
WPBeginner Support
If multiple users attempt uploads at the same time it can have an effect on your site’s load time but it shouldn’t open you to security threats
Admin
Vinod
Thanks a lot!!! Method 3 worked for me
WPBeginner Support
Glad our recommendation worked for you
Admin
Janice
Nice article, but I tried adding your 3 lines of code to the functions.php file, but got an “unknown @ rule” error. What’s that all about?
WPBeginner Support
It would depend on the entire error but it could have been a hiccup with how the code was inserted, you may want to take a look at our guide here: https://www.wpbeginner.com/beginners-guide/beginners-guide-to-pasting-snippets-from-the-web-into-wordpress/
Admin
Abduaziz
Thanks a lot!!! Method 3 worked for me
WPBeginner Support
Glad our recommendation could help
Admin
Alexander Gartley
Thanks, this helped me troubleshoot an upload limit. I’m on a WordPress multisite network install, so it ended up being a setting in the Network Admin Settings.
I was confused at first, because my php settings were allowing larger uploads, but it was restricted in the Network Settings.
WPBeginner Support
Thanks for sharing what solved the problem for you
Admin
Ernesto
Would have been great if you have included the .user.ini method.
.user.ini uploaded in the root folder with the same value/text in your edited php.ini
Most of the time, only this method works for shared hosting.
ErnestPH
WPBeginner Support
The php.ini file should work the same as the user.ini file unless your specific host ignores the php.ini but thank you for sharing your recommendation
Admin
Mark
This is the only solution that works on my shared hosting server. Thanks Ernesto!
Tamir Davidoff
Not working for me.
I have followed this guide and double checked the php.ini file to make sure that the changed are in fact saved. changed htaccess file to increase limits. and also tried modifying the phpMyAdmin httpd-app.conf and php-settings.conf file. All of these files reflect max upload higher than 40m and my WP site does not reflect Any of these changes. Really frustrated here.
Please help me, thanks !
WPBeginner Support
If you haven’t already, you would want to reach out to your hosting provider to ensure there is not a setting on their end that is overriding what you are setting
Admin
rajesh
i have tried all 3 method none of them worked. i am trying to upload newspaper theme in my in my wordpress site. but every time it show that php.ini file upload max file size.
plz help me
WPBeginner Support
You would want to reach out to your hosting provider to ensure they don’t have a setting that is overriding the changes you made.
Admin
Adam Walsworth
Watchout for hidden php.ini files. In my setup I found 2 of them. The one which I found actually resolved the issue was found under
./etc/php/7.0/apache2/php.ini
modifying this file fixed my issue.
WPBeginner Support
Thanks for sharing your solution, with where that file is located we would recommend most users reach out to their hosting provider before looking in locations like that.
Admin
Rafiq khan
Thanks buddy i have solved my problem by adopting method 2 by editing my php.ini file
Thanks alot you are working great
WPBeginner Support
Glad our article could help
Admin
Carla
None of the above worked for me. A matter of fact, editing the htaccess file broke my site even after deleting the above code. Overwriting with a new file fixed the problem though.
I have a dedicated server on Bluehost. What worked for me was going in the WHM root, not cpanel nor FTP access. Search for MultiPHP INI Editor. Give it at least 5 minutes to load if you only see the title and icon. You can set you upload time, post size, etc. there. Works instantly, even if your site is using Cloudflare, without placing it in development mode or clearing the cache. I hope this helps someone.
WPBeginner Support
Thank you for sharing what worked for you, should other users be on a dedicated server, if they reach out and let BlueHost know the need to increase the upload size then BlueHost can normally edit that for them
Admin
Pezza
Great Stuff! .htaccess worked for me!
WPBeginner Support
Thank you, glad our guide could help
Admin
ReineR
htaccess metod worked for me, thanks!
WPBeginner Support
Glad our article could help
Admin
Ahmed
Work for me
3. htaccess Method
you need to click (show hidden files to view and edit this file).
WPBeginner Support
Glad our article could help
Admin
rahul
when i tried this
Unable to communicate back with site to check for fatal errors, so the PHP change was reverted. You will need to upload your PHP file change by some other means, such as by using SFTP.
this happened to me
whats the solution of this
WPBeginner Support
You would need to use FTP rather than WordPress itself to add the code: https://www.wpbeginner.com/beginners-guide/how-to-use-ftp-to-upload-files-to-wordpress-for-beginners/
Admin
Ephraim
I had been trying php.ini method but it never works please how will I set it..
Or you should please tell me the were to paste at function.php
WPBeginner Support
You would normally use a text editor to set the content in the php.ini file. For your functions.php it should go at the end normally so it can be removed later as needed. You may also want to check with your hosting provider if you are having trouble with these methods for if they can assist in increasing the file size for you.
Admin
Ivos G.
None worked for me. But this one fixed it – add to your .htaccess this line:
LimitRequestBody 104857600
WPBeginner Support
Thanks for sharing your solution for this issue
Admin
Achilleas
I am using Nginx and i had already setup properly the values for php in the php.ini but what fixed it was puting the same value in the server block with the variable client_max_body_size xxxM;
I am writing this hoping it will help someone.
Editorial Staff
Thank you for sharing this with us
Admin