Beim Einrichten einer WordPress-Website wird manchmal versehentlich ein Ordner namens “wordpress” angelegt. Das kann dazu führen, dass die Adresse Ihrer Website seltsam aussieht, mit “/wordpress/” in der Mitte. Anstelle von http://www.yoursite.com/ sieht sie dann vielleicht aus wie http://www.yoursite.com/wordpress/.
Im Laufe der Jahre haben uns viele unserer Leser gefragt, wie man dieses Problem beheben kann. Die Angabe /wordpress/ in der Adresse Ihrer Website kann unprofessionell wirken und Ihre Besucher verwirren.
In diesem Artikel zeige ich Ihnen, wie Sie /wordpress/ aus Ihrer Website-URL entfernen können, so dass Ihre Website-Adresse sauber und professionell aussieht und für andere leichter zu merken ist.
Hinweis: Die in diesem Lernprogramm gezeigte Methode funktioniert auch für andere Unterverzeichnisse.
Warum hat meine Website /wordpress/ in ihrer URL?
WordPress ist recht einfach zu installieren, und die meisten WordPress-Hosting-Unternehmen bieten schnelle WordPress-Installationsprogramme in ihren Hosting-Kontrollfeldern an.
Allerdings kann es vorkommen, dass Anfänger, die ihre WordPress-Website manuell installieren, sie versehentlich in einem Unterverzeichnis ablegen. Meistens heißt dieses Unterverzeichnis “wordpress”.
Dies geschieht in der Regel, weil die Benutzer den WordPress-Ordner hochladen, den sie im offiziellen WordPress.org-Download finden.
Schauen wir uns an, wie Sie dies leicht beheben und /wordpress/ aus der URL Ihrer Website loswerden können. Wir werden drei Methoden vorstellen, und Sie können diese Links verwenden, um zu der gewünschten Methode zu springen:
Methode 1: Einfach mit einer neuen WordPress-Installation neu beginnen
Wenn Sie WordPress gerade erst installiert haben und noch keine Inhalte auf Ihrer Website vorhanden sind, können Sie einfach von vorne beginnen.
Löschen Sie einfach die aktuelle Installation und folgen Sie den Anweisungen in unserem WordPress-Installationstutorial, um WordPress ordnungsgemäß neu zu installieren.
Wenn Sie bereits Inhalte zu Ihrer Website hinzugefügt haben, gibt es zwei einfache Möglichkeiten, das /wordpress/ aus der URL Ihrer Website zu entfernen. Wir werden sie in den Methoden 2 und 3 behandeln.
Methode 2: Ändern Sie die Adresse Ihrer WordPress-Website
Wenn Sie eine bestehende WordPress-Website haben, ist diese Methode einfacher und schneller. Der Nachteil dieser Methode ist, dass Ihre Mediendateien, wie z. B. Bilder, weiterhin /wordpress/ in ihrer URL verwenden.
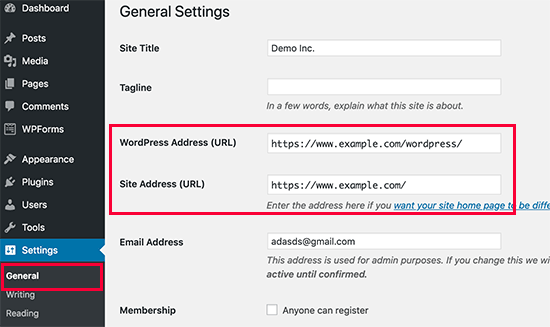
Melden Sie sich zunächst in Ihrem WordPress-Verwaltungsbereich an und gehen Sie zu Einstellungen ” Allgemein. Sie werden feststellen, dass die Felder “WordPress-Adresse” und “Website-Adresse” beide die gleiche URL haben.
Sie müssen die Option “Site Address” ändern und auf Ihre Root-Domain verweisen, z. B. http://www.example.com, und die Option “WordPress Address” so belassen, wie sie ist.
Klicken Sie anschließend auf die Schaltfläche “Änderungen speichern”, um Ihre Einstellungen zu speichern.
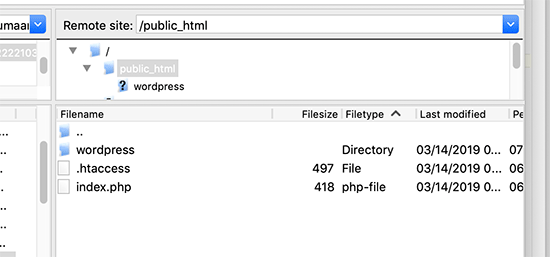
Als nächstes müssen Sie mit einem FTP-Client eine Verbindung zu Ihrer Website herstellen. Gehen Sie dann in das Verzeichnis /wordpress/ und laden Sie die Dateien .htaccess und index.php auf Ihren Computer herunter.
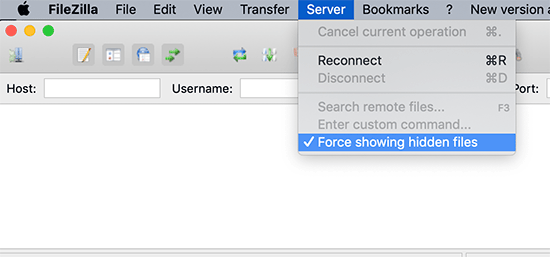
Wenn Sie die .htaccess-Datei nicht finden können, müssen Sie möglicherweise Ihren FTP-Client zwingen, versteckte Dateien anzuzeigen. Wenn Sie Filezilla verwenden, müssen Sie in der Menüleiste auf Server klicken und die Option “Anzeige versteckter Dateien erzwingen” auswählen.
Sobald Sie beide Dateien auf Ihren Computer heruntergeladen haben, müssen Sie die Datei index.php in einem Texteditor wie Notepad öffnen. In dieser Datei finden Sie eine Zeile wie diese:
1 | require( dirname( __FILE__ ) . '/wp-blog-header.php' ); |
Diese Zeile lädt die Datei wp-blog-header.php, die zum Laden Ihrer WordPress-Site erforderlich ist.
Nun müssen Sie den korrekten Speicherort der Datei eingeben, indem Sie die vorhandene Zeile durch diese ersetzen:
1 | require( dirname( __FILE__ ) . '/wordpress/wp-blog-header.php' ); |
Speichern Sie Ihre Änderungen und laden Sie die Dateien index.php und .htaccess von Ihrem Desktop-Computer per FTP in das Stammverzeichnis Ihrer Domain hoch.
Der Stammordner ist der übergeordnete Ordner, in dem sich der Ordner “wordpress” befindet, und er heißt normalerweise /www/ oder /public_html/.
Das war’s schon. Sie können nun Ihre Website mit der Stammdomäne besuchen, und alles wird gut funktionieren.
1 | http://example.com |
Wenn Sie sich jedoch bei Ihrem WordPress-Administrator anmelden müssen, müssen Sie immer noch zum wp-admin innerhalb des Verzeichnisses “wordpress” wie folgt gehen:
1 | http://www.example.com/wordpress/wp-admin |
Methode 3: WordPress in das Stammverzeichnis verschieben
Diese Methode ist umfassender und verschiebt Ihre WordPress-Site dauerhaft aus dem Unterverzeichnis in den Stammordner Ihrer Website.
Schritt 1: Erstellen Sie ein Duplikatorpaket
Zunächst müssen Sie das kostenlose Duplicator-Plugin auf Ihrer Website installieren und aktivieren. Weitere Details finden Sie in unserer Schritt-für-Schritt-Anleitung für die Installation eines WordPress-Plugins.
Hinweis: Für diese Anleitung verwenden wir die kostenlose Version von Duplicator. Sie können jedoch auf Duplicator Pro upgraden, um unbegrenzte Backups, geplante Backups, Drag-and-Drop-Importe und mehr zu erhalten.
Nach der Aktivierung müssen Sie die Seite Duplicator ” Backups aufrufen und dann auf die Schaltfläche “Neu erstellen” klicken.
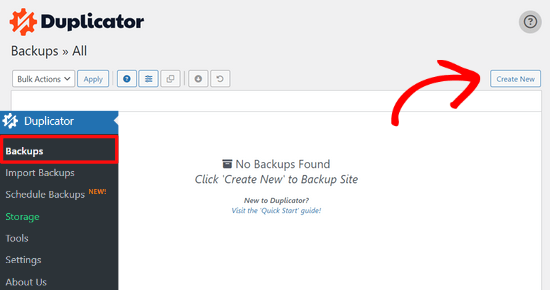
Dadurch wird der Duplicator-Assistent gestartet, der ein Installationspaket Ihrer kompletten Website erstellt.
Sie können einen Namen für Ihre Sicherung eingeben und auf die Schaltfläche “Weiter” klicken, um fortzufahren.
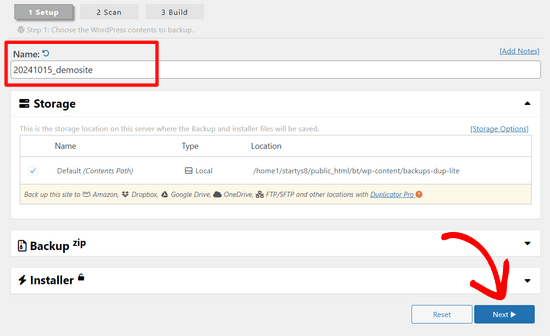
Als nächstes führt das Plugin einige Scans durch. Wenn alles gut aussieht, können Sie unten auf die Schaltfläche “Erstellen” klicken.
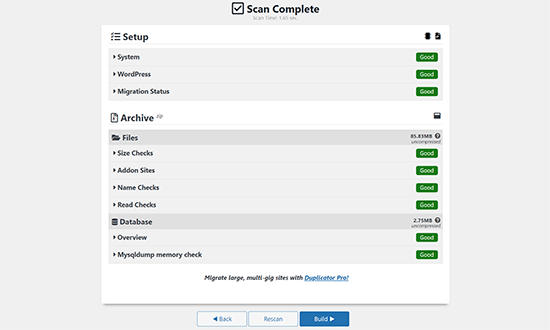
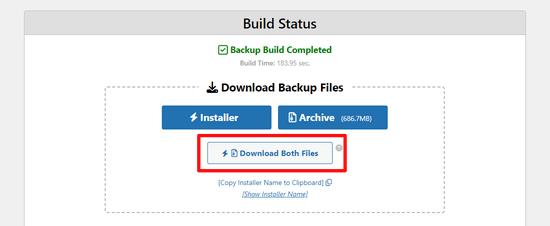
Duplicator erstellt nun ein Paket und fordert Sie auf, es zusammen mit dem Installationsskript herunterzuladen.
Laden Sie beide Dateien auf Ihren Computer herunter, indem Sie auf die Schaltfläche “Beide Dateien herunterladen” klicken.
Schritt 2: Erstellen einer neuen Datenbank für eine neue WordPress-Installation
Sie können die vorhandene WordPress-Datenbank verwenden, aber es ist besser, eine neue Datenbank zu erstellen, damit Ihre alte Datenbank sicher und unverändert bleibt. Auf diese Weise können Sie ohne viel Aufhebens zu Ihrer Website zurückkehren, wenn etwas schiefgeht.
Rufen Sie das cPanel-Dashboard Ihres Hosting-Accounts auf, scrollen Sie zum Abschnitt “Datenbanken” und klicken Sie dann auf das Symbol “MySQL-Datenbanken”.

Danach geben Sie einfach einen Namen für Ihre Datenbank an.
Als nächstes sollten Sie auf die Schaltfläche “Datenbank erstellen” klicken.

cPanel wird nun eine neue Datenbank für Sie erstellen. Danach müssen Sie nach unten zum Abschnitt “MySQL-Benutzer” scrollen.
Hier müssen Sie einen Benutzernamen und ein Passwort für Ihren neuen Datenbankbenutzer angeben und auf die Schaltfläche “Benutzer erstellen” klicken.
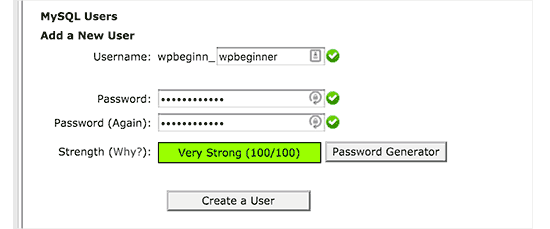
Nun müssen Sie dem neuen Benutzer Datenbankberechtigungen zuweisen.
Blättern Sie nach unten zum Abschnitt “Benutzer zur Datenbank hinzufügen”. Wählen Sie einfach den von Ihnen erstellten Datenbankbenutzer aus dem Dropdown-Menü neben dem Feld “Benutzer” aus und wählen Sie dann die Datenbank. Klicken Sie schließlich auf die Schaltfläche “Hinzufügen”.

Ihre neue Datenbank ist nun bereit, für die neue WordPress-Installation verwendet zu werden.
Schritt 3: Führen Sie den Duplikator-Assistenten aus
Nun müssen Sie das Duplicator-Archivpaket und die Installationsdatei, die Sie zuvor heruntergeladen haben, in das Stammverzeichnis Ihrer Website hochladen.
Dies ist das Verzeichnis, das den Ordner/wordpress/ enthält.
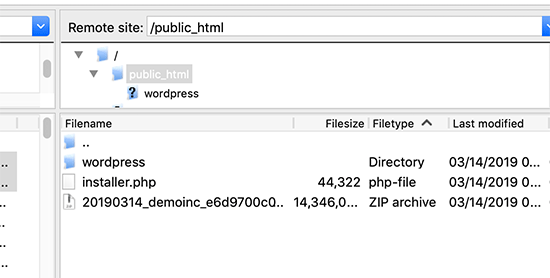
Nachdem Sie beide Dateien hochgeladen haben, öffnen Sie das Installationsskript in einem Browserfenster. Sie müssen die Stamm-URL Ihrer Website eingeben und ihr das Präfix /installer.php voranstellen.
1 | https://example.com/installer.php |
Dadurch wird der Duplicator-Installationsassistent geöffnet.
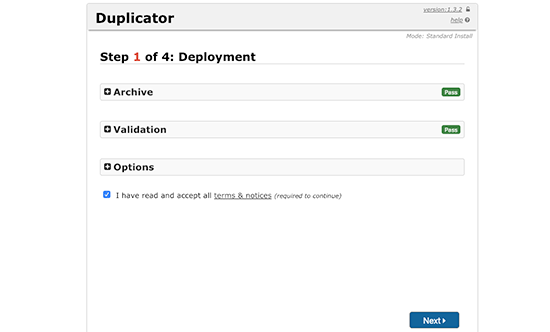
Aktivieren Sie das Kontrollkästchen für die Allgemeinen Geschäftsbedingungen und klicken Sie dann auf die Schaltfläche “Weiter”, um fortzufahren.
Als nächstes werden Sie aufgefordert, die Datenbankinformationen einzugeben. Geben Sie die Informationen für die Datenbank ein, die wir in Schritt 2 erstellt haben.
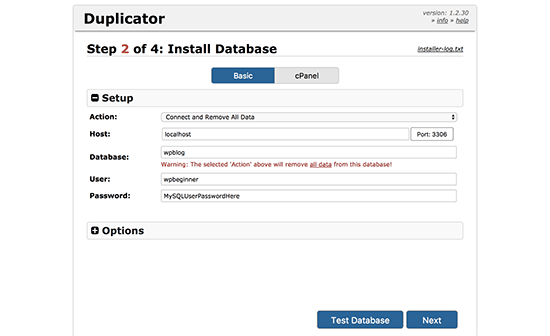
Nachdem Sie die Datenbankinformationen eingegeben haben, klicken Sie auf die Schaltfläche “Weiter”, um fortzufahren. Duplicator wird nun Ihre WordPress-Datenbank-Sicherung aus dem Archiv in Ihre neue Datenbank entpacken.
Als nächstes werden Sie aufgefordert, die URL und den Pfad der Website zu aktualisieren. Hier brauchen Sie nichts zu tun, da die neue URL und der neue Pfad automatisch erkannt werden. Wenn dies jedoch nicht der Fall ist, können Sie die Details hier manuell eingeben.
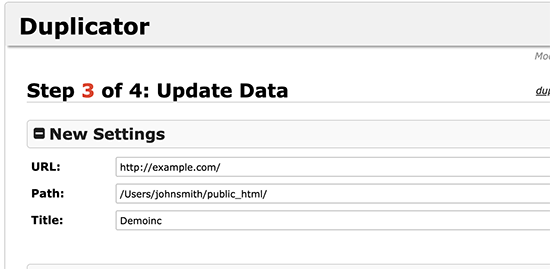
Duplicator schließt nun die Migration ab.
Sie können auf die Schaltfläche “Admin Login” klicken, um auf Ihre Website am neuen Standort zuzugreifen.
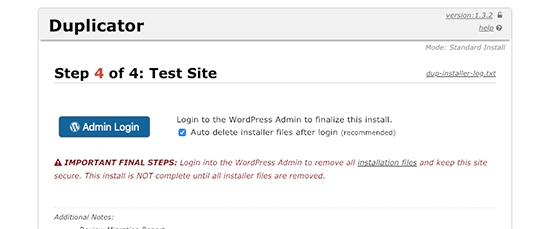
Schritt 4: Einrichten von Umleitungen von Unterverzeichnissen zu Stammordnern
Herzlichen Glückwunsch, Sie haben Ihre WordPress-Site erfolgreich aus dem Unterverzeichnis in den Stammordner verschoben.
Jetzt ist es an der Zeit, Weiterleitungen einz urichten, damit Ihre Nutzer und Suchmaschinen den neuen Standort Ihrer Website finden können.
Zunächst müssen Sie sich mit einem FTP-Client mit Ihrer WordPress-Website verbinden und dann den alten Ordner /wordpress/ löschen.
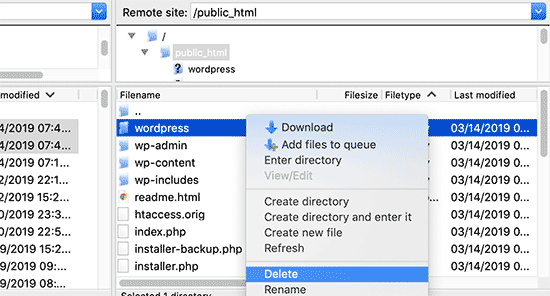
Wechseln Sie danach in den Verwaltungsbereich Ihrer WordPress-Website. Da Sie ihn in das Stammverzeichnis Ihrer Website verschoben haben, sieht Ihre WordPress-Admin-URL wie folgt aus:
1 | https://example.com/wp-admin |
Nun müssen Sie das Redirection-Plugin installieren und aktivieren. Weitere Details finden Sie in unserer Schritt-für-Schritt-Anleitung für die Installation eines WordPress-Plugins.
Nach der Aktivierung müssen Sie die Seite Tools ” Redirection aufrufen. Das Plugin zeigt Ihnen nun einen Einrichtungsassistenten. Klicken Sie einfach auf die Schaltflächen “Einrichtung fortsetzen” und dann “Einrichtung beenden”.
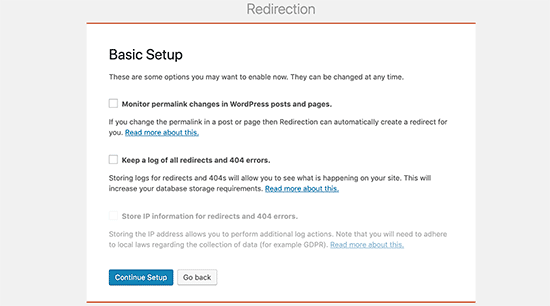
Als Nächstes müssen Sie auf die Registerkarte “Umleitungen” wechseln und Ihre neue Umleitung hinzufügen.
Zunächst müssen Sie das Kästchen “Regex” in der Ecke des ersten Feldes markieren.
Danach gehen Sie in das Feld “Quell-URL” und fügen https://example.com/wordpress/ein . Als Nächstesgehen Sie in das Feld “Ziel-URL” und fügen https://example.com/$1 ein.
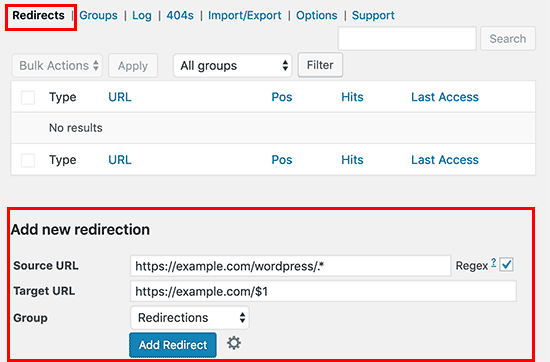
Vergessen Sie nicht, “example.com” durch Ihren eigenen Domänennamen zu ersetzen. Klicken Sie anschließend auf die Schaltfläche “Weiterleitung hinzufügen”, um Ihre Änderungen zu speichern.
Ein weiteres Tool, das Sie für die Weiterleitung von Beiträgen und Seiten verwenden können, ist All in One SEO (AIOSEO). Wir zeigen Ihnen, wie Sie Besucher mit alten URLs, die /wordpress/ enthalten, auf Ihre neue Website umleiten können, und zwar in unserer Anleitung für Einsteiger, wie man vollständige Website-Umleitungen in WordPress durchführt.
Außerdem können Sie die 404-Fehlerverfolgung aktivieren, um fehlerhafte Links zu erkennen, damit Sie keine Keyword-Rankings verlieren.
Von nun an werden alle Benutzer, die versuchen, auf Ihre Website mit /wordpress/ in der URL zuzugreifen, automatisch zu den richtigen Beiträgen mit Ihrer neuen Stamm-URL umgeleitet.
Expertenanleitungen zum Ändern von URLs in WordPress
Wir hoffen, dass dieser Artikel Ihnen geholfen hat zu erfahren, wie Sie /wordpress/ aus der URL Ihrer WordPress-Website entfernen können. Vielleicht interessieren Sie sich auch für einige andere Anleitungen zum Ändern von URLs in WordPress:
- So ändern Sie die URLs Ihrer WordPress-Website (Schritt für Schritt)
- Wie Sie URLs beim Umzug Ihrer WordPress-Site einfach aktualisieren können
- Wie man Zahlen aus WordPress-URLs entfernt
- Wie man das Datum aus WordPress-URLs entfernt
- Entfernen der Zeichenfolge v=XXXX aus WordPress-URLs
- Wie man Parent Slug von Child Page URL in WordPress entfernt
- Ändern des Standard-Such-URL-Slugs in WordPress
- Hinzufügen einer benutzerdefinierten Anmelde-URL in WordPress (Schritt für Schritt)
- Anleitung für Anfänger: Wie Sie Ihre WordPress-Login-URL finden
- Wie man WordPress richtig von HTTP auf HTTPS umstellt (Anleitung für Anfänger)
Wenn Ihnen dieser Artikel gefallen hat, dann abonnieren Sie bitte unseren YouTube-Kanal für WordPress-Videotutorials. Sie können uns auch auf Twitter und Facebook finden.


Brenda
Thank you so much for this tutorial! So helpful.
I followed step #2 and all the pages on my site work now without the /wordpress in the URL, EXCEPT for the homepage. I updated the Site URL in Settings > General, but for some reason the homepage still redirects from mysite.com to mysite.com/wordpress.
Any idea why this might be happening? Thanks in advance!
WPBeginner Support
From the sound of the issue, we would recommend checking your index.php and htaccess are both in the correct folder for a likely reason.
Admin
Brenda
Thanks so much for your response. Figured out the issue!
WPBeginner Support
Glad to hear!
Adrian
Not sure if this related, on initial set up should you you use the www dot …. com or just your sitename dot… com
WPBeginner Support
That is a different situation that we cover in our guide below. WWW vs non-WWW is personal preference:
https://www.wpbeginner.com/beginners-guide/www-vs-non-www-which-is-better-for-wordpress-seo/
Admin
Lilly Walker
I followed Method 1: Change WordPress Site Address
changed the site address with out /mywpfolder
and downloaded the ht.access and the index file – (they dont match your eg but just added the /mywpfolder etc
and uploaded the htaccess and the index files back to the root directory
BUT
the correct front page came up and then clicked on a link it came up but clicked on a link then and it 404’d.
my guess is that some pages have urls manually put in but how do I search and replace these?
Alice K
Hi!
First, thank you very much!
I followed the second method, and now accessing the admin page works without adding “/wordpress” in the URL.
But when I try to access my website I still have to add “/wordpress” to the URL?!
Can anyone help? Where have I gone wrong?
WPBeginner Support
The site is likely active in the old location, you should should still be able to see your login if you go to yourdomain/wp-login.php
Admin
sginader
Thank you! I’m a WP novice so your step by step instructions was perfect. I do have a question – I followed Method 1 – does the redirect add to the site loading time? I ask because my site takes very long to load. Thank you!
WPBeginner Support
While it adds a small amount to the loading time, it shouldn’t add enough to be noticeable. If this increase in load time was recent then you may want to check with your host to ensure there isn’t something conflicting with the redirect you set up.
Admin
Nkosiyapha
This was very helpful. Thank you very much
WPBeginner Support
You’re welcome
Admin
Rachel
I have a question: if I use method 1, do I have to change all url links of my posts and images? My blog are actually inside a folder and I want to make a redirection to the root domain. It’s not clear…
WPBeginner Support
For the first method, you shouldn’t need to redirect your posts.
Admin
birgit van Munster
Hi, I made the change in the index.pho file as directed and moved the two files to the root directory, but I get this error message:
Parse error: syntax error, unexpected ” );’ (T_ENCAPSED_AND_WHITESPACE) in /data/40/5/47/114/5373603/user/6433782/htdocs/index.php on line 17
I think line 17 is exactly as described in the instructions, please help!
WPBeginner Support
You may want to ensure you copied the code correctly and pasted it on a new line. You may want to take a look at our article here: https://www.wpbeginner.com/beginners-guide/beginners-guide-to-pasting-snippets-from-the-web-into-wordpress/
Admin
Bella
Thank you so much! The guide I was reading didn’t mention the .htaccess part. This guide fixed the error on my site. Great work!
Bart
Hi!
Great tutorial, and my URL now redirects (woohoo!)
However when I go the settings tab and change the site title to the one without /wordpress, the site works fine except for the home page, which gives an error.
What am I missing here…?
TROP ICSU
Hi there!
I have my site hosted on my server. WordPress dir is located in /home/myuser/.
I tried to follow your steps by copying the updated index.php and .htaccess into same dir level where wordpress dir is. But no success.
Can you pl guide? Thank you.
Rachel
If I have a wordpress instance in a subdirectory and I just want to delete it and not move it, can I just delete the folder, or do I need to go through some kind of un-install procedure so it is removed from the database as well?
WPBeginner Support
Hi Rachel,
Yes you can delete it. However, we will still recommend to download it as a backup before deleting it.
Admin
Michael Hayman
Hey, so i had a go at this, and for some reason i am now faced with an HTTP 500 error.
Not sure where i went wrong, but i don’t seem to be able to get it back to normal.
Any ideas would be much appreciated.
I have tried resetting the index.php back to default as well as the .htacess file with no avail.
To make matters more difficult i get the same HTTP 500 message when trying to login to the wordpress admin as well.
Clarisse
Hi Michael,
My folder is called “/wp” instead of “/wordpress”, so probably yours too!
That might be the problem…
Louise
I had the same problem, and my folder was called wp. I just went back to the index.html file and changed it from wordpress to wp and problem solved! Such a helpful article, this was hanging over my head for months and so glad to have it fixed!
Gareth Botha
Hi Syed, many thanks for all these, I have been postponing my site for over a year now as it was simply too intimidating. I had however made the fault of installing wordpress to the subdomain /wp and set the entire site up. Just sorted it out with you tut above. I have however come across a new problem, my home/landing page no longer loads my blog posts. How do I resolved this? I also get a redirect error as well.
WPBeginner Support
Hi Gareth,
Good luck with your new website. Wish we could be more helpful, but it is up to the theme and your website settings. Please see our WordPress troubleshooting guide to figure out whats causing it.
Admin
Yan Xun
Hi, I followed these steps and my website is working fine. Only issue is now I can’t seem to load my theme’s UX Builder for my site.
does this method cause any issue if I am using a theme UX builder?
WPBeginner Support
Hi Yan Xun,
Here is what you can try. First create a backup of your website. After that Uninstall the UX builder by visiting the plugins page, now install and activate it again.
If it comes packaged with your theme, then again create a backup of your website. After that you need to download a fresh copy of your theme. Next, temporarily switch your WordPress site to a default WordPress theme like TwentySeventeen. Delete your old theme and then install it from the zip file you downloaded earlier.
Admin
Gina
Help! I followed your tutorial for removing wordpress. Now I can’t get into the site or admin.
Getting the following:
Warning: require(/home/content/09/8001609/html/wordpress/wp-blog-header.php) [function.require]: failed to open stream: No such file or directory in /home/content/09/8001609/html/index.php on line 17
Fatal error: require() [function.require]: Failed opening required ‘/home/content/09/8001609/html/wordpress/wp-blog-header.php’ (include_path=’.:/usr/local/php5/lib/php’) in /home/content/09/8001609/html/index.php on line 17
Marko
Done that, and ‘/wordpress’ from addressbar is gone, but Google still lists it with it in the search. For example:
WPBeginner Support
Hi Marko,
You will need to redirect those users. See our guide on how to setup redirects in WordPress.
Admin
Andrew
Thanks guys i love u <3
Priyanka
This tutorial is a life saviour. Thank you so much.
Beth
Thanks for your helpful website. I downloaded .htaccess and index.php. My index php says index.php4 The line on it says this: .htaccess disapears when I download it to the desktop. In ftp, they are located in the same folder as the wordpress1 folder is located. It appears to be the root directory. The site has the url with wordpress1 at the end of it. I’m not sure what to do, and don’t want to crash the site!
Thanks,
Beth
Lee Graham
Can I ask why you download .htaccess only to upload it again?, there is no mention of edting htaccess so why download in the first place ?
Brandi
I believe he’s asking us to download the one from the /wordpress/ subdirectory and then upload it to the / root (which is up one level). I hope that helps
Manpreet Kaur
HI,
Thankyou so much for these helpful tutorials my one problem is solved but there is one another. When I search on google and type my website address it shows index of link instead of my website name. When I click on that link it opens my website. Can anyone help me to display my website URL on google instead of index of URL.
Ariadne1985
THANK YOU SO MUCH!!!
I spent hours working on it (failure) and then found your site + explanation.
SUPERB!
Filip Kevely
1. I have moved my example.com WP installation into subfolder (let’s call it “secret-sub”).
2. Typing example.com/wp-login.php automatically re-directs me to example.com/secret-sub/wp-login.php :((
((Note: Visiting no other part of my web page shows this subfolder name as part of URL address; visitors see only example.com everywhere.))
Is this normal behaviour?
And if so – what’s actually the point of having your WP installation in “secret” subfolder – when basic /wp-login.php and /wp-admin brute attack re-directs to URL showing the “secret subfolder” name??
Any clear explanation will be very much appreciated. Thx.
WPBeginner Support
Hi Filip Kevely,
When you install another WordPress instance in a sub-folder it creates a conflict for WordPress permalinks. To fix that you need to add this code to your sub-folder site’s .htaccess file:
# BEGIN WordPress<IfModule mod_rewrite.c>RewriteEngine OnRewriteBase /secret-sub/RewriteRule ^index\.php$ – [L]RewriteCond %{REQUEST_FILENAME} !-fRewriteCond %{REQUEST_FILENAME} !-dRewriteRule . /secret-sub/index.php [L]</IfModule>#ENDWordPress1-click Use in WordPress
Don’t forget to replace secret-sub with the actual subfolder name.
Admin
Charlotte Tomic
How do you get rid of FEATURED CONTENT on your blog? I eliminated footers without a problem, but can’t get rid of featured content showing up on the blog front page.
Jade
Hi there, I am pulling my hair out…….I dont have the wordpress address url or the Site Address url under settings general! I have one site with nothing on it with my web address and then another site which I have fixed up with the same name but then wordpress.com at the end, any help would be greatly appreciated.
Arif
I have followed given the instruction but I am facing problem my website is not open correct and wp login penal is not coming please help me quickly.
Bright Bernard
Hello,
I successfully got rid of /wordpress from site URL following the instructions in the tutorial but once i installed yoast for seo , google shows the pages with /worpress in its search results.how can we remove that from google search results also?
Blane
Thank you! This works great!
Kala
Please help, I thought I had followed the steps correctly but am receiving this error when I type in my web domain:
Fatal error: require() [function.require]: Failed opening required ‘/home/melanieh/public_html/wordpress/wp-blog-header.php’ (include_path=’.:/usr/lib/php:/usr/local/lib/php’) in /home/melanieh/public_html/index.php on line 17
What did I do wrong?
Robel
Thank you man this work after so many hard work. Thanks again keep it up…..will come here for wordpress problem
Julius Decada
problem with 404, I resolve it in a longest manner, First I just open the post and click update, it works,.. although if you got a thousand post then you grow beard before you finish everything,..
second solution
another solution, although i never test this type of solutions in my active sites,
1. first thing first back-up your wordpress website,
2. when back-up is done, got to tools and click export, it will create xml file
3. delete all post,..
4. Import the xml file that you exported,. and and everythng go smoothly,..
Rodrigo Henriques
Thank you for the great tutorial. Worked perfectly!
rio
everything worked except my root domain name.
when I go to mydomain.com I get a 500 error, but all my links mydomain.com/contact mydomain.com/links look fie
Rodrigo Henriques
Hi,
have you checked if you REALLY have a “yourdomain/wordpress” directory?
Or a “yourdomain/wp” directory!
Because if you do you have to change the index.php editing accordingly ; )
Hope that helps,, it worked for me ; )
Marko Vojnovic
THANK YOU SO MUCH!!!!!!!
omkar
how to check whether i have a /wordpress or a /wp directory? and what following changes should i make then in the index.php file?
Tammie Radikopf
Thank you for this reply!! Your answer is what helped me solve my problem. I didn’t realize you couldn’t just use ‘wordpress’ as the tutorial said but needed to use the exact subdirectory name. it worked. Thanks!!
Vernon Harris
I was moving our word press site from the root folder to a sub folder and everything almost worked. The only exception was that I couldn’t find a way to remove the sub-folder from the domain URL. This site had the easiest instructions and was easy to follow. It worked perfectly the 1st time. Thank You!
WPBeginner Support
Hi Vernon,
Glad you found it helpful Don’t forget to join us on Twitter for more WordPress tips and tutorials.
Admin
rio
I followed the steps but now my website page isn’t working. And I cannot open my wordpress admin page either. Help?
Fadiah Karim
I followed the steps but now my website page isn’t working. And I cannot open my wordpress admin page either. Help?
Dan Kemble
You say upload the ht access file but you never say how to edit it?
Alexandra
I never leave comments but this post was just so clear and helpful that I have to say THANK YOU!!! :-)))
WPBeginner Support
Hi Alexandra,
Thanks, we are glad you found it helpful. Don’t forget to join us on Twitter for more WordPress tips and tutorials.
Admin