Ihre WordPress Website versendet keine E-Mails. Eingaben in Kontaktformulare verschwinden, und wichtige Benachrichtigungen kommen nie an. Kommt Ihnen das bekannt vor?
Sie sind nicht allein, und das Problem liegt nicht an WordPress selbst. Es ist die Art und Weise, wie Websites normalerweise die Zustellung von E-Mails handhaben.
Wir haben uns auf WPBeginner mit genau diesem Problem beschäftigt. Deshalb verwenden wir WP Mail SMTP und vertrauen darauf, dass es alle unsere E-Mails in WordPress zustellt. Es verwendet SMTP (den Industriestandard für die zuverlässige Zustellung von E-Mails), um sicherzustellen, dass Ihre E-Mails tatsächlich ihr Ziel erreichen.
In diesem Leitfaden zeigen wir Ihnen genau, was die Ursache für Ihre E-Mail-Probleme ist und wie Sie sie mit SMTP beheben können, damit Sie nie wieder eine wichtige Benachrichtigung verpassen.
Warum Sie keine E-Mails von Ihrer WordPress-Website erhalten
Der häufigste Grund für fehlende E-Mails ist, dass Ihr WordPress-Hosting-Server nicht richtig für die Verwendung der PHP-Funktion mail() konfiguriert ist.
Auch wenn Ihr Hosting so konfiguriert ist, verwenden viele E-Mail-Dienstanbieter wie Gmail und andere eine Reihe von Tools zur Reduzierung von Spam. Diese Tools versuchen zu erkennen, dass eine E-Mail von dem Ort kommt, von dem sie zu stammen vorgibt.
E-Mails, die von WordPress-Websites verschickt werden, bestehen diesen Test häufig nicht.
Das bedeutet, dass eine E-Mail, die von Ihrer WordPress-Website versendet wird (von einem Kontaktformular-Plugin, einer Admin-Benachrichtigung usw.), möglicherweise nicht einmal im Spam-Ordner des Empfängers landet, geschweige denn im Posteingang.
Aus diesem Grund empfehlen wir, WordPress nicht für den Versand Ihres E-Mail-Newsletters zu verwenden.
Dies ist auch der Grund, warum wir jedem empfehlen, SMTP für den Versand von E-Mails in WordPress zu verwenden.
Was ist SMTP?
SMTP (Simple Mail Transfer Protocol) ist der Industriestandard für den Versand von E-Mails.
Im Gegensatz zur PHP-Funktion mail() verwendet SMTP eine ordnungsgemäße Authentifizierung, was zu einer hohen Zustellbarkeit von E-Mails führt.
WordPress verfügt über ein WP Mail SMTP-Plugin, das Ihre WordPress-Website so konfiguriert, dass E-Mails über SMTP statt über die PHP-Funktion mail() versendet werden.
Sie können es für die Verbindung mit allen gängigen SMTP-Diensten wie SendLayer, Brevo (ehemals Sendinblue), Gmail (Google Workspace), Amazon SES und anderen verwenden.
Sie können unsere WP Mail SMTP Rezension lesen, wenn Sie mehr Details über das Plugin benötigen.
Schauen wir uns also an, wie man das Problem beheben kann, dass WordPress keine E-Mails sendet. Sie können die Links unten verwenden, um durch diesen Artikel zu navigieren:
Alternative: Wenn Sie WooCommerce verwenden und Ihre E-Mails nicht zugestellt werden, dann lesen Sie stattdessen unsere Anleitung zur Behebung des Problems, dass WooCommerce keine E-Mails versendet.
Schritt 1: Installieren Sie das WP Mail SMTP Plugin
Unabhängig davon, für welchen SMTP-Dienst Sie sich entscheiden, müssen Sie das WP Mail SMTP-Plugin auf Ihrer Website installiert haben. Damit können Sie WordPress von der integrierten PHP-Funktion mail() auf Ihren SMTP-Dienst umstellen.
Installieren und aktivieren Sie zunächst das WP Mail SMTP-Plugin. Wenn Sie sich nicht sicher sind, wie das geht, lesen Sie unsere Schritt-für-Schritt-Anleitung für die Installation eines WordPress-Plugins.
Klicken Sie anschließend in Ihrem WordPress-Dashboard auf “WP Mail SMTP”, um die Plugin-Einstellungen zu konfigurieren.
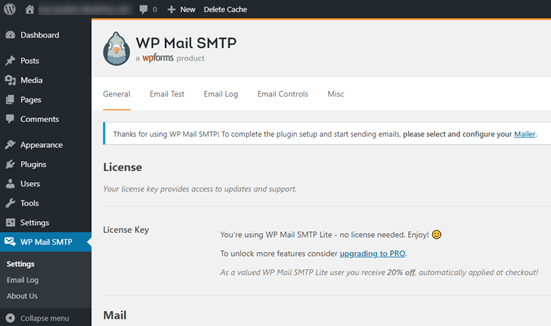
Zunächst müssen Sie den Namen und die geschäftliche E-Mail-Adresse eingeben, von der die E-Mails für Ihre Website kommen sollen.
Achten Sie darauf, dass Sie hier dieselbe E-Mail-Adresse verwenden, die Sie auch für Ihren SMTP-Versanddienst nutzen.
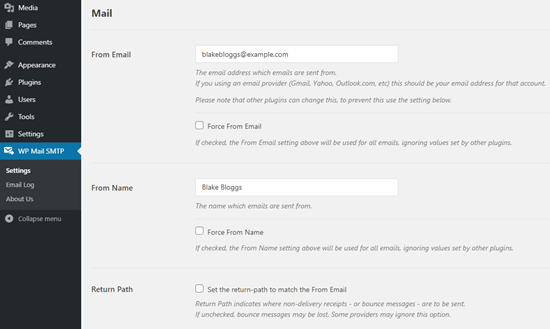
Sie können festlegen, dass E-Mails diesen Namen und diese E-Mail-Adresse verwenden sollen, auch wenn andere Plugins, wie WPForms, andere Einstellungen haben. WP Mail SMTP setzt die Einstellungen der anderen Plugins außer Kraft.
Danach müssen Sie einen SMTP-Versanddienst für Ihre Website auswählen. In diesem Lernprogramm werden wir SMTP mit SendLayer einrichten.
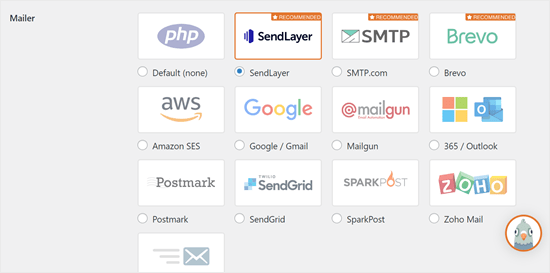
Um die Einrichtung von WP Mail SMTP abzuschließen, müssen Sie ein Konto bei SendLayer erstellen. Wir werden als Nächstes damit fortfahren und dann auf die abschließende Einrichtung von WP Mail SMTP zurückkommen, also stellen Sie sicher, dass Sie diese Registerkarte geöffnet lassen.
Schritt 2: Einrichten Ihres SMTP-Mailingdienstes
SendLayer ist ein zuverlässiger E-Mail-Dienstleister. Damit können Sie eine große Anzahl von E-Mails mit hoher Zustellbarkeit versenden.
Mit SendLayer können Sie kostenlos bis zu 200 E-Mails versenden, was für die meisten kleinen Websites für den Anfang mehr als ausreichend ist.
Dies können E-Mails von Ihrem Kontaktformular, neue Benutzerkontodaten, E-Mails zur Wiederherstellung des Passworts oder andere E-Mails sein, die über Ihre WordPress-Website gesendet werden.
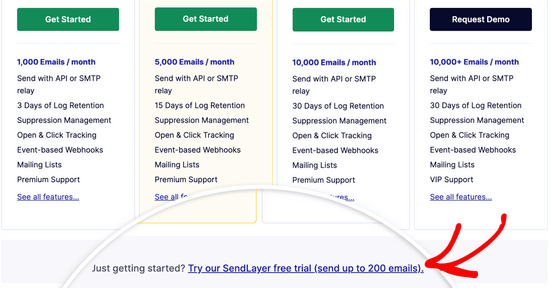
Zuerst müssen Sie auf die SendLayer-Website gehen, um ein Konto zu erstellen. Klicken Sie auf der Preisseite auf den Link “Testen Sie unsere kostenlose SendLayer-Testversion (bis zu 200 E-Mails senden)”, um Ihr Konto einzurichten.
Sobald du ein Konto erstellt hast, siehst du dein SendLayer-Dashboard.
Jetzt, wo Sie ein SendLayer-Konto haben, können Sie Ihren E-Mail-Anbieter mit WordPress einrichten.
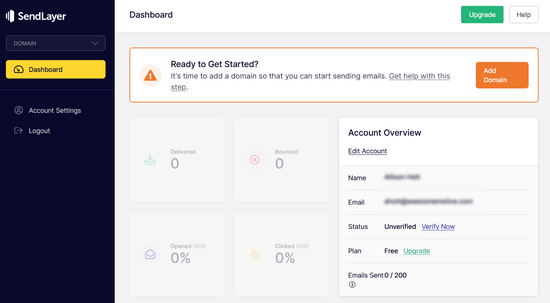
Schritt 3: Verbinden Sie Ihre WordPress-Website mit SendLayer
Bevor Sie E-Mails mit SendLayer versenden können, müssen Sie Ihre Domain autorisieren.
Dies beweist den E-Mail-Servern, dass Sie der bestätigte Inhaber Ihrer Absenderdomäne sind und dass Ihre E-Mails von einer legitimen Quelle gesendet werden.
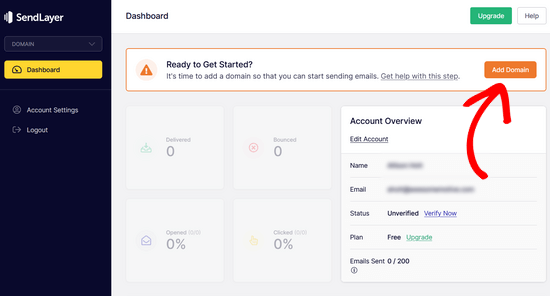
Um Ihre Domain zu autorisieren, klicken Sie auf die orangefarbene Schaltfläche “Domain hinzufügen” im SendLayer-Dashboard.
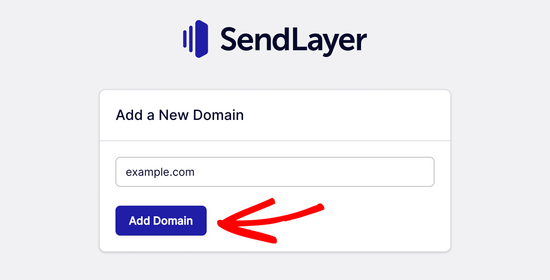
Geben Sie auf der nächsten Seite einfach Ihren Domänennamen in das vorgesehene Feld ein.
Klicken Sie dann auf die Schaltfläche “Domäne hinzufügen”.
Hinweis: Bei anderen Mailing-Diensten wie Brevo (ehemals Sendinblue) müssen Sie zunächst eine Subdomain für Ihre Website einrichten. SendLayer hingegen fügt die Subdomain automatisch zu den DNS-Einträgen der Absenderdomain hinzu.
Sie müssen also bei der Registrierung der Domäne keine zusätzliche Subdomäne hinzufügen.
Sobald Sie Ihre Domain hinzugefügt haben, zeigt SendLayer Ihnen 5 DNS-Einträge, die Sie zu den DNS-Einstellungen Ihrer Domain hinzufügen müssen.
Mit diesen Codezeilen kann SendLayer Ihren Domainnamen autorisieren.
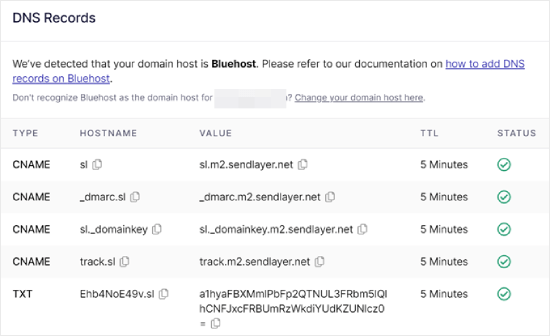
Sie müssen diese DNS-Einträge zu Ihrer WordPress-Website hinzufügen. Das mag kompliziert erscheinen, aber Sie brauchen sie nur zu kopieren und an der richtigen Stelle einzufügen.
In diesem Tutorial werden wir unser Beispiel anhand unseres Hosting-Kontos bei Bluehost demonstrieren.
Wenn Sie andere Hosts nutzen oder wenn Ihr DNS von einem Domain-Registrar wie Domain.com, Network Solutions oder GoDaddy verwaltet wird, befolgen Sie die entsprechenden Anweisungen.
Sie können auch unsere Anleitung lesen, wie Sie WP Mail SMTP bei jedem Host einrichten können.
Öffnen Sie zunächst eine neue Browser-Registerkarte und melden Sie sich bei Ihrem WordPress-Hosting-Konto an. Suchen Sie dann die DNS-Einträge Ihrer Domain.
Bei Bluehost gehen Sie dazu auf “Domains”. Klicken Sie dann auf “Einstellungen” neben der Domain, die Sie mit SendLayer verbinden möchten.
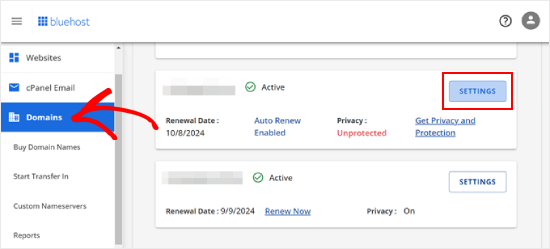
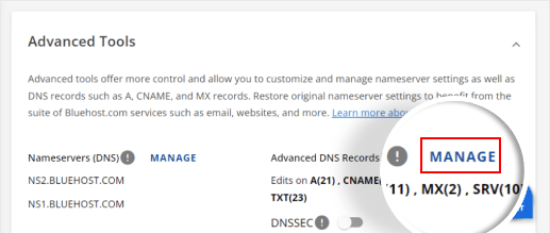
Blättern Sie auf der nächsten Seite nach unten zum Abschnitt “Erweiterte Tools”.
Klicken Sie anschließend auf die Schaltfläche “Verwalten” neben “Erweiterte DNS-Einträge”.
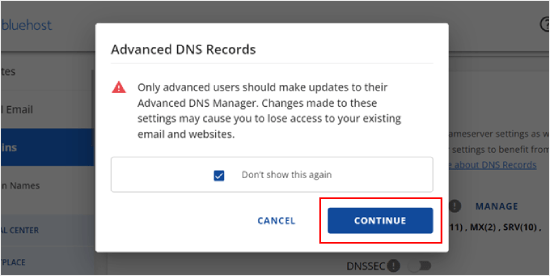
Sie werden eine Warnmeldung sehen, die besagt, dass DNS-Einträge von einem erfahrenen Benutzer bearbeitet werden sollten. Machen Sie sich keine Sorgen wegen dieser Meldung, denn der Vorgang ist ziemlich einfach.
Klicken Sie auf “Weiter”, um fortzufahren.
Sie gelangen nun auf die Seite Erweiterte DNS-Einträge verwalten.
Klicken Sie zunächst auf die Schaltfläche “+ Datensatz hinzufügen”.
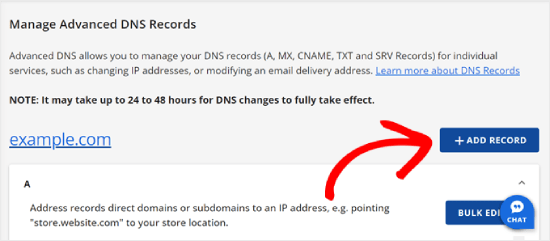
Fügen wir nun die DNS-Einträge hinzu, die SendLayer bereitgestellt hat.
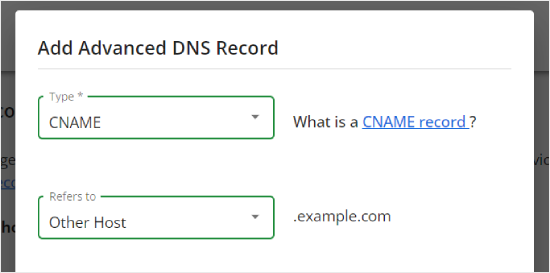
Wählen Sie zunächst den Typ des DNS-Eintrags. In diesem Fall werden wir CNAME für den ersten Eintrag verwenden.
Klicken Sie im Abschnitt “Verweist auf” auf “Anderer Host”. Diese Option werden Sie später für alle Ihre DNS-Einträge wählen.
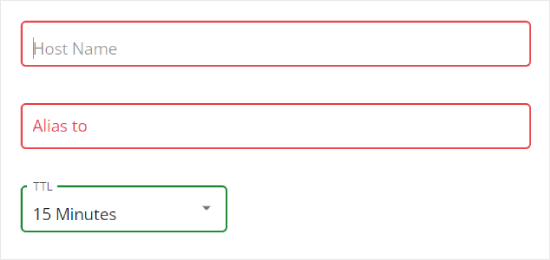
Wenn Sie nach unten blättern, sehen Sie drei Felder: Hostname, Alias und TTL.
Der Hostname sollte mit dem von SendLayer bereitgestellten Wert in ‘Hostname’ ausgefüllt werden. Der Alias sollte mit dem Wert in “Value” ausgefüllt werden. Die TTL können Sie auf 15 Minuten belassen.
Der folgende Screenshot zeigt, wie unser Bildschirm aussah, als wir unseren ersten CNAME-Eintrag hinzugefügt haben.
Wenn Sie fertig sind, klicken Sie einfach auf “Hinzufügen”.
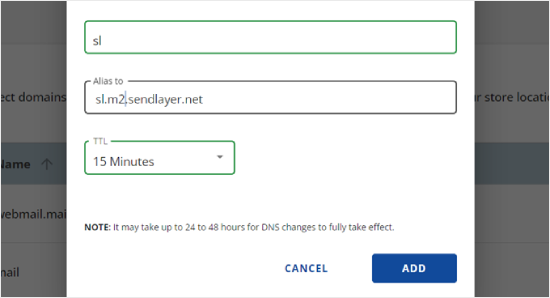
Sie können diese Schritte für alle DNS-Einträge (sowohl CNAME als auch TXT) wiederholen.
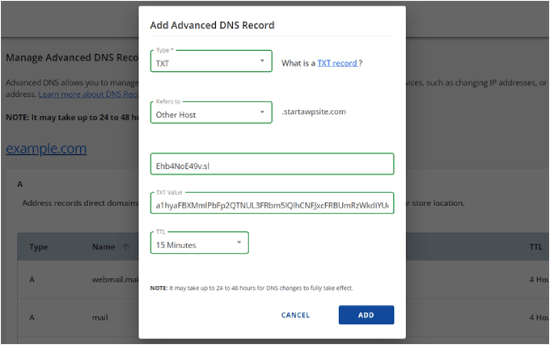
Beim Hinzufügen des TXT-Eintrags müssen Sie den Wert “Hostname” aus SendLayer in das Feld “Hostname” und den Wert aus “Value” in das Feld “TXT Value” einfügen.
So sieht es aus:
Nachdem Sie Ihre Einträge hinzugefügt haben, kehren Sie zu SendLayer zurück und markieren das Kästchen neben “Ich habe diese DNS-Einträge hinzugefügt und bin bereit, fortzufahren”.
Klicken Sie dann auf die Schaltfläche “DNS-Einträge überprüfen”.
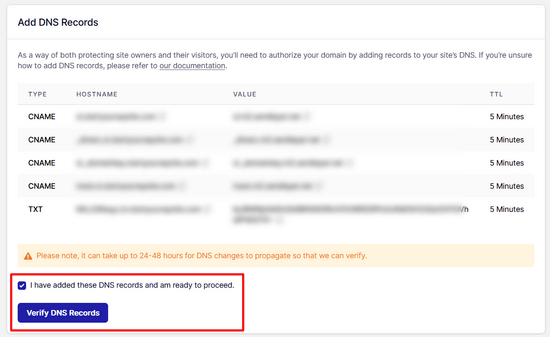
Es kann 24-48 Stunden dauern, bis SendLayer in der Lage ist, Ihre Datensätze zu verifizieren. Nach unserer Erfahrung hat es mehrere Stunden gedauert.
Wenn nichts passiert, wenn Sie auf diese Schaltfläche klicken, können die Einträge noch nicht verifiziert werden. Sie können später noch einmal überprüfen, ob sie verifiziert wurden, indem Sie in Ihrem SendLayer-Dashboard zu “Einstellungen” und zur Registerkarte “DNS-Einträge & Einstellungen” navigieren.
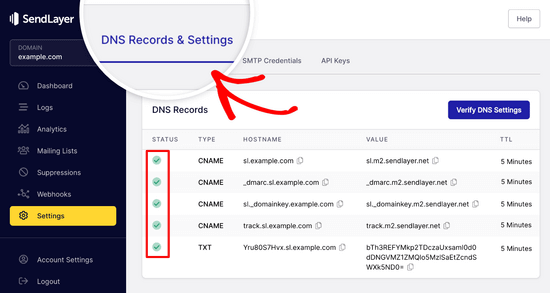
Hier finden Sie eine Liste aller Ihrer DNS-Einträge an einem Ort. Sobald Ihre Domäne erfolgreich autorisiert wurde, sehen Sie grüne Häkchen neben jedem DNS-Eintrag in der Spalte “Status”.
Sie können mit dieser Anleitung weitermachen, während Sie auf die Genehmigung warten.
Schritt 4: Beenden Sie die Einrichtung von WP Mail SMTP zur Verwendung von SendLayer
Lassen Sie uns die Einrichtung abschließen. Gehen Sie zunächst zu Ihrem SendLayer-Konto, um Ihren API-Schlüssel zu finden.
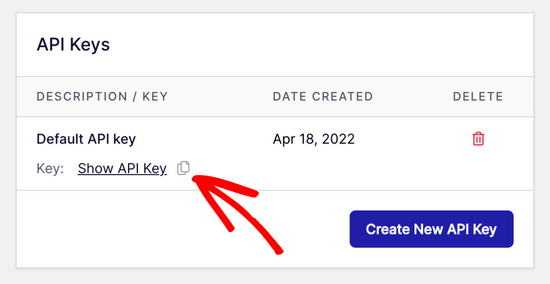
Gehen Sie im SendLayer-Dashboard einfach auf die Seite Einstellungen “ API-Schlüssel. Hier sehen Sie einen Standard-API-Schlüssel, der generiert wurde, als Sie Ihre Domain in SendLayer autorisiert haben.
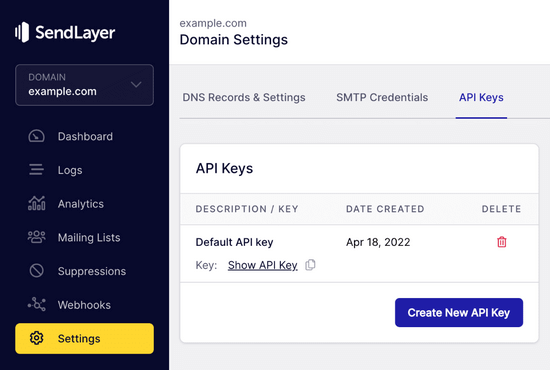
Sie können den API-Schlüssel von dieser Seite aus kopieren, indem Sie auf das Kopiersymbol klicken.
Etwa so:
Danach können Sie zur Registerkarte des WP Mail SMTP-Einrichtungsassistenten zurückkehren.
Fügen Sie dann den API-Schlüssel an der entsprechenden Stelle ein.

Herzlichen Glückwunsch! Sie haben nun alles eingerichtet. Der letzte Schritt besteht darin, eine Test-E-Mail zu senden, um sicherzustellen, dass alles funktioniert.
Gehen Sie zu WP Mail SMTP “ Tools. Geben Sie auf der Registerkarte “E-Mail-Test” eine E-Mail-Adresse ein, an die Sie eine E-Mail senden möchten. Standardmäßig ist dies die E-Mail-Adresse des Administrators der Website. Klicken Sie auf “E-Mail senden”.
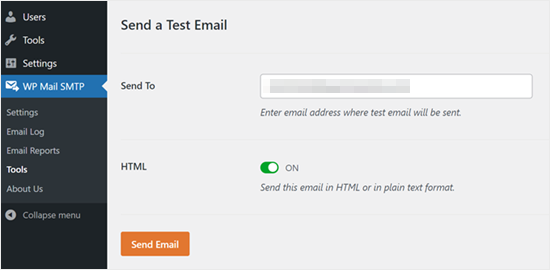
Sie sollten die Meldung ‘Test HTML email was sent successfully!
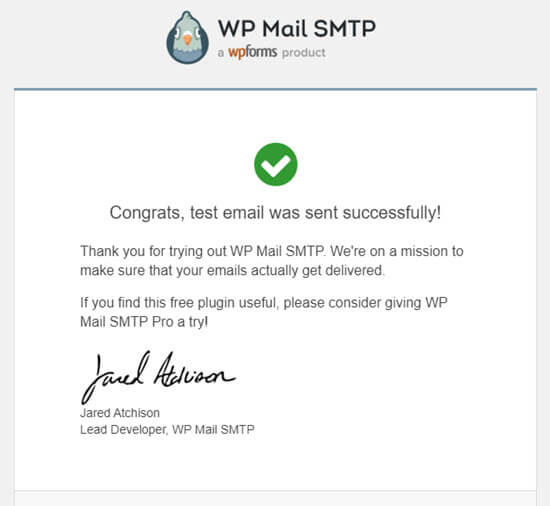
Überprüfen Sie Ihren Posteingang, um zu sehen, ob sie angekommen ist. Es sieht dann so aus:
Hinweis: Wenn Ihr SendLayer-Konto noch nicht aktiviert ist, erhalten Sie die Meldung: [permission_denied]: E-Mail kann nicht gesendet werden. Ihr SMTP-Konto ist noch nicht aktiviert.
Alternative Wege zur Behebung des Problems, dass WordPress keine E-Mails sendet
Wie Sie aus der Liste der Mailer-Optionen des WP Mail SMTP-Plugins ersehen können, müssen Sie nicht unbedingt SendLayer verwenden. Es ist zwar unsere beste kostenlose Empfehlung, aber es gibt auch andere Optionen, die Sie verwenden können, einschließlich Microsoft 365, Gmail(Google Workspace), Amazon SES, etc.
Verwendung von Gmail oder Google Workspace mit WP Mail SMTP zur Korrektur von WordPress-E-Mails
Wenn Sie Gmail haben, können Sie dies zum Versenden Ihrer E-Mails verwenden. Wenn Sie das WP Mail SMTP-Plugin verwenden, müssen Sie Ihre E-Mail-Anmeldedaten nicht in WordPress eingeben.
Um Gmail oder Google Workspace zu verwenden, richten Sie WP Mail SMTP wie oben beschrieben ein und klicken dann auf die Option “Google / Gmail” für Ihren Mailer.
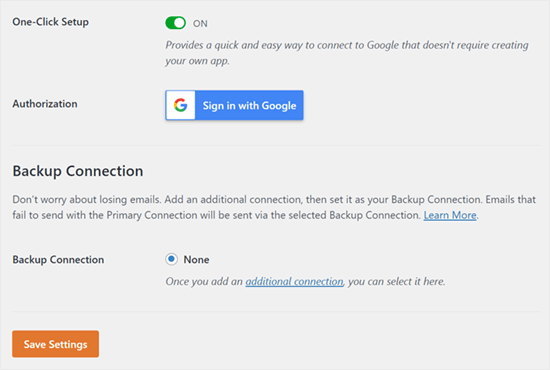
Als Nächstes können Sie die Mailer-Einstellungen konfigurieren, indem Sie die Ein-Klick-Einrichtung von WP Mail SMTP verwenden.
Bei dieser Methode müssen Sie keine eigene App erstellen, was viel einfacher ist. Sie müssen sich nur bei Ihrem Google Mail-Konto anmelden und auf “Einstellungen speichern” klicken.
Die Verwendung von Google Mail oder Google Workspace für berufliche Zwecke birgt jedoch einige entscheidende Nachteile.
Zum einen müssen Sie sich möglicherweise an Ihren Webhoster wenden, damit er das richtige Zertifikat installiert, damit es funktioniert.
Ein weiterer Nachteil ist, dass Sie den gesamten Prozess erneut durchlaufen müssen, wenn Sie die E-Mail-Adresse in Zukunft ändern. Dazu gehört auch die Erstellung einer neuen Webanwendung.
Verwendung von Microsoft 365 mit WP Mail SMTP zur Korrektur von WordPress-E-Mails
Wenn Sie Microsoft Office 365 oder Outlook für Ihr reguläres E-Mail-Konto verwenden, können Sie auch dieses für den Versand von E-Mails über WordPress nutzen. Dies ist jedoch keine empfehlenswerte Option, da sie weniger sicher ist.
Sie müssen WP Mail SMTP wie oben beschrieben einrichten und dann bei der Auswahl Ihres SMTP-Mailers auf die Option “365 / Outlook” klicken. Anschließend müssen Sie eine App auf Microsoft Azure registrieren, damit Sie die unten stehenden Felder ausfüllen können.
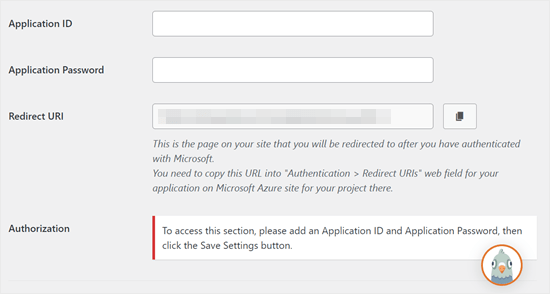
Weitere Einzelheiten finden Sie in der ausführlichen Anleitung zur Einrichtung von Outlook mit WP Mail SMTP.
Verwendung von Amazon SES mit WP Mail SMTP zur Korrektur von WordPress-E-Mails
Die Amazon AWS-Plattform verfügt über einen Simple Email Service (SES), den Sie verwenden können, um das WordPress-E-Mail-Problem zu beheben.
Das Beste an Amazon ist, dass Sie damit jeden Monat bis zu 62.000 E-Mails kostenlos versenden können. Der Nachteil ist, dass die Einrichtung für Anfänger etwas schwieriger ist, weshalb wir es nicht als unsere bevorzugte Option empfehlen.
Aber wie Sie sich vorstellen können, verwenden viele Fachleute und Experten Amazon SES für ihren WordPress-E-Mail-SMTP-Dienst, so dass wir keinen Artikel schreiben konnten, ohne es zu erwähnen.
Wenn Sie daran interessiert sind, Amazon SES mit WordPress einzurichten, lesen Sie die vollständige Anleitung zur Einrichtung von Amazon SES mit WordPress.
Für welchen Mailer Sie sich auch entscheiden, denken Sie immer daran, die Funktion “Test-E-Mail” zu verwenden, um sicherzustellen, dass die E-Mails erfolgreich versendet werden.
Sie müssen auch Ihren Posteingang überprüfen und bestätigen, dass Sie die Test-E-Mail erhalten haben.
Video-Anleitung
Wenn Sie visuelle Anleitungen bevorzugen, dann sehen Sie sich dieses Video an:
Haben Sie andere WordPress Fehler? Schauen Sie sich diese Leitfäden an
WordPress ist nicht perfekt, und von Zeit zu Zeit können Sie auf einige häufige Fehler stoßen. Hier sind einige Anleitungen, die Sie sich ansehen können, um sie zu lösen:
- Wie man den Add Media Button in WordPress repariert, der nicht funktioniert
- Wie man das Problem des Uploads von Bildern in WordPress behebt (Schritt für Schritt)
- Wie man den Fehler “Gemischter Inhalt” in WordPress behebt (Schritt für Schritt)
- WordPress-Beiträge mit dem Fehler 404 beheben (Schritt für Schritt)
- So beheben Sie den Fehler “WordPress-Datenbankfehler – Festplatte voll”
- So beheben Sie den Fehler beim Herstellen einer Datenbankverbindung in WordPress
- So beheben Sie den Fehler “Dieser Dateityp ist aus Sicherheitsgründen nicht zulässig” in WordPress
- So beheben Sie den 502 Bad Gateway Fehler in WordPress
- Wie behebt man, dass die WordPress-Suche nicht funktioniert?
- WordPress-Formular funktioniert nicht: 7 Tipps zur Problembehandlung
Wir hoffen, dass dieser Artikel Ihnen geholfen hat, das Problem, dass WordPress keine E-Mails sendet, zu beheben. Vielleicht interessiert Sie auch unsere Liste der häufigsten Probleme mit dem Block-Editor von WordPress oder unsere Auswahl der besten Plugins für die individuelle Anpassung von E-Mails in WooCommerce.
Wenn Ihnen dieser Artikel gefallen hat, dann abonnieren Sie bitte unseren YouTube-Kanal für WordPress-Videotutorials. Sie können uns auch auf Twitter und Facebook finden.


Jiří Vaněk
Im using WP Forms paid version with WP Mail SMTP in free version and this combination work pretty well together.
Jiří Vaněk
Currently, the most problems that I have solved in the last year with sending emails on WordPress was the missing DNS record for SPF and DKIM. Specifically, it is most evident on the side of Google and Gmail, which rejects such emails. It is therefore a good idea to also focus on SPF and DKIM records for the domain.
WPBeginner Support
If the method in this guide does not work then that could certainly be something to check
Admin
Moinuddin Waheed
Sending emails and being hundred percent assured that it has got delivered is a must for any kind of online businesses.
This is where comes the role of this excellent plugin called wp SMTP mail which ensures that the email that has been sent has also been delivered to the recipient.
I have implemented wp mail SMTP to my websites and planning to use on all my wordpress websites.
Carol
The best answer so far! I have been looking for this answer for 1 year!
WPBeginner Support
Glad to hear our guide was helpful!
Admin
Abubakar Bala
Wow! WP Beginner is my number 1 go to destination for WordPress bugs. I have been facing serious issues with the issues discussed in this article. Thank you so much for these detailed solutions.
WPBeginner Support
Glad to hear our guide was helpful!
Admin
Joe
What is the purpose of setting up the mail1 subdomain?
Bren
Is there a code-only alternative? I’d like to avoid using plugins where possible.
WPBeginner Support
We do not have any beginner-friendly methods for adding SMTP without a plugin, for not using a plugin, we would recommend taking a look at our site below that covers common concerns for using multiple plugins and why they aren’t as prevalent as they seem:
https://www.wpbeginner.com/opinion/how-many-wordpress-plugins-should-you-install-on-your-site
Admin
Tim
I understand having to set up the WP Mail SMTP Plugin. That’s fabulous.
I suppose what I don’t understand is if I have SMTP with my hosting account and I can send through that, why use a third-party SMTP provider? Did I miss something? What benefit does the third-party provide? Thanks.
WPBeginner Support
It would be a personal preference if you use a third party as we recommend or some hosting providers do not have the option to use SMTP through them.
Admin
Qudus
Thank you for this great article.
I followed every step successfully until I got to AUTHENTICATE THIS DORMAIN.
when I clicked on manage domains, I couldn’t find any DNS record or TXT for me to add the codes from Sendinblue.
Please what do I do?
WPBeginner Support
If you do not see where you can add the records, you would want to reach out to your hosting provider and they should be able to assist.
Admin
Brittany Pelegrino
Thank you so much for this awesome article! I was wondering if you could advise on where you need to point your subdomain to when creating the DNS record?
WPBeginner Support
Unless your hosting provider requires it, you shouldn’t need to point the subdomain to a specific location on your site or anywhere at all other than the records from our guide.
Admin
Oscar
hey i have the setup correct the test email went through however the email from the contact form was sent to promotions. what can i do to fix this?
WPBeginner Support
That would be determined by the email provider being used and not something the plugin would change sadly.
Admin
Michael
Tnx a lot for your guide. After not less than 10 different attempts to make my emails functionable, this did it. THANKS!
WPBeginner Support
Glad our guide was helpful
Admin
Paul
What if email domain and web site domain are different? In your instructions and also the instructions of sendinblue it was confusing under which of the two domains am I putting the records, getting authorization, etc.
WPBeginner Support
You would want to set up Sendinblue for the domain that is in the email address
Admin
Paul
Excuse my SMTP ignorance but can I use Sendinblue for sending email from that email address from my wordpress account if I already have that email account functioning elsewhere (in my case outlook)?
WPBeginner Support
Yes, you can customize the address you send the email from in Sendinblue.
Admin
Marlene Elizabeth
It worked with the WP Mail SMTP Configuration perfectly. Literally just had to changed the E-Mail. Thanks.
WPBeginner Support
Glad our guide was helpful
Admin
Lisa
Two days trying to resolve wordpress not sending attachment bigger than 1mb; nothing works.
Resolved in 1 minute thanks to you.
WPBeginner Support
Glad our guide was helpful
Admin
Martin N
Is there any way to do this but without a plugin?
WPBeginner Support
We do not have a recommended method to set this up without a plugin.
Admin
eva
Hi,i follow your steps. but my WordPress still don’t send an email now. I think i set up WP Mail SMTP successfully and test my private email, but when my clients subscribed, placed an order, canceled, and order, i didn’t receive a notification, either my clients. i have checked with my host server several times, they don’t know how to help me, and only clients’ reset passwords email was sent successfully after their help. Now they think there are must be something wrong with my woo commerce plugin or my theme.
I don’t know how to deal with this problem now, can you give me your suggestion?
WPBeginner Support
You may want to check with the support for the plugin to ensure they don’t override the sending method for emails.
Admin
Harold
I was able to use sindInBlue and get it to work. Whenever a customer fills out my form, I get an email with all the customers information. They only problem I have is that I would like to send a “confirmation” email to my customers email address, stating that we received their email and will respond within 24 hours.
WPBeginner Support
You would want to check with the options in your contact form for that.
Admin
Scott
In the tutorial, there is the line “Open up a new browser tab and log back into your web hosting account. You need to find your domain and open up the DNS records. ”
Do I open up the DNS of my domain, or the newly created subdomain?
WPBeginner Support
You would open your primary domain’s DNS and add the records that Sendinblue has given you to that.
Admin
Victoria
I was really struggling with this issue and your article really helped – thank you!
WPBeginner Support
You’re welcome, glad our guide helped
Admin
Tulay Girard
Great tutorial. Thank you!
WPBeginner Support
You’re welcome
Admin
Tolu
I thought this guide would help as my issue seemed similar but after going through this guide, im still not sure how to fix my issue. I’ve been trying to change the Admin email so I can receive order details. when I try to change it says the new email will not be recognized until the confirmation email (sent to old) is accepted. But that confirmation email is nowhere to be found. How to I change the admin email?
WPBeginner Support
If the message is not caught in your spam folder when you resent it, we would recommend taking a look at our guide below:
https://www.wpbeginner.com/beginners-guide/how-to-change-the-wordpress-admin-email
Admin
Rudy Ramkissoon
I’m receiving emails from non gmail accounts and getting error. Like the following below.
Address not foundYour message wasn’t delivered to example@example.com because the domain example.com couldn’t be found. Check for typos or unnecessary spaces and try again.
What can cause this?
WPBeginner Support
If the user did not type in their email address correctly would be the most common reason.
Admin
J H
I followed this guide and got “test email sent successfully” but I didn’t receive an email on my email account, how come?
WPBeginner Support
There are multiple possible reasons, you may want to ensure that the email did not get caught in your spam folder for a starting point
Admin
Joel
Thank You so very much for the step by step guidance… Was using the same plugin earlier and it stopped working… Following your instructions, have signed up for Sendinblue & now it works like a charm.
I have always followed most of the instructions from your blog… Thank You
WPBeginner Support
Glad our guide was able to help
Admin
lori
Hello, I’m a little confused. When I set up our site I contacted the web host (BlueHost) and they set up our email accounts using G-Suite so that we could use @ourdomain for our emails. They said it would be complicated to do, so they set it up without explaining the details. We pay for each email account set up this way. After reading this post, I’m wondering if I’m also supposed to set up the WP Mail SMTP plugin. Do I need to go back and set up this plugin also for the best email performance, or would that not apply in our situation? Thank you.
WPBeginner Support
We would recommend using SMTP to send your emails still as having a custom email address does not change how WordPress sends emails.
Admin
John
Thanks for this but why do we need to create a subdomain?
WPBeginner Support
To ensure that connections going there are for email and not possible site visitors
Admin
Jack
This was super helpful, super easy to follow and fixed my issue Thanks!
WPBeginner Support
You’re welcome, glad our guide was helpful
Admin
Daniel
You guys really help me out . I really need this information.
WPBeginner Support
Glad we could help you with our guide
Admin
Bob
Thank you for the guidance..
WPBeginner Support
You’re welcome
Admin
Julie
Thank you for the guidance..
WPBeginner Support
You’re welcome
Admin
Peter
Thank you for the guidance.
WPBeginner Support
You’re welcome
Admin
Corinne
Followed along on how to fix the issue of WordPress not sending emails. Worked great until about half way through. What was on the website to what was actually happening totally off from each other. Did not successfully complete the task and not sure what to do next. Please update the help on the website. Thanks!!
WPBeginner Support
We will certainly take a look at what needs to be updated in this article.
Admin
Kate
Thanks for the tutorial, it has changed a bit in google dev since you wrote it but I got there in the end. And emails are being sent and received!
WPBeginner Support
You’re welcome, it’s difficult to keep up with Google’s changes but glad our article could still be helpful
Admin
Shahbaaz
I am not receiving WordPress password recovery emails or WordPress confirm emails. What should I do ? I am using Google cloud hosting trial. I am a beginner. Please help!
WPBeginner Support
It may be the method that WordPress is sending emails, you can change the method your site sends emails using our article here: https://www.wpbeginner.com/plugins/how-to-send-email-in-wordpress-using-the-gmail-smtp-server/
Admin
Carla
Hi there, thanks for this amazing tutorial and so well explained – However I’m still unable to overcome the problem on the main settings. I’m using contactform7 and forms aren’t working duo to this issue. I’m not receiving any email at all to be able to confirm the address change.
WPBeginner Support
If you set up SMTP properly and the emails are not sending correctly then you would want to reach out to your form’s support to ensure there isn’t an issue with the form itself.
Admin
Emmanuel
I am currently using Google Gmail setup and was able to follow the steps to create the Gmail api to connect the Client ID and Secret ID. I can test the redirection URL and login to Google all right. However, I’m unable to send a Test Email. All of sudden the “Force From Email” check box is also grayed out and uncheck. I can’t check that box. Please help
WPBeginner Support
For issues with the plugin, please reach out to the plugin’s support through the support forum and they should be able to assist.
Admin
Adi Hermanto
Thanks for brilliant tutorial mate, really did help solve an issue which wasted hours of my time.
WPBeginner Support
Glad our article could help solve the problem
Admin
Ankit
Thanks !!!
Which theme are you using?
WPBeginner Support
Hi Ankit,
We are using a custom theme made on top of Genesis framework.
Admin
Penina
Thank you for the tutorial. It works so well!
mudasir abbas turi
Hello dear thank you very much i got success
Pugazhendhi
I got an error message 403 forbidden at the last stage of setting up the gmail smtp.Can you suggest me something so that I can resolve it to send an email of the enquiry form that i have created using contact form 7.
Joel
I installed the WP Mail SMTP plugin and although you made a great effort to demonstrate connectivity with mailgun, your info was not necessarily dated with Godaddy’s cpanel. I decided to go with Sendgrid which was a much easier set process than mailgun.
brad
i successfully installed WP Mail SMTP and got the confirmation test email. However, I don’t know how to attach it to my website. The current contact form in zerif lite gives me an error message. Please advise. Thanks.
WPBeginner Support
Hi Brad,
Please contact your theme support. Alternately you can use WPForms Lite to add a contact form to your website.
Admin
Jason
I was able to set up WP Mail SMTP to work with Contact Form 7, but in all emails we receive they always show my gmail as the sender but not the real senders email. Is there anyway to fix this problem?
Josin
I get the following error when I try to authorize the plugin to send mails using Gmail.
“The Web server is configured to not list the contents of this directory or you do not have enough permissions to access the resource”
How can I tackle this error?
Alicia
I tried twice to follow these directions and everything was going according to plan… But then at the end… and error message! Anyone know what this means?
The OAuth client was not found.
Will
My problem is that wordpress won’t send emails to or from an address that is coming from my domain name. E.g. @domain.com. But it will send from any other email address type.
Md Sajid
i successfully setup my site, and it is working very well.
thanks for this nice and working tutorial..
i used gmail api first method..
SORRY FOR MY BAD ENGLISH