Eines der ersten Dinge, die wir tun, wenn wir eine Website umgestalten wollen, ist das Klonen dieser Website in eine Staging- oder lokale Umgebung. Auf diese Weise können wir eine exakte Kopie der Website erstellen, an der wir gerade arbeiten, ohne die Live-Version zu beeinträchtigen.
Wenn Sie ein Website-Besitzer mit wenig oder gar keinen technischen Kenntnissen sind, sind Sie es wahrscheinlich leid, dass die von Ihnen vorgenommenen Änderungen zu unerwarteten Fehlern führen. Sie möchten Ihre WordPress Website zu Testzwecken klonen, haben aber Angst, dass der Vorgang zu schwierig ist.
Eigentlich ist es genau das Gegenteil. Mit dem Duplicator Plugin ist das Klonen einer WordPress Website super einfach, und wir zeigen Ihnen in diesem Artikel, wie das geht.
Was ist das Klonen von WordPress-Websites, und warum sollte man es verwenden?
Die Idee hinter dem Klonen einer WordPress-Website ist, dass Sie eine exakte Kopie einer Website erstellen und diese auf eine andere Website anwenden.
Es gibt viele Gründe, warum Sie eine Website klonen müssen. Zum Beispiel können Sie eine Website auf einen neuen Hoster oder einen neuen Domänennamen umziehen. Durch das Klonen einer Website können Sie eine Menge Zeit und Mühe sparen und den Migrationsprozess viel schneller abschließen.
Ein weiteres Beispiel ist die Entwicklung einer Website für einen Kunden auf Ihrem eigenen lokalen Server. Sobald die Arbeit abgeschlossen ist, können Sie die Website einfach klonen und auf den Live-Server des Kunden übertragen.
Sie können auch eine Live-WordPress-Site klonen und eine Staging-Site ein richten, um Änderungen zu testen, bevor Sie sie live schalten.
In diesem Sinne zeigen wir Ihnen, wie Sie eine WordPress-Website in wenigen Schritten klonen können. Sie können die folgenden Links verwenden, um durch das Tutorial zu navigieren:
- Step 1: Set Up the Duplicator WordPress Plugin for Easy Cloning
- Step 2: Create a Duplicator Package of Your WordPress Site
- Step 3: Upload Your WordPress Site Archive and Installer to a New Location
- Step 4: Create a New WordPress Database for Your Website
- Step 5: Run the WordPress Website Importer Script
- Step 6: Test Your Cloned Website and Delete Temporary Files
Schritt 1: Einrichten des WordPress-Plugins Duplicator zum einfachen Klonen
Der beste Weg, eine WordPress-Website zu klonen, ist die Verwendung des Duplicator-Plugins. Es ist ein leistungsstarkes WordPress-Plugin zum Klonen und Duplizieren, das dennoch sehr einfach zu bedienen ist.
Das Plugin sichert alles von Ihrer Website in einer einzigen Datei, die Sie einfach an den neuen Speicherort verschieben können.
Als Erstes müssen Sie das Plugin auf der Website, die Sie klonen möchten, aktivieren und installieren. Weitere Einzelheiten finden Sie in unserer Schritt-für-Schritt-Anleitung für die Installation eines WordPress-Plugins.
Hinweis: Es gibt eine Pro-Version von Duplicator, die zusätzliche Funktionen wie geplante Backups, Multisite-Migration und mehr bietet. Für diesen Leitfaden werden wir jedoch die kostenlose Version verwenden, da sie alles bietet, was Sie zum Klonen einer WordPress-Website benötigen.
Schritt 2: Erstellen Sie ein Vervielfältigungspaket für Ihre WordPress-Website
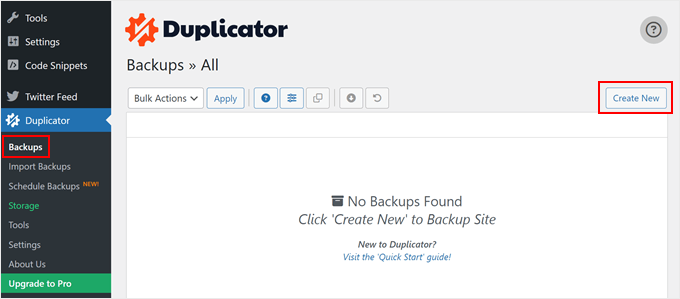
Gehen Sie nach der Aktivierung zu Duplicator ” Backups und klicken Sie dann auf den Button “Neu erstellen” oben auf der Seite.
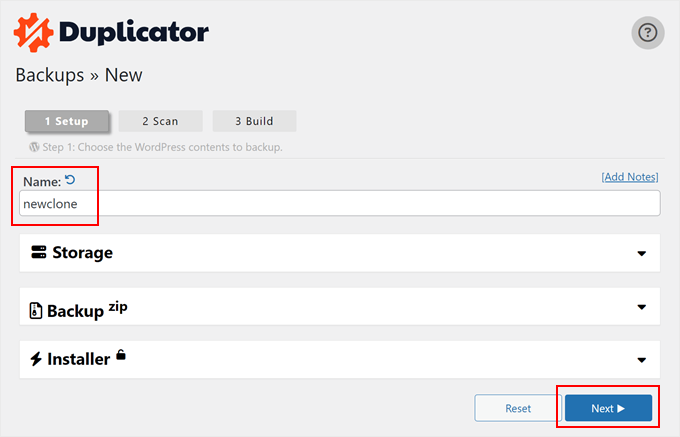
Danach wird ein Bildschirm angezeigt, in den Sie einen Namen für die doppelte Datei eingeben können. Dieser dient nur als Referenz, Sie können also jeden beliebigen Namen verwenden.
Klicken Sie dann auf den Button “Weiter”.
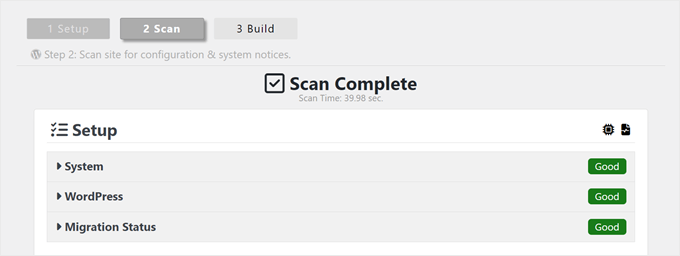
Duplicator wird nun Ihre Website scannen.
Wenn das Programm ein Problem mit einem Teil Ihrer WordPress-Website findet, wird eine Warnung mit Informationen zur Behebung des Problems angezeigt. Ansonsten heißt es einfach “Gut”.
Blättern Sie nun auf der Seite nach unten.
Klicken Sie dann auf “Erstellen”, um die Sicherungsdatei zu erstellen.
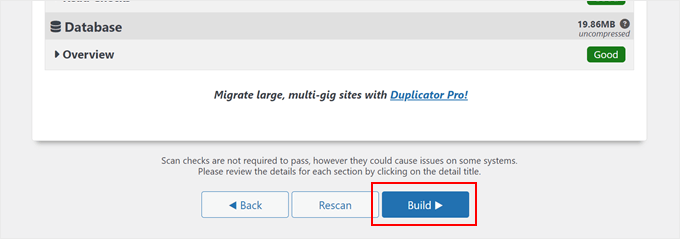
Das Plugin sichert nun Ihre WordPress-Datenbank, Bilder, Vorlagen, Plugins und alle anderen Dateien in einem einzigen herunterladbaren Paket.
Je nach Größe Ihrer Website kann dieser Vorgang ein paar Minuten dauern.
Sobald der Sicherungsvorgang abgeschlossen ist, können Sie Ihre Dateien herunterladen.
Sie müssen sowohl die Archivdatei, die Ihr Backup enthält, als auch das Installationsprogramm zum Entpacken des Archivs herunterladen.
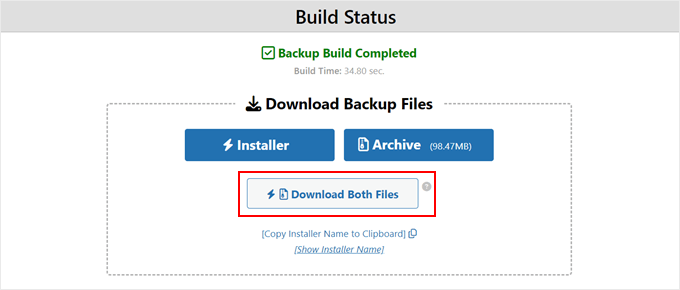
Klicken Sie dazu auf den Button “Beide Dateien herunterladen”.
Profi-Tipp: Technisch gesehen können Sie den Rest dieser Schritte überspringen und einfach unserer Anleitung zur Wiederherstellung einer WordPress Website-Sicherung folgen, in der wir Ihnen zeigen, wie Sie Ihre Sicherungsdatei mit Duplicator importieren.
Wenn Sie die geklonte Website in einer leeren Umgebung wiederherstellen möchten, können Sie den Rest dieser Schritte dennoch ausführen.
Schritt 3: Upload des Archivs und des Installers Ihrer WordPress Website an eine neue Position
Jetzt haben Sie eine vollständige Sicherung Ihrer Website und der Installationsdatei, und der nächste Schritt ist das Hochladen an den neuen Speicherort.
Dieser neue Speicherort kann ein Live-WordPress-Blog oder eine Website auf Ihrem lokalen Server sein. Wenn sich die Website auf einem lokalen Server befindet, müssen Sie einen neuen Ordner im Stammverzeichnis Ihres lokalen Servers erstellen. Dies ist die Datei, in der Ihr lokaler Server alle Websites speichert.
Wenn Sie zum Beispiel MAMP verwenden, ist es der Ordner “/Applications/MAMP/htdocs/”.
Wenn Sie WAMP verwenden, ist es alternativ der Ordner “C:\wamp\www \”.
Danach müssen Sie den Ordner öffnen, den Sie für Ihre geklonte Website erstellt haben, und sowohl die Archivdatei als auch das Installationsprogramm in diesen Ordner kopieren.

Wenn Sie Ihre Website auf eine andere WordPress-Hosting-Plattform klonen möchten, können Sie zunächst eine leere Website erstellen und die Dateien mit dem Dateimanager des Providers hochladen.
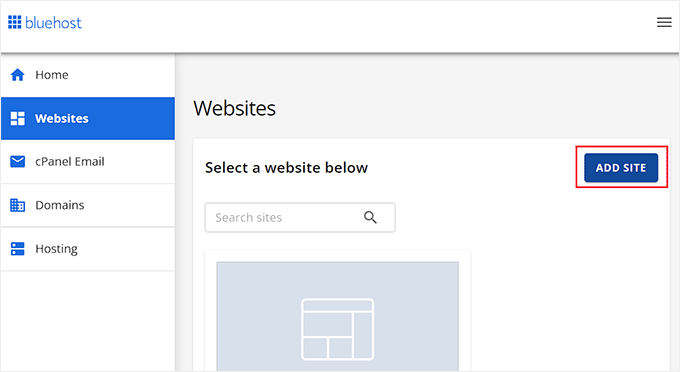
Wenn Sie Bluehost nutzen, loggen Sie sich einfach in das Dashboard Ihres Hosting-Kontos ein und navigieren Sie zur Registerkarte “Websites”. Klicken Sie dann auf “Website hinzufügen”.
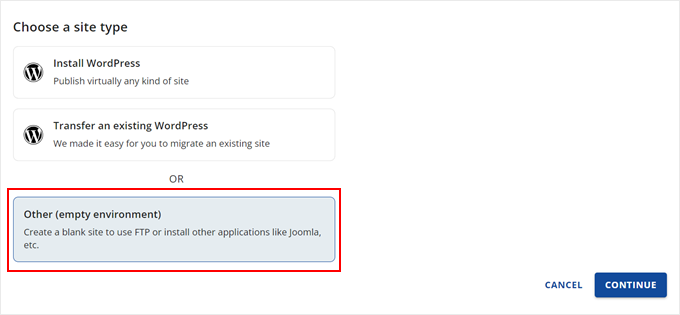
Auf dem nächsten Bildschirm sehen Sie einige Optionen für den Standorttyp.
Wählen Sie einfach “Andere (leere Umgebung)” und klicken Sie auf “Weiter”.
Als nächstes geben Sie den Titel Ihrer Website ein.
Sie können diesen Schritt bei Bedarf auch überspringen und einfach auf “Weiter” klicken.

In diesem Stadium können Sie Ihre Website mit einem Domänennamen verbinden.
Oder Sie können in der Zwischenzeit eine temporäre Domain verwenden, wenn Sie noch keinen Domainnamen haben.
Klicken Sie auf “Weiter”, um fortzufahren.
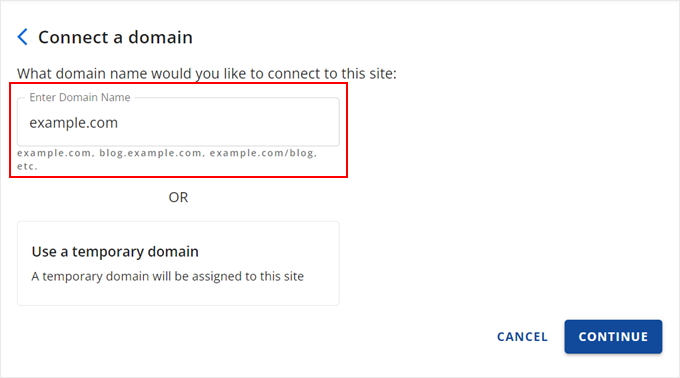
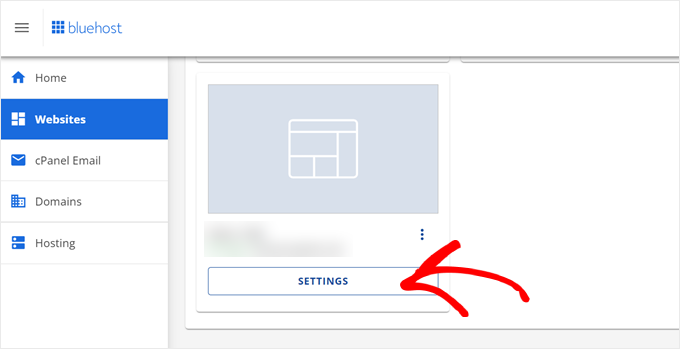
Sobald Ihre leere Website fertig ist, kehren Sie zur Registerkarte “Websites” zurück.
Klicken Sie auf Ihrer neu erstellten Website auf die Schaltfläche “Einstellungen”.
Blättern Sie nun nach unten zum Abschnitt “Quick Links”.
Klicken Sie dort einfach auf die Schaltfläche “Dateimanager”.
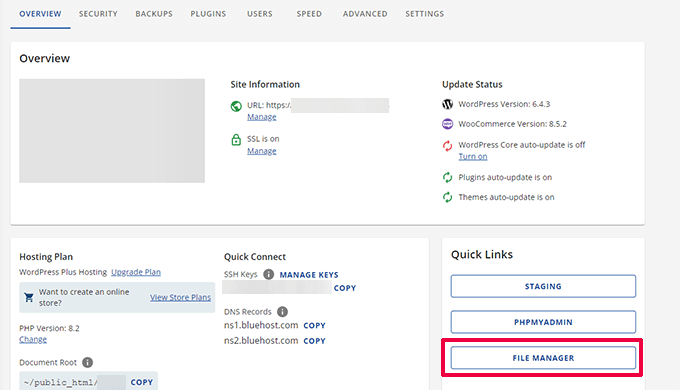
Bluehost bringt Sie nun zum Dateimanager Ihrer Website.
Klicken Sie auf die Schaltfläche “Hochladen”, um Ihre Dateien hochzuladen.
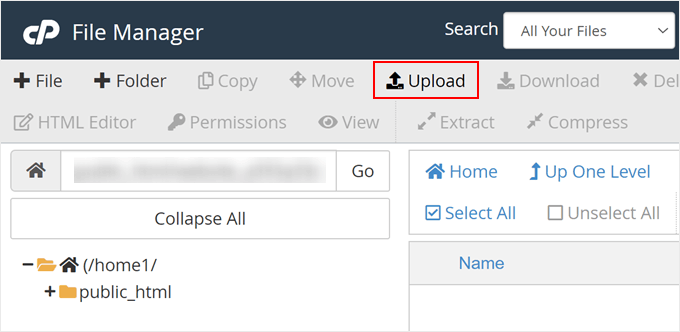
Wählen Sie nun die Dateien aus, die Sie auf die leere Website hochladen möchten.
Wenn Sie fertig sind, klicken Sie einfach auf “Zurück zu …”.
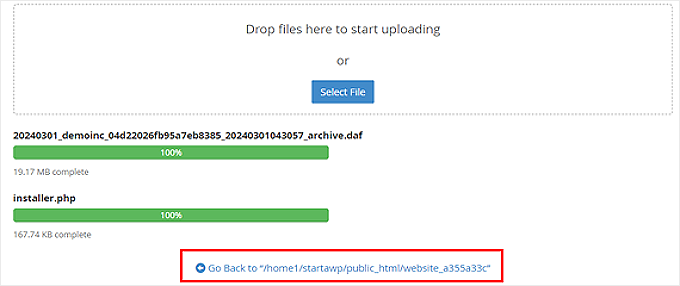
Sie sollten nun Ihre Archiv- und Installationsdateien im Dateimanager sehen.
Entfernen Sie die anderen Dateien, die sich in diesem Verzeichnis befinden, damit die Installation später reibungslos verläuft.

Alternativ können Sie das Installationsprogramm und das Archiv auch mit einem FTP-Client in das Stammverzeichnis hochladen.
Wenn Sie dies noch nicht getan haben, lesen Sie unseren Leitfaden für Einsteiger, wie Sie Dateien per FTP in WordPress hochladen.
Unabhängig davon, wo Sie die Dateien hochladen, müssen Sie sicherstellen, dass der Ordner nur Ihre installer.php und die Archiv-Zip-Dateien enthält.

Schritt 4: Erstellen Sie eine neue WordPress-Datenbank für Ihre Website
Als Nächstes müssen Sie eine neue WordPress-Datenbank erstellen, um Ihre geklonte Version von WordPress zu entpacken. Wenn Sie bereits eine Datenbank erstellt haben, können Sie diesen Schritt überspringen.
Es gibt mehrere Möglichkeiten, eine Datenbank zu erstellen, je nachdem, ob es sich bei dem neuen Standort um eine Live-Site oder eine Site auf Ihrem lokalen Server handelt.
Wenn Sie eine Live-Site verwenden, loggen Sie sich einfach in das Dashboard Ihres WordPress-Hosting-Kontos ein.
Für Bluehost-Benutzer müssen Sie wie zuvor auf die Registerkarte “Einstellungen” Ihrer leeren Website gehen. Wechseln Sie dann zur Registerkarte “Erweitert” und klicken Sie auf “Verwalten” neben cPanel.
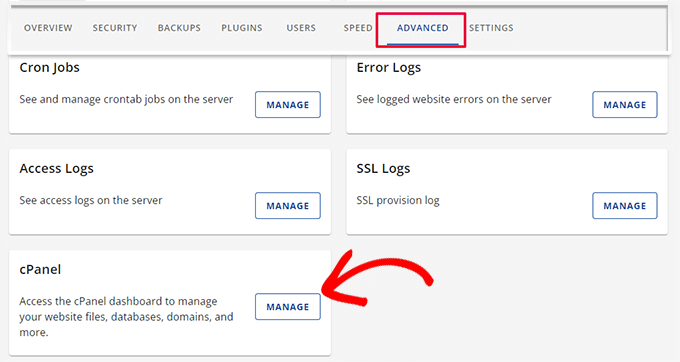
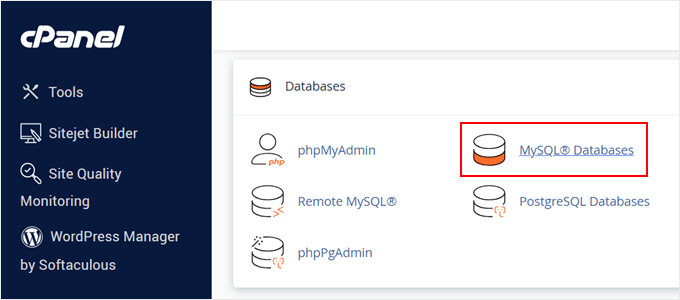
Blättern Sie im cPanel zum Abschnitt “Datenbanken”.
Wählen Sie anschließend “MySQL-Datenbanken”.
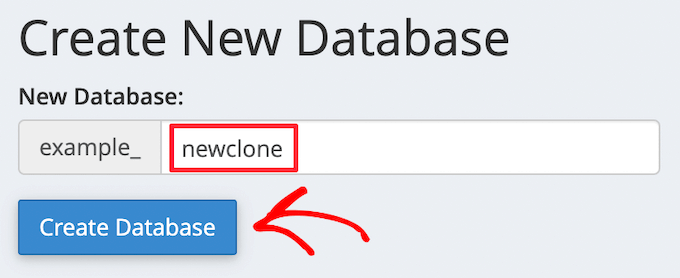
Sie gelangen nun zu einem Bildschirm, in dem Sie einen Namen für Ihre Datenbank eingeben können.
Klicken Sie dann auf die Schaltfläche “Datenbank erstellen”.
Als nächstes müssen Sie der MySQL-Datenbank einen neuen Benutzer hinzufügen.
Blättern Sie einfach zum Abschnitt “MySQL-Benutzer”. Geben Sie dann einen Benutzernamen und ein Passwort für den neuen Benutzer ein, und klicken Sie auf die Schaltfläche “Benutzer erstellen”.
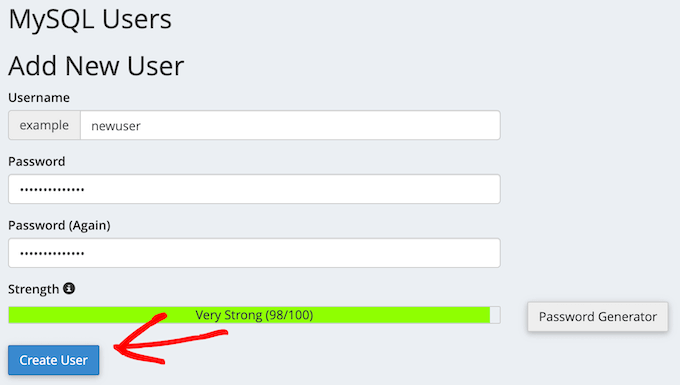
Wenn Sie das getan haben, ist der nächste Schritt das Hinzufügen des Benutzers zu Ihrer Datenbank.
Blättern Sie einfach zum Abschnitt “Benutzer zu einer Datenbank hinzufügen” und öffnen Sie das Dropdown-Menü “Benutzer”. Wählen Sie hier den Datenbankbenutzer aus, den Sie im vorherigen Schritt erstellt haben.
Öffnen Sie dann das Dropdown-Menü “Datenbank” und wählen Sie die Datenbank aus, die Sie zuvor erstellt haben.
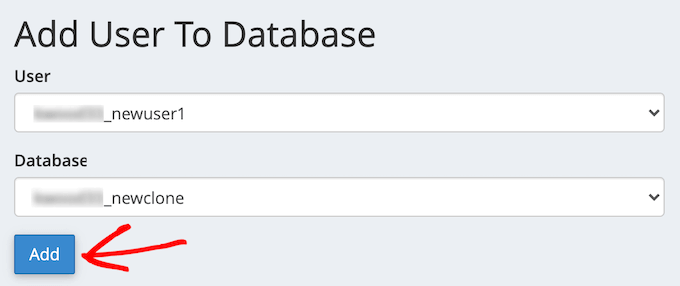
Notieren Sie sich unbedingt den Namen der Datenbank, den Benutzernamen und das Passwort, da Sie diese Informationen im nächsten Schritt benötigen.
Klicken Sie anschließend auf die Schaltfläche “Hinzufügen”.
Wenn Sie eine Localhost-Installation mit XAMPP oder anderen Werkzeugen verwenden, rufen Sie einfach “http://localhost/phpmyadmin/” oder “http://localhost:8080/phpmyadmin/” in Ihrem Browser auf, um phpMyAdmin zu starten.
Klicken Sie anschließend auf die Registerkarte “Menü” und wählen Sie die Option “Datenbank”.
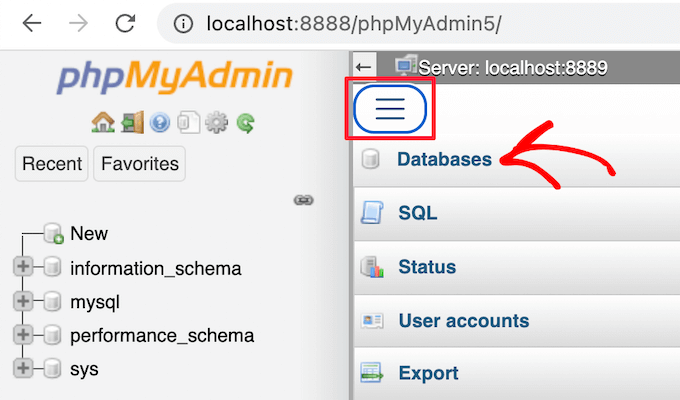
Als nächstes müssen Sie einen neuen Namen für die Datenbank eingeben.
Klicken Sie dann einfach auf die Schaltfläche “Erstellen”.

Den Namen der Datenbank werden Sie im nächsten Schritt verwenden. Bei den meisten localhost-Installationen ist Ihr Host localhost und der Benutzername root mit einem leeren Passwort.
Schritt 5: Führen Sie das WordPress Website Importer Script aus
Nun, da alle Dateien vorhanden sind, ist es an der Zeit, das Duplicator-Installationsskript auszuführen. Dieses Skript entpackt Ihre Archivdatei mit ein paar Klicks.
Geben Sie zunächst die URL Ihrer Website in den Webbrowser ein und fügen Sie installer.php an das Ende der URL an. Das sieht dann etwa so aus wie “https://example.com/installer.php”. Achten Sie darauf, dass Sie “example.com” durch Ihren eigenen Domänennamen oder die Localhost-Adresse Ihrer Website ersetzen.
Als nächstes wird das Duplicator-Installationsskript auf der Ansicht erscheinen. Zuerst müssen Sie die Informationen Ihrer WordPress-Datenbank eingeben.
Dies ist die Datenbankinformation, die Sie oben kopiert haben.
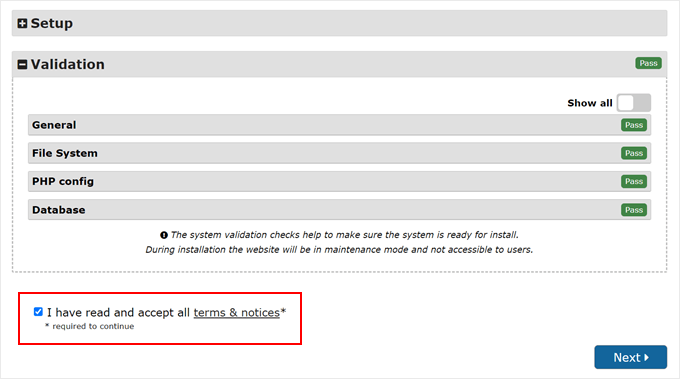
Klicken Sie anschließend auf “Validieren”.
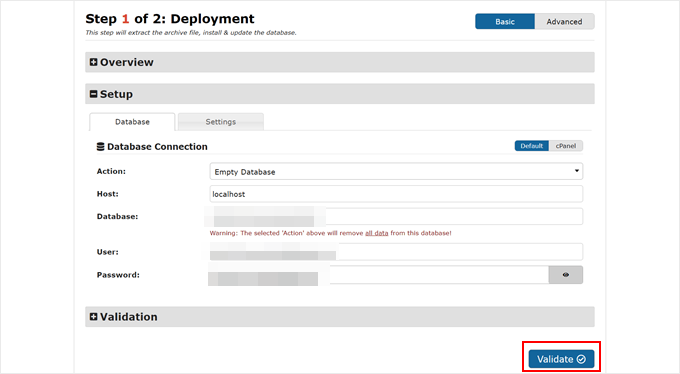
Wenn es keine Fehler gibt, markieren Sie das Kontrollkästchen Begriffe und Hinweise am unteren Rand.
Klicken Sie anschließend auf “Weiter”, um fortzufahren.
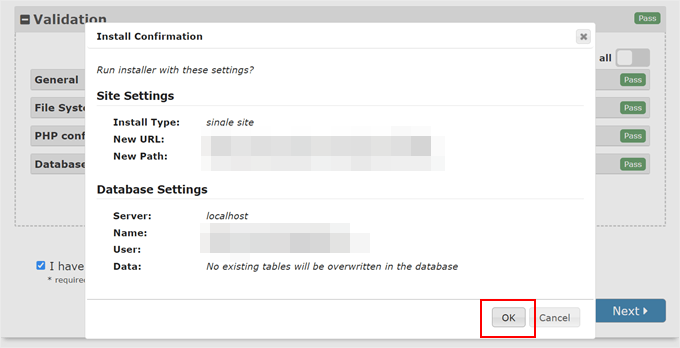
Anschließend erscheint ein Popup-Fenster zur Bestätigung der Installation.
Klicken Sie anschließend auf den Button “OK”.
Wenn die Installation erfolgreich war, können Sie sich sofort bei Ihrer neuen WordPress Website anmelden.
Aktivieren Sie dazu das Kontrollkästchen “Installationsdateien nach Anmeldung auf sicherer Website automatisch löschen (empfohlen!)” und klicken Sie auf den Button “Admin Login”.
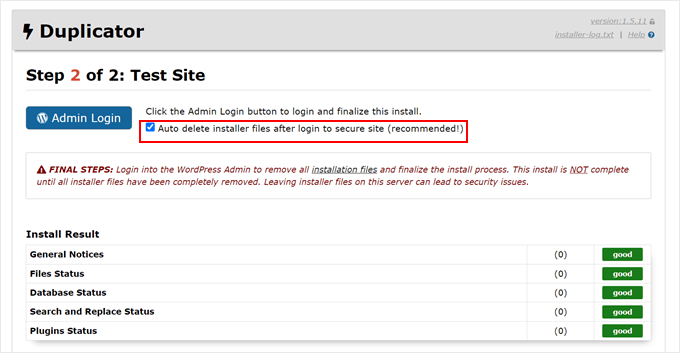
Wenn Sie diese Box ankreuzen, werden die Installationsdateien automatisch entfernt, um mögliche Sicherheitsprobleme zu beseitigen und die Installation abzuschließen.
Schritt 6: Testen Sie Ihre geklonte Website und löschen Sie temporäre Dateien
Jetzt können Sie Ihre geklonte Website testen.
Wir empfehlen, sowohl den WordPress-Verwaltungsbereich als auch das öffentliche Frontend Ihrer Website zu testen, um sicherzustellen, dass alle Daten vorhanden sind und die Website wie erwartet funktioniert.
Wenn Sie WordPress-Fehler erhalten, lesen Sie unseren Leitfaden für Anfänger zur Fehlerbehebung bei WordPress-Fehlern.
Sie müssen auch überprüfen, ob Ihre Installationsdateien noch existieren. Zur Sicherheit empfehlen wir Ihnen, zu Duplicator ” Werkzeuge zu gehen und dann auf den Button “Installationsdateien entfernen” zu klicken.
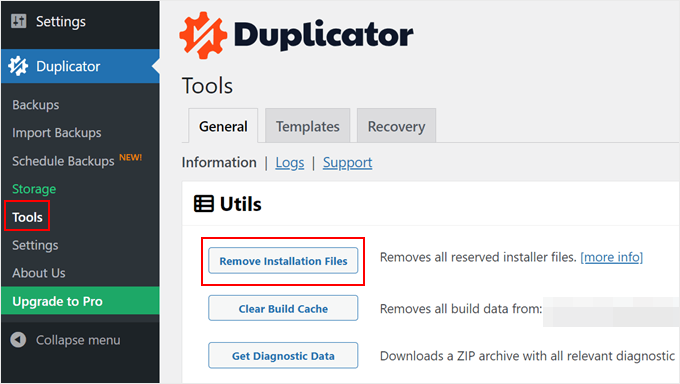
Das war’s, Sie haben erfolgreich eine WordPress-Site geklont.
Ich habe meine WordPress-Website geklont, was kommt jetzt?
Wenn Sie Ihre WordPress-Website erfolgreich geklont haben, sind hier einige Dinge, die Sie als nächstes tun sollten:
- Prüfen Sie mit dieser ultimativen Migrations-Checkliste, ob Sie Ihre Website richtig migriert haben.
- Überprüfen Sie die Permalink-Einstellungen Ihrer geklonten Website.
- Installieren Sie unverzichtbare WordPress-Plugins, um Ihre Website zu erweitern.
- Deaktivieren Sie die Funktionen des Blogs, wenn Sie eine Website ohne Blog betreiben möchten.
- Lesen Sie diese Checkliste für den Start Ihrer Website, bevor Sie Ihre Website veröffentlichen.
- Zeigen Sie eine Vorschau Ihrer Website an, um zu sehen, ob alles funktioniert.
- Aktivieren Sie den Debug-Modus von WordPress, um mögliche Fehler schnell zu beheben.
- Erfahren Sie , wie Sie Speicherplatz freigeben und die Inode-Nutzung reduzieren können, um Ihren Webserver gesund zu erhalten.
- Führen Sie einen Website-Geschwindigkeitstest durch, um festzustellen, ob die Leistung Ihrer Website verbessert werden muss.
Wir hoffen, dass dieser Artikel Ihnen geholfen hat zu lernen, wie Sie Ihre WordPress Website einfach klonen können. Vielleicht interessieren Sie sich auch für unseren Leitfaden zur Verwaltung mehrerer Websites über ein Dashboard und unsere Expertenauswahl der besten Plugins für das WordPress-Aktivitätsprotokoll und die Nachverfolgung.
Wenn Ihnen dieser Artikel gefallen hat, dann abonnieren Sie bitte unseren YouTube-Kanal für WordPress-Videotutorials. Sie können uns auch auf Twitter und Facebook finden.


Dennis Muthomi
This step-by-step guide was extremely helpful! I followed the tutorial to clone my existing WordPress site to a new server with a different host. Everything went smoothly except I ran into an SSL issue initially on the cloned site. However, after contacting my new host’s support team, they were able to resolve the SSL problem quickly. Thanks so much for providing such a clear and valuable walkthrough
WPBeginner Support
Glad our guide could help you
Admin
Dan
Hi, I have done this however upon completing the Install and clicking the admin button, it takes me back to the original domain page prior to a WordPress Install. I’ve double checked the process and I don’t think I’ve missed any steps?
It just appears that everything was wiped (just an original WP install) but the duplicate file hasn’t been installed?
WPBeginner Support
Your domain is pointing to your original host. You can either change your hosts file to see the cloned site or point your domain to the new host location. For moving your site to a new domain, we would recommend taking a look at our article below:
https://www.wpbeginner.com/wp-tutorials/how-to-properly-move-wordpress-to-a-new-domain-without-losing-seo/
Admin
Martin Page
I have followed your instructions and uploaded the 2 files to an otherwise empty file but when i go to the site/installer.php I get a 404 page.
My FileZilla screen loos exactly like your example.
Any suggestions?
Thanks
WPBeginner Support
You would want to visit the duplicator plugin’s FAQ page and they cover the different troubleshooting steps for that error.
Admin
Rene Young
Thanks. I did that and I have successfully completed creating the clone. I have a question about the step to install the database in the new location (Step 2 of 4 – Install Database): The screen shot shows a choice between “Basic” and “cPanel” but you don’t discuss this.
WPBeginner Support
In this tutorial, we went with Basic
Admin
Rene Young
I could not complete Step 2. I do get warnings in Duplicator, under Paths:
“If the root WordPress path is not writable by PHP on some systems this can cause issues.
If Duplicator does not have enough permissions then you will need to manually create the paths above.”
WPBeginner Support
You would want to either follow our guide below for updating your file permissions:
https://www.wpbeginner.com/beginners-guide/how-to-fix-file-and-folder-permissions-error-in-wordpress/
Or you can reach out to your hosting provider for assistance with the folder permissions.
Admin
Sue
I’m trying to clone a demo site I’m making for people to use as a template. Using Duplicator I’ve created the package, gone into File Manager of CPanel and navigated to the root directory for the subdomain I’m testing it on, and uploaded the zip file and installer file. There is nothing else in the folder.
When I follow the instructions and go to the website address with installer.php added to the end, I do not get the Duplicator import info. I get a Page Not Found….though it does have the header, footer and top menu of the site I’m cloning. What did I do wrong?
WPBeginner Support
If you are using the same domain then you are likely still looking at the old site and not the new one, if you reach out to your hosting provider, they can normally assist with setting up a temporary domain that you can use.
Admin
Tarık Hacıalioğulları
Thank you very much, this saved me so much time. It worked very good!!!
WPBeginner Support
You’re welcome
Admin
saad
Everything s clear thank you but what about login and password to WordPress dashboard can we duplicate ?
WPBeginner Support
It copies your users table so it would transfer your user and password over for you.
Admin
Kara
I’m having a bit of trouble with step 4. With my Hostgator account I don’t have access to my server panel but when I try to add the file via an FTP client, I’m under able to find the folder containing the installer.php. Am I missing something? Could the file name be different or could someone tell me where exactly to put the zip file?
WPBeginner Support
You would want to reach out to your hosting provider and they would be able to assist
Admin
ed
HI there, what if i have paid plugins and themes specific for 1 wordpress site
Will it still work ? Thanks alot, your tutorial so far is the easiest to follow
WPBeginner Support
You would want to reach out to the support for those tools for how they handle that.
Admin
Emma
What do you do when there is a size check notice? Limit is 500mb and my site is 1.32gb uncompressed. Not sure how to compress. It is recommending a 2 part install manually from c panel which is sadly beyond my tech abilities.
WPBeginner Support
You would want to reach out to your hosting provider’s support and they should be able to assist
Admin
Dominique
uploaded zip and installer script to root and i am getting this message when i enter domain.com/installer.php
403 Forbidden
Request forbidden by administrative rules.
What next?
WPBeginner Support
There are a few different options you can try, for a starting point, you would want to take a look at our article below:
https://www.wpbeginner.com/wp-tutorials/how-to-fix-the-403-forbidden-error-in-wordpress/
Admin
Loz Bigrave
Great article, worked like a charm.
WPBeginner Support
Thank you, glad our article was helpful
Admin
Derek
I’ve successfully copied across to a new URL and the cloned website seems to be working. However, when I go into wordpress it’s a reduced version with quite a few tabs missing such as: users/plugins/settings to name a few. How can I get a full version of wordpress the same as the site I copied from?
WPBeginner Support
You may want to ensure you are logged in as an admin user on your cloned site as the most likely reason for that issue.
Admin
Adi
How do you change the name of the website, the url and also the database when installing the cloned site using Duplicator?
WPBeginner Support
To do that, you would want to take a look at our article here:
https://www.wpbeginner.com/wp-tutorials/how-to-properly-move-wordpress-to-a-new-domain-without-losing-seo/
Admin
diana
Hi, I have a question , can a clone my site without erased the other one , i mean the original website ?
WPBeginner Support
Yes, cloning your site does not remove the original
Admin
Todd Murray
This is a great post. Just one clarification before I run the import…on STEP 4, these are the instructions:
No matter where you are copying the files, you need to make sure that the folder is completely empty and has no other files or folders inside it except installer.php file and your backup zip file.
If I already have a theme and started building a site before finding this article, do I need to delete everything from the destination? “folder completely empty” refers to which folder?
Thanks!
Todd
WPBeginner Support
If you want to duplicate a site from elsewhere then you would need to remove what is currently there for your site.
Admin
Christie Bellah
Been using this article for years. Thanks so much!
WPBeginner Support
You’re welcome, glad our guide has been so helpful
Admin
Alexandre
You were right, I didn’t put in the root folder :/
So I tried again, but in the end, I got an error 404 result.
I’ve fixed the wp_config (name, user, pw & host) and made the changes to the htaccess (copied the NEW .htaccess).
All files are deleted, besides the now unzipped folder which contain all the files. *what about the __MACOSX folder? I tried with and without, but get the same result.
Even after this, in Step 4, I still get the 2 warnings in the General Notices:
wp-config not found
wp-config.php not found.
I found the wp-config.php, but seem like I don’t have the wp-config. Are they the same?
Anything else missing?
Thank you
WPBeginner Support
The macosx you don’t need, the wp-config files should be the same. For moving from the subfolder if the original site is still available you would likely want to go through the steps in: https://www.wpbeginner.com/wp-tutorials/how-to-get-rid-of-wordpress-from-your-wordpress-site-url/
Admin
Alexandre
I end up on a “Index of” page showing the file in my sub folder. Anyone know why?
Thanks
WPBeginner Support
You likely installed your WordPress site in the subfolder rather than the root folder for your site.
Admin
Alexandre
Sorry, forgot to say. If I type in the full path on my web browser, I have a loading time, but end up on a white page.
Thanks
WPBeginner Support
If you are getting that white screen you may want to try the recommendations in our article here: https://www.wpbeginner.com/wp-tutorials/how-to-fix-the-wordpress-white-screen-of-death/
JanysF
Does anyone know why the Packages option under Duplicator » Packages isn’t showing for me? I only see under Duplicator: Tools, Settings, and Go Pro.
WPBeginner Support
You may want to try reinstalling the plugin and if that doesn’t work you would want to reach out to the plugin’s support and let them know about that not appearing properly
Admin
ouiouiphoto
Cloning works well with duplicator but having a clone site online seems not to be liked by jetpack
During my tests Jetpack have put himselt in failure on the original site even if jetpack was not active one the cloned site telling me the original was a copy of the clone
If google find your clone you have also some possible issues
WPBeginner Support
While there is a problem with simply cloning a site without any new content, the primary goal would normally be to use this when transferring your site from one location to another and then removing the old site or using the copied site as a template and adding new content to your new site.
Admin
Bidmead
For some inexplicable reason, when I save this useful page to Pocket, what actually arrives there is the old 11 May 2015 version, which discusses a completely different method based on a plugin called BackupBuddy which costs $52 for the 1-site version.
—
Chris
WPBeginner Support
We’ll certainly take a look if it is something on our end. You may want to check with Pocket if there is a cache that needs to be cleared on their end as well
Admin
Chris Bidmead
I’ve been in touch with Pocket. They suggest it might be a problem with their Parser, which checks the content and determines the best way to display it. They’ve managed to reproduce the bug and are investigating.
—
Chris
Gary Andrews
I wand to upgrade my production site to WP 5 and change themes. I thought it might be a good idea to clone my site on my local windows machine under Desktop Server.
I’ve been trying for 2 days to clone my site.
Let me just add that your tuto is perfectly straightforward as long as things go well. It doesn’t go into what might not work correctly.
Firstly Duplicator package creation times out (despite having filtered out the big files). Of course my hosting company doesn’t support Duplicator because it tries to change the time limit, can’t really blame the host company.
I also tried the Duparchive option which doesn’t time out and generates a .daf archive instead of a .zip.
On the Desktop Server local side I tried to run installer.php from my browser but got messages saying I needed to enable ziparchive and/or shell exec. I contacted Desktop Server support about that and have had no answer.
I thought I’d try to extract the data from the daf archive manually but the software that is needed to do this no longer seems to be available.
I imagine that the Duplicator Pro version would work better but I don’t have the budget (association website).
Oh woe is me, looks like I’ll have to do it all by hand.
WPBeginner Support
From the sound of it you sadly may need to manually import/export the data, the other option would be if you have a backup of your site that you could restore to your local installation.
Admin
Adam
Awesome article!!!
Followed your steps and it worked perfectly.
I did make one error though, I extracted the zip file and uploaded the files in ftp which did create errors. Much easier to simply upload the zip instead.
Thanks heaps!
WPBeginner Support
You would likely need to extract the zip once it is on your hosting provider but glad you found a solution for your error
Admin
Donna Lutheran
I copy sites all the time.
The plugins actually look more complicated than doing it manually.
Just download your files, back up your database, ftp to the new server, restore your database to your new database, edit the wp-config file to point to the new database, edit the url in your database to point to the new url.
I also download velvet blue to correct any url problems.
I had a site not pass our security scan that used the plugin. Also, the database back up was stored in the root of your site.
James Cook
I used a much simpler way. My WP installation is with Godaddy…so logged in the cPanel of the site I wanted to cloned…went to subdomains and created the domain for the site destination…then I went to applications and the top of cPanel and clicked the little check box next the primary site I wanted to clone…then hit the clone button…and voila…and exact copy of our site was created in less than 10 minutes…
Indusekar S K
Is there any plugin or other software that could clone a wordpress website to another wordpress on the live?
Mark C
The price for this is riduculous. Even the cheapest option is $80 PER YEAR! What an absolute rippoff!
Better off just going to Control Panel, zipping up your files and download them … then go to PHPMyAdmin and downloading a copy of your database. Then upload your zipped files to the new location…edit the config file, then import the database.
If that’s too hard for website retards … just install the free version of “Duplicate” (similar to Backup Buddy … but FREE).
Carlos A. B. S.
You’re right man, no need to spend a dime on such a a simple task…
Felisha
Either of you have a step by step guide? I am trying to copy my site to a subdomain to target a different city from the main site.
The only thing I understand so far is that I have to:
1. create a subdomain
2. create a new database
3. copy the public html folder of the main site over to the subdomain pubic html folder
After that, every tutorial I’ve seen on the internet gets too confusing
Jerri
What are you talking about? Duplicator is free. I mean, there’s a pro version, but I use the free version all the time to duplicate websites.
The only thing these instructions didn’t add is that you need to first create a new database and add a user to it on the new site before running the installer.
But it’s all easy and free.
Lipa
thx a lot !!! ;]
Mack
Can i copy someone’s site page to my site??
Allan Seabrook
Hi,
I really appreciate all the posts you share with us! Please keep them coming!
My question regarding this post is…
This technique using BackupBuddy works flawlessly.
However, I now have a problem:
When I type in the URL of my original site (where I took the backup), I get directed to the site I cloned from that backup. It’s as if my original site now has a redirect to the cloned site.
What on earth have I broken?
Any advice would be much appreciated!
Thanks,
Allan
Stephen
Check your DNS record. That would be one of the only ways this would happen.
Jonathan
Thanks! Worked perfect!
Mamun sarkar
Hi,
I would like to know how to clone any wordpress website have no hosting access information as well. I mean, suppose a buyer order your wpbeginner like website. Then, How to do it sir. Do you have any tutorials plz.
Hanna
not possible anymore to use backup buddy unless you want to pay. Is their a different method?
Nelson
Duplicator is perfect.
sandeep
i want to copy the theme of running website to another website…
Moses
Hi Sandeep,
Did you get solution to this. I also want to copy a theme to another website(subdomain)
Chris
I’ve used another service to clone WordPress sites and have discovered a problem with residual tables, and I was curious whether this was an issue with BackupBuddy as well.
In the scenario I recently encountered, I create WP Site A with table prefix wp1_.
Then I have to create a new environment to clone to, so I install WordPress at WP Site B with table prefix wp2_.
Now I use my [unnamed] tool to clone site A to site B, which appears good on the admin and public side but when I look in the database I have both wp1_ and wp2_ sets of tables, and all of the GUIDs in the functioning tables for the new cloned site have WP Site A’s URL, not WP Site B’s as I would have expected.
These have to be cleaned up manually. So I wonder, does BackupBuddy do the same thing? Is this to be expected?
WPBeginner Support
BackupBuddy’s sales/support team can probably answer this better.
Admin
Andrew Lopez
I’d be curious to know how to manually perform this task without a plugin or is a plugin recommended for backing up and migrating over to a new website?
Dave Navarro
BackupBuddy fails on large WordPress installs. I can’t get it to back up our site which between database all files is over 400GB in size.
I had to manually download all of the files, then re-upload them to the new site and use importbuddy with just the database. Even that fails if the raw database is too large (failed around 200MB in size).
Nitin
wonderful technique but there is use of another plugin
Gf
I recently moved a small simple blog with all-in-one wordpress migration and it worked great. But when I attempted a larger site on wp4.1 it failed. I think I would like back up buddy but the price is staggering. It would be my biggest wordpress expense, almost twice as much as my hosting!
Jean
I love using BackupBuddy for backups and migrations.
All you need is access to install the plugin and your set to move.
Great article!
johnraf
I used to have similar problems too, but after using
“long path tool” You can use to solve this problem.
yaser
How about if we want to clone a website that we have no backend access? Is there an easy way?
fletch
Do you have ftp access? Do you have access to the database? You would need those two things to backup a website if you don’t have access to wp-admin.