Möchten Sie den Stil des WordPress-Kommentarformulars auf Ihrer Website ändern? Bei WPBeginner haben wir jahrelang mit verschiedenen Möglichkeiten experimentiert, um das Engagement der Benutzer zu steigern, und wir haben festgestellt, dass ein gut aussehendes, benutzerfreundliches Kommentarformular einen großen Unterschied machen kann.
Kommentare spielen eine wichtige Rolle für das Engagement der Benutzer auf einer Website. Wenn Sie es Benutzern leicht machen und optisch ansprechend gestalten, Kommentare zu hinterlassen, fördern Sie mehr Diskussionen und Interaktionen auf Ihrer Website.
In diesem Artikel zeigen wir Ihnen, wie Sie das WordPress-Kommentarformular einfach gestalten können, um das Engagement auf Ihrer Website zu steigern.
Bevor Sie anfangen
WordPress-Themes steuern das Erscheinungsbild Ihrer Website. Jedes WordPress-Theme enthält mehrere Dateien, darunter Vorlagendateien, Funktionsdateien, JavaScripts und Stylesheets.
Stylesheets enthalten die CSS-Regeln für alle von Ihrem WordPress-Theme verwendeten Elemente. Sie können Ihr eigenes benutzerdefiniertes CSS hinzufügen, um die Stilregeln Ihres Themes außer Kraft zu setzen.
Wenn Sie dies noch nicht getan haben, lesen Sie unseren Artikel über das Hinzufügen von benutzerdefiniertem CSS in WordPress für Anfänger.
Abgesehen von CSS müssen Sie möglicherweise auch einige Funktionen hinzufügen, um das Standardaussehen Ihres WordPress-Kommentarformulars zu ändern. Wenn Sie dies noch nicht getan haben, lesen Sie bitte unseren Artikel über das Kopieren und Einfügen von Code in WordPress.
Werfen wir also einen Blick darauf, wie das WordPress-Kommentarformular gestaltet werden kann.
Da es sich um einen recht umfassenden Leitfaden handelt, haben wir zur leichteren Navigation ein Inhaltsverzeichnis erstellt:
- Styling WordPress Comment Form Using SeedProd Theme Builder
- Change WordPress Comments with Default CSS Classes
- Adding Social Login to WordPress Comments
- Adding Comment Policy Text in WordPress Comment Form
- Move Comment Text Field to Bottom
- Remove Website (URL) Field from WordPress Comment Form
- Add a Subscribe to Comments Checkbox in WordPress
- Add Custom Fields to WordPress Comment Form
Gestaltung des WordPress-Kommentarformulars mit SeedProd Theme Builder
Diese Methode erfordert SeedProd, das beste WordPress-Plugin für Seiten- und Themenerstellung auf dem Markt.
Sie wird für Anfänger ohne Programmierkenntnisse empfohlen. Der Nachteil dieser Methode ist jedoch, dass sie Ihr bestehendes WordPress-Theme durch ein benutzerdefiniertes Theme ersetzt.
Zunächst müssen Sie das SeedProd-Plugin installieren und aktivieren. Weitere Details finden Sie in unserer Schritt-für-Schritt-Anleitung für die Installation eines WordPress-Plugins.
Hinweis: Sie benötigen mindestens den PRO-Tarif, um auf die Theme-Builder-Funktion zugreifen zu können.
Nach der Aktivierung müssen Sie Vorlagen für Ihr benutzerdefiniertes WordPress-Theme erstellen. Mit SeedProd können Sie diese Vorlagen ganz einfach mit einem der integrierten Themes erstellen.
Detaillierte Anweisungen finden Sie in unserem Tutorial zur Erstellung eines benutzerdefinierten WordPress-Themes ohne Programmierkenntnisse.
Sobald Sie Ihre Themes-Templates erstellt haben, müssen Sie auf den Link „Design bearbeiten“ unter dem Template „Einzelbeitrag“ klicken.
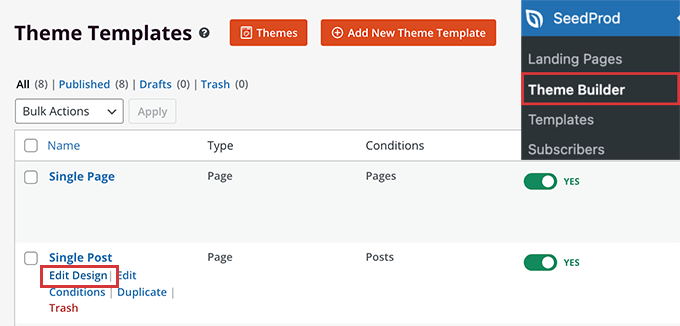
Dadurch wird die Vorschau eines einzelnen Beitrags in der Oberfläche des SeedProd-Theme-Builders geladen. Unten in der Vorschau sehen Sie den Block mit dem Kommentarformular.
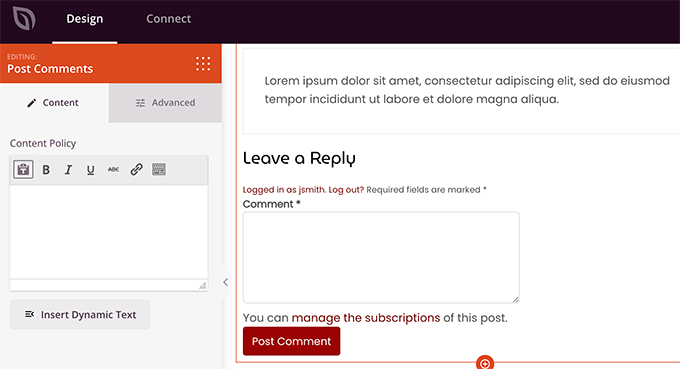
Klicken Sie einfach auf das Kommentarformular und Sie sehen dessen Eigenschaften im linken Bereich.
Von hier aus können Sie einen Kommentar oder eine Datenschutzerklärung hinzufügen. Sie können auch zum Tab ‚Erweitert‘ wechseln, um den Stil des Kommentarformulars zu bearbeiten, ohne CSS-Code zu schreiben.
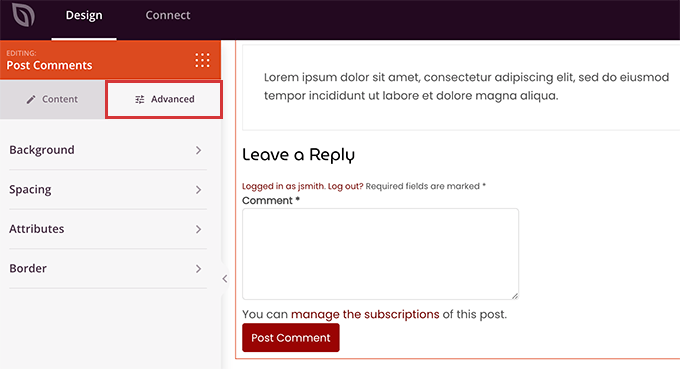
Wenn Sie fertig sind, vergessen Sie nicht, auf den Button „Speichern“ zu klicken, um Ihre Änderungen zu veröffentlichen.
Mit SeedProd können Sie den Stil eines jeden Elements auf Ihrer Website ganz einfach ändern, ohne Code schreiben zu müssen.
Es handelt sich jedoch um einen Theme-Builder, und vielleicht verwenden Sie bereits ein WordPress-Theme, das Ihnen gefällt. In diesem Fall helfen Ihnen die folgenden Tipps, die Stile der Kommentarformulare in WordPress manuell zu ändern.
Ändern des Stils des Kommentarformulars in WordPress
In den meisten WordPress-Themes gibt es eine Vorlage namens comments.php. Diese Datei wird verwendet, um Kommentare und Kommentarformulare in Ihren Blogbeiträgen anzuzeigen. Das WordPress-Kommentarformular wird mit der folgenden Funktion erstellt: <?php comment_form(); ?>.
Standardmäßig generiert diese Funktion Ihr Kommentarformular mit drei Textfeldern (Name, E-Mail und Website), einem Textfeld für den Kommentartext, einem Kontrollkästchen für die Einhaltung der DSGVO und dem Submit-Button.
Sie können jedes dieser Felder leicht ändern, indem Sie einfach die Standard-CSS-Klassen anpassen. Nachstehend finden Sie eine Liste der Standard-CSS-Klassen, die WordPress jedem Kommentarformular hinzufügt.
1 2 3 4 5 6 7 8 9 10 11 12 13 14 15 16 17 18 | #respond { }#reply-title { }#cancel-comment-reply-link { }#commentform { }#author { }#email { }#url { }#comment#submit.comment-notes { }.required { }.comment-form-author { }.comment-form-email { }.comment-form-url { }.comment-form-comment { }.comment-form-cookies-consent { }.form-allowed-tags { }.form-submit |
Durch einfaches Anpassen dieser CSS-Klassen können Sie das Aussehen Ihres WordPress-Kommentarformulars komplett verändern.
Versuchen wir nun, ein paar Dinge zu ändern, damit Sie sich ein Bild davon machen können, wie das funktioniert.
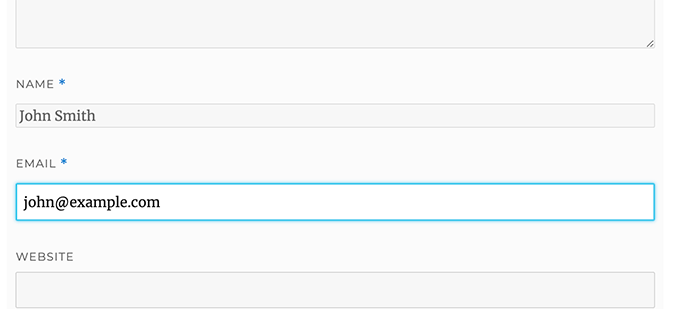
Wir beginnen damit, das aktive Formularfeld hervorzuheben. Durch die Hervorhebung des aktiven Feldes wird Ihr Formular für Menschen mit besonderen Bedürfnissen zugänglicher und sieht auch auf kleineren Geräten besser aus.
1 2 3 4 5 6 7 8 9 10 11 12 13 14 15 16 17 18 19 20 21 22 23 24 25 26 | #respond {background: #fbfbfb;padding:0 10px 0 10px;}/* Highlight active form field */#respond input[type=text], textarea { -webkit-transition: all 0.30s ease-in-out; -moz-transition: all 0.30s ease-in-out; -ms-transition: all 0.30s ease-in-out; -o-transition: all 0.30s ease-in-out; outline: none; padding: 3px 0px 3px 3px; margin: 5px 1px 3px 0px; border: 1px solid #DDDDDD;}#respond input[type=text]:focus,input[type=email]:focus,input[type=url]:focus,textarea:focus {box-shadow: 0 0 5px rgba(81, 203, 238, 1);margin: 5px 1px 3px 0px;border: 2px solid rgba(81, 203, 238, 1);} |
So sieht unser Formular im WordPress-Theme Twenty Sixteen nach den Änderungen aus:
Mit diesen Klassen können Sie das Verhalten von Text in Eingabefeldern ändern. Wir werden fortfahren und den Textstil der Felder „Autorenname“ und „URL“ ändern.
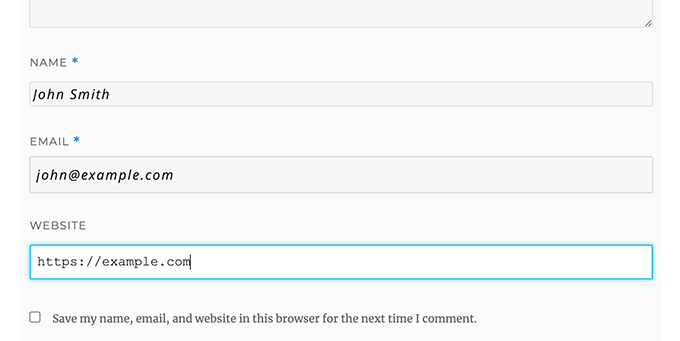
1 2 3 4 5 6 7 8 9 10 11 | #author, #email {font-family: "Open Sans", "Droid Sans", Arial;font-style:italic;color:#1d1d1d;letter-spacing:.1em;} #url {color: #1d1d1d;font-family: "Luicida Console", "Courier New", "Courier", monospace;} |
Wenn Sie sich den Screenshot unten genau ansehen, sehen Sie, dass die Schriftart des Namens und des E-Mail-Feldes anders ist als die der Website-URL.
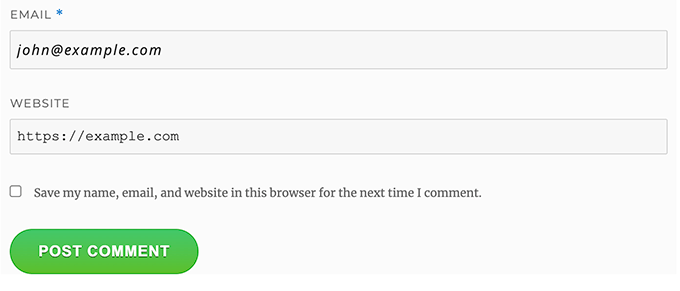
Sie können auch den Stil des WordPress-Buttons zum Abschicken des Kommentarformulars ändern. Anstatt den Standard Submit Button zu verwenden, geben wir ihm einen CSS3 Farbverlauf und einen Box-Schatten.
1 2 3 4 5 6 7 8 9 10 11 12 13 14 15 16 17 18 19 20 21 22 23 24 25 26 27 28 29 30 31 32 33 34 | #submit {background:-moz-linear-gradient(top, #44c767 5%, #5cbf2a 100%);background:-webkit-linear-gradient(top, #44c767 5%, #5cbf2a 100%);background:-o-linear-gradient(top, #44c767 5%, #5cbf2a 100%);background:-ms-linear-gradient(top, #44c767 5%, #5cbf2a 100%);background:linear-gradient(to bottom, #44c767 5%, #5cbf2a 100%);background-color:#44c767;-moz-border-radius:28px;-webkit-border-radius:28px;border-radius:28px;border:1px solid #18ab29;display:inline-block;cursor:pointer;color:#ffffff;font-family:Arial;font-size:17px;padding:16px 31px;text-decoration:none;text-shadow:0px 1px 0px #2f6627;} #submit:hover {background:-webkit-gradient(linear, left top, left bottom, color-stop(0.05, #5cbf2a), color-stop(1, #44c767));background:-moz-linear-gradient(top, #5cbf2a 5%, #44c767 100%);background:-webkit-linear-gradient(top, #5cbf2a 5%, #44c767 100%);background:-o-linear-gradient(top, #5cbf2a 5%, #44c767 100%);background:-ms-linear-gradient(top, #5cbf2a 5%, #44c767 100%);background:linear-gradient(to bottom, #5cbf2a 5%, #44c767 100%);background-color:#5cbf2a;}#submit:active {position:relative;top:1px;} |
WordPress-Kommentarformulare auf die nächste Stufe heben
Sie werden vielleicht denken, dass das zu einfach war. Nun, wir müssen damit anfangen, damit jeder mitkommen kann.
Sie können Ihr WordPress-Kommentarformular jedoch auf die nächste Stufe heben, indem Sie Formularfelder neu anordnen, soziale Anmeldungen, Kommentarabonnements, Kommentarrichtlinien, Schlagwörter und mehr hinzufügen.
Social Login zu WordPress-Kommentaren hinzufügen
Beginnen wir mit dem Hinzufügen von Social Logins zu WordPress-Kommentaren.
Als Erstes müssen Sie das Super Socializer-Plugin installieren und aktivieren. Weitere Details finden Sie in unserer Schritt-für-Schritt-Anleitung für die Installation eines WordPress-Plugins.
Nach der Aktivierung müssen Sie Super Socializer “ Social Login besuchen und dann das Kästchen „Enable Social Login“ ankreuzen.

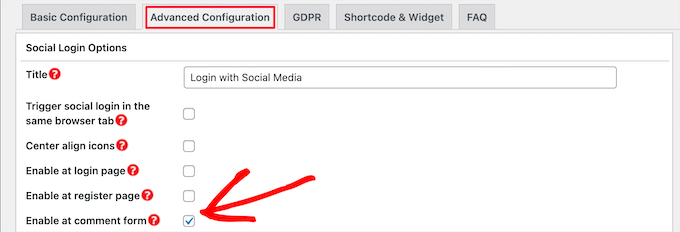
Daraufhin wird das Panel mit den Optionen für die soziale Anmeldung angezeigt. Klicken Sie zunächst auf die Registerkarte „Erweiterte Konfiguration“.
Vergewissern Sie sich dann, dass das Kästchen „Bei Kommentarformular aktivieren“ markiert ist.
Klicken Sie anschließend auf die Registerkarte „Grundkonfiguration“. Hier können Sie die sozialen Netzwerke auswählen, die Sie hinzufügen möchten, indem Sie die Kästchen im Abschnitt „Soziale Netzwerke auswählen“ markieren.

Darunter benötigt das Plugin API-Schlüssel, um sich mit sozialen Plattformen zu verbinden. Klicken Sie einfach auf das „Fragezeichen“-Symbol, um die Anweisungen aufzurufen, wie Sie diese für jede Plattform erhalten.

Wenn Sie fertig sind, klicken Sie auf die Schaltfläche „Änderungen speichern“, um Ihre sozialen Anmeldeeinstellungen zu speichern.
Sie können nun Ihre Website besuchen, um die Buttons für die Anmeldung bei sozialen Netzwerken über Ihrem Kommentarformular zu sehen.

Hinzufügen von Text zur Kommentarrichtlinie vor oder nach dem Kommentarformular
Wir freuen uns über alle unsere Nutzer und schätzen es sehr, dass sie sich ein paar Minuten Zeit nehmen, um einen Kommentar auf unserer Website zu hinterlassen. Um eine gesunde Diskussionsumgebung zu schaffen, ist es jedoch wichtig, Kommentare zu moderieren.
Um vollständige Transparenz zu gewährleisten, haben wir eine Seite mit Kommentarrichtlinien eingerichtet, aber Sie können diesen Link nicht einfach in die Fußzeile setzen.
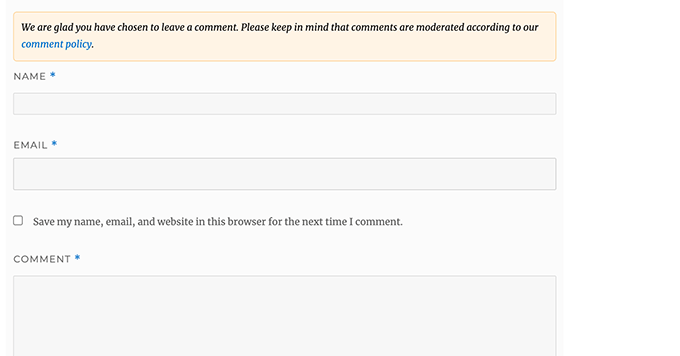
Wir wollten, dass unsere Kommentarrichtlinien für alle Benutzer, die einen Kommentar hinterlassen, deutlich sichtbar sind. Deshalb haben wir beschlossen, die Kommentarrichtlinien in unser WordPress-Kommentarformular aufzunehmen.
Wenn Sie eine Seite mit Kommentarrichtlinien hinzufügen möchten, müssen Sie zunächst eine WordPress-Seite erstellen und Ihre Kommentarrichtlinien festlegen (Sie können unsere Seite übernehmen und sie an Ihre Bedürfnisse anpassen).
Danach können Sie den folgenden Code in die Datei functions.php Ihres Themes oder ein Code Snippets Plugin einfügen.
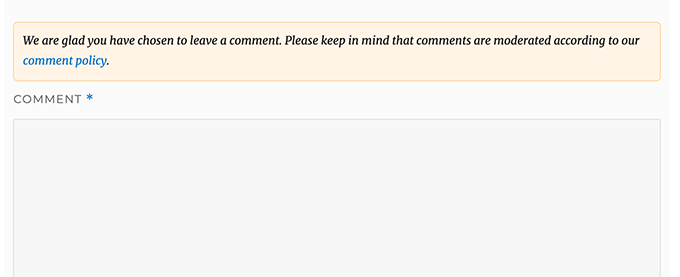
1 2 3 4 5 6 | function wpbeginner_comment_text_before($arg) { $arg['comment_notes_before'] .= '<p class="comment-policy"">We are glad you have chosen to leave a comment. Please keep in mind that comments are moderated according to our <a href="http://www.example.com/comment-policy-page/">comment policy</a>.</p>'; return $arg;}add_filter('comment_form_defaults', 'wpbeginner_comment_text_before'); |
Der obige Code ersetzt das Standard-Kommentarformular vor Notizen durch diesen Text. Wir haben auch eine CSS-Klasse in den Code eingefügt, so dass wir den Hinweis mit CSS hervorheben können. Hier ist das von uns verwendete CSS-Beispiel:
1 2 3 4 5 6 7 8 9 | p.comment-policy { border: 1px solid #ffd499; background-color: #fff4e5; border-radius: 5px; padding: 10px; margin: 10px 0px 10px 0px; font-size: small; font-style: italic;} |
So sah es auf unserer Testseite aus:
Wenn Sie den Link nach dem Textbereich des Kommentars anzeigen möchten, verwenden Sie den folgenden Code.
1 2 3 4 5 6 | function wpbeginner_comment_text_after($arg) { $arg['comment_notes_after'] .= '<p class="comment-policy"">We are glad you have chosen to leave a comment. Please keep in mind that comments are moderated according to our <a href="http://www.example.com/comment-policy-page/">comment policy</a>.</p>'; return $arg;}add_filter('comment_form_defaults', 'wpbeginner_comment_text_after'); |
Vergessen Sie nicht, die URL entsprechend zu ändern, damit sie zu Ihrer Seite mit den Kommentarrichtlinien und nicht zu example.com führt.
Kommentar-Textfeld an den unteren Rand verschieben
Standardmäßig zeigt das WordPress-Kommentarformular zuerst den Textbereich für den Kommentar und dann die Felder für den Namen, die E-Mail und die Website an. Diese Änderung wurde in WordPress 4.4 eingeführt.
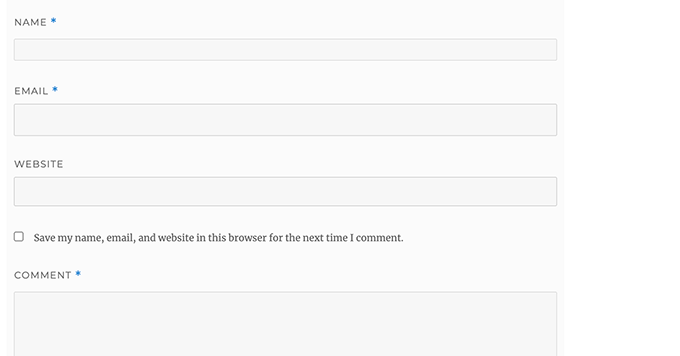
Zuvor wurden auf WordPress-Websites zuerst die Felder Name, E-Mail und Website angezeigt und dann das Textfeld für den Kommentar. Wir waren der Meinung, dass unsere Nutzer daran gewöhnt sind, das Kommentarformular in dieser Reihenfolge zu sehen, daher verwenden wir auf WPBeginner immer noch die alte Feldreihenfolge.
Wenn Sie das möchten, müssen Sie nur den folgenden Code in die Datei functions.php Ihres Themes oder in ein Code Snippets Plugin einfügen.
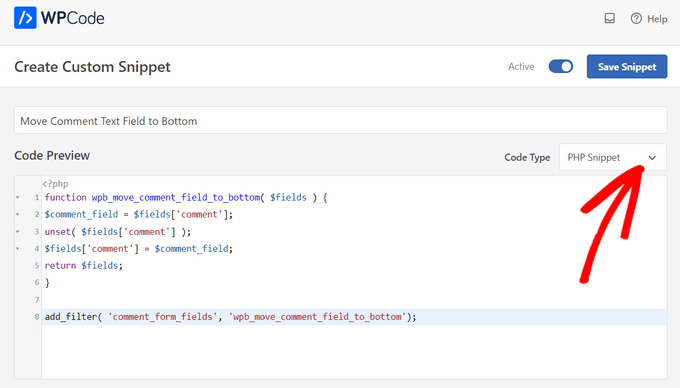
1 2 3 4 5 6 7 8 | function wpb_move_comment_field_to_bottom( $fields ) {$comment_field = $fields['comment'];unset( $fields['comment'] );$fields['comment'] = $comment_field;return $fields;}add_filter( 'comment_form_fields', 'wpb_move_comment_field_to_bottom'); |
Wir empfehlen immer, Code in WordPress mit einem Code-Snippets-Plugin wie WPCode hinzuzufügen. Damit können Sie ganz einfach benutzerdefinierten Code hinzufügen, ohne Ihre functions.php-Datei zu bearbeiten, so dass Sie sich keine Sorgen machen müssen, Ihre Website zu beschädigen.
Um loszulegen, müssen Sie das kostenlose WPCode-Plugin installieren und aktivieren. Anweisungen dazu finden Sie in dieser Anleitung zur Installation eines WordPress-Plugins.
Nach der Aktivierung gehen Sie im WordPress-Dashboard auf Code Snippets “ + Snippet hinzufügen.
Suchen Sie dort die Option „Benutzerdefinierten Code hinzufügen (neues Snippet)“ und klicken Sie darunter auf die Schaltfläche „Snippet verwenden“.

Als Nächstes fügen Sie oben auf der Seite einen Titel für Ihr Snippet ein, der beliebig sein kann, damit Sie sich daran erinnern, wofür der Code ist.
Fügen Sie dann den Code von oben in das Feld „Codevorschau“ ein und wählen Sie „PHP Snippet“ als Codetyp aus der Dropdown-Liste auf der rechten Seite.
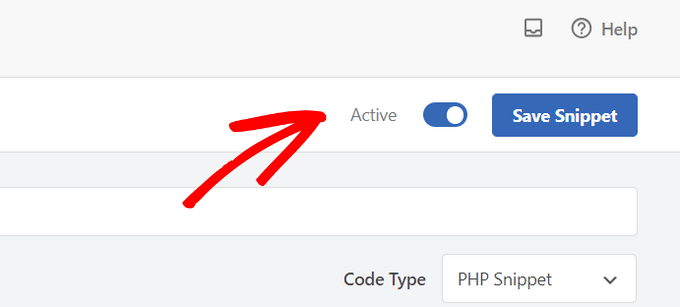
Danach schalten Sie einfach den Schalter von „Inaktiv“ auf „Aktiv“ um und klicken auf die Schaltfläche „Snippet speichern“.
Dieser Code verschiebt einfach das Feld für den Kommentartextbereich nach unten.
Website (URL)-Feld aus WordPress-Kommentarformular entfernen
Das Website-Feld im Kommentarformular lockt viele Spammer an. Das Entfernen dieses Feldes wird Spammer zwar nicht aufhalten oder sogar die Zahl der Spam-Kommentare verringern, aber es wird Sie davor bewahren, versehentlich einen Kommentar mit einem falschen Link zur Autoren-Website zu genehmigen.
Außerdem wird ein Feld aus dem Kommentarformular entfernt, wodurch es einfacher und benutzerfreundlicher wird. Weitere Informationen zu diesem Thema finden Sie in unserem Artikel über das Entfernen des Website-URL-Feldes aus dem WordPress-Kommentarformular.
Um das URL-Feld aus dem Kommentarformular zu entfernen, fügen Sie einfach den folgenden Code in Ihre functions.php-Datei oder ein Code-Snippets-Plugin ein.
1 2 3 4 5 | function wpbeginner_remove_comment_url($arg) { $arg['url'] = ''; return $arg;}add_filter('comment_form_default_fields', 'wpbeginner_remove_comment_url'); |
Sie können die gleichen Schritte wie im vorherigen Abschnitt ausführen, um diesen Code mit dem WPCode-Plugin sicher in WordPress einzufügen.
Hinzufügen einer Checkbox zum Abonnieren von Kommentaren in WordPress
Wenn Nutzerinnen und Nutzer einen Kommentar auf Ihrer Website hinterlassen, möchten sie vielleicht nachverfolgen, ob jemand auf ihren Kommentar geantwortet hat. Durch Hinzufügen eines Kontrollkästchens zum Abonnieren von Kommentaren ermöglichen Sie es den Nutzern, sofortige Benachrichtigungen zu erhalten, wenn ein neuer Kommentar zu einem Beitrag erscheint.
Um diese Checkbox hinzuzufügen, müssen Sie zunächst das Plugin Subscribe to Comments Reloaded installieren und aktivieren. Nach der Aktivierung müssen Sie die Seite StCR “ Comment Form besuchen, um die Einstellungen des Plugins zu konfigurieren.
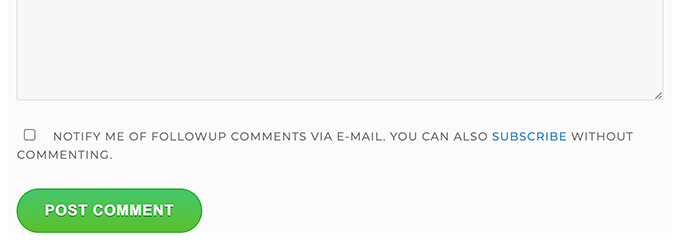
Eine ausführliche Schritt-für-Schritt-Anleitung finden Sie in unserem Artikel über die Möglichkeit, Kommentare in WordPress zu abonnieren.
Zusätzliche Felder zum WordPress-Kommentarformular hinzufügen
Möchten Sie Ihrem WordPress-Kommentarformular zusätzliche Felder hinzufügen? Zum Beispiel ein optionales Feld, in dem Nutzer ihren Twitter-Handle hinzufügen können?
Installieren und aktivieren Sie einfach das WordPress-Plugin „Comments Fields“. Gehen Sie nach der Aktivierung auf die Seite „Kommentar-Felder“ und wechseln Sie auf die Registerkarte „Kommentar-Felder“.
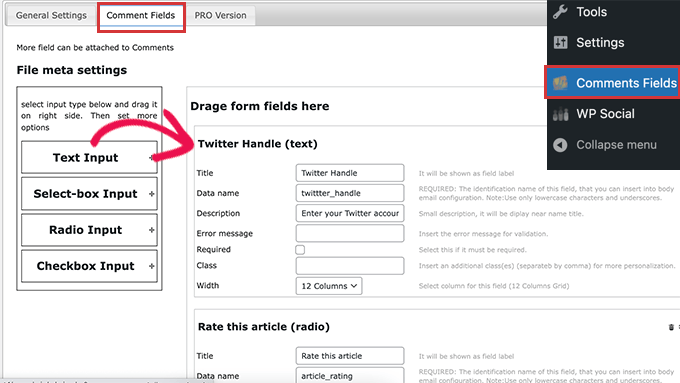
Ziehen Sie einfach ein benutzerdefiniertes Feld per Drag & Drop und geben Sie ihm einen Titel, eine Beschreibung und einen Datennamen.
Wenn Sie die Felder hinzugefügt haben, vergessen Sie nicht, auf die Schaltfläche „Alle Änderungen speichern“ zu klicken.
Sie können jetzt Ihr Kommentarformular anzeigen, um die benutzerdefinierten Felder in Aktionen zu sehen.
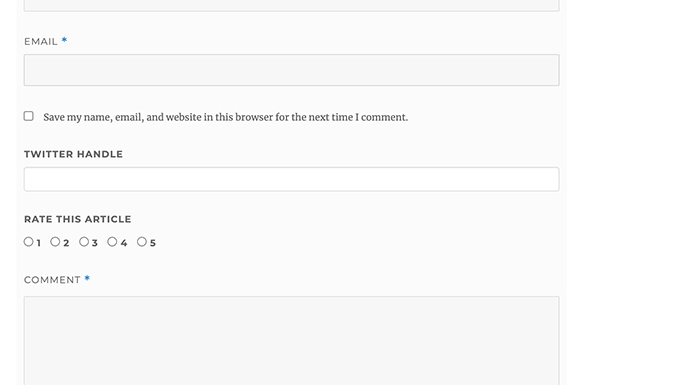
Die benutzerdefinierten Felder werden dann in der Kommentar-Moderation und unter dem Kommentarinhalt angezeigt.
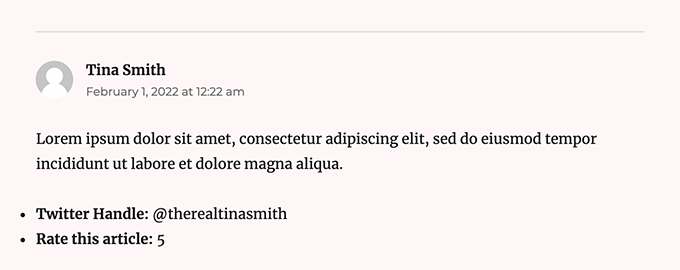
Weitere Details finden Sie in unserem Tutorial über das Hinzufügen von benutzerdefinierten Feldern zum Kommentarformular in WordPress.
Wir hoffen, dass dieser Artikel Ihnen geholfen hat, das WordPress-Kommentarformular so zu gestalten, dass es Ihren Nutzern mehr Spaß macht. Vielleicht interessieren Sie sich auch für unsere Tipps, wie Sie mehr Kommentare zu Ihren WordPress-Blogbeiträgen erhalten, und unsere Expertenauswahl der besten Social-Media-Plugins für WordPress.
Wenn Ihnen dieser Artikel gefallen hat, dann abonnieren Sie bitte unseren YouTube-Kanal für WordPress-Videotutorials. Sie können uns auch auf Twitter und Facebook finden.


tom
Great Article! thanks a lot
WPBeginner Support
You’re welcome
Admin
mobileninja
Thank you so much. It is very helpful article.
WPBeginner Support
Glad it could be helpful
Admin
Emma
Hi. Great tutorial. I wanted to refrain my users from adding their website url to the comment section, because it causes crashes for some users (no idea why). I succeeded, but now it still says the usual „remember my name, e-mail adres and website for the next time I leave a comment“. Do you know how to fix that?
WPBeginner Support
You may want to check with your theme’s support and let them know about the crashing and editing that message.
Admin
WPBeginner Support
Glad our guide could help
Admin
Deepak Bharti
Thanks for sharing this type of article. it is helpful for me and my website.
WPBeginner Support
Glad our article could be helpful
Admin
Rubel Ahmed
Hello
Nice article and I have used some of your suggestions but I found a code error that needs fixing under ‘Adding Comment Policy Text Before or After Comment Form’.
You have placed the add filter within the function or otherwise it won’t get executed, it needs to be moved outside of the function.
Rubel
WPBeginner Support
Both filters should be outside the function but we will certainly take another look and update if we can see the error
Admin
suvo
obviously like your web-site Post Thanks for Shearing. i Read your Blog every day.it very bothersome to tell the reality then again I’ll definitely come back again.Please write more about this topics.
WPBeginner Support
Glad you like our articles
Admin
ARPIT
The Information you’ve provided here is very good. Nice Tutorial. Thanks for sharing. I was looking for a long time for this.It’s really helping me get more familiar with WordPress!
WPBeginner Support
Hi Arpit,
We are glad you found the tutorial helpful.
Admin
Hồ Ngọc Thanh
I can’t find #respond { }
#reply-title { }
#cancel-comment-reply-link { }
#commentform { }
#author { }
#email { }
#url { }
#comment
#submit
in my wordpress theme?
WPBeginner Support
Your theme may have styled it differently, for finding what they are you would want to take a look at our article: https://www.wpbeginner.com/wp-tutorials/basics-of-inspect-element-with-your-wordpress-site/
The # would be for the ID of the object so if something had the ID of button then it would be #button
Admin
Chintan
How to add real-time comment preview?
Paulina
Hello, thank you for this very useful article. I am interested in adding a text before the button „submit“. In the code that you are providing here: would I need to change the words ‚wpbeginner‘ to anything else that is connected to my own site?
Akramul Hasan
Hello Paulina,
You can add text or anything before Submit button by using a simple filter hook that works for comments form fields.
Hena
wow!! It’s very good
Woolker Cherenfant
Hi! Great article as usual. But I am wondering how can I change the word „says“ in the comment section. I want to translate it into Haitian Creole „di“. Any help with that?
Thanks in advance.
—Woolker
Tisha
Is it possible to copy the code to blogger?. Because I want to make WordPress style comment in my Blogger blog. Thanks for your help.
Mate Hodi
Hey!
Great article! I was looking for a solution to change the „Leave a Reply“ part. Do you have any idea how I may change it?
Neeraj
This is a helpful guide which gave thorough guidance to me about Comments Section Optimization.
Kevin Byrnes
Excellent article. I will be facing some of these issues as well..
JP
Hi
I love your tutorials! I still have a question though; is it popular to change the greyish background color of the entire comment form to some thing else? Perhaps even to an image instead of a solid color?
Mahesh
I’m Loving Your Tuts It is very Easy to Understand and More Useful any Where.
Thanks For Sharing Sir.
Lisa Marten
Can I put the comment box to be fill in above the list of posted comments instead of below?
WPBeginner Support
Yes you can.
Admin
SiRetu
Is there any complete tutorial? I mean start from scratch including creating comments.php file from the first time. Thanks, great tutorial as always
Luis Izquierdo
I am customizing my wp themes child theme and I was able to place the policy text above the comment form. But it only shows to logged out users. How do I get it to show to Logged in users?
Luca Morelli
Hello great tutorial: thanks!
I keep improving my knowledge about WordPress thanks to your lessons. I have a question (I don’t know much about php): I managed to add the comment policy text before the submit button, but I noticed that if I click “reply” and see your codes, the php output is inside the paragraph tag together with a class named „commentpolicy“. How did you achieve that (e.g. how to style the php output on an HTML webpage with a tag and a class, which can then be styled with CSS)?
Hopefully I explained it correctly and my question makes sense.
Again many thanks for all your tutorials.
Luca
WPBeginner Support
We are not sure what you are trying to ask. Can you please explain bit more? Thanks.
Admin
Jayanta
I have the same question. Trying to clarify a bit.
I have added your snippet to get the comment policy text before comment field. But This is only some text, no special div class is added for that text. So, I am not able to style it using css (I would like to make the text smaller, or may be put a border-box to it). Please guide us. Hope it makes sense now. Thank you so much.
Erick
How do you make comments look like this website?
gift charles
Thank you very much for this,i was looking for a long time for a way to make the built in comments look better because i prefer them to other services like facebook comments or disqus
Adnan Bashir
As you have noticed, the newest version of WP (4.4) is displaying Name and Email form below Text box, do you have any idea how to revert it to old style (Name and Email box above the Text box) ?
Thanks
WPBeginner Support
Please take a look at How to move comment text field to bottom in WordPress 4.4
Admin
Adnan Bashir
Thank you, now the Comment form is looking better
mario
Hello, great tutorial !
But I’d like to know one more thing: is it possible to add a checkbox for the privacy policy? Since wordpress system collect the ip, I want my users to check teh box before sending the message. Any suggestion ? Thank you !
WPBeginner Support
Please see our article on how to add custom fields to comments form in WordPress.
Admin
Ramon
I would like to have the input comments fields above the comments them self so my customers can leave a comment without the need to scroll all the way down the page.
Is there an easy way to accomplish this?
Thank you.
dragons
Is there any way to ad an EDIT button for the commenters? So they can fix typos and such? Also what if the site wants to allow commenters the ability to upload images in the comments? Is there a way to do that?
Rick Hellewell
Good tutorial. Used it to develop my own customized contact form
plugin, where I re-define the $args for the comment form fields.
But it turns out, while testing, that some themes create their own
‘textarea’ field, which adds to my ‘textarea’ field, resulting in two
comment text fields. Not good.
I have set my add_filter( ‘comment_form_default_fields’…. with a
higher priority (99) so that it happens later in the ‘page build’ (after
the theme does it’s comment_form_default_fields), but the duplicates
comment text boxes are still there. Also tried a priority of 8, and that
didn’t do it either.
So, can you think of a generic (works for any theme) that can
determine if the comment field has already been defined? And, if the
duplicate is found, remove the one in the theme, so I can replace it
with mine?
I understand that the problem is caused by bad coding practices on the theme, but would like to find a workaround.
Thanks….Rick…
Larisa Frolova
Thank you!
I’ve searched the forums and Google for this, but I’m still a little confused as to what to do. If I just want to change the LOCATION of the comment/reply link that appears on posts, how do I do that? It’s not that I want to make it invisible, or change the wording – I just want it to be at the bottom of a post, not at the top.
How do I go about doing that for the Twenty-Twelve theme?
Mikael
I like this layout!
lflier
Very helpful!
I’m really liking the Disqus comment system you’re now using. It’s slick and very inviting. I find myself leaving more comments on sites using Disqus.
But I’m discouraged from using it on my own site by the lack of integration with BuddyPress activity stream. So the more I can do to streamline the native WordPress comment system and make it as inviting as Disqus, the better. Thanks again for your tutorial.
Therese
Thank you so much for all this! It’s really helping me get more familiar with WordPress!
I’ve got the social media logins, I’ve got the border sorted, but now I am totally stuck in trying to find *where* to edit the font for the comment box’s individual boxes.
I can’t figure it out.
Can you please tell me where exactly to find that? You don’t specify this clearly enough in the tutorial.
WPBeginner Support
Please see how we changed fonts for #author and #url input fields in the article. To change font in the comment box you can use something like this:
#comment {font-family:arial,verdana,sans-serif;font-size:16px;}1-click Use in WordPress
Admin
JG
how do I add a required checkbox people have to tick before the form gets submitted? I have tried adding the field in via adding a field under add_filter(‚comment_form_default_fields,) while the field shows the form can still be submitted without ticking the box.
Jewel
Thank you a lot…
Bhushan
I’m trying
Ann
I read through your tutorial… and was wondering if it can be applied to a WordPress site that has a Genesis Framework and Child theme. I am using the Epic Child theme by the way. Thanks for your help.
WPBeginner Support
Yes some parts of the tutorial can be directly applied to your child theme. For CSS styling you need to over ride your childtheme’s CSS.
Admin
Jonathan
Any idea how to place those checkboxes for Subcribe to Comments and other plugins so that they appear above the Submit button? Is there a way define where wordpress would normally include those items?
WPBeginner Support
if you are using Subscribe to comments plugin then you can place
<?php show_subscription_checkbox(); ?>in your templates where you want the subscription checkbox to appear.Admin
Jeff Hilron
Im trying to figure out how to get the round avatars.
Editorial Staff
Here is a tutorial for you:
https://www.wpbeginner.com/wp-themes/how-to-display-round-gravatar-images-in-wordpress/
Admin
Ravinder
Nice Tutorial. the information you have provided here is very good. I was searching for it from a while. Thanks for sharing.
mohib
This is a wonderfull tuturial, „Click here to cancel repley“ i want ot chage this name, but not found any way, would you pls help me ?
Mike Lee
Hi, your tutorial is so wonderful and i would like to ask how to make the comment form appear under the specific comment when clicking the ‚Reply‘ word of that coment.
Thanks
Editorial Staff
This happens by default in the WordPress theme when you allow threaded comments. WordPress loads comment-reply.min.js. If your theme is not loading that, then you need to load it.
Admin
Jae
I have the Elegant Tonight theme on my WordPress, and I have my dashboard-settings-discussion set to: Enable threaded (nested) comments 3 levels deep. So, I should be seeing threaded comments, but I am not. WordPress doesn’t seem to be loading comment-reply.min.js. Where in my comments.php theme do I add this? And do I add exactly that, or in some other coding format? Thank you for any advice!
Editorial Staff
Hey Jae,
Elegant themes staff is better equipped to answer that question because we are not very familiar with that theme. When you pay for Elegant Themes, you also get access to their support.
Robo Ek
Helpful article once again from you. Maybe you should change your name. Even professionals would find your tutorial useful
Adrian Robertson
Another nice tutorial from you guys, time and time again when I can’t remember how to do something I end up on your site.
Great work!
Mattia
Hi guys thanks a lot. Just a question: which is the difference between and . With this last one, your adivecs don’t work!
Mattia
sorry the output deleted my question: difference between „comment_form“ and „comment_template“…
Editorial Staff
No problem. So comments_template is a function that loads the template used to display comments. It loads the comments.php file by default however you can use another file if you have a customized version. The comments.php file usually contains the code to load all the comments, and it also contains the function comment_form. The commnent_form function outputs the actual comment form (name, email, website, message, submit button, etc).
Hope that helped clear things up
Admin
Mattia
It did. Thanks
Sue Kearney
I’m loving all of this juicy input, some of which I’ve shamelessly lifted from what you do. I’m about halfway done. Check it out here: http://goo.gl/8r9uO
Thanks again!
Ernice Gilbert
Hello, how do I add a reply button in the comments box just like yours to my wordpress site? It is a plugin or tweaking of code?
Thanks.
Editorial Staff
Hey Ernice,
It is not a plugin. We are using the same technique showed in this article. Instead of using background color, we are using the background image property of CSS.
Admin
Rifat Bin Sharif
In my wordpress theme, I just noticed that in comment area there is a word “says‘ but I couldn’t find it in comments.php file. How to remove this text?
Thanks
Colin Crawford
Hi Nice article and I have used some of your suggestions but I found a code error that needs fixing under ‚Adding Comment Policy Text Before or After Comment Form‘.
You have placed the add filter within the function or otherwise it won’t get executed, it needs to be moved outside of the function.
Colin
Editorial Staff
Fixed it
Admin
Gaelyn
All wonderful suggestions. Now, how do you change the word „responses“ to „comment“ and make it more prominent. On Suffusion theme. Thanks.
Editorial Staff
Edit your comment.php file in the theme to make the change.
Admin
Umer Rock
I just want to add a Image just right on Comment Box, How i can, for example this is a screenshot of comment box : http://oi48.tinypic.com/2itrket.jpg
Editorial Staff
You could probably use the filters shown in the article and CSS to make it look like that.
Admin
Umer Rock
Ok. Thank you, let me consider again on article. well i am not expert with CSS.