Die DSGVO der Europäischen Union erfordert eine ausdrückliche Zustimmung, bevor Benutzerdaten gespeichert werden, und Ihr WordPress-Abschnitt für Kommentare bildet da keine Ausnahme.
Viele Benutzer von WordPress haben sich gefragt, wie sie ihre Abschnitte für Kommentare DSGVO-konform machen können. Zum Glück haben wir DSGVO-konforme Kommentare auf zahlreichen WordPress Websites implementiert und zeigen Ihnen genau, wie es geht.
In diesem Artikel zeigen wir Ihnen, wie Sie ein GDPR-Kontrollkästchen für den Datenschutz zu Ihrer WordPress-Website hinzufügen können.
Warum ein Kommentar Datenschutz Opt-in Checkbox in WordPress hinzufügen?
Die allgemeine Datenschutzverordnung (GDPR) soll den EU-Bürgern mehr Kontrolle über ihre persönlichen Daten geben.
Als dieses Gesetz eingeführt wurde, änderte es die Herangehensweise vieler Organisationen an den Datenschutz. Weitere Informationen zu diesem Thema finden Sie in unserem ultimativen Leitfaden für WordPress und die Einhaltung der GDPR.
Wenn Sie die DSGVO nicht einhalten, können Sie zu einer Geldstrafe oder sogar zu einer Gefängnisstrafe verurteilt werden. Deshalb ist es wichtig, dass Sie Ihre Website DSGVO-konform gestalten, auch Ihr Kommentar-Formular.
Ein Kommentarformular sammelt persönliche Informationen von Besuchern, einschließlich ihrer Namen, E-Mail-Adressen und optional Website-URLs. WordPress speichert diese Informationen auch in einem Browser-Cookie, so dass die Informationen des Autors des Kommentars in Zukunft automatisch ausgefüllt werden können.
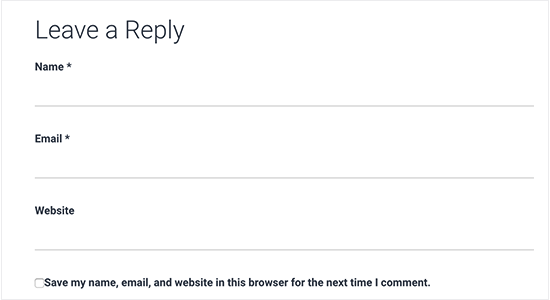
Standardmäßig zeigt das WordPress-Kommentarformular ein Kontrollkästchen für den Datenschutz an.
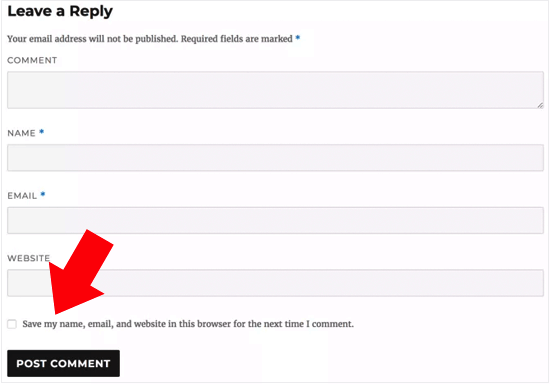
Wenn Sie dieses Kontrollkästchen auf Ihrer Website jedoch nicht sehen, ist es möglicherweise von Ihrem WordPress Theme deaktiviert.
Ähnliche Beiträge: Erzeugen von DSGVO-konformen Kontaktformularen in WordPress
Wie man das Opt-in-Kontrollkästchen für den Kommentarschutz in WordPress aktiviert
Bevor Sie Ihre eigene Datenschutzbox für Kommentare erstellen, sollten Sie prüfen, ob Ihr Theme diese Funktion bereits integriert hat.
Prüfen Sie zunächst, ob Ihr Theme und der WordPress-Kern auf dem neuesten Stand sind, indem Sie auf Dashboard ” Updates gehen.
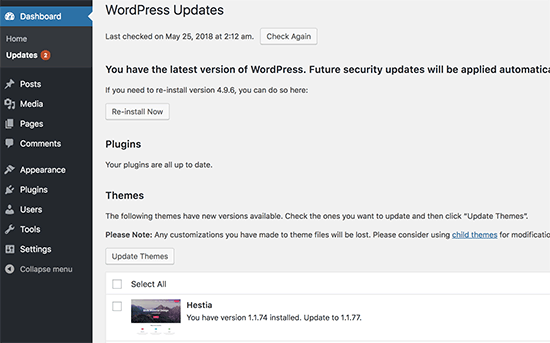
Wenn Aktualisierungen verfügbar sind, installieren Sie sie einfach. Wenn Sie Hilfe benötigen, lesen Sie bitte unseren Leitfaden für die sichere Aktualisierung von WordPress.
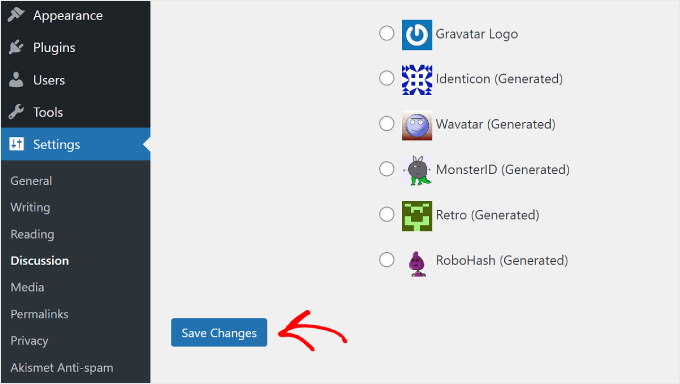
Gehen Sie danach auf Einstellungen ” Diskussion und scrollen Sie zu “Andere Kommentareinstellungen”. Aktivieren Sie hier das Kontrollkästchen neben “Opt-in-Kontrollkästchen für Kommentar-Cookies anzeigen….”.

Klicken Sie dann einfach auf “Änderungen speichern”, um Ihre Einstellungen zu speichern.
Jetzt können Sie Ihre WordPress-Website besuchen, um zu sehen, ob diese Änderungen das fehlende Cookie-Zustimmungs-Kontrollkästchen hinzugefügt haben.
Wenn Sie auf dem neuesten Stand sind und das Kontrollkästchen für den Datenschutz bei Kommentaren immer noch nicht sehen können, dann bedeutet dies, dass Ihr Theme das Standard-WordPress-Kommentarformular außer Kraft setzt.
Wir empfehlen daher, den Entwickler des Themes zu bitten, dieses Problem zu beheben, indem Sie ein Support-Ticket eröffnen. Ratschläge finden Sie in unserem Leitfaden für die richtige Anfrage an den WordPress-Support.
Eine andere Möglichkeit besteht darin, das Kontrollkästchen für den Kommentarschutz selbst in Ihr WordPress-Theme einzufügen. Es gibt verschiedene Möglichkeiten, dies zu tun. Verwenden Sie die unten stehenden Links, um direkt zu der gewünschten Methode zu gelangen:
Methode 1: Verwenden Sie das Thrive Comments Kommentarformular (empfohlen)
Am einfachsten fügen Sie ein Kontrollkästchen für den Datenschutz bei Kommentaren hinzu, indem Sie Ihr aktuelles Kommentarformular durch das von Thrive Comments ersetzen.
Thrive Comments ist ein Plugin für WordPress-Kommentare, das mit einer Vielzahl von Funktionen ausgestattet ist, um das Engagement für Kommentare zu erhöhen. Neben einem anpassbaren Kommentarformular bietet das Plugin auch Funktionen zum:
- Erlauben Sie Benutzern, Kommentare zu mögen und abzulehnen
- Funktionen oder Begraben von WordPress Kommentaren
- Umleitung von Kommentaren zu einem anderen Blog-Beitrag, nachdem sie einen Beitrag veröffentlicht haben
Der Grund, warum diese Methode am einfachsten ist, liegt darin, dass Sie nicht am Code in Ihren Theme-Dateien herumfummeln müssen, um die Checkbox hinzuzufügen. Sie müssen lediglich das Plugin installieren und die DSGVO-Funktion aktivieren, und das war’s.
Allerdings gibt es keine kostenlose Version des Plugins, so dass es sich wie eine Investition anfühlen kann. Sie können mehr über Thrive Comments in unserem Thrive Themes Test erfahren.
Der erste Schritt besteht darin, Thrive Comments zu installieren. Um dies zu tun, können Sie auf die Website von Thrive Themes gehen und einen bezahlten Plan erhalten.

Melden Sie sich dann einfach an, um zum Dashboard Ihres Kontos zu gelangen.
Klicken Sie auf dieser Seite auf “Herunterladen und Installieren des Thrive Product Manager Plugins”.
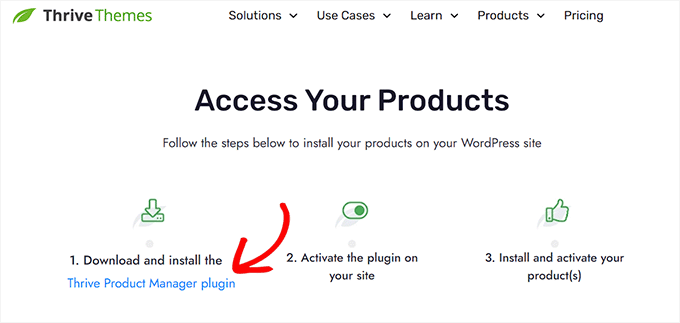
Jetzt müssen Sie nur noch das Thrive Product Manager Plugin auf Ihrer WordPress Website installieren. Weitere Details finden Sie in unserer Anleitung zur Installation eines WordPress Plugins.
Als Nächstes gehen Sie einfach von Ihrem WordPress-Administrationsbereich auf die Seite Produktmanager und klicken auf “In mein Konto einloggen”.
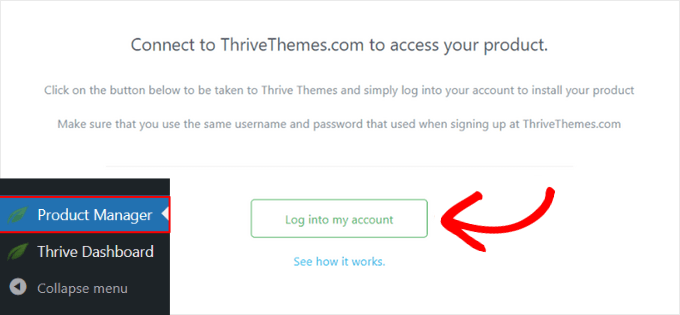
Sie befinden sich nun im Thrive Product Manager Dashboard.
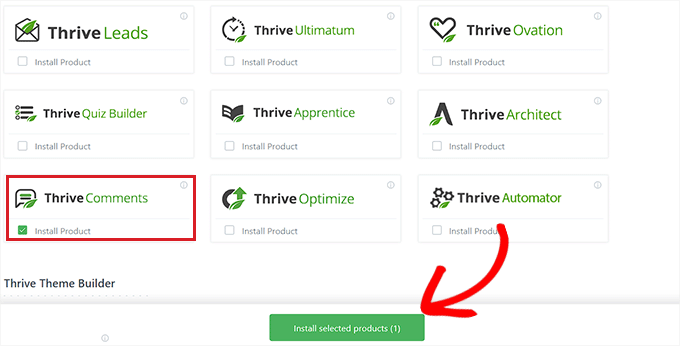
Wählen Sie an dieser Stelle Thrive Comments aus. Klicken Sie dann auf den Button “Ausgewählte Produkte installieren”.
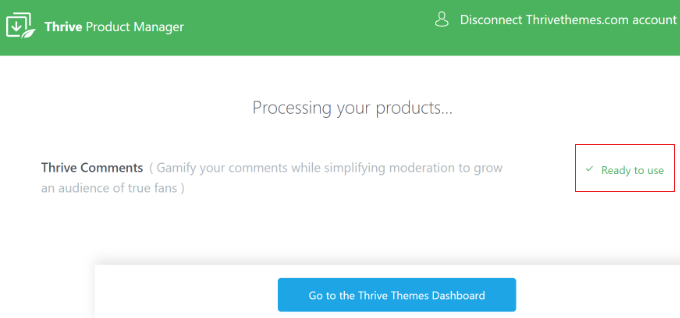
Wenn die Installation abgeschlossen ist, wird die Meldung “Bereit zur Verwendung” angezeigt.
Klicken Sie einfach auf den Button “Zum Thrive Themes Dashboard gehen” am unteren Rand.
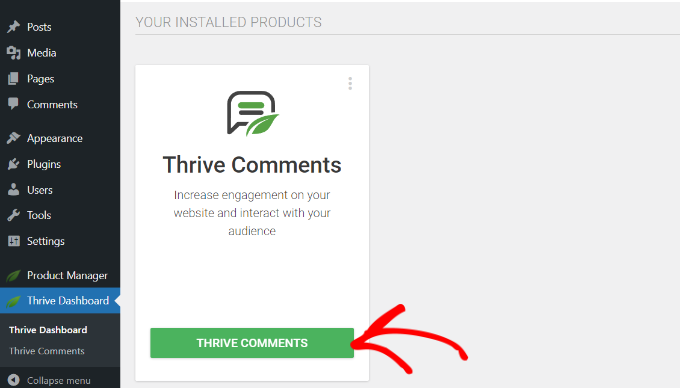
Sie sehen nun alle Ihre installierten Plugins in der Suite.
Klicken Sie auf den Button “Thrive Comments”, um das Plugin zu verwenden.
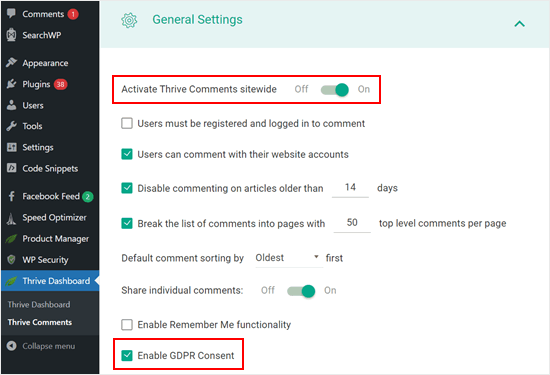
Öffnen Sie auf der nächsten Seite das Menü “Allgemeine Einstellungen”.
Aktivieren Sie dann den Abschnitt Thrive Comments für Ihre gesamte Website und setzen Sie ein Häkchen in die Box “DSGVO-Zustimmung aktivieren”.
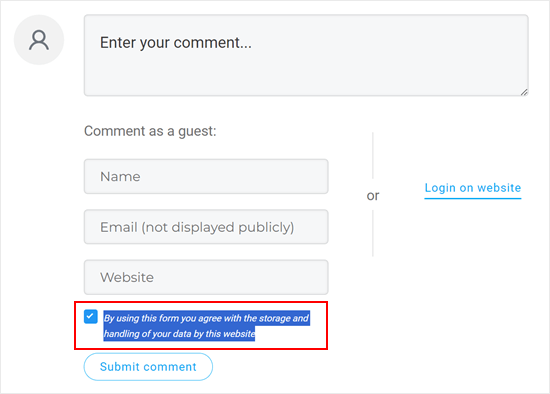
Danach können Sie eine Vorschau Ihres Abschnitts mit den Kommentaren anzeigen.
Wie Sie sehen können, wurde das Standard-Kommentarformular ersetzt und es gibt jetzt ein Zustimmungs-Kontrollkästchen, das besagt: “Durch die Verwendung dieses Formulars erklären Sie sich mit der Speicherung und Verarbeitung Ihrer Daten durch diese Website einverstanden”.
Das war’s schon. Sie können auch gerne mit anderen Einstellungen von Thrive Comments herumspielen, um Ihren Abschnitt für Kommentare weiter zu verbessern.
So können Sie beispielsweise Benutzern erlauben, WordPress-Kommentare zu abonnieren und sie über Antworten auf ihre Kommentare zu benachrichtigen.
Wir verstehen, wenn Sie das Gefühl haben, dass es übertrieben ist, ein kostenpflichtiges Plugin für Kommentare zu verwenden, nur um dieses eine Kontrollkästchen hinzuzufügen.
In diesem Fall empfehlen wir, die nächsten beiden Methoden auszuprobieren. Beide erfordern eine individuelle Programmierung, aber wir führen Sie durch den Prozess, damit Sie das Datenschutz-Kontrollkästchen auch dann erfolgreich hinzufügen können, wenn Sie keine Erfahrung mit der Programmierung haben.
Hinweis: Bevor Sie die nachstehenden Anleitungen befolgen, empfehlen wir Ihnen dringend, eine Sicherungskopie Ihrer Website zu erstellen, für den Fall, dass unerwartete Fehler auftreten. Sie können ein Backup-Plugin wie Duplicator verwenden.
Methode 2: Hinzufügen einer DSGVO-Checkbox zu Ihrem WordPress Theme mit Code
Diese Methode sollte für die meisten WordPress Themes funktionieren. Außerdem bleiben der Formularstil und das Layout Ihres Themes intakt.
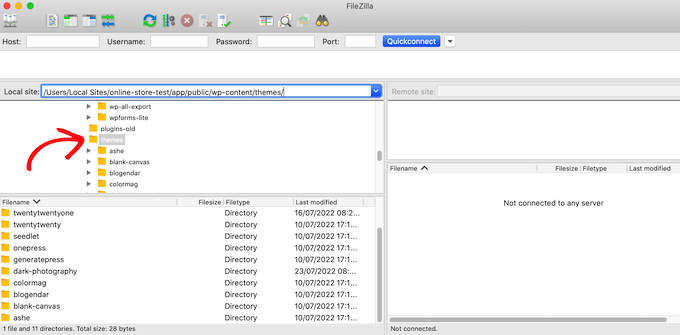
Zunächst müssen Sie sich mit einem FTP-Client wie FileZilla mit Ihrer WordPress-Website verbinden, oder Sie können den Dateimanager Ihres WordPress-Hosting-CPanels verwenden. Wenn Sie ein SiteGround-Kunde sind, können Sie den Dateimanager im Dashboard der Site Tools verwenden.
Wenn Sie FTP zum ersten Mal verwenden, lesen Sie bitte unsere vollständige Anleitung, wie Sie sich mit Ihrer Website per FTP verbinden.
Sobald Sie verbunden sind, müssen Sie zu /wp-content/themes/ gehen und den Ordner für Ihr aktuelles WordPress-Theme öffnen.
Sie müssen den Code finden, der das Standard-WordPress-Kommentarformular außer Kraft setzt. Normalerweise finden Sie diesen Code in der Datei comments.php oder functions.php in Ihrem Theme-Ordner.
Nachdem Sie eine dieser Dateien geöffnet haben, suchen Sie nach Code, der den Filter comment_form_default_fields enthält. Themes verwenden diesen Filter, um das Standard-WordPress-Kommentarformular außer Kraft zu setzen.
Er enthält Zeilen für alle Felder Ihres Kommentarformulars. Jedes Theme ist anders, aber hier ist ein Beispiel für den Code, nach dem Sie suchen:
1 2 3 4 5 6 7 8 9 10 11 12 13 14 15 16 17 18 19 20 21 22 23 24 25 26 27 28 29 | $comments_args = array( // change the title of send button 'label_submit'=> esc_html(__('Post Comments','themename')), // change the title of the reply section 'title_reply'=> esc_html(__('Leave a Comment','themename')), // redefine your own textarea (the comment body) 'comment_field' => ' <div class="form-group"><div class="input-field"><textarea class="materialize-textarea" type="text" rows="10" id="textarea1" name="comment" aria-required="true"></textarea></div></div>', 'fields' => apply_filters( 'comment_form_default_fields', array( 'author' =>'' . '<div><div class="input-field">' . '<input class="validate" id="name" name="author" placeholder="'. esc_attr(__('Name','themename')) .'" type="text" value="' . esc_attr( $commenter['comment_author'] ) . '" size="30"' . $aria_req . ' /></div></div>', 'email' =>'' . '<div><div class="input-field">' . '<input class="validate" id="email" name="email" placeholder="'. esc_attr(__('Email','themename')) .'" type="email" value="' . esc_attr( $commenter['comment_author_email'] ) . '" size="30"' . $aria_req . ' /></div></div>', 'url' =>'' . '<div class="form-group">'. '<div><div class="input-field"><input class="validate" placeholder="'. esc_attr(__('Website','themename')) .'" id="url" name="url" type="text" value="' . esc_attr( $commenter['comment_author_url'] ) . '" size="30" /></div></div>', ) ), ); comment_form($comments_args); ?> |
In diesem Code werden Sie feststellen, dass der Filter comment_form_default_fields verwendet wird, um die Felder author, email und URL zu ändern.
Es zeigt jedes Feld in folgendem Format an:
1 2 | 'fieldname' => 'HTML code to display the field','anotherfield' => 'HTML code to display the field', |
Jetzt fügen wir das Feld für das Ankreuzen des Datenschutzes am Ende des Codeblocks vor der Zeile comment_form($comments_args); ?> hinzu.
So sollte der Code jetzt aussehen, aber Sie können den Code auch einfach kopieren und aus // einfügen. Jetzt fügen wir unseren neuen Datenschutz-Kontrollkästchen-Opt-in-Kommentar hinzu:
1 2 3 4 5 6 7 8 9 10 11 12 13 14 15 16 17 18 19 20 21 22 23 24 25 26 27 28 29 30 31 32 33 34 | $comments_args = array( // change the title of send button 'label_submit'=> esc_html(__('Post Comments','themename')), // change the title of the reply section 'title_reply'=> esc_html(__('Leave a Comment','themename')), // redefine your own textarea (the comment body) 'comment_field' => ' <div class="form-group"><div class="input-field"><textarea class="materialize-textarea" type="text" rows="10" id="textarea1" name="comment" aria-required="true"></textarea></div></div>', 'fields' => apply_filters( 'comment_form_default_fields', array( 'author' =>'' . '<div><div class="input-field">' . '<input class="validate" id="name" name="author" placeholder="'. esc_attr(__('Name','themename')) .'" type="text" value="' . esc_attr( $commenter['comment_author'] ) . '" size="30"' . $aria_req . ' /></div></div>', 'email' =>'' . '<div><div class="input-field">' . '<input class="validate" id="email" name="email" placeholder="'. esc_attr(__('Email','themename')) .'" type="email" value="' . esc_attr( $commenter['comment_author_email'] ) . '" size="30"' . $aria_req . ' /></div></div>', 'url' =>'' . '<div class="form-group">'. '<div><div class="input-field"><input class="validate" placeholder="'. esc_attr(__('Website','themename')) .'" id="url" name="url" type="text" value="' . esc_attr( $commenter['comment_author_url'] ) . '" size="30" /></div></div>', // Now we will add our new privacy checkbox opt-in 'cookies' => '<p class="comment-form-cookies-consent"><input id="wp-comment-cookies-consent" name="wp-comment-cookies-consent" type="checkbox" value="yes"' . $consent . ' />' . '<label for="wp-comment-cookies-consent">' . __( 'Save my name, email, and website in this browser for the next time I comment.' ) . '</label></p>', ) ), ); comment_form($comments_args); ?> |
Nachdem Sie diese Änderung vorgenommen haben, speichern Sie die Datei und laden Sie sie wieder auf Ihr WordPress-Hosting-Konto hoch.
Wenn Sie fertig sind, können Sie Ihren WordPress-Blog besuchen, um die Änderungen in Aktion zu sehen.
Methode 3: Ersetzen Sie das Kommentarformular Ihres Themes durch das Standard-Formular von WordPress
Bei dieser Methode wird einfach das Kommentarformular Ihres Themes durch das Standard-WordPress-Kommentarformular ersetzt.
Diese Methode kann das Aussehen des Kommentarformulars verändern und ist daher nicht die beste Methode, wenn Sie den Stil und das Layout des Formulars beibehalten möchten. Nachdem Sie diese Änderung vorgenommen haben, können Sie Ihr Kommentar-Formular jedoch jederzeit mit individuellem CSS gestalten.
Wie bei der vorhergehenden Methode müssen Sie sich zunächst per FTP mit Ihrem Server verbinden oder den Dateimanager Ihres Hosts öffnen.
Danach öffnen Sie die Datei comments.php und suchen nach einer Zeile mit der Funktion comment_form(). Ihr Theme hat ein definiertes Argument, eine Funktion oder eine Vorlage, mit der es das benutzerdefinierte Kommentarformular Ihres Themes lädt. Die comment_form-Zeile wird etwa so aussehen:
1 | <?php comment_form( custom_comment_form_function() ); ?> |
Sie müssen diese durch die folgende Zeile ersetzen:
1 | <?php comment_form(); ?> |
Speichern Sie anschließend Ihre Änderungen.
Wenn Sie nun Ihre Website besuchen, sehen Sie das Standard-WordPress-Kommentarformular mit dem Kontrollkästchen für den Datenschutz bei Kommentaren.
Bonustipp: Verbessern Sie die Einhaltung der DSGVO mit MonsterInsights und WPConsent
Die Aktivierung einer Checkbox für den Datenschutz bei Kommentaren ist eine Möglichkeit, Ihre Website GDPR-konformer zu machen. Wenn Sie andere Daten sammeln und sicherstellen wollen, dass Ihre Website die GDPR einhält, dann empfehlen wir die Installation von MonsterInsights.
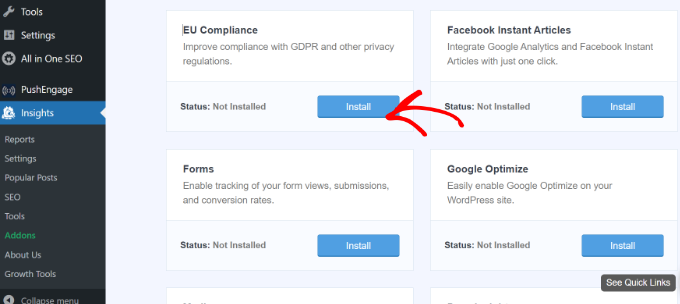
MonsterInsights ist ein Plugin, das es einfach macht, Ihre Website mit Google Analytics zu verbinden. Darüber hinaus verfügt es über ein EU-Compliance-Add-on, damit Ihr Tracking der GDPR entspricht.
Damit wartet MonsterInsights auf die Zustimmung des Nutzers, seine Aktivitäten zu verfolgen, anstatt dies zu tun, sobald er auf Ihrer Seite ankommt.
Für weitere Informationen über MonsterInsights lesen Sie bitte unsere Rezension zu MonsterInsights.
Ein weiteres wichtiges Werkzeug für die Einhaltung der DSGVO ist WPConsent, das die Cookie-Zustimmung auf Ihrer gesamten Website verwaltet. Es ist eines der besten Plugins für die Einhaltung der DSGVO in WordPress auf dem Markt.
Dieses Plugin scannt automatisch Ihre gesamte WordPress-Installation, um Cookies von Skripten von Drittanbietern, zentralen Funktionen von WordPress und Plugins zu erkennen, und findet sogar versteckte Cookies, von denen Sie vielleicht nichts wissen.
Nach der Erkennung können Sie automatisch ein individuelles Cookie-Einwilligungs-Popup erstellen, das verhindert, dass diese Skripte die Aktivitäten der Benutzer verfolgen, solange keine ausdrückliche Berechtigung erteilt wird.

Die Verwendung von MonsterInsights und WPConsent zusammen mit der Checkbox für den Datenschutz bei Kommentaren erstellt ein umfassendes System zur Einhaltung der DSGVO, das sowohl Sie als auch Ihre Benutzer schützt.
Wir hoffen, dass dieser Artikel Ihnen geholfen hat zu erfahren, wie Sie das DSGVO-Kontrollkästchen für den Datenschutz bei Kommentaren in WordPress hinzufügen können. Vielleicht interessieren Sie sich auch für unseren Leitfaden für Anfänger zum Moderieren von WordPress-Kommentaren und unseren Artikel darüber, wie Sie Benutzern erlauben, unangemessene WordPress-Kommentare zu melden.
Wenn Ihnen dieser Artikel gefallen hat, dann abonnieren Sie bitte unseren YouTube-Kanal für WordPress-Videotutorials. Sie können uns auch auf Twitter und Facebook finden.


Kris
What I just don’t understand or maybe I am missing something, is how to put the Privacy Policy checkbox as in what you have on your comments. Something like, “by using this form you agree to us collecting and storing data as per our privacy policy. Nobody seems to have this information – just the usual comment checkbox which is straight forward to do.
WPBeginner Support
If I understand what you’re looking to do, you can change the text by editing the text on line 29 in our code above that currently has ‘Save my name, email, and website in this browser for the next time I comment.’ when replacing, ensure you keep the single quotes.
Admin
Stephen Ho
Thank!
mike carpenter
Got this working and checked that the cookie was being created as expected, but when I browse away from the blog page and then return to it, I expected the form values to be pre-populated with the values stored in the cookie, but this doesn’t happen and the fields are left blank! I think I assumed that the line $commenter = wp_get_current_commenter(); and subsequent lines esc_attr( $commenter[‘comment_author_url’] ) etc. would retrieve the stored field values from the cookie. Have I missed something, or am I msundersatding the way the checkbox is supposed to work?
Sefket
Do you have one for contact forms?
WPBeginner Support
Hi Sefket,
Please see our article on how to create GDPR compliant forms in WordPress.
Admin
Tara
I normally find great info on your site, but I have to speak up and say in this case, this is not accurate to be ready for GDPR, you need get consent to save their data for the comment/email/name/ip etc in your website database, whether or not they choose to save their details in a cookie for faster commenting at a later time.
I used css to hide this checkmark and installed a GDPR plugin, unfortunately now that plugin is not prompting people that they have to checkmark to leave their comment, so now we are losing comments. What’s also frustrating is that it appears for all users with no option to show only for EU. Another frustration is that with hiding the wordpress added checkmark, now the users do not see “your comment is awaiting moderation”.
parijatak ayurveda
Thanks for the sharing of information.
Mirko
What if I don’t want the commenters to store a cookie with their personal data at all? Is there a way to deactivate the whole process and to hide this cookie consent for good?
Uphoria
What if the code is there in my theme already? It’s still not showing up, but it has each of the fields there.
Peter
Thx for the guide,
but everything described doesn’t seem to be possible, if it’s a wordpress.com page (free/no plan).
There is no updating and there is nothing in the settings to add an opt-in check box or any other specific code. The only thing in the settings, that implies a possibility to achieve GDPR-compliance is to add a short info, that data will be provided to and stored at automaticc with a link to their privacy disclaimer. Furthermore, plug-ins and access via ftp can not be used.
—
Any suggestions on how to include an opt-in check box for users who only use the free wordpress.com solution?
Or is it not even needed due to the fact that user access to the web space is only possible via the rather limited wordpress configuration page – or due to any other means?
WPBeginner Support
Hi Peter,
Please reach out to WordPress.com support, they will be able to help you better.
Admin
Bryan
Hello, I was able to add this in my theme and it works, but there is one problem. I check consent box. Next time, my name and email are filled in, but I have to check consent box again. In default WP theme, if I check remember name, email fields box once, next time it comes checked by default. Is there problem with my theme or this code can be improved?
Jim
Hey there! Great instruction! I am trying to get some sites GDPR compliant as well.
I was wondering about Genesis websites, I couldn’t find this code in either comments.php OR functions.php so I first tried loading the code from Method 1 in via Simple Hooks after the comment form then I used the code you gave to Mateja in my functions.php. Both gave me a checkbox but… is it supposed to do anything else? Is there somewhere that I can see whether a commenter has checked this box? Thanks in advance for any help.
Jim
Elisa
Unfortunately I cannot apply any of the mentioned solutions as none of the CSS can be found. Contacted the comoany I got my theme from, hope they can help.
Alexander
Hi,
I was not helped by Method 1 and Method 2.
I could not find the code I needed to edit.
I’m using the “publisher” (themeforest) template.
Can you tell me how to configure the “publisher” template?
Thank you
WPBeginner Support
Hi Alexander,
Unfortunately, it is not possible for us to come up with a solution for each theme as they use different methods. It would be best to contact your theme developer for support.
Admin
Samantha
I also got the “Undefined variable: consent” message when I tried to do this, although the checkbox appeared along with the message.
Vicdayo
What if I’m using facebook comment system on my blog?
Mateja
Hi, I disabled the Jetpack comment form and now I can see the checkbox. All good. BUT, I don’t like how the text looks like….save my name, address and so on…..I would like to insert my own text with a link to the privacy policy,,,,,….is that possible? and how I do that? Thank you
WPBeginner Support
Hi Mateja,
You can try this code in your theme’s functions.php file. You’ll be able to change the label text for the consent checkbox.
functionwpb_comments_privacy($arg) {$arg['cookies'] ='<p class="comment-form-cookies-consent"><input id="wp-comment-cookies-consent" name="wp-comment-cookies-consent" type="checkbox" value="yes"'.$consent.' />'.'<label for="wp-comment-cookies-consent">'. __('Save my name, email, and website in this browser for the next time I comment.') .'</label></p>';return$arg;}add_filter('comment_form_default_fields','wpb_comments_privacy');1-click Use in WordPress
Admin
Inayatali
Thank you so much.
WPBeginner Support
You’re welcome
Kamran Khan
Thank you sir. I have applied the 1st method. Its working but after inserting the code some of the code elements also shown with the checkbox and message which I manually removed. Is it OK? Now its working fine but the checkbox is showing above the message and not inline. How I can inline both the checkbox and the message.
WPBeginner Support
Hi Kamran,
No, there is probably something missing in the code. Most likely a quote or a php start or end tag. Carefully review the code to make sure that all quotes are closed and code is properly formatted.
For styling you will need to use custom CSS to adjust the field.
Admin
Carey
Ok, I am ignorant about adding code. I am using the K2 theme, which does not seem to have the updated comments form. I installed Code Snippets, but I don’t understand – does it just know where to put the snippet? I looked at the comments code in the theme files, but it doesn’t look anything like your example here. In fact it has 189 lines of code for comments. Do I just add your “new privacy checkbox optin” code to snippets and click activate and it inserts it in the correct place? So confused…
WPBeginner Support
Hi Carey,
If you find editing theme files difficult, then ask your theme author to release an update.
Admin
Brian Sanderson
Hi! I do not have the above code in your article, as is, but i do have the following code in the comments.php file. The code includes the 4 fields;
Could you please advise how my code could be edited? Thanks in advance.
WPBeginner Support
Hi Brian,
It depends on rest of the code in your theme. Unfortunately, we cannot cover all the possible ways in which a theme may display a comment form. You will need to reach out to your theme author for support.
Admin
Mark Corder
Thanks for this – I know it was quick work on your part too!
Thomas
I tried using this and got the following notice in place of the checkbox:
Undefined variable: consent
So you didn’t define it? How do I do that?
Mark Corder
Huh… It’s working for me. I just need to get the checkbox and label lined-up to match the rest of my form…
Thomas
Just so everyone knows I opened up comments-template.php file from the wp-includes folder and found this:
$consent = empty( $commenter[‘comment_author_email’] ) ? ” : ‘ checked=”checked”‘;
Adding this to the above defines the consent and in doing so will remove the notice if you have debug turned on.
You have to add it before the $comments_args = array. This all depends on how you have your template configured.
Hope it helps.