Seit mehr als 15 Jahren helfen wir leidenschaftlich gerne Menschen dabei, tolle WordPress-Websites zu erstellen. Wir haben sogar unsere eigenen Dienste für die Gestaltung von Websites eingeführt, um noch mehr Benutzern zu helfen!
Und wissen Sie, was wir im Laufe der Jahre gelernt haben? Das richtige Plugin für den Page-Builder kann das Spiel völlig verändern. Es ermöglicht es jedem, unabhängig von seinen technischen Fähigkeiten, eine erstklassige Website zu erstellen, ohne teure Designer oder Entwickler einstellen zu müssen.
In dieser SeedProd Rezension stellen wir einen der beliebtesten Drag-and-drop Page-Builder auf den Prüfstand. Wir beschäftigen uns eingehend mit den Funktionen, den Optionen für den Support und den Preisen, um herauszufinden, ob SeedProd die perfekte Lösung für Ihre WordPress-Website ist.
Halten Sie sich oben, und am Ende dieser Rezension über SeedProd werden Sie wissen, ob es der richtige Page-Builder für Sie ist. Lasst uns eintauchen!
SeedProd Überprüfung: Warum es in WordPress verwenden?
Ich möchte Sie etwas fragen: Haben Sie sich jemals gewünscht, Sie könnten ohne Programmierkenntnisse beeindruckende Seiten erstellen?
Die Lösung kann ein Page-Builder Plugin wie SeedProd sein.
Denken Sie an Landing Pages, Verkaufsseiten, individuelle Homepages und sogar komplette WordPress-Themes – und das alles, ohne eine einzige Zeile Code anzufassen oder einen WordPress-Entwickler zu engagieren.
Hier ist der Deal: SeedProd bietet Ihnen über 180 professionell gestaltete Templates.
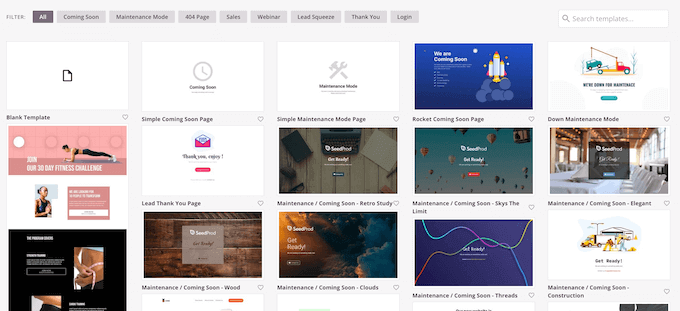
Wählen Sie einfach ein Template aus und Sie haben schon die Hälfte geschafft! Sie können den super einfachen Drag-and-drop Editor von SeedProd verwenden, um alles individuell anzupassen.
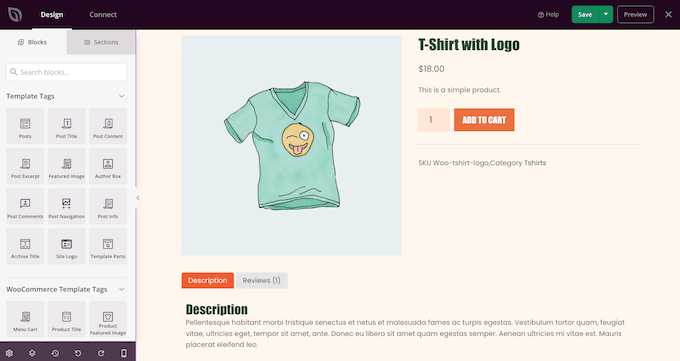
Im Editor finden Sie über 90 vorgefertigte Blöcke, die Sie einfach auf Ihr Layout ziehen können. Dazu gehören fortschrittliche Multimedia-Blöcke wie Optin-Formulare, soziale Profile, Countdown-Timer, Kontaktformulare… was auch immer!

Wenn Sie ein Online-Geschäft betreiben, verfügt SeedProd sogar über WooCommerce-Blöcke wie “In den Warenkorb”, “Meistverkaufte Produkte”, “Produktpreis” und “Produktbewertung”.
Damit können Sie benutzerdefinierte WooCommerce-Kassenseiten, Warenkorbseiten, Produktseiten und mehr erstellen.
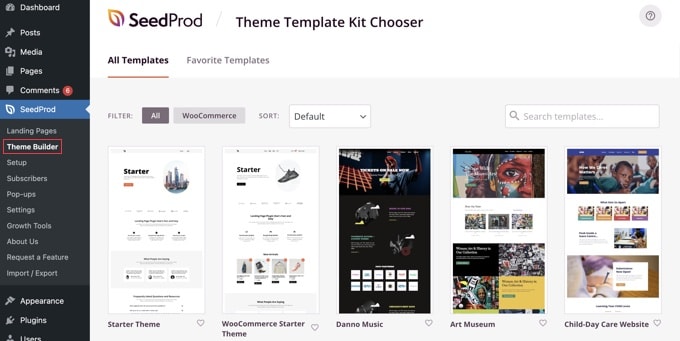
Möchten Sie Ihr eigenes Theme entwerfen? Dann hat SeedProd über 150 Website-Baukästen.
Diese Kits enthalten alles, was Sie brauchen, um ein einheitliches Design zu erstellen. Webinar-Seiten, 404-Seiten, eCommerce-Seiten… Sie sind startklar!
Wenn Sie gerade erst anfangen oder nur über ein kleines Budget verfügen, können Sie die kostenlose Version von SeedProd von WordPress.org herunterladen.
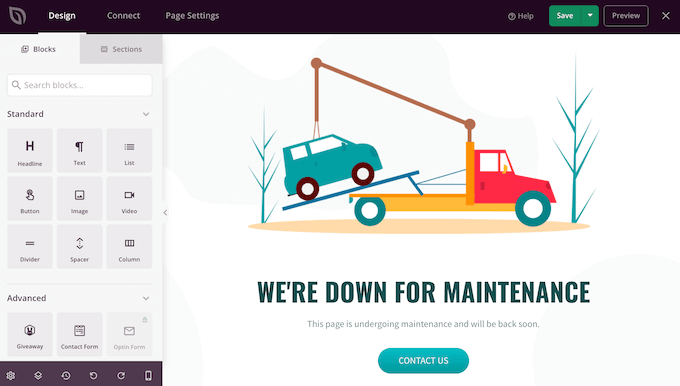
Mit diesem Plugin können Sie schöne “Coming Soon”-Seiten und Seiten im Wartungsmodus für Ihre Website erstellen.
Es gibt auch eine gute Auswahl an Templates für Landing Pages.
So können Sie unabhängig von Ihrem Budget professionell aussehende Seiten erstellen. Das ist ein guter Einstieg.
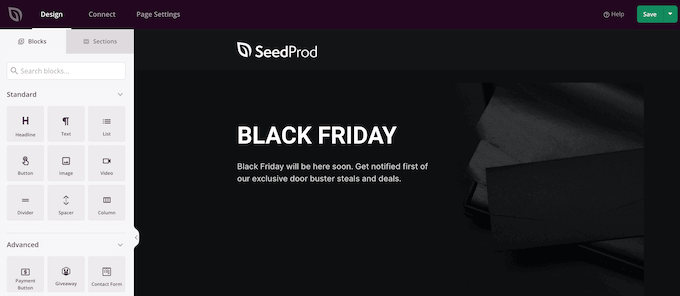
Aber wenn Sie die wirkliche Leistung wollen – individuelle Themes, erweiterte Blöcke, WooCommerce-Anpassung, all diese guten Dinge – müssen Sie ein Upgrade auf SeedProd Pro durchführen.
SeedProd Rezension: Ist es der richtige Page-Builder für Sie?
Wir alle wissen, dass der erste Eindruck zählt – besonders im Internet! Sie brauchen eine Website, die Aufmerksamkeit erregt und Besucher in Kunden verwandelt. Und das bedeutet, das richtige Page-Builder Plugin zu haben.
In dieser Rezension über SeedProd werden wir sehen, ob es wirklich das beste WordPress Plugin für Seiten-Builder ist.
1. Über 180 vorgefertigte Vorlagen
Seien wir ehrlich: Das Entwerfen und Erstellen Ihrer eigenen Seiten kann entmutigend sein. Nun, raten Sie mal? SeedProd hält Ihnen den Rücken frei! Es wird mit über 180 professionell gestalteten Templates geliefert, die Sie als Ausgangspunkt verwenden können.
Damit Sie schnell die richtige Vorlage finden, sind die Designs von SeedProd in Kategorien wie Dankeschön, benutzerdefinierte Anmeldeseiten und Lead Squeeze unterteilt.
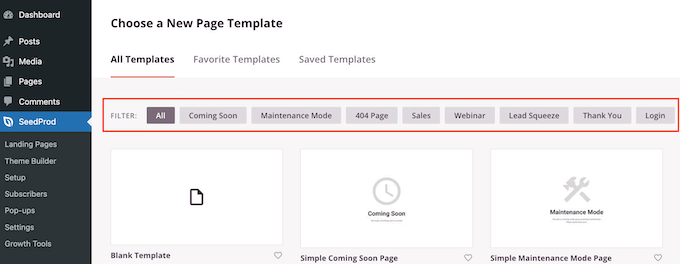
Möchten Sie die Konversionsrate erhöhen? SeedProd bietet Templates für Landing Pages und Verkaufsseiten, die auf Leistung ausgelegt sind.
Sie brauchen etwas für eine Nische? Es gibt sogar ein Template für persönliche Links – perfekt, um einen Link in der Bio-Seite zu erstellen, den Sie mit Ihren Follower teilen können.
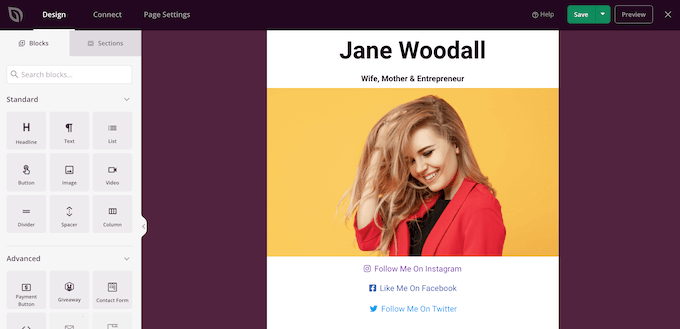
Alle Templates von SeedProd sind vollständig anpassbar. Sie können alles anpassen, ändern und personalisieren, sodass Sie nicht mit einem Design aus einem Cookie-Schneider oben gehalten werden.
Sie können zum Beispiel Ihre eigenen Nachrichten eingeben, ein eigenes Logo hinzufügen und vieles mehr mit dem Drag-and-Drop-Editor von SeedProd.
2. Ein benutzerfreundlicher Editor
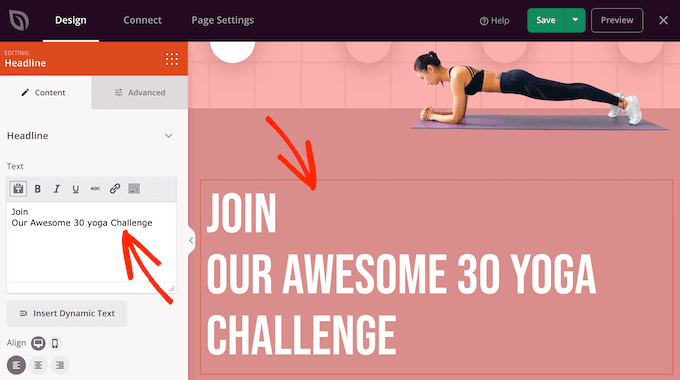
Bevor wir uns mit all den ausgefallenen Funktionen beschäftigen, wollen wir eines klarstellen: Bei der Entwicklung von SeedProd stand die Benutzerfreundlichkeit im Vordergrund.
Nachdem Sie ein Template ausgewählt haben, können Sie es mit dem Drag-and-drop Editor von SeedProd individuell anpassen. Auf der rechten Seite sehen Sie eine Live-Vorschau Ihrer Seite und auf der linken Seite einige Blockeinstellungen.
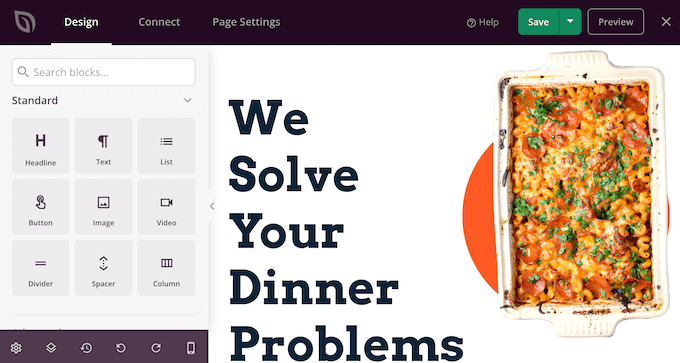
Blöcke sind ein zentraler Bestandteil von SeedProd, und Sie können sie zur Erstellung jeder Art von Seite verwenden.
Die meisten Vorlagen verfügen über integrierte Blöcke, die Sie über die Einstellungen im linken Menü anpassen können.
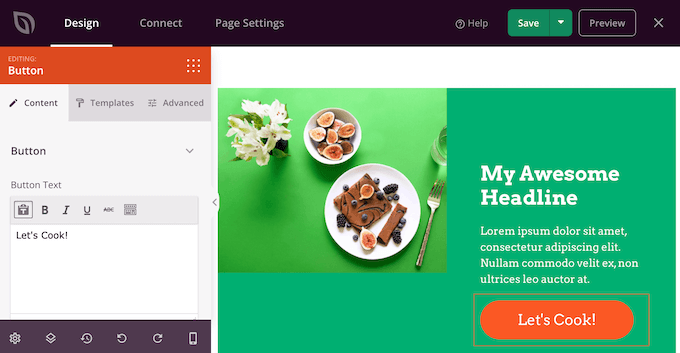
Sie beginnen mit dem Hinzufügen Ihrer eigenen Inhalte – Texte, Bilder, Videos, was immer Sie brauchen.
Anschließend können Sie das Aussehen anpassen: Farben ändern, Schatten hinzufügen, Buttons individuell anpassen… Sie haben die Wahl!
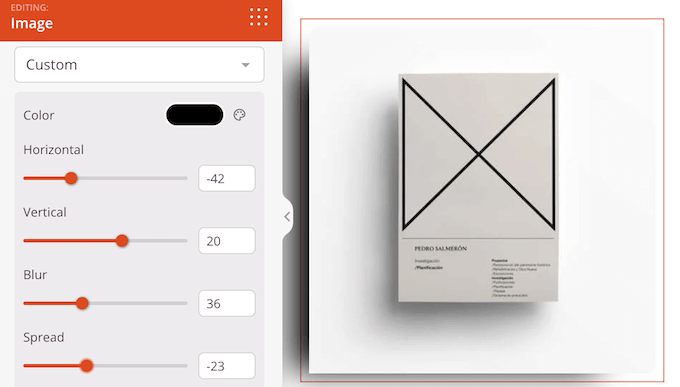
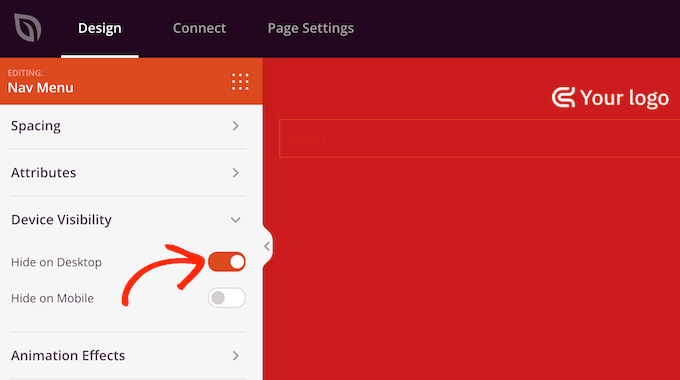
Und jetzt kommt’s: Sie können sogar individuelle CSS-Animationen hinzufügen oder den Block auf Desktop- oder Mobilgeräten ausblenden.
SeedProd macht es zum Beispiel einfach, unterschiedliche Navigationsmenüs anzuzeigen, je nachdem, ob der Besucher ein Desktop- oder ein Mobilgerät benutzt. Mit SeedProd können Sie das tun, ohne zusätzliche Plugins oder Kodierung.
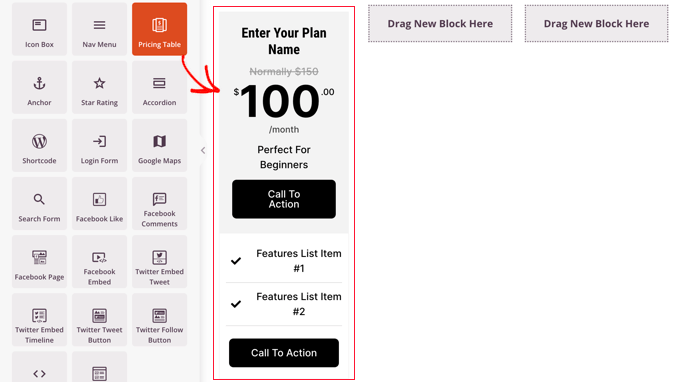
SeedProd verfügt über mehr als 90 Blöcke, die Sie zu Ihrem Design hinzufügen können. Dazu gehören erweiterte Optionen wie Preistabellen, Suchformulare und animierte Überschriften.
Suchen Sie einfach den gewünschten Block im linken Menü, und ziehen Sie ihn auf Ihr Layout.
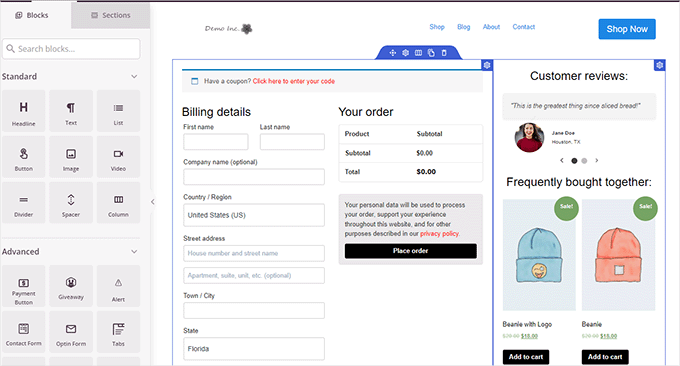
Und noch etwas Cooles: SeedProd lässt sich nahtlos in Plugins wie WooCommerce und Easy Digital Downloads integrieren.
Wenn Sie also ein Online-Geschäft betreiben, finden Sie Blöcke speziell für diese Plattformen.
Nachdem Sie einige Blöcke hinzugefügt haben, können Sie sie per Drag-and-drop in Ihrem Entwurf verschieben. So einfach ist das.
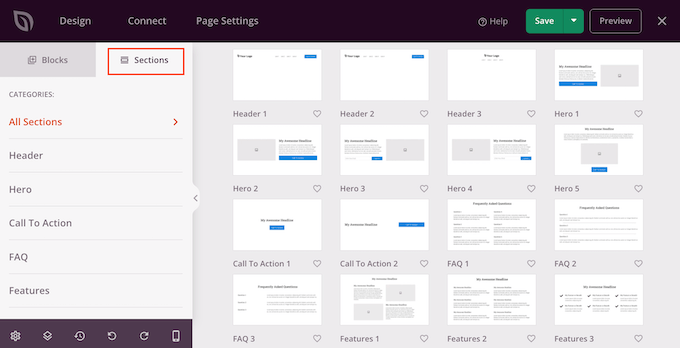
SeedProd verfügt auch über “Sektionen”, d. h. Blöcke, die häufig zusammen verwendet werden, wie z. B. Zeugnisse, Kontaktformulare, Funktionen, FAQs und mehr.
Wenn Sie also ein Anfänger sind, der eine benutzerfreundliche Möglichkeit sucht, tolle Seiten zu erstellen, ist SeedProd auf jeden Fall einen Blick wert.
3. Nahtlose Integration mit WooCommerce und Easy Digital Downloads
Gut, lassen Sie uns über das Geschäft reden! Viele beliebte eCommerce-Plattformen verfügen über integrierte Seiten-Designs. WooCommerce hat zum Beispiel vorgefertigte Seiten für Kasse und Warenkorb.
Diese Standard Seiten sind jedoch nicht immer für Konversionen optimiert. Und seien wir mal ehrlich, Sie wollen doch mehr Umsatz, oder? Dann sollten Sie diese Seiten wahrscheinlich durch Ihre eigenen Designs ersetzen.
Diese Rezension von SeedProd ist jedoch nicht vollständig, ohne auf die WooCommerce-Unterstützung einzugehen. Zunächst einmal verfügt SeedProd über eine Reihe von WooCommerce-Blöcken, mit denen Sie individuelle Dankeseiten, Kassenseiten, eine Shop-Seite und mehr erstellen können.
SeedProd verfügt sogar über Blöcke wie “Top Rated Products”, ” Best Selling Products” und “Sale Products”, die perfekt für Upselling und Cross-Selling geeignet sind.
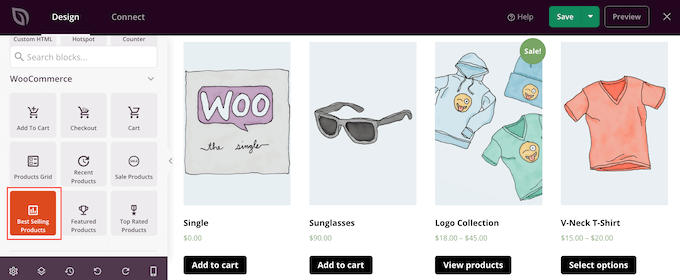
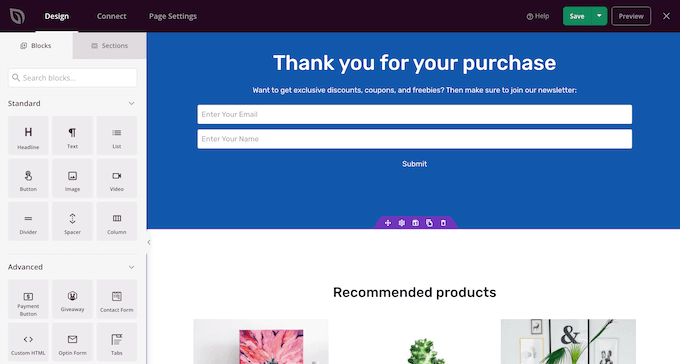
Obwohl SeedProd über spezielle WooCommerce-Blöcke verfügt, können Sie jeden Block zu Ihren Seiten hinzufügen.
Stellen Sie sich vor, Sie fügen Ihrer Seite zur Bestellbestätigung ein Optin-Formular hinzu und erhalten so Kunden, die sich für Ihren E-Mail-Newsletter anmelden.
Wenn Sie Easy Digital Downloads verwenden, um digitale Produkte auf WordPress zu verkaufen, dann hat SeedProd auch für Sie gesorgt. Es enthält mehrere EDD-Blöcke, darunter ein Raster für Downloads, das alle Ihre digitalen Produkte an einem einzigen Ort anzeigt.
Fügen Sie diesen Block einfach zu jeder Seite hinzu. Sofortiges digitales Schaufenster!
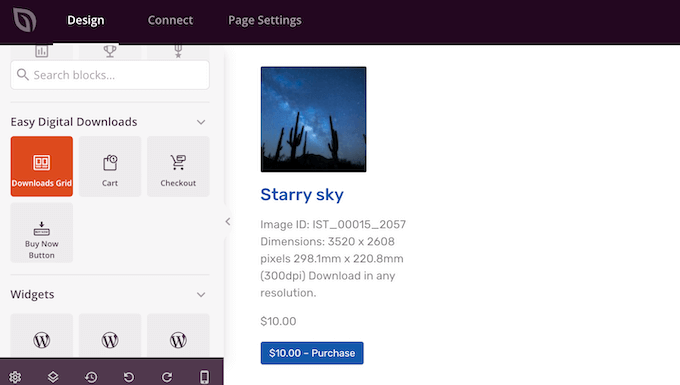
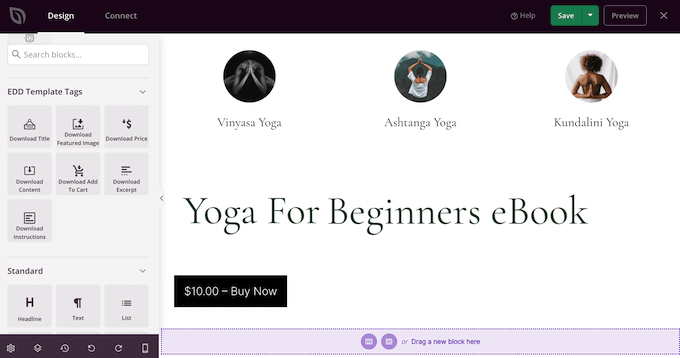
Während Easy Digital Downloads bereits eine nahtlose Kaufabwicklung bietet, können Sie diese in SeedProd mit EDD Cart und Checkout Blöcken anpassen.
SeedProd verfügt auch über einen Buy Now Button, mit dem Kunden den Kaufprozess von jeder Seite Ihres Online-Shops aus starten können. So lässt sich die Customer Journey optimieren!
4. Verbinden Sie Ihre Seite mit Tools von Drittanbietern
Wenn Sie eine benutzerdefinierte Seite zur Erfassung von Leads erstellen, sollten Sie ein Anmeldeformular hinzufügen.
Nun, gute Nachrichten! SeedProd lässt sich nahtlos mit den besten E-Mail Marketing Diensten wie Constant Contact und ActiveCampaign integrieren.
Und so geht’s: Durch die Anbindung Ihres E-Mail-Dienstes hilft Ihnen SeedProd nicht nur beim Aufbau einer E-Mail-Liste. Es verfolgt auch, welche Seiten die meisten Abonnenten einbringen.
Sie können sehen, was funktioniert und was nicht, und Ihre Seiten für noch mehr Anmeldungen optimieren.
Die Verbindung von SeedProd mit Ihrem E-Mail Marketing Anbieter ist ein Kinderspiel. Klicken Sie einfach auf den Tab “Verbinden”.
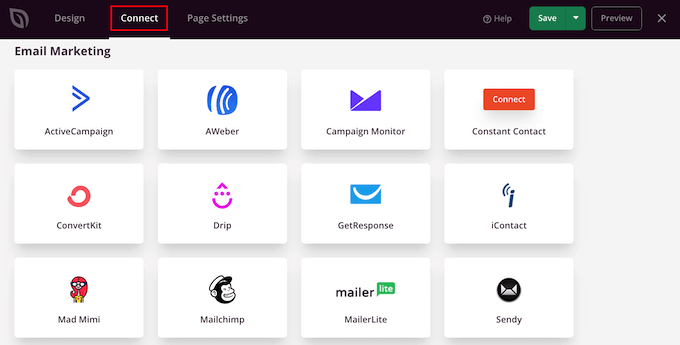
Sie können dann Ihren E-Mail-Dienstanbieter auswählen, z. B. ConvertKit, Mailchimp oder Drip. SeedProd führt Sie durch den Prozess der Verbindung der Seite mit Ihrem E-Mail-Anbieter. Das ist ganz einfach.
Was aber, wenn SeedProd keine direkte Integration mit Ihrem E-Mail Anbieter hat? Kein Grund zur Panik! Sie haben eine Geheimwaffe: Zapier.
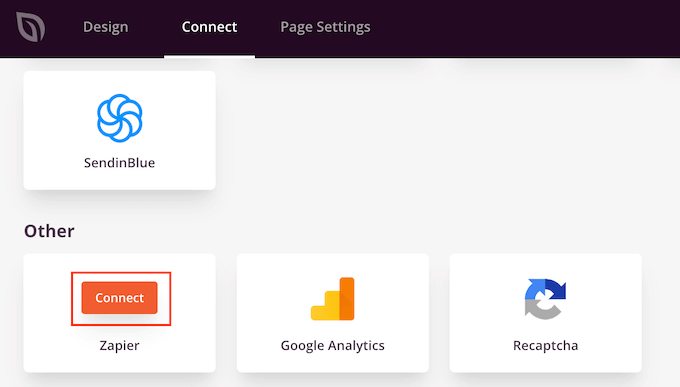
Zapier fungiert als Brücke zwischen SeedProd und mehr als 3.000 anderen Anwendungen. Scrollen Sie einfach zum Abschnitt “Andere” und fahren Sie bei Mauszeigerkontakt über “Zapier”.
Wenn die Schaltfläche “Verbinden” erscheint, klicken Sie darauf und folgen Sie den Anweisungen auf dem Bildschirm, um SeedProd und Zapier zu verbinden.
5. Dynamischer Text
Nun gut, lassen Sie uns darüber sprechen, wie Sie es schaffen, dass Ihre Inhalte bei Ihren Besuchern wirklich ankommen.
Dynamischer Text ist ein Inhalt, der sich in Abhängigkeit von verschiedenen Faktoren wie dem Namen des Besuchers, seinem Verhalten und seinem Standort ändert. Dies ist eine großartige Möglichkeit, den Besuchern personalisierte Inhalte zu zeigen, was Ihre Inhalte oft noch interessanter macht.
Dynamische Inhalte können Ihnen auch helfen, mehr Anmeldungen und Verkäufe zu erzielen. Sie können zum Beispiel das Datum dynamisch in einem Countdown-Verkaufsangebot anzeigen, das automatisch jeden Tag aktualisiert wird. Auf diese Weise können Sie ein Gefühl der Dringlichkeit erstellen und mehr Konversionen erzielen.
SeedProd macht dies mit der Einstellung Dynamischen Text einfügen ganz einfach. Sie können dynamische Inhalte direkt in Ihre Überschriften und Texte einfügen.
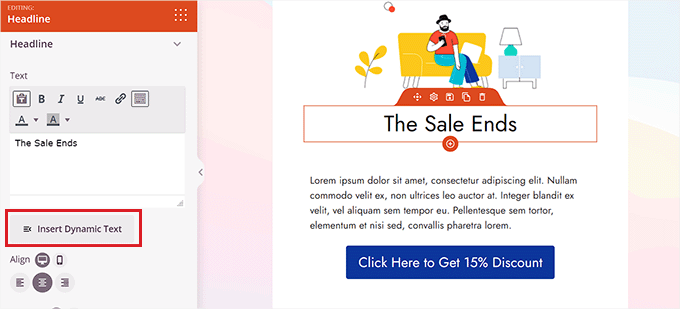
Sie können dann die Uhrzeit und das Datum einstellen, indem Sie Optionen wie Morgen oder Nächster Monat auswählen.
Dies ist eine fantastische Möglichkeit, immergrüne Inhalte zu erstellen oder FOMO zu nutzen, um die Konversionsrate zu erhöhen.
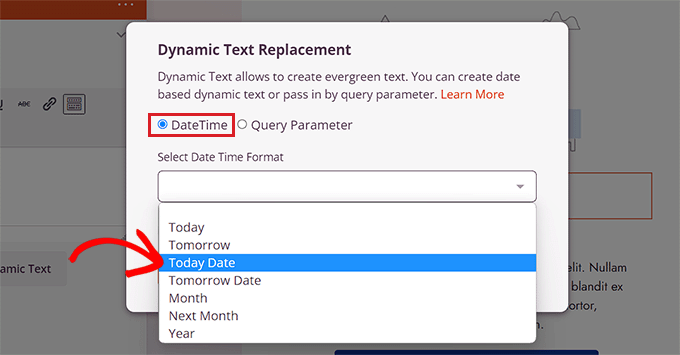
Und wenn Sie Online-Anzeigen schalten, können Sie sogar noch weiter gehen. Sie können Daten an SeedProd übergeben, indem Sie einen Parameter für die Abfrage verwenden.
Denken Sie an Keywords aus Ihren Anzeigen, den Namen des Besuchers, seine Position – all das können Sie nutzen, um Ihre SeedProd Seiten zu personalisieren. Stellen Sie sich eine Landing Page vor, die einen Besucher mit seinem Namen begrüßt oder ihm ein Produkt auf der Grundlage des von ihm gesuchten Schlüsselworts anzeigt. Das ist die Stärke von dynamischen Inhalten.

Weitere Informationen zu diesem Thema finden Sie in unserem Leitfaden zum Hinzufügen dynamischer Inhalte in WordPress.
6. WordPress Theme Builder
Wenn Sie Ihr eigenes WordPress-Theme erstellen möchten, müssen Sie in der Regel lernen, wie man PHP, HTML, CSS und JavaScript programmiert, oder einen Theme-Entwickler beauftragen.
Wenn Sie einen Entwickler oder eine Agentur beauftragen, können die Kosten für ein individuelles WordPress-Theme Tausende von Dollar erreichen.
Aber hier ist der Clou: Mit SeedProd können Sie den Code über Bord werfen und individuelle Themes per Drag-and-drop erstellen. Ja, Sie können dieselben Blöcke und Abschnitte wie für Seiten verwenden, um ein ganzes Theme zu erstellen.
SeedProd verfügt über eine wachsende Bibliothek professioneller Website-Kits, die Sie mit einem einzigen Klick zu Ihrer Website hinzufügen können. Kinderleicht!

Dabei handelt es sich um Sammlungen von vorgefertigten Vorlagen, Layouts und anderen Elementen, mit denen Sie schnell eine professionell aussehende Website erstellen können.
SeedProd bietet Templates für verschiedene Branchen und Nischen wie Restaurant-Websites, Reise-Blogs, Marketing-Beratungen und mehr. Es ist ein Kinderspiel, die perfekte Vorlage zu finden.
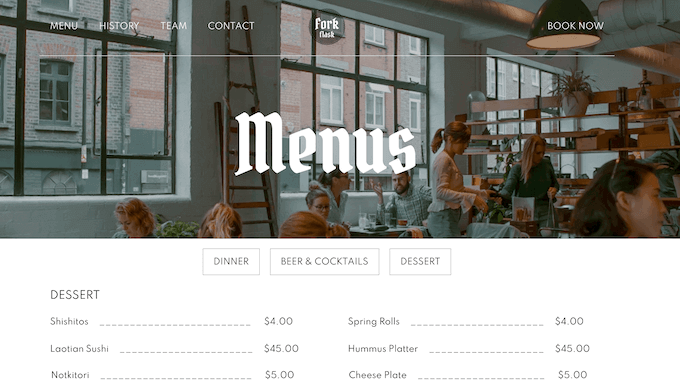
Und das Beste daran? Die Template-Kits von SeedProd sind so konzipiert, dass sie zusammen verwendet werden können. Sie können also einfach ein Kit installieren und das gleiche Design für Ihre gesamte WordPress-Website verwenden.
Und sie enthalten oft Templates für die Kernelemente wie Header und Footer.
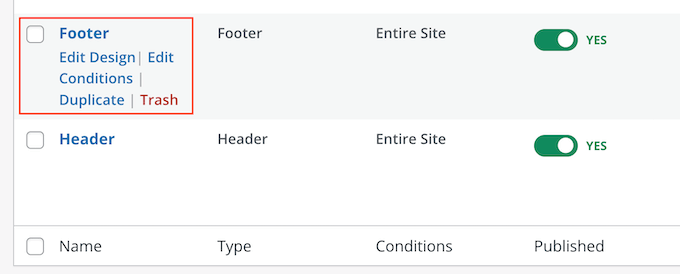
Dies macht es einfach, ein konsistentes Aussehen und Gefühl in Ihrem benutzerdefinierten WordPress-Theme zu schaffen.
Individuelle Anpassung ist der Schlüssel, richtig? Nun, SeedProd macht es super einfach. Öffnen Sie einfach ein beliebiges Design im Drag-and-drop Editor von SeedProd und fügen Sie Inhalte hinzu, entfernen Sie sie und passen Sie sie individuell an – genau so, wie Sie jede andere Seite gestalten. Individuelle Schriften, Farben, Ihr Logo – alles ist vorhanden.
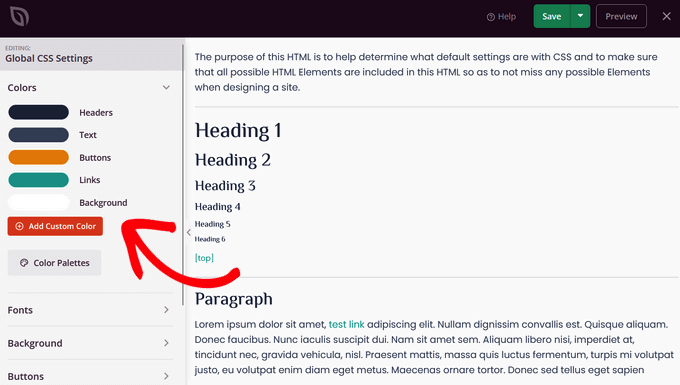
Wenn Sie Ihr Theme entwerfen, möchten Sie vielleicht jedes Template individuell anpassen. SeedProd bietet jedoch auch ein globales CSS Template, in dem Sie die Standard Schriften, Hintergründe, Farben und vieles mehr für das gesamte Kit ändern können. Eine enorme Zeitersparnis!

Mit dem SeedProd-Editor können Sie z. B. die Farben für die Überschriften, Absätze, Links, Schaltflächen usw. des Kits ändern.
SeedProd wendet diese Änderungen dann auf das gesamte Vorlagenkit an.
Weitere Informationen zu diesem Thema finden Sie in unserem Leitfaden zur Erstellung eines benutzerdefinierten WordPress-Themes.
7. KI-Assistent
Die Erstellung einer individuellen WordPress-Website ist mit SeedProd einfach, aber mit dem neuen KI-Assistenten geht es jetzt wahnsinnig schnell.
Vergessen Sie die stundenlange Suche nach Inhalten oder nach den perfekten Bildern im Internet. Jetzt können Sie dank KI in Sekundenschnelle auffällige Überschriften, überzeugende Website-Texte und einzigartige, lizenzfreie Bilder erstellen.
Das bedeutet, dass Sie mit dem KI-Assistenten von SeedProd eine professionelle, visuell ansprechende Website schneller erstellen können, als Sie es je für möglich gehalten hätten. Betrachten Sie ihn als Ihr eigenes persönliches Team für die Erstellung von Inhalten und Bildern, direkt in SeedProd.
Um mit der Texterstellung zu beginnen, wählen Sie einfach einen beliebigen Überschriften- oder Textblock in der SeedProd-Erstellung aus. Klicken Sie dann auf den Button “AI-Text generieren” im Einstellungsfenster auf der linken Seite.
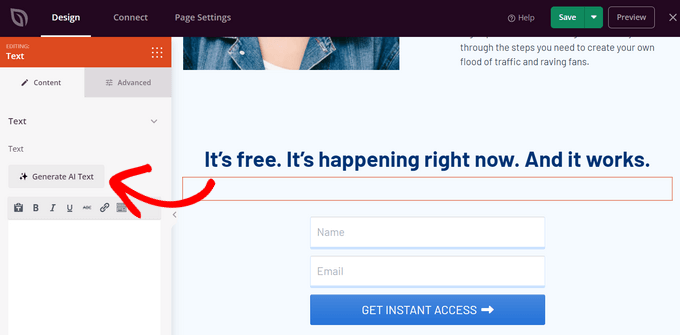
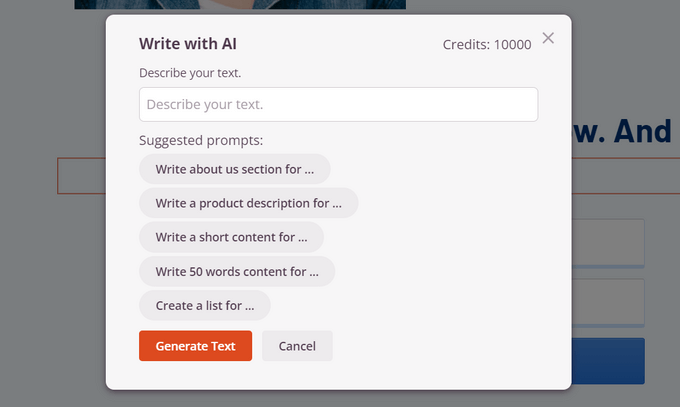
Als nächstes können Sie der KI mitteilen, welche Art von Text Sie benötigen.
Sie können eine Beschreibung in die Box eingeben oder einen Vorschlag aus der Liste auswählen. Klicken Sie dann auf den Button “Text generieren”.
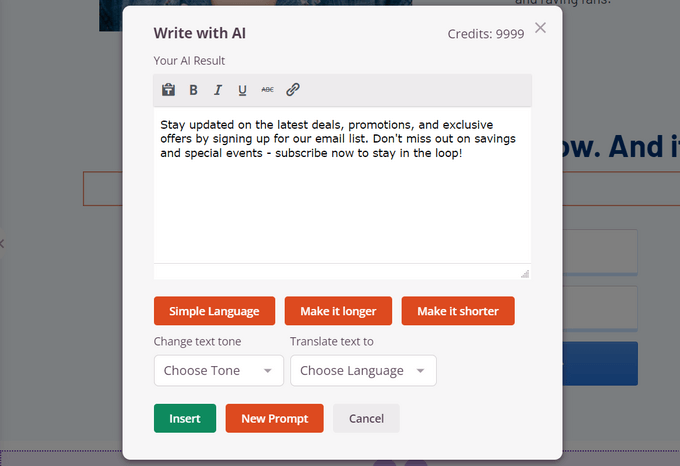
Der KI-Assistent von SeedProd spuckt Ihre Inhalte in Sekundenschnelle aus. Und das ist noch nicht alles. Sie können ihn nach Ihren Wünschen anpassen, den Wortlaut optimieren, den Tonfall ändern und ihn sogar in über 50 Sprachen übersetzen – alles mit einem Klick.
Wenn Sie mit dem Ergebnis zufrieden sind, klicken Sie auf “Einfügen”, um es zu Ihrer Seite hinzuzufügen.
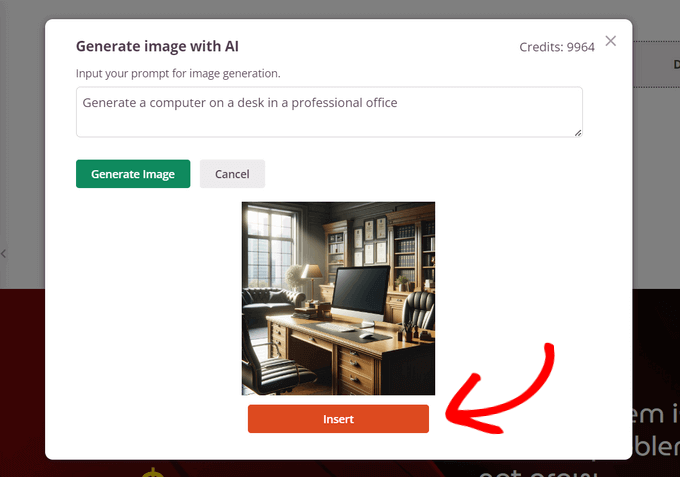
Genauso einfach ist es, Bilder zu erzeugen. Wählen Sie einen beliebigen Bildblock in SeedProd aus, und Sie finden einen Button “Mit AI hinzufügen” im Einstellungsfenster.
Geben Sie wie bei einem Text eine Beschreibung ein oder wählen Sie aus einer Liste von Vorschlägen, und die KI macht sich an die Arbeit. Wenige Sekunden später haben Sie ein fertiges Bild.
Wenn Sie tiefer eintauchen möchten, haben wir einen Leitfaden für die Verwendung von KI zur Bilderzeugung in WordPress.
8. Integriert sich nahtlos mit dem besten SEO Plugin
Die Erstellung schöner Seiten ist nur die halbe Miete. Diese Seiten müssen auch tatsächlich gesehen werden. Und genau hier kommt das SEO-freundliche Design von SeedProd ins Spiel.
Mit SeedProd ist es einfach, gut strukturierte Seiten zu erstellen, die gut aussehen. Dies ermutigt Besucher, länger auf Ihrer Website zu bleiben, was positive Signale an die Suchmaschinen sendet. Auf diese Weise kann SeedProd Ihre WordPress-SEO verbessern und dazu beitragen, dass Ihre Inhalte besser ranken.
Dies ist ein guter Anfang, aber wenn Sie AIOSEO verwenden, können Sie die Dinge auf eine ganz neue Ebene bringen.
AIOSEO ist das beste WordPress-SEO-Plugin, das sich nahtlos in SeedProd integrieren lässt. Klicken Sie im SeedProd-Editor einfach auf “Seiteneinstellungen” und wählen Sie dann “SEO”.
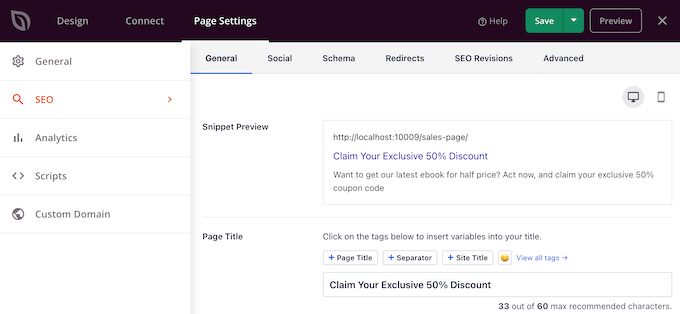
Sie können jetzt den Seitentitel und die Meta-Beschreibung optimieren, eine Ziel-Keyphrase eingeben und vieles mehr, direkt im SeedProd-Editor.
Und das ist noch nicht alles. Sie können Schema-Auszeichnungen hinzufügen und fein abstimmen, wie die Seite aussehen soll, wenn sie in sozialen Medien geteilt wird.
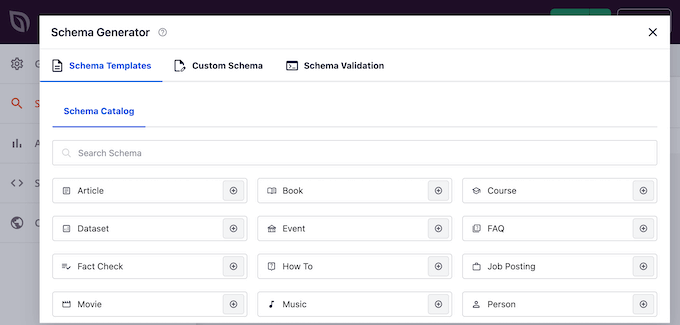
Diese Integration bedeutet, dass Sie beeindruckende, hochkonvertierende Seiten erstellen und sie für Suchmaschinen optimieren können – alles an einem Ort.
Wenn Sie alles über AIOSEO wissen möchten, lesen Sie unseren Leitfaden zur Einrichtung von All in One SEO für WordPress.
9. Eingebaute Zugangskontrollen
Wie bereits in dieser Rezension zu SeedProd erwähnt, können Sie sowohl mit der kostenlosen als auch mit der Premium-Version schöne Seiten für den “Coming Soon”- und Wartungsmodus erstellen. Das ist superpraktisch, wenn Sie Ihre Website aufbauen oder optimieren wollen.

Es kann jedoch vorkommen, dass jemand auf die Website zugreifen möchte, während sie sich im “Coming Soon”- oder Wartungsmodus befindet. Wenn Sie z. B. eine WordPress-Entwicklungsagentur sind, möchten Ihre Kunden vielleicht ihre Website sehen, während sie sich im Aufbau befindet, damit sie Feedback geben können.
Hier kommt die Zugangskontrolle von SeedProd Pro ins Spiel.
Wenn Sie auf SeedProd Pro upgraden, erhalten Sie leistungsstarke Zugangskontrollen. So können Sie begrenzten Zugriff erlauben, während sich die Website im Wartungs- oder “Coming Soon”-Modus befindet.
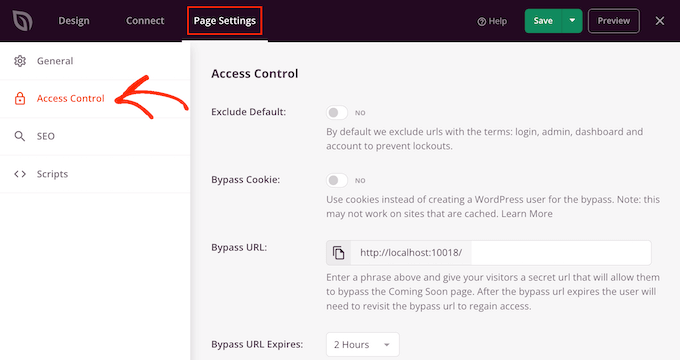
Wenn Sie die Registrierung von Benutzern anbieten, sollten Sie die Option “Standard ausschließen” aktivieren. Damit können Besucher auf URLs zugreifen, die die folgenden Begriffe enthalten: Anmeldung, Admin, Dashboard und Konto. Niemand möchte aus seinem Konto ausgesperrt werden, oder?
Sie können auch Benutzern mit bestimmten Browser-Cookies oder mit einer bestimmten Rolle Zugang gewähren.
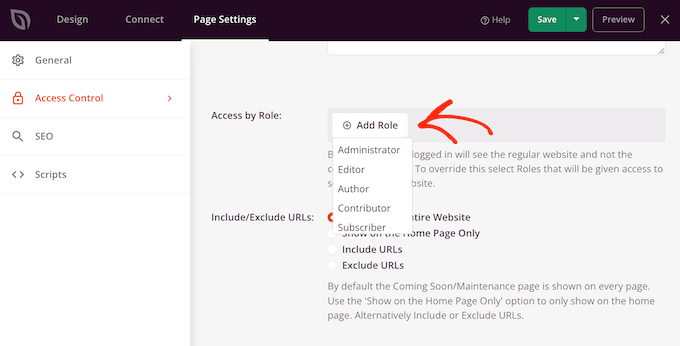
Sie können sogar Benutzerrollen einbeziehen oder ausschließen, die von Ihrem WordPress-Mitgliedschafts-Plugin oder eCommerce-Plugin erstellt wurden.
Wenn Sie mehr über Rollen und Berechtigungen von Benutzern in WordPress erfahren möchten, haben wir einen Leitfaden für Einsteiger.
10. Domain Mapping leicht gemacht
Normalerweise lebt jede Seite, die Sie erstellen, unter dem Domainnamen Ihrer Hauptwebsite. Das ist doch sinnvoll, oder? Aber manchmal möchten Sie vielleicht stattdessen eine individuelle Domain verwenden.
Stellen Sie sich vor, Sie rezensieren in Ihrem Fitness-Blog Fitnessgeräte für zu Hause. Nun möchten Sie Ihre Marke erweitern, indem Sie Trainings- und Ernährungskurse verkaufen.
Aber Sie sollten diese Online-Kurse nicht mit Ihren Rezensionen vermischen – das könnte Ihre Besucher verwirren. Anstatt eine völlig neue Website einzurichten, können Sie eine individuelle Domain hinzufügen und diese dann auf eine Landing Page auf Ihrer bestehenden Website verweisen.
Das mag technisch klingen, aber SeedProd macht es überraschend einfach, jeder Seite eine individuelle Domain zuzuordnen. Erstellen Sie einfach Ihre Seite wie gewohnt und wählen Sie dann “Seiteneinstellungen”.
Klicken Sie dann auf den Tab ‘Individueller Bereich’.
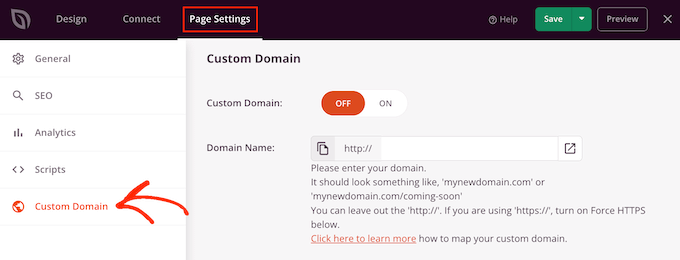
Klicken Sie anschließend auf die Schaltfläche “Ein” neben “Benutzerdefinierte Domäne”.
Sie können dann einfach den Domänennamen eingeben, den Sie für die benutzerdefinierte Seite verwenden möchten.
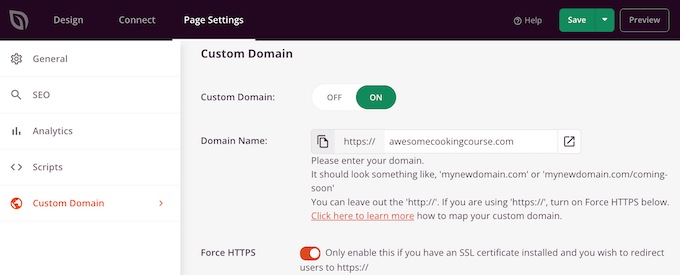
Danach müssen Sie nur noch einige Änderungen in Ihrem WordPress-Hosting-Dashboard vornehmen. Die Schritte können je nach Hosting-Anbieter variieren, aber in der Regel müssen Sie die DNS-Nameserver unter Ihrem Domain-Registrar-Konto bearbeiten.
Wir haben eine Schritt-für-Schritt-Anleitung , wie Sie einen individuellen Domain-Alias für Ihre WordPress Landing Page hinzufügen. Sie wird Sie durch den gesamten Prozess führen.
Wenn Sie also eine eigene Marke oder Produktlinie hinzufügen möchten, ohne eine neue Website erstellen zu müssen, ist die Funktion für individuelle Domains von SeedProd ein wahrer Lebensretter.
11. Gemeinschaftliche und professionelle Unterstützung
SeedProd wurde entwickelt, um Ihnen beim Erstellen individueller Seiten und sogar ganzer Themes behilflich zu sein. So können Sie ganz einfach individuelle Seiten und sogar ganze Themes erstellen, ohne dass Sie irgendeinen Code anfassen oder einen ausgefallenen Designer engagieren müssen.
Aber wir alle kommen manchmal nicht weiter, oder? Hier kommen die Optionen von SeedProd ins Spiel.
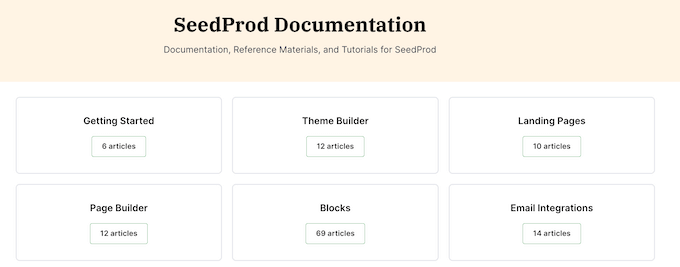
Wenn Sie Probleme lieber selbst recherchieren möchten, finden Sie auf der SeedProd-Website eine ausführliche Online-Dokumentation und einen regelmäßig aktualisierten Blog. Ich habe diese Ressourcen beim Verfassen dieser SeedProd Rezension häufig genutzt.
Und das Beste daran? Sie können auf diese Ressourcen zugreifen, unabhängig davon, ob Sie das kostenlose Plugin herunterladen oder ein Upgrade auf eine Premium-Lizenz erwerben.
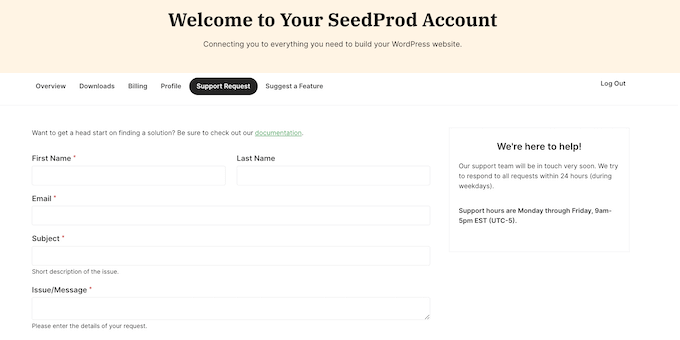
Wenn Sie in SeedProd Pro investieren, dann erhalten Sie die VIP-Behandlung mit professionellem Support. Eröffnen Sie einfach ein Support-Ticket, und das Team wird Ihnen sofort helfen.
Sie bemühen sich, innerhalb von 24 Stunden zu antworten, von Montag bis Freitag.
SeedProd Überprüfung: Preisgestaltung und Pläne
Lassen Sie uns über die Preise sprechen. Wenn Sie mit einem knappen Budget arbeiten oder der “Probieren vor dem Kaufen”-Typ sind, dann können Sie das kostenlose Plugin SeedProd von WordPress.org herunterladen. Es ist eine gute Möglichkeit, ein Gefühl für das Plugin zu bekommen.
Wenn Sie jedoch ein benutzerdefiniertes Thema erstellen, zusätzliche Vorlagen freischalten oder Ihren Online-Marktplatz anpassen möchten, müssen Sie eine Premium-Lizenz erwerben.
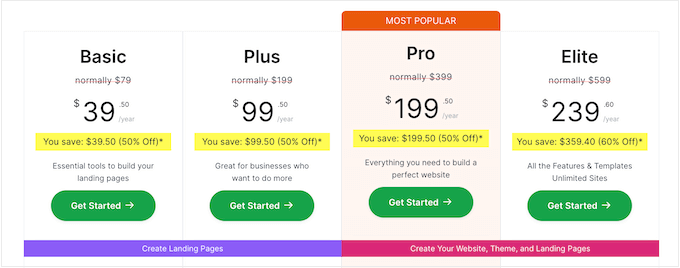
Sie haben die Wahl zwischen vier Premium-Tarifen:
- Einfach. Diese Version ist perfekt für Benutzer mit nur einer Website. Für 39,50 $ pro Jahr erhalten Sie 50 zusätzliche Templates und Zugang zu dem großartigen professionellen Support, über den wir gesprochen haben.
- Plus. Wenn Sie eine E-Mail-Liste aufbauen wollen, dann ist der Plus-Plan Ihr Freund. Für 99,50 $ pro Jahr können Sie SeedProd auf 3 Websites nutzen und sich mit allen großen E-Mail Marketing Diensten wie Brevo (früher Sendinblue), Constant Contact und MailerLite verbinden.
- Pro. Dieser Plan gibt Ihnen Zugang zu SeedProd’s Theme Builder und Website-Kits, für $199.50 pro Jahr. Es schaltet auch alle professionell gestalteten Templates, Blöcke und Abschnitte von SeedProd frei. Es ist das komplette Design-Paket.
- Elite. Wenn Sie eine Design- oder Entwicklungsagentur betreiben, können Sie mit diesem Plan SeedProd für eine unbegrenzte Anzahl von Kunden-Websites verwenden. Es lässt sich auch mit WooCommerce integrieren und unterstützt Domain Mapping.
Egal, ob Sie ein Gelegenheits-Blogger, ein wachsendes Unternehmen oder eine ausgewachsene Agentur sind, SeedProd hat einen Plan, der Ihren Bedürfnissen und Ihrem Budget entspricht.
SeedProd Bewertung: Ist es das wert?
Schließen wir diese SeedProd Rezension ab! Nachdem wir es auf Herz und Nieren geprüft haben, sind wir zuversichtlich, dass es einer der besten Drag-and-drop Page-Builder für WordPress ist.
Wenn Sie gerade erst anfangen, dann gibt es eine kostenlose Version von SeedProd, mit der Sie schöne “Coming Soon”- und Wartungs-Seiten erstellen können. Es hat auch einen Drag-and-drop Page-Builder, so dass Sie individuelle Seiten erstellen können, egal wie hoch Ihr Budget ist.
Wenn Sie jedoch ernsthaft an der Erstellung von hochkonvertierenden Landing Pages und Verkaufsseiten interessiert sind, empfehlen wir definitiv ein Upgrade auf SeedProd Pro.
Wenn Sie ein WordPress-Blogger sind oder ein neues Online-Unternehmen gründen, dann ist SeedProd Basic eine erschwingliche Option, mit der Sie individuelle Seitendesigns für eine einzelne Website erstellen können.
Möchten Sie Ihre E-Mail-Liste vergrößern? Dann empfehlen wir Ihnen SeedProd Plus. Dieser Plan ist mit den besten E-Mail-Dienstleistern wie Campaign Monitor, ConvertKit und AWeber integriert. So können Sie Seiten erstellen, die die E-Mail-Adressen der Besucher sammeln und diese Informationen dann automatisch in Ihre Mailing-Listen aufnehmen.
Träumen Sie davon, Ihre eigenen WordPress Themes zu erstellen? Dann kommt SeedProd Pro mit einem leistungsstarken Theme-Builder und Website-Kits, mit denen Sie schnell eine ganze Website neu gestalten können.
Mit dem Elite-Tarif schließlich können Sie SeedProd für eine unbegrenzte Anzahl von Websites verwenden. Das macht es zur perfekten Wahl für Design- und Entwicklungsagenturen oder Vermarkter, die viele Kunden-Websites verwalten.
Wenn Sie einen Online-Shop haben, dann verfügt SeedProd Elite auch über WooCommerce- und Easy Digital Downloads-Blöcke. Damit können Sie Ihren Shop anpassen, um mehr Konversionen und Verkäufe zu erzielen.
Unabhängig davon, für welchen Plan Sie sich entscheiden, SeedProd ermöglicht es Ihnen, atemberaubende, hochkonvertierende WordPress-Websites ohne Programmierkenntnisse zu erstellen. Es geht nur darum, die Macht des Designs in Ihre Hände zu legen.
Wir hoffen, dass diese SeedProd-Bewertung Ihnen bei der Entscheidung geholfen hat, ob es der richtige Page Builder für Ihre WordPress-Website ist. Schauen Sie sich auch unseren Leitfaden zur Auswahl der besten Webdesign-Software an, oder sehen Sie sich unsere Expertenauswahl der wichtigsten WordPress-Plugins für Unternehmenswebsites an.
Wenn Ihnen dieser Artikel gefallen hat, dann abonnieren Sie bitte unseren YouTube-Kanal für WordPress-Videotutorials. Sie können uns auch auf Twitter und Facebook finden.


Letisha Williams
Super easy and effective
Samantha
Absolutely amazing product!! I’m not the most tech savvy person but SeedProd made the process of starting my own website beyond easy!!
Uzairul
Fantastic website builder found it very easy and simplistic to use!
Ashley Zabel
SeedProd is a powerful WordPress plugin that enables users to effortlessly create stunning coming soon, maintenance mode, and landing pages. It’s a fantastic tool for website owners, designers, and developers looking to create a professional online presence even before their site is fully launched.
One of the standout features of SeedProd is its user-friendly interface, making it incredibly easy to customize pages using its drag-and-drop builder. With a plethora of templates and customization options available, users can tailor their pages to match their brand identity seamlessly.
Moreover, SeedProd offers robust functionality, including integration with popular email marketing services, social media platforms, and seamless compatibility with various WordPress themes and plugins. Its responsive design ensures that created pages look great on all devices, further enhancing user experience.
The plugin also boasts excellent customer support, providing timely assistance and resources to help users navigate any challenges they might encounter.
In conclusion, SeedProd stands out as an exceptional WordPress plugin for creating captivating coming soon and landing pages. Its intuitive interface, extensive customization options, and robust functionality make it a valuable asset for anyone looking to make a strong first impression online.
Peter M.
Seedprod has a ton of great templates and apps to help anyone build a better website.
Moody Adel
Really good plugin
Dinuka
Great Plugin & Easy to use!
ali hassan
Easy to use i indeed recommended
Ben
No better way to develop a website than with this
hichem
easy to use i strongly recommended
Tashrif
Very easy to use and helpful
Skyzel
Loved this product.
Moinuddin waheed
Seed prod is the go to plugin for page builder. This is one of the best page builder out there.
I would recommend everyone out there to use this plugin
Prince Batubo
SeedProd is an amazing Website builder, I use them to work for my clients effortlessly.
I can recommend them to anyone with 100% satisfaction, they’re the best.
Yousef Ahmed
SeedProd is a great drag and drop website builder’s.
Sigurgeir Ársælsson
Great product that no one should be without.
Shafqat Khan
Outstanding offerings featuring a diverse array of options and features, ensuring optimal choices for your needs. This company stands out, and I wholeheartedly endorse SeedPod as an excellent choice.
Saiful Islam
SeedProd totally rocked my website launch! As a non-techie, the drag-and-drop features were a lifesaver. Crafted a sleek coming soon page without breaking a sweat. The pre-designed templates? Pure genius – made my site look like a pro’s handiwork.
Mouhssine Benkacem
very good tool
simple to use
mortaza
The only Elementor Killer
Mathias
One of the better tools I have used, easy to learn and feels helpful. Need to use it more to really understand all its different tools and extensions
santosh sendha
The product UI and the design part, I loved it.
Melinda Gaines
I’ve got to say you’ve hit it out of the park with SeedProd. It’s so user friendly for even a novice such as myself.
Toby Cummings
A great product for web developers.
Stefan Neuhaus
All is well and the best product
Kervi Bacuel
Seedprod are great website builder and offers giveaway too
Misa
SeedProd is a great company!
Cyril John
SeedProd is a great website developer
Sharon Smith
SeedProd is an excellent website builder that allows easy creation of custom pages!
Jayne Lyall
It is the best!
Debra Taylor
I have heard a lot about this.Just started using it and I really like it
saikumar j
Easily build WordPress custom themes.
Create custom template parts like: Headers, Footers,
Content Pages, Category Pages, Tag Pages, Sidebars.
Best tool to build website like wordpress.
*****Awesome*****
SHANNOn PETERSON
Fantastic products with many different options and functions to give you the best way to choose . it’s a great company and I would highly recommend seedpod
Kus Duwi
cool and easy to use
Melissa Slaughter
I love the organization and they really are simple to use!!
Barb Hadley
SeedProd is a great company that offers wonderful giveaways! Give them a look and you won’t be disappointed.
Shellie Clark
SeedProd is a great drag and drop website builder.
Michael DeFren
wow how organized and simple to use