Manchmal brauchen Sie mehr Kontrolle über die Anordnung Ihrer Beiträge in Ihrem Blog. Wir haben selbst schon versucht, eine wichtige Ankündigung hervorzuheben, einen Wettbewerb zu präsentieren oder eine wichtige Funktion hervorzuheben.
Standardmäßig zeigt WordPress Ihre Beiträge in umgekehrter chronologischer Reihenfolge an, wobei die neuesten Beiträge ganz oben stehen. Das funktioniert zwar meistens gut, kann aber frustrierend sein, wenn Sie bestimmte Inhalte priorisieren müssen.
Aus diesem Grund haben wir diesen Leitfaden zusammengestellt. Wir führen Sie durch verschiedene Methoden, um Ihre WordPress Beiträge neu zu ordnen, von schnellen und einfachen Tricks bis hin zu fortgeschrittenen Techniken.

Warum Blogbeiträge in WordPress neu ordnen?
Manchmal gibt es bestimmte Inhalte, die Sie Ihren Besuchern zuerst zeigen möchten. So können Sie z. B. einen Blog mit einer großen Ankündigung auf der Startseite, der Blogseite, den letzten Beiträgen oder den Archivseiten anheften.
Möglicherweise müssen Sie auch benutzerdefinierte Beitragstypen manuell neu anordnen. Wenn Sie z. B. einen WooCommerce-Shop erstellt haben, möchten Sie vielleicht Ihre beliebtesten Produkte oder Artikel, die im Angebot sind, zuerst anzeigen.
Das Problem besteht darin, dass WordPress Ihre Blogbeiträge normalerweise in umgekehrter chronologischer Reihenfolge anzeigt (die neuesten Beiträge in der Reihenfolge der am wenigsten veröffentlichten), ohne dass es eine einfache Möglichkeit gibt, einen Beitrag nach oben oder unten zu verschieben. Selbst wenn Sie den Abfrage-Schleifen-Block im Block-Editor oder im Editor für die gesamte Website individuell anpassen, haben Sie nur begrenzte Optionen für die Neuanordnung.
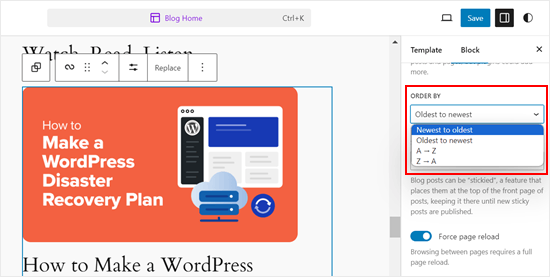
In diesem Sinne möchten wir Ihnen einige Umgehungsmöglichkeiten und Tricks vorstellen, mit denen Sie Blogbeiträge, WooCommerce-Produkte und vieles mehr ganz einfach neu anordnen können. Verwenden Sie einfach die unten stehenden Links, um direkt zu der gewünschten Methode zu springen:
- Method 1: Change the Post's Published Date (Quick and Easy)
- Method 2: Use Post Types Order Plugin (More Control)
- Method 3: Use Drag and Drop in WooCommerce (Product Post Types)
- Method 4: Make WordPress Posts Sticky (Best for Highlighting Specific Posts)
- Method 5: Re-Order WordPress Posts Using Code (Advanced)
Video-Anleitung
Methode 1: Ändern Sie das Veröffentlichungsdatum des Beitrags (schnell und einfach)
Am einfachsten können Sie die Reihenfolge Ihrer Beiträge ändern, indem Sie einfach das Veröffentlichungsdatum ändern.
Standardmäßig zeigt Ihre WordPress-Website die Beiträge nach ihrem Veröffentlichungsdatum in umgekehrter chronologischer Reihenfolge an, so dass neuere Beiträge zuerst erscheinen.
Wenn Sie das Veröffentlichungsdatum eines Beitrags ändern, wird er auch auf der Archivseite, der Blogseite und in anderen Bereichen Ihrer WordPress-Website angezeigt.
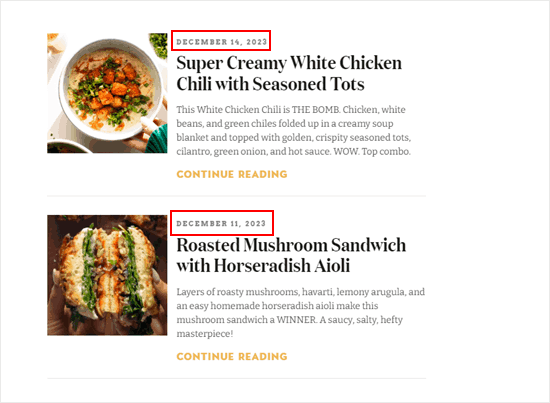
Wenn Sie z. B. einen älteren Beitrag zuerst anzeigen möchten, können Sie das Veröffentlichungsdatum auf heute ändern. Wenn Sie einen Beitrag in der Liste nach unten verschieben möchten, können Sie einfach das Veröffentlichungsdatum älter machen.
Öffnen Sie dazu einfach den Blog-Beitrag im WordPress Block-Editor. Navigieren Sie in der rechten Seitenleiste zum Tab “Beitrag”, und klicken Sie dann auf den Link neben “Veröffentlichen”.
Es öffnet sich ein Popup-Fenster mit Datum und Uhrzeit, in dem Sie das Veröffentlichungsdatum ändern können.
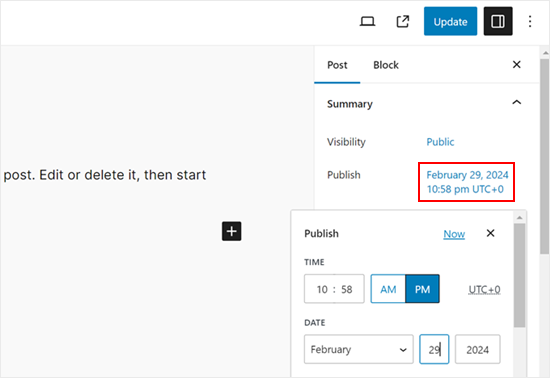
Hier ist es wichtig, ein Datum zu wählen, das für andere Beiträge relevant ist. Wenn Sie zum Beispiel möchten, dass der Beitrag vor einem Blog erscheint, der am 8. März veröffentlicht wurde, dann müssen Sie das Veröffentlichungsdatum auf den 9. März ändern.
Nachdem Sie das Datum und die Uhrzeit geändert haben, klicken Sie auf “Aktualisieren”, um Ihre Änderungen zu speichern.
Methode 2: Verwenden Sie das Plugin “Beitragstypen bestellen” (mehr Kontrolle)
Wenn Sie Beiträge neu anordnen möchten, ohne ihr Veröffentlichungsdatum zu ändern, empfehlen wir Post Types Order. Mit diesem Plugin können Sie Blogbeiträge, WooCommerce-Produkte, Gutscheincodes, Bestellungen, benutzerdefinierte Beitragstypen und mehr per Drag & Drop organisieren.
Zunächst müssen Sie das Plugin “Post Types Order” installieren und aktivieren. Weitere Details finden Sie in unserer Schritt-für-Schritt-Anleitung zur Installation eines WordPress-Plugins.
Gehen Sie nach der Aktivierung auf die Seite Einstellungen ” Post Types Order, um die Einstellungen des Plugins zu konfigurieren.
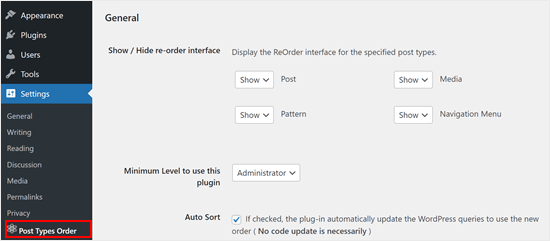
Im Abschnitt “Schnittstelle zum Neuordnen ein-/ausblenden” sind alle verschiedenen Inhaltstypen aufgeführt, die mit Post Types Order neu geordnet werden können.
Sie müssen sicherstellen, dass diese Dropdown-Menüs auf “Anzeigen” eingestellt sind.

Danach blättern Sie zum Abschnitt “Archiv Drag & Drop”.
Öffnen Sie für jeden Inhaltstyp, den Sie reorganisieren möchten, das entsprechende Dropdown-Menü und wählen Sie “Ja”.
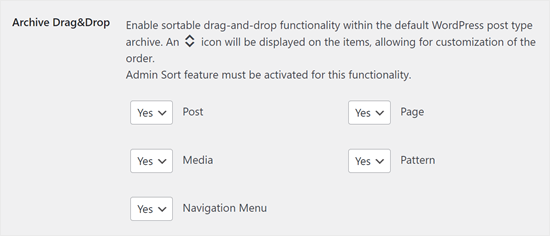
Wenn Sie mit der Einrichtung des Plugins zufrieden sind, klicken Sie auf “Einstellungen speichern”.
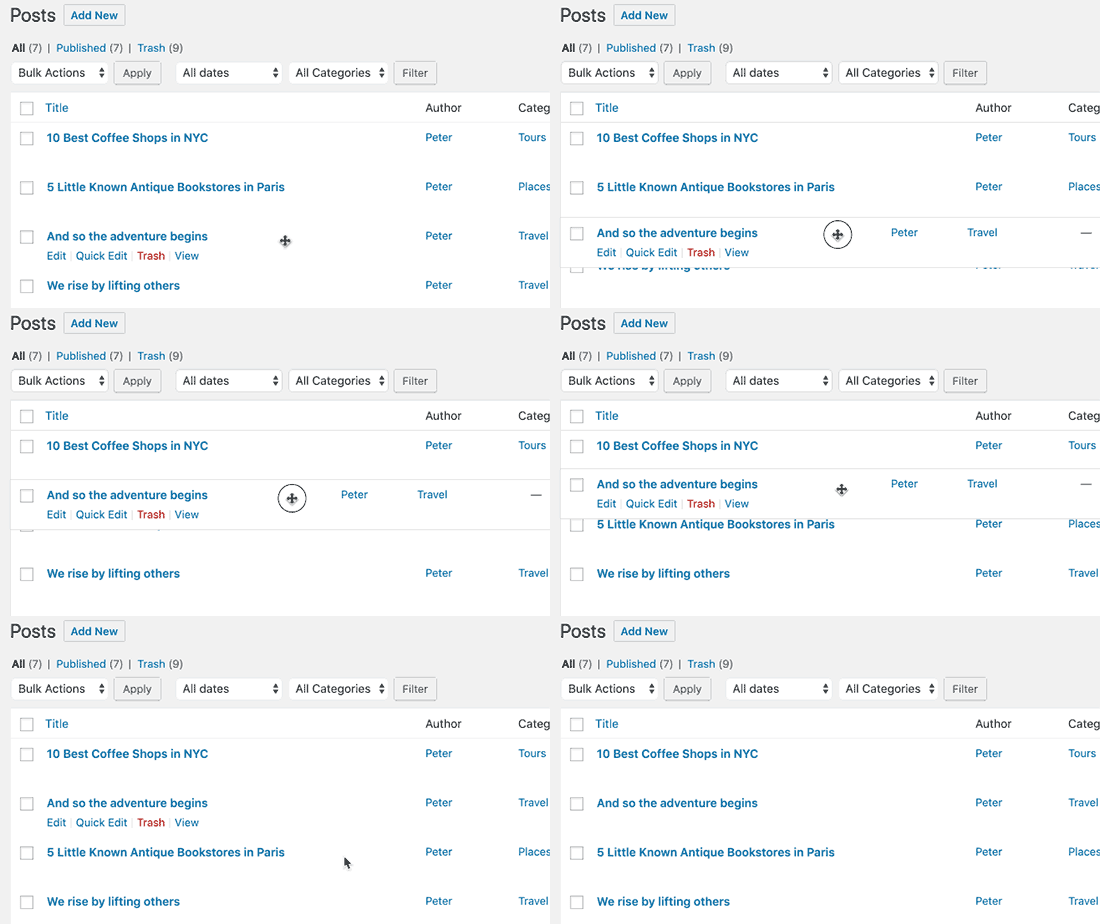
Gehen Sie nun zu einem Bereich mit den Inhalten, die Sie neu anordnen möchten, z. B. Beiträge ” Alle Beiträge. Sie können dann eine benutzerdefinierte Reihenfolge erstellen, indem Sie die Beiträge einfach per Drag&Drop an eine neue Position ziehen.
Methode 3: Verwenden Sie Drag-and-drop in WooCommerce (Produktbeitragstypen)
Wenn Sie einen Online-Shop betreiben, dann unterstützt WooCommerce bereits von Haus aus Drag & Drop.
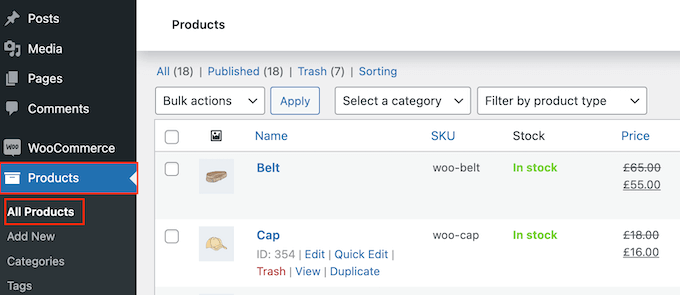
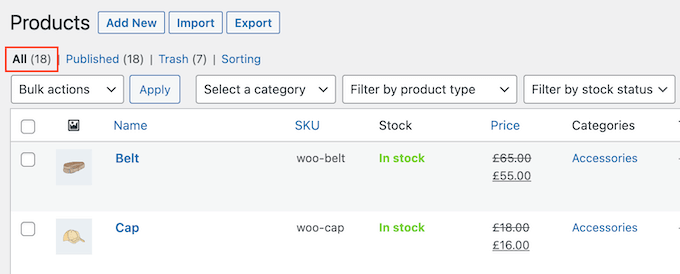
Um Ihre Produkte nachzubestellen, müssen Sie die Seite Produkte ” Alle Produkte aufrufen.
Klicken Sie hier auf den Link “Sortierung” am oberen Rand der Seite.
Sie können dann die Reihenfolge Ihrer Produkte durch Ziehen und Ablegen ändern.
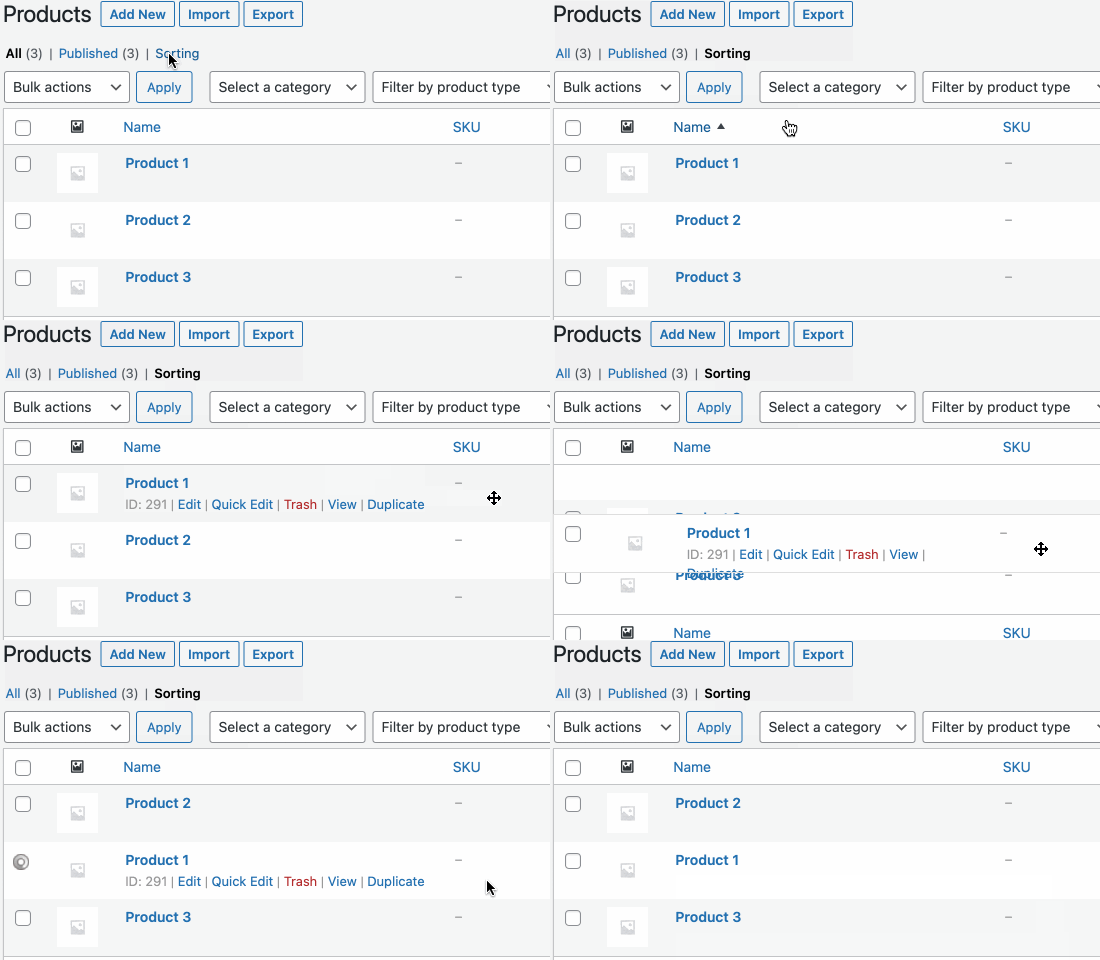
Sind Sie mit der Anordnung der Produkte in Ihrem Online-Shop zufrieden?
Klicken Sie dann einfach auf den Link “Alle”, um die Sortierung zu beenden.
Methode 4: WordPress-Beiträge als “Sticky” kennzeichnen (am besten zum Hervorheben bestimmter Beiträge)
Manchmal möchten Sie vielleicht einen wichtigen Blogbeitrag hervorheben, z. B. eine große Produktankündigung oder einen Beitrag über eine Werbeaktion oder einen Wettbewerb, den Sie durchführen.
Mit WordPress können Sie einen Beitrag als “sticky” kennzeichnen, so dass er unabhängig vom Veröffentlichungsdatum über allen anderen Beiträgen auf Ihrer Blogseite erscheint.
Öffnen Sie dazu einfach den WordPress-Blogbeitrag, den Sie hervorheben möchten. Aktivieren Sie im Menü “Beitrag” das Kontrollkästchen neben “Am Anfang des Blogs anbringen”.
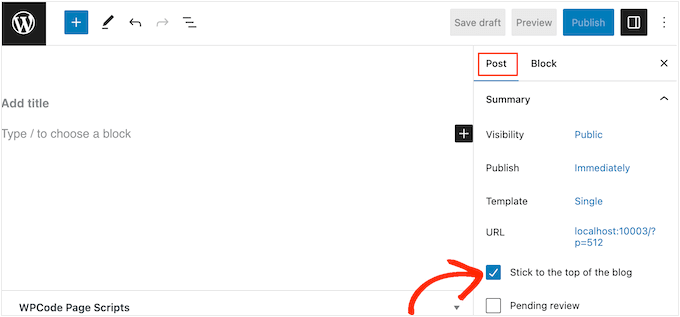
Klicken Sie anschließend auf die Schaltfläche “Aktualisieren”, um Ihre Änderungen zu speichern.
Wenn Sie nun Ihre Website besuchen, sehen Sie den Beitrag ganz oben angeheftet. Je nach WordPress-Theme kann der angeheftete Beitrag sogar unterschiedlich hervorgehoben sein.
Ausführlichere Anweisungen finden Sie in diesen Leitfäden:
- Wie man oben gehaltene Beiträge in WordPress erstellt (schnell und einfach)
- Hinzufügen von individuell gehaltenen Beiträgen in den Archiven des Individuellen Inhaltstyps von WordPress
- Wie man oben gehaltene Beiträge für Kategorien in WordPress hinzufügt
- Wie man die neuesten oben gehaltenen Beiträge in WordPress anzeigt
- Wie man oben gehaltene Beiträge aus der Schleife in WordPress ausschließt
Methode 5: WordPress-Beiträge mit Code neu ordnen (Fortgeschrittene)
Sie möchten vielleicht ändern, wie WordPress alle Beiträge auf Ihrer Website organisiert, einschließlich aller Beiträge, die Sie in Zukunft veröffentlichen. Dies geschieht am besten durch Hinzufügen von benutzerdefiniertem Code in WordPress.
Oft finden Sie Anleitungen, wie Sie die Datei functions.php Ihres Themes bearbeiten können. Dies kann jedoch alle Arten von WordPress-Fehlern verursachen oder sogar Ihre Website komplett zerstören.
Außerdem verlieren Sie die Anpassungsmöglichkeiten, wenn Sie Ihr WordPress-Theme aktualisieren.
Wir empfehlen stattdessen das kostenlose Plugin WPCode, das beste und einsteigerfreundlichste Plugin für Code-Snippets, das von über 1 Million WordPress-Websites verwendet wird. Es ermöglicht Ihnen das einfache Hinzufügen von individuellem CSS, HTML, PHP und mehr, ohne Ihre Website zu gefährden.
Als Erstes müssen Sie WPCode installieren und aktivieren. Weitere Details finden Sie in unserer Schritt-für-Schritt-Anleitung für die Installation eines WordPress-Plugins.
Nach der Aktivierung gehen Sie zu Code Snippets ” Snippet hinzufügen.
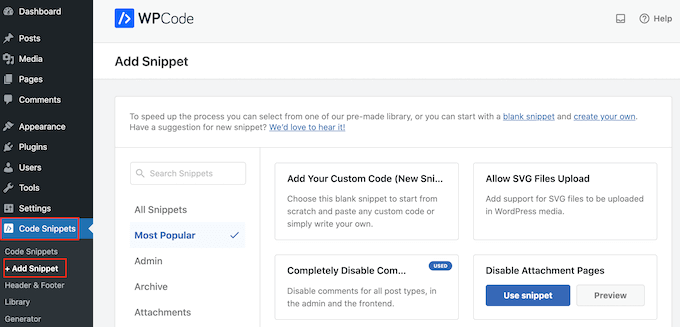
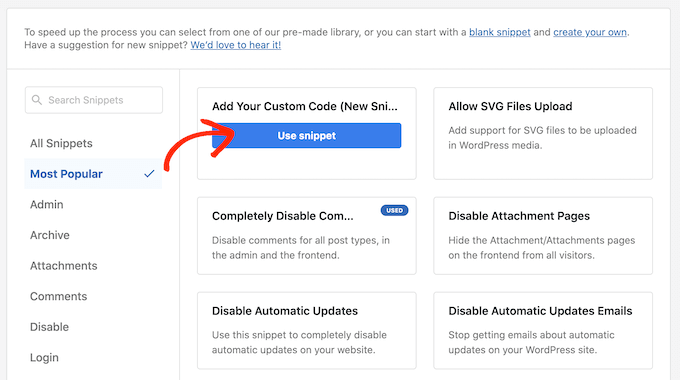
Fahren Sie hier einfach mit der Maus über “Add Your Custom Code”.
Wenn es erscheint, müssen Sie auf “Snippet verwenden” klicken.
Geben Sie zunächst einen Titel für das benutzerdefinierte Code-Snippet ein. Dies kann alles sein, was Ihnen hilft, das Snippet im WordPress-Dashboard zu identifizieren.
Öffnen Sie anschließend das Dropdown-Menü “Code-Typ” und wählen Sie “PHP Snippet”.
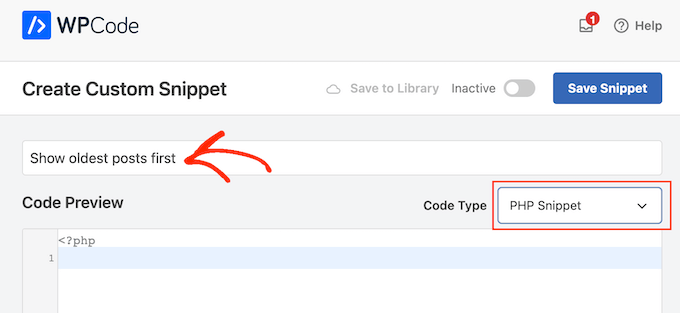
Fügen Sie im Code-Editor den folgenden Codeschnipsel hinzu:
1 2 3 4 5 6 7 8 9 10 11 12 13 14 | //function to modify default WordPress queryfunction wpb_custom_query( $query ) { // Make sure we only modify the main query on the homepage if( $query->is_main_query() && ! is_admin() && $query->is_home() ) { // Set parameters to modify the query $query->set( 'orderby', 'date' ); $query->set( 'order', 'ASC' ); }} // Hook our custom query function to the pre_get_posts add_action( 'pre_get_posts', 'wpb_custom_query' ); |
Dieser Code ändert einfach die Parameter orderby und order in der Standard-WordPress-Abfrage.
In dem obigen Ausschnitt werden die Beiträge in chronologischer Reihenfolge angezeigt, so dass die älteren Beiträge zuerst erscheinen. Der Parameter orderby bietet jedoch viele Optionen, sodass Sie Ihre Beiträge auf viele verschiedene Arten anordnen können.
Eine vollständige Liste der Optionen finden Sie in der WP-Query-Code-Referenz.
Hier ist ein weiteres Codebeispiel, bei dem wir die Reihenfolge durch eine völlig zufällige Reihenfolge geändert haben:
1 2 3 4 5 6 7 8 9 10 11 12 13 | // Function to modify default WordPress queryfunction wpb_custom_query( $query ) { // Make sure we only modify the main query on the homepage if( $query->is_main_query() && ! is_admin() && $query->is_home() ) { // Set parameters to modify the query $query->set( 'orderby', 'rand' ); }} // Hook our custom query function to the pre_get_posts add_action( 'pre_get_posts', 'wpb_custom_query' ); |
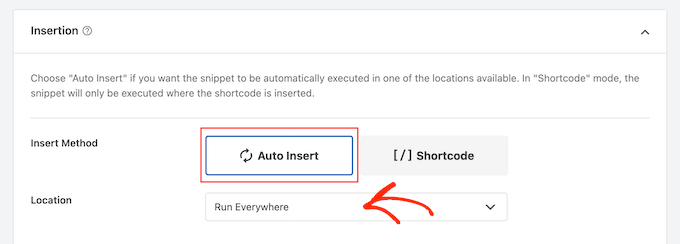
Wenn Sie mit dem Snippet zufrieden sind, müssen Sie zum Abschnitt “Einfügen” scrollen. WPCode kann Ihren Code an verschiedenen Stellen einfügen, z. B. nach jedem Beitrag, nur im Frontend oder nur für Administratoren.
Wir wollen den benutzerdefinierten PHP-Code auf unserer gesamten WordPress-Website verwenden, also klicken Sie auf “Automatisch einfügen”, wenn dies nicht bereits ausgewählt ist.
Öffnen Sie dann das Dropdown-Menü “Standort” und wählen Sie “Überall ausführen”.
Danach können Sie zum oberen Rand des Bildschirms scrollen und auf den Schalter “Inaktiv” klicken, damit er auf “Aktiv” wechselt.
Klicken Sie abschließend auf “Snippet speichern”, um das PHP-Snippet zu aktivieren.
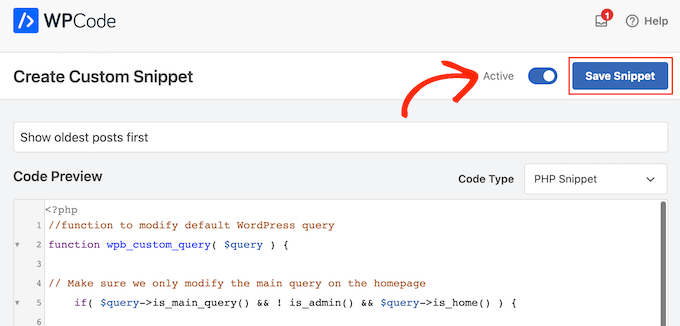
Wenn Sie nun Ihre Website besuchen, werden Sie sehen, dass die Beiträge auf der Grundlage Ihres Codes neu geordnet wurden.
Wir hoffen, dass dieser Artikel Ihnen geholfen hat, einfache Wege zu finden, Blogbeiträge in WordPress neu zu ordnen. Vielleicht interessieren Sie sich auch für unsere Expertenauswahl der besten Plugins für verwandte Beiträge in WordPress und dafür, wie Sie einen Button zum Laden weiterer Beiträge in WordPress hinzufügen.
Wenn Ihnen dieser Artikel gefallen hat, dann abonnieren Sie bitte unseren YouTube-Kanal für WordPress-Videotutorials. Sie können uns auch auf Twitter und Facebook finden.


Jiří Vaněk
Is there some way, eg using CSS, to highlight a post that is pinned to the top of the blog like this? For example, a different background color of the block, etc.? The currently used template cannot do this.
WPBeginner Support
That would require custom CSS that would depend on your specific theme for determining what would work. We do not have a guaranteed CSS for changing that information but you may want to take a look at our guide on using Inspect element to help test CSS:
https://www.wpbeginner.com/wp-tutorials/basics-of-inspect-element-with-your-wordpress-site/
Admin
Olivier
For some reasons, the drag-and-drop options for Products did not work for me, and I did not want to install another plugin…
So I found a workaround to display my products for one specific category, by using the default woocommerce shortcode with the order attribute.
[products columns=”3″ category=”some-category-goes-here” order=”ASC”]
Now my producs for this category are display from first to last (which happened to be in my case with ascending price, which is what I wanted), and from not last to first.
Somehow a 6th method, to update your post with.
Hope this helps.
WPBeginner Support
Thank you for sharing this shortcode for those looking for other options!
Admin
Barq
Hi, how to use this code for “blog” page?
WPBeginner Support
The simplest method from this that would affect your blog page would be to change the published date for your blog posts
Admin
Jeff Moyer
Wow fantastic article thank you, I was aware of a couple of these options but not all thank you! Probably going to avoid the coding option but we’ll see lol.
WPBeginner Support
Glad our guide was helpful
Admin
Brian
I have the post reorder plugin, but do you know if there’s a plugin that allows the write to choose the post priority while in edit? For example, a dropdown that allows the user to select where on the page the post should appear (first, fifth, 10th, etc.).
WPBeginner Support
Not at the moment.
Admin
mark
First of all thank you for putting this together, your post are usually very helpful.
For some reason the theme i’m using has the blog posts order with oldest post on top. I would like to see the newest on top.
I’m running out of ideas. Any idea what to look for (and where) to get my posts sorted with the newest post on top?
WPBeginner Support
You would want to reach out to the support for your specific theme for if this is a theme setting.
Admin
Tom Grisak
Thanks for the help. I didn’t know a plugin could do that for me. I thought I’d have to go to every post and change the publish date. But I have a question, it sounds like you can put two stickies at the top. Are those also sorted by date?
WPBeginner Support
It would depend on your theme but normally they should be shown in date order
Admin
Rico
What I would like is for the sticky post to be at the top and the rest of the posts to follow the default (reverse chronological) order below it. I’ve used the sticky option but it doesn’t always put the sticky post at the top. It’s sticky on the blog page but at the bottom of the list in the sidebar for Recent Blog Posts. I’m using the Alizee template. Is there something I can do with CSS or another method to achieve this for both areas?
WPBeginner Support
You would either need to manually create your own recent posts widget or find a plugin that changes that. For creating a custom widget you would either recreate the look using an HTML or Text widget or manually creating a custom widget as we show here: https://www.wpbeginner.com/wp-tutorials/how-to-create-a-custom-wordpress-widget/
Admin
dirkthewebphoenix
What about a merely temporary reversal of order?
Example: As a visitor you have a special interest making you want to start with the oldest posts in your search, or as the site author you want to create a search URL for your menu that will present a popular post series in chronological order.
Is there any search term one could enter to reverse the order or any modification of the search URL (get request) that would do this on this one-time basis?
WPBeginner Support
For that, you would need to look into a plugin for your search to allow that type of one time re-order
Admin
Phil Smart
When ordering and displaying blog posts, my sponsor wants them ordered by the date of the event, which is the only reliable date. I am asking how to make that happen.
My sponsor considers that altering the date published just to alter the order means that no-one can count on that date to know which version of posts they are looking at.
How can we add a field to capture event-date?
WPBeginner Support
You can use a plugin like Advanced custom fields for setting up a new field: https://wordpress.org/plugins/advanced-custom-fields/
Admin
Michael Walther
Unfortunately, drag-and-drop type plugins like ‘Post Types Order’ are completely useless if you have more posts in your blog than fit on one screen.
For instance, I have > 100 posts in my blog. If I want so drag, say, post #96 all the way up to position #3, then I am out of luck because #5 and #96 do not fit on the same screen, which makes drag and drop impossible.
WPBeginner Support
If you go to your screen options in the top right of your All Posts page and you should be able to increase the number of posts to display on the page
Admin
Jo Wagner
Hi there,
I like this plugin. But find it limiting to only post types and not Pages as well. Simple Page Order works well for pages, but then you have two plugins again, which is not ideal. Is there no plugin to be able to do both?
Please let me know.
Abe
Hi there, I’m using the WordPress.com free blog, and when I clicked on plug-ins, it’s asking me to upgrade. Is there another way of installing the re-order word press posts? Any tips would be great. I was planning on including my previously done writings, which weren’t done in this blog, but in review sites like Trip Advisor or Zomato, but the tendency of the site is that my latest posts will be the ones posted on top, so the chronological thing works only if I write my posts also based on timing of the visit, which is not feasible of how I’m going to populate my blog post.
WPBeginner Support
Hi Abe,
You’ll need a self hosted WordPress.org website or the business plan on WordPress.com. Please see our guide on the difference between WordPress.org vs WordPress.com.
Admin
Donna L Lovette
I downloaded the post oder plugin and I worked perfectly. Now my blog looks like I want it to. Thanks
Sherry
Hi – I installed the post order plug in and reordered my posts but it didn’t change the order on the site. what am I doing incorrectly?
Gert Cilliers
Your plugin works like a charm – Just what I needed – Many Thanks
Christophe Giraud
Thank you!
Lee Grainger
I have uploaded this plugin, dragged and dropped my posts in the order I want them in, but they don’t appear to have changed.
I have several blog post categories on different pages, is it possible this is the reason?
Vickie Robinson
OMG you just saved my work life.
THANK YOU so much this is just PERFECT!!!!!!!!!!!!!!!!!!!
Tony
Thank you!
Laura Sage
I’ve used this plugin many times. Very useful. Thank you. HOWEVER, I just created a custom post type, and the re-oder option isn’t showing up for it. What do I need to do in order for it to be added to my custom post type as well? The custom post type doesn’t show up in Settings.
WPBeginner Support
It does not work with hierarchical post types like Pages.
Admin
Alex Carby
Cheers, this was a very helpful post, Simple to the point.
Neooth
This plugin is amazing. But I have a question: On my front page, I’ve got a combined archive of multiple post types. Whenever I change the order of the posts/custom posts, oddly, an old post from a custom post type springs to the top.
I am guessing this happens because when I use the plugin, the rearrangement is done according to the ID, and ID’s from all custom post types start vying with each other.
Is there a way to prevent an old custom post type with an ID of 0 from appearing near the top?
Mariusz Szatkowski
Scheduled posts order would be great idea. Anyone has seen it?
Okun
You just saved my day!!!
Pixeltender
This plugin just saved me tons of time and yelling at my computer. Thanks!
Karen Johnson
this plugin removed my banner completely from my site, so I deleted it.
Subin
Installed the plugin and seeing the extra Reorder page in the admin. Reordering the posts there doesn’t have any effect though.
Can’t seem to find anything wrong and don’t have any idea to fix it other than I think the plugin needs to overrule the datestamp of each post (or something) to work.
http://wordpress.org/extend/plugins/metronet-reorder-posts/
Editorial Staff
No, you just have to edit the loop in your theme to say orderby=order.
Admin
Ankur
Useful plugin, might use it on my site.
Also, I like new layout of the site. Is it some customized genesis child theme of some completely different customized theme for your site ?
Editorial Staff
Customized theme for our site.
Admin
Ankur
It looks great, clean and elegant.
Also, I like the this default comment system compared to livefyre
bill
Wow! Wish I would’ve known about this plugin three months ago. When working on a client’s site, I had to re-date over three hundred posts; not a fun gig Thanks for the article.
Kathy Drewien
I noticed the plugin shows compatibility only up to WP 3.2.2, yet it was updated 11 days ago. Any known issues with 3.3 and higher?
Editorial Staff
Not that we are aware of.
Admin
Jaspal Singh
Wow! Excellent Plugin to have Drag & Drop ordering functionality.
Thanks for sharing.