Sie fragen sich, warum Ihre WordPress E-Mails nicht in den Posteingängen ankommen? Sie sind nicht allein!
Viele Website-Besitzer sind mit diesem Problem konfrontiert, weil die meisten Web Hosts die Standard PHP E-Mail Funktion einschränken, wodurch E-Mails verloren gehen oder im Spam landen.
Mit dem Gmail SMTP Server, einer zuverlässigen, kostenlosen Lösung, die sicherstellt, dass Ihre E-Mails ordnungsgemäß zugestellt werden, können Sie dies ganz einfach beheben. Wir haben ihn selbst verwendet und sind der Meinung, dass er eine gute Wahl für Blogger, kleine Unternehmen und alle ist, die E-Mails problemlos versenden möchten.
In dieser Anleitung zeigen wir Ihnen genau, wie Sie Gmail SMTP in WordPress einrichten, damit Ihre E-Mails jedes Mal den Posteingang erreichen . ✅

Warum und wann Sie Gmail SMTP-Server für WordPress-E-Mails benötigen
Ihre WordPress Website sendet E-Mails, um Sie über die Registrierung neuer Benutzer, das Zurücksetzen verlorener Passwörter, automatische Aktualisierungen und Benachrichtigungen über Ihre Kontaktformulare zu informieren.
Standardmäßig verwendet WordPress die PHP E-Mail-Funktion, um E-Mails zu versenden. Diese Funktion funktioniert jedoch aus mehreren Gründen nicht wie erwartet.
Die meisten WordPress-Hosting-Unternehmen schränken die Nutzung dieser Funktion ein, um Missbrauch und Spam zu verhindern.
Spam-Filter gängiger E-Mail-Dienste überprüfen eingehende E-Mails, um festzustellen, ob sie von authentischen Servern gesendet wurden. Manchmal können die Standard WordPress E-Mails diese Prüfung nicht bestehen und landen nicht einmal im Spam Ordner.
SMTP (Simple Mail Transfer Protocol) ist der Industriestandard für den Versand von E-Mails. Im Gegensatz zur PHP-E-Mail-Funktion verwendet SMTP eine ordnungsgemäße Authentifizierung, die die Zustellbarkeit von E-Mails erhöht.
Gmail bietet einen SMTP-Dienst, mit dem Sie E-Mails von Ihrer WordPress Website aus verschicken können. Die Server von Gmail sind die beste Option, wenn Sie nur WordPress-Benachrichtigungs-E-Mails an sich selbst und einige Benutzer Ihrer Website senden möchten.
Wenn Sie jedoch E-Mails für Newsletter versenden oder einen Online-Shop betreiben wollen, sollten Sie sich die Mühe machen.
Dann sollten Sie einen Dienst für Massen-E-Mails wie Constant Contact, Brevo (früher Sendinblue) oder Mailgun nutzen.
Kostenloser vs. kostenpflichtiger Gmail SMTP-Dienst für WordPress
Sie können Ihr kostenloses Google Mail Konto verwenden, um WordPress E-Mails zu verschicken. Für eine bessere Zustellbarkeit empfehlen wir jedoch die Verwendung des kostenpflichtigen Google Workspace.
Mit Google Workspace erhalten Sie Ihre eigene , professionelle E-Mail-Adresse, z. B. name@yoursite.com.
Google Workspace erfordert, dass Sie MX-Einträge zu Ihrem Domainnamen hinzufügen. Das bedeutet, dass Ihre E-Mails so aussehen, als kämen sie von Ihrem Domainnamen, was die Authentizität erhöht und eine bessere Zustellbarkeit gewährleistet.
Wenn Sie eine schriftliche Anleitung bevorzugen, lesen Sie einfach weiter. Hier finden Sie einen kurzen Überblick über alle Methoden, die wir in diesem Leitfaden behandeln werden:
Sind Sie bereit? Dann fangen wir an.
Senden von WordPress-E-Mails mit Gmail SMTP-Server
Wenn Sie sich für Google Workspace entscheiden, müssen Sie zunächst Ihre Domain für die Arbeit mit Google Apps einrichten. Wir haben eine Schritt-für-Schritt-Anleitung, wie Sie eine professionelle E-Mail-Adresse mit Google Workspace einrichten.
Der Rest der Anweisungen ist gleich, egal ob Sie ein kostenpflichtiges oder ein kostenloses Google Mail-Konto verwenden.
Nun, WP Mail SMTP ist das beste WordPress SMTP Plugin auf dem Markt. Es ermöglicht Ihnen die einfache Nutzung eines beliebigen SMTP Servers, um WordPress E-Mails mit höherer Zustellbarkeit zu versenden.
📌 Hinweis: Wir verwenden WP Mail SMTP selbst auf unserer Website und haben gesehen, wie es dazu beiträgt, dass alle unsere E-Mails den Posteingang der Benutzer erreichen – und nicht den Spam-Ordner. In unserer vollständigen Rezension zu WP Mail SMTP finden Sie einen Einblick in die Funktionen des Programms!
Installieren und aktivieren wir also das WP Mail SMTP Plugin. Weitere Details finden Sie in unserer Schritt-für-Schritt-Anleitung zur Installation eines WordPress Plugins.
Es gibt zwar eine kostenlose Version, aber wir empfehlen den Kauf der kostenpflichtigen Version WP Mail SMTP Pro, mit der Sie Zugang zu Premium-Support, mehr Mailern und einer White-Glove-Einrichtung durch einen ihrer Experten erhalten.
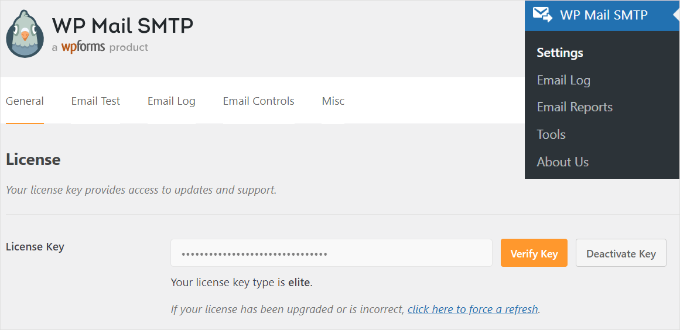
Nach der Aktivierung müssen Sie den Abschnitt Einstellungen ” WP Mail SMTP besuchen, um die Einstellungen des Plugins zu konfigurieren. Geben Sie dann einfach Ihren Lizenzschlüssel ein und klicken Sie auf den Button “Schlüssel überprüfen”. Sie finden den Schlüssel im Bereich Ihres WP Mail SMTP Kontos.
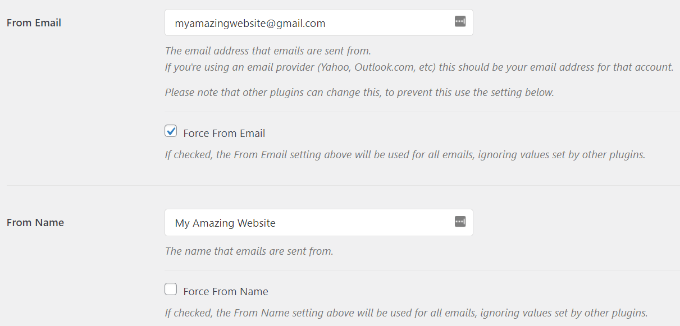
Auf dem Tab “Allgemeine Einstellungen” müssen Sie sicherstellen, dass Sie Ihre E-Mail-Adresse von Google Mail im Feld “Von E-Mail” verwenden.
Als nächstes müssen Sie den Namen des Absenders angeben.
Das WP Mail SMTP Plugin bietet 3 Möglichkeiten, Ihre WordPress Website mit den Servern von Gmail zu verbinden:
- Die erste Methode verwendet eine Ein-Klick-Installation, die die einfachste und anfängerfreundlichste ist, aber nur für Benutzer von Premium Plugins verfügbar ist.
- Die zweite Methode verwendet die OAuth-Authentifizierung. Diese Methode ist sicher und erfordert kein Premium Plugin.
- Die dritte Methode besteht darin, die SMTP-Einstellungen von Google Mail manuell zu konfigurieren. Im Allgemeinen empfehlen wir diese Methode nicht, da sie weniger sicher ist.
Richten wir also WordPress so ein, dass es Gmail SMTP für den Versand von E-Mails verwendet.
Methode 1: Einrichten von Gmail zum Senden von WordPress E-Mails mit einer Ein-Klick-Installation
Diese Methode ist die schnellste und einfachste für alle, so dass Sie Zeit und Verwirrung sparen können.
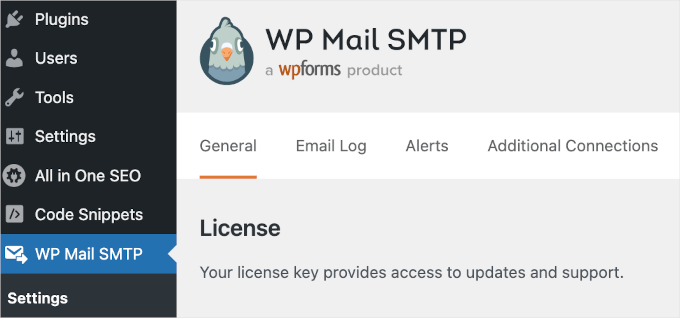
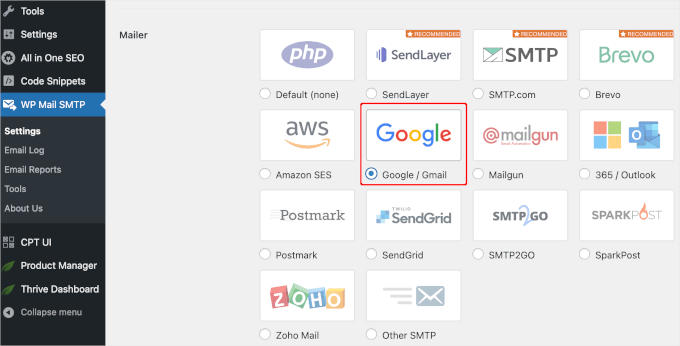
Nachdem Sie das Plugin WP Mail SMTP installiert und aktiviert haben, navigieren Sie zu WP Mail SMTP ” Einstellungen und vergewissern Sie sich, dass Sie sich auf dem Tab “Allgemein” befinden.
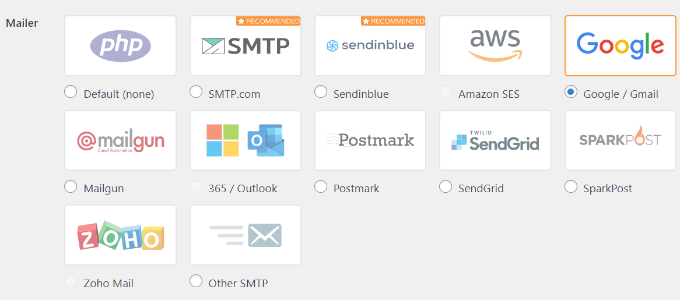
Dann müssen Sie unter dem Abschnitt “Mailer” die Option “Google / Gmail” auswählen.
Damit können Sie die Option “Ein-Klick-Einrichtung” verwenden.
Der nächste Schritt besteht darin, Ihr Google Konto zu autorisieren.
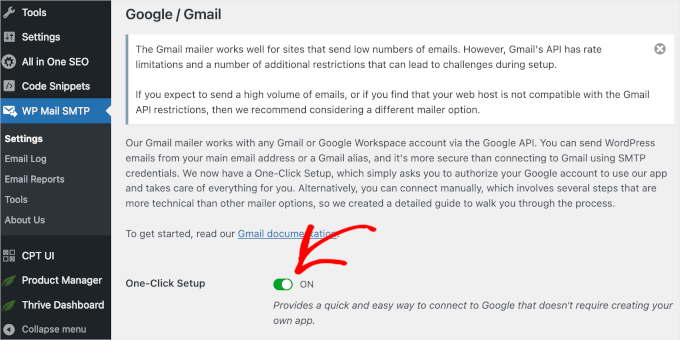
Auf Ihrer Ansicht sehen Sie einen Abschnitt “Google / Gmail” unter “Mailer”. Klicken Sie auf den Schalter, um die Funktion der Ein-Klick-Installation zu aktivieren.
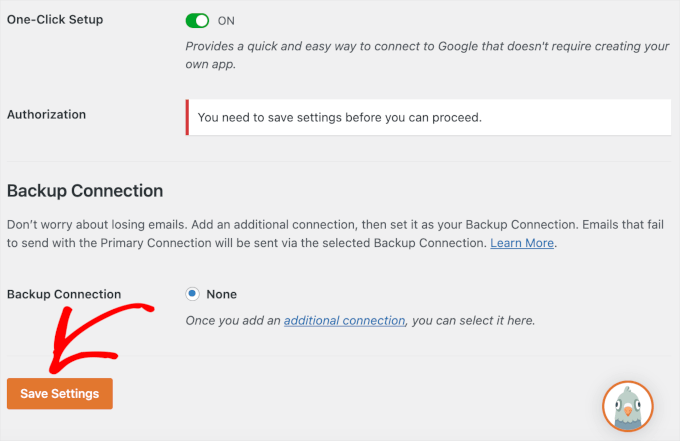
Dann wird möglicherweise eine Benachrichtigung angezeigt, die besagt, dass Sie die Änderungen erst speichern müssen, um den Autorisierungsprozess fortzusetzen.
Klicken wir also auf den Button “Einstellungen speichern”.
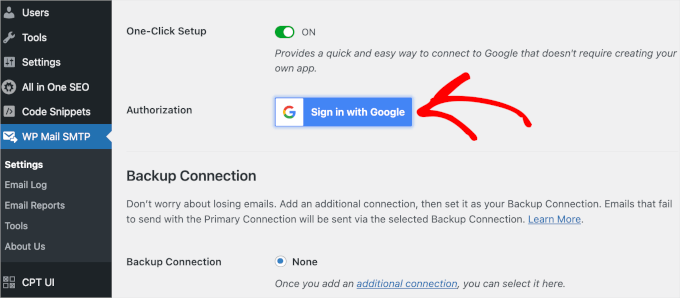
Danach sollten Sie in der Lage sein, den Vorgang fortzusetzen.
Sie werden aufgefordert, sich bei Ihrem Google-Konto anzumelden. Klicken Sie einfach auf den Button “Bei Google anmelden” und wählen Sie ein Konto aus.
Anschließend bittet Google Sie um die Berechtigung, dass WP Mail SMTP E-Mails in Ihrem Namen versenden darf.
Sie können auf “Zulassen” klicken, um fortzufahren.
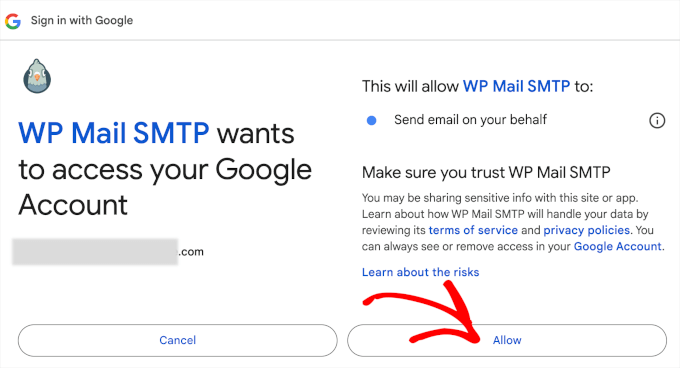
Nachdem Sie auf den Button geklickt haben, werden Sie zum Tab “Allgemein” von WP Mail SMTP in Ihrem WordPress-Administrationsbereich zurückgeleitet.
Scrollen Sie von hier aus nach unten zum Abschnitt “Autorisierung”, um zu sehen, ob das von Ihnen eingerichtete Google Mail-Konto erfolgreich verbunden wurde.
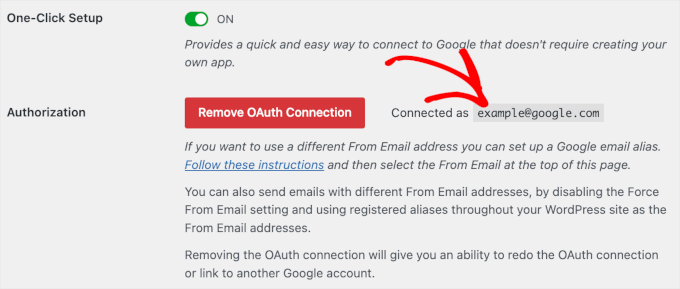
Das war’s! Sie haben Ihr Gmail Konto erfolgreich mit WP Mail SMTP verbunden, indem Sie die Ein-Klick-Einrichtungsmethode verwendet haben!
Methode 2: Einrichten von Gmail zum Senden von WordPress E-Mails mit dem OAuth Protokoll
Diese Methode ist eine gute Option , wenn Sie eine kostenlose Version des WP Mail SMTP Plugins verwenden. Es ist sicher, und wenn Sie es einmal eingerichtet haben, müssen Sie es nie wieder tun.
Zunächst müssen Sie “Google/ Gmail” als Mailer auswählen.
Wenn Sie nun nach unten scrollen, sehen Sie drei Felder, die Sie ausfüllen müssen.
Füllen Sie einfach die Felder “Client ID”, “Client Secret” und“Authorized Redirect URI” aus, wenn Sie dort sind.
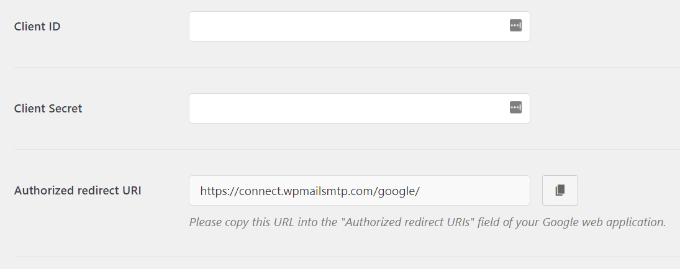
Lassen Sie uns diese Felder einrichten.
Eine App erstellen und API-Schlüssel für Google Mail generieren
Um zu beginnen, besuchen Sie einfach die Google Cloud Platform-Website und klicken Sie dann oben auf “Mein erstes Projekt”.
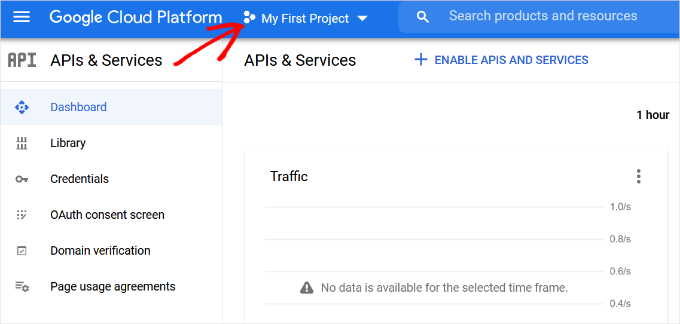
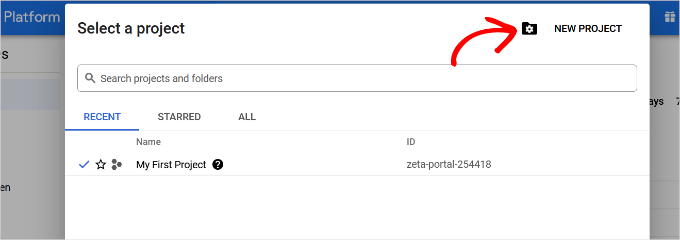
Es öffnet sich ein kleines Popup-Fenster, in dem Sie Ihre Projekte auswählen können.
Klicken Sie nun auf die Option “Neues Projekt”.
Auf dem nächsten Bildschirm werden Sie aufgefordert, einen Namen für Ihr Projekt anzugeben.
Wir empfehlen, ihm einen einprägsamen Namen zu geben, damit Sie es in Zukunft leicht wiedererkennen können.
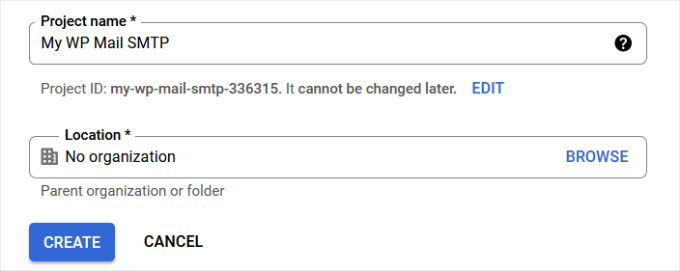
Danach klicken wir auf den Button “Erstellen”, um fortzufahren.
Die Entwicklerkonsole erstellt nun Ihr Projekt und führt Sie zu seinem Dashboard.
Google bietet Entwicklern Zugang zu vielen seiner APIs und Dienste. Sie müssen die APIs aktivieren, die Sie für dieses Projekt benötigen.
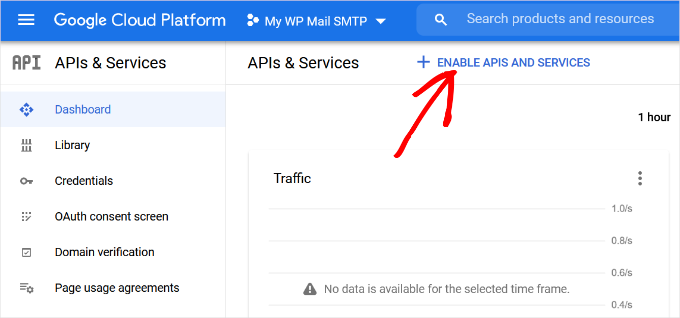
Klicken Sie einfach auf den Button “APIs und Dienste aktivieren”, um fortzufahren.
Dadurch gelangen Sie auf die Seite der APIs-Bibliothek.
Von hier aus können Sie Gmail in das Suchfeld eingeben, um die Gmail-API schnell zu finden, und sie durch Anklicken auswählen.

Sie erhalten nun einen Überblick über die API und ihre Funktionen.
Klicken Sie einfach auf die Schaltfläche “Aktivieren”, um fortzufahren.
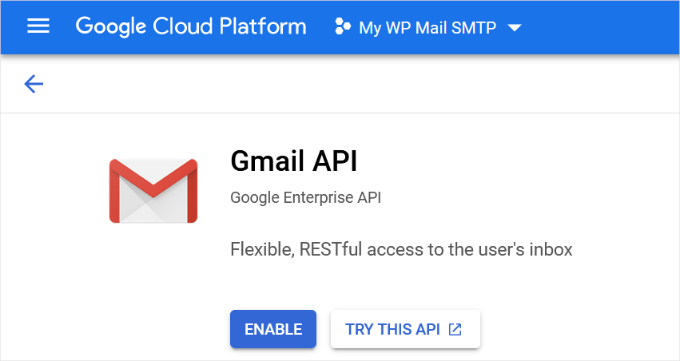
Da Ihre API nun aktiviert ist, müssen Sie im nächsten Schritt Anmeldeinformationen erstellen, die Sie in den Einstellungen Ihres WP Mail SMTP-Plugins verwenden können.
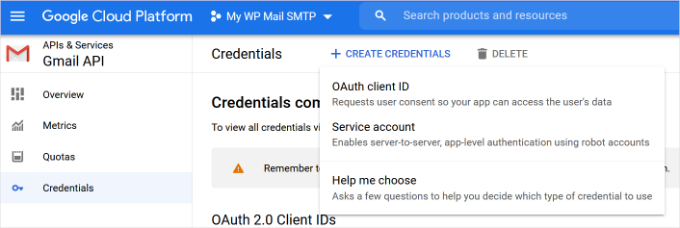
Klicken Sie auf den Button “+ Anmeldeinformationen erstellen”, um fortzufahren, und wählen Sie im Dropdown-Menü die Option “Hilfe bei der Auswahl”.
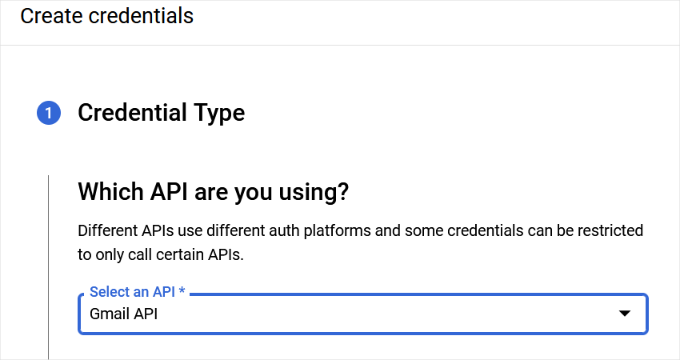
Auf dem nächsten Bildschirm werden Sie gefragt, welche API Sie verwenden möchten.
Wählen Sie “Gmail API” aus dem Dropdown-Menü für “Welche API verwenden Sie?
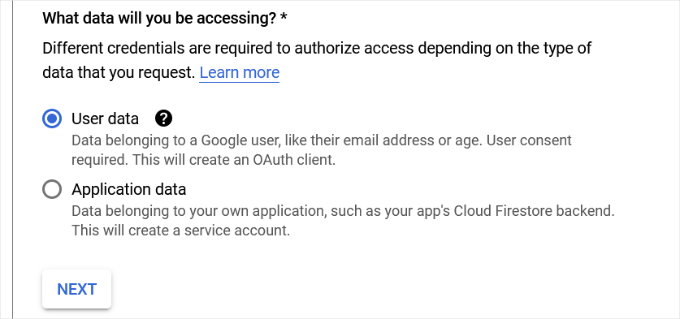
Danach wählen Sie “Benutzerdaten” für das Feld “Auf welche Daten werden Sie zugreifen?”.
Klicken Sie anschließend auf den Button “Weiter”.
Nun müssen Sie die Informationen zu Ihrer App eingeben.
Sie können zunächst einen Namen für Ihre App angeben, die von Ihnen angegebene E-Mail-Adresse auswählen und gegebenenfalls ein App-Logo hinzufügen.
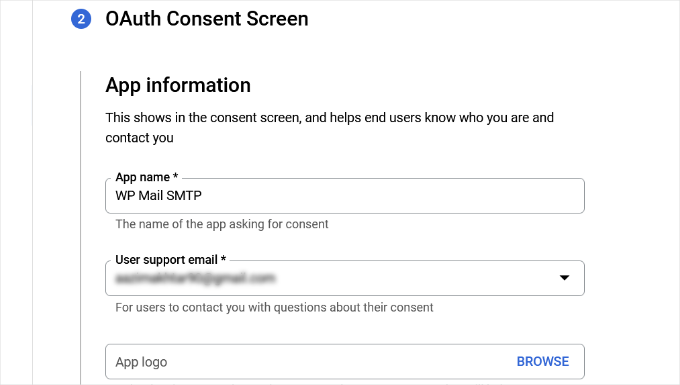
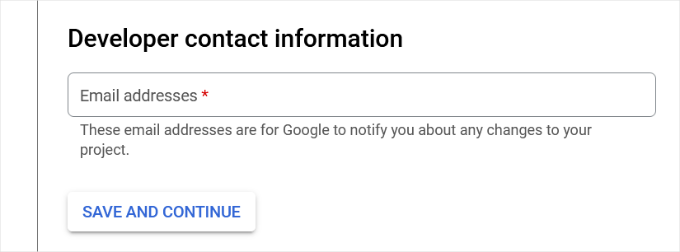
Von dort aus müssen Sie nach unten blättern und die Kontaktinformationen eines Entwicklers eingeben.
Sobald Sie die E-Mail-Adresse eingegeben haben, klicken Sie einfach auf die Schaltfläche “Speichern und weiter”.
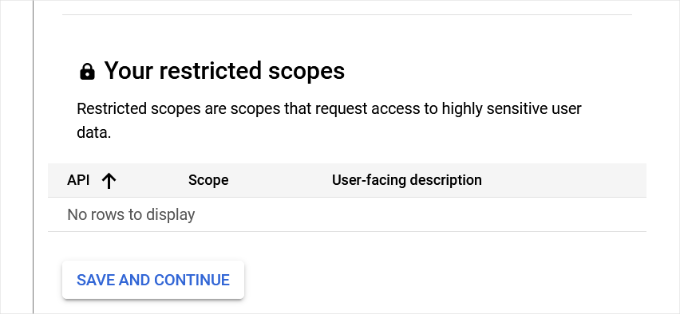
Auf dem nächsten Bildschirm können Sie die “Bereiche” für die Google Mail-API konfigurieren. Dies ist ein optionaler Schritt, den Sie vorerst überspringen können.
Blättern Sie einfach bis zum Ende der Seite und klicken Sie auf die Schaltfläche “Speichern und weiter”.
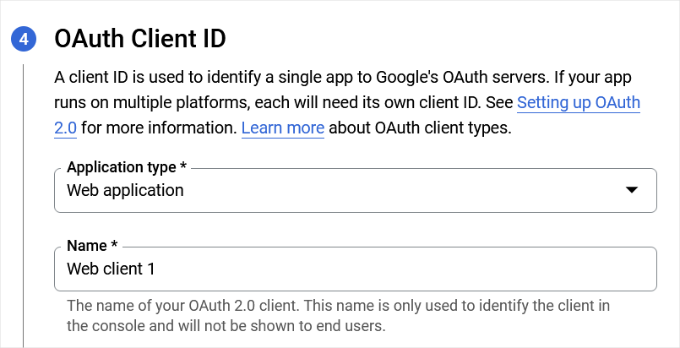
Geben Sie als Nächstes die Details für den Abschnitt “OAuth Client ID” ein.
Wählen Sie zunächst “Webanwendung” als “Anwendungstyp” aus dem Dropdown-Menü und geben Sie dann einen Namen ein.
Wenn Sie nach unten blättern, sehen Sie Optionen für “Autorisierte JavaScript-Ursprünge”. Sie können dies überspringen und zu “Authorized redirect URIs” übergehen.
Klicken Sie auf den Button “+ URL hinzufügen” unter “Autorisierte Umleitungs-URIs” und geben Sie https://connect.wpmailsmtp.com/google/ in das Feld "URIs" ein .
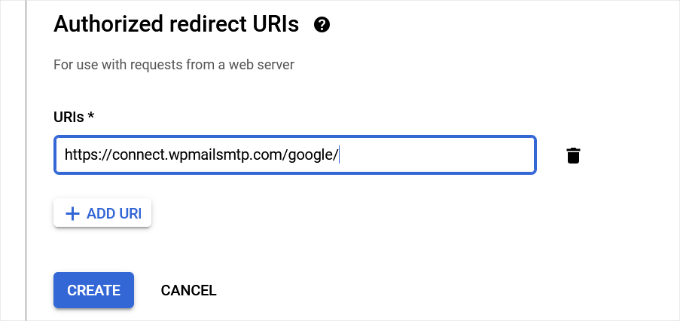
Sobald Sie die URL eingegeben haben, klicken Sie einfach auf die Schaltfläche “Erstellen”.
Als Nächstes sehen Sie Ihre Anmeldedaten unter dem Bereich “Ihre Anmeldedaten”.
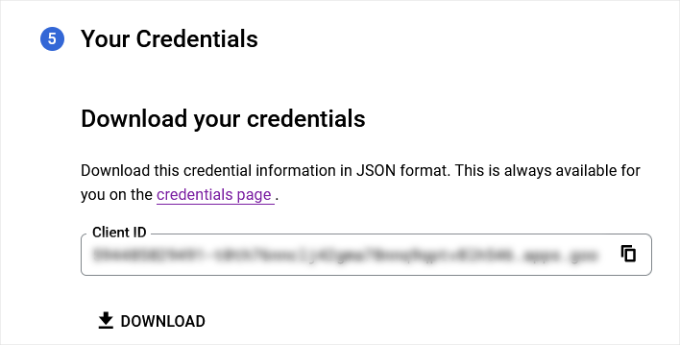
Klicken Sie auf den Button “Fertig” am unteren Rand, um fortzufahren.
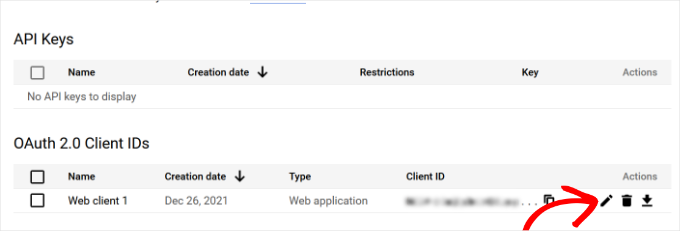
Sie gelangen nun zur Seite mit den Anmeldeinformationen für Ihr Projekt.
Auf dieser Seite sehen Sie Ihre kürzlich erstellten Zugangsdaten aufgelistet. Um fortzufahren, müssen Sie auf das Bearbeitungssymbol neben Ihren Anmeldedaten klicken.
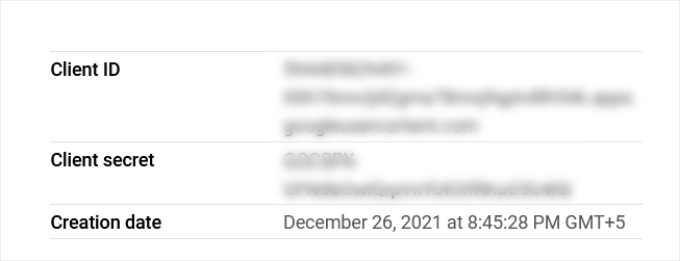
Dadurch gelangen Sie auf die Seite Anmeldeinformationen bearbeiten, wo Sie Ihr Kundengeheimnis und Ihre Kunden-ID sehen können.
Kopieren Sie einfach den Schlüssel und fügen Sie ihn auf der Seite mit den Einstellungen Ihres Plugins ein.
Danach können Sie zur Seite mit den Einstellungen des Plugins in Ihrem WordPress-Administrationsbereich zurückkehren.
Da Sie nun sowohl die Client-ID als auch die geheimen Client-Schlüssel haben, müssen Sie auf die Schaltfläche “Einstellungen speichern” klicken, um fortzufahren.
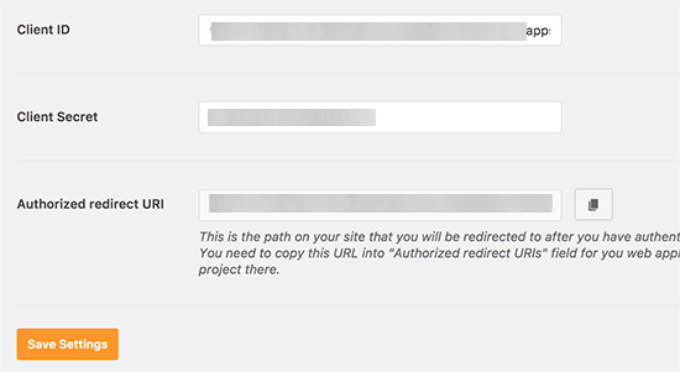
Das Plugin speichert nun Ihre Einstellungen und lädt die Seite neu.
Danach müssen Sie bis zum Ende der Einstellungsseite scrollen und auf die Schaltfläche “Erlauben Sie dem Plugin, E-Mails über Ihr Google-Konto zu senden” klicken.
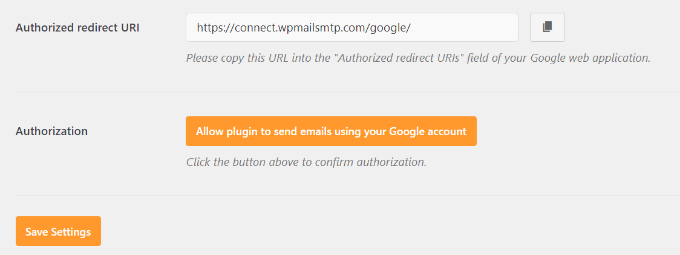
So gelangen Sie zu Ihrem Google Konto.
Anschließend werden Sie aufgefordert, der Website die Erlaubnis zu erteilen, in Ihrem Namen E-Mails zu versenden.
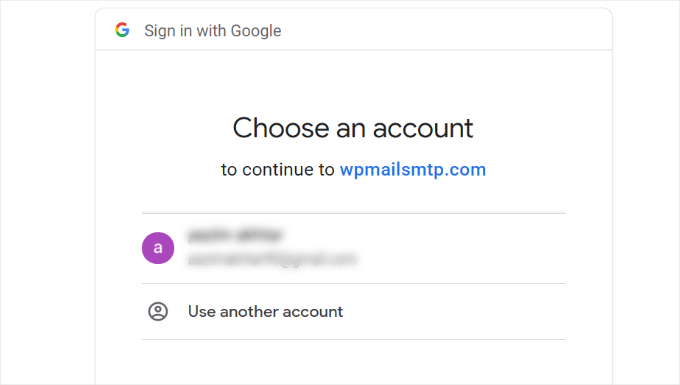
Wählen Sie einfach Ihr Google Mail-Konto aus und erteilen Sie die Erlaubnis, Ihr Google API-Projekt zu verknüpfen.
Danach werden Sie zu Ihrer Website zurückgeleitet, wo Sie eine Erfolgsmeldung sehen.
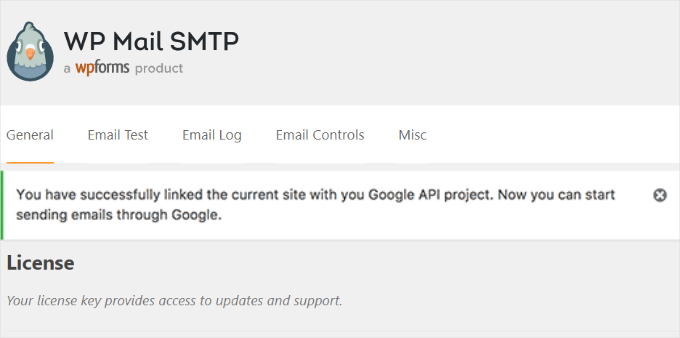
Methode 3: Einrichten von Gmail SMTP als SMTP-Sender
Mit dieser Methode können Sie sich manuell mit den SMTP-Servern von Google Mail verbinden, um Ihre WordPress E-Mails zu versenden.
Zunächst müssen Sie in Ihrem WordPress-Administrationsbereich auf Einstellungen ” WP Mail SMTP gehen, um die Plugin-Einstellungen zu konfigurieren.
Von hier aus können Sie beginnen, indem Sie die gewünschte Google Mail-Adresse in das Feld “Von E-Mail” und Ihren Namen in das Feld “Von Name” eingeben.

Als nächstes wählen wir “Other SMTP” als Mailer aus.
Außerdem sollten Sie die Box neben dem Rückweg ankreuzen.
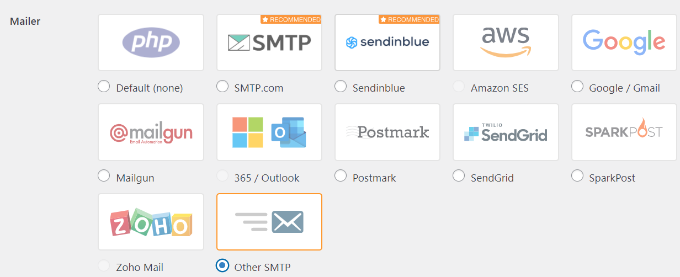
Danach können Sie zum Abschnitt “Andere SMTP” hinunterblättern.
Hier können Sie weitere Einstellungen für die Verbindung mit den SMTP-Servern von Google Mail vornehmen.
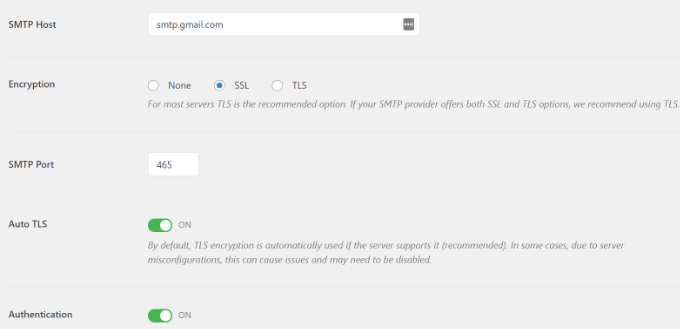
Hier ist die genaue Konfiguration, die Sie zu den Plugin-Einstellungen hinzufügen müssen:
- SMTP-Host: smtp.gmail.com
- Verschlüsselung: Verwenden Sie SSL-Verschlüsselung
- SMTP-Port: 465 (sollte automatisch erscheinen, wenn Sie SSL-Verschlüsselung wählen)
- Auto TLS: TLS ausschalten
- Authentifizierung: Aktivieren Sie die Authentifizierung
- SMTP-Benutzername: Ihre vollständige Gmail-Adresse, z. B. john.smith@yourdomain.com oder john.smith@gmail.com
- SMTP-Passwort: Passwort für Ihr Gmail-Konto
Wenn Sie fertig sind, klicken Sie auf den Button “Änderungen speichern”, um Ihre Einstellungen zu speichern.
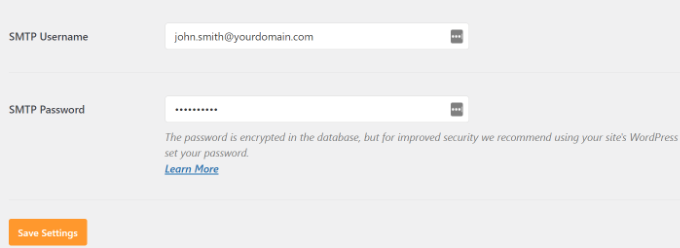
Das ist alles; Sie haben WP Mail SMTP erfolgreich eingerichtet, um Gmail SMTP-Server zu verwenden.
Testen Ihrer WP Mail SMTP-Einstellungen
Mit dem WP Mail SMTP-Plugin können Sie Ihre E-Mail-Einstellungen testen, um sicherzustellen, dass alles richtig funktioniert.
Navigieren Sie zu Einstellungen ” WP Mail SMTP und klicken Sie auf den Tab “E-Mail Test”.
Danach geben Sie einfach eine E-Mail-Adresse in das Feld “Senden an” ein, auf die Sie zugreifen können, und klicken dann auf den Button “E-Mail senden”.
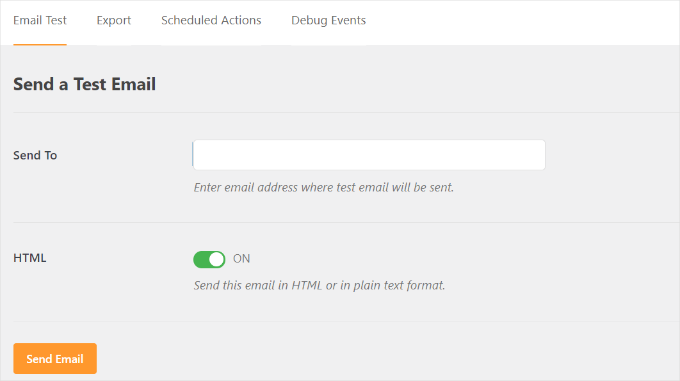
Sie sollten dann eine Erfolgsmeldung sehen.
Um sicherzugehen, können Sie in Ihrem Posteingang eine Nachricht mit der Betreffzeile ‘WP Mail SMTP: Test E-Mail to…’ sehen.
Das war’s. Sie haben Ihre WordPress-Website erfolgreich für den Versand von E-Mails über Gmail SMTP-Server eingerichtet.
Mehr erreichen mit WP Mail SMTP Pro
Wenn Sie noch mehr Funktionalität wünschen, sollten Sie WP Mail SMTP Pro ausprobieren. Mit der Pro-Version des Plugins können Sie eine Verbindung mit:
- Google Arbeitsbereich/Gmail
- Amazon SES
- Mailgun
- Büro 365 / Outlook.com
- SendGrid
- Und mehr
Außerdem erhalten Sie zusätzliche Funktionen wie E-Mail-Protokolle, die Möglichkeit zur Feinabstimmung oder Kontrolle, welche Benachrichtigungen Ihre WordPress Website sendet, und vieles mehr.
Fehlerbehebung bei nicht funktionierendem Gmail SMTP-Problem
Wir haben gesehen, dass Benutzer bei der Verwendung von Gmail SMTP mit bestimmten Shared-Hosting-Konfigurationen auf einige Probleme gestoßen sind.
Sie können die folgenden Schritte ausführen, um das Gmail SMTP-Problem zu beheben:
Zunächst müssen Sie sich bei Ihrem cPanel-Konto anmelden. Von hier aus müssen Sie den Button “+ Erstellen” auf der Seite für E-Mail Konten finden.

Erstellen Sie einfach ein E-Mail-Konto, das mit Ihrer E-Mail-Adresse in Google Apps übereinstimmt.
Durch die Einrichtung des E-Mail-Kontos machen Sie Ihren Hosting-Server auf eine E-Mail-Adresse aufmerksam, über die E-Mails versendet werden sollen. Dieser Schritt ist ein Workaround, um den Server davon zu überzeugen, dass Sie E-Mails über ihn versenden, auch wenn Sie den SMTP-Server von Google Mail verwenden möchten.
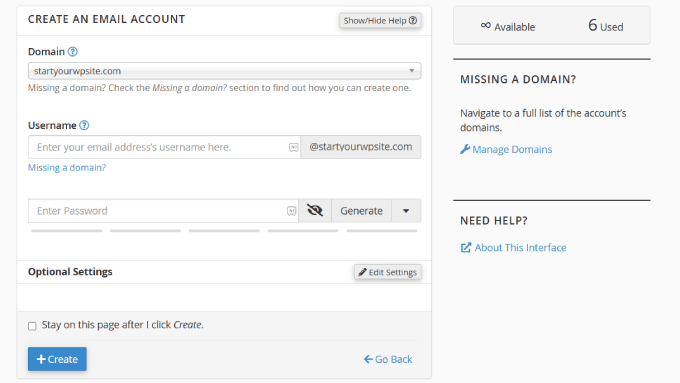
Das mag seltsam erscheinen, weil Sie Ihren Server nicht für E-Mails verwenden. Es gaukelt Ihrem Server im Grunde vor, dass Sie die E-Mails über den Server senden.
Gehen Sie in Ihrem cPanel-Konto zu den MX-Einträgen und ändern Sie das MX-Routing von automatisch auf remote. Beachten Sie, dass dies ein wenig schwierig zu finden sein könnte, da jeder Hosts jetzt eine individuelle cPanel-Schnittstelle hat.
Dann müssen Sie nach einem kleinen Link neben MX suchen, auf dem “E-Mail Routing” steht: Entfernter E-Mail-Austauscher’.
Danach können Sie sich wieder bei Ihrer WordPress Website anmelden und eine Test-E-Mail senden. Weitere Einzelheiten finden Sie in unserer Anleitung zum Ändern der MX-Einträge für Ihre WordPress Website auf der Grundlage Ihres Hosts.
Video-Anleitung
🎥 Sehen Sie sich unser Video-Tutorial an, das Sie Schritt für Schritt durch die Einrichtung von Gmail SMTP in WordPress führt und sicherstellt, dass Ihre E-Mails zuverlässig zugestellt werden.
Einfach auf Play drücken und mitmachen!
Wir hoffen, dass dieser Artikel Ihnen geholfen hat, zu lernen, wie man E-Mails in WordPress mit dem Gmail SMTP Server versendet. Vielleicht interessieren Sie sich auch für unsere Tipps zur Problembehandlung, wenn WordPress-Formulare nicht funktionieren, und unsere Anleitung zum Exportieren von WordPress-Formulareinträgen in CSV und Excel.
Wenn Ihnen dieser Artikel gefallen hat, dann abonnieren Sie bitte unseren YouTube-Kanal für WordPress-Videotutorials. Sie können uns auch auf Twitter und Facebook finden.


David
Hi, I used this tutorial last year to install and configure the Gmail SMTP plugin. Until very recently, the Gmail SMTP plugin in conjunction with my website’s contact form worked perfectly. But I tested my website’s contact form today, and I got the following fatal-error message:
Fatal error: Uncaught exception ‘Google_Auth_Exception’ with message ‘Error refreshing the OAuth2 token, message: ‘{ “error” : “invalid_grant” }”
I don’t have a clue what that means. I get the same fatal-error message when I use the plugin to send a test message at Gmail SMTP plugin>Settings>Test email.
I haven’t changed any of the plugin settings since I first installed it a year ago, and I haven’t done anything new with my Google Console account either. I’m using the most recent version of the Gmail SMTP plugin, and also the newest version of WordPress.
Any ideas or suggestions?
Thanks!
WPBeginner Support
Hey David,
It seems like your Oauth2 token has expired. Try following the tutorial again from the beginning to set it up again.
Admin
Ehsan
Thank U very much – one of my problem was this “my emails goes to spam folder”
with this service(Method 1) Now It’s great – of course after 14 days you must pay for that but still it’s prefect
I have question;
Can I send 100 Emails like newsletter for my customer is it OK for Google!?
I afraid my Emails after it goes to spam folder again
Sharon
I did everything as described, but the contact form on my website still does not work.
Adondriel
Hey, add a thing at the end for the troubleshooting thing: “Check with your website host and verify that they do not block outgoing requests by default.” I know 1. GoDaddy does this, and won’t let you unblock. and 2. Namecheap also blocks by default but you just gotta contact support, give em your info and ask em to unblock port 587 and boom, it’ll all work again.
Lucas
You save my life!
Tks!
adam
i keep getting a Error: redirect_uri_mismatch when i press ‘grant permission’. It’s driving me nuts as I can’t work out what is wrong? Everything seems to match.
Adam
Grzegorz
Same here. i get redirect_uri_mismatch
Macky
This video has been a fantastic help.
I’m a complete WordPress beginner.The step-by step instructions are very easy to follow. Now my emails are working perfectly!! Plus I also learnt how to insert headers & footers with ease.
Thanks once again!!
WPBeginner Support
Hi Macky,
We are glad you found the video helpful. You may also want to subscribe to our YouTube Channel for WordPress video tutorials.
Admin
Fabio
Your tutorial saved my site! Thank you very much mate!
Maggie Z
A follow-up question – because of the login conflict issue, I was also considering using WP Mail SMTP. However, many users on the support forum for that plugin express concern that the password for the email account is visible on the admin page in plain text.
I have a firewall set up that prevents non-admins from getting in to the back end, so is there any real security concern regarding the password showing in plain text? Any advice much appreciated!!!
Maggie Z
After troubleshooting quite a bit, I finally relented and went with WP Mail SMTP, which requires the “allow less secure apps” solution – a tech support person at G Suite told me that it was safe, and it seems like the only way to go for my particular setup. Appears to be working now. Thanks for the incredibly clear instructions!!! I am now a firm fan of this site.
Maggie Zellner
The video is fantastic, and the plugin installed perfectly. Unfortunately I didn’t realize until after I went through the whole process (because I didn’t read the documentation on the plugin carefully), the Gmail SMTP plugin eliminates the need for users to log in, and therefore it interfered with the login process that we have instituted for paid members on our website (which we manage through a plugin called PaidMembershipsPro).
Is there any way to disable that aspect of this plugin, so I can send all email via our Gmail account, but can still have users log in and out?
Eric
Great article! However, I am unclear on something when using WordPress for sending newsletters. What is the difference between those mass emailing service providers (mailgun & Sendgrid) and using Google Apps for work SMTP?
Can’t we use Google Apps for work to send newsletters just as well?
WPBeginner Support
with Google Apps for Work, you can only send an email to 500 recipients max (for paid business accounts). You cannot use it for newsletters.
Admin
Eric
Thanks so much for your response! With Google Apps for Work only limiting to 500 recipients, then I suppose it would work if we sent it to 500 or less people.
My next question, is it max to send all at one time or per day? If we throttle it to only send out a few per minute, do you know if it would allow it to send thousands within a few hours?
Heather
Thank you so much! This was so helpful!
zim ejin
Hi, this was very informative thank you for posting. however i have a website hosted on aws ec2, and route53 for dns. i tried the secure configuration. it didn’t work. Is there a special configuration for self hosted websites on aws ec2/route53. btw : i don’t have a cpanel installed.
Lanrz
After granting access and clicking on the allow button, I was not being redirected back to wordpress and the SMTP status is still not connected.
Any advice on how I should go about doing it?
Thanks!
Nathalie
Doesn’t work: test email retuens Connection: opening to smtp.gmail.com:587, timeout=300, options=array ( ‘ssl’ => array ( ‘verify_peer’ => false, ‘verify_peer_name’ => false, ‘allow_self_signed’ => true, ),)
I checked Email Routing -> Remote Mail Exchanger but it didn’t help
Raph Divine
Thanks for the write-up. It really helped me! 5stars!
Real Name
This guide worked wonderfully until my server stopped sending emails and I can’t get it to work again. The “Test Email” tab doesn’t make it clear if the email has successfully sent or not since it just spews out 52 lines that don’t mean much to me. :/
Boro
Amazing Tutorial !!!!
Thank you
peter
Ok, so I have followed the OAuth instructions and my SMPT status button has gone green. However, whether through test email or my site, I can not send an email through the contact us form (pluggin contact form builder by web Durado). The hanging message say waiting for and eventually I get a 405 error notice.
Any thoughts.
Thomas
Hoping you can help me?
I tried setting up method 1 using gmail and I got the ‘green light’ from wordpress however when testing the email I receive the following error message after waiting 1 minute for it to send:
Connection: opening to smtp.gmail.com:587, timeout=300, options=array ()
Any ideas on how to fix this?
Very best,
Tom
Fernando Santos
This tutorial is awesome!
I have one question, though. I directed the contact form messages to a gmail group email address, but, for some reason, the messages aren’t being delivered. When I direct to a “real” e-mail address like the messages are normally delivered.
I would really appreciate if someone could give me a hand figuring out why this happens.
Thank you!!!
Paul
+1 for this question. Have exactly the same question as wish to use our info@.. address
Andres
Thanks guys for such useful article. I followed all the steps and was able to configure the email correctly. However, when I receive the email from mydomain.com address (sent by wordpress after purchasing a product), the user avatar (gmail picture) doesn’t appear even though mydomain.com has a picture already.
In fact, if I send an email directly from mydomain.com account via google for work, the receiver is able to see the image right away, but it’s not the case if the email is sent via wordpress.
Do you have any suggestions? Thanks a lot, and keep rocking!
Sahar
Thanks for this helpful information. You really helped me out in setting this up, and I appreciate you taking the time to create this useful information!
WPBeginner Support
Glad you found it helpful.
Admin
lokesh kumar CL
What is origin URI of the client application. its not accepting website URL ….please help me out
Susan
Excellent instructions and thanks for walking me through setting this up. I did try the MX record change but no luck there either.
I get a 405 Not allowed message when I try to send an email.
I am hosted by Bluehost and am using the DIVI theme.
If anyone has any ideas I would be very grateful.
Leista
Hello, having a similar issue. Getting a 405 error, and also hosted on Bluehost. By any chance, were you able to fix the problem? Thanks.
JDC
I had the same problem with bluehost. But this gave me the solution.
I uninstalled any extra plugin for mail, including smtp mailer or gmail smtp plugin and just used a random address like mynewaddress@example.com (replace example.com with your own domain name) and it worked. I sent an email to my gmail account I it passes all the filters. It seems that BlueHost validates the address if it is comming from the server that hosts that domain. In gmail you usually get a warning that says that this email might not have being validated, but my email are comming fine with custom wordpress email functions. No extra plugin needed.
Prashant Bhandarkar
Thank you so much. This was of great help. God Bless you!
Karmen
Awesome tutorial!!!
Louise
I have this working brilliantly with a Google apps for work account for a woocommerce solution on wordpress, thank you.
Should this work if I use a Google group mail instead of an account?
Thanks very much.
Brian Treiber
I am not using Google apps for work, I have everything set up and connected. I tried to send a test email however I get a 405 not allowed error. I went into my cpanel and changed the mx records to the recommended” remote.” Still can’t send. Does this mean I need to use the less secure method?
Jason North
I’m getting this error when I try to activate the plugin:
Plugin could not be activated because it triggered a fatal error. Parse error: syntax error, unexpected T_FUNCTION, expecting ‘)’ in /home3/north23/public_html/forcebrain/wp-content/plugins/gmail-smtp/google-api-php-client/src/Google/autoload.php on line 19
genie
Hello, I use gmail-smtp plugin but it conflict with ultimate membership. Could you help me ?
I try another wp mail smtp but in the last feld: user account pass. Google app not allow to login from plugin. Pls help
Thank you
Leslie Andrews
Clearly I’m doing something wrong. When I get to “add credentials” I’m getting this error message and can’t move forward.
Invalid Redirect: must end with a public top-level domain (such as .com or .org)
Any help would be great
WPBeginner Support
If you look at the URL closely, you will notice that you are missing a . between domainname and the TLD, yours is examplecom when it should be example.com.
Admin
Graham
Thanks for the tutorial, but I get this error when I try to send a test email:
Connection: opening to ssl://smtp.gmail.com:587, timeout=300, options=array ()
SMTP ERROR: Failed to connect to server: Connection refused (111)
SMTP connect() failed.
Does it have something to with my site being secured with SSL?
Tony
I’m having the same issue. Did you figure it out?
Tom
Nice Article, I’m having a few issues to get this working. So I Deactivated the Plugin and tested a Contact Form to see if all was the same before setting up Gmail SMTP, unfotunately No Emails are being sent through now.
Even though the Gmail SMTP Plugin is NOT active, do we need to reset back to the default settings somehow?
WPBeginner Support
Nope simply deactivating it would turn it off.
Admin
Jenny
Hi,
I have this all set up properly and the test email worked…I just commented on my own blog to see if I would get an email when a comment was posted but I unfortunately didn’t. Can someone help me figure out where I went wrong?
Sachin
Hey thanks for the tutorial. Everything works fine in Setup, but when mail is being sent the site freezes for about 5 mins. site doesnt open at that time. It doesnt respond at that time. Any idea what might be causing this issue. But the point is mail is sent at last finally
WPBeginner Support
Please contact your WordPress hosting provider. They may be able to help you better.
Admin
crissy
Hi,
I’m having problem with the test email send
Fatal error: Cannot redeclare class phpmailer in /home/mywebsite/wp-includes/class-phpmailer.php on line 29
please help
David
Hi, I just installed this plugin, and everything went perfectly–thanks to your excellent tutorial! (I definitely couldn’t have done it without you.) My website’s outgoing email immediately started landing in people’s inboxes rather than in their spam folders.
But since I’m a novice at these matters and don’t know SMTP from RSVP, I did some reading on SMTP, and on one website I came across made this statement:
“Another strategy that hackers use: If your app sends email using SMTP, the IP address will be recorded in the Received header lines. Either scrub the original Received line [no explanation provided of how that’s done], or don’t use SMTP for email submission.”
Is this something I should be concerned about security-wise? Or does this plugin solve this problem somehow? And if not, how should I fix it?
Thanks!
WPBeginner Support
You shouldn’t be concerned about it. Most popular email service providers and their spam filters can check if an email is originating from the IP address it claims to be coming from.
Admin
Rob
Thank YOU so much for this!! I’ll keep coming back for more!!
Travis
Thanks so much for this tutorial.
Originally I had this all setup and working fine, but I moved my website and did some other fixes to it, and suddenly mailing stopped working.
Previously I spent some time trying to set it up and get it to work, but then it “stopped” working randomly.
Anyways, option #1 really saved me a major headache.
Christine Tabor
I configured, and got the green go to go button… THANKS FOR THE STEP BY STEP…
(doing this on a client test site)…
BUT REGARDING GRAVITY FORMS (or any form plug in)… do I also need to change up the notification emails that I’ve used for the Gravity Forms submissions?
Is it ok for the “from” email I used in the configuration to be different than the gmail used to set i up?
The issue that started all this was client not getting his Gravity Form notifications.
SO, before I install on their live site… (which is ecommerce and SSL)… can you reply to this … and should I still use the TSL for the configuration? I wasn’t sure if a certificate on the site made any difference in configuring this.
Thanks,
Christine
WPBeginner Support
No you don’t need to change notification emails.
It is OK, but to ensure maximum deliverability you should use the email address that is actually sending the email.
You should try with SSL first for the Gmail Configuration.
Admin
Christine
Thanks for reply…little bit more clarification please.
I set up an email…info@domain.com as a forwarder in cpanel, and I forward to their Verizon email.
I left the Verizon email in the GF notification list, added the info email, and another alternate email.
So the info email is the one in Gmail plugin set up that is sending the email…is it ok that it’s a forwarder?
Also, when I set up the plugin, I used a gmail I had created … CompanyName@gmail.com
But not using it as the sending email or anywhere else.
I sent a test and it appears all worked… Should I go back and change to SSL instead of the TSL or leave as is?
Thanks again…
Christine
WPBeginner Support
Sounds about right. However, if it was up to us we would use the Gmail address as the sender and add the forwarding email address as the Reply-to address.
Tribhuwan Bhatt
Thank You
Tim R
Doesn’t work for me on April 14, 2016.
Things I do rarely work.
Connection: opening to smtp.gmail.com:587, timeout=300, options=array ()
SMTP ERROR: Failed to connect to server: Network is unreachable (101)
SMTP connect() failed.
Mailer Error: SMTP connect() failed.
Any point in fussing with this ?
zse
Hi,
I have this same error.
Did you solved this problem?
Regards
Tim R
Here’s a follow up:
Settings of my web host’s server made this impossible.
Switched hosts and now it works easy as pie.
Don’t forget to change settings on gmail account to allow for unregistered apps (a search will discover many instructions to do that so I won’t add it here)
Monica
Hey i tried allowing access for unregistered apps it still doesnt work for me.
I am getting the error:
Connection: opening to smtp.gmail.com:587, timeout=300, options=array ()
SMTP ERROR: Failed to connect to server: Connection refused (111)
SMTP connect() failed.
Any ideas ?
Bclose
Hi ,
Thanks for this ticket ..i was fighting with my emial provider weblayer and nothing. it worked with your magic touch , one simple note .. by the end of Ouauth when explaining to create a fake local email you forgot to include that we must use MX record and what is is , i search on google and found ALT2.ASPMX.L.GOOGLE.COM, but this last simply thing could be a danwfault for all readers
Either way thank you..a lot!
Kay
Thank you soooooo much for this! Worked like a charm. The instructions are 100% on point!
Tyler
Anyone get this working with google apps email? I’ve created API credentials. SMTP status is green. But Test email says connection refused. Already set mx to remote on godaddy. Are there any security setting ls in google apps email that have to be configured?
TJ
Nice article, was able to install the plugin and it sent the email from the plugin test email.
Fails when using Contact Form 7, any recommendations for a contact form plugin that this might work with?
Thanks
WPBeginner Support
You can try it with WPForms.
Admin
Muhammad
thanks for the nice post.i was thinking to set up this for my site.
Ripul
Interesting, however I am getting this error : “Error: redirect_uri_mismatch”
Ripul
I forgot to mention I am testing this on Localhost.
Rashmirekha Moharana
Hi Syed.
Thanks a lot for such a wonderful solution. Let me implement and see.
Kudos to you.