Müssen Sie E-Mails von einer WordPress-Installation auf localhost versenden?
WordPress auf Ihrem eigenen Computer von localhost aus zu betreiben, ist praktisch, wenn Sie eine neue Website, ein Plugin oder ein Theme entwickeln oder testen. Das Einrichten von WordPress-E-Mail auf localhost ist jedoch schwierig, da Ihre Website offline ist und E-Mail nicht standardmäßig aktiviert ist.
In diesem Artikel zeigen wir Ihnen, wie Sie WordPress-E-Mails von localhost empfangen können.

Warum WordPress auf Localhost betreiben?
Bevor Sie größere Änderungen an Ihrer WordPress-Website vornehmen, sollten Sie diese Änderungen zunächst auf einer anderen Website testen, die für Ihre Benutzer nicht sichtbar ist.
Eine Staging-Site ist ein Klon Ihrer Live-Website, der dazu dient, Änderungen zu testen, bevor sie live geschaltet werden. Staging-Sites helfen Ihnen, Fehler zu finden, damit Sie Ihre Live-Website nicht zerstören.
Viele Benutzer installieren ihre WordPress-Staging-Sites lokal auf ihren Windows- oder Mac-Computern. Sobald die Website getestet wurde, laden sie die Änderungen einfach vom Localhost auf den Live-Server hoch.
Die Einrichtung von E-Mail auf einer lokal gehosteten WordPress-Installation kann jedoch knifflig sein, und Sie sehen möglicherweise die Fehlermeldung “Could not instantiate mail function”, wenn WordPress versucht, eine E-Mail zu senden. Das liegt daran, dass E-Mail auf den WAMP- und MAMP-Server-Stacks standardmäßig nicht aktiviert ist.
Sehen wir uns also an, wie man WordPress-E-Mails von localhost aus empfangen kann.
Wie man WordPress-E-Mails von Localhost empfängt
Als Erstes müssen Sie das WP Mail SMTP-Plugin auf der WordPress-Installation auf Ihrem lokalen Server installieren und aktivieren. Weitere Details finden Sie in unserer Schritt-für-Schritt-Anleitung für die Installation eines WordPress-Plugins.
WP Mail SMTP übernimmt die Standard-E-Mail-Versandfunktion in WordPress, sodass Ihre E-Mails stattdessen über einen SMTP-Anbieter geleitet werden. Das bedeutet, dass Sie E-Mail-Benachrichtigungen von Ihrer Staging-Site erhalten, auch wenn diese nicht live im Internet ist.
Weitere Informationen zur Verwendung des WP Mail SMTP-Plugins finden Sie in unserem WP Mail SMTP-Test.
Einrichten von WP Mail SMTP
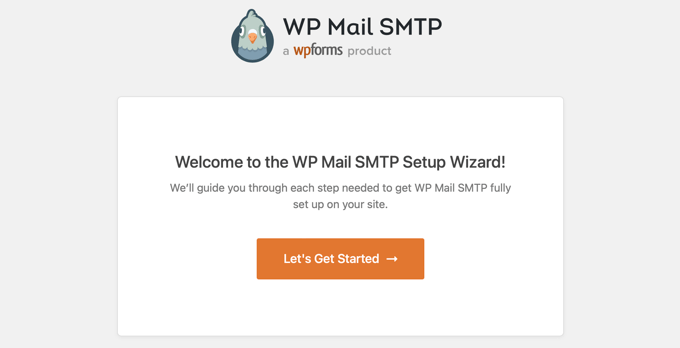
Sobald das Plugin aktiviert ist, wird der WP Mail SMTP Setup Wizard automatisch gestartet.
Als Erstes müssen Sie einen SMTP-Dienstanbieter auswählen.
In unserem Leitfaden zu den besten SMTP-Dienstanbietern mit hoher E-Mail-Zustellbarkeit finden Sie Hilfe bei der Auswahl eines Anbieters. Wenn Sie unsicher sind, ist Sendinblue eine gute Wahl für die meisten WordPress-Websites.
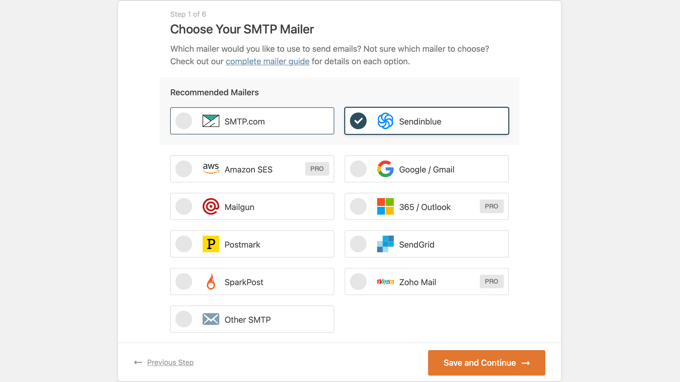
Folgen Sie den Anweisungen des WP Mail SMTP-Assistenten Schritt für Schritt. Wenn Sie Hilfe benötigen, können Sie unseren Anleitungen zur Einrichtung von WP Mail SMTP mit Sendinblue, Gmail, Microsoft Outlook oder Amazon SES folgen.
Hinweis: Wenn Sie Amazon SES, Microsoft Outlook oder Soho Mail als Ihren SMTP-Mailerdienst verwenden möchten, müssen Sie eine WP Mail SMTP Pro-Lizenz erwerben.
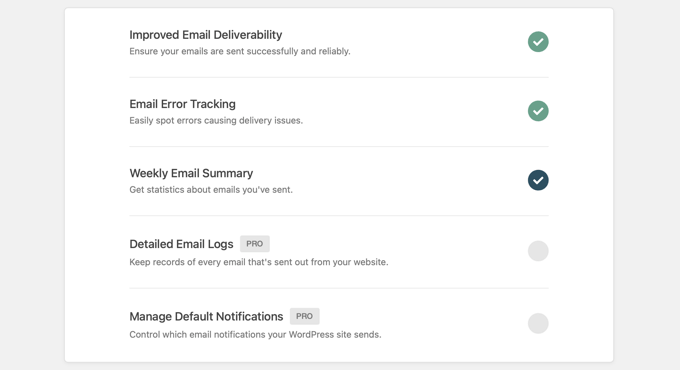
Während der Einrichtung werden die E-Mail-Zustellbarkeit und die Fehlerverfolgung automatisch aktiviert. Benutzer der Pro-Version können auch die E-Mail-Protokollierung aktivieren und Standardbenachrichtigungen verwalten.
Versenden einer Test-E-Mail
Sobald Sie die Einrichtung von WP Mail SMTP abgeschlossen haben, können Sie eine Test-E-Mail senden, um sicherzustellen, dass das Plugin korrekt konfiguriert ist.
Dazu müssen Sie in Ihrem Verwaltungsmenü auf WP Mail SMTP ” Tools gehen, wo Sie die Seite “E-Mail-Test” sehen. Standardmäßig wird die Test-E-Mail an die Administrator-E-Mail-Adresse Ihrer Website gesendet, aber Sie können dies ändern, indem Sie eine andere E-Mail-Adresse in das Feld “Senden an” eingeben.
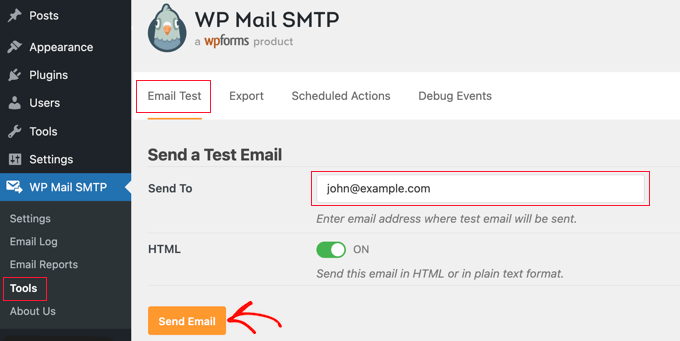
Wir empfehlen Ihnen, die Einstellung “HTML” auf “Ein” zu belassen und dann einfach auf die Schaltfläche “E-Mail senden” zu klicken. WordPress wird versuchen, eine Test-E-Mail an die von Ihnen angegebene Adresse zu senden.
Wenn es Probleme mit Ihrer E-Mail-Konfiguration gibt, wird eine Meldung angezeigt, in der das Problem beschrieben wird und Sie einige Schritte zur Lösung des Problems unternehmen können.
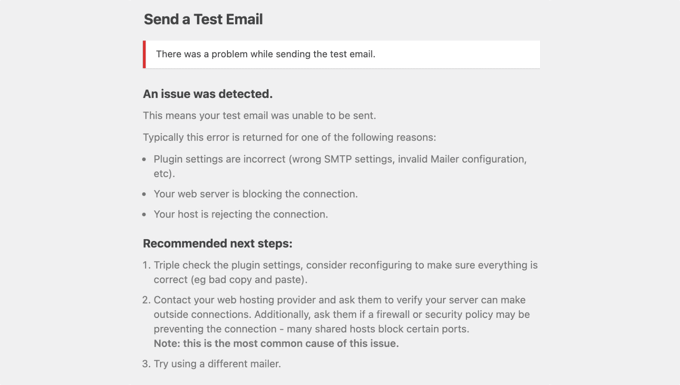
Nachdem Sie die Schritte zur Behebung der Probleme ausgeführt haben, sollten Sie eine weitere Test-E-Mail senden, um zu bestätigen, dass Ihre WordPress-E-Mail jetzt funktioniert.
Wenn Ihre WP SMTP Mail-Konfiguration korrekt ist, sollten Sie eine E-Mail in Ihrem Posteingang finden.
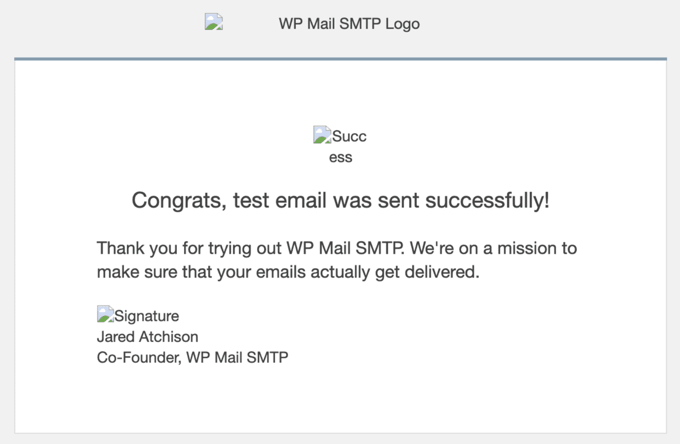
Sie werden feststellen, dass die Bilder in der Test-E-Mail fehlerhaft sind, was völlig normal ist, wenn Sie E-Mails von localhost aus versenden. Das liegt daran, dass die Bilder normalerweise aus dem Internet geladen werden, Ihre localhost-Website aber nicht online ist.
Auch wenn die Test-E-Mail erfolgreich war, kann WP Mail SMTP ein Problem mit Ihren DMARC-, DKIM- oder SPF-Einträgen festgestellt haben, das zu Problemen bei der Zustellbarkeit führen kann. Sie finden Links zu Schritt-für-Schritt-Anleitungen, die Ihnen helfen, Ihre DNS-Einträge korrekt zu konfigurieren.
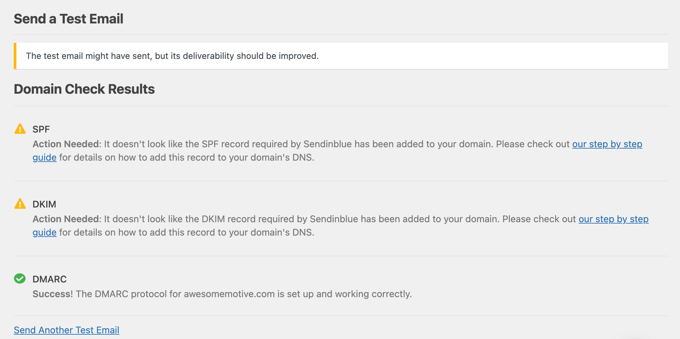
Weitere Informationen finden Sie in der Anleitung zum Senden einer Test-E-Mail von WordPress aus.
Sobald Sie die Probleme behoben haben, sollten Sie eine weitere Test-E-Mail senden, um sicherzugehen, dass jetzt alles richtig funktioniert.
Deaktivieren von WordPress-E-Mail-Benachrichtigungen – Pro-Benutzer
Jetzt werden Sie WordPress-E-Mails von localhost erhalten. Dazu gehören Benachrichtigungs-E-Mails über Plugin-Updates, Theme-Updates und Core-Updates. Sie erhalten auch E-Mails über Änderungen an der Website-Administration, das Zurücksetzen von Passwörtern, neue Benutzerregistrierungen und mehr.
Vielleicht haben Sie das Gefühl, dass Sie zu viele E-Mails erhalten. Oder Sie möchten bestimmte E-Mail-Benachrichtigungen deaktivieren, während Sie Ihre Website entwickeln und testen.
WP SMTP Mail Pro-Benutzer können steuern, welche E-Mails von localhost gesendet werden. Sie müssen zu WP Mail SMTP ” Einstellungen gehen. Dort sollten Sie oben auf der Seite auf die Registerkarte “E-Mail-Steuerung” klicken. Hier können Sie alle E-Mails deaktivieren, die Sie nicht erhalten möchten.
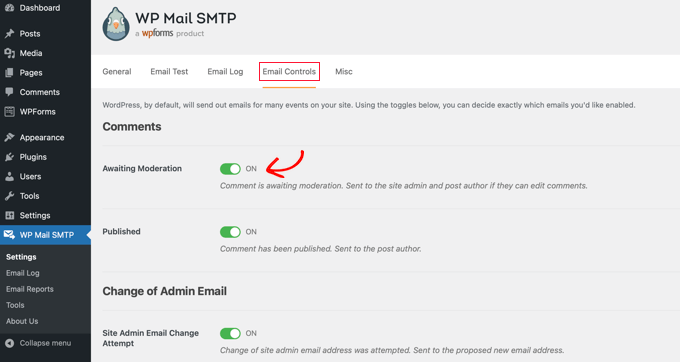
Wenn Sie zum Beispiel keine E-Mails über Kommentare erhalten möchten, die auf die Moderation warten, schalten Sie die Einstellung einfach aus.
Wir hoffen, dass diese Anleitung Ihnen geholfen hat zu lernen, wie Sie WordPress-E-Mails von localhost empfangen können. Vielleicht möchten Sie auch erfahren , wie Sie eine kostenlose E-Mail-Domain erhalten oder unsere Liste der häufigsten WordPress-Fehler und deren Behebung lesen.
Wenn Ihnen dieser Artikel gefallen hat, dann abonnieren Sie bitte unseren YouTube-Kanal für WordPress-Videotutorials. Sie können uns auch auf Twitter und Facebook finden.


Geoff
This post is WAY out of date. You now need to set up an API and OAuth on Google. The WP Forms website has full details, but allow 15-20 minutes to do so.
WPBeginner Support
The post was last updated in 2014, thank you for letting us know we should look into updating this post
Admin
Gerard Chartier
I have just tried this out and it does still work but you have to set “Allow less secure apps: ON” in your Google account, which is not recommended.
WPBeginner Support
Thank you for sharing that this still works and how to get it to work.
Prashant Sontale
I installed the plugin but I cant see the options such as those iin Mailer and also cant view the option of SMTP Host, Port, Authentication, Username, Password, etc. In mailer I haveoptions such as PHP, Google, Maligun, Sendgrid, Other SMTP. If I click on Google, they ask Client ID and Client Secret.
What to do?
Carla
That is to send… smtp… not to recieve the email on wordpress… POP3
swarna
my email is not working
Barka Piy Ndahi
Thanks for the tutorial.
I have xampp and i tried above. It showed test message sent, though below i saw: 2017-10-20 13:06:18 SMTP Error: Could not connect to SMTP host.
And i didnt see in my yahoo box.
Please can you help me make this to work.
Thank you.
Ashan Rupasinghe
That’s Worked. Thanks.
sudhakar
Hi i did the same but i have did not get any email for contact form and product enquiry form think that in localhost mail system does not works or there is an idea means please help me
Vivekraj
Hi new user registration mail contact us mail are working but woocommerce order mail and all not sending to the customers.
mukesh
i m mukesh
this is too good
surati
not work so work for me thnq…
Maksym
Works very good! Thank you
Steve
You have to go into your Google account and turn on the feature “Sign In & Security > Connected Apps & Sites > Allow Less Secure Apps > ON”.
Warren
Hi Steve
What’s the navigation to get to the sign in and security > connected apps etc? Loads of tabs on the top once in settings, each with multitude of options.
Thanks,
Shashank Chattopadhyaya
From your Google account:
[Settings -> Accounts and Import -> Other Google Account settings -> Sign-in & security -> Connected apps & sites -> Allow less secure apps (turn ON)]
Sharon
Same here. Otherwise gmail would authenticate because of the “Less secured application”
saurabh
awesome..blowsome.. worked!!
make sure your gmail has access to third party apps to send email.nothing else is needed than this video. good work . loved it.
Pam Marshall
Just what I needed to do my testing.
Roger Moore
I worked well after I enable access to less secure apps in my gmail account. Thanks
Chetan Buddh
array (size=18)
‘authenticate’ => string ‘SMTP Error: Could not authenticate.’ (length=35)
‘connect_host’ => string ‘SMTP Error: Could not connect to SMTP host.’ (length=43)
‘data_not_accepted’ => string ‘SMTP Error: data not accepted.’ (length=30)
’empty_message’ => string ‘Message body empty’ (length=18)
‘encoding’ => string ‘Unknown encoding: ‘ (length=18)
‘execute’ => string ‘Could not execute: ‘ (length=19)
‘file_access’ => string ‘Could not access file: ‘ (length=23)
‘file_open’ => string ‘File Error: Could not open file: ‘ (length=33)
‘from_failed’ => string ‘The following From address failed: ‘ (length=35)
‘instantiate’ => string ‘Could not instantiate mail function.’ (length=36)
‘invalid_address’ => string ‘Invalid address’ (length=15)
‘mailer_not_supported’ => string ‘ mailer is not supported.’ (length=25)
‘provide_address’ => string ‘You must provide at least one recipient email address.’ (length=54)
‘recipients_failed’ => string ‘SMTP Error: The following recipients failed: ‘ (length=45)
‘signing’ => string ‘Signing Error: ‘ (length=15)
‘smtp_connect_failed’ => string ‘SMTP connect() failed.’ (length=22)
‘smtp_error’ => string ‘SMTP server error: ‘ (length=19)
‘variable_set’ => string ‘Cannot set or reset variable: ‘ (length=30)
this error come what can i do now?
i can’t understand.
plz help me guyz.
Dan Canetti
Hi,
Looks as though it’s failed to Authenticate. Try ensuring your Email and Password are entered correctly.
Gabriel Hernández
Thanks! Works!=)
I will save this great website.
Daniel
Works! Thamks for the manual. Google asks to ‘Enable access for less secure apps’ in Gmail, but for testing purposes I see no problem..
deepika
It shows ‘Test message sent’ but I didn’t get any mail.
CarolineElisa
Thanks for this suggestion, but I can only get it to work if I ‘Enable access for less secure apps’ in Gmail, which Google does not recommend. Any other tips?
Marty
Tried this, no luck Any other suggestion? Thanks!
Marty
Hi! Thank you for a great article. I’m trying it all out, but still get an error when sending the test email: SMTP -> ERROR: Failed to connect to server: Operation timed out (60). So I did as suggested, added extension=php_openssl.dll. But nothing seems to work Anyone have another idea? Thanks!
Jesse Brownstein
After sending the test email, the browser loads infinitely without any indication of success/failure. How can I fix?
jam
Thanks very much for sharing your knowledge
Joker
This suggestion should work, But if you got error saying “Failed to connect to server: Unable to find the socket transport “ssl” ” ,
Then Please do the following
1. Edit your php.ini from your installed php folder
2. Search for extension=php_openssl.dll
3. The initial will look like this ;extension=php_openssl.dll
Remove the ‘;’ and it will look like this extension=php_openssl.dll
If you can’t find the extension=php_openssl.dll, add this line extension=php_openssl.dll.
4.Then restart your Xampp or LAMP or APACHE server (depends upon which of these you’re using).
Syed
Nice article. Helped me. Works for me. Thanks.
Komalchand
I used your setting for localhost but it din’t works where it works for my test server. so ur suggestion will be helpful for me. Thanks
Easy
sory if my question sounds sily bt which inbox am I to check?. am on a local machine without an internet service. or do I need internet to receive the mail?
WPBeginner Support
yes you will need an internet connection to receive email.
Admin
Bhargav
I didnt get email. Please help me.
WPBeginner Support
Make sure that you have correctly entered Gmail SMTP settings.
Admin
Cristian Nebunu
This is actually really helpfull. I needed to test some custom features and now i know how.
adolf witzeling
Very helpful. Thanks for sharing.