Do you want to show product recommendations in WordPress?
Displaying product recommendations can encourage users to make additional purchases, boosting your sales and revenue. It can also improve user engagement by convincing visitors to stay longer on your site.
In this article, we will show you how to easily show product recommendations in WordPress, step by step.
Why Show Product Recommendations in WordPress?
If you have an online store, then showing product recommendations on the cart or checkout page can increase the average order value on your site.
By suggesting relevant products, you can help customers discover items they might be interested in, leading to a more satisfying shopping experience.
For instance, if a customer purchases a hat in your clothing store, you can recommend sunglasses because both these options protect from the sun and are often bought together.
You can show these recommendations as a slide-in cart, order bump, upsell, or cross-sell products, and even send automated emails to users upon purchase to gain traction.
Having said that, let’s take a look at how to easily show product recommendations in WordPress.
For this tutorial, we will be using multiple methods, so you can use the links below to jump to the one of your choice:
- Method 1: Show Product Recommendations on the Products Page
- Method 2: Show Product Recommendations on the Cart Page
- Method 3: Show Product Recommendations as a Sliding Cart
- Method 4: Show Product Recommendations as Order Bumps
- Method 5: Offer Post-Purchase Recommendations With Emails
- Method 6: Show Product Recommendations in Popups
- Method 7: Display Product Recommendations in Easy Digital Downloads
- Bonus: Properly Set Up eCommerce Tracking In WordPress
Method 1: Show Product Recommendations on the Products Page
If you want to show relevant recommendations on the products page, then this method is for you.
You can easily do this using the default upsell feature in WooCommerce, so you won’t need any other plugin for this method.
Upsells basically means recommending a more premium version of the product the user is purchasing. However, you can also add other relevant products in this section.
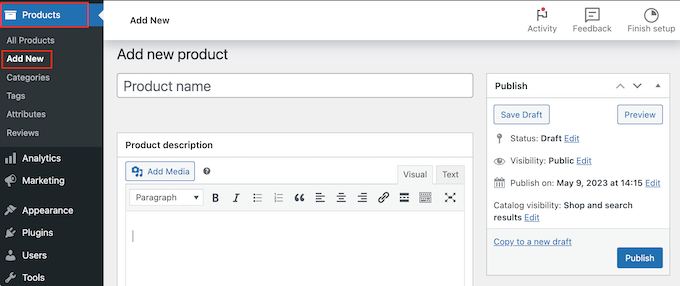
First, you must visit the Products » Add New page from the WordPress dashboard to create a new product. You can also edit an existing one if you want.
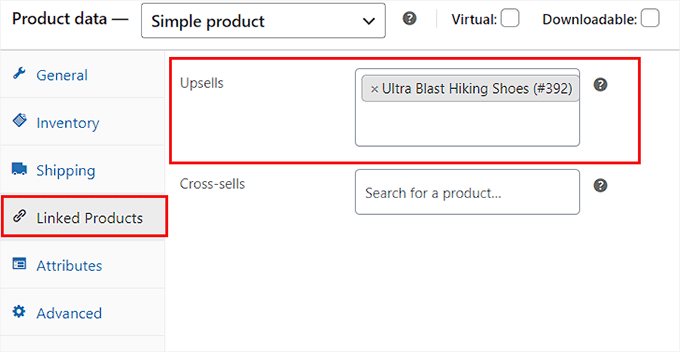
Once you have added the details, scroll down to the ‚Product Data‘ section and switch to the ‚Linked Products‘ tab from the left column.
Here, you can add different products to your WooCommerce store in the ‚Upsell‘ section. To do this, just enter the name of the product, and you will be shown the search results from which you can choose a product to add.
After that, scroll back to the top and click the ‚Publish‘ button to store your settings and make your product live.
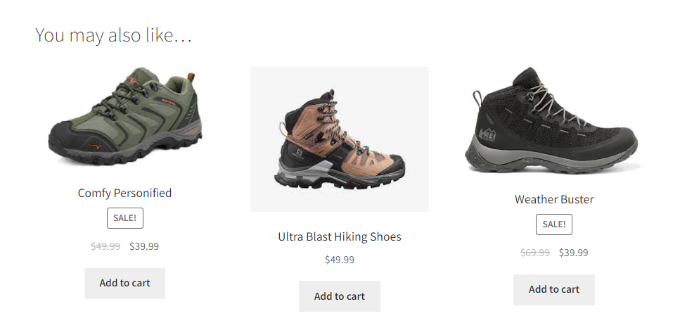
Now, visit your WooCommerce store to view the upsell products under the ‘You may also like’ section.
For more details, see our tutorial on how to upsell products in WooCommerce.
Method 2: Show Product Recommendations on the Cart Page
If you want to display product recommendations on the cart page just as the customer is moving to the checkout, then this is the method to use.
WooCommerce offers the default cross-sell option that allows you to show relevant and complementary products without using any plugin.
First, open the product of your choice in the WooCommerce editor and scroll down to the ‚Product Data‘ section.
Here, switch to the ‚Linked Products‘ tab where you can add relevant products to be displayed on the carts page in the ‚Cross-sells‘ section.
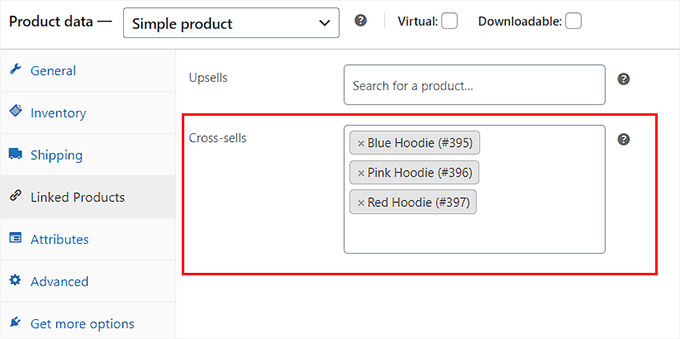
Once you are done, just click the ‚Publish‘ or ‚Update‘ button at the top to store your settings.
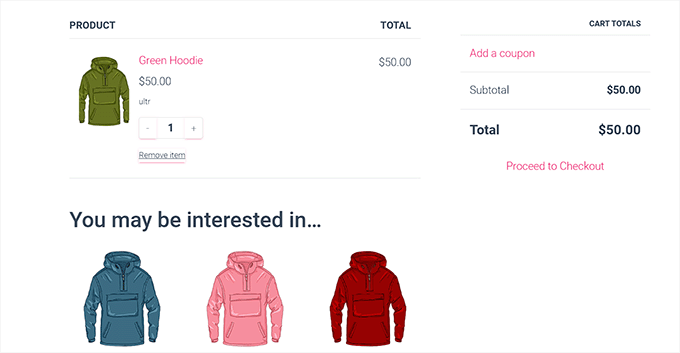
Now, visit your store and add a product in the cart to head over to the Cart page. Here, you will notice that the product recommendations are displayed in the ‚You may be interested in…‘ section.
Method 3: Show Product Recommendations as a Sliding Cart
You can use this method if you want to show product recommendations in a sliding cart.
FunnelKit is a popular WooCommerce plugin that lets you add a sliding cart to your store and also show relevant recommendations within this cart to encourage users to make more purchases.
First, you need to install and activate the Sliding WooCommerce Cart by FunnelKit plugin. For details, see our tutorial on how to install a WordPress plugin.
Upon activation, head to the FunnelKit » Cart page and toggle the ‚Enable Cart‘ switch to ‚On.‘
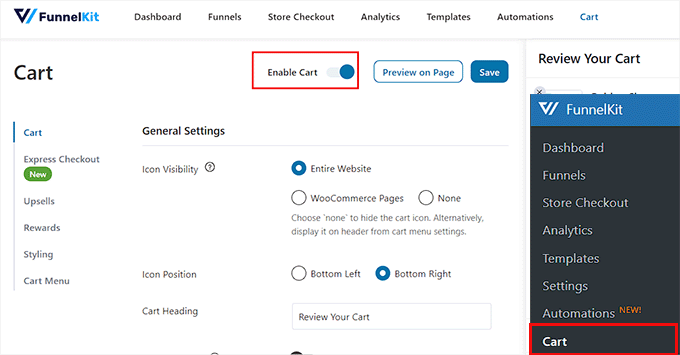
After that, you can select the sliding cart visibility, icon position, coupon field, summary, and checkout settings from the section below. For more details on this, see our tutorial on how to easily add a sliding cart in WooCommerce.
Once satisfied, you must switch to the ‚Upsells‘ column from the left and toggle the ‘Enable Cart Upsells‘ switch to ‚On.‘
Note: Keep in mind that you will need the pro version of the plugin to unlock the upsells feature.
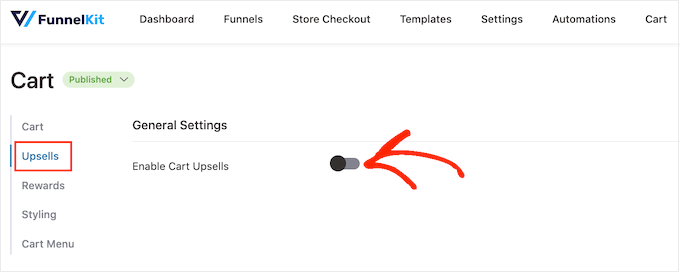
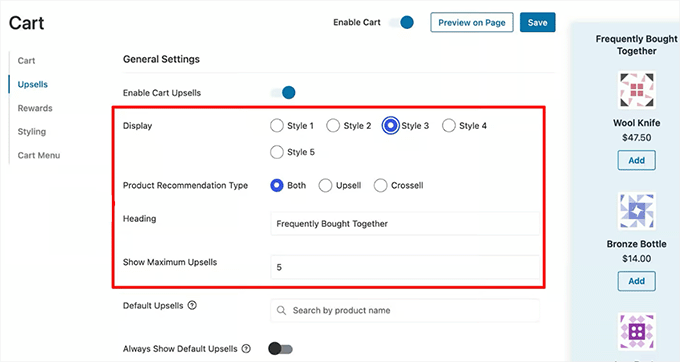
This will open new settings on the page from where you can configure the display layout for product recommendations. You will be able to see a preview for each layout style on the right corner of the screen.
After that, you must select if you want to show cross-sell or upsell products as recommendations. You can also choose the ‚Both‘ option.
Then, you can add a heading to be displayed at the top of product recommendations and choose the number of recommendations to be displayed.
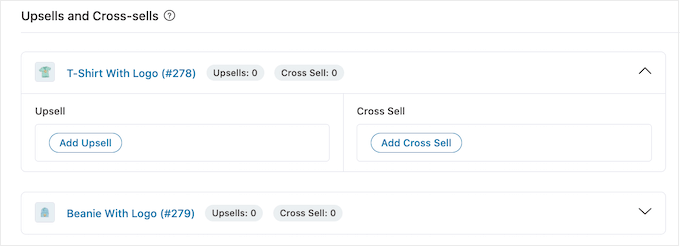
Once that is done, scroll down to the ‘Upsells and Cross-Sells’ section to view the list of all the products on your online store.
From here, expand a product’s tab and click the ‘Add Upsell’ or ‘Add Cross Sell’ button to add recommendations.
Remember that upsell products are like the premium version of the product that the customer has added to the cart, while cross-sell products are the ones that are related to the product the user is purchasing.
Upon clicking on one of the buttons, a popup will open on the screen from where you can search and add the product that you want to be displayed in the recommendations.
You can follow the same process for all the products on your online store.

Once you are done, just click the ‚Save‘ button at the top to store your settings.
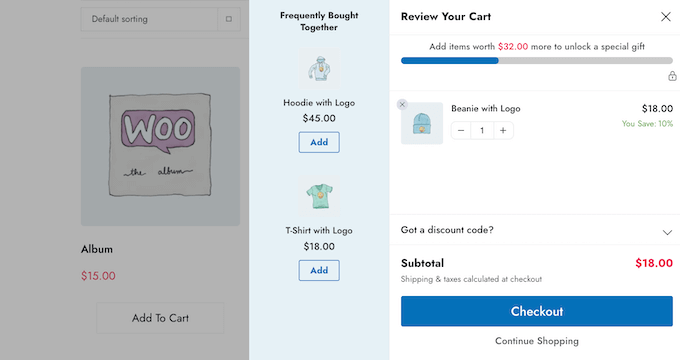
You can now visit your WooCommerce to view the sliding cart with product recommendations.
Method 4: Show Product Recommendations as Order Bumps
Use this method to display relevant product recommendations as an order bump, which is a technique used on the checkout page to show relevant products to customers at a lower price point.
This can often convince them to buy it right before finishing the checkout process.
To create order bumps, you will need to install and activate the Funnelkit Builder. For details, see our step-by-step guide on how to install a WordPress plugin.
Note: FunnelKit Builder has a free plan, but you will need the pro version to unlock the order bumps feature.
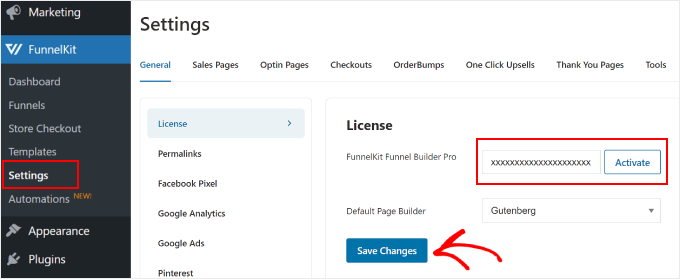
Upon activation, visit the FunnelKit » Settings page from the admin sidebar and switch to the ‚License‘ tab in the left column.
Then, enter your license key and click the ‚Activate‘ and ‚Save Changes‘ button to store your settings. You can get this information from your account on the FunnelKit website.
Next, you will need to create a checkout page on your WooCommerce store using FunnelKit. For more information on this, see our tutorial on how to customize your WooCommerce checkout page.
Once that is done, go to the FunnelKit » Store Checkout page from the WordPress dashboard and click the ‚Add Order Bump’ button.
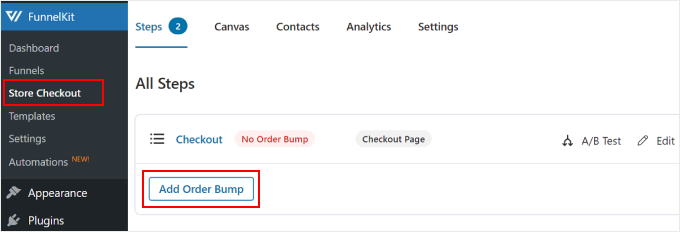
This will open a popup where you must add a name for the order bump that you are creating and click the ‚Add‘ button.
The plugin will now add the order bump to your checkout funnel. Here, click the ‚Edit‘ button to start the process.
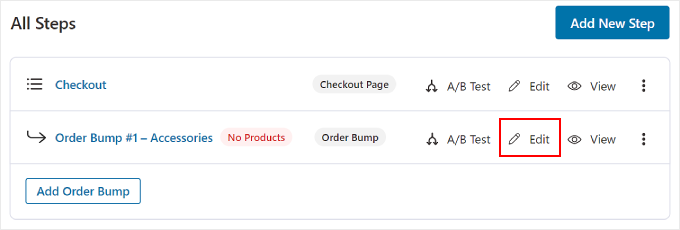
This will take you to a new screen where you must click the ‚Add Product‘ button to open a popup.
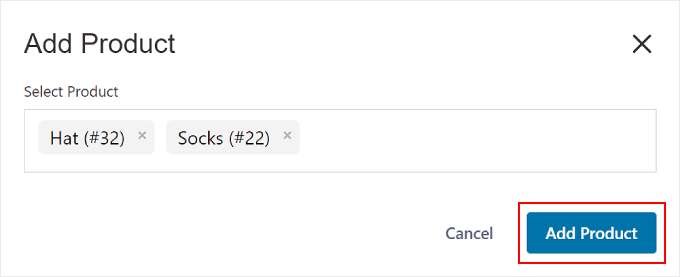
Here, just type and add the products that you think will complement the buyers‘ purchase and then click the ‘Add Product’ button.
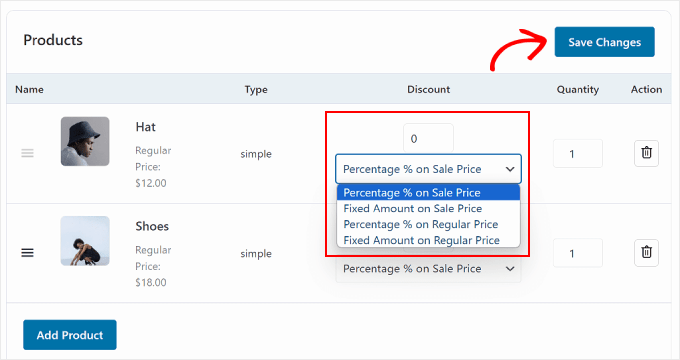
Next, you can select a discount type for the products that you chose from the dropdown menu and can even offer more than one quantity for each item to customers.
Once you have done that, just click the ‚Save Changes‘ button to store your settings.
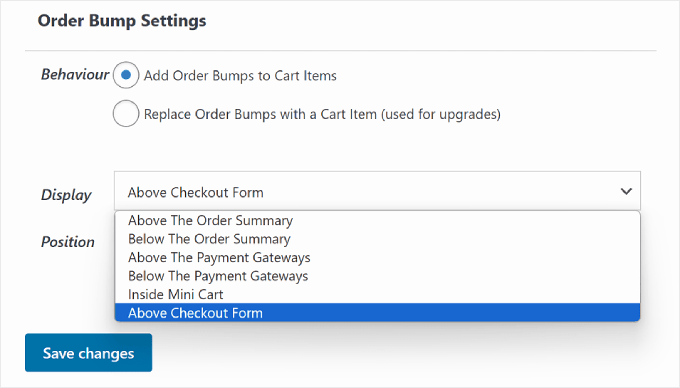
Then, scroll down to the ‚Order Bump Settings‘ section, where you can select the order bump’s behavior and display position during checkout.
For instance, if you select the ‘Add Order Bumps to Cart Items’ option as the bump behavior, then customers will be suggested these products to add as an extra purchase.
However, when choosing ‘Replace Order Bumps with a Cart Item (used for upgrades)’, you give customers the option to replace their purchase by upgrading to a higher-end version of the product.
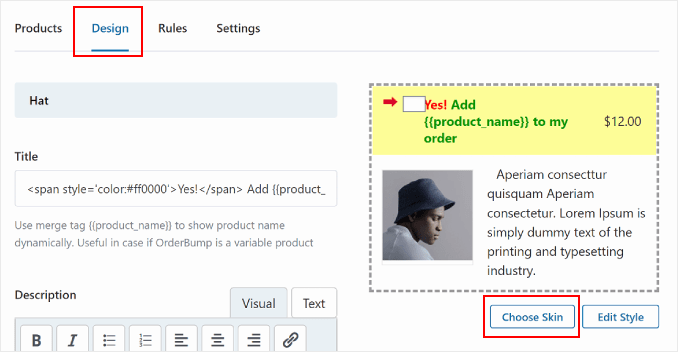
After that, switch to the ‚Design‘ tab from the top. Here, you can configure how the order bump offer will look to customers.
You can add a title and description and change the text colors, background color, toggle color, border, font size, price display, and box padding and width. Once you are satisfied, just click the ‚Save‘ button to store your settings.
Now, it is time for you to switch to the ‚Rules‘ tab, where you have to click the ‚Add Rules‘ button.
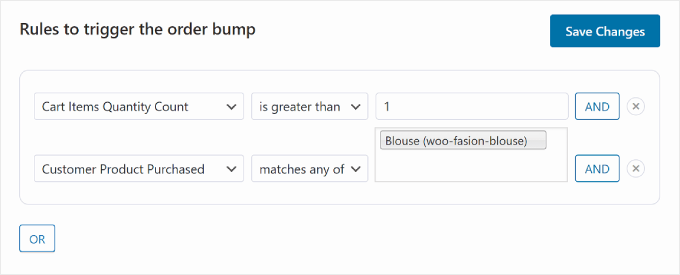
This will display some new settings on the screen that you can use to display the order bump for specific products. The rules can be based on the cart, customer, geography, or date and time.
For example, if you want to display the order bump on the checkout for a specific product, then you must choose the ‚Customer Product Purchased‘ option from the dropdown menu on the right.
After that, just add the product name in the text field on the right and click the ‚Save Changes‘ button to store your settings.
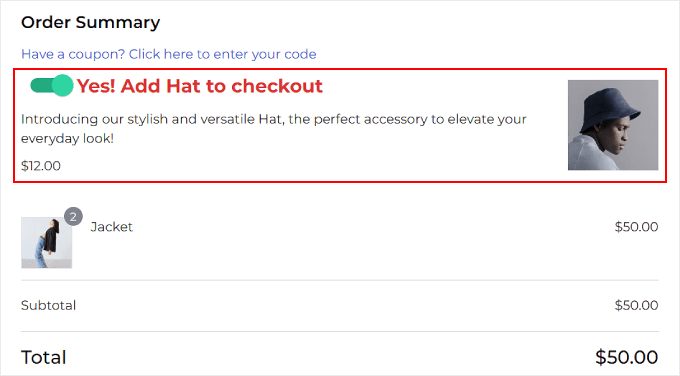
Now, visit your WooCommerce to view the order bump on the checkout page of a specific product.
If you want to know more about trigger rules for order bumps, then you can see our beginner’s guide on how to create an order bump in WooCommerce.
Method 5: Offer Post-Purchase Recommendations With Emails
If you want to send a post-purchase recommendation email to customers, then this method is for you. For this, you will need FunnelKit Automations, which is a powerful automation plugin.
You can create a workflow with it that will automatically send a recommendation email to users sometime after their purchase.
First, you need to install and activate the FunnelKit Automations plugin. For instructions, see our tutorial on how to install a WordPress plugin.
Note: You can sign up for the FunnelKit free plan to do this.
Upon activation, visit the FunnelKit Automations » Automations page from the WordPress dashboard and click the ‚Create Automation‘ button.
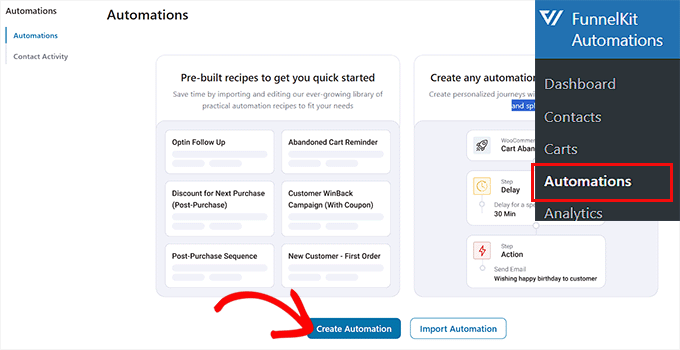
This will take you to the ‚Add Automations‘ page, where you will see a list of premade templates offered by the plugin.
From here, switch to the ‚WooCommerce‘ tab and select the ‚Post Purchase Sequence‘ template.
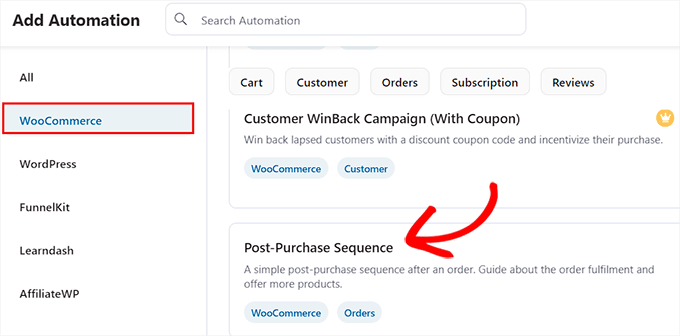
Doing that will open a preview of the automated workflow in a new tab from where you must click the ‚Import Recipe‘ button.
This will open a new prompt. Here, add the name for the workflow that you are making and click the ‚Create‘ button.
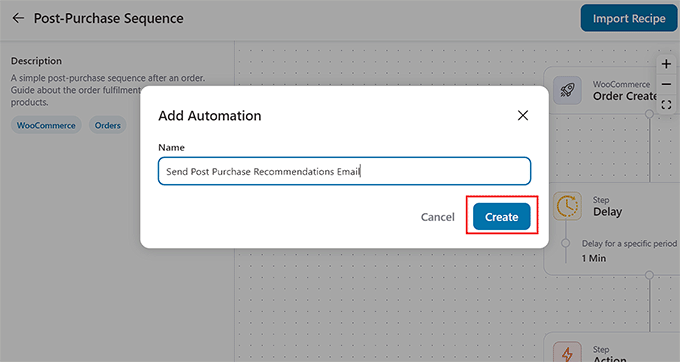
The FunnelKit Automation editor will now be launched on the screen. You can start by clicking on the ‚Order Created‘ tab. This is the trigger that will start the workflow.
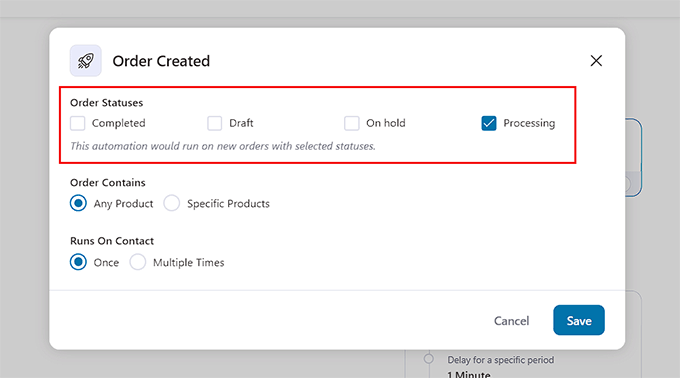
A popup will appear on your screen, where you will have to select the order status. For instance, if you select the ‚Processing‘ option, then the email will be sent to users after they place their order.
However, when choosing the ‚Completed‘ option, customers will receive an email after they get the order at their address. Just configure these settings and click the ‚Save‘ button.
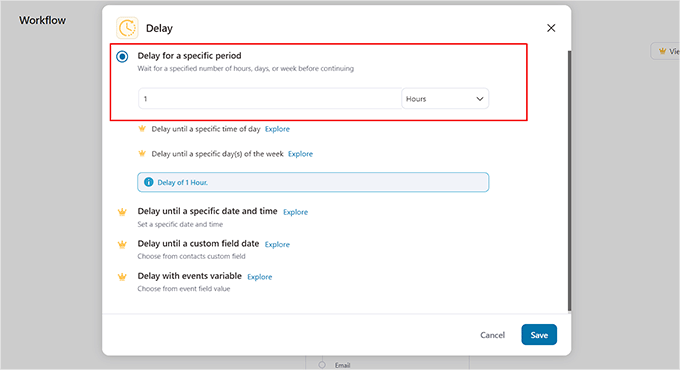
Once you do that, click the ‚Delay‘ tab.
This will open the prompt on the screen where you can choose how long after the purchase the email should be sent to users. For example, you can choose 1 hour from the dropdown menu.
After that, click the ‚Save‘ button to store your settings.
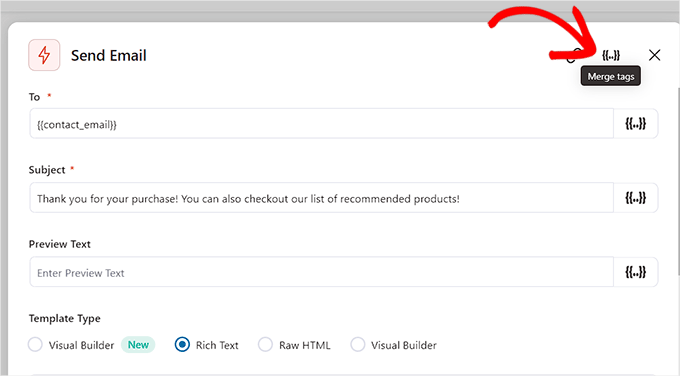
Next, click the ‚Action‘ tab in the editor to open its settings in the popup. Here, you can start by configuring the subject line of the email.
Then, click the ‚Merge Tags‘ option at the top.
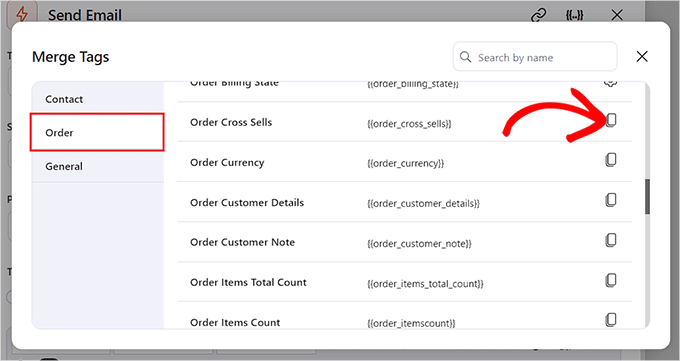
On doing that, a popup will open up where you have to switch to the ‚Orders‘ tab.
Next, scroll down to the ‚Order Cross Sells‘ option and click the copy button next to it.
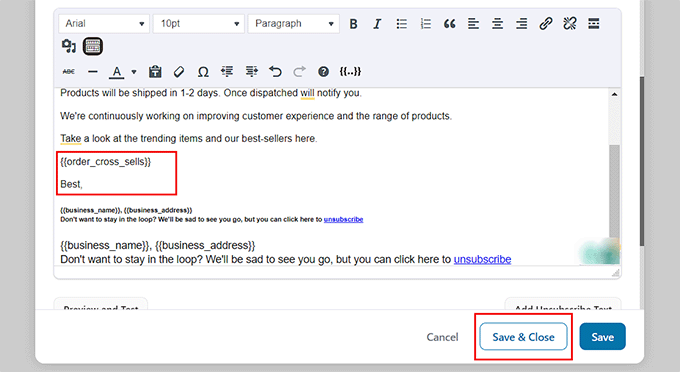
The prompt will now automatically close, and you can scroll down to the text builder in the ‚Action‘ popup.
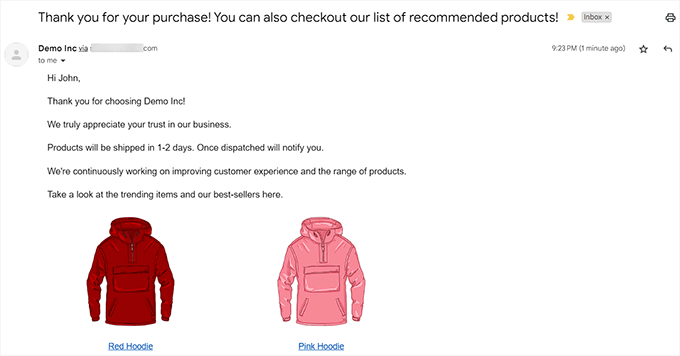
Here, you can change the email content according to your liking and add the cross-sells tag. Now, users will see a list of relevant products that you added for the purchased product using WooCommerce or FunnelKit.
Once you are done, just click the ‚Save and Close‘ button.
You can now view your automated workflow again to see if you want to make any changes.
After that, toggle the ‚Inactive‘ switch at the top to ‚Active‘.
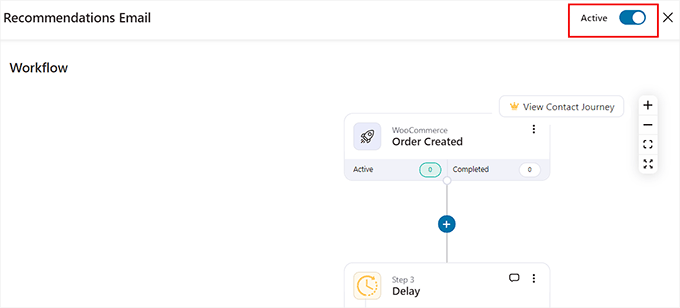
Now, your customers will receive an email with product recommendations exactly an hour after purchase.
Method 6: Show Product Recommendations in Popups
If you want to show product recommendations in popups, then this method is for you.
For this, you will need OptinMonster, which is the best lead generation and conversion optimization tool on the market. It allows you to create popups, gamified spin the wheels, banners, and floating bars using its premade templates and visual editor.
It also has exit intent technology that lets you display product popups to users just as they are planning to leave your store.
To create a product recommendation popup, you will need to create an account on the OptinMonster website.
Once you do that, open your WordPress dashboard and install the free OptinMonster plugin, which will connect your website with the tool.
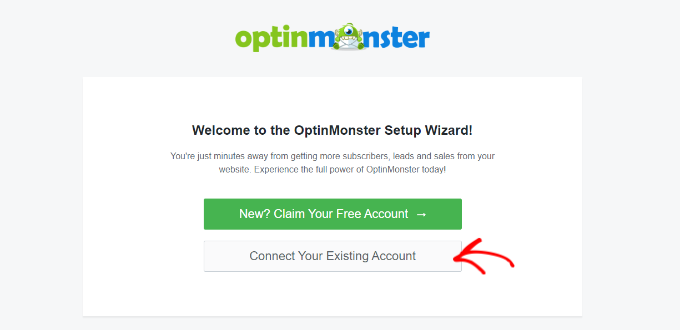
Upon activation, the OptinMonster setup wizard will open up, where you must click the ‘Connect Your Existing Account’ button. You can then follow the onscreen instructions to complete the process.
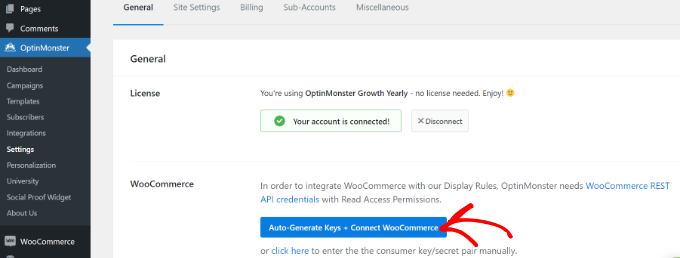
Next, visit the OptinMonster » Settings page and click the ‘Auto Generate Keys + Connect WooCommerce’ button.
If you don’t do this, then campaigns created with OptinMonster won’t be shown in your store.
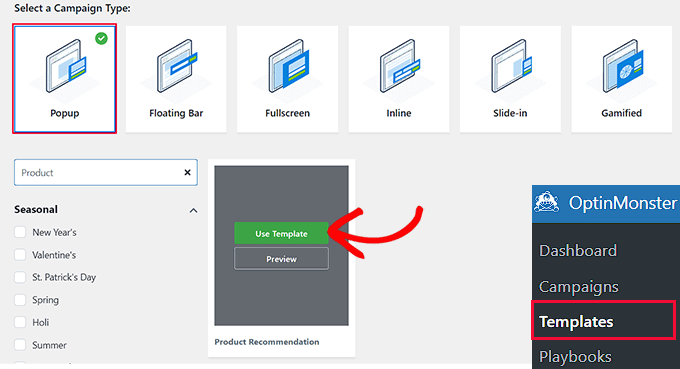
Once that is done, head over to the OptinMonster » Templates page from the WordPress dashboard and select ‚ Popup‘ as the campaign type.
Next, click the ‚Use Template‘ button for a template that you want to use. For this tutorial, we have used the ‚Product Recommendations‘ template.
This will open a prompt where you can add a name for the campaign that you are creating.
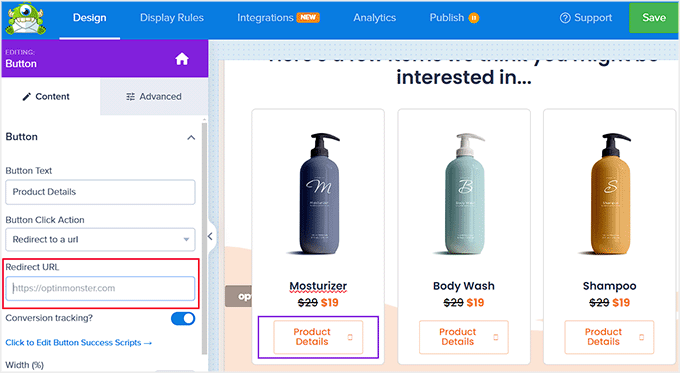
Once you do that, OptinMonster’s drag and drop builder will be launched on the screen. Here, you can use different blocks to add an image, details, and CTA for a product. For more instructions, see our tutorial on how to create a WooCommerce popup to increase sales.
Then, click the ‚Product Details‘ button in the popup preview to open its settings in the left column. You can now add the URL for the product’s page in the ‚Redirect URL‘ field.
Now, switch to the ‚Display Rules‘ tab from the top. Here, you will be setting conditions for the product recommendation popup appearance.
To do this, open the ‚Time on Page‘ dropdown menu and choose the ‚Page Targeting‘ option.
This will allow you to show your popup to users on a specific product’s page, letting you cross-sell or upsell the product.
Upon choosing this option, select ‚contains‘ from the dropdown menu in the middle and then add the URL of the product page where you want to display the specific recommendation popup.
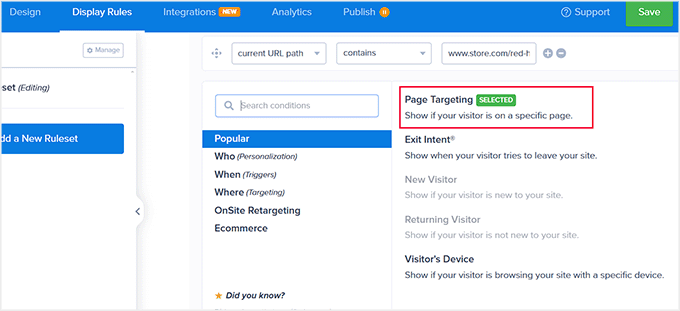
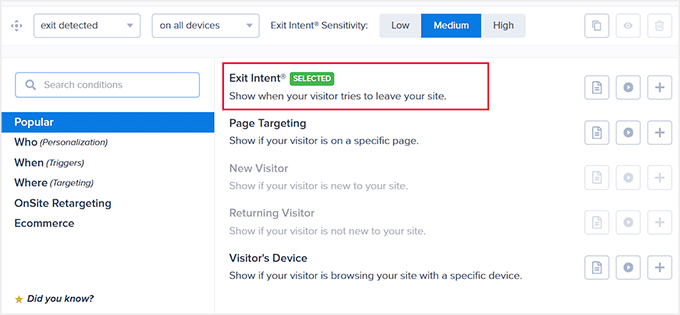
You can also choose the ‚Exit Intent‘ option to display the popup as the user is about to leave your store.
If you want, you can change the feature’s intensity to show it to more customers.
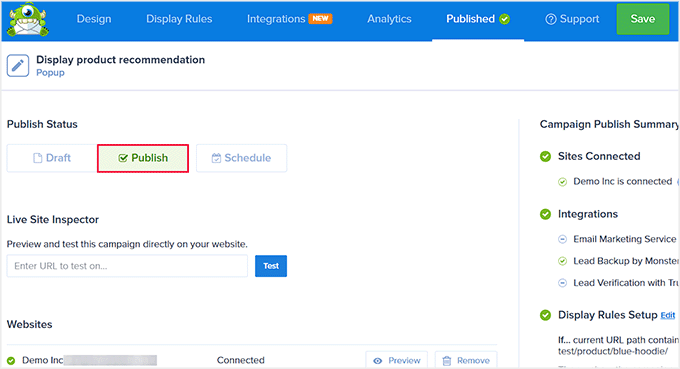
Finally, switch to the ‚Publish‘ tab from the top.
Here, click the ‚Publish‘ button to make your popup live. Then, click the ‚Save‘ button to store your settings.
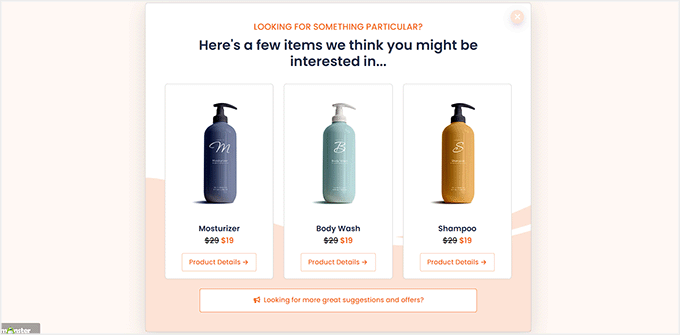
You can now visit your online store to view the product recommendations popup in action.
If you selected a specific page for the popup, then you must head to that page to view the results.
Method 7: Display Product Recommendations in Easy Digital Downloads
If you sell digital downloads on your online store, then the above methods may not be suitable for you.
In that case, you can use Easy Digital Downloads, which is the best plugin for selling digital goods, to show product recommendations.
First, you need to install and activate Easy Digital Downloads. For details, see our guide on how to install a WordPress plugin.
Note: EDD has a free plan, but you will need the pro version to unlock the Cross-sell and Upsell add-on.
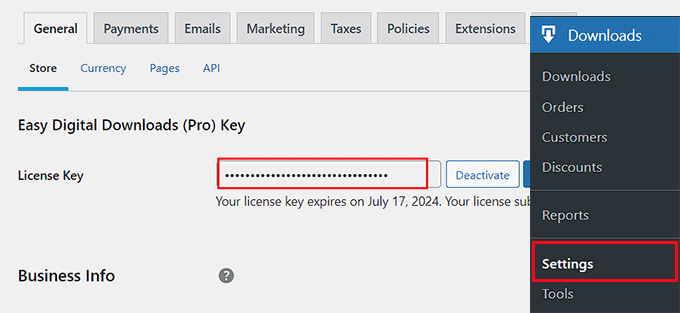
Upon activation, visit the Downloads » Settings page from the WordPress admin sidebar to enter your license key. You can get information from under your account on the EDD website.
Then, click the ‚Activate‘ button.
Once you have done that, you must set up your store to start selling products. For instructions, see our beginner’s guide on how to sell digital downloads in WordPress.
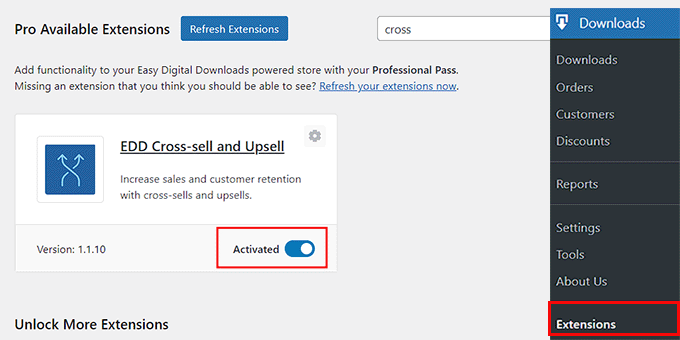
Next, head over to the Downloads » Extensions page and locate the ‚EDD Cross-sell and Upsell‘ addon, and click the ‚Install‘ button under it.
Once the addon is installed, it will automatically show an activated toggle like this:
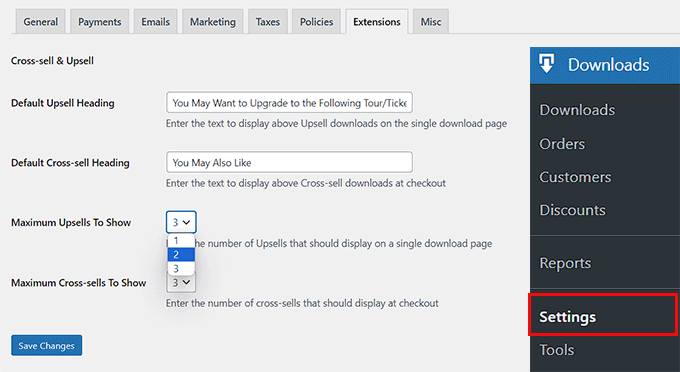
Now, it’s time for you to visit the Downloads » Settings page and switch to the ‚Extensions‘ tab.
From here, you can configure the heading for upsell and cross-sell products. Remember that the upsell products are like a premium version of the product the user is purchasing, while cross-sell products are the ones that are related to the purchased products.
You can add your headings according to your liking and also adjust the number of product recommendations to be shown from the dropdown menus.
After that, just click the ‚Save Changes‘ button to store your settings.
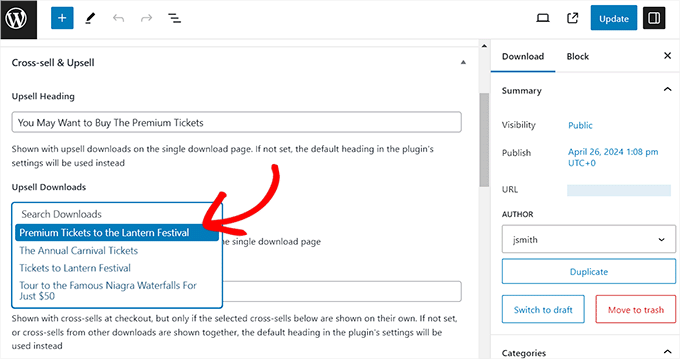
Now, open the digital product where you want to add product recommendations.
Once the block editor appears, simply scroll down to the ‚Cross-sell and Upsell‘ section, where you can add custom headings for each section.
If you don’t add a heading, then the default headings you configured will be added to the page.
After that, select the upsell product recommendations from the dropdown menu. You can follow the same process for cross-sell products as well.
Once you are done, just click the ‚Update‘ or ‚Publish‘ button to store your settings.
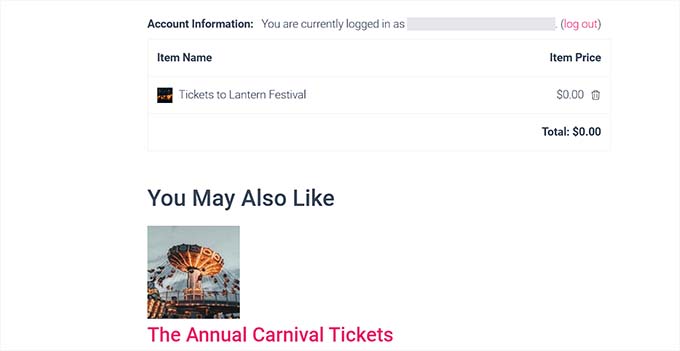
Now open the product page on the website front-end, and you will see that the upsell product will be recommended on the product page.
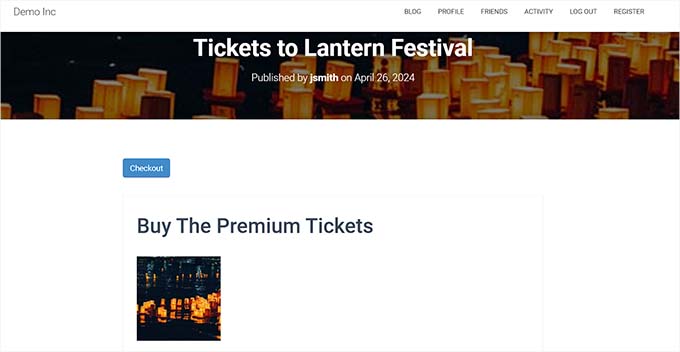
On the other hand, the cross-sell products will be recommended to users when they are on the checkout page.
This is how the cross-sell products looked on our demo website.
Bonus: Properly Set Up eCommerce Tracking In WordPress
Once you have added product recommendations, it is time for you to set tracking for your online store to find your top-selling products, see which campaigns perform the best, and understand how people find and use your website.
This will help you find what kind of products customers are likely to buy along with others in your store. For example, you may notice that anyone who is buying sunscreen is also purchasing a hat.
With this information, you can show relevant product recommendations to customers and boost your conversions.
To do this, you will need MonsterInsights, which is the best Google Analytics solution on the market.

Upon plugin activation, simply connect your website with Google Analytics. For details, see our tutorial on how to install Google Analytics in WordPress.
Then, head over to the Insights » Addons page from the WordPress dashboard and install the eCommerce addon.
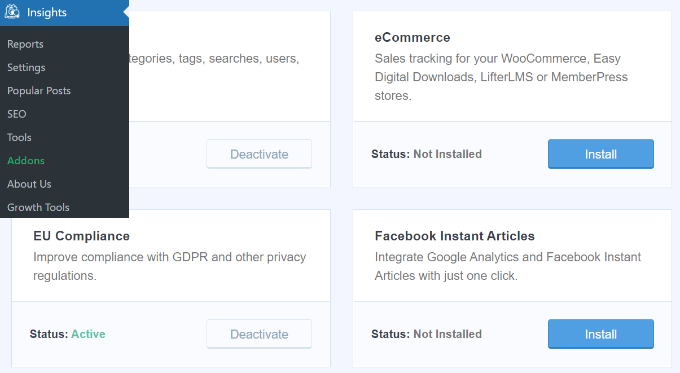
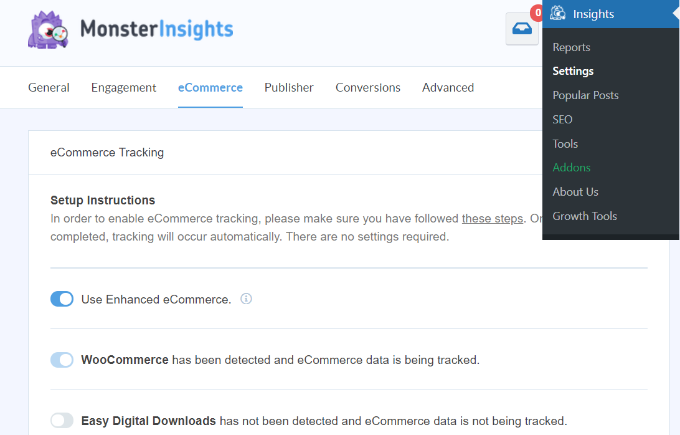
Now visit the Insights » Settings page and switch to the ‚eCommerce‘ tab. Here, you must toggle the ‚Use Enhanced eCommerce‘ switch to ‚On.‘
Once you do that, MonsterInsights will start recording analytics and find the data you need, including conversion rate, transactions, revenue, average order value, and top products.
For details, see our tutorial on how to properly set up eCommerce tracking in WordPress.
We hope this article helped you learn how to show product recommendations in WordPress. You may also like to see our beginner’s guide on how to pass payment processing fees to customers in WordPress and our top picks for the best email marketing services to grow your email list.
Wenn Ihnen dieser Artikel gefallen hat, dann abonnieren Sie bitte unseren YouTube-Kanal für WordPress-Videotutorials. Sie können uns auch auf Twitter und Facebook finden.


Have a question or suggestion? Please leave a comment to start the discussion.