Mit einem Site-spezifischen Plugin können Sie Ihrer WordPress-Website ganz einfach Codeschnipsel hinzufügen, ohne sich auf Ihr Theme verlassen zu müssen. So können Sie benutzerdefinierten Code verwenden, um Ihre Website zu verbessern, und müssen sich keine Sorgen machen, dass Sie alles neu machen müssen, wenn Ihr Theme aktualisiert wird.
Bei WPBeginner haben wir in der Vergangenheit viele standortspezifische Plugins erstellt, um Shortcodes, neue Beitragstypen und andere Funktionen zu unserer Website hinzuzufügen. Außerdem haben wir auch unseren Kunden geholfen, mit site-spezifischen Plugins zu starten.
In diesem Artikel wird erklärt, wie man ein standortspezifisches WordPress-Plugin erstellt und warum dies wichtig ist.
Was ist ein standortspezifisches WordPress-Plugin?
Ein site-spezifisches WordPress-Plugin ist ein eigenständiges Plugin, mit dem Sie alle Anpassungsschnipsel hinzufügen können, die nicht themenabhängig sind.
Wenn Sie an Ihrer Website arbeiten, werden Sie in WordPress-Tutorials oft aufgefordert, Code in die Datei functions.php Ihres Themes oder ein site-spezifisches Plugin einzufügen.
WordPress wird nicht mit einem standortspezifischen Plugin geliefert. Sie müssen Ihr eigenes erstellen und es dann installieren und aktivieren.
Warum ein standortspezifisches WordPress-Plugin erstellen?
Wie bereits erwähnt, stoßen Sie häufig auf Tutorials, in denen ein Code gezeigt wird, den Sie in die functions.php-Datei Ihres Themes oder in ein site-spezifisches Plugin einfügen können.
Diese benutzerdefinierten Codes können verwendet werden, um neue Beitragstypen, Taxonomien, Shortcodes und eine Vielzahl von Hacks zur Verbesserung Ihrer Website hinzuzufügen.
Wenn Sie den benutzerdefinierten Code in die Funktionsdatei Ihres Themes einfügen, verschwindet er, wenn Sie Ihr Theme aktualisieren oder wechseln.
Sie können ein untergeordnetes Thema erstellen und die Funktionsdatei des untergeordneten Themas verwenden, um Ihren Code zu speichern. Allerdings verschwindet Ihr Code auch dann, wenn Sie das Theme wechseln.
Mit einem site-spezifischen WordPress-Plugin können Sie Ihrer WordPress-Website ganz einfach benutzerdefinierte Codeschnipsel hinzufügen und sicherstellen, dass diese themenunabhängig sind. Es ist ein eigenständiges WordPress-Plugin, d. h. es ist nicht von Ihrem Theme abhängig, und Sie können Ihr Theme aktualisieren oder wechseln.
Schauen wir uns also an, wie Sie mit einem Site-spezifischen Plugin ganz einfach benutzerdefinierten Code hinzufügen können. Wir zeigen Ihnen zwei Möglichkeiten, und Sie können die Methode wählen, die für Sie am besten geeignet ist (Tipp: Methode #2 ist für Anfänger einfacher).
Methode 1: Manuelles Erstellen eines Site-spezifischen WordPress-Plugins
Wir wissen, dass dies für Anfänger etwas kompliziert klingen mag, aber wir werden versuchen, es Ihnen so einfach wie möglich zu machen.
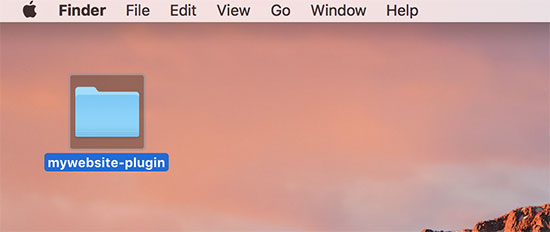
Zunächst müssen Sie einen neuen Ordner auf Ihrem Desktop erstellen und ihn nach Ihrer Website benennen. Zum Beispiel: mywebsite-plugin.
Öffnen Sie nun einen einfachen Texteditor wie Notepad oder TextEdit auf Ihrem Computer.
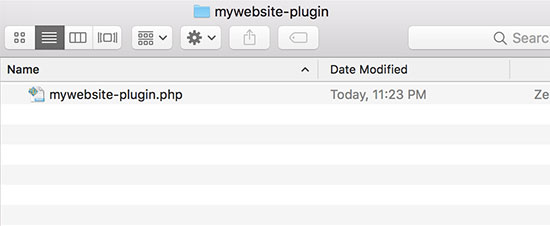
Sie müssen eine neue Datei erstellen und diese unter dem Namen mywebsite-plugin.php im Plugin-Ordner auf Ihrem Desktop speichern.
Ihre Plugin-Datei benötigt einen speziellen Header-Code, damit WordPress sie als Plugin erkennen kann. Fügen Sie den folgenden Code in Ihre Datei mywebsite-plugin.php ein:
1 2 3 4 5 6 7 8 9 | <?php/*Plugin Name: Site Plugin for example.comDescription: Site specific code changes for example.com*//* Start Adding Functions Below this Line *//* Stop Adding Functions Below this Line */?> |
Sie können example.com durch Ihren eigenen Domänennamen ersetzen. Sobald Sie dies getan haben, ist Ihr standortspezifisches Plugin fertig.
Es gibt zwei Möglichkeiten, Ihr standortspezifisches Plugin auf Ihre Website hochzuladen. Sie können es entweder über Ihr WordPress-Administrationspanel hochladen oder FTP verwenden.
1. Installieren Sie ein standortspezifisches Plugin aus dem WordPress-Adminbereich (empfohlen)
Diese Methode ist einfacher und wird für alle Benutzer empfohlen.
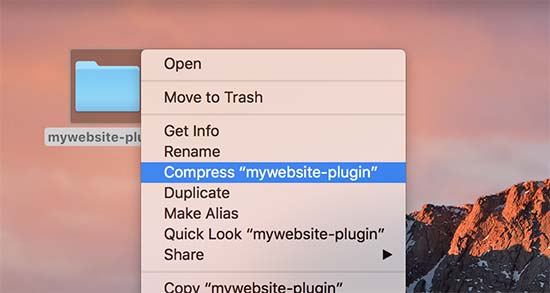
Als Erstes müssen Sie eine Zip-Datei mit dem für Ihre Website spezifischen Plugin-Ordner erstellen.
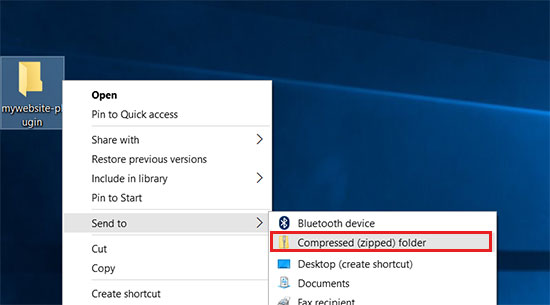
Windows-Benutzer können einfach mit der rechten Maustaste auf den Plugin-Ordner klicken und Senden an “ Komprimierter (zip) Ordner wählen.
Mac-Benutzer müssen mit der rechten Maustaste klicken.
Wählen Sie dann „mywebsite-plugin komprimieren“.
Sobald Sie die Zip-Datei des Plugins haben, gehen Sie auf die Seite Plugins “ Neu hinzufügen in Ihrem WordPress-Adminbereich.
Klicken Sie dann auf die Schaltfläche „Plugin hochladen“ oben auf der Seite.
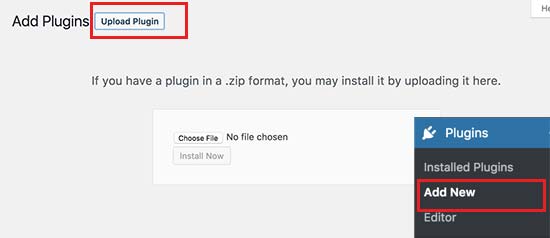
Klicken Sie anschließend auf die Schaltfläche „Datei auswählen“, um die zuvor erstellte ZIP-Datei auszuwählen, und klicken Sie dann auf die Schaltfläche „Jetzt installieren“.
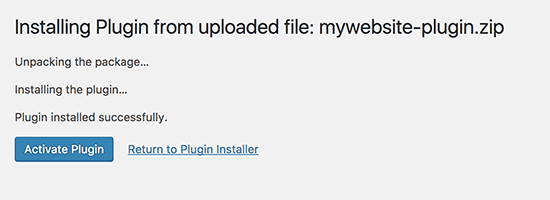
WordPress wird nun das Plugin für Sie hochladen und installieren. Sobald es hochgeladen ist, müssen Sie auf die Schaltfläche „Plugin aktivieren“ klicken, um Ihr standortspezifisches Plugin zu verwenden.
2. Laden Sie Ihr Site-spezifisches WordPress-Plugin per FTP hoch
Bei dieser Methode brauchen Sie keine Zip-Datei zu erstellen. Sie werden das Plugin per FTP hochladen.
Zunächst müssen Sie mit einem FTP-Client eine Verbindung zu Ihrer Website herstellen.
Sobald Sie verbunden sind, gehen Sie zum Ordner /wp-content/plugins/ in der Spalte „Remote Site“. Als Nächstes müssen Sie Ihren standortspezifischen Plugin-Ordner auswählen und ihn auf Ihre Website hochladen.
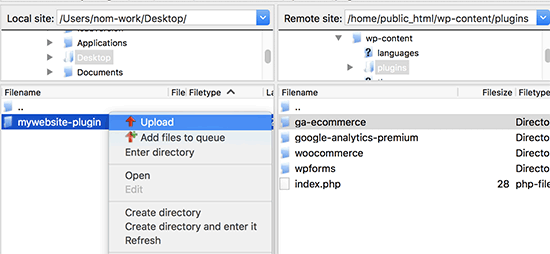
Ihr FTP-Client überträgt nun den für Ihre Website spezifischen Plugin-Ordner auf Ihre WordPress-Website. Dadurch wird das Plugin auf Ihrer Website installiert.
Sie müssen das Plugin jedoch noch aktivieren, um es verwenden zu können. Gehen Sie dazu auf die Seite „Plugins“ in Ihrem WordPress-Verwaltungsbereich und klicken Sie dann auf den Link „Aktivieren“ unter dem Plugin für Ihre Website.

Das war’s schon. Ihr standortspezifisches Plugin ist nun einsatzbereit.
Hinzufügen von benutzerdefinierten Code-Snippets zu Ihrem Site-spezifischen Plugin
Es gibt zwei Möglichkeiten, Ihr Plugin zu bearbeiten und ihm benutzerdefinierte Codeschnipsel hinzuzufügen.
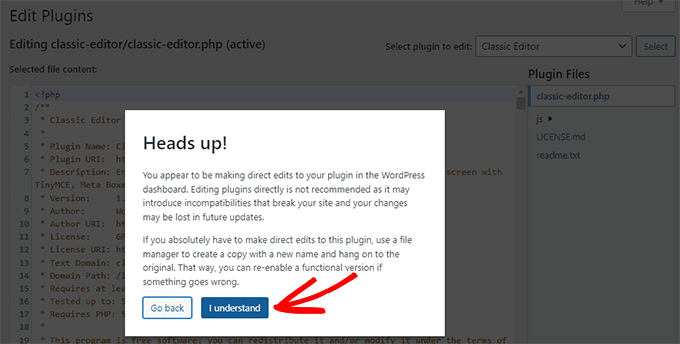
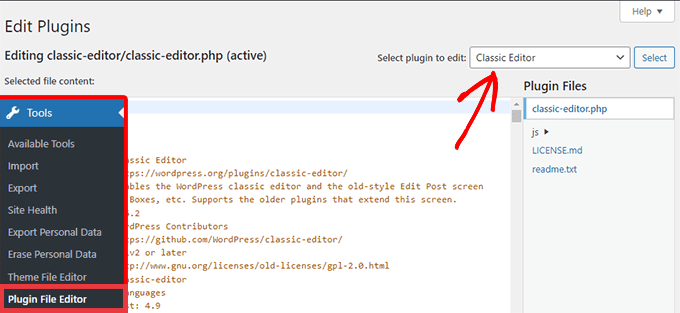
Die erste Methode ist, dies über den WordPress-Verwaltungsbereich zu tun. Sie können auf die Seite Plugins “ Editor gehen.
Es wird eine Warnmeldung angezeigt, und Sie müssen auf die Schaltfläche „Ich verstehe“ klicken, um fortzufahren. Wenn Sie die Dateien auf sicherere Weise bearbeiten möchten, können Sie auch mit der zweiten Methode fortfahren.
Als Nächstes müssen Sie Ihr Site-spezifisches Plugin aus dem Dropdown-Menü „Plugin zur Bearbeitung auswählen“ auswählen.
Der Editor lädt Ihre Plugin-Datei, und Sie können ihr Code-Schnipsel hinzufügen.
Wenn Sie fertig sind, klicken Sie auf den Button „Datei aktualisieren“, um Ihre Änderungen zu speichern.
Wenn in Ihrem Code etwas fehlt oder Ihre Website dadurch beschädigt werden könnte, macht der Plugin-Editor Ihre Änderungen automatisch rückgängig.
Wenn der Editor jedoch fehlschlägt und Sie den weißen Bildschirm des Todes sehen, können Sie FTP verwenden, um Ihre Plugin-Datei zu bearbeiten und die Änderungen rückgängig zu machen.
Die zweite Methode besteht darin, die Plugin-Datei direkt per FTP zu bearbeiten. Rufen Sie einfach den Plugin-Ordner mit Ihrem FTP-Client auf. Klicken Sie mit der rechten Maustaste auf die Plugin-Datei und wählen Sie dann „Anzeigen/Bearbeiten“.
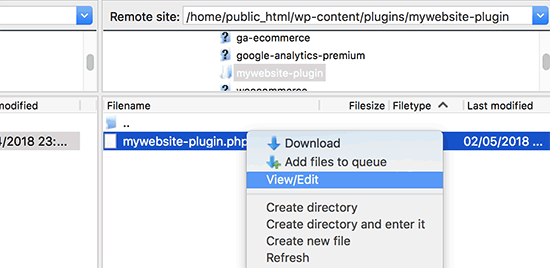
Sie können die Plugin-Datei auch auf Ihren Computer herunterladen, sie bearbeiten und dann wieder hochladen.
Methode 2: Hinzufügen von benutzerdefiniertem Code mit WPCode (empfohlen)
Diese Methode ist viel einfacher und bietet Ihnen eine bessere Möglichkeit, Ihre individuellen Code-Snippets in WordPress mit WPCode zu verwalten.
Als Erstes müssen Sie das kostenlose WPCode-Plugin auf Ihrer Website installieren und aktivieren. Weitere Einzelheiten finden Sie in unserer Schritt-für-Schritt-Anleitung für die Installation eines WordPress-Plugins.
Verwandter Beitrag: Weitere Informationen finden Sie in unserem vollständigen Test von WPCode.
Nach der Aktivierung fügt das Plugin einen neuen Menüpunkt mit der Bezeichnung „Code Snippets“ zu Ihrem WordPress-Administrationsmenü hinzu. Wenn Sie darauf klicken, gelangen Sie auf eine Seite, auf der Sie alle Ihre individuellen Codes verwalten können.
Um Ihr erstes Codefragment hinzuzufügen, klicken Sie auf den Button „Neu hinzufügen“.
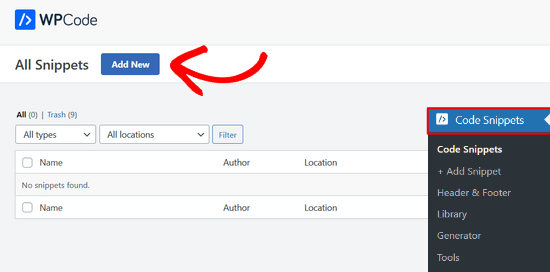
Dadurch gelangen Sie auf die Seite „Snippet hinzufügen“. Hier können Sie ein Code-Snippet aus der vorgefertigten Bibliothek auswählen oder Ihren eigenen Code hinzufügen.
Um benutzerdefinierten Code hinzuzufügen, navigieren Sie zur Option „Benutzerdefinierten Code hinzufügen (neues Snippet)“ und klicken Sie auf die Schaltfläche „Snippet verwenden“.
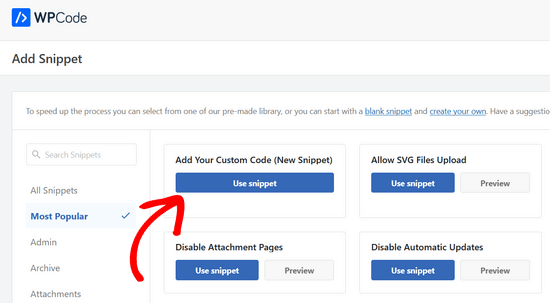
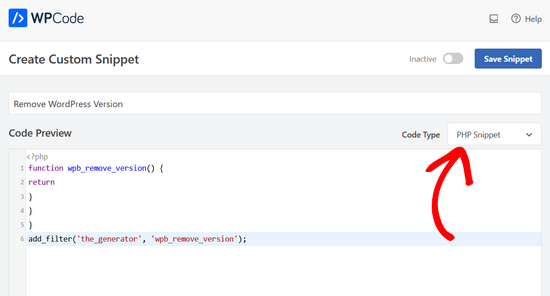
Jetzt können Sie einen Titel für Ihr benutzerdefiniertes Codefragment eingeben. Dies kann alles sein, was Ihnen hilft, den Code zu identifizieren.
Danach können Sie Ihr Code-Snippet in das Code-Feld einfügen. Sie müssen auch den Typ „PHP Snippet“ aus der Dropdown-Liste „Code-Typ“ auf der rechten Seite auswählen.
Sie können auch Notizen zum Code im Abschnitt „Basisinformationen“ hinzufügen.
Sie sollten diesen Bereich nutzen, um zu notieren, was dieser Code bewirkt, wo Sie ihn gefunden haben und warum Sie ihn Ihrer Website hinzufügen. Dies wird Ihrem „zukünftigen Ich“ helfen, sich daran zu erinnern, warum das „vergangene Du“ diesen Code hinzugefügt hat.
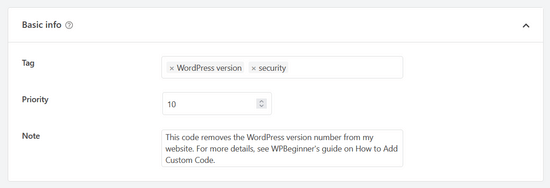
Sie haben auch die Möglichkeit, Ihren Code-Snippets Tags zuzuweisen, mit denen Sie Code-Snippets nach Themen und Funktionen ordnen können.
Mit dem Plugin können Sie auch auswählen, wie Sie das Code-Snippet ausführen möchten. Im Abschnitt „Einfügen“ können Sie die Methode „Automatisch einfügen“ auswählen, um den Code automatisch in Ihre Website einzufügen und auszuführen.
Sie können zwischen den Optionen „Verwaltungsbereich“, „Front-End“ und „Überall“ wählen. Wenn Sie unsicher sind, sollten Sie die Standardoption „Überall ausführen“ beibehalten.

Sie können auch die Methode „Shortcode“ wählen. Bei dieser Methode wird das Snippet nicht automatisch eingefügt. Sobald Sie das Snippet speichern, erhalten Sie einen Shortcode, den Sie manuell an einer beliebigen Stelle Ihrer Website einfügen können.
Sie können auch den Abschnitt „Intelligente bedingte Logik“ verwenden, um automatisch eingefügte Snippets auf der Grundlage einer Reihe von Regeln ein- oder auszublenden.
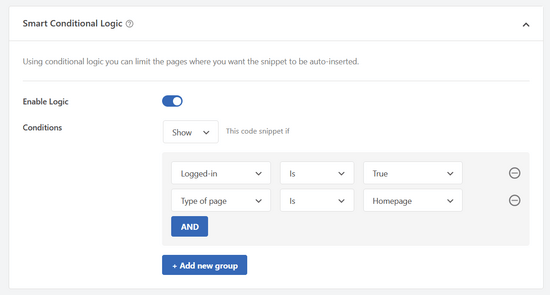
So können Sie beispielsweise Code-Snippets nur für angemeldete Benutzer laden, PHP-Code-Snippets nur bei bestimmten Seiten-URLs laden, Code-Snippets auf der Grundlage des Seitentyps anzeigen und vieles mehr.
Schließlich können Sie den Schalter von „Inaktiv“ auf „Aktiv“ umschalten und dann auf die Schaltfläche „Snippet speichern“ klicken.
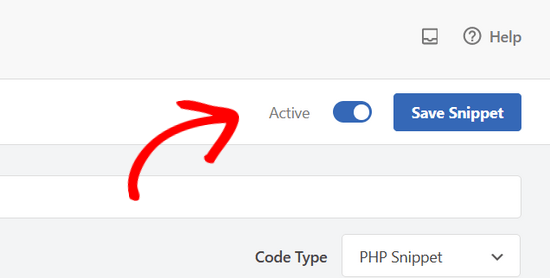
Wenn Sie das Code-Snippet speichern möchten, ohne es zu aktivieren, können Sie nur auf die Schaltfläche „Snippet speichern“ klicken.
Sobald Sie ein Code-Snippet gespeichert und aktiviert haben, wird es automatisch auf Ihrer Website wirksam, wenn Sie diese Einfügemethode gewählt haben.
Weitere Einzelheiten finden Sie in unserem Leitfaden zum einfachen Hinzufügen benutzerdefinierter Code-Snippets in WordPress.
Wir hoffen, dass dieser Artikel Ihnen geholfen hat zu erfahren, warum und wie Sie ein standortspezifisches WordPress-Plugin erstellen. Vielleicht interessieren Sie sich auch für unsere Liste nützlicher Tipps für Funktionsdateien und die beliebtesten WordPress-Hacks, um Ihr standortspezifisches Plugin optimal zu nutzen.
Wenn Ihnen dieser Artikel gefallen hat, dann abonnieren Sie bitte unseren YouTube-Kanal für WordPress-Videotutorials. Sie können uns auch auf Twitter und Facebook finden.


BSubra
Is it possible to add code snippets like Google Analytics Code, Adsense code in Site Specific Pliugin. Or only possible to add codes we generally put in functions.php file.
I mean, is it possible to add codes in site-specific plugin what we generally put in Header.php file.
WPBeginner Support
You can do that if you would like, you can also use the insert headers and footers plugin.
Admin
Bola Oussou
hi
Thanks for this tuto
however is there a way to make this plugging(not to be visible) not in plugging list and also in a specific folder (not wp-content folder) ?
Thanls
Tor-Bjorn Fjellner
Actually yes, there is:
Instead of placing the plugin in …/wp-content/plugins/ you put it in …/wp-content/mu-plugins/ (You may have to create that directory, if it’s not there yet.
Plugins that are placed in mu-plugins are ALWAYS run, so the only way to deactivate a MU plugin (MU currently is construed as „must use“) is to delete it (or remain the directly mu-plugins to something else…).
Judith
Hi I tried to do the Site-specific plugin, but it is not working, I get this message „The package could not be installed. No valid plugins were found.
Plugin installation failed.“
What do I do?
WPBeginner Support
Hi Judith,
This usually means that the plugin header information is incorrect. You can try again and make sure that your plugin header is exactly in the format displayed in the tutorial.
Admin
Jonathan Manheim
I get this same error. I have tried maybe 10 times. Uploaded through admin and on FTP. Cannot get it to upload. I am using TextEditor to paste the code. Notice several things you don’t mention in the post that I wonder could be an issue. First, won’t let me save the file as .php. I have to save it as .php.rtf OR .rtf then go back and rename the file after it is saved.
Second, not sure what you mean by making sure the format for the plugin header is exactly the same. Should the line number be in there? If so, I can’t get that to work. If I copy and paste with the line numbers, the green vertical line doesn’t show up and there is no space between the line numbers and the code. Or am I supposed to just copy the code (without the line numbers)? Either way, I’ve tried everything I can with my current Textedit application and it will not work.
Any ideas? I can send you screen shots of exactly what I have if you would like
WPBeginner Support
Hi Jonathan,
You will need to save file as .php. Please use a different text editor on Windows you can use Notepad or download Notepad++. On Mac, you can use TextEdit or download and install TextWrangler.
You don’t need to copy and paste line numbers.
Kacper
In my case the issue was that the file had Unicode encoding. Changing it to ANSI fixed the issue.
Ikram
Hi,
Good day!
Would like to know how to set a white paper in my blog post article to download it with add email address from the visitor.
Thanks, Ikram
WPBeginner Support
Hi Ikram,
You can do that with the pro version of WPForms. You will need at least Plus plan for that. After users enter their email address and click submit you can redirect them to the download page.
Admin
Alain Fradette
Great info! Thanks so much. I have been using WordPress for years and this little gem made it so much easier!
Abhijeet
I have edited some code in Style.css . Will it be overwritten if i update a theme?
is it possible to create style css file in this site specific plugin?
LFreitas
Yes, they will.
You should create a child theme and put your modifications there instead of in the original theme.
Read more: https://www.wpbeginner.com/glossary/child-theme/
dave
White screen on publishing pages.
The code works to show child pages on a parent page using the shortcode however I am getting white screen. Anyone know why?
Tommy
The plugin generated 3 characters of unexpected output during activation. If you notice “headers already sent” messages, problems with syndication feeds or other issues, try deactivating or removing this plugin.
Saurin
I believe best approach to add custom code to site is child theme. No matter if we need to customize theme or not. I mad a practice to always use child theme even if there is no customization. This habit saved my time & effort many times. I dont think it is good to create extra plugin for such customization.
I believe in minimum use of plugin no matter how simple you created one.
Jason
Which is better, site-specific plugin or Child Theme? or both?
I need to create a custom post type to add some major functionality to my site so is the plugin better or the child theme and its functions.php?
Thanks!
Josh
The thing is, is that you’re creating the plug-in yourself, using the functions the same exact way. So the answer to your question would be that neither is better, because you should be using them WITH each other.
Josh
Think of the site-specific plug-ins as functions that are independent of your theme.
Vickey
How would I create a create a new plugin directory in Azure? I have WordPress running on Azure using MS SQL Server, which I activated using Project NAMI.
vishal
not working on multisite with publisher theme can you help me this is my site and also tell me how can i remove featured image inside the post not from front page latest post
Nadia Khan
Hi there,
You WP Beginners are rock. and I want to thank you for your Struggles for us.
Now come to the point. I have installed an theme and in that theme, there is an function that is showing wp toolbar for guests, I have tried so many times to find this function in theme files to remove this, but i can’t. So please help me to remove that toolbar, that is showing to every visitor with wordpress logo and wordpress’s own link to their website. Screen Shot is attached.
Manuel
Does something like this work for plugins too? Im finding that I am making a few changes to plugins that I add to my site….many times deleting certain lines of code I dont want. I’m assuming that after I update that plugin, all my changes will be erased. How can I avoid this?
Elizabeth
Hi, thanks for the post. I’m getting an error when I activate the plugin for some reason:
Parse error: syntax error, unexpected ‚*‘, expecting identifier (T_STRING) on line 9
Any ideas what I’ve done wrong?
Thanks!
WPBeginner Support
Hi Elizabeth,
There is an unexpected asterisk sign in the code on line 9 which is blocking the php script. Edit the file again and copy the code exactly as it is shown above. Make sure that you don’t copy line numbers in the code click on the Copy button at the top right corner of the code snippet box
.
Admin
Steven Denger
I tried naming the new folder as you did in the example but I got an error that said something in the way of you cannot use a name like this. This Instruction may be helpful to some – but it is very difficult and confusing to me and does not help at all. As I said – you need to explain this down to the fine details or otherwise these tutorals will not help. The name of this site is wp BEGINNER – and that is what I am. You project these tutorals to the more experienced.
I guess I will have to start going elswhere to get beginners instructiions because, most of time, wp beginner is not helpful – it is more like a techs only club.
Steven Denger
How do you get to the /wp-content/plugins/yoursitename-plugin/ in wordpress and upload a file there? I am lost on the first line of instruction. You guys always assume that we know these things in your instructions but they are not clear enough.
I went to cpanel and opened up the wpcontent > plugins – and it shows a list of plugins – but I am lost from this point. How do I go about uploading a file in here? I am a beginner – and you guys seem to always explain things like your instructing experienced techs. I am not but I go to WP Beginner to try to learn. It is usually difficult to follow your instructions and I end up having to go somewhere else in google search to find things explained down to a beginners level.
If you want to be more helpful try breaking things down a little more simple.
Manuel
Hey Steven,
I know the feeling! I’m far from a expert with wordpress and I pretty much live on google searches and this site trying to learn. I know a little bit and was able to get this to work. Send me your email and I’ll send you the steps with screenshots. I havent tested putting actual code into the plugin so we’ll see if that works….but I was able to see the newly created plugin on my admin page
Steven Denger
thank you manuel
NiceRazer
Hello, can you please tell me how to do that to? I’ve tried finding posts that would help me with this same prob but still didnt found it.
JoAnn Chateau
Thank you for the great advice and simple how-to instructions. I easily created a Site-Specific WordPress Plugin for my site and enabled shortcodes for widgets. Now I have less worry when changing themes, and I didn’t need to install another plugin. Again, thanks!
george
hi i followed the instruction on how to make a site plugin for my site. ive uploaded it but cant see it in my list of plugins.
any ideas why?
Dawn
I cannot find where the folders live in the plug in directory. I tried searching for: /wp-content/plugins/yoursitename-plugin/ (with my site name).
Kara
Never mind, I figured it out and got it activated. My hosting server was acting up, must have timed out or something…cheers!
Kara
I followed your instructions but i don’t know how to activate it. It doesn’t show in my list of plugind in my wp-admin. Can you help?
Sheyejinkazama
Thank you. Thank you so so much.
Molly
How do you get the plugin to „Network Activate“ on a multi-site?