Microsoft Outlook ist eine ausgezeichnete Wahl für Unternehmen jeder Größe. Wenn Sie jedoch einen kostenlosen Plan verwenden, werden Sie mit der Standard E-Mail-Domäne oben gehalten. Das bedeutet, dass Sie am Ende Ihrer E-Mail-Adresse “@outlook.com” sehen werden.
Die Beibehaltung der Standard E-Mail-Domäne ist nicht ideal, da sie keinen guten Eindruck auf Ihre Zielgruppe macht. Das liegt daran, dass eine generische E-Mail-Adresse weder eine starke Markenidentität unterstützt noch sehr professionell aussieht.
Glücklicherweise können Sie mit dem Microsoft 365 Business Premium-Plan Ihren Domänennamen verwenden, um eine geschäftliche E-Mail-Adresse mit Outlook zu erstellen. Dies erstellt ein professionelleres Erscheinungsbild beim Versenden von E-Mails. Außerdem bietet Ihnen der Premium-Plan leistungsstarke Funktionen wie Spam-Schutz und bessere Sicherheit.
In diesem Artikel zeigen wir Ihnen, wie Sie eine individuelle E-Mail-Adresse mit Outlook einrichten können.

Was ist eine professionelle Marken-E-Mail-Adresse?
Eine professionelle E-Mail enthält den Namen Ihres Unternehmens. Zum Beispiel ist “support@yourdomain.com” eine professionelle E-Mail-Adresse. Im Gegensatz dazu ist “yourdomain@yahoo.com” keine professionelle E-Mail-Adresse.
Es gibt viele Möglichkeiten, wie Sie eine professionelle E-Mail-Adresse erstellen können. Sie können den integrierten Mailserver verwenden, der bei den meisten WordPress-Hosting-Unternehmen im Lieferumfang enthalten ist.
Dies ist für die meisten Einsteiger-Websites mit kleinem Budget geeignet. Es fehlen jedoch einige wichtige Funktionen wie ein besserer Spam- und Virenschutz, verbesserte Sicherheit, einfache Verwaltung von Konten und mehr.
Wenn Sie die oben genannten leistungsstarken Funktionen nutzen möchten, benötigen Sie einen professionellen E-Mail-Dienst für Unternehmen, der mit Ihrem bestehenden Firmen- oder Domänennamen funktioniert.
Was ist Outlook.com?
Outlook ist ein E-Mail-Dienst, der von Microsoft angeboten wird. Sie können ein kostenloses Konto “yourname@outlook.com” erstellen, um den Dienst zu nutzen.
Wenn Sie jedoch eine professionell gestaltete E-Mail-Adresse mit Outlook.com erstellen möchten, müssen Sie sich für ein Microsoft 365 Business Premium-Konto anmelden.
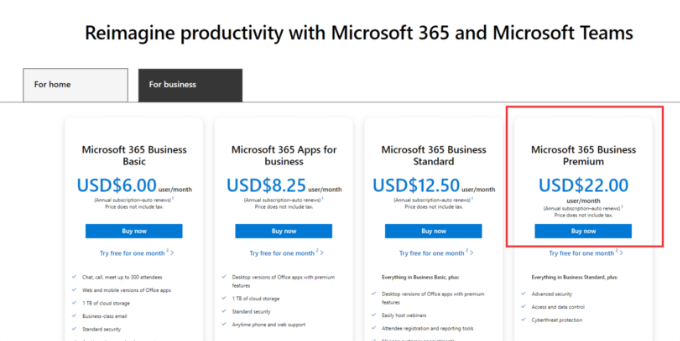
Es handelt sich um einen kostenpflichtigen Dienst ab 6,00 $ pro Benutzer/Monat. Er umfasst 1 TB OneDrive-Speicher und die neuesten Versionen von Outlook, Word, Excel und PowerPoint für Ihren PC oder Mac.
Bei WPBeginner verwenden und empfehlen wir Workspace oder G Suite von Google für geschäftliche E-Mail-Adressen, weil sie kostengünstiger sind. Wir bevorzugen auch Google Cloud, da unser Team mit Gmail und anderen Google Apps vertraut ist.
Weitere Details finden Sie in unserem Vergleich zwischen G Suite und Office 365, um zu erfahren, wie sich die Lösung gegenüber Outlook.com schlägt.
Schauen wir uns also an, wie Sie eine benutzerdefinierte E-Mail-Adresse mit Outlook.com erstellen können.
Anmeldung für Outlook Premium mit Microsoft 365
Zunächst müssen Sie die Microsoft 365-Website besuchen und sich für das Abonnement “Microsoft 365 Business Premium” anmelden.
Es ist das einzige Abonnement, das Unterstützung für benutzerdefinierte Domains bietet. Um zu beginnen, klicken Sie einfach auf die Schaltfläche “Jetzt kaufen”.
Im nächsten Schritt müssen Sie Ihre E-Mail-Adresse eingeben. Dies kann Ihre Arbeits- oder Schul-E-Mail sein.
Sobald Sie die E-Mail eingegeben haben, klicken Sie auf die Schaltfläche “Weiter”.
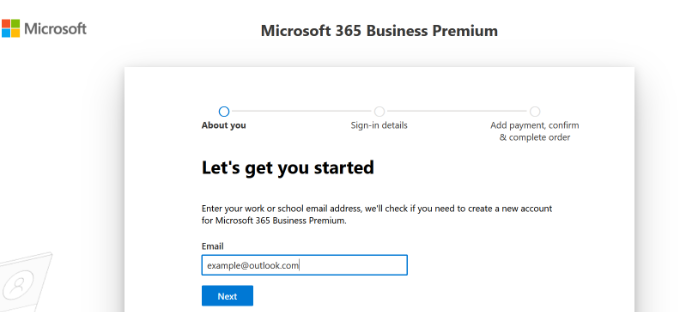
Es wird dann geprüft, ob die Adresse bereits mit einem Microsoft-Konto verknüpft ist oder ob Sie ein neues Konto erstellen müssen.
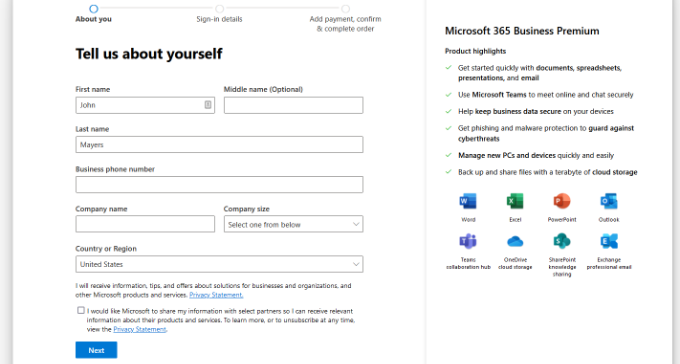
Anschließend werden Sie aufgefordert, persönliche Daten wie Ihren Namen, Ihre geschäftliche Telefonnummer, Ihren Firmennamen, Ihre Unternehmensgröße und Ihr Land anzugeben.
Nachdem Sie diese Angaben eingegeben haben, klicken Sie auf die Schaltfläche “Weiter”.
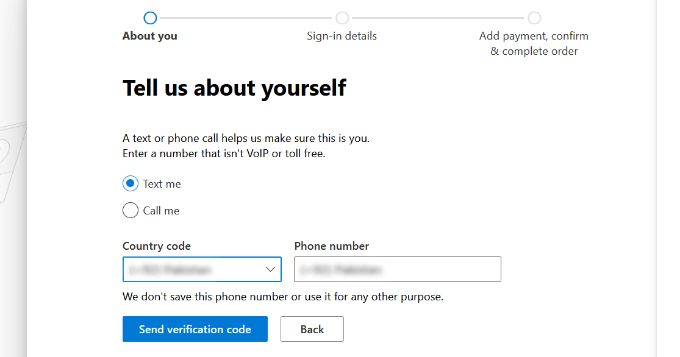
Auf dem nächsten Bildschirm müssen Sie die Telefonnummer Ihres Unternehmens bestätigen.
Sie können wählen, ob Sie eine Textnachricht oder einen Anruf erhalten möchten, um den Verifizierungscode zu erhalten.
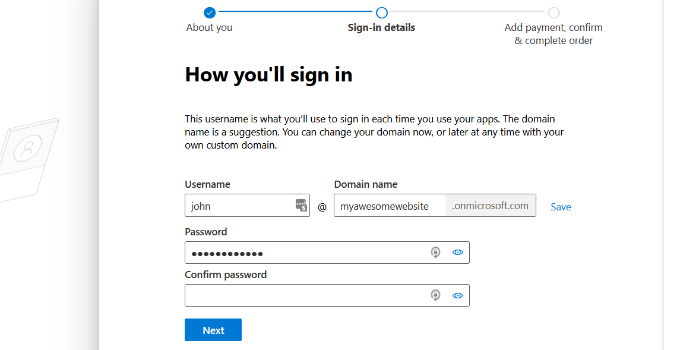
Nach der Überprüfung werden Sie aufgefordert, ein Passwort und einen Domänennamen einzugeben.
Wenn Sie fertig sind, können Sie auf die Schaltfläche “Weiter” klicken.
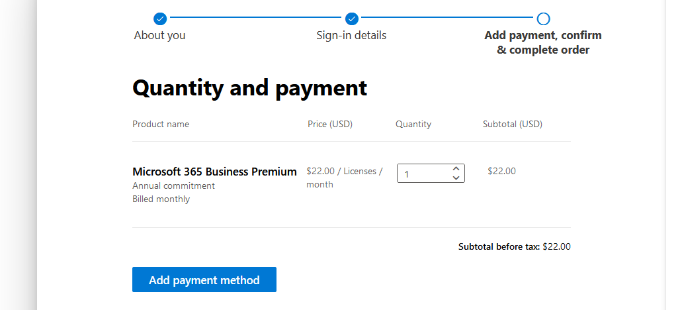
Von hier aus müssen Sie die Anzahl der gewünschten Microsoft 365 Business Premium-Konten auswählen.
Klicken Sie anschließend auf “Zahlungsmethode hinzufügen”, um fortzufahren.
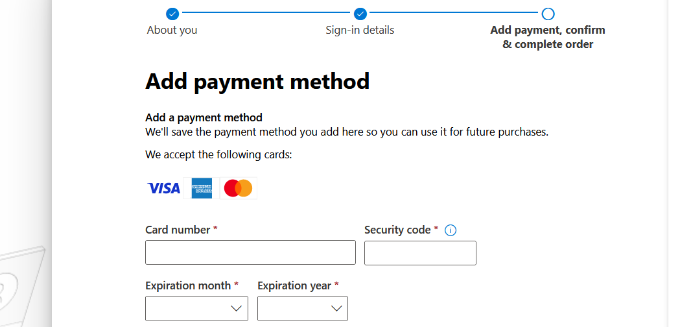
Microsoft fordert Sie nun auf, eine Zahlungsmethode, z. B. eine Kreditkarte, auszuwählen.
Geben Sie die Zahlungsdaten ein, um den Anmeldevorgang abzuschließen.
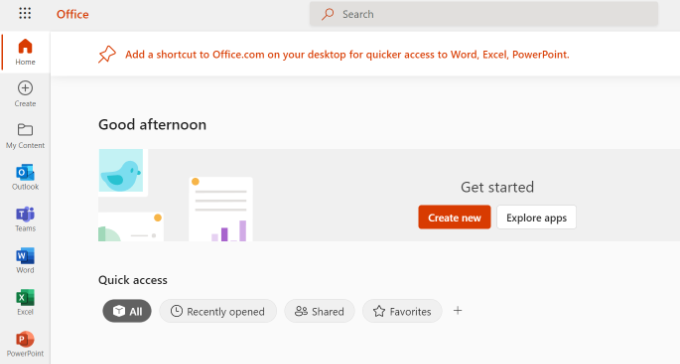
Danach landen Sie auf dem Office 365 Dashboard.
Einrichten von Outlook-E-Mail mit benutzerdefinierter Domäne
Im Dashboard sehen Sie verschiedene Tools und Anwendungen, die von Microsoft im Rahmen der Office 365-Suite angeboten werden.
Die linke Seitenleiste enthält Verknüpfungen zu den verschiedenen Diensten und Anwendungen, auf die Sie mit Ihrem Abonnement Zugriff haben.
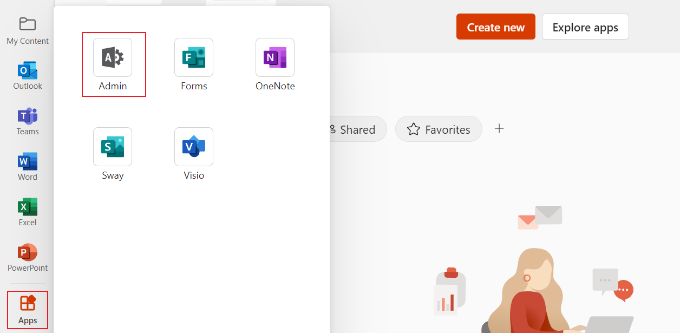
Als Nächstes können Sie im Menü der Seitenleiste auf die Option “Apps” klicken.
Unter Apps werden nun weitere Tools angezeigt. Gehen Sie weiter und wählen Sie die Option “Admin”.
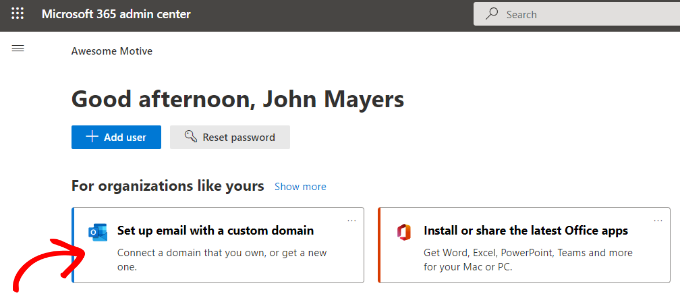
Als nächstes sehen Sie oben auf der Seite das “Microsoft 365 Admin Center”.
Von hier aus können Sie die Option “E-Mail mit benutzerdefinierter Domäne einrichten” auswählen.
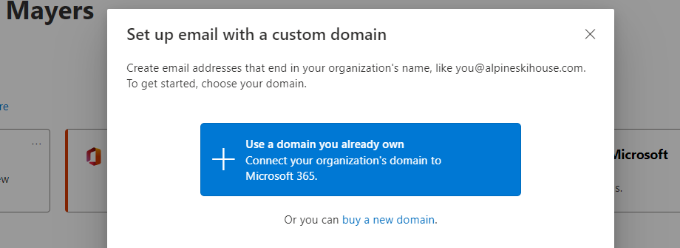
Daraufhin öffnet sich ein Popup-Fenster, in dem Sie gefragt werden, ob Sie eine bestehende Domain verwenden oder eine neue kaufen möchten.
Klicken Sie einfach auf die Schaltfläche “Verwenden Sie eine Domain, die Sie bereits besitzen”.
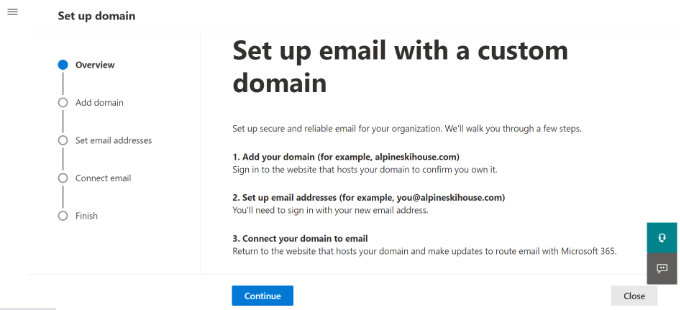
Danach wird ein Einrichtungsassistent geöffnet, der Sie bei der Konfiguration einer benutzerdefinierten Domäne mit Outlook unterstützt.
Der erste Schritt gibt Ihnen einen Überblick über die zu befolgenden Schritte. Klicken Sie auf die Schaltfläche “Weiter” am unteren Rand.
Auf dem nächsten Bildschirm werden Sie aufgefordert, den Domainnamen einzugeben, den Sie einrichten möchten.
Nachdem Sie den Domänennamen eingegeben haben, klicken Sie auf die Schaltfläche “Weiter”.
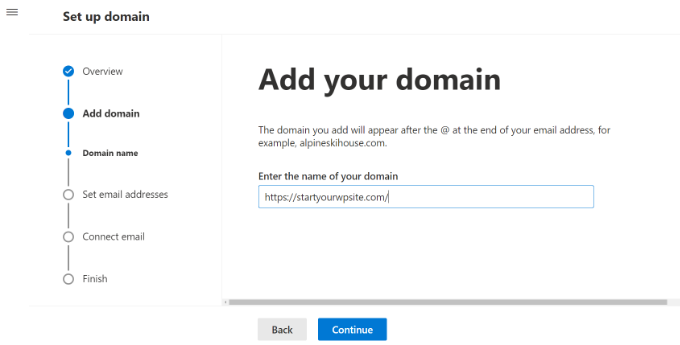
Microsoft sucht nun nach Ihrem Domänennamen.
Danach werden Sie aufgefordert, die Inhaberschaft zu bestätigen, indem Sie Informationen zu den DNS-Einstellungen Ihrer Domain hinzufügen.
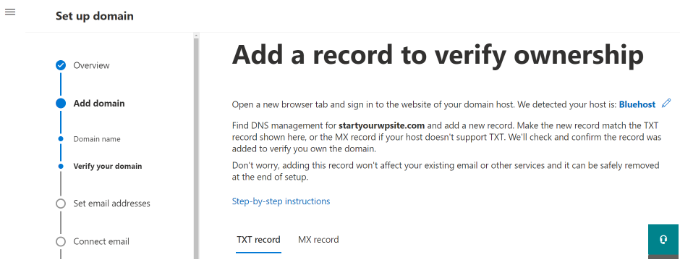
Dazu müssen Sie eine neue Registerkarte oder ein neues Fenster im Browser öffnen und die Seite mit den Einstellungen Ihrer Domain aufrufen. Je nach Ihrem Domain-Registrar befindet sich diese Seite in Ihrem Konto. Sie müssen die Option DNS-Einstellungen finden.
Wenn Ihre Domain bei Ihrem WordPress-Hosting-Unternehmen registriert ist, finden Sie die Domain-Einstellung in Ihrem cPanel-Dashboard unter der Bezeichnung “Zone Editor” oder “DNS Zone Editor”.
Hinweis: Wenn Sie ein SiteGround-Benutzer sind, haben Sie kein cPanel. Sie finden dies im Abschnitt “Domain” in Ihrem Site Tools Dashboard.
Für dieses Tutorial werden wir das Bluehost Dashboard verwenden. Um zu beginnen, können Sie im Menü auf der linken Seite zu Domains gehen. Suchen Sie dann Ihre Website und klicken Sie auf den Button “Einstellungen”.
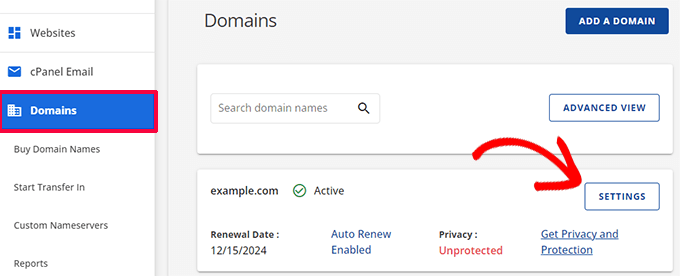
Von hier aus können Sie in den Domäneneinstellungen nach unten blättern.
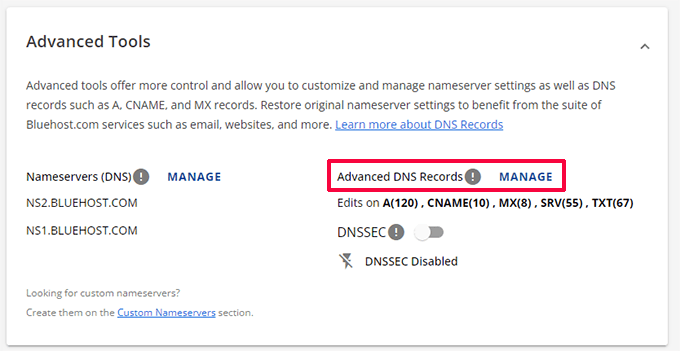
Klicken Sie nun auf die Option “Erweiterte Werkzeuge”.
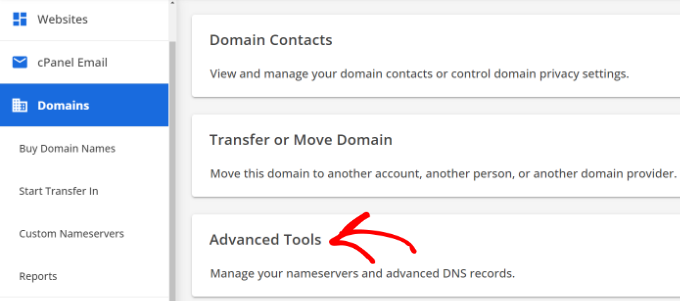
Hier zeigt Bluehost die Nameserver für Ihre Domain und andere Einträge an.
Um DNS-Einträge zu verwalten, können Sie auf den Button “Verwalten” neben “Erweiterte DNS-Einträge” klicken.
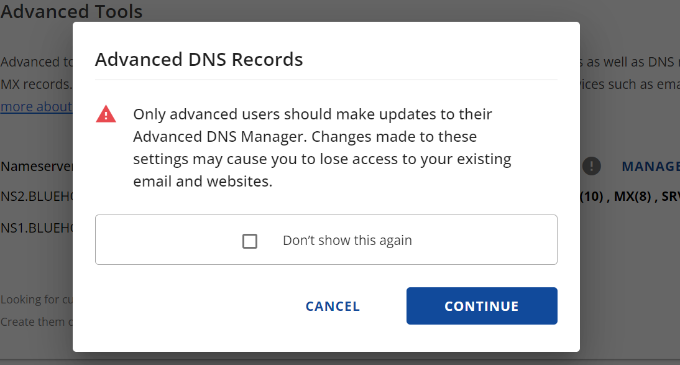
Bluehost wird dann eine Warnmeldung anzeigen.
Sie können auf den Button “Weiter” klicken, um fortzufahren.
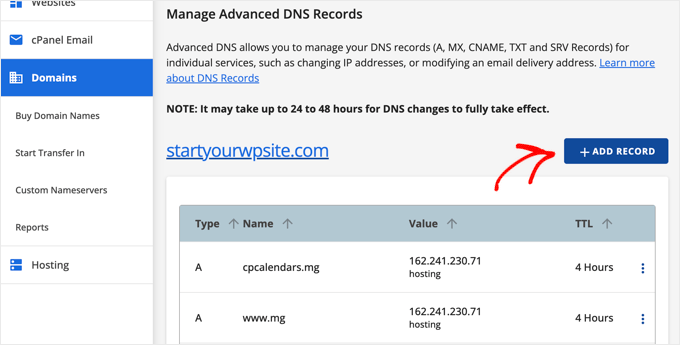
Als nächstes sehen Sie verschiedene Arten von DNS-Einträgen.
Klicken Sie einfach auf den Button “+ Datensatz hinzufügen”.
Es erscheint nun ein neues Popup-Fenster zum Hinzufügen des Datensatzes.
Klicken Sie dann auf das Dropdown-Menü und wählen Sie “TXT” als Typ.
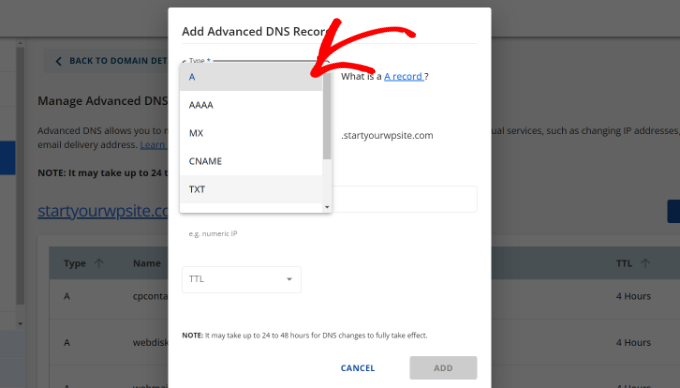
Von hier aus müssen Sie die TXT-Details eingeben. Dazu gehören der Host-Eintrag, der TXT-Wert und die TTL-Zeit.
Sie können diese Informationen leicht auf der Registerkarte Microsoft Office 365 finden.
Sobald Sie die Details hinzugefügt haben, klicken Sie auf den Button “Hinzufügen”.
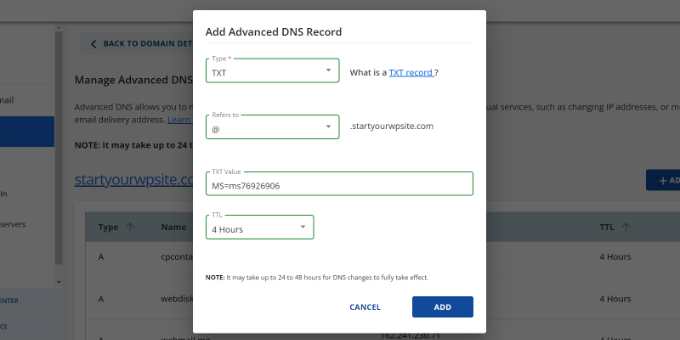
Achten Sie beim Hinzufügen eines DNS-Eintrags darauf, dass die von Ihnen eingegebenen Informationen mit den von Office 365 angezeigten Informationen übereinstimmen.
Als Nächstes müssen Sie zurück zum Microsoft Office 365-Administrationsportal wechseln und auf die Schaltfläche “Verifizieren” klicken.
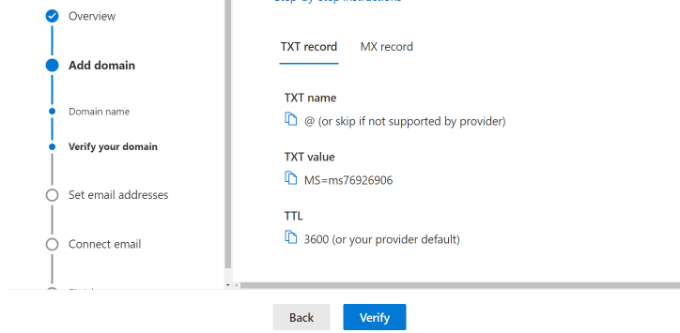
Office 365 sucht nun nach DNS-Einträgen, um zu überprüfen, ob Sie der Eigentümer des Domänennamens sind. Die DNS-Überprüfung kann 5 bis 10 Minuten dauern, da Ihre DNS-Einstellungen manchmal nicht sofort aktualisiert werden.
Nach der Verifizierung werden Sie aufgefordert, Ihre neue Marken-E-Mail-Adresse anzugeben. Klicken Sie anschließend einfach auf die Schaltfläche “Aktualisieren und abmelden”.
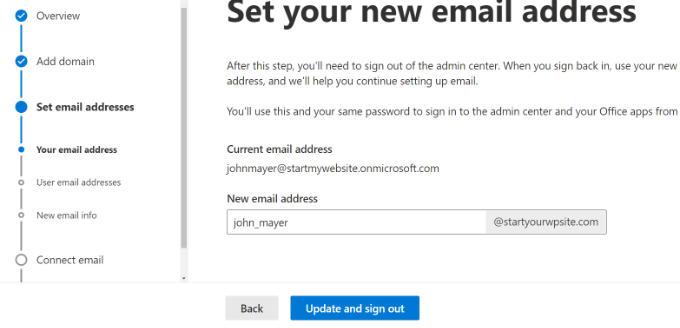
Als Nächstes müssen Sie sich erneut mit der neuen E-Mail-Adresse anmelden, die Sie gerade hinzugefügt haben.
Nach der Anmeldung sehen Sie weitere Einträge, die Sie zu Ihrer Domäne hinzufügen und mit Outlook-E-Mail verbinden können.
Für den E-Mail-Austausch werden drei DNS-Einträge benötigt, darunter ein MX-Eintrag, ein CNAME-Eintrag und ein TXT-Eintrag.
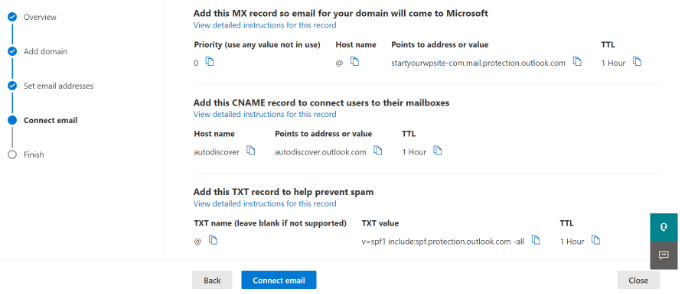
Auch hier müssen Sie die DNS-Einstellungen für Ihre Domäne aufrufen und diese Einträge einzeln hinzufügen.
Erstens haben Sie einen MX-Eintrag, der Anweisungen darüber enthält, wohin die E-Mails zugestellt werden sollen.
Gehen Sie bei Bluehost zu den DNS-Einstellungen Ihrer Website und klicken Sie auf den Button “+ Eintrag hinzufügen”, um einen neuen MX-Eintrag hinzuzufügen.

Daraufhin wird ein Popup mit den Datensatzeinstellungen angezeigt.
Klicken Sie zunächst auf das Dropdown-Menü am oberen Rand und wählen Sie die Option “MX”.

Wenn Ihre Website bereits einen MX-Eintrag hatte, wird er durch diesen ersetzt. Dadurch wird sichergestellt, dass Sie die Mailserver von Outlook zum Senden und Empfangen von E-Mails von Ihrer benutzerdefinierten Domänen-E-Mail-Adresse verwenden können.
Danach haben Sie einen TXT-Eintrag, der verhindert, dass jemand Ihre E-Mail fälscht, um Spam zu versenden.

Schließlich haben Sie einen CNAME-Eintrag, der es Software wie Outlook ermöglicht, den E-Mail-Dienst zu erkennen und eine Verbindung zu ihm herzustellen.
Fügen Sie einfach einen neuen CNAME-Eintrag in Bluehost hinzu und geben Sie die Details über das Microsoft-Dashboard ein.
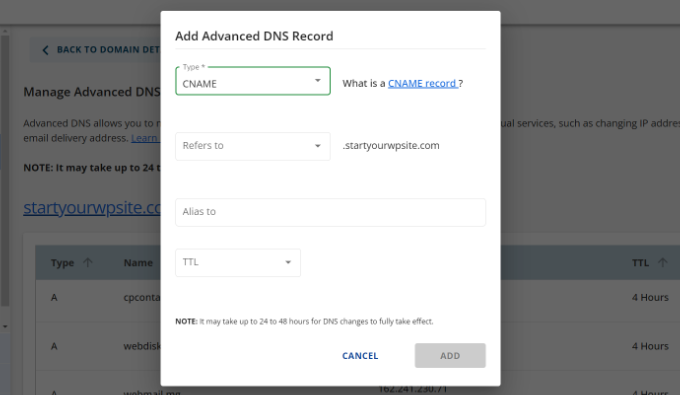
Sobald Sie alle DNS-Einträge eingegeben haben, können Sie zur Registerkarte Microsoft Office 365 zurückkehren und auf die Schaltfläche “E-Mail verbinden” klicken.
Office 365 überprüft nun die DNS-Einstellungen Ihrer Domäne. Beachten Sie, dass es 24 bis 48 Stunden dauern kann, bis die TXT-Einträge überprüft sind.

Wenn alles in Ordnung ist, sind Sie am Ende der Einrichtung angelangt.
Im letzten Schritt sehen Sie eine Zusammenfassung Ihrer Konfiguration. Schließen Sie nun den Einrichtungsassistenten.
Das war’s! Sie haben Ihren Domänennamen erfolgreich für die Arbeit mit Outlook eingerichtet.
Hinzufügen einer benutzerdefinierten Marken-E-Mail-Adresse in Outlook
Jetzt können Sie mit Outlook benutzerdefinierte Domänen-E-Mail-Adressen erstellen.
Gehen Sie in Ihrem Office 365 Dashboard zu Benutzer ” Aktive Benutzer.
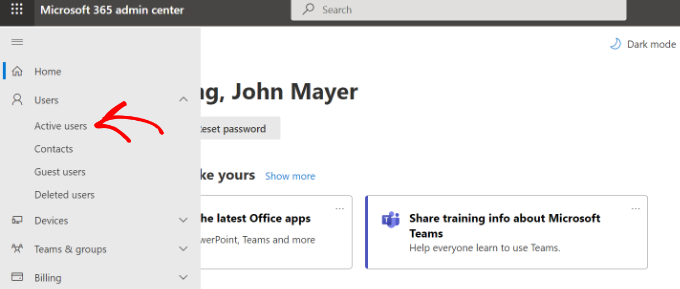
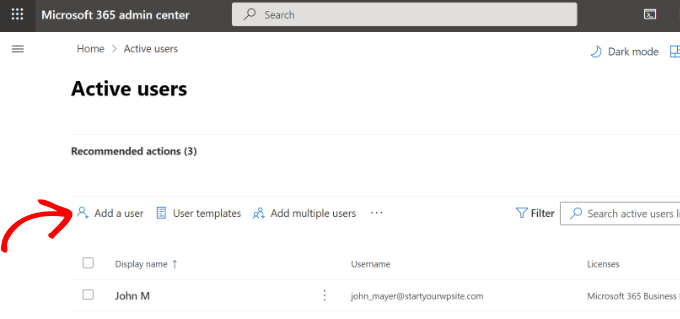
Als nächstes sehen Sie eine Liste Ihrer aktiven Benutzer.
Klicken Sie nun auf die Option “Benutzer hinzufügen”.
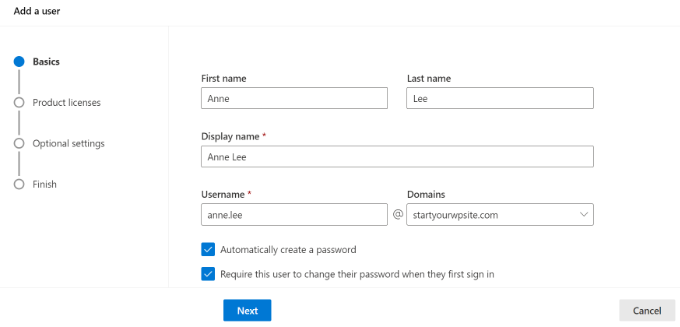
Auf dem nächsten Bildschirm müssen Sie die persönlichen Daten des Benutzers angeben und dann eine E-Mail-Adresse auswählen.
Nach Eingabe der Daten klicken Sie einfach auf die Schaltfläche “Weiter”.
Dann müssen Sie einen geografischen Standort für Ihren Benutzer auswählen und eine Produktlizenz zuweisen.
Im Plan Microsoft 365 Business Premium können Sie bis zu 25 Lizenzen zuweisen. Wenn Sie fertig sind, klicken Sie einfach auf die Schaltfläche “Weiter”.
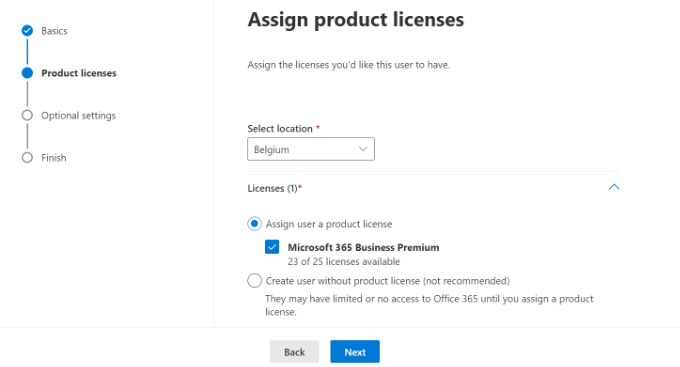
Microsoft bietet auch zusätzliche Einstellungen für neue Benutzerprofile an.
So können Sie beispielsweise eine Benutzerrolle auswählen und den Zugriff auf das Admin Center gewähren. Es besteht auch die Möglichkeit, Profilinformationen wie Berufsbezeichnung, Abteilung, Büro und mehr hinzuzufügen.
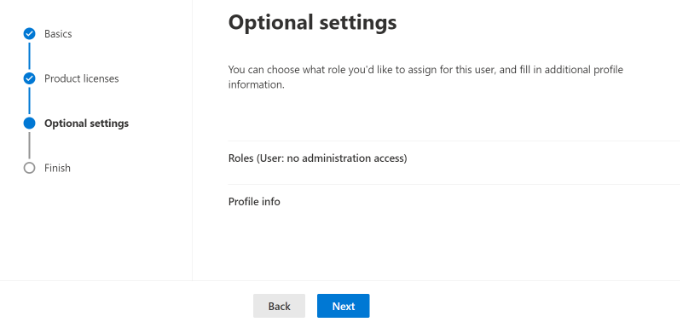
Diese Einstellungen sind optional und Sie können sie auch leer lassen. Wenn Sie fertig sind, klicken Sie einfach auf die Schaltfläche “Weiter”.
Zum Schluss sehen Sie eine Zusammenfassung des neuen Benutzers, den Sie gerade hinzugefügt haben. Sie können die Details überprüfen, notwendige Änderungen vornehmen und dann auf die Schaltfläche “Hinzufügen beenden” klicken.
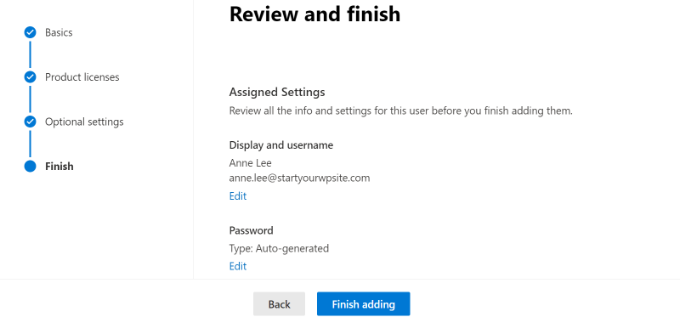
Jetzt haben Sie erfolgreich einen neuen Benutzer hinzugefügt und eine markengeschützte E-Mail-Adresse in Outlook erstellt.
Sie können sich nun mit der E-Mail-Adresse und dem Kennwort anmelden, die Sie im vorherigen Schritt erstellt haben, um Ihre neue, professionell gestaltete E-Mail in Outlook zu verwenden.
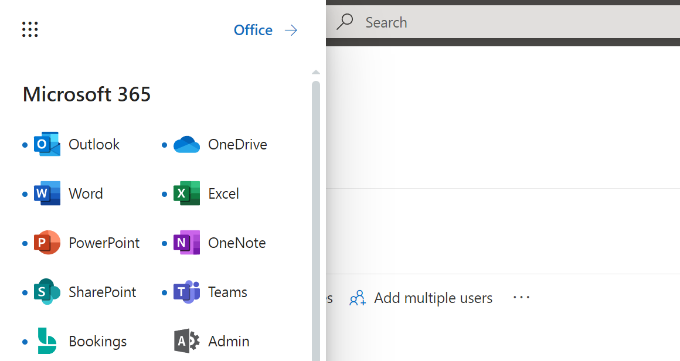
Sie können auch Office 365-Anwendungen auf Ihrem Mac und PC installieren, einschließlich Outlook. So können Sie Ihre gebrandete Microsoft Outlook-Geschäfts-E-Mail-Adresse mit Offline-Zugriff über die Outlook-App verwenden.
Wir hoffen, dass dieser Artikel Ihnen geholfen hat, zu erfahren, wie Sie eine professionelle E-Mail-Adresse mit Outlook einrichten können. Vielleicht interessieren Sie sich auch für unseren Artikel über die besten SMTP-Anbieter mit hoher Zustellbarkeit von E-Mails und unseren Leitfaden für Einsteiger zur WordPress-E-Mail-Automatisierung.
Wenn Ihnen dieser Artikel gefallen hat, dann abonnieren Sie bitte unseren YouTube-Kanal für WordPress-Videotutorials. Sie können uns auch auf Twitter und Facebook finden.


shayne
i notice that some of the email i received came from contact@domainname .com or support@domainname . com , how can i create, use and send just like that? or they just put contact or support as the name of there email, like myname@mydomainname .com, did they just put contact or support on “myname” ?
WPBeginner Support
You can put the username as what you want the email to be as we show under the ‘Adding Custom Branded Email Address in Outlook.com’ section or there are tools for allowing multiple users to answer emails from the same email address.
Admin
Andrew
I have a Professional Branded Email Address hosted by gmail. I’d like to switch it over to be hosted by outlook. is this possible?
I don’t want my emails interrupted for any length of time, and I’d like to keep my history if possible.
Any advice?
WPBeginner Support
Once you change the DNS settings for your domain it would swap from Gmail to Outlook for you with the main possible downtime being any caching active which you should be able to clear.
Admin
Jack
Thank you for the guidance.. It does work.
WPBeginner Support
You’re welcome, glad our guide was helpful
Admin
Olivia
Gsuite actually charges $12 per month for business accounts and is unlimited storage space. I have it. So, just to clarify price on that if you are looking for budget purposes.
WPBeginner Support
Thanks for letting us know about that section needing to be updated
Admin
kelli stark
I need a catch-all alias to be sure to receive all the email addresses How do I set up with a live domains
Refentse
hi i already purchased a domain with is it possible to use that domain to setup an email with Outlook or do i need to purchase another one?
Esther
To add to my earlier query, I would like to have my own domain name. Can help to create it and have it linked to my website?
Esther
Esther
Hi, I like to create a business email address. Can you please advise?
Thereafter, I would like to create a webpage/website for the business..
Please advise. Thank you.
Esther
WPBeginner Support
Hi Esther,
Please take a look at our guide on how to set up professional email address with Google Apps and Gmail.
Admin
Atira Laila
how much does it cost?
sumit
i want to create bussiness mail id plz help me
Jan Oniszczuk
For bussiness e mail address I have to pay?
I do not work for over year . It’s hart for me to generate any money at all ..
I’m over sixty eight I have chance to get a contract only if I will have my company e-mail address.
I have no extra money to pay for e-mail .
I have only money for the rent not even for the food..
please to understand me.
Jan.
WPBeginner Support
You can also get a business email address with Gmail. They are offering one month free trial that you can use.
Admin
Kasun Wijekantha
What is the maximum email capacity which we can send through this service?
John
Hi, is this for free?
Abhijeet Waibhaw
I have already my own domain name and want to create email id for my organization, needs technical support
WPBeginner Staff
Yes you can but both outlook and gmail now require a small fee to use your own domain name.
judy
office 365 ain’t free?
pze100@gmail.com
i own a domain name but have not built a website yet. Can I still create a business email address using my domain name? Can I use OUTLOOK or GMAIL for this ?
Janarthanan
Hi Syed,
Me too want to know the details about the below screenshot. Is this will be problem to us with the existing emails and email IDs.
Pls help us, as we are newbies and can’t understand Microsoft’s technical explanations.
Thanks
Janarthanan
sherilyn
it doesn’t offer the free service anymore ☹
Hasnain
UPDATE: Microsoft is no more offering this service.
Andre Imbayago
Microsoft has pulled the plug on this.
I’ve setup a petition to Microsoft to allow us to keep our accounts as is without migrating them to Office 365.
https://www.change.org/en-AU/petitions/microsoft-keep-current-outlook-com-custom-domains-as-is-without-forced-migration-to-premium-office-365-subscription
Katie Metz
Thank you for this information. It was very helpful!
Katie
Thank you so much!! This is such a great guide to setting up a custom email. You helped me and my family’s Company to add a professional touch to our email services! I only have one problem and that is when I entered the new MX Record I was not aware that you would have to delete any existing Records in that area otherwise it will interfere with the activation of the account. Other than that I’m totally happy!
Nagulan Shan
I need to know the screen shot. it will help us more.
Jagath Singh
How can I increase the mail ids limit from 50 to 500 for free?
Nishant Thakur
Was looking for this! Perfect!
Peter
Hello, thanks for this tutorial, please where do I need to add this
v=spf1 include:hotmail.com ~all
Jay
its more than 72 hrs of changing my dns. but now also it is showing “You need to prove ownership of this domain by creating a DNS record. Use the settings below.”
WPBeginner Support
This probably means your DNS records are not correctly set.
Admin
Abhay
hey! nice article…thank you
Rani
Hi,
I set up the account following your instructions.Thanks
But I have this problem , i am not receiving any mails in my inbox. when i send mails from other accounts to this mail it is bounced.
i checked the microsoft support. looks like it is some internal problem and not a settings problem. people are reporting other issues with accounts.Microsoft says they resolved the issue. But doesnt look like so.
http://answers.microsoft.com/en-us/outlook_com/forum/oemail-osend/my-outlookcom-email-account-is-not-receiving-any/02581144-c02b-4cdc-9132-98a8e0531ab1?msgId=2fd9d76f-6dfa-45bc-9a46-81e11265a7a1&page=1
R
Ankush
Hi,
I am trying to setup emails for my domain. This tutorial is really helping me since I am a non technical person. I have set up my live account and I am getting a message ‘You need to prove ownership of this domain by creating a DNS record. Use the settings below’.
When contacted a person where I have hosted my site, he is saying that the settings displayed here are for CPANEL and my sited is on DreamHost. DreamHost has its own CPANEL and that doesn’t support entries like ‘Priority: 10 (or High priority)’ etc.
Can you please guide us to take this forward.
Thanks,
Ankush
WPBeginner Support
Ankush dreamhost does support A records and Max records. For records ask the person managing your account to go to Mail » Custom MX in Dreamhost Panel. As for A or TXT records go to Domains and then click on DNS.
Admin
Ria Parish
I don’t suppose you’d still be able to use this email for Google+ and YouTube account though, eh…. Better than nothing, I guess.
Thanks for the alternative!
princess
Hi I set up my domain via Godaddy.com..and I already have my live mail set up. My question is: When I tried replying to the email my replies bounces back. what could be the problem?
WPBeginner Support
seems like you have not correctly configured your site to use Outlook’s mail servers.
Admin
Verma
Hi- I did a setup of outlook.com with my domain. All seems to be working fine except i am not able to get emails from MS Outlook. If it is possible to access email via MS Outlook app please let me know.
Paul Jones
Great article thanks.
We run a mail server and batch import mail into a sql server database. Would it be viable/possible to switch our mx to outlook.com and forward all inbound and outbound email to our mail server so that we can still import mail into sql?
WPBeginner Support
Sounds doable. But make sure before you implement it.
Admin
Chris
Hi, I just created an outlook email admin account with my own domain name. i create 2 users. Will I be able to see the emails sent to the users I created? If so, how do I enable that feature? Thank you Great article by the way. Thanks.
sivakumar
Now showing it
You can create up to 50 accounts in your domain.
How to create 500 accounts
WPBeginner Support
Contact outlook support for more accounts.
Admin
david
If you want users to use mail.yourdomain.com to sign in for email address, then you can create a CNAME record in your domain’s custom DNS settings or in cpanel’s Simple DNS Editor. Enter Mail in the Name field, and enter subdomain in CNAME field, e.g. mail.example.com.
this is not well explained. Could you please…
WPBeginner Support
Using a subdomain will allow users to sign in to their accounts by typing in your domain name instead of outlook.com.
Admin
kaycee
please how can i create the sub domain
kaycee
If you want users to use mail.yourdomain.com to sign in for email address, then you can create a CNAME record in your domain’s custom DNS settings or in cpanel’s Simple DNS Editor. Enter Mail in the Name field, and enter subdomain in CNAME field, e.g. mail.example.com
…..Please can you provide a guide on how to create this? cos am using ipage and they said its not possible for me to have mail.businessname.com
thank you
Kelly
Hi, thanks for your tutorial.
So after a week of waiting for the service to become active it is now saying that “Your service is suspended. Please make the required DNS changes.” Can somebody please help?
Letitia
I’m having the same problem
Asad
Currently outlook allows 50 free Email addresses. If I need more Account then what is the procedure ?
WPBeginner Support
Contact outlook support and they will extend your user account limit.
Admin
Tihomir Valkanov
Very good article!!! It save me a lot of time Thank you!
phil
Hi I have a question, I bought my domain name off Godaddy, but I built the site and its being hosted by wix.com, I want to use my own domain with outlook so who do I update my mx and txt with godaddy or wix?
Hope to hear from you soon
Phil
WPBeginner Support
Go Daddy if your domain is controlled by GoDaddy.
Admin
Murali
Thank you. I also got good email service.
Lynn Jackson
Awesome post! Very user-friendly. This was almost effortless. I was up and running after about 10 minutes! Thanks.
JANARTHANAN
Hi Syed, as said earlier I’ve done setting of my domains mails on outlook.com. Let me know how to configure this on blackberry and iPhone devices.
Thanks – Janarthanan
tilak
I want to view my old mails from my previous employers where we were using Outlook server. I have those .pst data files in my external hard disk. But don’t know how to configure them in Outlook 2013. Could any one please help me on the step by step guide. thanks.
Haseeb Ahmad Ayazi
Guys the New UI of outlook is tooooo slow. While loading it makes my PC also slow. Outllook can compete Gmail but will loss badly only due to his loading speed.
Jon Adams
Check your computer. Due to the new Gmail compose debacle, I have been testing Outlook.com for the past few months in case Google makes the change permanent and mandatory. The only reason I don’t make the switch now is six years of company emails in twenty accounts. Not to mention everything that lives in Google Drive.
The Outlook UI is vastly superior to Gmail even without consideration of the new compose.
Kunal
I already have an email account on Google Apps, if I were to move to Outlook, what would happen to emails that I already have in my existing accounts on changing the MX record ? Do I have to transfer my emails from google apps to outlook?
quocnt
Thank you. I have successfully setup my professional email.
But can I go to mail.mydomain.com to check mail or must I go to outlook.com every time?
Ana
Hi,
I followed the steps and everything went fine. But when I started using the email, I can send emails, but not receive them. Any idea what can be the issues?
Thanks!
hunter
I have the exact same problem. help
JANARTHANAN
Hi Ana,
Have you got the solution, did your mail work fine on both send & receive ways!
If you got the solution pls let me know.
Thanks
Ankush
Hi Ana,
Did you get solution to your problem? Are you able to send/receive from your new email account. Please guide us as well.
Thanks,
Ankush
Leon
Hi! I finally finally got to the last part.. I had to login using my old @live.com account, I never saw the DNS options when trying to signup using just my domain name http://hempconnection.net
Anyways I was able to create an info@ email for my domain, but now where do I go to login? I tried mail.mydomain.net and I just see the last page I was on showing the emails I created, but not able to actually access my new email
Leon
Screw this, Outlook and Microsoft sucks… I’ve been trying for 3 hours.. this is freaking ridiculous
marco
Me too, I’ve been trying for 3 days using chrome, maybe I should try using I.E.
JANARTHANAN
Hi Syed,
I have my website already set up at windows live admin center and the emails are already in use by users.
But now i planned to migrating my domain from godaddy to a Blue Host (i came to know about the cheapest and best service of this host by reading your site), what should i do so the emails will not be deleted and users can continue using the same mails.
Pls give me clarification thru email or on you blog. It will be very helpful for me and all others.
Thanks in advance
Janarthanan
Editorial Staff
In your bluehost account setup the MX records. Then do the transfer, and it will work.
Admin
JANARTHANAN
Hi Buddy, Thanks for the info. But i’ve a doubt, before transfering a domain from Godaddy how can i setup MX records in Bluehost for the same domain. PLs explain as i was a newbie on this field.
Thanks
Editorial Staff
In the DNS settings in your Bluehost cPanel, you can specify MX records. Bluehost support will be able to help you with this.
JANARTHANAN
Hi Syed,
Thanks for your info, i followed your tuts, also as per your comment i get details from Blue Host too. Now i successfully transferred my domain. And all my emails associated to it (functions on outlook.com) work fine.
Thanks once again for your great tuts.
Janarthanan
Tuyen
Hi I set up my professional mail on outlook.com, it’s work fine for about a month but now when I send email to client it alway have hotmail_77425feceaf13aa1@live.com on behalf of my email, pls advise how to remove (hotmail_77425feceaf13aa1@live.com on behalf of my email)
hope to hear soon
all the best
WPBeginner Support
Please contact outlook support, they would be able to help you better.