Eine schnelle Website ist entscheidend für zufriedene Besucher und eine gute Platzierung in den Suchmaschinen. Das liegt daran, dass Suchmaschinen wie Google die Geschwindigkeit einer Website inzwischen als wichtigen Ranking-Faktor betrachten.
WP Super Cache ist ein beliebtes Plugin, das statische HTML-Dateien von Ihren Seiten erstellt. Dies bedeutet, dass Ihr Server nicht so viel arbeiten muss, wodurch Ihre Website für Besucher schneller geladen wird.
Wir verwenden Performance Plugins wie Cloudflare und WP Rocket, um die Geschwindigkeit von WPBeginner zu verbessern. WP Super Cache ist eine kostenlose Alternative, die die Leistung erheblich verbessern, die SEO steigern und die Benutzererfahrung für Website-Besucher verbessern kann.
In diesem Artikel werden wir Sie durch die Installation und Einrichtung von WP Super Cache auf Ihrer WordPress Website führen. Wir werden jeden Schritt klar und deutlich erklären, so dass Sie auch dann mitkommen können, wenn Sie nicht technisch versiert sind. Am Ende werden Sie eine schnellere Website haben, die Besucher und Suchmaschinen schätzen werden.
Was ist WP Super Cache und warum sollten Sie es verwenden?
WP Super Cache ist eines der beliebtesten und besten WordPress Caching Plugins. Es ist ein kostenloses Tool und hat über eine Million aktive Installationen.
WP Super Cache erstellt eine zwischengespeicherte Kopie jeder Seite auf Ihrer Website in Form einer statischen HTML-Datei. Auf diese Weise wird bei jedem Besuch Ihrer Website schnell die kopierte Version angezeigt, anstatt die gesamte Website von Grund auf neu zu generieren.
Dadurch verbessern sich die Geschwindigkeit und die Leistung Ihrer WordPress-Website dramatisch. Das Cache-Plugin überspringt viele Schritte hinter den Kulissen, um sicherzustellen, dass Ihre Besucher nicht darauf warten müssen, dass die Seite geöffnet wird.
Dadurch wird die Erfahrung der Besucher Ihrer Website verbessert. Eine Website, die schnell lädt, ermutigt Menschen, sie öfter zu besuchen, was zu mehr Engagement und Konversionen führt, da die Benutzer mehr Zeit auf Ihren Beiträgen und Seiten verbringen.
Außerdem können Sie mit einer schnell ladenden Website auch Ihre WordPress-SEO und Ihr Suchmaschinen-Ranking verbessern. Das liegt daran, dass Google schnelleren Websites einen erheblichen Vorteil einräumt, da es die Website-Geschwindigkeit als Ranking-Faktor verwendet.
Sind Sie nun bereit, WP Super Cache auf Ihrer Website einzurichten? Legen wir los!
WP Super Cache einrichten – der einfache Weg
Als Erstes müssen Sie das WP Super Cache-Plugin auf Ihrer Website installieren und aktivieren. Weitere Details finden Sie in unserer Anleitung zur Installation eines WordPress-Plugins.
Nach der Aktivierung wird WP Super Cache Sie darüber informieren, dass das Caching auf Ihrer Website derzeit nicht aktiviert ist.
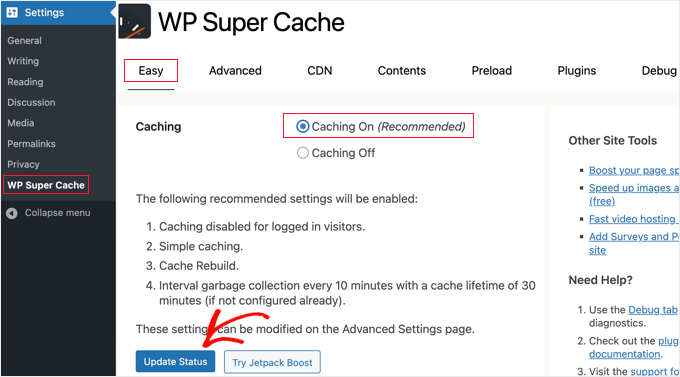
Um den Cache zu aktivieren, gehen Sie zu Einstellungen ” WP Super Cache. Klicken Sie dann unter dem Tab “Einfach” auf die Option “Caching ein”. Klicken Sie anschließend auf den Button “Status aktualisieren”.
Nachdem Sie den Cache aktiviert haben, müssen Sie zum Abschnitt “Cache-Tester” hinunterblättern.
Dort sollten Sie auf die Schaltfläche “Cache testen” klicken, um zu überprüfen, ob er funktioniert.
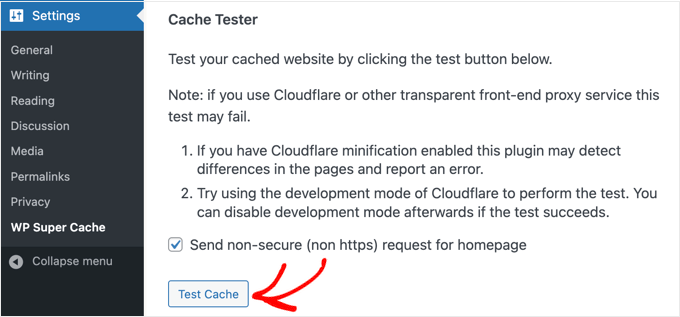
WP Super Cache ruft Ihre WordPress Website zweimal ab und vergleicht die Zeitstempel der beiden Seiten. Wenn beide Zeitstempel übereinstimmen, bedeutet das, dass das Caching auf Ihrer Website jetzt funktioniert.
WP Super Cache Erweiterte Einrichtung
WP Super Cache ist ein leistungsstarkes WordPress Plugin, das über zahlreiche erweiterte Optionen verfügt. Diese Optionen können die Leistung Ihrer Website weiter verbessern und geben Ihnen mehr Kontrolle darüber, wie das Plugin Ihre Website zwischenspeichert.
Caching einschalten
Um WP Super Cache mit erweiterten Optionen einzurichten, gehen Sie in den Einstellungen des WP Super Cache Plugins auf den Tab “Erweitert”. Klicken Sie dann auf das Kontrollkästchen für “Caching aktivieren”.
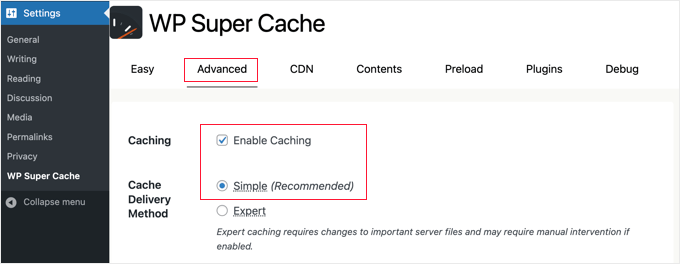
Unterhalb der Zwischenspeicherung finden Sie Optionen für die “Cache Delivery Method”. Wir empfehlen, die Option “Einfach” zu verwenden, wenn Sie Anfänger sind und sich mit der Bearbeitung Ihrer Server-Dateien nicht auskennen.
Nachdem Sie Ihre Option für die Zwischenspeicherung ausgewählt haben, klicken Sie auf den Button “Status aktualisieren”.
Komprimierung in WP Super Cache einschalten
Die Komprimierung ermöglicht es WP Super Cache, zwischengespeicherte Dateien als komprimierte Dateien bereitzustellen, was die Ladezeit verbessert. Diese Dateien sind kleiner und können von Browsern schneller heruntergeladen werden.
Um die Komprimierung zu aktivieren, scrollen Sie zum Abschnitt “Verschiedenes” im Tab “Erweiterte Einstellungen” und aktivieren Sie die Box “Seiten komprimieren, damit sie den Besuchern schneller angezeigt werden”.

Klicken Sie erneut auf den Button “Status aktualisieren”, um Ihre Änderungen zu speichern.
Dynamische Zwischenspeicherung einschalten
Wenn Sie bestimmte Teile einer Webseite während des Zwischenspeicherns dynamisch halten wollen, dann bietet WP Super Cache eine Option dafür.
Die Aktivierung der dynamischen Zwischenspeicherung ist in bestimmten Situationen nützlich, insbesondere wenn Sie Seiten mit häufig wechselnden Inhalten haben. So können Sie beispielsweise Seiten, die Anzeigen enthalten, durch die Aktivierung der dynamischen Zwischenspeicherung beschleunigen.
Um diese Option zu aktivieren, gehen Sie zum Abschnitt “Erweitert” und klicken Sie auf das Kontrollkästchen “Dynamisches Caching aktivieren”.

Stellen Sie sicher, dass Sie Ihre Änderungen speichern, wenn Sie fertig sind.
Verfallszeit und Garbage Collection einrichten
Mit WP Super Cache können Sie auch die Verfallszeit und die Häufigkeit des Löschens von zwischengespeicherten Seiten auf Ihrem Server festlegen.
Blättern Sie einfach zum Abschnitt “Ablaufzeit und Garbage Collection” unter dem Tab “Erweitert”, um ihn zu konfigurieren.
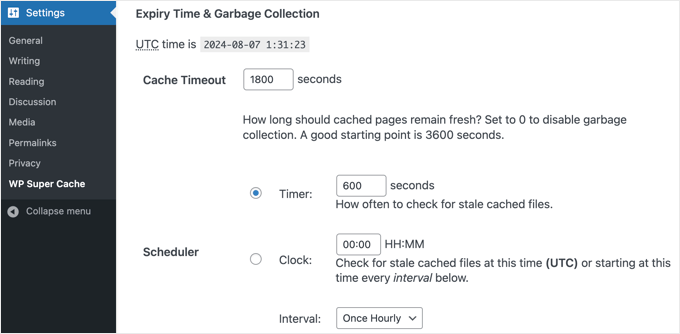
Die “Cache-Zeitüberschreitung” weist das Plugin an, die zwischengespeicherte Seite zu entfernen und einen neuen Cache zu erstellen. Das Plugin setzt es standardmäßig auf 1800 Sekunden, was für eine stark frequentierte Website ideal ist.
Wenn Sie jedoch eine neue Website haben, auf der noch nicht viel los ist, dann sind 3600 Sekunden ein guter Ausgangspunkt.
Darüber hinaus können Sie einen Zeitpunkt festlegen, zu dem das Plugin nach veralteten Dateien im Cache sucht und diese entfernt.
Wenn Sie Ihre Auswahl getroffen haben, müssen Sie auf den Button “Ablauf ändern” klicken, um Ihre Änderungen zu speichern.
Festlegen von Seiten, die nicht zwischengespeichert werden sollen
Standardmäßig speichert das Plugin alle Seiten auf Ihrer Website im Cache. Dies kann die Größe Ihrer Cache-Dateien erhöhen und mehr Ressourcen verbrauchen. Mit WP Super Cache können Sie jedoch Seiten auswählen, die nicht zwischengespeichert werden sollen.
Sie können zum Abschnitt “Abgelehnte URL Zeichenfolgen” im Tab “Erweitert” scrollen, um diese Funktion zu nutzen. Geben Sie in die Box die Zeichenfolgen der URLs der Seiten ein, die das Plugin nicht zwischenspeichern soll.
Wenn Sie z. B. ein eCommerce-Geschäft haben, können Sie Seiten ausschließen, die von Besuchern nicht häufig besucht werden, um Serverressourcen zu sparen. Dies können die Kassenseite, die Kontoseite und die Dankesseite sein.
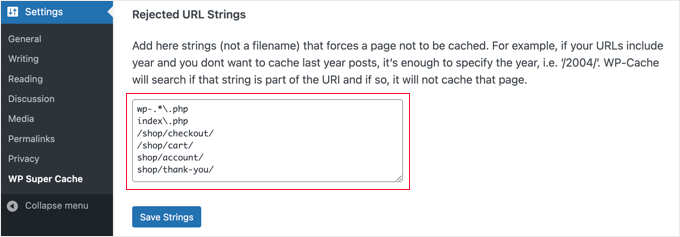
Wenn Sie fertig sind, vergessen Sie nicht, auf die Schaltfläche “Strings speichern” zu klicken.
Einrichten von WP Super Cache für die Zusammenarbeit mit Ihrem CDN
Wenn Sie auch einen CDN-Dienst (Content Delivery Network) verwenden, um Ihre Website zu beschleunigen, können Sie WP Super Cache so konfigurieren, dass er mit diesem zusammenarbeitet. Andernfalls können Sie diesen Abschnitt getrost auslassen.
Ein CDN ist ein Netzwerk von Servern, die über verschiedene geografische Positionen verteilt sind und dazu beitragen, Ihre Besucher schnell mit Inhalten zu versorgen. Weitere Details finden Sie in unserer Infografik, warum Sie ein CDN benötigen.
Tipp: Wir empfehlen die Verwendung von Cloudflare, da dies ein kostenloser CDN-Anbieter ist, der einfach einzurichten ist. In unserem Tutorial erfahren Sie , wie Sie das kostenlose CDN von Cloudflare auf Ihrer WordPress Website einrichten.
Um WP Super Cache für die Zusammenarbeit mit Ihrem CDN einzurichten, klicken Sie auf den Tab CDN in Ihren Einstellungen. Aktivieren Sie dann die Box neben der Option “CDN-Unterstützung aktivieren”.
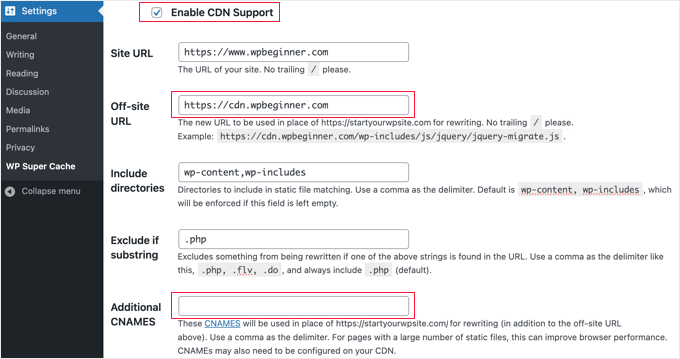
Als Nächstes müssen Sie Ihre “Off-site URL” eingeben. Dies ist die “Pull-Zone” Ihres CDN, d. h. die URL, unter der Ihre Dateien im CDN gespeichert sind.
Die Einstellung hier hängt von Ihrem CDN-Dienst ab, aber hier sind einige Tipps:
- Wenn Sie Cloudflare verwenden, sollten Sie dieses Feld leer lassen. WP Super Cache wird automatisch erkannt und arbeitet mit Cloudflare.
- Wenn Sie einen anderen CDN-Dienst verwenden, sollten Sie etwas eingeben wie: https:
//cdn.wpbeginner.com.Stellen Sie sicher, dass Sie “wpbeginner.com” durch den Domainnamen Ihrer Website ersetzen. - Im Zweifelsfall können Sie sich bei Ihrem CDN-Dienst anmelden und im Dashboard Ihres Kontos die Einstellungen für “Domain”, “CDN-Domain” oder “CDN URL” überprüfen.
Wenn Sie wissen, dass Ihr CDN mehrere URLs hat, können Sie diese in das Feld “Zusätzliche CNAMES” eingeben, z. B.: http: //cdn1.wpbeginner.com, http://cdn2.wpbeginner.com, http://cdn3.wpbeginner.com. Andernfalls sollten Sie dieses Feld leer lassen.
Die anderen Einstellungen können Sie auf dem Standard belassen. Aktivieren Sie schließlich die Box “https-URLs überspringen, um Fehler bei gemischten Inhalten zu vermeiden” und klicken Sie dann auf den Button “Änderungen speichern”.
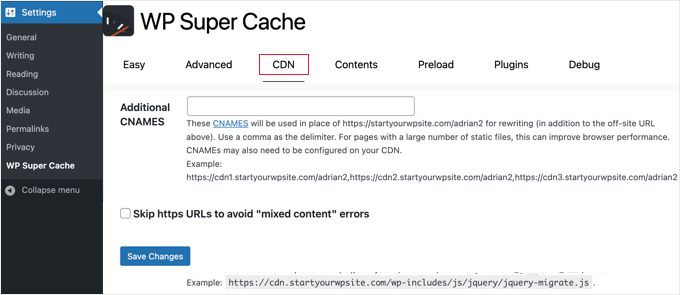
Jetzt ist Ihre Website bereit für die Bereitstellung statischer Inhalte von einem CDN.
Eine statische Website mit WP Super Cache bereitstellen
Der Preload-Modus in WP Super Cache ermöglicht es Ihnen, statische Super-Cache-Dateien für alle Ihre Beiträge und Seiten zu erstellen und eine statische Website zu erstellen. Auf diese Weise wird Ihr Inhalt schnell geladen, wenn jemand Ihre Website besucht.
Eine statische Super-Cache-Datei hilft dabei, Server-Ressourcen zu sparen, eine alte Website zu bedienen, die nicht mehr aktualisiert wird, und die Geschwindigkeit der Website zu verbessern, indem nur statische Inhalte bedient werden.
Gehen Sie zunächst auf den Tab “Vorladen” im WP Super Cache Plugin. Als nächstes können Sie die Zeit für die Aktualisierung der vorgeladenen Cache-Dateien festlegen.
Standardmäßig setzt das Plugin die Zeit auf 600 Minuten, aber Sie können die Zeit verringern, wenn Sie mehrere Artikel pro Tag veröffentlichen.
Denken Sie daran, dass das Vorladen Ihrer gesamten WordPress Website einige Zeit in Anspruch nimmt und die Ressourcen Ihres Servers stark beansprucht. Sie können den Wert auf 0 belassen, wenn Sie nicht wollen, dass Ihre statischen Dateien jemals ablaufen, es sei denn, Sie aktualisieren den Cache manuell.
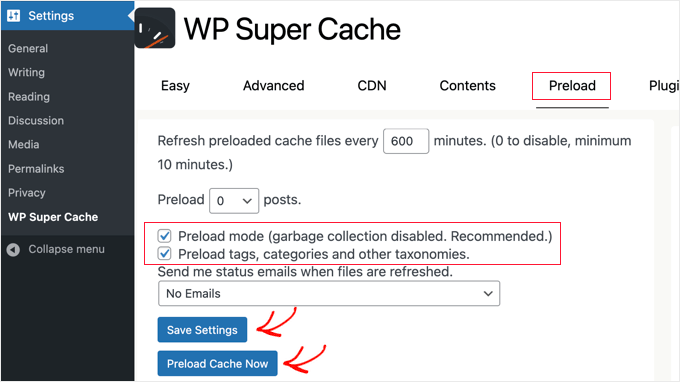
Stellen Sie anschließend sicher, dass Sie die Boxen für “Vorlade-Modus (Garbage Collection deaktiviert. Empfohlen)” aktivieren. Sie können das Vorladen auch für verschiedene Schlagwörter, Kategorien und andere Taxonomien auf Ihrer Website aktivieren.
Das Plugin bietet auch die Möglichkeit, sich per E-Mail benachrichtigen zu lassen, wenn Ihre Dateien aktualisiert werden. Standardmäßig wird die Einstellung “Keine E-Mail” verwendet, aber Sie können sie ändern, indem Sie eine Option aus dem Dropdown-Menü auswählen.
Wenn Sie fertig sind, speichern Sie Ihre Einstellungen und klicken Sie dann auf die Schaltfläche “Cache jetzt vorladen”.
Experten-Leitfäden zum WordPress-Caching
Wir hoffen, dass diese Anleitung Ihnen geholfen hat, WP Super Cache in Ihrem WordPress-Blog einzurichten. Vielleicht interessieren Sie sich auch für andere Artikel zum Thema WordPress Caching:
- Wie man die Browser-Caching-Warnung in WordPress leicht behebt
- Wie Sie Ihren Cache in WordPress löschen (Schritt für Schritt)
- Beste WordPress Caching Plugins zur Beschleunigung Ihrer Website
- LiteSpeed Cache vs. WP Rocket – Was ist besser?
- Wie man WP Rocket in WordPress richtig installiert und einrichtet
- Installation und Einrichtung von W3 Total Cache für Einsteiger
- Der ultimative Leitfaden zur Steigerung der Geschwindigkeit und Leistung von WordPress
- Wie man die Leistung von WooCommerce beschleunigt
Wenn Ihnen dieser Artikel gefallen hat, dann abonnieren Sie bitte unseren YouTube-Kanal für WordPress-Videotutorials. Sie können uns auch auf Twitter und Facebook finden.


Anze
Hey; I have a question – so preload mode enabled does not deletes old cached files – but does that means then when preloaded files are refreshed, the old ones are deleted and replaced, or does it just adding files, which would mean space on server would eventually run out?
WPBeginner Support
When the page is preloaded a new time, the old preloaded version would be deleted and replaced.
Admin
James Omeke
Thanks so much . This was very helpful.
I got my website up and running now
WPBeginner Support
You’re welcome, glad our guide was helpful!
Admin
Mike Royden
Plug in installed, but can’t get past this;
Permalink Structure Error
A custom url or permalink structure is required for this plugin to work correctly. Please go to the Permalinks Options Page to configure your permalinks.
I have gone to the Permalinks Options Page to configure your permalinks, but can’t see where I’m going wrong. Going round in circles, please help. Thanks
WPBeginner Support
You would want to ensure your permalinks are not set to plain for that error. We recommend using the Post name structure.
Admin
Mike Royden
Sorted! Many thanks for your advice and taking the time to reply. Cheers.
Katherine
I’m trying to set up this plug in to get the best results, and I’m not tech-savvy at all. Your Wp advanced cache set up section is not the same as the current plugin advanced options.
WPBeginner Support
Thank you for letting us know, we will be sure to take a look into this and update our article when able.
Admin
Simon
I was able to speed up my homepage significantly but unfortunately it only worked for the homepage. The subpages like i.e. ‘Services’ are still really slow.
What could be the problem?
WPBeginner Support
You would want to run a speed test for that using our guide below to figure that out:
https://www.wpbeginner.com/beginners-guide/how-to-properly-run-a-website-speed-test-best-tools/
Admin
Rainey
Unable to activate the plugin. I get a warning message that a .php file already exists and I should manually delete it before using the plugin. Since I am not a techie I do not know where to go to delete the file. If you could put language in your update to the tutorial to guide us would be really helpful.
WPBeginner Support
For that error, you may want to follow our guide below:
https://www.wpbeginner.com/wp-tutorials/how-to-fix-destination-folder-already-exists-error-in-wordpress/
Admin
Paul
This post is dated. When will this post be updated? Would like to know the current status of WP Super Cache?
WPBeginner Support
Thank you for letting us know, we do not have a specific date that content will be updated but we will take a look into updating this article
Admin
Nic
Is there a way to export settings once you get done?
WPBeginner Support
At the moment WP Super Cache does not have a built-in option to export settings.
Admin
ShoaiB
Thank you for this Awesome Guide.
I’m using WP Super Cache (Version 1.7.0 ). In the above tutorial, many features are not included. plz, Update Post.
WPBeginner Support
Thank you for your request, we will look into updating the post
Admin
Christopher
not as easy as described…
A custom url or permalink structure is required for this plugin to work correctly. Please go to the Permalinks Options Page to configure your permalinks.
WPBeginner Support
Thank you for reminding us of that, we’ll be sure to look into updating the article for clarification.
Admin
Ana
Hello Support!
Thank you for all your work, I’m a complete newbie and without you, I don’t know how I’d manage.
I’m confused as regards what off-site URLs and CNames are, so I’m unable to fill in that in the form. Do I have to refer to somewhere on my page to find out or do I just create it my indicating something?
Just in case it affects somehow I’d like to inform that I run a multisite.
Thank you so much & hope you can help me,
Ana
WPBeginner Support
Hi Ana,
The off site URL is the URL of your CDN location and CNames are different pullzones you have created on your CDN server. If you are not using a CDN, then you don’t need to make any changes to these settings.
Admin
krishna
can i use this plugin for testing in localhost ??
i installed this plugin in localhost and in “Cache Contents” nothing cached
displaying this …
WP-Cache (0KB)
0 Cached Pages
0 Expired Pages
WP-Super-Cache (0KB)
0 Cached Pages
0 Expired Pages
is it because i can’t use cache plugin in localhost or some other issue ?
Hardik
There is nothing called MOD_REWRITE. Everything from that step seems completely different. Please update the tutorial.
Mike
No matter what settings I use Pingdom still gives me an F and says “The following cacheable resources have a short freshness lifetime. Specify an expiration at least one week in the future for the following resources:” and I see and “expiration not specified” message in the details. Am I missing a setting?
Akshay
Hi Team ,
Thanks for the amazing article .
I have installed WP Super Cache with cloudflare (newbie blogger).
Can you please help me, how can I integrate cloudflare with WP super cache .
I did not found any articles or vidoes for the same .
I thought of installing WP Total , but it has not releasedthe update for recent wordpress version 4.8.1
Thank You
Sumaiya
Hi, I wanted to speed up my site. I used this guide and customized the settings as you shown. But before installing this plugin I tested my site speed it was 4.20 sec. But after installing I check it was 6.78 sec. Why is it like this? please guide me well.
WPBeginner Support
Hi Sumaiya,
Please test it again. If the result persists, then deactivate the plugin.
Admin
Rajeev jaiswal
hello sir, I’m trying to integrate js and CSS code elements in twenty-seventeen WordPress theme. I use enqueue methods but it does not work, so suggest me to all about.
Sara
I just downloaded WP Super Cache and the “Advanced” Page doesn’t have the same setup (or some of the same options!) as your screenshot and instructions. Are those dates, or did I somehow end up with an older version of the plugin?
Carrie
Same here, my settings are different.
Abner
Hi guys – Thanks for sharing this. I am using wp super cache and my wordpress is 4.0.1. At first, i don’t have any problem. Until recently, having a problem. My post did not appear on my website. I tried to put the caching off and my post appear. After that, I put the caching on again. My workaround was after posting article to my website, I will put my caching off to appear the post in my website, then after a few minutes, I will put the caching to on.
Few weeks doing that, and now, when I put the caching on, my post will disappear again to my website. As of now, my caching is still off.
Thanks and hope you can help me.
WPBeginner Support
Hi Abner,
Seems like WP Super Cache is not clearing the cache when you publish new content. Please see our article on how to clear cache in WordPress.
Admin
Mark Layton
Hello Support,
Thank You for your help with this issue while trying to install WP Super Cache.
Here is a copy of issue :
Warning! Could not update /var/www/website/wp-config.php! WPCACHEHOME must be set in config file.
Warning! /var/www/website/wp-content/advanced-cache.php does not exist or cannot be updated.
1. If it already exists, please delete the file first.
2. Make /var/www/website/wp-content writable using the chmod command through your ftp or server software. (chmod 777 /var/www/website/wp-content) and refresh this page. This is only a temporary measure and you’ll have to make it read only afterwards again. (Change 777 to 755 in the previous command)
3. Refresh this page to update /var/www/website/wp-content/advanced-cache.php
If that doesn’t work, make sure the file /var/www/website/wp-content/advanced-cache.php doesn’t exist:
1. Open /var/www/website/wp-content/plugins/wp-super-cache/advanced-cache.php$wp_cache_file in a text editor.
2. Change the text CACHEHOME to /var/www/website/wp-content/plugins/wp-super-cache/
3. Save the file and copy it to /var/www/website/wp-content/advanced-cache.php and refresh this page.
Cannot continue… fix previous problems and retry.
Already use your Envira Gallery and WP Forms and those are fantastic.
Should I just use W3 Total Cache instead?
Thank You so much for your help.
Mark Layton
WPBeginner Support
Hey Mark,
You can try following the instructions shown in WP Super Cache. If you find them too complicated, then you can try W3 Total Cache. Good luck
Admin
sheikave Jhurreea
Initially my website was loading for under 8 seconds which is pretty bad. But using your tutorial I was able get 90/100 for desktop performance.
But the mobile platform it remained 74/100. Could you suggest some resources where I could look up too or what is your suggestion.
WPBeginner Support
Hey Sheikave,
Congrats! That’s impressive. You may also want to see our guide on how to fix render-blocking JavaScript and CSS in WordPress.
Admin
Greg
Hi, I’d like to know whether your guidance to choose mod_rewrite to serve cache files still stands as opposed to using PHP or Legacy Caching. I notice since you published your article, WP Super Cache have changed their own recommendation from mod_rewrite to PHP.
Thanks in advance!
Greg
Dillon
Hi there. I’ve followed this tutorial to a T, and for the most part, everything works correctly, but I’m having two problems. First, when I make changes, they don’t appear on the site if I’m logged in. If I log out, they appear just fine. Second, I’m working on a WPMU network, and I only have the plugin installed on one site. But it’s caching the other sites on the network as well. How do I stop it from doing that? Thanks!
Belayet Hossain
This is an awesome guideline for new users.
It helped me a lot.
Thanks from the core of heart.
Sarah
Hi,
I followed your steps because my site was taking over 5s to load but after setting up the WP Super Cache my site wouldn’t load. At all. It was basic HTML – no content, no pictures, just the header…
So, I guess I’m wondering if there’s a laymen’s guide to literally all the terms you use cause I don’t understand websites or programming and I have a website for a start-up NGO so can’t really pay for any help at this point.
Or maybe you could direct me somewhere that will help me understand all this better? I’m a complete novice and confused easily!
Help!
Pedro Moreira
Hello,
I have a “conceptual doubt” about WP Super Cache, that I didn´t see answered neither in your site neither in other sites.
The question is: the structure of my site is finished. In basic terms, it is mainly a site of videos of football, which means that from this day on I will gradually add posts (that include the videos that I refered) and pages (of the teams).
Since that this will be a long and permanent process, I need right now to speed up my site because nowadays is very slow.
My doubt is: when I install and configue this plugin, what does that mean in terms of the updates that I will do in my site (post and pages that I add)?
I mean, if I cache the site today and tomorrow I add a new page or post, what do I have to do in order that these pages or posts will be also cached? – do I just have to require an update of the plugin? If so, how do I do that, is it possible to define that the plugin will update the cache for example once a week?
Thank you!
Best regards.
Bogdan
If i don„t use set up the CDN ,the wp super cache will be work properly ?
WPBeginner Support
Yes, it will work even without CDN.
Admin
Herman
I’m getting an error on the first step where you need to click on caching on and update. You mentioned the following in your article:
“WP Super Cache will fetch your WordPress site twice and will compare the time stamps of both pages. If the both time stamps match then this means that caching is working on your site now.”
This is the place where I get the error. I get a message that says:
Fetching to prime cache: OK
Fetching first copy of FAILED
Fetching second copy of : FAILED
I would be glad if you could help me out.
Sofor
Thank you so much, It works great for me.
Teddy
My site is a coupon site, so code is included on the coupon so it prints out by itself without lots of other junk that is on the page. If I use WP Super Cache, will that code be lost because it’s now a static page? Will people still be able to click on the coupon to print just the coupon?
WPBeginner Support
Hi Teddy,
You will have to test it out first on your computer or in a staging environment.
Admin
Alex
Thanks so much for the the help. Do i have to create a cname record to use the CDN service in WP super cache. Thanks
Stefan Andonov
Hi,
How to preload for several languages, I am using qtranslate, that seems impossible, right?
10x
Stefan
John Johnson
This is an ecommerce site using Exchange from iThemes. With WP Super Cache activated certain pages that need to be refreshed don’t get refreshed i.e. Empty Cart. When you Empty Cart it comes back with the same content or in other words it appears unemptied.
When I deactivate WP Super Cache the problem disappears. It was suggested that I Whitelist the pages that shouldn’t be cached. I am uncertain about how to do that. Any help would be appreciated.
Regards,
John
Dajuan
WP Beginner Staff, when a theme update is applied, or when other plugin updates are made, is WP Super Cache alerted to create new cached versions? Or does the plugin wait until “Expiry Time & Garbage Collection” or a manual cache deletion?
Iosif
Hello,
I am using WP Super Cache, but it seems that my images don’t get cached. Any ideas on how to configure this?
I did have a lazy load plug-in, but it conflicted with my theme, so I deactivated it…
shubhendu
I have just install wp super cache plugin by reading your article but nor js,css and image is not loading at my blog…plz help my site address is
If you dont want to publish is comment because i include my site link PLEASE reply to my email id.
Thanks.
WPBeginner Support
Seems like you have already resolved the issue.
Admin
madhavi jha
hi , i am regular reader of your site , i have setup WP Super Cache plugin as you guide in your blog , but its not working its show only 20/100
please guide me ,i have been tried to solve this problem since last 2 days , please guide me .
nitai roy
Hi,
I followed as you mentioned here. Everything has done perfectly but I could not find this option: “Enable Compression in WP Super Cache:”
Where is it please?
Also, Now how can I know whether it is working perfectly or not?
Thank you very much.
Patel Shoeb
How to Install and Setup WP Super Cache with CloudFlare CDN?
kurakaniz
after updating the plugin it says “.htaccess file may need to be moved” and this error too
A difference between the rules in your .htaccess file and the plugin rewrite rules has been found. This could be simple whitespace differences but you should compare the rules in the file with those below as soon as possible. Click the ’Update Mod_Rewrite Rules’ button to update the rules.
what to do please help
Ron
Same problem here.Anyone help
stephen
I installed everything just as you said but I am still getting 52sec load time and if I tried using gtmetrix I get an error saying the URL does not appear to be an HTML.home page . please help site is
Megan Good
This article was very helpful, and I was able to troubleshoot my issues based on your suggested settings. Thank you for the info!
Omprakash Jaiswal
wp super cache does not work
Permlink Structure Error
A custom url or permalink structure is required for this plugin to work correctly. Please go to the Permalinks Options Page to configure your permalinks.
Hammad
Thank you for your suggestions, I’m trying to apply these settings on my website now. Can you please advise if wp super cache supports minify settings.
I had wp3 total cache and had a score of 97/81 on gtmetrix, after installing wp super cache my score decreased to 82/68.
Imran
Was looking for some great guide for super cache plugin. Now I will try it on my test site.
Thanks for such a nice tutorial
Robert Connor
Some great tips-now i need to go back and fix my site
User
How do I get it to work for Mobile without changing the theme?
cezars
Any info for Rejected User Agents list from the plugin ?
herb
Installed it and got a lower grade E/D on Gtmetrix…switched to W3TC and it gave me and A/B grade.
efiga
Hi
i have a little question , when using this plugin to cashe pages , the google adsense ads will be cashed too ? ,it will show the same ads ?
thank you in advance
WPBeginner Staff
No your Google Ads will not be cached.