Möchten Sie wissen, wie man grundlegende Bildbearbeitung im WordPress-Adminbereich durchführt?
Mit WordPress können Sie Bilder zuschneiden, drehen, spiegeln und in der Größe skalieren, ohne dass Sie einen Bildbearbeiter benötigen. Diese Funktionen sind besonders praktisch, wenn Sie nicht an Ihrem Hauptrechner sitzen und unterwegs Bilder hochladen.
In diesem Artikel zeigen wir Ihnen, wie Sie WordPress ganz einfach als grundlegenden Bildeditor verwenden können, mit dem Sie Bilder zuschneiden, drehen, skalieren und spiegeln können.
Warum WordPress für die grundlegende Bildbearbeitung verwenden?
Mit dem integrierten WordPress Editor können Sie Bilder für Ihren WordPress Blog ganz bequem bearbeiten. Sie müssen nicht einmal zusätzliche Software oder WordPress Plugins verwenden.
Der Bildeditor spart auch viel Zeit, da er einfache Korrekturen und Anpassungen ermöglicht, ohne dass der Benutzer zwischen verschiedenen Werkzeugen hin- und herwechseln muss.
Mit WordPress können Sie Ihre Bilder in der Mediathek ganz einfach zuschneiden, drehen, skalieren, die Abmessungen ändern und spiegeln.
Wenn Sie zum Beispiel ein Bild zuschneiden möchten, um einen übermäßigen Hintergrund zu entfernen, können Sie das ganz einfach mit dem WordPress-Bildeditor tun, anstatt ein teures Tool dafür zu kaufen.
Sehen wir uns nun an, wie Sie Schritt für Schritt grundlegende Bildbearbeitungen auf Ihrer WordPress-Website vornehmen können.
Video-Anleitung
Wenn Ihnen das Video nicht gefällt oder Sie weitere Anweisungen benötigen, lesen Sie einfach weiter.
Grundlegende Bildbearbeitung in WordPress
Zunächst müssen Sie ein Bild in Ihre WordPress-Mediathek hochladen.
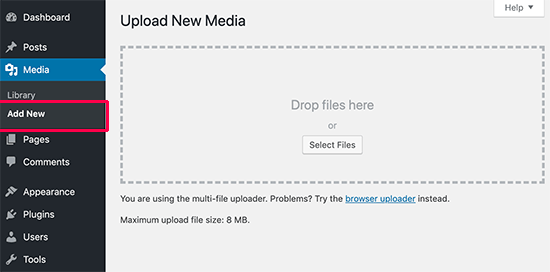
Sie können ein Bild ganz einfach mit dem Block-Editor hochladen, während Sie einen Beitrag schreiben, oder indem Sie die Seite Media ” Add New in der WordPress-Admin-Seitenleiste aufrufen.
Klicken Sie hier auf die Schaltfläche “Dateien auswählen” und laden Sie eine Bilddatei von Ihrem Computer hoch.
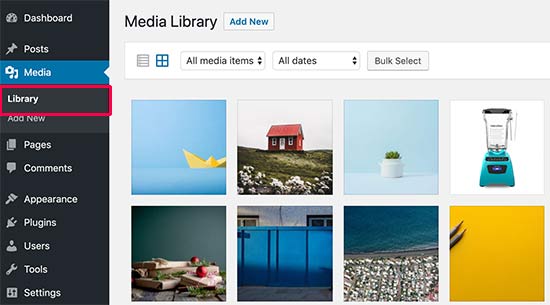
Sobald Sie das getan haben, gehen Sie im WordPress-Administrations-Dashboard auf die Seite Medien ” Bibliothek.
Hier werden alle Bilder, die Sie auf Ihre WordPress-Website hochgeladen haben, auf dem Bildschirm angezeigt.
Jetzt müssen Sie das soeben hochgeladene Bild suchen und anklicken.
Dadurch wird das Bild in einem Popup-Fenster geöffnet. Sie sehen nun die Bilddetails auf der rechten Seite und eine Bildvorschau auf der linken Seite.
Von hier aus gibt es zwei Möglichkeiten, das Bild mit dem integrierten WordPress-Bildeditor zu öffnen.
Die erste Option ist, auf den Button “Bild bearbeiten” unter der Bildvorschau zu klicken. Dadurch wird der Editor im Popup-Fenster geöffnet. Die zweite Option besteht darin, auf den Link “Weitere Details bearbeiten” zu klicken.
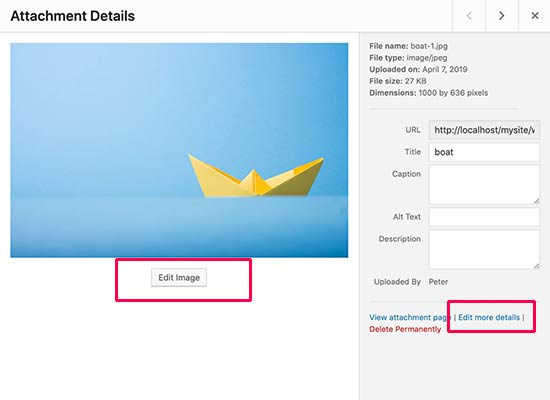
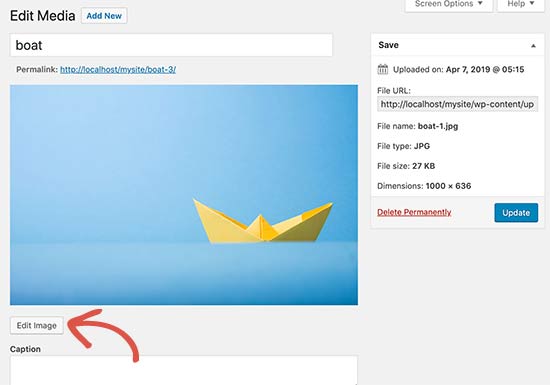
Wenn Sie auf diesen Link klicken, werden Sie auf die Seite Medien bearbeiten weitergeleitet.
Von hier aus müssen Sie auf die Schaltfläche “Bild bearbeiten” klicken, um die grundlegenden Bildbearbeitungswerkzeuge zu öffnen.
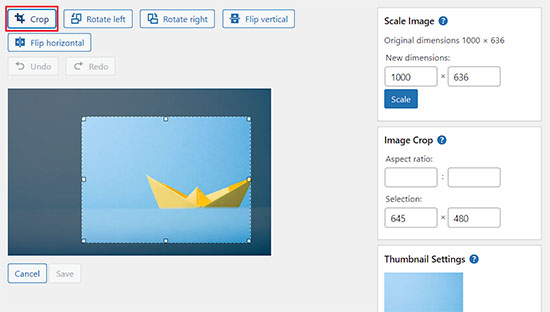
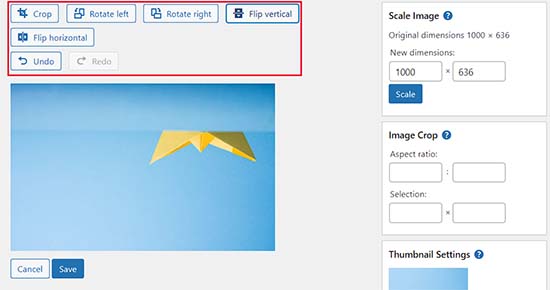
Sobald Sie dies getan haben, sehen Sie eine Symbolleiste mit einigen Schaltflächen über Ihrem Bild. In der rechten Spalte sehen Sie außerdem eine Reihe von Optionen zur Größenänderung des Bildes.
Mit den Schaltflächen am oberen Rand können Sie jetzt ganz einfach Bilder drehen, spiegeln oder nach Ihren Wünschen zuschneiden.
Wenn Sie z. B. auf den Button “Zuschneiden” klicken, können Sie den Bereich auswählen, der aus dem Originalbild ausgeschnitten werden soll.

Außerdem können Sie die Buttons “Nach links drehen” und “Nach rechts drehen” verwenden, um Bilder im oder gegen den Uhrzeigersinn zu drehen.
Mit verschiedenen Schaltflächen können Sie Ihre Bilder sogar horizontal oder vertikal spiegeln, ganz wie es Ihnen gefällt.
Sie können auch die Schaltflächen Rückgängig/Wiederherstellen verwenden, um Änderungen, die Ihnen nicht gefallen, einfach rückgängig zu machen, oder um sie wiederherzustellen.
Wenn Sie Ihr Bild skalieren möchten, können Sie Ihre bevorzugten Bildmaße in das Feld “Bild skalieren” in der linken Spalte eingeben.
Wir empfehlen, diese Option vor dem Zuschneiden eines Bildes zu verwenden, damit die Bildproportionen erhalten bleiben.
Beachten Sie, dass WordPress nur die Verkleinerung eines Bildes erlaubt. Das bedeutet, dass Sie Ihre Bilder nicht größer machen können, als sie ohnehin schon sind.
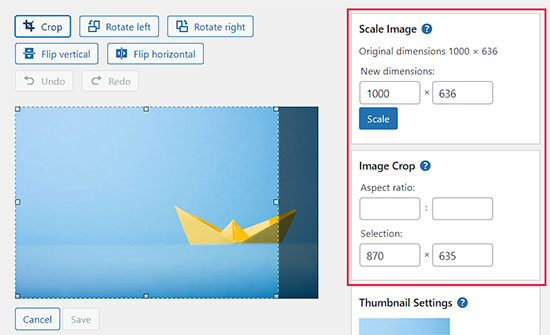
Danach können Sie auch die Option “Seitenverhältnis” verwenden, wenn Sie ein bestimmtes Seitenverhältnis für Ihr Bild beibehalten möchten. Diese Funktion funktioniert nur, während Sie ein Bild zuschneiden.
Als Nächstes können Sie in der linken Spalte zum Abschnitt “Miniaturansicht-Einstellungen” scrollen und wählen, ob Sie diese Änderungen auf alle Bildgrößen, nur auf die Miniaturansicht oder auf alle Bildgrößen außer der Miniaturansicht anwenden möchten.
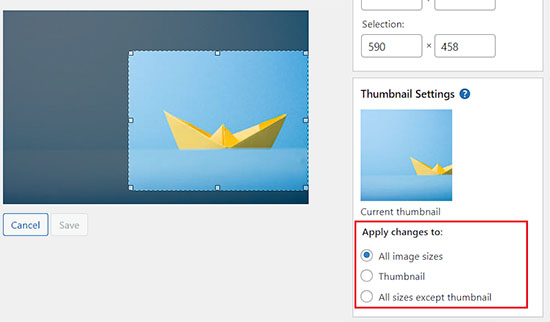
Wenn Sie mit den vorgenommenen Änderungen zufrieden sind, vergessen Sie nicht, auf die Schaltfläche “Speichern” zu klicken, um Ihre Änderungen zu speichern.
WordPress wendet nun Ihre Änderungen an dem Bild an und erstellt eine neue Kopie davon auf Ihrem Server.
Originalbild nach Bearbeitung wiederherstellen
Wenn Sie mit dem bearbeiteten Bild nicht zufrieden sind, können Sie einfach zur ursprünglichen Version zurückkehren.
Öffnen Sie einfach erneut die Seite “Medien bearbeiten” für das Bild, und dieses Mal werden Sie ein neues Metafeld mit der Bezeichnung “Originalbild wiederherstellen” sehen.

Klicken Sie auf , um das Metafeld zu erweitern. Klicken Sie anschließend auf die Schaltfläche “Bild wiederherstellen”.
WordPress stellt nun Ihr ursprüngliches Bild wieder her, und Sie können es erneut bearbeiten oder unverändert lassen.
Bonus: Bulk-Bearbeitung von Featured Images in WordPress
Neben der Bearbeitung von Bildern, die Sie zu Ihren Blogbeiträgen hinzufügen, können Sie auch die angezeigten Bilder auf Ihrer WordPress-Website in großen Mengen bearbeiten.
Dies sind die Bilder, die als Vorschaubilder in Ihren Beiträgen verwendet werden.

Wenn Sie z. B. alle Bilder für die Suchmaschinenoptimierung optimieren oder Ihre Website umgestalten wollen und möchten, dass Ihre Bilder dies widerspiegeln, dann wird die Bearbeitung jedes einzelnen Bildes viel Energie und Zeit in Anspruch nehmen.
Wenn Sie diese Bilder jedoch in großen Mengen bearbeiten, können Sie ein einheitliches Erscheinungsbild für alle Bilder sicherstellen, Zeit sparen und den Prozess rationalisieren.
Das können Sie ganz einfach mit Quick Featured Images erreichen. Details finden Sie in unserem Tutorial zur Installation eines WordPress-Plugins.
Rufen Sie nach der Aktivierung die Seite Featured Images ” Overview im WordPress-Dashboard auf und wählen Sie die Option “Set the selected image as a new featured image”.
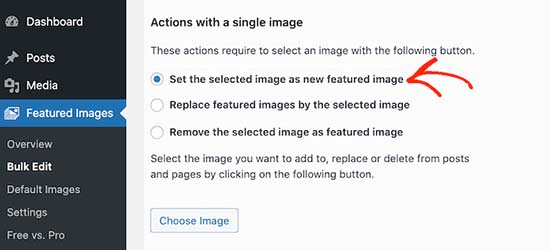
Danach laden Sie einfach das Bild hoch, das Sie während des Massenbearbeitungsprozesses als Featured Image verwenden möchten. Sie können dieses Bild dann bearbeiten und Filter hinzufügen, damit die Änderungen nur auf bestimmte Bilder angewendet werden.
Weitere Informationen finden Sie in unserem Tutorial über die Massenbearbeitung von Bildern in WordPress.
Wir hoffen, dass dieser Artikel Ihnen geholfen hat, grundlegende Bildbearbeitung im WordPress-Adminbereich zu erlernen. Vielleicht interessiert Sie auch unsere Anleitung für Einsteiger, wie Sie die Höhe und Breite von Blöcken in WordPress-Beiträgen ändern können, und unsere Expertenauswahl der besten WordPress-Themes für Fotografen.
Wenn Ihnen dieser Artikel gefallen hat, dann abonnieren Sie bitte unseren YouTube-Kanal für WordPress-Videotutorials. Sie können uns auch auf Twitter und Facebook finden.


Jiří Vaněk
Is it possible to crop an image into a circle in wordpress, or do I need a plugin for that? I’m talking about a photo of a team member, where the face should be like a picture in the wheel. Can wp do it, or do I have to edit the image externally and upload the already cropped ones?
WPBeginner Support
To have the image in a circle it would normally be best to use an image editor to have it display how you want. Otherwise you would normally use CSS instead of image editing for what you want to achieve.
Admin
Jiří Vaněk
I understand, the CSS method didn’t occur to me, that’s why I solved it externally. CSS will be much faster for multiple images. Thank you for the advice.
Mrteesurez
You can use page builder like Seedprod or elementor to create a circular images, even these page builder usually has default template for team that already showed the images in circular form or that can be easily customized.
Jiří Vaněk
Hi Mrteesurez,
thank you for the advice. I use Elementor a lot so I will look into this feature. Because I need to create a portfolio of employees on one website, and circular images look much more elegant to me. I’ll definitely look into it.
Patrick
I am a web designer, I have over 100 installs of wordpress over many different servers and NOT ONE of those installs does wordpress crop an image.
Its so frustrating to have to load photos in photoshop just to make a tiny change and then upload.
WPBeginner Support
You may want to ensure you don’t have a specific theme or plugin across those sites that would be preventing you from using the crop tool
Admin
TimGS
I am using wordpress 4.9.5 on an IPad mini. When I go to scale an image all the selections work until I press the scale button; the image is cropped but I only get about 1/2 the width of the original crop selection. Anyone see this problem?
Justin
Thanks for sharing! Just used the crop tool. Very handy!!
Steven Denger
This does not work at all and is not in the least bit helpful. WordPress is the most horrid place to try to work with images. My featured images in my posts list pages are all cut – cropped out and only show a partial photo. I have tried all kinds of plugins that wp beginner has suggested and none of them work at all. I use the Awaken theme and the author will not respond to fix his worthless theme. The site that I am working on will have to be deleted because of wordpress being such a horrid cms to work with.
TimGS
A year later, I am experiencing your problem on an iPad mini….but not on a PC
Zohaib
Cropping function doesn’t work anymore.
Any plugin that can do image cropping in media library?
Peter Willianson
I dont get that menu when i click edit image.. i am using bluehost.. i cant do anything to the images that are loading rotated 90 degrees.. fyi they not rotated when loaded to other sites.. this is specific to wordpress bluehost
amy
There is no edit button on my end. Looks like I’m not the only one.
Linda Strader
Does this work with the free version? I see NO options to edit photos, and all the ones I uploaded are rotated the wrong way.
Ra.
Does nt work, anymore. It is just not there.
Matteo
Hi,
when you scale an image from the media library, does it automatically reduce the quality of the image in every post/page where it was previously published or is it necessary to load it again in each single page to speed up the site?
Cheers
mike cooper
Anyone had the issue when you rotate an image you get the following. ‘Could not load the preview image. Please reload the page and try again.’??
I have GD and ImageMagick installed..
flip works ok just not rotate and crop.
Craig Canapari
I just discovered this yesterday. However, it seems to scale it on the fly as GTMetrix said that scaling images (that I had scaled using the tools above) was slowing down my page loading. I turned off Photon to be sure it wasn’t a cached image and also cleared my cache.
Jason
I must admit, the editing of photographs is not very clear. I thought I had it all sorted and when I published it the image was huge and you only saw our eyes. I understand that the scale image has to be adjusted, but come on guys, we are all not up to speed with stuff like that. We want idiot proof editing and there are plenty on the market that do such. please have a look at it or you will lose this customer very quickly
Ron Strilaeff
I’ve played with that edit feature, but cannot figure out how to get it to lock the aspect ratio. Let’s say I want a contributor to upload an image and then crop the part to show as the thumbnail before saving it. The numbers under “Image Crop -> Aspect Ratio” don’t seem to do anything and sometimes won’t let me enter any values. What are they for anyways?
Ed Power
This crop does not work when I try to save the crop as thumbnail only – I want to show a cropped image as a thumbnail in a gallery page, and then show the full version when launched in the lightbox. Is this possible
IgorPureta
Thanks for the good post. So far I figured out what you have written. What I can’t manage is following:
My featured image is 960×332 to fit into home page slider. When I crop the picture I want to save cropped part as thumbnail so I can include it in the post. That is all managed by WP itself. What I didn’t mange is to change thumbnail from default crop to the crop I selected. No matter how many times I have cropped, saved, deleted or whatever is possible I can’t complete it. Could you please, explain it. Thank you!
KreativTheme
I already use a few times this feature, but today I learned a few more tricks. Thanks a lot for the great tut …
Roderick Dunne
Nice feature – never noticed it.
One thing to ponder: Does it save an updated version of the file which is then referenced (i.e. if the edited pic is in a post)?
I’d just be concerned that page load times could be increased if an inserted image in a WP post needs to be dynamically cropped/edited for correct display on each users page request.
Otto
@Roderick Dunne The final result replaces the existing image. It doesn’t need to perform those operations every time.
AnTo
Well, it’s nice but if more functions can be provided for photo editing that would be amazing! However, it might consumes more web space or usage if it goes!
petebocken
Crop has never worked for me. The Save button never works. It’s always grayed out. Actually in your post screenshot, the save button is also grayed out. Anyone else get crop to work?
Otto
@petebocken The save button is greyed out because the selection is still being made. Make your selection, then click the “Crop” button in the upper right to confirm the selection. Then it will perform the crop and you can save the result.
BarryFuchs
@Otto@petebocken
I had been confused by this, too, and though that crop either didn’t work on my installation or only worked for certain file types (ie jpg but not png). The process of selecting first and clicking “Crop” second seems opposite of other programs that I’ve used, such as Acrobat and Picasa. But, at least I know how to do it now!
Chris Howard
Yeah, it’s ridiculous that I have google to find out how to do something that should be intuitive
Otto
@petebocken Sorry, I meant upper left, of course.
Brad Dalton
Only used it once but will probably have another go next time. Prefer using MS picture manager but nice tutorial. Pics look good
dunfalach
@tonyjalicea When I see WP, my first thought is Wordperfect. #youmightbeanoldnerdif
tonyjalicea
@dunfalach Well that’s a blast from the past.
Moe_NYC
@tonyjalicea Whoa. How did I miss that? I had no clue. You think you know someone. WordPress, she’s so sexy!
tonyjalicea
@Moe_NYC Indeed!
itravelwithlove
@wpbeginner how to upload 2 or more photos at once in a New Post? Pls reply.
wpbeginner
@itravelwithlove Just drag two photos or as many you want at once in the drag drop media uploader.
itravelwithlove
@wpbeginner that’s what I do, but after that, I still need to upload it in my post one by one.
wpbeginner
@itravelwithlove You mean insert it in your post one by one.. Yes because most of the time you insert images at different spots.
wpbeginner
@itravelwithlove if you want to add all images one after another perhaps in a gallery format then u can do this: http://t.co/JOVHrsVQ
itravelwithlove
@wpbeginner I was able to try that too. Thank you for the help!☺