Recently, one of our readers asked us how they can track different campaigns and purchases on their WordPress website.
We’ve been blogging for a long time and running many marketing campaigns, so we know how important it is to track conversions in WordPress.
Conversion tracking helps you measure the impact of your marketing efforts and makes it easier to understand how users interact with your website.
In this guide, we will show you how to add conversion tracking in WordPress and track your conversions like a total pro.
This is a comprehensive guide to conversion tracking in WordPress, so we have divided it up into different sections. Here is what we’ll cover in this article:
- What is Conversion Tracking?
- Why is Conversion Tracking Important?
- Tools You Need to Setup Conversion Tracking in WordPress
- Setting Up Conversion Tracking in Google Analytics
- Turning on Enhanced Ecommerce Conversion Tracking
- Viewing eCommerce Conversion Tracking Reports
- Turning on Form Conversion Tracking in Google Analytics
- Setting Up Events in Google Analytics 4
- Google Ads Conversion Tracking in WordPress
- Use UTM Parameters for Conversion Tracking in Google Analytics
- Setting Up Facebook Conversion Tracking in WordPress
- Setting Up Twitter Conversion Tracking in WordPress
- Setting Up Goals for Conversion Tracking in Universal Analytics
- Optimizing Conversion Rates to Boost Sales
What is Conversion Tracking?
Conversion tracking is the ability to track and measure the success of your various marketing efforts.
Depending on your business, the conversion is the desired action you want users to perform on your website.
- For an online store or eCommerce website, a conversion could be a successful purchase.
- For a news/blog site, the conversion could be a successful subscription to the email newsletter.
- For a professional services website, a conversion could be a user filling up a contact form.
Simply put, conversion tracking shows you how many of your website visitors successfully perform the desired action.
Why is Conversion Tracking Important?
Conversion tracking is important because it helps you make data-driven decisions to grow your business.
For instance, it shows that users from a specific traffic source are more likely to convert. You can then focus your attention on getting more traffic from that particular source.
Conversion tracking also helps you uncover the users who are not converting so well.
For instance, you may learn that users open the contact page, but many abandon it before submitting the form. You can then make your form easier by removing unnecessary fields, making it conversational, changing colors, setting up partial form submission, etc.
Basically, you need to track conversions to measure your successes and failures and then improve upon them to grow your online business.
That being said, let’s take a look at what tools we’ll need to set up conversion tracking in WordPress.
Tools You Need to Setup Conversion Tracking in WordPress
Most conversion optimization experts rely heavily on Google Analytics. It is a free tool provided by Google that helps you track your website traffic.
It shows where your users are coming from and what they do while on your website.
If you are running Google AdWords, Facebook Ads, and Twitter Ads to promote your business, then you’ll need to set up those for conversion tracking.
This may sound complicated, but you’ll only have to set it up once, and we’ll walk you through every step of the way.
Ready? Let’s get started.
Setting Up Conversion Tracking in Google Analytics
First, you need to install Google Analytics on your website.
The easiest way to do this is by using MonsterInsights. It is the best Google Analytics plugin on the market that comes with enhanced eCommerce tracking, form tracking, and other conversion tracking tools built-in.
You’ll need the PRO version of the plugin to access eCommerce and other advanced tracking features. For basic tracking, the free version works as well.
Simply install and activate the MonsterInsights plugin. For more details, see our step-by-step guide on how to install a WordPress plugin.
Upon activation, you’ll see the setup wizard. Go ahead and click the ‘Launch the Wizard’ button.

Next, you can follow the on-screen instructions to connect your WordPress site to Google Analytics using MonsterInsights. For more details, see our guide on how to install Google Analytics in WordPress.
Now that you have installed Google Analytics, let’s set up conversion tracking on your website.
Turning on Enhanced Ecommerce Conversion Tracking
Ecommerce tracking helps you see which products are doing well on your site, which products are being looked at but not purchased, and what’s bringing you the most revenue.
Google Analytics comes with enhanced eCommerce tracking, which works for most eCommerce websites. However, you’ll need a developer to add code to your website or use Google Tag Manager to set up eCommerce tracking on your website.
Note: the manual process for adding eCommerce conversion tracking has a lot of room for errors, so we strongly recommend using a plugin like MonsterInsights.
Install MonsterInsights eCommerce Addon
MonsterInsights comes with an eCommerce addon that lets you properly set up eCommerce conversion tracking in Google Analytics without editing code. It works out of the box, and you don’t have to perform any additional configuration.
It works with all top eCommerce platforms for WordPress, including WooCommerce, MemberPress, LifterLMS, Easy Digital Downloads, and more.
First, you need to visit the Insights » Addons page to install and activate the eCommerce addon.
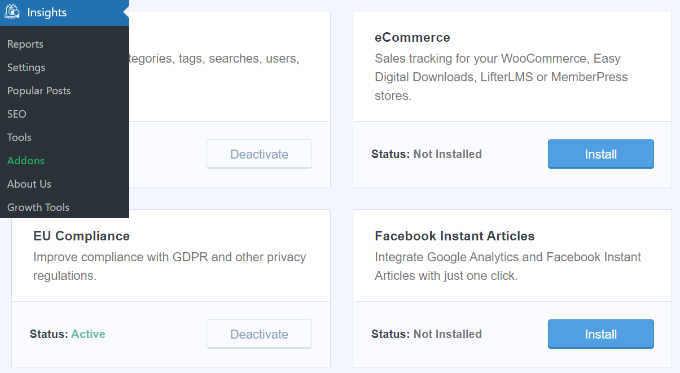
Afterward, you can go to your WordPress dashboard and visit the Insights » Settings page.
From here, switch to the eCommerce tab.
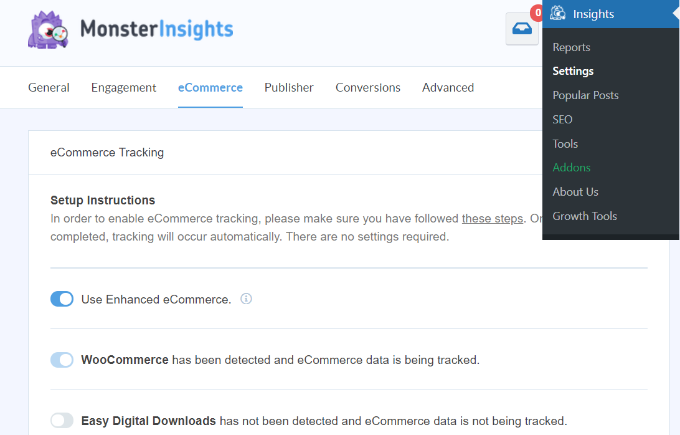
MonsterInsights will automatically detect your eCommerce software and enable advanced eCommerce tracking for your store.
Viewing eCommerce Conversion Tracking Reports
Now that you have enabled eCommerce conversion tracking on your website. Let’s see how to view these reports and use them to make informed decisions about your business.
Ecommerce Conversion Reports in MonsterInsights
Simply go to the Insights » Reports page inside the WordPress admin area and then switch to the eCommerce tab.
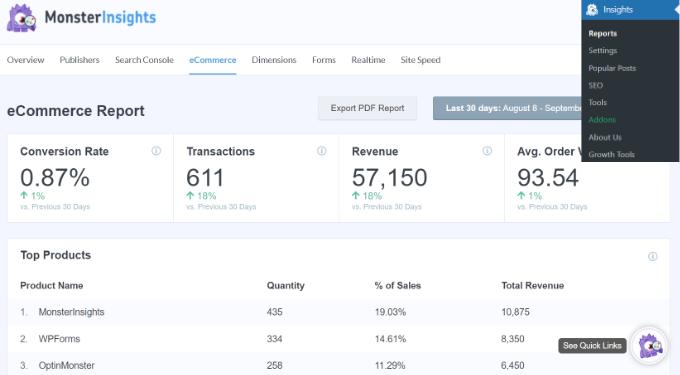
At the top, you’ll see your most important metrics, like the conversion rate, transactions, revenue, and average order value.
Below that, you will see a list of your top products with quantity, sale percentage, and total revenue. This shows you which products are doing well in your store.
Next, you’ll see your top conversion sources with the number of visits, conversion share, and revenue. You can see which sources are bringing you more revenue and which traffic sources are not very effective.
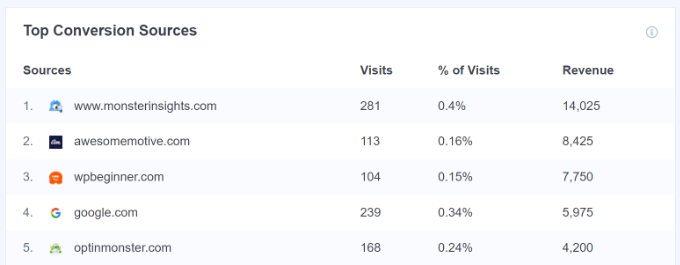
MonsterInsights will also show you shopper behavior reports with the number of times products were added to and removed from the cart.
That’s not all the data. You can drill down these reports even further inside Google Analytics.
Ecommerce Conversion Reports in Google Analytics
In Google Analytics 4, you can head to Reports » Monetization » Overview to view the report.
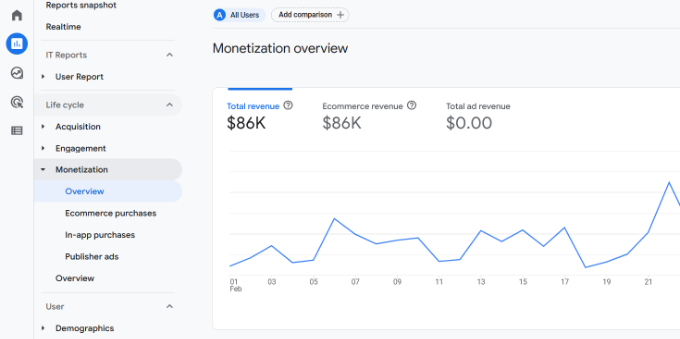
Here, you can see the total revenue your online store is making. Besides that, there are more metrics you can track, like items purchased, first-time purchasers, and total purchases.
On the other hand, if you have historical data collected using Universal Analytics, you can see those eCommerce reports in your UA dashboard. However, no new data will be collected as all users have been switched to GA4.
Note: Universal Analytics has now sunset and will be closed soon. If you have historical data in your UA property, then we recommend exporting it as soon as possible.
Next, click on the Conversions » Ecommerce from the left column.
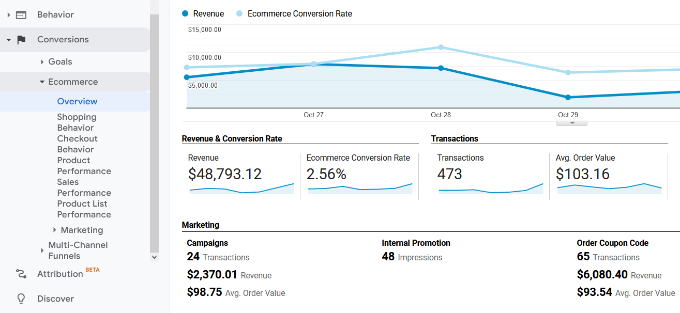
The overview section offers the most important stats, such as revenue, conversion rate, transactions, and average order value.
You can further drill down to view different reports. For example, you can switch to shopping and checkout behavior reports to see how users reach the conversion page. You can also figure out what stopped them at the last minute from completing the transaction.
You may also want to see our guide on how to set up WooCommerce conversion tracking.
Turning on Form Conversion Tracking in Google Analytics
Not all websites use an eCommerce platform to conduct business. For instance, a restaurant website may use an order delivery form, or a salon may use a booking form.
Many businesses use contact forms to capture leads from their website. A lot of news and blogs use an email newsletter to convert website visitors into subscribers.
To track them, you need to enable form conversion tracking in Google Analytics.
MonsterInsights comes with a Forms addon that lets you easily track form conversions on your WordPress site. It works with all popular WordPress form plugins, including WPForms, Formidable Forms, Gravity Forms, Contact Form 7, and more.
Simply go to the Insights » Addons page. Scroll down to the ‘Forms’ addon, and then click on the Install button.
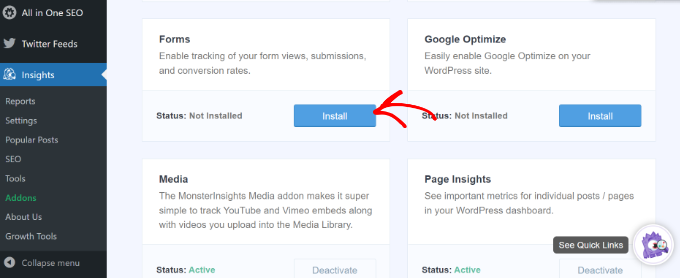
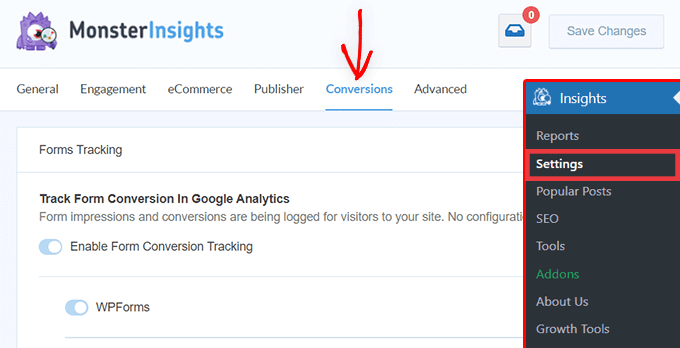
Upon activation, you need to visit the Insights » Settings page and switch to the ‘Conversions’ tab.
MonsterInsights will automatically detect your WordPress form plugin and will also start tracking miscellaneous WordPress forms on your site.
Viewing Your Form Conversion Reports
You can now view your form conversion reports inside your WordPress admin area.
Head over to the Insights » Reports page and switch to the ‘Forms’ tab.
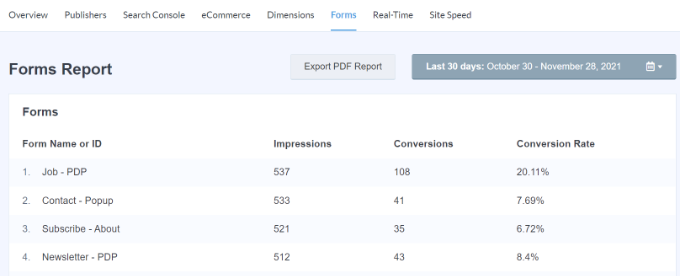
You’ll see a list of forms on your website with their impressions, conversion, and conversion rates.
This helps in tracking how each WordPress form is performing. You can optimize low-converting forms while increasing the visibility of high-converting forms.
For more details, please see our guide on how to set up form tracking in Google Analytics.
Setting Up Events in Google Analytics 4
Google Analytics 4 replaces goals with events. You can manually configure events to track different user interactions in GA4.
First, you’ll need to go to the ‘Admin’ settings from your GA4 property.
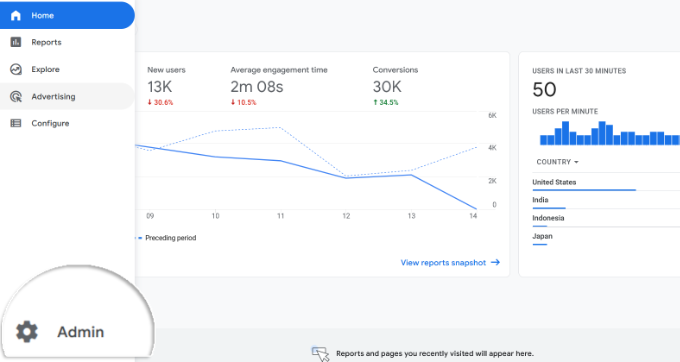
Next, you will need to navigate to the Property column.
After that, simply click the ‘Event’s option.

You are now ready to create a new event in GA4.
Simply click the ‘Create event’ button to get started.

You should now see a new window slide in from the right. This is where all your custom events will be listed.
Go ahead and click the ‘Create’ button.

On the next screen, you can enter details of your new event.
Google Analytics 4 already has pre-built events. Simply click the Custom event name dropdown menu and choose an event. For example, we’ll select the ‘file_download’ event for this tutorial.

GA4 will automatically enter the specific Parameter and Operator for your custom event.
Next, you can enter a value for your event. For instance, we will enter ‘.pdf’ since we want to track PDF file downloads. However, you can enter any specific word you use to organize filenames on your site.

After entering these details, click the ‘Create’ button at the top.
You will now see your new custom event listed under the Custom events area in GA4.

Viewing Your Event Conversions in Google Analytics 4
Now that you’ve created a custom event in GA4, the next step is to view the conversions.
To do that, simply head to Reports » Engagement » Event: Event name from the menu on your left and view the report.

You can now repeat this step to track other custom events.
That said, an easier way of tracking user behavior is by using MonsterInsights. The plugin automatically sets up different events in Google Analytics.
This way, you don’t have to manually configure events or worry about messing up your tracking.
Google Ads Conversion Tracking in WordPress
If you run Google Ads (formerly Google AdWords) to bring targeted traffic to your website, then you may want to track those conversions.
Setting up is a bit complicated because it requires adding code to your website. However, with MonsterInsights, you can easily set up Google Ads conversion tracking without editing code or hiring a developer.
First, you can go to Insights » Addons from your WordPress dashboard and install the Ads addon.

Once you install the addon, it should automatically activate.
From here, you can go to Insights » Settings and head to the Publisher tab.

Next, you can scroll down to the ‘Ads Tracking’ section.
Here, you will need to enter the Conversion ID, which will be in this format: AW-123456789.

If you’re tracking Google Ads on an eCommerce store, then you can also enter the Conversion Label.
To find the Conversion ID and Conversion Label, you’ll need to go to your Google Ads dashboard and create a conversion action.
For more details, please follow our step-by-step guide on how to set up Google Ads conversion tracking in WordPress.
Viewing Google Ads Conversion Reports in Google Analytics 4
Your Google Ads conversion tracking will now appear in your Google Analytics reports.
In Google Analytics 4, you can head to Acquisition » Acquisition overview and then navigate to the ‘Session Google Ads’ report.
After that, click the ‘View Google Ads campaigns’ option at the bottom of the report.

This will expand the report and show more details about your ad campaigns.
You can see the total number of users, sessions, Google Ads clicks, and more.

Viewing Google Ads Conversion Reports in Universal Analytics
For Universal Analytics, you can open your website property.
After that, view the Google Ads report by going to the Acquisition » Google Ads » Campaigns section. Here, you can see conversions for all your paid campaigns.

Remember, though, Universal Analytics will only let you see historical data and does not collect anything new.
Use UTM Parameters for Conversion Tracking in Google Analytics
UTM parameters are special tags you can add to URLs to pass important information to Google Analytics.
For instance, if you want to track users coming from a particular ad, then you can add UTM parameters to your ad URL like this:
https://yourwebsite.com/special-offer/?utm_source=ads&utm_medium=cpc&utm_content=bfad
You can also use UTM parameters anywhere you want to share your URLs.
For instance, your email newsletter, Tweets, SMS campaigns, and more.
https://yourwebsite.com/special-offer/?utm_source=newsletter&utm_medium=email&utm_campaign=jan_sale
MonsterInsights makes it super easy to build URLs with UTM parameters. Simply head over to the Insights » Tools page and select the ‘URL Builder’ tab.
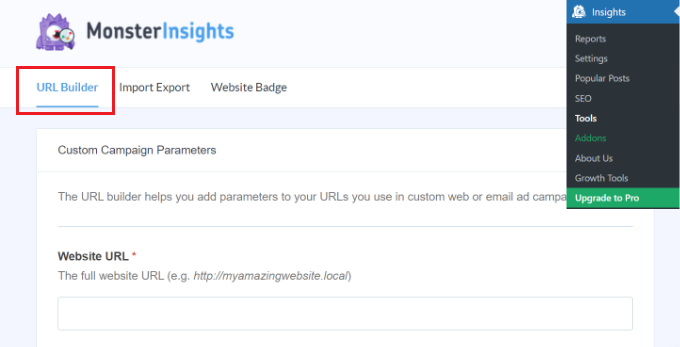
Simply enter the UTM parameters you want to use, and it will automatically generate the URL, which you can then use in your campaigns.
For instance, you can enter a campaign source, like a newsletter or Google, which tells you where the users are coming from. After that, you can define a campaign medium, such as emails or banner ads, and enter a campaign name.
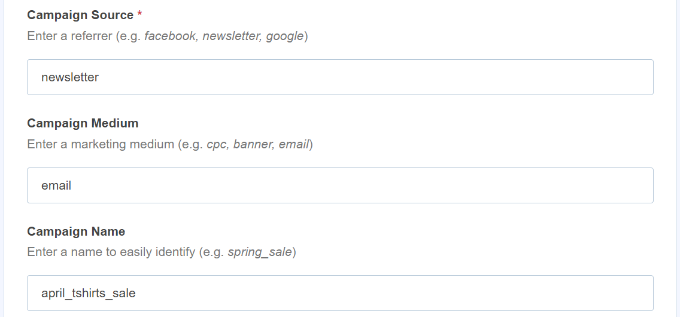
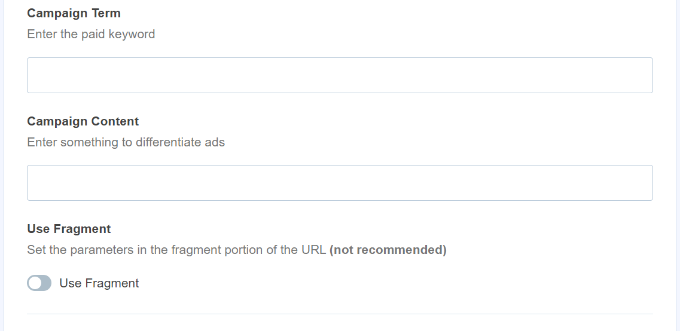
MonsterInsights will also give you additional options to add campaign terms and content.
This is useful if you’re split-testing different emails or paid campaigns.
For creating a custom URL, you can leave these options blank.
Next, you can scroll down to the bottom to see your custom URL.
Go ahead and use the link for campaigns and track conversions on your website.

Viewing UTM Parameter Reports in Google Analytics 4
Now that you’ve added UTM parameters to a URL, you can track its performance in Google Analytics.
First, log in to your GA4 account. After that, head to Reports » Acquisition » Traffic Acquisition from the menu on your left.
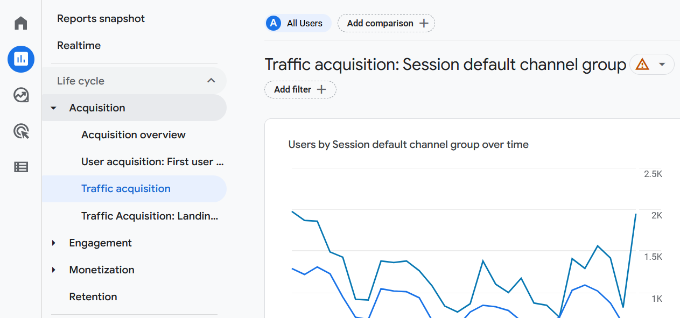
You should now see traffic from different sources on your website, such as organic search, email, display, and more.
You can use the search bar to filter the traffic source for your custom campaign. For example, if you’re tracking conversions from a newsletter, then you can look up ‘Email’ in the report.
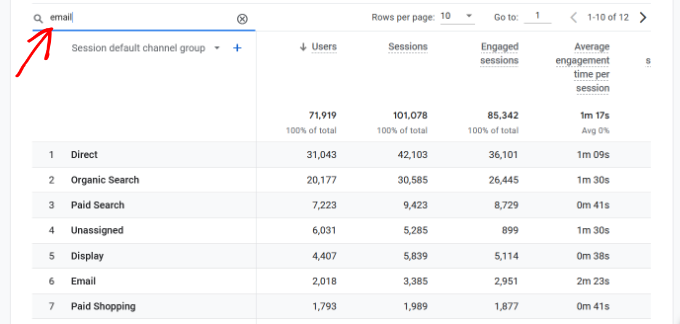
After that, you further drill down and filter your traffic.
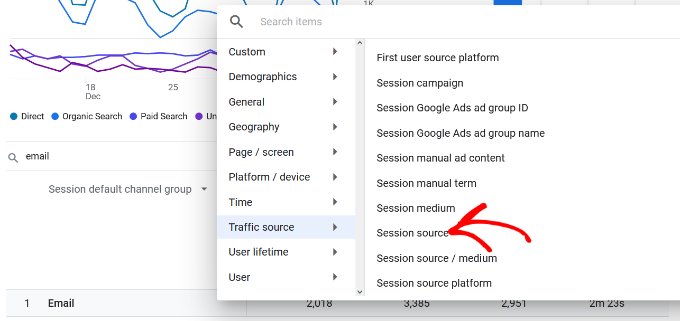
Simply click the ‘+’ button under the search bar.

GA4 will then show different options to filter your traffic.
You can select Traffic source » Session source from the dropdown list.
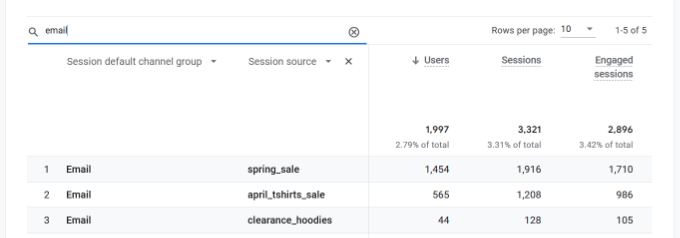
Next, Google Analytics will list your email campaigns.
You can now see which campaign performs best and gets the most conversions.
Viewing UTM Parameter Reports in Universal Analytics
In Universal Analytics, you can track the conversions of your campaigns under your Google Analytics dashboard.
Simply switch to the Acquisition » Campaigns » All Campaigns report.
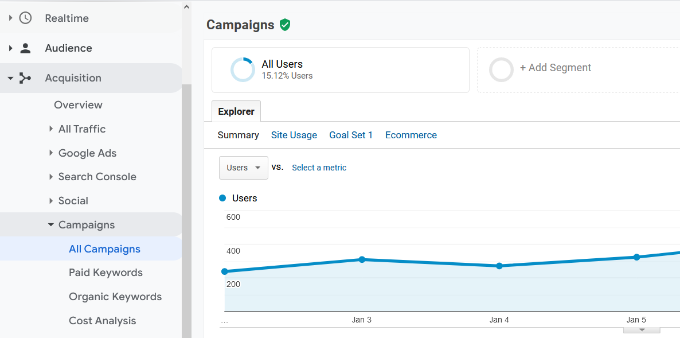
Your campaigns will appear here.
You can click on any of them to drill down further.

Setting Up Facebook Conversion Tracking in WordPress
Facebook is the largest social media website on the planet, with billions of active users. This is why Facebook ads are sometimes the easiest way to reach a niche audience.
Now, if you are running Facebook ads, then you may want to see how well your ads are doing by implementing conversion tracking for your Facebook ads.
Usually, you’d need to add a code snippet to your WordPress website to track Facebook conversions. However, WPCode makes it very simple, and you can simply enter the Facebook Pixel ID to set up tracking.
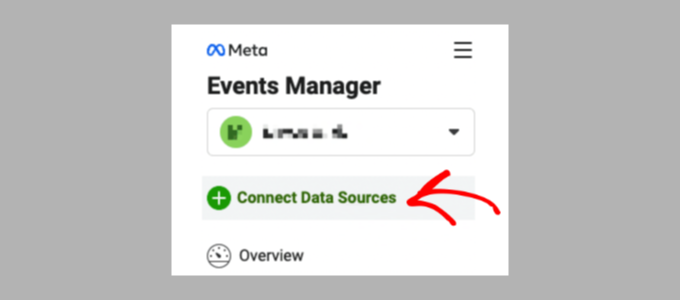
First, you’ll need to log in to Facebook and visit the Meta Business Suite. Then, click on All Tools » Events Manager.
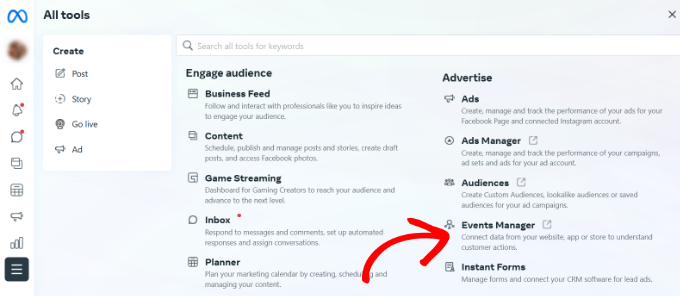
Next, you need to add a data source to the Event Manager.
Simply click the ‘+ Connect to Data Sources’ button in the left-hand menu.
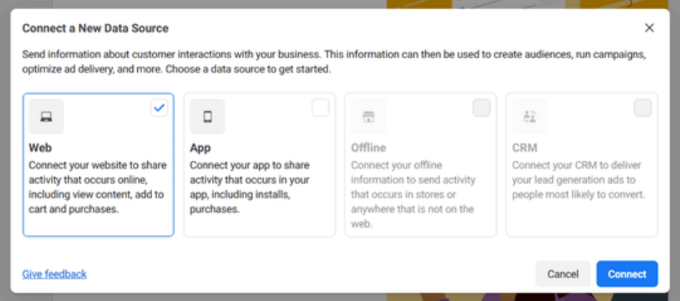
You should now see different options to connect your new data source.
Go ahead and select the ‘Web’ option and click the ‘Connect’ button to continue.
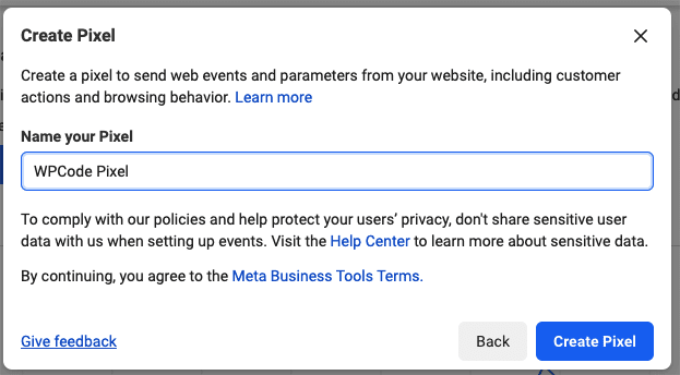
After that, enter a name for your pixel.
Once that’s done, you can click the ‘Create Pixel’ button.
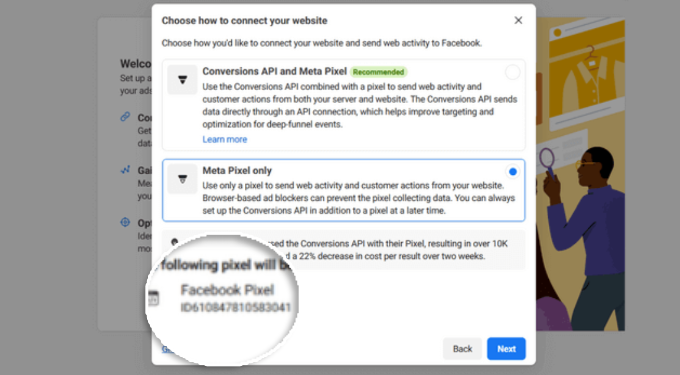
Next, you need to choose how to connect your website and send activity to Facebook.
At the bottom, you will see the Facebook Pixel. Go ahead and copy the pixel ID.
Next, you can return to your WordPress website dashboard and install and activate the WPCode Free Plugin plugin. For more details, see our step-by-step guide on how to install a WordPress plugin.
Note that you’ll need at least the WPCode Plus plan because it includes the Conversion Pixel Addon. However, there is also a free version of WPCode you can use to get started.
Upon activation, you need to visit the Code Snippets » Conversion Pixel page and go to the Facebook tab. From here, you need to paste the Facebook Pixel ID in the respective field.
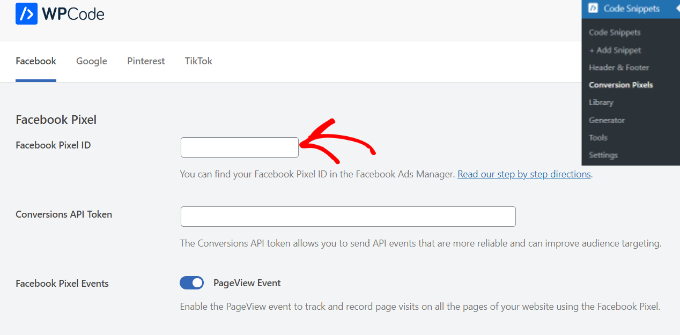
WPCode will now automatically add the code to your site that’s needed to track Facebook ad conversions.
Setting Up Twitter Conversion Tracking in WordPress
If you run Twitter Ads to promote your business, then you’ll need to set up Twitter conversion tracking to measure the success of your ads.
Simply log in to your Twitter Ads account and click on the Tools » Event manager from the menu at the top.
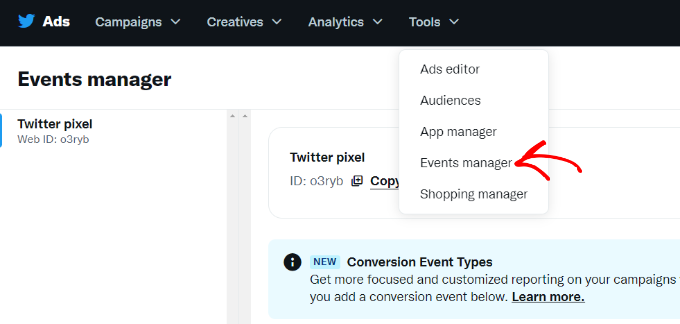
You should now see a pixel created by Twitter.
Go ahead and click the ‘View Twitter Pixel’ option.

On the next screen, you will see different options to add the Twitter pixel to your site.
You can use the ‘Pixel Code’ method and simply copy the code.
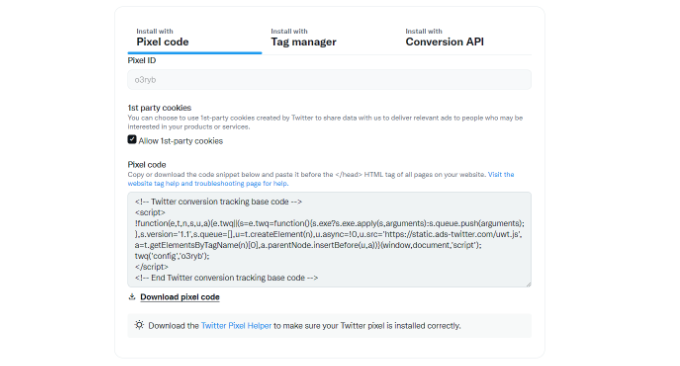
You will need to add this code to the header of your WordPress site.
First, you need to switch back to your WordPress website’s admin area.
If you haven’t already done so, then go ahead and install and activate the WPCode plugin. For more details, please see our guide on how to install a WordPress plugin.
Upon activation, you need to visit the Code Snippets » Header & Footer page. Now you can paste the Twitter pixel code into the Header section.
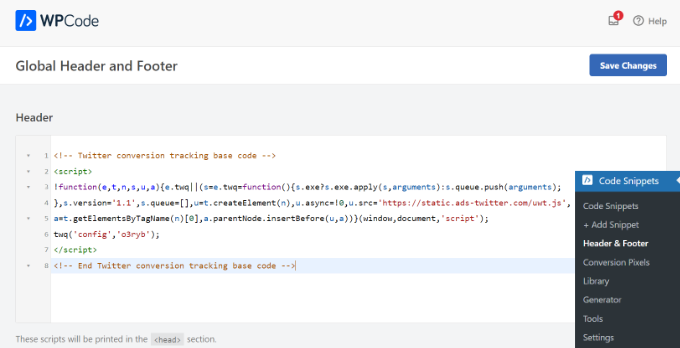
Don’t forget to click the ‘Save Changes’ button to store your settings.
After you have successfully installed the pixel code, you can track conversions on your Twitter Ads account.
Setting Up Goals for Conversion Tracking in Universal Analytics
An important thing to note is that the new Google Analytics 4 version doesn’t have goals anymore. It is one of the major differences you’ll see between the new and old versions.
Goals were used in Universal Analytics to track different user interactions. However, the way new Google Analytics works, goals are replaced with events.
Viewing Your Goal Conversions in Universal Analytics
While there isn’t an option to set up goals in Google Analytics, you can still access your old data in Universal Analytics if you have goals set up.
Simply, go to the Conversions » Goals and then click on Overview.

Like all Google Analytics reports, you can drill down to view visitor journeys and get deeper insights.
For more details, see our guide on how to set up Google Analytics goals for your WordPress website.
Optimizing Conversion Rates to Boost Sales
Once you start tracking conversions on your website, the next step is to improve those conversion rates.
You’d be surprised how little things can make a huge impact on your business.
The best way to improve your conversions is by using OptinMonster. It is the best conversion optimization software on the market and helps you convert more visitors into customers.
OptinMonster comes with tools like lightbox popups, fullscreen welcome mats, countdown timers, slide-in boxes, and more.
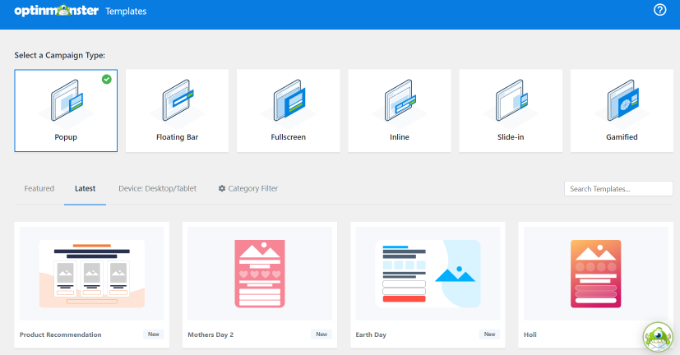
It integrates with any email marketing service and works with all popular eCommerce platforms.
OptinMonster’s display rules allow you to show targeted messages to your customers at the precise time and nudge them into making a buying decision.

For instance, if you notice that customers are leaving a product page without taking any action, then you can offer them a discount when they are about to exit.
Similarly, you can run time-sensitive campaigns to trigger the FOMO effect and give customers a nudge in the right direction.
For more practical tips, see our guide on how ways to recover WooCommerce abandoned cart sales.
We hope this guide helped you set up conversion tracking in WordPress. You may also want to see our comparison of the best email marketing services and the ultimate guide to WordPress speed and performance.
If you liked this article, then please subscribe to our YouTube Channel for WordPress video tutorials. You can also find us on Twitter and Facebook.


David Lim
It is true that there are people who use UTM parameters for internal links as well, but is this a bad practice overall? What could be the meaning of this?
WPBeginner Support
It is not specifically a bad practice. If you are getting useful information for your needs then it can be a helpful tool for understanding when someone uses a link from a specific page.
Admin
Dayo Olobayo
I really appreciate this step-by-step guide on WordPress conversion tracking. I have a question regarding the use of UTM parameters. How do I ensure that the UTM parameters are correctly set up for my campaigns, especially when running multiple ads across different platforms?
WPBeginner Support
Having descriptive names for your UTM parameters to help you test if a url is used when testing a campaign.
Admin
Mrteesurez
One of the things I like about Google Analytics is the events tracking functionality, it gives an opportunity to know what action are users taking in a website.
Also, I have been seen UTM stuffs before but today I can see a way to use it.
My question: If I set tracking for Facebook and Twitter, where will I see the Analytics or conversion results, is it inside WPcode or where ??
WPBeginner Support
You would see the information in Google Analytics or if you are using a plugin like MonsterInsights you should see information in the plugin for your conversion tracking.
Admin
Ahmed Omar
A brilliantly simplified step-by-step guide to WordPress conversion tracking
The detailed instructions, especially the breakdown of tracking goals and events, make it easy for any user.
Monster insight has proven to be a gem in my toolkit.
Thank you
Moinuddin Waheed
Conversion tracking of the products and services we offer is very important in order to measure the exact impact of the different platforms and sources of conversion. it not only helps in our better understanding of how the different platforms performing but also in optimizing our efforts in the right direction.
I wa not aware that there is this much option available to track our conversion rate inside our dashboard itself.
Very helpful article in terms of its impact in increasing and growing the business.
WPBeginner Support
Glad we could share this helpful article
Admin
alessandro
Great post, thnks for the informations
WPBeginner Support
You’re welcome!
Admin
Mtalula Mohamed
I met this post at a time I needed it the most. Thank you wpbeginner for this post, I will definitely implement this for my blog and an ecommerce.
WPBeginner Support
Glad our article was helpful!
Admin
Vince Png
Great post! I have always wanted to work on improving conversion on my affiliate website but find the topic dauting. this guide will come in handy.
WPBeginner Support
Glad we could make the process simpler!
Admin
Sacha C.
Great article! Conversion tracking is an essential aspect of measuring the effectiveness of your marketing efforts and understanding user interactions on your website. I’m glad you’re providing a guide on how to add conversion tracking in WordPress, as it can be a valuable tool for businesses looking to optimize their online presence.
Thanks for your guide
WPBeginner Support
Happy to hear you found our guide helpful!
Admin
hafid
May I know what plugin you use to create the table of the contents? Or you create manually? Do you have some tips on how to point to the exact position? Thanks in advance.
WPBeginner Support
We created ours manually, you can see our guide on anchor links below:
https://www.wpbeginner.com/beginners-guide/how-to-easily-add-anchor-links-in-wordpress-step-by-step/
Admin