For people just starting out with WordPress, learning to use code snippets can open up a whole new world of possibilities, helping you tailor your website to your specific needs.
While developing our own website, we have often used code snippets for customization within our admin panel and front-end display.
With this guide, our goal is to make these powerful tools accessible to beginners by carefully selecting and explaining useful WordPress code snippets that you can start using right away.
We have thoroughly tested these snippets on real websites to ensure they work as intended and don’t produce any errors.
In this article, we will share our list of the most useful WordPress code snippets for beginners.

Why Add Code Snippets in WordPress?
If you have a WordPress website, then adding some useful code snippets to your theme files or a code snippets plugin can help you unlock limitless customization and make your site stand out.
You can use custom code to tailor some specific elements on your website. For example, you might change the text selection color in WordPress by adding a simple CSS code snippet.
As a beginner, adding some useful code snippets can also enhance the performance and speed of your site by reducing the need for multiple plugins.
Other than that, snippets can help you expand your coding skills and access the vast library of code snippets that the WordPress community shares for free.
Having said that, let’s take a look at some of the most useful WordPress code snippets for beginners. You can use the quick links below to jump to different parts of our tutorial:
- Allow SVG File Upload
- Disable the WP Admin Bar
- Remove WordPress Version Number
- Add Featured Images to RSS Feeds
- Disable Automatic Updates Email
- Change 'Howdy, Admin' in the Admin Bar
- Disable XML-RPC
- Disable Automatic Trash Emptying
- Change Excerpts Length
- Disable Site Admin Email Verification
- Disable Automatic Updates
- How to Add Code Snippets in WordPress (Easy Method)
- Frequently Asked Questions About WordPress Code Snippets
1. Allow SVG File Upload
SVG (Scalable Vector Graphics) is a file format that defines vector graphics using the XML markup language. This format allows you to enlarge images without losing any quality.

These files are smaller and more lightweight than JPEG or PNG, helping you boost your website speed.
However, WordPress does not allow SVG file uploads by default because SVGs can contain malicious code that compromises site security.
With that in mind, if you still want to upload SVG files on your website, then you can add the following code snippet to your site:
/**
 * Allow SVG uploads for administrator users.
 *
 * @param array $upload_mimes Allowed mime types.
 *
 * @return mixed
 */
add_filter(
	'upload_mimes',
	function ( $upload_mimes ) {
		// By default, only administrator users are allowed to add SVGs.
		// To enable more user types edit or comment the lines below but beware of
		// the security risks if you allow any user to upload SVG files.
		if ( ! current_user_can( 'administrator' ) ) {
			return $upload_mimes;
		}

		$upload_mimes['svg']  = 'image/svg+xml';
		$upload_mimes['svgz'] = 'image/svg+xml';

		return $upload_mimes;
	}
);

/**
 * Add SVG files mime check.
 *
 * @param array        $wp_check_filetype_and_ext Values for the extension, mime type, and corrected filename.
 * @param string       $file Full path to the file.
 * @param string       $filename The name of the file (may differ from $file due to $file being in a tmp directory).
 * @param string[]     $mimes Array of mime types keyed by their file extension regex.
 * @param string|false $real_mime The actual mime type or false if the type cannot be determined.
 */
add_filter(
	'wp_check_filetype_and_ext',
	function ( $wp_check_filetype_and_ext, $file, $filename, $mimes, $real_mime ) {

		if ( ! $wp_check_filetype_and_ext['type'] ) {

			$check_filetype  = wp_check_filetype( $filename, $mimes );
			$ext             = $check_filetype['ext'];
			$type            = $check_filetype['type'];
			$proper_filename = $filename;

			if ( $type && 0 === strpos( $type, 'image/' ) && 'svg' !== $ext ) {
				$ext  = false;
				$type = false;
			}

			$wp_check_filetype_and_ext = compact( 'ext', 'type', 'proper_filename' );
		}

		return $wp_check_filetype_and_ext;

	},
	10,
	5
);
You can add this code to your theme’s functions.php file or use a code snippets plugin like WPCode. Later on in this article, we will show you exactly how to do this.
For more detailed instructions, you can see our tutorial on how to add SVG image files in WordPress.
2. Disable the WP Admin Bar
By default, WordPress shows an admin bar at the top of your website to all logged-in users, including subscribers, authors, editors, and any other user roles.
This admin bar can direct them to your WordPress dashboard, where they can make any changes to your site depending on their user permissions.
However, it can be a bit distracting when you are looking at the front end of your website because it can sometimes overlap with design elements like the header.
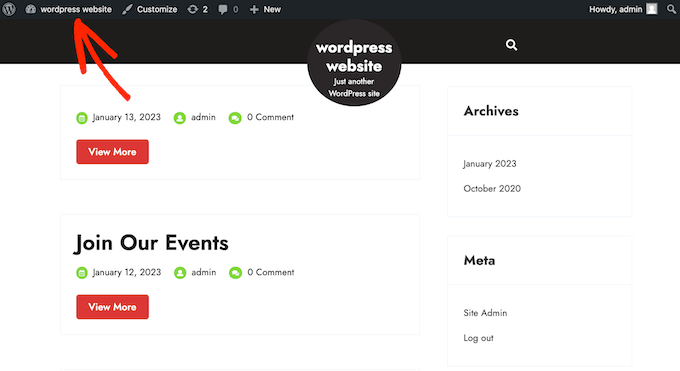
To disable the WP admin bar, simply add the following PHP code snippet to your WordPress site:
/* Disable WordPress Admin Bar for all users */
add_filter( 'show_admin_bar', '__return_false' );
Upon code execution, the admin bar won’t display on the website’s front end.
However, if you want the admin bar to be removed for everyone but the administrator, then you can see our tutorial on how to disable the WordPress admin bar for all users except administrators.
3. Remove WordPress Version Number
WordPress displays the current WordPress version number on your website for tracking.
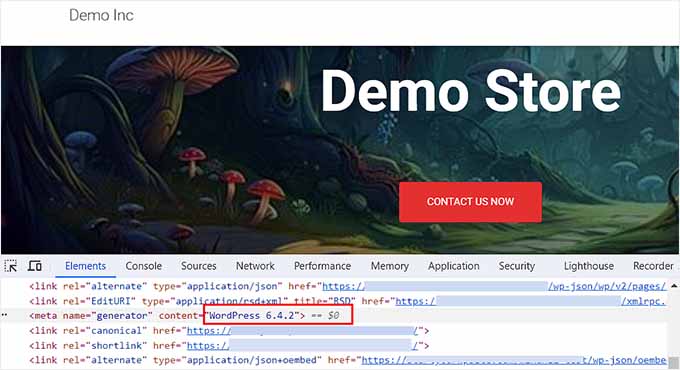
However, sometimes, this footprint can cause security leaks by telling the hackers about the WordPress version in use. The hackers can then target known vulnerabilities in specific versions.
To remove the version number, add the following code snippet to your website:
add_filter('the_generator', '__return_empty_string');
Once you do that, hackers will not be able to guess your WordPress version with automatic scanners and other less sophisticated attempts.
For more detailed instructions, you can see our tutorial on the right way to remove the WordPress version number.
4. Add Featured Images to RSS Feeds
RSS feeds allow users to receive regular updates about your WordPress blog with a feed reader like Feedly.
This can help promote your content and drive more traffic to your site. By adding featured images or thumbnails next to the posts in the RSS feeds, you can make the feed visually appealing and further improve the user experience.

You can easily show posts thumbnails in your RSS feeds by adding the following useful WordPress code snippet:
/**
 * Add the post thumbnail, if available, before the content in feeds.
 *
 * @param string $content The post content.
 *
 * @return string
 */
function wpcode_snippet_rss_post_thumbnail( $content ) {
	global $post;
	if ( has_post_thumbnail( $post->ID ) ) {
		$content = '<p>' . get_the_post_thumbnail( $post->ID ) . '</p>' . $content;
	}

	return $content;
}

add_filter( 'the_excerpt_rss', 'wpcode_snippet_rss_post_thumbnail' );
add_filter( 'the_content_feed', 'wpcode_snippet_rss_post_thumbnail' );
This can make your feed more engaging and bring back visitors to your site.
For more detailed information, please see our tutorial on how to add post thumbnails to your WordPress RSS feeds.
5. Disable Automatic Update Emails
By default, WordPress sends you an email notification every time it automatically updates any plugins, themes, or the core itself.
This can get super annoying if you have multiple WordPress sites and are constantly seeing these notifications upon opening your email account.
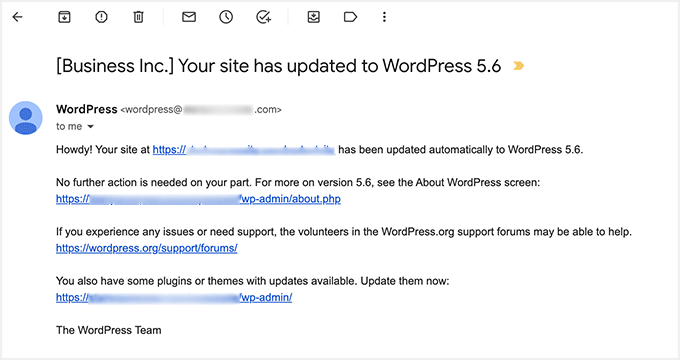
In that case, you can easily disable automatic update emails by adding the following PHP code snippet to your website:
// Disable auto-update emails.
add_filter( 'auto_core_update_send_email', '__return_false' );

// Disable auto-update emails for plugins.
add_filter( 'auto_plugin_update_send_email', '__return_false' );

// Disable auto-update emails for themes.
add_filter( 'auto_theme_update_send_email', '__return_false' );
Once you do that, you won’t receive any notifications for plugin or theme auto updates.
For detailed instructions, see our step-by-step tutorial on how to disable automatic update email notifications in WordPress.
6. Change ‘Howdy, Admin’ in the Admin Bar
When you log in to your WordPress dashboard, you will be greeted with a ‘Howdy’ followed by your display name at the top right corner of the screen.
This greeting may not sound natural to you or look outdated, or even a bit annoying.
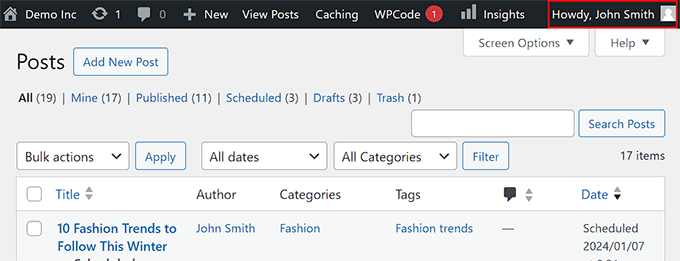
You can easily change the greeting in the admin bar by adding the following code snippet to your WordPress site:
function wpcode_snippet_replace_howdy( $wp_admin_bar ) {

	// Edit the line below to set what you want the admin bar to display intead of "Howdy,".
	$new_howdy = 'Welcome,';

	$my_account = $wp_admin_bar->get_node( 'my-account' );
	$wp_admin_bar->add_node(
		array(
			'id'    => 'my-account',
			'title' => str_replace( 'Howdy,', $new_howdy, $my_account->title ),
		)
	);
}

add_filter( 'admin_bar_menu', 'wpcode_snippet_replace_howdy', 25 );
Once you add the code, you must also add a greeting of your liking next to the $new_howdy = line in the code.
For more information, you can see our tutorial on how to change or remove ‘Howdy Admin’ in WordPress.
7. Disable XML-RPC
XML-RPC is a core WordPress API. It allows users to connect to their websites with third-party services.
For instance, you will need to enable XML-RPC if you want to use an automation tool like Uncanny Automator or a mobile app to manage your website.
However, if you don’t want to use any of these functionalities, we recommend disabling XML-RPC to prevent hackers from accessing your website.
Hackers can use these vulnerabilities to find your login credentials or launch DDoS attacks.
To disable XML-RPC, you can use the following code snippet on your website:
add_filter( 'xmlrpc_enabled', '__return_false' );
If you need more information, then you can see our tutorial on how to disable XML-RPC in WordPress.
8. Disable Automatic Trash Emptying
WordPress deletes anything that has been in the trash for more than 30 days, including posts, pages, and media files.
However, some users may not want to empty their trash automatically so they can recover deleted files at any time.

In that case, you can add the following code snippet to your WordPress site:
add_action( 'init', function() {
    remove_action( 'wp_scheduled_delete', 'wp_scheduled_delete' );
} );
Upon adding this code, you will now have to manually empty your trash. For more details, you can see our tutorial on how to limit or disable automatic trash emptying in WordPress.
9. Change Excerpt Length
Excerpts are the first few lines of your blog posts displayed under the post headings on your WordPress home, blog, or archives page.
You may want to shorten your excerpt to create intrigue among users and encourage them to click on the post to find out more.
Similarly, you can increase the length to give more context and key information to readers without having to click on the post.

To change the excerpt length, just add the following code snippet to your website:
add_filter(
	'excerpt_length',
	function ( $length ) {
		// Number of words to display in the excerpt.
		return 40;
	},
	500
);
By default, this snippet will limit the excerpt to 40 words, but you can adjust the number on Line 5 to whatever works best for your blog.
For more information, see our beginner’s guide on how to customize WordPress excerpts.
10. Disable Site Admin Email Verification
By default, WordPress sends an admin verification email to site administrators every few months to verify if the email they use is still correct.
However, sometimes this notice can be sent to you more often than necessary, which can be annoying.
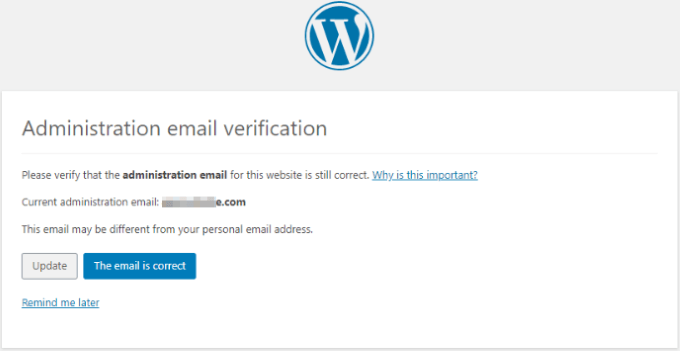
Fortunately, you can disable the admin email verification notice by adding the following code snippet to your WordPress site:
add_filter( 'admin_email_check_interval', '__return_false' );
For detailed instructions, check our tutorial on how to disable the WordPress admin email verification notice.
11. Disable Automatic Updates
WordPress automatically updates its core software, plugins, or themes to reduce security threats, malware infections, website breaches, and data theft.
However, automatic updates can sometimes introduce compatibility issues or break your website in rare situations.
In that case, you can use the following code snippet to disable automatic updates:
// Disable core auto-updates
add_filter( 'auto_update_core', '__return_false' );
// Disable auto-updates for plugins.
add_filter( 'auto_update_plugin', '__return_false' );
// Disable auto-updates for themes.
add_filter( 'auto_update_theme', '__return_false' );
This will disable all the WordPress automatic updates for the core software, themes, and plugins. For detailed information, see our tutorial on how to disable automatic updates in WordPress.
How to Add Code Snippets in WordPress (Easy Method)
Now that you know the most useful WordPress code snippets for beginners, you can easily add them to your theme’s stylesheets or functions.php file.
However, remember that the smallest error while typing the code can break your site and make it inaccessible. Plus, if you switch to a different theme, then all your custom code will be lost and you will have to add it again.
That is why we always recommend using WPCode.

We use WPCode to extend the functionality of our WordPress sites, and we’ve found that it makes it super easy to safely add custom code to your website.
Plus, the plugin also comes with a library of over 900 code snippets, including all the ones that we have mentioned above. For more information, see our complete WPCode review.
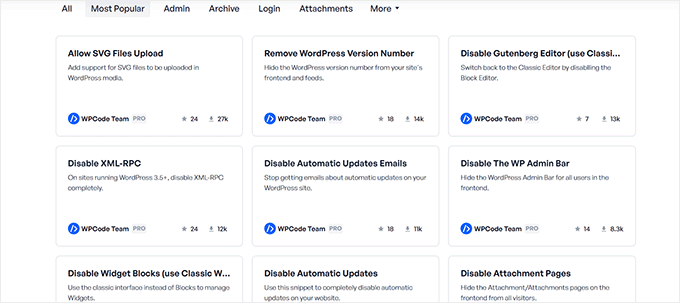
First, you need to install and activate the WPCode plugin. For detailed instructions, see our tutorial on how to install a WordPress plugin.
📒 Note: There is also a free WPCode plugin that you can use. However, upgrading to the premium plugin will give you access to a cloud-based snippets library, code revisions, and more.
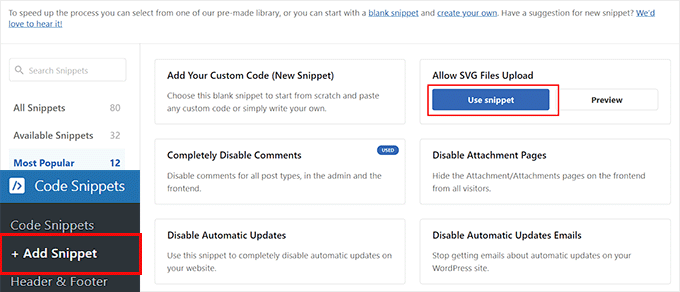
Upon activation, visit the Code Snippets » + Add Snippet page from the WordPress dashboard.
This will take you to the snippet library, where you can add custom code to your website by clicking the ‘Use Snippet’ button under the ‘Add Your Custom Code (New Snippet) option.
However, if you want to use a premade code snippet, then you can simply click the ‘Use Snippet’ button under that option.
If you are adding a custom code snippet, then you simply need to paste it into the ‘Code Preview’ box.
Then, scroll down to the ‘Insertion’ section and choose the ‘Auto Insert’ mode. The code will be automatically executed on your website upon snippet activation.

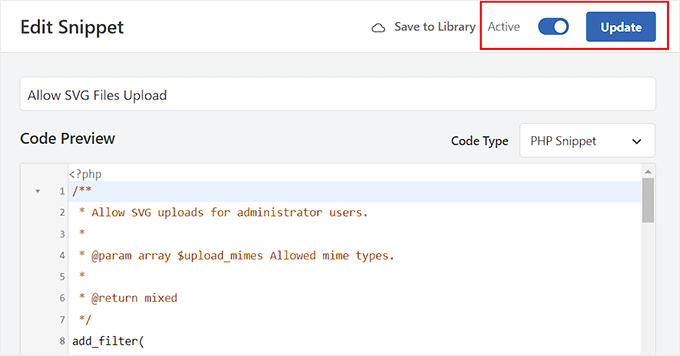
Finally, visit the top of the page and toggle the inactive switch to active. After that, just click the ‘Update’ button to store your settings.
You have now successfully added the code snippet to your WordPress site.
For more detailed instructions, see our beginner’s guide on how to easily add custom code in WordPress.
💡 Expert Tip: If you’re scared of using custom code to customize your website, then don’t worry because we’ve got you covered.
WPBeginner is now offering Website Design Services at super affordable pricing. With a dedicated project manager, we bring your ideas to life.
Whether you are looking for a simple blog or a full WooCommerce store, our team will set up your WordPress site. We’ll also make sure it’s as successful as possible by building it with SEO in mind.
See our WPBeginner Pro Services page for more information!
Frequently Asked Questions About WordPress Code Snippets
Here is a list of some questions frequently asked by our readers about using custom code and code snippets in WordPress.
How do I display code on my WordPress site?
If you write blog posts about technical topics, then adding code snippets to your posts can be useful. To do this, you must open the page/post where you want to display the code snippet and click the add block ‘+’ button.
Once you do that, just insert the Code block from the block menu and then add your custom code into the block itself.
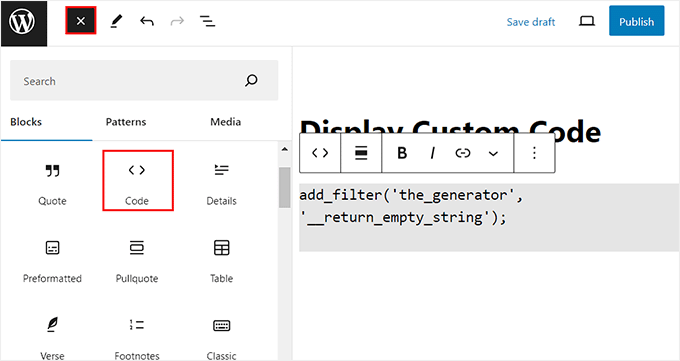
Finally, click the ‘Publish’ or ‘Update’ button at the top to store your changes.
The code snippet will now be displayed on your WordPress site. For detailed instructions, see our tutorial on how to easily display code on your WordPress site.
How do I create a WordPress website from scratch without coding?
If you want to create a website from scratch without using any code, then you can use SeedProd.
It is the best WordPress page builder on the market that lets you create custom themes and landing pages without any coding.
We’ve used it ourselves to build entire websites, and we’ve had great experiences with it. To find out more, see our SeedProd review.

The plugin comes with 300+ premade templates, a drag-and-drop builder, and numerous advanced blocks that allow you to build an attractive website with just a few clicks.
For details, you can see our tutorial on how to create a landing page in WordPress.
Where can I get WordPress code snippets?
You can use WPCode’s library to access over 900 code snippets that you can add to your website easily.
However, if you are not using WPCode, then you can also get prewritten code snippets from websites like Stack Overflow, CodePen, or GenerateWP.
We hope this article helped you find the most useful WordPress code snippets for beginners. You may also want to see our tutorial on how to easily add JavaScript to WordPress pages or posts and our top picks for the best WordPress theme builders on the market.
If you liked this article, then please subscribe to our YouTube Channel for WordPress video tutorials. You can also find us on Twitter and Facebook.


Dennis Muthomi
I love the security bits, like disabling XML-RPC and removing the WordPress version number.
Those are small things that can make a big difference. One that caught my eye was allowing SVG file uploads. and heads about SVGs can contain malicious code.
Thanks for compiling these and explaining what they do so well! I bookmarked for future reference, it’s so valuable
David Lim
Personally, I find the snippets very useful with WPCode. They make my life easier.
Funny story, once I changed the welcome text on a colleague’s Wordpress admin interface and he got a bit scared because he thought that the admin interface was dominated by some AI.
Oyatogun Oluwaseun Samuel
This series of code shared here are of immense benefits, these are action that (for me) required fiddling with wordpress code but wpcode plugin is changing the way one works. Thanks so much for this beneficial article.
Mrteesurez
I know it maybe sometime beneficial for someone to disable trash delete but I want to ask if one retains all the trash posts, won’t they take up a substantial space in the server and what might be the implications ?
WPBeginner Support
It can take up space if it is large posts going to the trash and staying but it would depend on the type of site as not all sites use posts the same way.
Admin
Jiří Vaněk
The articles themselves in the database don’t take up that much space. Therefore, I shouldn’t have an exaggerated fear of disabling automatic trash deletion. Many people are afraid that it will take up a lot of space in MySQL or on FTP, but a much bigger problem is, for example, revisions if they are not regularly removed. I have about 1300 articles on the website, and I have automatic trash deletion disabled. So far, it hasn’t significantly affected the size of the website. So you don’t have to worry about it that much.
Hajjalah
I used to get too many failed login attempts by hackers to my website but after implementing ” Disable XML-RPC ” my website no-longer gets a single failed login attempts from hackers. This worked out like magic indeed.
I highly credit and recommend this guide because all codes on this article are absolutely a must for all WordPress websites to function well. Thanks WPBeginner.
WPBeginner Support
Glad to hear it helped you!
Admin
Mrteesurez
WPcode is promising, I have been using it since when it was WP header and footer plugin. I recommend to use WPcode to add these code snippets as it will be easier and saver so as not to break things in your site if you are not a tech savvy.
Michael Sneed
Howdy, er, Hello!
Awesome tutorial! There are a lot of great snippets that are must haves for security!
Keep up the great work!
Cheers!
WPBeginner Support
Happy to hear you found our list helpful
Admin
Syed Shan Shah
Was looking for RSS Code snippet. Thanks for sharing
WPBeginner Support
You’re welcome, glad our snippet was helpful
Admin
Jiří Vaněk
I’ve noticed that many of these snippets already include WPCode itself, and I’m already using some of them as well. The great thing about this plugin is that it includes a similar database of snippets already in its native settings and is really very easy to use. Thanks to WPCode, I saved space for several plugins that would otherwise have to do the same thing as a simple snippet.