We have all seen online stores that are so slow that we changed our minds and looked for alternatives.
If this happens to your WooCommerce store, then it will cost you money and potential sales.
Speed is critical for online stores. A faster-loading WooCommerce store keeps customers engaged and encourages them to complete purchases.
In this guide, we will share practical and easy-to-follow tips that we’ve used to optimize WooCommerce performance for online stores. These steps can help improve your store’s speed, user experience, and conversions.
Why Is WooCommerce Speed Important?
On our own online stores, we have run tests to see what stops users from making a purchase.
We learned that speed can boost user satisfaction, time spent on site, and increased sales. It plays a vital role in creating a smooth shopping experience for your online store.
Studies show that even a 1-second delay in page loading can lead to a 7% drop in conversions and a 16% decline in customer satisfaction. That’s a significant impact for any business.
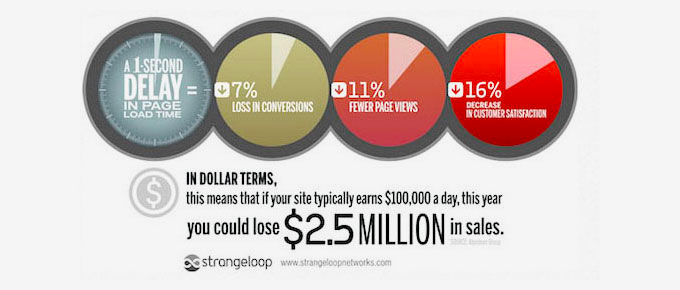
Over 73% of users will switch to a competitor if a website loads too slowly. This can directly reduce conversions and hurt your revenue.
Page speed also affects your SEO rankings. Search engines like Google consider site speed as a key ranking factor, making it even more important to prioritize performance.
WooCommerce is an excellent eCommerce platform, designed for speed and efficiency. However, optimizing your store further can unlock additional performance benefits, leading to higher sales, conversions, and happier customers.
To evaluate your store’s speed, you can use tools like IsItWP’s free speed test tool, GTMetrix, or Pingdom. These tools help measure page load times and identify areas for improvement.
💡Need expert help? Check out our WooCommerce Speed Optimization service. Hire expert engineers to optimize your store for faster page loading so you can focus on growing your business and sales.
With that in mind, let’s dive into actionable tips to improve WooCommerce speed and performance:
- Upgrade Your WooCommerce Hosting
- Set up Caching for Your WooCommerce Store
- Keep WooCommerce Updated
- Optimize Product Images in WooCommerce
- Choose a Faster Loading WooCommerce Theme
- 6. Replace Poorly Coded Plugins & Extensions
- Use The Latest PHP Version
- Turn On a DNS Level Firewall
- Use an SMTP Service to Send WooCommerce Emails
- Upgrade Conversion Optimization Tools
- Optimize WooCommerce Database
- Optimize JavaScript and CSS Files
- Bonus Resources
1. Upgrade Your WooCommerce Hosting
We run several online businesses, and their success depends on reliable performance. Over the years, we have learned that choosing the right hosting provider makes the biggest difference.
For online stores running WooCommerce, a reliable host ensures faster load times and a better overall user experience.
Hosting is where all your WooCommerce files are stored. If the hosting provider doesn’t offer an optimized platform, it can lead to slower page loads and an unsatisfactory shopping experience for your customers.
Even the best WooCommerce optimization tips won’t work effectively without solid WooCommerce hosting. It’s the foundation of your store’s speed and reliability.
If you’re just starting out, we recommend using SiteGround. They are an officially recommended WooCommerce hosting provider and have consistently impressed us with their speed and customer support.
WPBeginner users can take advantage of a special discount when using our SiteGround coupon. Their hosting includes powerful features like Ultrafast PHP, eCommerce caching, and easy upgrades to VPS hosting for scaling your business.
If you’re looking for alternatives, we also recommend Hostinger. For those who can afford to spend a little more, we recommend WordPress.com (the Commerce plan gives you WooCommerce support) or Rocket.net.
Need help migrating your WooCommerce store? We’ve got you covered.
Follow our step-by-step guide on how to move WordPress to a new host without downtime.
2. Set up Caching for Your WooCommerce Store
WooCommerce runs on top of WordPress. It automatically generates pages when a user visits your website.
This means more people visiting your WooCommerce site will keep your hosting server busier for longer.
Caching helps you solve this issue.
Instead of generating pages on the fly, it serves your users a static copy it has stored.
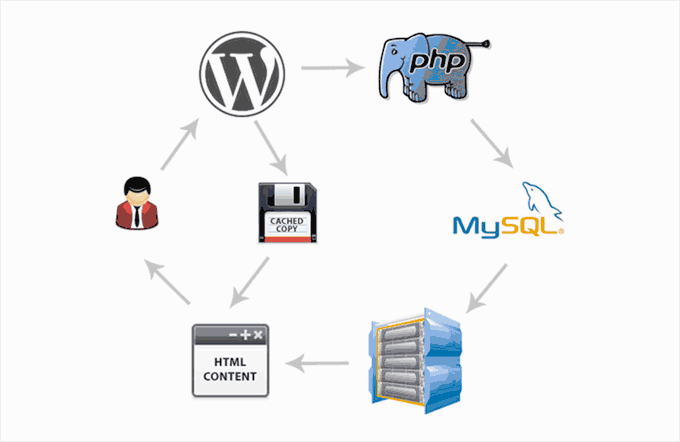
This frees up your website server resources, making it faster and more responsive.
The best way to add caching to your WooCommerce store is by using WP Rocket. It is the best WooCommerce caching and performance plugin on the market that is incredibly powerful yet totally beginner-friendly.
We use WP Rocket on our own websites and have found it to be incredibly powerful. For more details, see our complete WP Rocket review.
Simply install and activate the WP Rocket plugin.
Once installed, it will automatically generate a cache and apply WooCommerce-related settings.
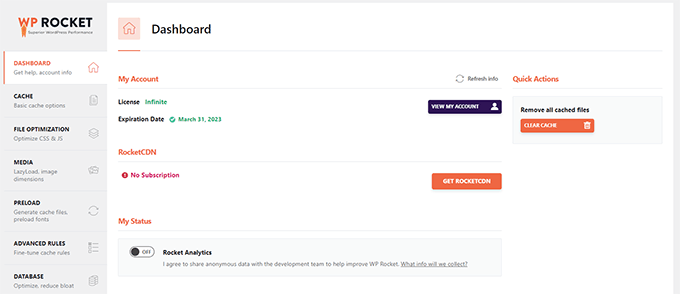
For more details, check out our tutorial on how to set up WP Rocket in WordPress.
WP Rocket proactively caches your WooCommerce store pages, includes lazy loading for images, and serves pages with gzip compression.
It also follows Google’s core web vitals guidelines to improve your speed test scores in page speed insights and other Google speed test metrics.
Most importantly, it will exclude important pages from the cache, like a customer’s checkout page, shopping cart, and account page.
Alternatives: Some free alternative WordPress caching plugins are WP Super Cache, or LiteSpeed Cache (highly recommended if your site is hosted on Hostinger or other hosting platforms that use Litespeed servers instead of Nginx or Apache). Your hosting service provider may also offer their own built-in caching options that are made specially for their hosting servers.
3. Keep WooCommerce Updated
WooCommerce frequently releases new versions. These new versions fix bugs and introduce new features, and they also improve website performance.
Make sure that your WooCommerce version is always up to date.
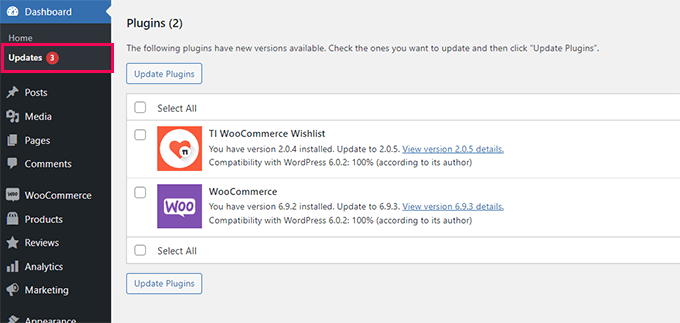
However, WooCommerce relies on WordPress and the whole ecosystem of your theme and plugins. Updating WooCommerce alone doesn’t mean that you are using the latest software for your online store.
You’ll also need to ensure that you are using the latest version of WordPress and have installed all plugins and theme updates.
It is always necessary to ensure that you have made a complete backup of your WooCommerce website before installing updates in the correct order.
We recommend using Duplicator, as it’s the best backup plugin on the market, used by over 1.5 million website owners. See our guide on how to back up your website for step-by-step instructions.
We use Duplicator on our own websites, including WPBeginner. See our complete Duplicator review for more details.
4. Optimize Product Images in WooCommerce
For an eCommerce website, you need product images to grow your business. However, images take longer to load and impact the speed of your WooCommerce store.
By optimizing your product images, you can significantly reduce their file size without losing quality. This makes all your store pages, product categories, and product pages load faster.
Now, there are several ways to optimize images. The most reliable image optimization tip is to resize and compress them before uploading them to your WooCommerce product.
Most image editing software like Adobe Photoshop allows you to export images for the web.
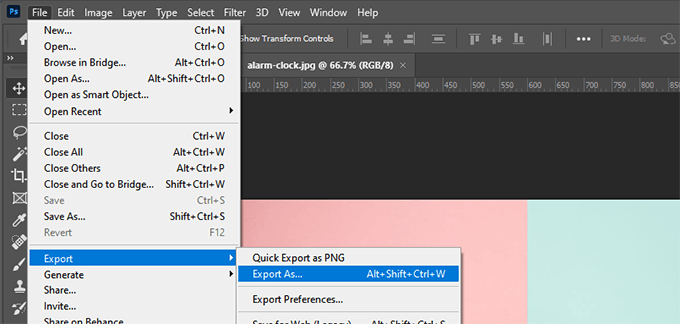
During the export dialog, you can choose the image file format (JPG/JPEG, PNG, GIF) that produces the smallest file size.
Then, you can reduce quality, colors, and other options to decrease file size further.
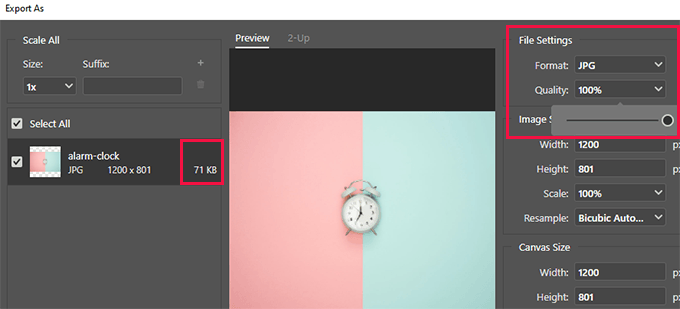
Using your image editing tool to reduce filesize is the most efficient way to improve images on your WooCommerce store.
However, you can also use an image compression plugin to automatically adjust image file sizes.
These WordPress image optimization plugins allow you not only to optimize new images but also let you bulk optimize previously uploaded images. This improves page loading speed for your older product pages and boosts your store’s performance.
For more details, see our tutorial on optimizing images for the web.
5. Choose a Faster Loading WooCommerce Theme
When choosing themes for their WooCommerce stores, many beginners end up choosing the fanciest theme with a ton of bells and whistles.
We understand the reason behind that. Beginners feel they should get a theme that has all the features they want to see in their eCommerce store.
That’s not how themes are supposed to work.

WordPress themes are meant to control only your website’s and WooCommerce store’s appearance, not add features.
When choosing a theme, you should look for options like layout choices, color schemes, WooCommerce support, etc. For functionality, you should use plugins and extensions.
Choosing a theme with tons of plugin-like features can slow down your site speed. The theme would load a lot of extra code you are probably not even using, increasing the page load time.
To learn more, see our article on choosing the perfect theme for your website.
If you need quick theme recommendations, we recommend Astra or simply use SeedProd to create a custom WooCommerce theme without any code (drag & drop page builder).
Do you need to design individual pages? Take a look at Thrive Architect. It comes with dozens of high-quality templates designed for conversions.
Need more ideas? Check out our expert pick of the best WooCommerce themes to find a faster theme for your online store.
6. Replace Poorly Coded Plugins & Extensions
The best part about using WooCommerce is accessing thousands of extensions and WordPress plugins.
As long as they are well-coded, you can install as many plugins as you need without any noticeable performance impact.
However, some poorly coded WordPress plugins can slow down your website. These plugins typically run database-intensive queries or load unnecessary JavaScript and CSS.
You can use plugins like Query Monitor to see the number of queries run on each page load.
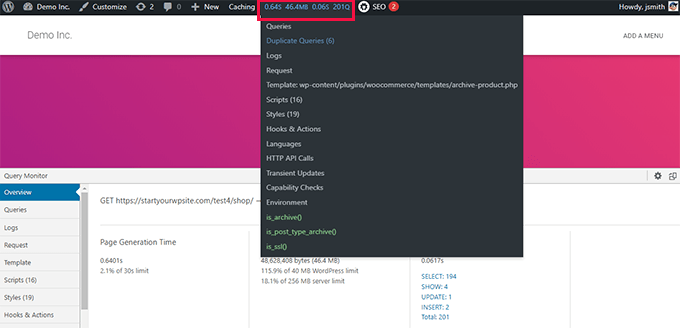
Query Monitor allows you to see the following activity:
- Database queries triggered by a page on your WooCommerce store
- HTTP requests made by scripts in your themes or plugins
- Hooks and actions triggered on a page
- Language, user role checks, and template files used to display the page
- Your hosting environment details, such as PHP and MySQL versions, memory limits, and more.
For more details and step-by-step instructions, see our tutorial on how to add a query monitor in WordPress.
If this doesn’t help, you can simply test your website after deactivating all plugins.
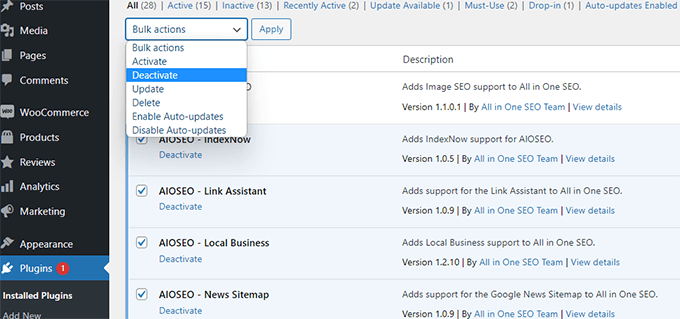
If deactivating plugins suddenly improves WooCommerce performance, you can activate them one by one to figure out which is the culprit.
You can then contact that plugin’s support and let them know about the issue. Meanwhile, you can replace the plugin with an alternate option.
For essential features, take a look at our expert pick of the best WooCommerce plugins that every online store should install.
7. Use The Latest PHP Version
WooCommerce and WordPress are both written using PHP as the main programming language.
PHP is an open-source programming language, just like WordPress. It is regularly maintained by a very active community of developers who frequently release new versions.
They spend a large amount of time and resources on improving PHP performance by making it faster for each new release.
However, WordPress hosting companies are often not as quick to switch to the latest PHP version. They often run several versions behind to ensure software compatibility.
You can see which PHP version is used by your website by visiting the Tools » Site Health page and switching to the ‘Info’ tab.
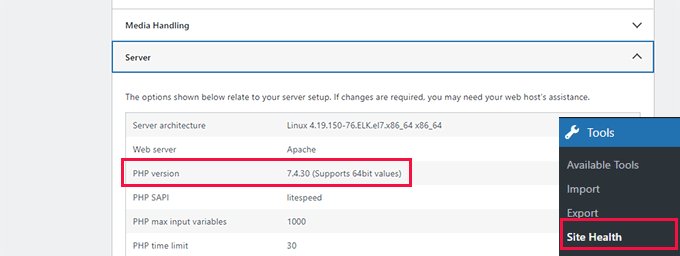
At the time of writing this article, the latest PHP version is 8.3.
All top WordPress hosting providers have easy tools to select which PHP version you want to use on your website.
For instance, on Bluehost, you can go to your hosting control panel and click ‘Settings’ under your website.
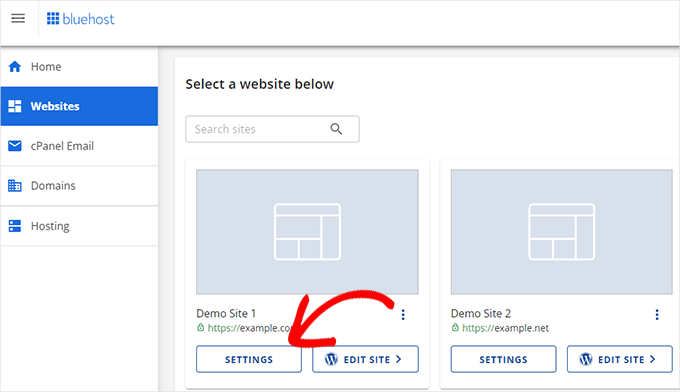
Next, click on the ‘Advanced’ tab at the top.
After that, scroll down a little to the cPanel section and click ‘Manage’.
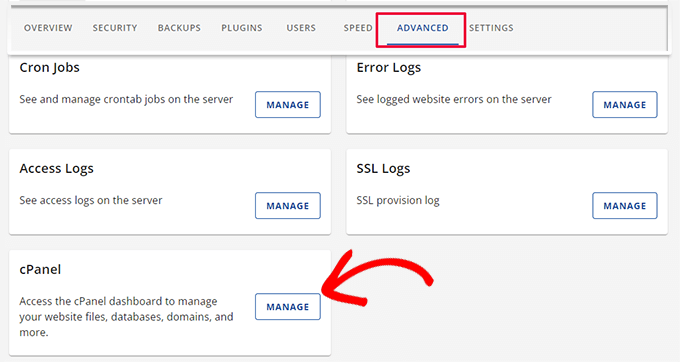
This will open the cPanel dashboard in a new tab.
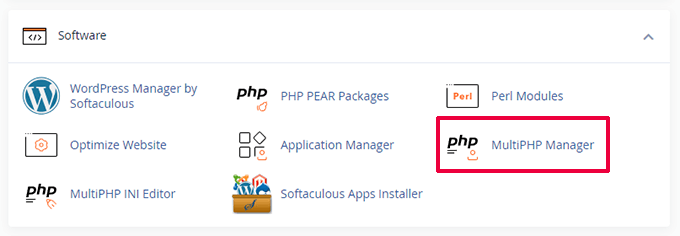
Scroll down a little to the Software section and then click ‘MultiPHP Manager’ to continue.
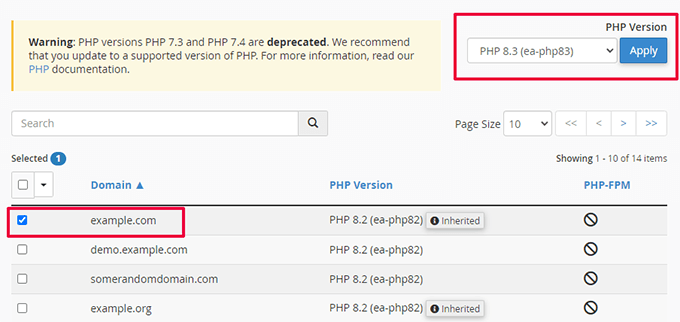
After that, you need to select your domain name from the list and then select the PHP version at the top.
Finally, click ‘Apply’ to start using the newer version of PHP.
For more information on this topic, you may want to see our article on updating the PHP version of your WordPress website.
8. Turn On a DNS Level Firewall
A DNS-level firewall protects your WooCommerce store against malicious activity. It blocks suspicious requests from reaching your WordPress site before they reach your server.
Hacking attempts, suspicious crawlers, and DDoS attacks can eat up your hosting resources and slow your website.
A DNS firewall blocks them from loading a web page, freeing up your server resources to do other things.
We recommend using Cloudflare. It is one of the world’s biggest firewall and CDN service providers.
Their massive global network of edge servers means your customers will access most of your website content from a server closest to them.
In addition, Cloudflare blocks most spam, DDoS attacks, hackers, and malicious requests from reaching your website.
We use Cloudflare on all our websites, including WPBeginner. Our case study explains why we switched to Cloudflare.
Alternative: Sucuri
For more details, see our guide on why you need a CDN for your WordPress website.
9. Use an SMTP Service to Send WooCommerce Emails
Your WooCommerce store sends email notifications for account management, order confirmation, and administrative notices.
By default, WordPress uses the PHP mail() function to send emails. This function can be misused by spammers, and many hosting companies deliberately limit or block it.
That’s why you need to use an SMTP server to send your WooCommerce emails.
SMTP is the standard protocol for sending emails.
Now, your hosting company may provide a free business email address that you can use to send emails via SMTP.
However, hosting companies typically host the mail server on the same computer as their web hosting server.
This means sending many emails at once can impact your website. Even when the email is processed, it may end up in spam.
To fix this problem, you’ll need to use an SMTP service provider.
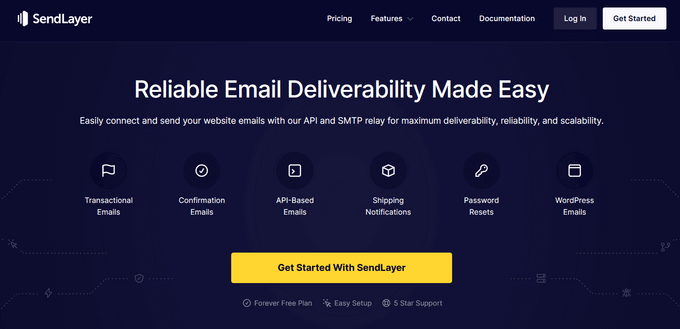
We recommend using SendLayer, which is the best SMTP service provider on the market. It’s easy to set up, and they also have a free trial that lets you send up to 200 emails.
Alternatives: SMTP.com and Brevo (formerly Sendinblue)
Once you have signed up, you can use WP Mail SMTP to start sending emails via your SMTP service provider.
Having issues with WooCommerce emails? See this tutorial to fix WooCommerce not sending emails issue.
10. Upgrade Conversion Optimization Tools
Conversion optimization is the combination of techniques store owners use to nudge website visitors into making a purchase or signing up.
To do that, they use a bunch of tools to display popups, promote coupons, display targeted offers, and more.
The problem is that some of these tools are often not optimized for speed. They may load too many unnecessary files, prevent page rendering, not display correctly on mobile devices, and basically destroy user experience on your store.
We recommend using conversion optimization software that is fast, optimized for user experience, and works beautifully on mobile devices.
This is where OptinMonster comes in. It is the industry leader in conversion optimization software and allows you to convert website visitors into customers.
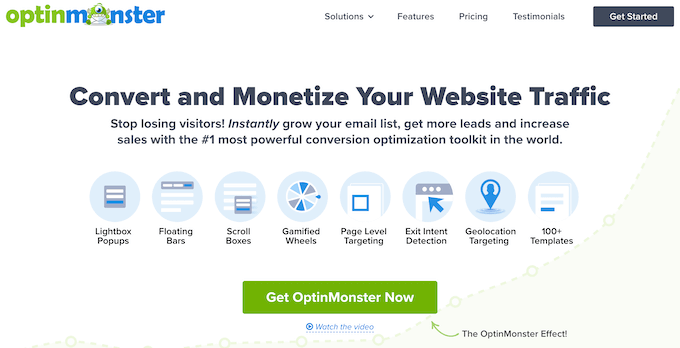
It comes with smart popups, slide in widgets, header and footer tools, countdown timers, and other tools to grow your business.
It also includes powerful targeting options that allow you to display your campaigns at the right time to the right users.
Most importantly, your OptinMonster campaigns are highly optimized for speed, performance, and user experience across all screen sizes.
We use OptinMonster on all our business websites, including online stores. We have found it highly useful in generating sales and increasing conversions. See our full OptinMonster review for more details.
For more tools and tips, see our expert tips on recovering abandoned carts in WooCommerce.
11. Optimize WooCommerce Database
WooCommerce uses the same database as your WordPress installation. They both save a lot of data that becomes useless after a while.
For instance, old revisions, transients, spam comments, and more will stay in your database long. WordPress may even query them when your website loads, which is an unnecessary waste of resources.
Now, this means that your WordPress backup plugin will take longer to prepare a backup. It will also take more time to download or upload it.
Luckily, there are excellent tools to optimize your WordPress database.
If you are using WP Rocket, then you can go to Settings » WP Rocket page and switch to the Database tab.
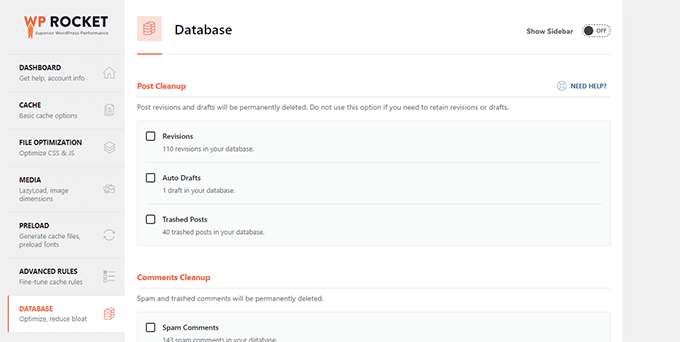
From here, you can clean up your WordPress database. Simply select the unnecessary items you want to remove and click on the Save Changes and Optimize button.
Alternatively, you can use the WP-Optimize plugin. Simply install and activate the plugin and go to the plugin’s settings page by clicking on WP-Optimize in the admin sidebar.
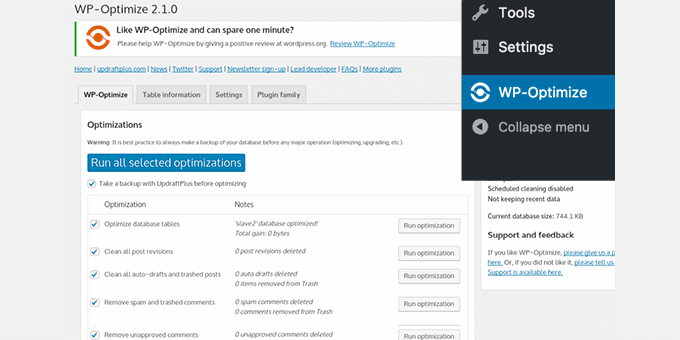
Select the items you want to delete or optimize, and then click on the ‘Run all selected optimizations’ button.
For more details, see our tutorial on how to optimize your WordPress database.
12. Optimize JavaScript and CSS Files
JavaScript and CSS files send individual HTTP requests and increase the time it takes for a page to load. Some of these files may block rendering, which means other plain HTML parts of the page will not be displayed until the browser has downloaded those files.
There are multiple ways to optimize JavaScript and CSS file delivery. We have already discussed using CDNs and caching.
More advanced users can minify or combine those files.
Minification removes white spaces from JavaScript and CSS files, which reduces their download size.
Combining all your JavaScript and CSS files allows you to serve users all the JavaScript and CSS in one file.
You can do that using the WP Rocket plugin. Simply go to the File Optimization tab, and turn on the minify and combine options for CSS and JavaScript.
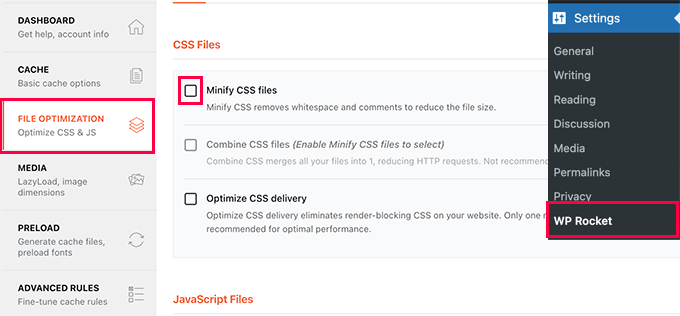
For alternate methods and more details, you may want to check out our tutorial on how to minify CSS and JavaScript in WordPress.
Note: Minifying and combining these files may cause unexpected issues on your website. If it does, you can simply turn it off.
Bonus Resources
The following are a few additional resources that will help you efficiently manage your WooCommerce store and increase sales.
- Best WooCommerce Automations to Increase Sales
- Best WooCommerce Sales Funnel Plugins to Boost Your Conversions
- How to Create a WooCommerce Popup to Increase Sales
- WooCommerce SEO Made Easy – A Step-by-Step Guide to Ranking #1 in Google
We hope this article helped you improve WooCommerce speed and boost performance for your online store. You may also want to see our guide on how to track WooCommerce conversions or see these tips for improving your organic click rate in WooCommerce.
If you liked this article, then please subscribe to our YouTube Channel for WordPress video tutorials. You can also find us on Twitter and Facebook.


Olaf
The foundation of a fast WooCommerce site is always the hosting. It’s hard to optimize website speed if it’s built on a slow hosting plan. Once this basic condition is met, WooCommerce optimization becomes much easier. Let’s be honest—paired with WordPress, this duo can be pretty resource-hungry, especially if there’s heavy traffic on the site. But otherwise, the points you outlined -> caching, PHP version, image optimization, and many more—can greatly improve both TTFB and the overall loading of the entire site, product pages, and the cart. For e-commerce sites with an international clientele, I always recommend a CDN, like Cloudflare. It can work wonders in delivering content.
Dayo Olobayo
I’ve seen firsthand how implementing the tips in this article can dramatically improve website performance. I was able to reduce the loading time of my WooCommerce store by over 50% by using the WP Rocket plugin. Thanks!
Jiří Vaněk
I also use the WP Rocket caching plugin and I have one more recommendation for readers. It’s seriously a good practice to keep a record of the changes you’ve made in the settings. For example, I once made several changes in the plugin settings and the website was working perfectly. However, after about 14 days, I noticed that at certain times, something unusual was happening on the website. After a few refreshes, the header jumped each time. As I hadn’t recorded the changes made, it was extremely difficult for me to locate the issue. It turned out that the problem was caused by the minification. Therefore, just because the website doesn’t behave strangely immediately after changes doesn’t mean it won’t happen later, and keeping a list of made settings changes can significantly help you revert back to the original setup. It’s also a good idea to backup the original WP Rocket settings into a JSON file, so you can revert to the initial settings at any time.
Moinuddin Waheed
Page speed of any website or blog is the fundamental aspect as it helps in good user experience for visitors and better chances of search engine visibility by Google.
One of the reasons why developers not talk good about wordpress is the website speed which has nothing to do with wordpres itself but having bad practices and not properly optimizing it to have good speed.
For e-commerce website it becomes more important to load faster.
Thanks for detailing everything about increasing ecommerce website performance and speed. These techniques will definitely help for all kinds of websites.