Many website owners we’ve helped face this challenge: resizing an image to make it larger, only to end up with blurry results. 🤦
Blurry images not only hurt engagement but can also damage your brand’s credibility. But, with the right tools and techniques, you can resize your images while preserving their sharpness.
In this guide, we’ll show you how to resize and make images larger without losing quality. To do it, we’ll only use trusted tools we’ve tested ourselves.

Why Do Images Lose Quality When Enlarged?
A bitmap is the most commonly used image format on the web, and all your JPEG and PNG files are bitmap image files.
A bitmap image is made up of thousands of pixels. If you zoom in, you can actually see those pixels as squares. Each pixel is mapped to a fixed location on the image, hence the name bitmap.

Most image editing software shrinks or enlarges these pixels to resize an image. This is why there is no visible quality loss when you resize an image to a smaller size, mainly because those pixels become even less visible.
On the other hand, when you resize an image in WordPress to make it large, these enlarged pixels become more visible, making the image look blurry and pixelated.

The solution is to adjust each enlarged pixel to look like the pixels around it. This method is called Fractal Interpolation or simply Fractals.
Note: Always start with a high-resolution image first. The higher the number of pixels in the original image, the better it will handle enlargement. This is because there’s more detail and data to work with when the image is stretched.
In the following sections, we’ll show you how to resize pictures using the most common image editing software for your WordPress website. You can use the links below to jump to any method with just a click:
Ready? Let’s get started.
Method 1: Enlarging Images Using GIMP (Free)

GIMP is a free alternative to premium tools like Adobe Photoshop and Affinity Photo. It can be used to enlarge images with minimum quality loss. However, we should warn you that the result will not be as good as Perfect Resize, which we’ll show you in method 3 below.
The first thing you’ll need to do is download and install the free software on your computer. It’s available for both Mac and Windows devices.
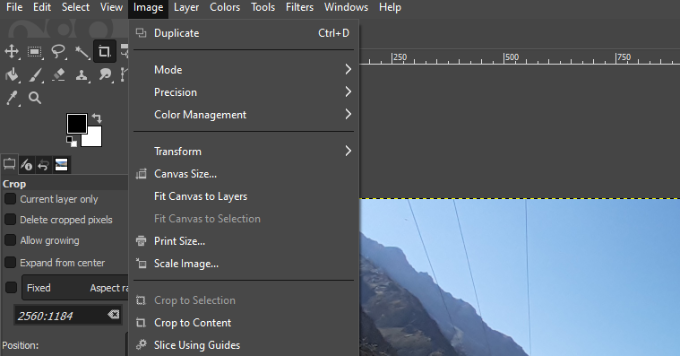
After that, you’ll want to open the image you want to resize in Gimp and go to Image » Scale Image.
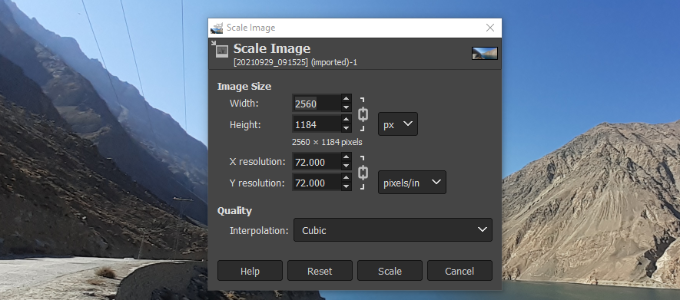
On the pop-up that appears, you can enter the width and height to set your desired dimensions.
Under the ‘Quality’ section, let’s choose ‘Cubic’ as the interpolation method. Once done, go ahead and click the ‘Scale’ button.
That’s all; you can now export the enlarged image in different formats, such as PNG, JPEG, WebP, HTML, and more.
Method 2: Enlarging Images Using Irfanview (Free)
Irfanview is a compact photo editing program that’s also free to use. Only available for Windows-based operating systems, it provides a smarter way to resize images and make them larger.
Before getting started with this tool, let’s make sure you’ve installed it on your Windows computer.
Upon installation, simply open your image in Irfanview and go to Image » Resize/Resample.
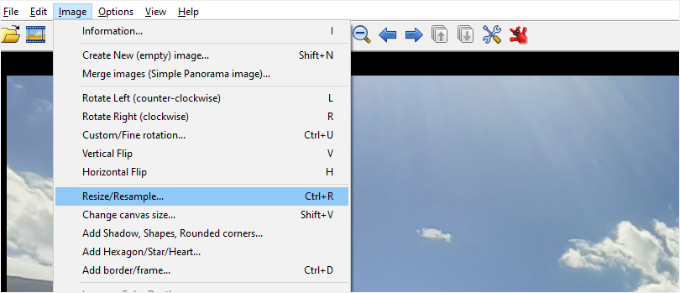
This will bring up the image resize pop-up window. Here, you’ll need to enter your desired image size in the ‘Set new size’ field by defining the width and height.
After that, you can select resample under the ‘Size method’ section. Let’s choose the ‘Lanczos (slowest)’ option from the filter dropdown menu.
Lastly, you’ll want to check the box next to ‘Apply Sharpen After Resample’ and click the ‘OK’ button when you’re done.
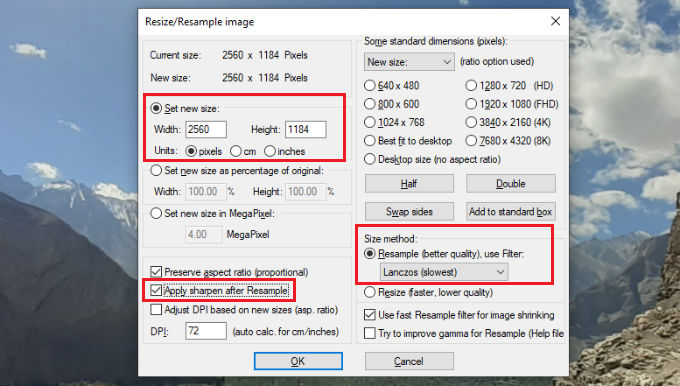
Irfanview will now resize the image, which you can then save to your computer.
You might notice that free tools don’t do a very good job of resizing an image to make it larger. However, by adjusting sharpness and contrast, you can enlarge images and minimize the quality loss.
That said, you can also use Irfanview’s premium tool to make sure that the image remains sharp and clear when enlarged.
Method 3: Enlarging Images Using ON1 (Premium)
ON1 Resize AI, or Perfect Resize as it was previously known, is a tool that allows you to resize your images smartly.
The software uses artificial intelligence to help keep your images in high resolution, even when their size increases or you want to zoom the image in on a particular area.
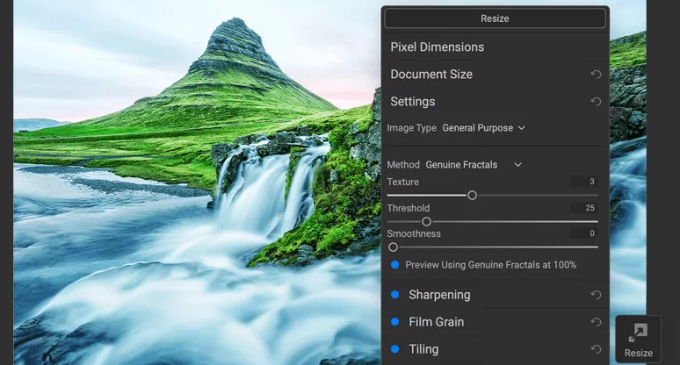
It’s available as standalone software and as a plugin for Adobe Photoshop, Lightroom, Capture One, and Apple Photos.
The standalone ON1 Resize AL software is available for $69.99. This software provides advanced tools to enlarge images while maintaining high quality, making it a valuable investment for photographers and graphic designers.
Bonus Tip: How to Take a Screenshot for Your Blog Posts
Instead of resizing images to make them clearer, you can ensure your screenshots look great from the start. High-quality screenshots can boost your WordPress blog and make your content more engaging and visually appealing.
You can take screenshots using a variety of tools, like Droplr, or built-in apps on your devices.

To help you get started, you can see our guide on how to take a screenshot for your blog posts.
We hope this article has helped you learn how to resize images to make them larger without losing quality. You may also want to see our guide on how to do basic image editing in WordPress and our handpicked list of great WordPress plugins for managing images.
If you liked this article, then please subscribe to our YouTube Channel for WordPress video tutorials. You can also find us on Twitter and Facebook.


Suman Sourabh
I used GIMP for creating thumbnails for my YouTube channel but never used this feature. Thanks for this article!
WPBeginner Support
Glad we could share another way to use it
Admin
Shamsad
For anyone seeing this in 2022, the gimp solution worked for me. The Sinc(Lanczos3) got replaced by NoHalo. Using this and scaling, I got to resize my png.
I always find quality solution in wpbeginner. Keep up the good work.
WPBeginner Support
Thank you for sharing and glad our guide was helpful!
Admin
Dorki3
None of the above solutions helped me resize to the desired size and quality, i managed to resize the picture but the quality was very poor! thank you for the effort tho! found some nice picture software!
WPBeginner Support
Sorry that you couldn’t solve the issue on your end but glad you liked our recommendations for tools
Admin
Giorgio
Hi, with Gimp is perfect. But if I have lot of photos is there a solution for automate with gimp?
Thanks
Giorgio
WPBeginner Support
Unless I hear otherwise, we don’t have an automation tool to work with Gimp like that at the moment.
Admin
Chris Campbell
Unfortunately the instructions call for opening an image in PS and then selecting File > Automate >Perfect Resize, but there is no Perfect Resize option available. Not sure how an article this new is incorrect, but that what I’m seeing. Very frustrating now since the article encouraged me to spend $60.
WPBeginner Support
There may have been an update to the option location. If you reach out to Perfect Resize’s support they should be able to let you know where the button is currently.
Admin
Jim Barker
well the explanation of each item to use was great, except I tried to down load both free versions and neither one did anything to the picture I was trying to increase in size. it was wallet to 5×7. bummer
Peter
Hello how do you make your mobile Nokia phone photos bigger to download on a shirt
Linto
Thank you so much for this tutorial!!
Liene
Thanks for this post. I haven’t heard about IrfanView, just now downloaded and it really does its job. Great. Thanks.
Melissa
Hi!
I tried the perfect resize which I think is now called ON1, and I wasn’t able to resize from a 3 inch to an 8 inch without losing quality. I just wanted to ask you if you hay any idea why.
Thank you!
manish
i great that i have founded the solution of my big and big problem.
i thank to the programmer of Irfanview and the web site designer.
thank a lot!!!!
Dufner
I’ve used Perfect Resize software itself without Photoshop and it works better than just resizing with Photoshop without plugin. I did it at school where they had the license for the program. Never tried it in Photoshop with the Resize plugin, good to know! Thanks
anupama
plz tell me what is hooks in wordpress? what is work of hooks ..
Safura Abbas
Hi Team,
I am glad to have found my solution on this site. So very well explained and understood. Appreciate your help. I downloaded the trial version of ON1 software and my image that i was trying to enlarge for hours to print right on the paper went in vain until I found your blog. Kudos to Syed Balkhi and team for this informative site. Happy me
Thank you once again.
ashish
nice tutorial awesome
Mike
Thank you! Very useful
sedatbasman
thank you for your help.
Rebecca Cunningham
It works like magic! I’ve tried everything, and this is pure perfection. Thank you so very much.
DBlake
Rebecca…which one did you use?
Tej
Hey, I had taken a picture of some old photography but it’s looks worst. How I can increase its quality
Irineu
I have used the extension Simple Image Resizer, Chrome, and have had good results. I’m from Brazil. Congratulations.
Rosie
But it does not make images LARGER – which is the point of the article!
Anthony
This is what i’ve been looking for. PS CC has limited options for retaining image size after merging it with several other layers. Thanks a lot!
May
I’m using the Gimp resize (logo obtained but company wont resize) and it still is a resolution I cant use?
Dana
Thank you! I have been looking for a resize plug in on photoshop!–Works great!!!!
Carol
I have two questions:
1. I know next to nothing about photoshop, but I do use Lightroom 6 when editing images. Is there a way that is similar to the ways mentioned here to do the same in Lightroom?
2. In another article here on WPBeginner, someone commented that the days of lowering the photo resolution for a faster site are practically over. If so, what is the recommended mg size & dpi for most blog photos? (This is a photography blog site, so I want them to be as clear as possible.)
Thanks.
Rebecca Rose
Hi and thank you for your site. I am a rank Beginner (to put it mildly) and found your site while searching the web for information on how to resize photos for Windows Movie Maker.
Right now I want to make Slide Show “movies” for the music I compose … but, those black panels on either side of the smaller photos that I use are a real turn-off! So, I am trying my best to learn what to do … I own Photo Shop – but sadly, as yet I have never used it. After reading the above comments, I think it’s time! Any other comments you have would be VERY welcome …
Richard Cunningham
Here is a simple solution if you are challenged by loss of definition/blurring or over pixellation when you re-size an image. My problem was with a business card where I had an excellent large image in .jpg format but I could not figure out how to retain the definition quality when I reduced it using gimp.
Voila!
Assume that you have an excellent .jpg image which is A4 size and you want to reduce it to a business card size allowing for trim and bleed of 3.6 inches by 2.1 inches at 300 dpi. If you try to edit the file in Gimp, you will end up with unacceptable quality. I wasted hours!
Try this:
1. Open a new file using a 300 dpi template. Set the size parameters as you want them to be – 3.600 x 2.100.
2. Open the file you want to resize – in this case you want to downsize.
3. While in this file, hit Edit – Copy.
4. Go to the new file and hit Edit – Paste.
Check the image details and you will find that you have a perfectly defined reduced 3.6 inch by 2.1 inch image at 300 dpi !
Eshaan
How do you make an image smaller than its original size without losing quality?
And I mean really small. In pixel units “10×10”
The answer to this question will mean a lot to me!
If possible please email me the answer at
Thank you!
Tom
@Eshaan
The thing is, when reducing an image’s size, you have to lose pixels. An image of 100×100 pixels contains 10,000 different pixels, whilst an image of 10×10 only contains 100. This means shrinking a 100×100 image to 10×10 requires you drop 9900 pixels. When making an image larger, you are adding pixels, which is physically possible, unlike in shrinking
john jr.
Hi I am trying to upload files to you but it is saying that the file size is too small.
How can I fix this so I can forward the pics I like.
joycebartley
hi i am trying to download some pictures from my computer to a contest and they have to be smaller than 4mg unfortunately most of my pictures are a little above that …so how can i reduce the size of mg lower than 4?????? i hope there is an easy way to do it…..from now on should i take the picture with my cell ph up closer or farther away?????
Dan
Whilst this offers some useful techniques, and some expensive ones. I personally don’t think that you should EVER size up an image. EVER!! I have worked in Print for years as well as web and this is just a big no no, or that’s how I was taught.
Size down, never up. This is one technique I will NEVER be taking on board. But thanks for the post.
Dave
I agree with Dan. If you want the picture bigger, you need to get it from the source or retake it.
Joe Turner
Dave, that’s really not very helpful. Obviously, I would think everyone understands they should retake it, if they could. People wouldn’t need to try to look at finding the “best” of all the imperfect ways of resizing if they could just retake a photo. But most of these photos are of events or at times and/or places that can’t be revisited and going back in time is not really an option, so retaking it is usually quite impossible. I think you should realize that most people looking to upsize didn’t think they were going to need to print the photo as large as they are now looking to go, but want the best results given the circumstances they find themselves in.
Mawande
Thanks Joe
I was also shaking my head before your comment. Obviously people would rather do things right the first time, but circumstances and situation can change involuntarily and all people can do is make the best of those situations by coming up with work arounds.
Peggy Woods
I must really spend some time learning how to operate the Photoshop I purchased some time ago. I generally just resize photos by using Picasa3 for cropping and such. Going to g+ this information. Thanks!
Nora
I have only ever used Photshop to re-size images. But only to a certain extent. When you start with a low-rez image it can only be sized up to a certain extent. Open the file in Photshop, click on “image size, un-check “Resample image”, then start adjusting the pixel size under width until you reach as close to 300dpi as possible. You will see the resolution # change as you mess with the pixel size. Once you have gotten to about 300dpi click “save”. The go back and re-check “Resample image”. Click “save” again. Done.
Leon Quinn
Surely there is some way of doing this in Photoshop without a commercial plugin?
Darshan Gajara
This is splendid stuff. Can you please suggest some free Photoshop plugins to simplify photo manipulation?
Mark Narusson
Nice article thanks for sharing. You could also consider using Photoshop, make the image a smart object, enlarge the canvas then scale the image to fit. This isn’t perfect but it has got me out a fix on a few occasions.
Jim Massman
A note for anyone who’s interested in editing pictures: Image formats generally used on the Web are based upon compression algorithms and you can get into trouble easily when editing those formats unless you edit a “lossless” copy. This is an old trick I’ve used for years after seeing some horrible results… simply save the first file in a non-compression file format such as “.tif”; edit that file to your hearts content, then “File Save As” in the .jpg or .png format.
Remember that every time you open, edit, then save a .jpg or .png file, whatever compression settings your graphics editing program has been set to will “recompress” that file. Most programs allow you to determine the compression rate, so it doesn’t hurt to set the default value to the least “loss” setting. The days of ‘needing’ to smash file sizes down for fast page loads are pretty much gone… but you may not know what the program defaults have been set to.
$0.02
Jim
_.- M -._
“The days of ‘needing’ to smash file sizes down for fast page loads are pretty much gone…”
That would depend upon your definition of ‘need’, as well as some rudimentary understanding of your target audience.
Is your target audience composed entirely of urban dwellers with access to fast broadband, who only visit your site while at home? Then, *maybe* that’s true.
If, on the other hand, you’re interested in reaching any rural audience at all, then you need to keep in mind that *25%* of the population of the rural US can’t get broad band access, and that 6% of the overall US population doesn’t have broadband access.
If you still say, “Oh, I don’t care about those 16 million potential visitors”, then stop and look at it from the perspective of the mobile web. Does your visitor-base have smart phones? Do you want to support a mobile experience? (A little clue here, your answer should be ‘yes’.) Then guess again. You DO still ‘need’ to do image optimization to minimize the bandwidth requirements for your site.
If you’re a real professional in the business of providing content to users, then *YES* you need to care about the actual user experience for folks visiting your site. And, part of that *IS* still site optimization for speed.
Richard
Guys, there is no way you can enlarge or shrink a pixel. Pixel size is relative. You can only add or subtract pixels.
Akash KB
Very nice and useful tips for resizing images. Specially the ‘Perfect Resize’ Plugin for Photoshop. Resizing of images is a very common day to day activity of bloggers while adding photos to blog posts
Melissa Klotz
I love this site and a lot of your posts have been very helpful. But I’m really scratching my head on this one. Maybe it’s my eyes, maybe my monitor, but I’m seeing very little difference between the “normal resize” and the other resizes. There are plenty of other resampling options in Photoshop. I don’t understand why you would buy a $150 photoshop plugin (extremely expensive for a plugin) or download free software to do something Photoshop is inherently capable of.