A few of our readers have asked us how often the WordPress trash should be emptied.
By default, WordPress automatically deletes anything that has been in the trash for 30 days. However, some users might prefer to empty the trash more or less often or empty it manually.
We looked into the different options and found that you can limit trash being deleted by simply using a plugin. Or add a code snippet to stop WordPress from automatically removing content from the trash.
In this article, we will show you how to limit or disable the trash being automatically emptied in WordPress.
What Is Trash in WordPress?
WordPress added a trash feature way back in version 2.9. It works just like the recycle bin or trash on your computer.
In other words, your deleted posts aren’t removed permanently but are sent to the trash instead so they can be recovered for a time. Anyone can delete a post accidentally. That’s why WordPress makes it easy to restore deleted posts and pages.
You can view them by going to Posts » All Posts from your WordPress dashboard and then clicking the ‘Trash’ option.

Your WordPress website will automatically delete anything in the trash after 30 days so that it doesn’t pile up.
What if you don’t want WordPress to automatically delete items from the trash? Or you’d prefer it to be emptied more or less often than once a month.
Let’s have a look at how you can have it automatically emptied as often as you like. We’ll cover three methods below. The first method is the easiest for most users. You can use the links below to jump to your preferred method:
Video Tutorial
If you’d prefer written instructions, please keep reading.
Method 1: Changing When WordPress Empties Trash With A Plugin
First, you need to install and activate the Change Empty Trash Time plugin. For more details, see our step-by-step guide on how to install a WordPress plugin.
Note: The Change Empty Trash Time plugin’s repository page says that it has not been tested with the current version of WordPress. We have tested it and can verify that it still works for us, but we cannot guarantee that no issues will happen on your site. For more details, see our guide on whether you should use outdated WordPress plugins.
Upon activation, you should visit the Settings » General page of your admin dashboard.
Once there, scroll to the bottom of the page, and you will find a new ‘Time to empty trash (in days)’ setting.

Simply type in the number of days that WordPress should take to empty the trash. For example, you can type 1 for daily, 7 for weekly, or 30 for monthly.
If you type 0, then deleted posts and pages will be deleted permanently instead of being placed in the trash.
Note: Be very careful about setting the time to empty to 0. It can be difficult to recover permanently deleted posts and pages. Make sure you’re using a backup plugin, just in case.
Don’t forget to click the ‘Save Changes’ button to store your settings.
Method 2: Changing When WordPress Empties Trash With Code
You can also configure how regularly the trash is emptied by using a code snippet. This method is not recommended for beginners, so if you’re not familiar with code, then you should use Method 1 instead.
For this method, you’ll have to edit your wp-config.php file.
If you haven’t edited the wp-config.php file before, then take a look at our guide on how to edit the wp-config.php file in WordPress.
You can simply add the following line of code to your wp-config.php file:
define('EMPTY_TRASH_DAYS', 1 ); //Integer is the amount of days
You should paste it near the end of the file, just before the line that says, ‘That’s all, stop editing! Happy blogging.’
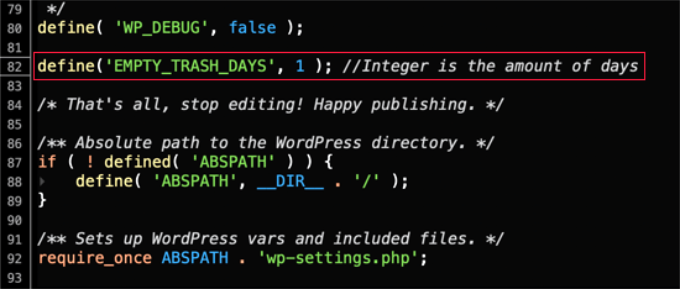
If you leave this code snippet as it is, then your trash will be emptied every day. Feel free to change the number 1 to some other number, and the trash will be emptied after that number of days.
If you don’t wish to use the trash feature at all, then you should set the number to 0. Deleted posts and pages will then be deleted permanently without being placed in the trash.
Make sure you have a backup plugin set up first, just in case you need to restore any accidentally deleted pages.
Don’t forget to save the wp-config.php file once you have made your changes.
Method 3: Stopping WordPress from Automatically Emptying Trash
Do you want to stop WordPress from automatically deleting items from the trash?
Many tutorials will tell you to add a code snippet to your theme’s functions.php file.
But we don’t generally recommend editing your site’s theme files directly. The slightest mistake can break your website. A better way of adding code snippets is by using WPCode.
First, you’ll need to install and activate the free WPCode plugin. For more details, please see our guide on how to install a plugin.
After that, you can go to Code Snippets » + Add Snippet from your WordPress dashboard and then select the ‘Add Your Custom Code (New Snippet) option.
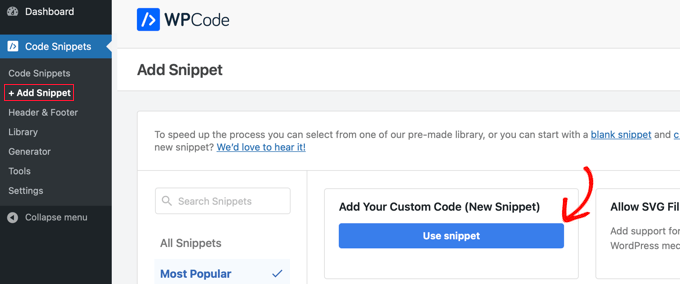
Next, you will need to enter a title for your code snippet.
Then, copy this snippet and paste it into the box labeled ‘Code Preview.’
function wpb_remove_schedule_delete() {
    remove_action( 'wp_scheduled_delete', 'wp_scheduled_delete' );
}
add_action( 'init', 'wpb_remove_schedule_delete' );
This code simply removes the action that deletes trashed items when their time is up.
Don’t forget to click the ‘Code Type’ dropdown menu and select the ‘PHP Snippet’ option.

After that, you can scroll down to the ‘Insertion’ section to view more options, such as how and where you’d like to insert the code.
We recommend using the default options. The plugin will Auto Insert the code and run it everywhere on your site.
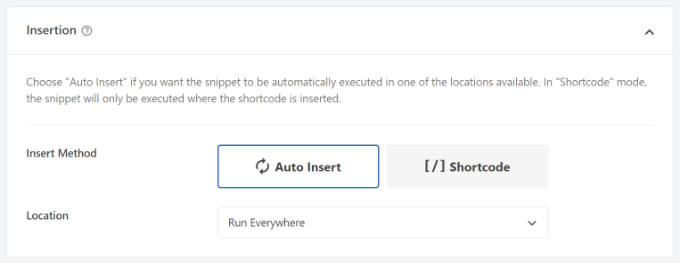
You can then click the toggle to make your code snippet Active.
Once that’s done, simply click the ‘Save Snippet’ button at the top.
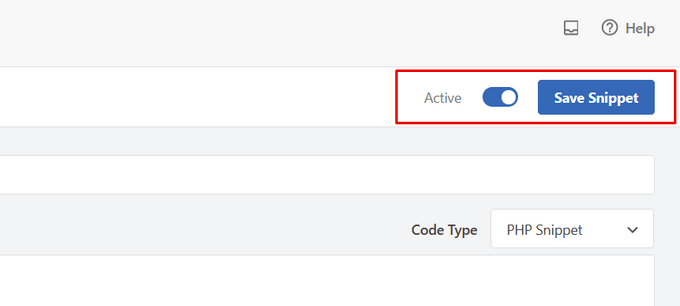
Now, when you send an item to the trash, it will remain there until you view your trashed files.
From here, you can manually click on the ‘Empty Trash’ button to delete any post.

We hope this tutorial helped you learn how to limit or disable automatic empty trash in WordPress. You may also want to learn how to automatically empty your WordPress trash or our expert pick of the best WordPress plugins to grow your site.
If you liked this article, then please subscribe to our YouTube Channel for WordPress video tutorials. You can also find us on Twitter and Facebook.


Dennis Muthomi
Well as someone who manages multiple WordPress sites, I’ve found that controlling the trash emptying schedule can be crucial for content management.
The wp-config.php method (Method 2) is elegant and doesn’t require an additional plugin. I’ve used this approach on several sites and found it reliable.
One tip I’d add: it’s a good practice to set up a reminder (perhaps using a task management plugin) to periodically review the trash contents before they’re automatically deleted, especially if you’ve extended the deletion timeframe.
Jiří Vaněk
For the websites I manage for others, I chose the code modification from your guide. A plugin would unnecessarily take up space and could be accidentally uninstalled. This is a great way to extend the trash emptying period to 3 months and ensure that managed websites won’t face issues with mistakenly deleted articles and then having to search for them after more than a month. An elegant solution.
WPBeginner Support
The plugin shouldn’t cause much issue with space as it is a simple plugin but glad to hear our guide was helpful
Admin
Bukunmi Adewumi
Does the autotrash code also work for Woocommerce products?
WPBeginner Support
Unless WooCommerce has changed its method, it should affect that as well.
Admin
Mahmud
Thank you so much. It brought me a big relief. I was able to extend the time for deletion, also disable automatic deletion. Wish you best of luck.
WPBeginner Support
Glad our guide was able to help
Admin
Mohsin Alam
If I add this define(‘EMPTY_TRASH_DAYS’, 1); code to Snippet will trash auto delete after 1 day?
If no, then tell me a way to set auto delete after 1 day. Thanks
WPBeginner Support
Yes, that would set the auto delete to one day.
Admin
Ryan
Does the “Stopping WordPress from Automatically Emptying Trash” function in this article affect Custom Post Types as well, stopping the automatic empty trash/purge for everything?
WPBeginner Support
It should prevent those as well
Admin
Cindy
Thank you! This was very helpful!
WPBeginner Support
You’re welcome
Admin
Gilvan
I think this information is wrong. Since when Wordpress deletes items from the trash after 30 days? Unaware of this option. Or has now emerged in versions 4.5.1 or 4.5.2?
WPBeginner Support
The trash feature and its automatic emptying is there since WordPress 2.9 which was released in December, 2009.
Admin