Have you ever uploaded the perfect photo to WordPress, only to notice it needs a quick trim or is slightly tilted? It can be frustrating to stop what you’re doing to open a separate photo editing app for a simple fix.
We’ve been there many times, which is why we often use the built-in WordPress image editor. It has all the essential tools you need for quick adjustments right inside your dashboard.
This article will show you exactly how to crop, rotate, scale, and flip your images without leaving your website.
Here is a quick overview of the topics we will cover in this guide:
- Why Use WordPress for Basic Image Editing?
- Video Tutorial
- How to Do Basic Image Editing in WordPress
- How to Restore Original Image After Editing
- Bonus: Bulk Edit Featured Images in WordPress
- Frequently Asked Questions About Image Editing in WordPress
- Additional Resources
Why Use WordPress for Basic Image Editing?
The built-in WordPress image editor is a super convenient way to edit images for your WordPress blog. You won’t even need to use any additional software or WordPress plugins.
The image editor also saves a lot of time by allowing users to make simple fixes and adjustments without having to go back and forth between different tools.
With WordPress, you can easily crop, rotate, scale, change dimensions, and flip your images from the media library.
For example, if you want to crop an image to remove excessive background, then you can easily do that with the WordPress image editor instead of buying an expensive tool for it.
Having said that, let’s see how to easily do basic image editing on your WordPress site, step by step.
Video Tutorial
If you don’t like the video or need more instructions, then just continue reading.
How to Do Basic Image Editing in WordPress
First, you will need to upload an image to your WordPress media library.
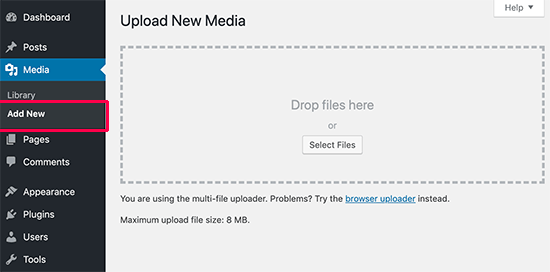
You can easily upload an image using the block editor while writing a post or by visiting the Media » Add New page from the WordPress admin sidebar.
From here, click the ‘Select Files’ button and upload an image file from your computer.
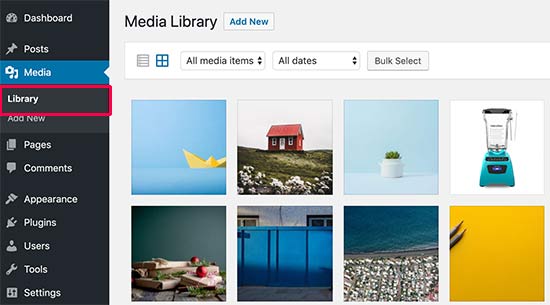
Once you have done that, head over to the Media » Library page from the WordPress admin dashboard.
Here, all the images that you have uploaded to your WordPress website will be displayed on the screen.
Now, you need to locate the image you just uploaded and click on it.
This will open the image in a popup window. You will now see image details on the right side and an image preview on the left.
From here, there are two ways to open the image with the built-in WordPress image editor.
The first option is to click on the ‘Edit image’ button under the image preview. This is the fastest method for a quick fix. The second option is to click on the ‘Edit more details’ link, which is better if you also want to adjust other image information at the same time, like its alt text or caption.
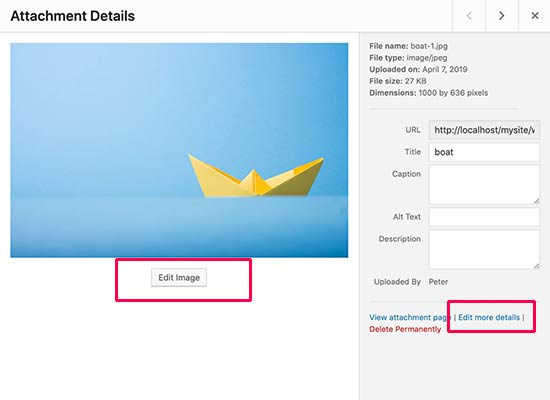
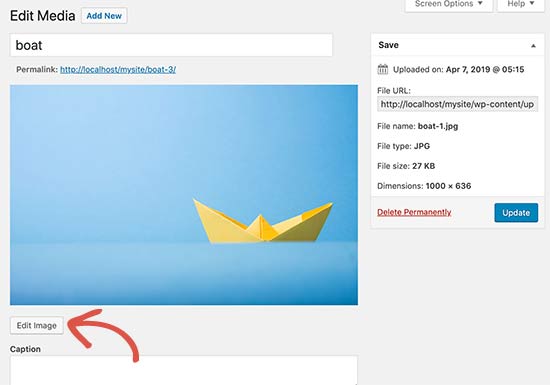
Clicking on this link will direct you to the Edit Media page.
From here, you need to click the ‘Edit Image’ button to open up the basic image editing tools.
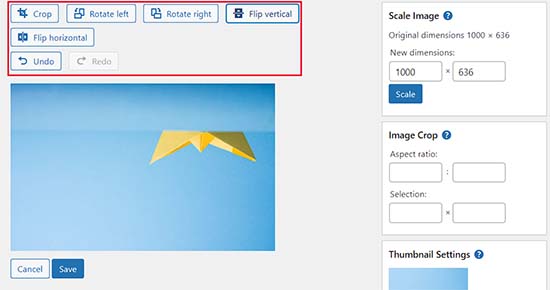
Once you do that, you will see a toolbar with some buttons on top of your image. In the right column, you will also see a bunch of options to resize the image.
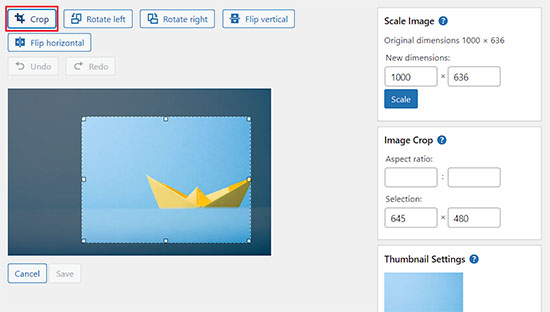
You can now easily use the buttons at the top to rotate, flip, or crop images according to your liking.
For example, once you click on the ‘Crop’ button, you can select the specific area to crop out of the original image.

Other than that, you can use the ‘Rotate Left’ or ‘Rotate Right’ buttons to rotate images clockwise and counterclockwise.
You can even flip your images horizontally or vertically according to your liking using different buttons.
You can also use the Undo/Redo buttons to simply undo the changes you don’t like or redo them to revert.
Next, look to the right-hand column to find the ‘Scale Image’ options. Here, you can enter your new, smaller dimensions to resize the image.
We recommend using this option before cropping an image to maintain your image proportions.
Keep in mind that WordPress only allows you to scale down an image. This means that you cannot make your images larger than they already are.
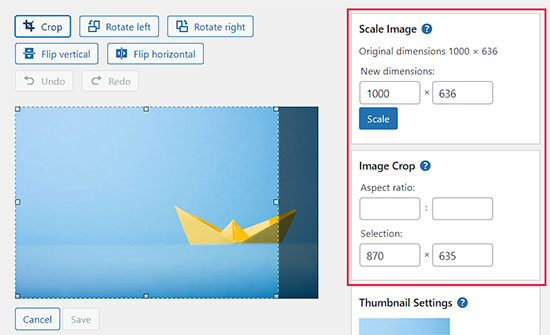
After that, you can also use the ‘Aspect ratio’ option if you want to keep a certain aspect ratio for your image intact. This feature only works while you are cropping an image.
In that same right-hand column, you can also scroll down to ‘Thumbnail Settings’. This lets you choose if you want your edits to apply to all generated versions of the image, just the thumbnail, or everything except the thumbnail.
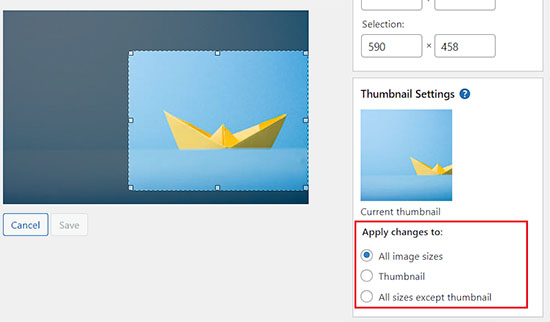
Once you are happy with the changes you have made, don’t forget to click on the ‘Save’ button to store your changes.
WordPress will now apply your changes to the image and create a new copy of it on your server.
How to Restore Original Image After Editing
If you are not happy with the edited image, then you can easily revert back to the original version.
Simply open up the Edit Media page for the image once again, and this time you will notice a new meta box labeled ‘Restore original image’.

Go ahead and click to expand the meta box. After that, click on the ‘Restore image’ button.
WordPress will instantly discard your changes and restore the original version of your image. This is possible because WordPress never actually changes your original uploaded file. It saves your edits as a copy, so you can always go back if you change your mind. 👍
Bonus: Bulk Edit Featured Images in WordPress
Beyond editing single images, you might need to update many featured images at once. These are the main images that represent your posts on your blog’s homepage, on category pages, and often when you share a link on social media.
For example, imagine you’ve created a new branded template for your blog graphics. Instead of opening and replacing hundreds of featured images one by one, you can use a plugin to do it all in a few clicks. This is a huge time-saver!
These are the pictures that are used as thumbnails on your posts.

For instance, if you want to optimize all your images for SEO or are rebranding your website and want your featured images to reflect them, then editing every single image will consume a lot of your energy and time.
However, by bulk editing these feature images, you can ensure a cohesive look for all the images, save time, and streamline the process.
You can easily do that using Quick Featured Images. For details, see our tutorial on how to install a WordPress plugin.
Upon activation, visit the Featured Images » Overview page from the WordPress dashboard and choose the ‘Set the selected image as a new featured image’ option.
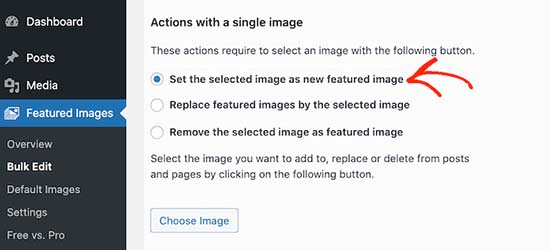
Once you do that, simply upload the image that you want to use. You can then set specific rules or conditions (like applying the change only to posts in a certain category) so that the new featured image is applied to the correct posts.
For details, see our tutorial on how to bulk edit featured images in WordPress.
Frequently Asked Questions About Image Editing in WordPress
Having helped thousands of users get the most out of WordPress, we’ve received a lot of questions about its built-in tools. Here are the answers to some of the most common ones about image editing.
What are the limitations of the WordPress image editor?
The built-in editor is perfect for basic tasks like cropping, rotating, scaling, and flipping. For more advanced features like adding text overlays, filters, or adjusting colors, you will need a dedicated image editing application.
Does editing an image in WordPress replace the original file?
No, WordPress saves your edits as a new copy of the image on your server. The original file is always preserved, and you can easily revert back to it using the ‘Restore original image’ button.
What’s the difference between scaling and cropping?
Scaling changes the overall size (dimensions) of the entire image without cutting anything out. Cropping removes parts of the image to change its shape or focus on a specific area.
Why can’t I make my image larger with the scale tool?
WordPress only allows you to scale images down to prevent them from becoming blurry or pixelated. Increasing an image’s size beyond its original dimensions results in a loss of quality, which the editor helps you avoid.
We hope this article helped you learn how to easily edit your images right inside the WordPress dashboard. With these basic tools, you can quickly make adjustments without needing to open any other software.
Additional Resources
We hope this article helped you learn how to do basic image editing in the WordPress admin area. You may also want to see some other guides related to images in WordPress:
- Beginner’s Guide to Image SEO – Optimize Images for Search Engines
- How to Fix Common Image Issues in WordPress
- Best WordPress Themes for Photographers
- How to Change Block Height and Width in WordPress
If you liked this article, then please subscribe to our YouTube Channel for WordPress video tutorials. You can also find us on Twitter and Facebook.


Mrteesurez
This are useful built-in features I have never noticed are present in Wordpress media library, to be able to crop, rotate, flip and scale image without using any external tool or plugin. This guide is an eye opener. I will definitely check out thess features and experience it. Thanks.
WPBeginner Support
Glad we could share how to make these minor tweaks without needing to re-upload an image
Admin
kzain
appreciate the clear instructions with screenshots, it makes the process foolproof for beginners like myself. Knowing how to crop and resize images is incredibly helpful for optimizing website visuals. Does WordPress offer any built-in tools for basic image editing tasks like adjusting brightness or contrast?
WPBeginner Support
No, for that level of editing you would need to use a different program.
Admin
Jiří Vaněk
Is it possible to crop an image into a circle in wordpress, or do I need a plugin for that? I’m talking about a photo of a team member, where the face should be like a picture in the wheel. Can wp do it, or do I have to edit the image externally and upload the already cropped ones?
WPBeginner Support
To have the image in a circle it would normally be best to use an image editor to have it display how you want. Otherwise you would normally use CSS instead of image editing for what you want to achieve.
Admin
Jiří Vaněk
I understand, the CSS method didn’t occur to me, that’s why I solved it externally. CSS will be much faster for multiple images. Thank you for the advice.
Mrteesurez
You can use page builder like Seedprod or elementor to create a circular images, even these page builder usually has default template for team that already showed the images in circular form or that can be easily customized.
Jiří Vaněk
Hi Mrteesurez,
thank you for the advice. I use Elementor a lot so I will look into this feature. Because I need to create a portfolio of employees on one website, and circular images look much more elegant to me. I’ll definitely look into it.
Mrteesurez
You’re welcome! Mr. Jiří Vaněk. Circular images can really enhance the elegance of an employee portfolio. Since you’re using Elementor, it’s easy to apply this effect and create a polished look. I’m sure it will make your portfolio stand out beautifully.
Patrick
I am a web designer, I have over 100 installs of wordpress over many different servers and NOT ONE of those installs does wordpress crop an image.
Its so frustrating to have to load photos in photoshop just to make a tiny change and then upload.
WPBeginner Support
You may want to ensure you don’t have a specific theme or plugin across those sites that would be preventing you from using the crop tool
Admin
TimGS
I am using wordpress 4.9.5 on an IPad mini. When I go to scale an image all the selections work until I press the scale button; the image is cropped but I only get about 1/2 the width of the original crop selection. Anyone see this problem?
Justin
Thanks for sharing! Just used the crop tool. Very handy!!
Steven Denger
This does not work at all and is not in the least bit helpful. Wordpress is the most horrid place to try to work with images. My featured images in my posts list pages are all cut – cropped out and only show a partial photo. I have tried all kinds of plugins that wp beginner has suggested and none of them work at all. I use the Awaken theme and the author will not respond to fix his worthless theme. The site that I am working on will have to be deleted because of wordpress being such a horrid cms to work with.
TimGS
A year later, I am experiencing your problem on an iPad mini….but not on a PC
Zohaib
Cropping function doesn’t work anymore.
Any plugin that can do image cropping in media library?
Peter Willianson
I dont get that menu when i click edit image.. i am using bluehost.. i cant do anything to the images that are loading rotated 90 degrees.. fyi they not rotated when loaded to other sites.. this is specific to wordpress bluehost
amy
There is no edit button on my end. Looks like I’m not the only one.
Linda Strader
Does this work with the free version? I see NO options to edit photos, and all the ones I uploaded are rotated the wrong way.
Ra.
Does nt work, anymore. It is just not there.
Matteo
Hi,
when you scale an image from the media library, does it automatically reduce the quality of the image in every post/page where it was previously published or is it necessary to load it again in each single page to speed up the site?
Cheers
mike cooper
Anyone had the issue when you rotate an image you get the following. ‘Could not load the preview image. Please reload the page and try again.’??
I have GD and ImageMagick installed..
flip works ok just not rotate and crop.
Craig Canapari
I just discovered this yesterday. However, it seems to scale it on the fly as GTMetrix said that scaling images (that I had scaled using the tools above) was slowing down my page loading. I turned off Photon to be sure it wasn’t a cached image and also cleared my cache.
Jason
I must admit, the editing of photographs is not very clear. I thought I had it all sorted and when I published it the image was huge and you only saw our eyes. I understand that the scale image has to be adjusted, but come on guys, we are all not up to speed with stuff like that. We want idiot proof editing and there are plenty on the market that do such. please have a look at it or you will lose this customer very quickly
Ron Strilaeff
I’ve played with that edit feature, but cannot figure out how to get it to lock the aspect ratio. Let’s say I want a contributor to upload an image and then crop the part to show as the thumbnail before saving it. The numbers under “Image Crop -> Aspect Ratio” don’t seem to do anything and sometimes won’t let me enter any values. What are they for anyways?
Ed Power
This crop does not work when I try to save the crop as thumbnail only – I want to show a cropped image as a thumbnail in a gallery page, and then show the full version when launched in the lightbox. Is this possible
IgorPureta
Thanks for the good post. So far I figured out what you have written. What I can’t manage is following:
My featured image is 960×332 to fit into home page slider. When I crop the picture I want to save cropped part as thumbnail so I can include it in the post. That is all managed by WP itself. What I didn’t mange is to change thumbnail from default crop to the crop I selected. No matter how many times I have cropped, saved, deleted or whatever is possible I can’t complete it. Could you please, explain it. Thank you!
KreativTheme
I already use a few times this feature, but today I learned a few more tricks. Thanks a lot for the great tut …
Roderick Dunne
Nice feature – never noticed it.
One thing to ponder: Does it save an updated version of the file which is then referenced (i.e. if the edited pic is in a post)?
I’d just be concerned that page load times could be increased if an inserted image in a WP post needs to be dynamically cropped/edited for correct display on each users page request.
Otto
@Roderick Dunne The final result replaces the existing image. It doesn’t need to perform those operations every time.
AnTo
Well, it’s nice but if more functions can be provided for photo editing that would be amazing! However, it might consumes more web space or usage if it goes!
petebocken
Crop has never worked for me. The Save button never works. It’s always grayed out. Actually in your post screenshot, the save button is also grayed out. Anyone else get crop to work?
Otto
@petebocken The save button is greyed out because the selection is still being made. Make your selection, then click the “Crop” button in the upper right to confirm the selection. Then it will perform the crop and you can save the result.
BarryFuchs
@Otto@petebocken
I had been confused by this, too, and though that crop either didn’t work on my installation or only worked for certain file types (ie jpg but not png). The process of selecting first and clicking “Crop” second seems opposite of other programs that I’ve used, such as Acrobat and Picasa. But, at least I know how to do it now!
Chris Howard
Yeah, it’s ridiculous that I have google to find out how to do something that should be intuitive
Otto
@petebocken Sorry, I meant upper left, of course.
Brad Dalton
Only used it once but will probably have another go next time. Prefer using MS picture manager but nice tutorial. Pics look good
dunfalach
@tonyjalicea When I see WP, my first thought is Wordperfect. #youmightbeanoldnerdif
tonyjalicea
@dunfalach Well that’s a blast from the past.
Moe_NYC
@tonyjalicea Whoa. How did I miss that? I had no clue. You think you know someone. Wordpress, she’s so sexy!
tonyjalicea
@Moe_NYC Indeed!
itravelwithlove
@wpbeginner how to upload 2 or more photos at once in a New Post? Pls reply.
wpbeginner
@itravelwithlove Just drag two photos or as many you want at once in the drag drop media uploader.
itravelwithlove
@wpbeginner that’s what I do, but after that, I still need to upload it in my post one by one.
wpbeginner
@itravelwithlove You mean insert it in your post one by one.. Yes because most of the time you insert images at different spots.
wpbeginner
@itravelwithlove if you want to add all images one after another perhaps in a gallery format then u can do this: http://t.co/JOVHrsVQ
itravelwithlove
@wpbeginner I was able to try that too. Thank you for the help!☺