One of our readers recently asked us how to clear the cache in WordPress. This is the first step we usually recommend when troubleshooting site issues.
Caching plays an important role in improving website performance, but it can sometimes prevent your visitors from seeing immediate changes after updates. This happens because your web browser, hosting server, and caching plugins might serve older, cached versions of your pages.
In this article, we will show you how to properly clear the cache in WordPress. We will cover clearing the browser cache, the web hosting cache, and the top WordPress caching plugins.
What Is Caching in WordPress?
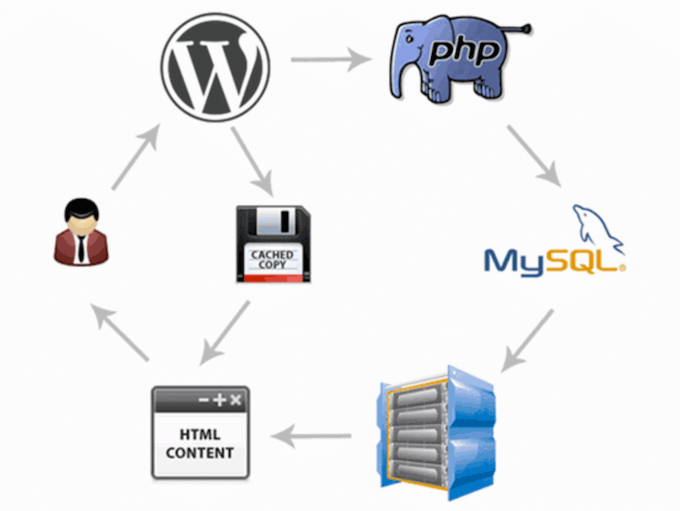
Caching solutions will store static versions of your website in a cache. This allows WordPress to skip running heavier PHP scripts every time your site loads.
The caching process helps to improve WordPress speed and performance and the overall user experience.
Here’s an example of what the caching process looks like:
There are several different types of caching solutions available for WordPress. The most popular method is using a WordPress caching plugin like WP Rocket or the WP Super Cache plugin.
These plugins give you control over which files and media are cached when the cache expires, when the cache is cleaned up, and more.
Depending on your hosting provider, you might already have WordPress caching built in. For example, managed WordPress hosting companies like SiteGround run their own caching solutions.
Popular WordPress hosts like Bluehost also have built-in caching for their users.
If you are using a web application firewall like Sucuri or Cloudflare to improve your WordPress security, then there’s also a cache to speed up your site and reduce downtime.
Finally, most modern web browsers will also store cached versions of pages on your web browser.
Why Clear Your WordPress Website Cache?
Sometimes the cache won’t realize that changes have been made to your WordPress website. Instead of loading the new version of your site, you will be stuck seeing an old version.
This will prevent both you and your visitors from seeing any updates you have made.
Clearing your WordPress cache ensures the most recent version of your website will always be live.
With that said, let’s take a look at how to clear your cache in WordPress. Simply use the quick links below to jump straight to the method you want to use:
Video Tutorial
If you prefer written instructions, then please continue reading.
Method 1: Clear Your Web Browser Cache
First, you need to clear your web browser cache. Most web browsers store static website content like stylesheets, JavaScript, images, and other website files to improve load times.
But sometimes, web browsers may fail to realize a web page has changed. Instead of fetching a fresh copy, they will load the page from the cached version stored in your browser.
To clear your browser cache in Google Chrome, click on the menu icon, then select More Tools » Clear Browsing Data.
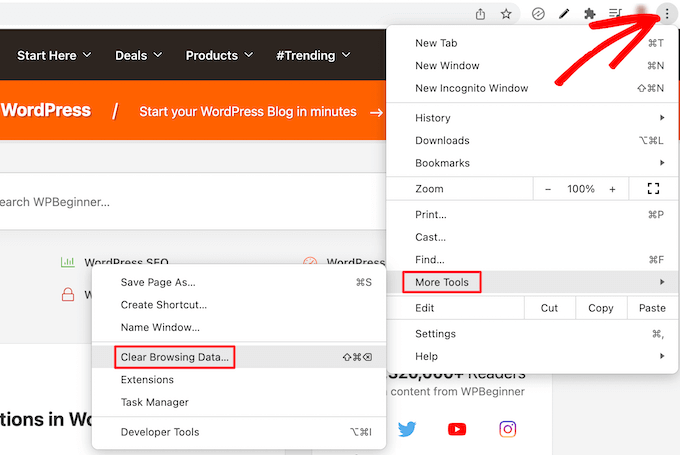
This brings up a popup where you can select the content you want to remove from the cache.
Make sure the ‘Cached images and file’ box is checked, then click the ‘Clear browsing data’ button.
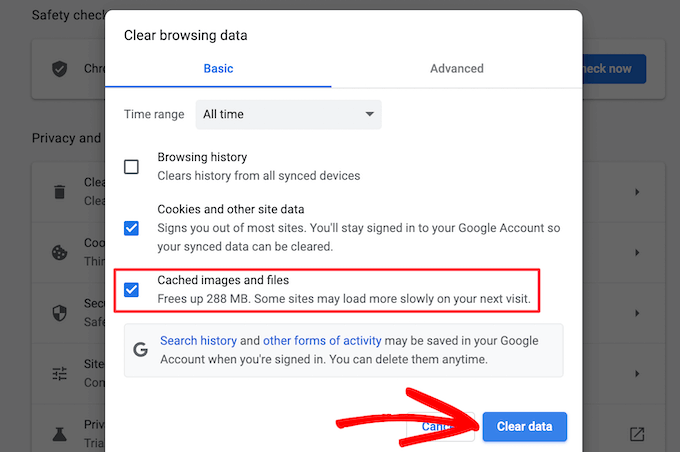
Now, you have successfully cleared your browser cache. You can visit your WordPress blog to see if it’s loading the new version of your site.
For more details, see our guide on how to clear your browser cache in all major browsers.
If you are still not seeing the changes you made to your website, then move on to the other methods in this article.
Method 2: Clear Cache in Your WordPress Caching Plugin
If you are using a WordPress caching plugin on your site, then you need to clear your plugin cache.
Here’s how to clear your cache with some of the most popular WordPress caching plugins.
Clear Cache in WP Rocket
WP Rocket is the best WordPress caching plugin on the market. The best part about using WP Rocket is that it proactively builds your WordPress cache in the background, so your users are always served a cached version of your site.
It also makes it very easy to clear cached files with a single click.
Simply go to the Settings » WP Rocket and click on the ‘Clear Cache’ button in the plugin dashboard.
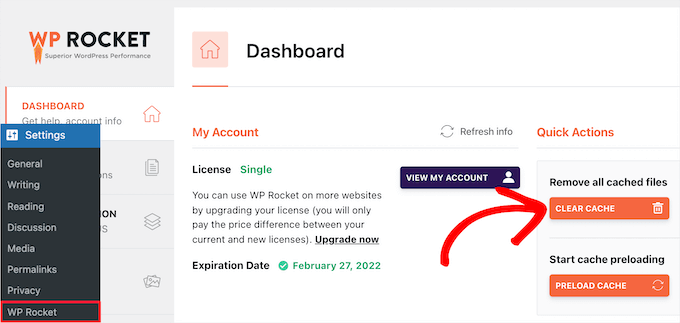
Now WP Rocket will clear all of your cached files for you.
Clear Cache in WP Super Cache
WP Super Cache is another popular WordPress caching plugin. It allows you to clear or purge all cached content with a single click.
Simply go to Settings » WP Super Cache in your WordPress dashboard, and then click the ‘Delete Cache’ button in the ‘Delete Cached Pages’ section.
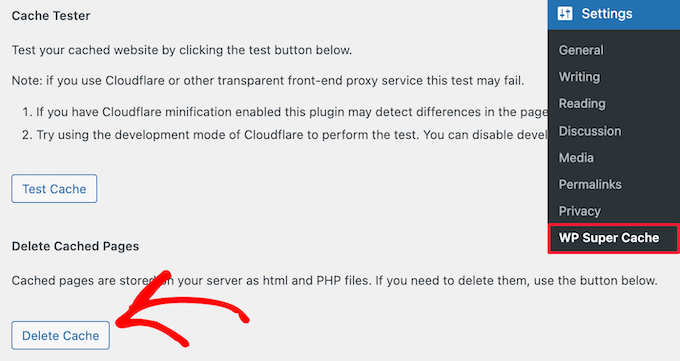
Now, WP Super Cache will delete all of the cached files from your website.
Clear Cache in W3 Total Cache
W3 Total Cache is a widely used WordPress caching plugin. Like the other plugins above, you can clear all caches with a single click.
You need to go to Performance » Dashboard and then click on the ’empty all caches’ button.
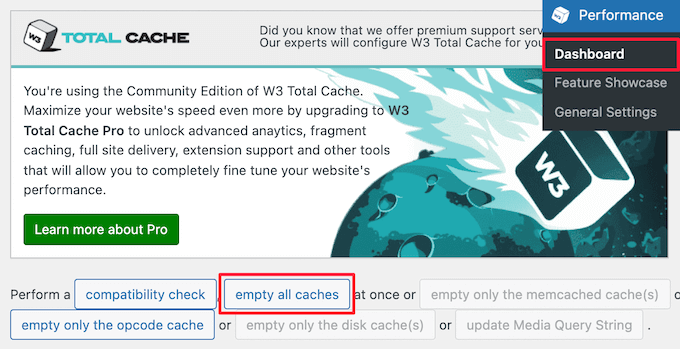
The W3 Total Cache plugin will now delete all cached content for your site.
Method 3: Clear Cache in Your WordPress Hosting
Some WordPress hosting providers have built-in caching options to help speed up WordPress.
Here’s how you can clear your web host cache in some of the most popular WordPress hosts.
Clear Cache in Bluehost
Bluehost is one of the best WordPress hosting providers and is officially recommended by WordPress. They have a built-in caching solution that instantly improves your WordPress performance and loading speed.
Bluehost makes it easy to clear your WordPress cache from your WordPress admin area.
Simply log in to your WordPress admin dashboard, and you will see a ‘Caching’ button in the top admin toolbar. Hover over this, then click the ‘Purge All’ option.
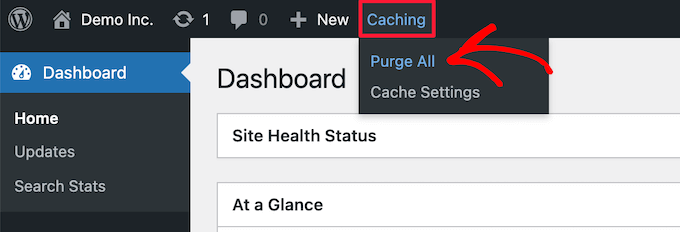
Bluehost will now clear data from your WordPress cache.
Clear Cache in SiteGround
SiteGround is a leading WordPress hosting provider that’s known for speed and top-notch customer support. They offer a built-in caching solution to improve your website performance.
You can clear the SiteGround cache from your hosting account control panel as well as the WordPress admin area.
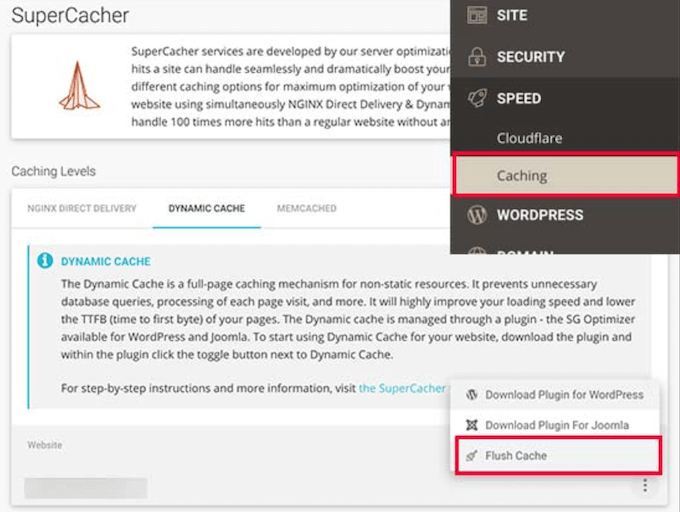
To clear your cache from your Siteground control panel, you need to log in to your hosting account dashboard and go to Speed » Caching under the site tool section.
Then, select the ‘Dynamic Cache’ menu option. Next, click on the menu icon next to your domain name and select the ‘Flush Cache’ option from the dropdown.
Another way you can manage your Siteground cache is with the SG Optimizer plugin. The first thing you need to do is install and activate the plugin. For more details, see our guide on how to install a WordPress plugin.
Upon activation, you need to click the ‘Purge SG Cache’ button in your top WordPress admin toolbar.
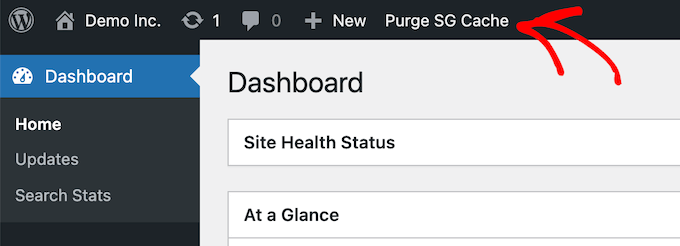
The plugin will automatically clear your SiteGround WordPress cache.
Method 4: Clear Your WordPress Firewall Plugin Cache
If you are using a WordPress firewall like Sucuri to protect your website, then there’s another layer of caching you will need to clear.
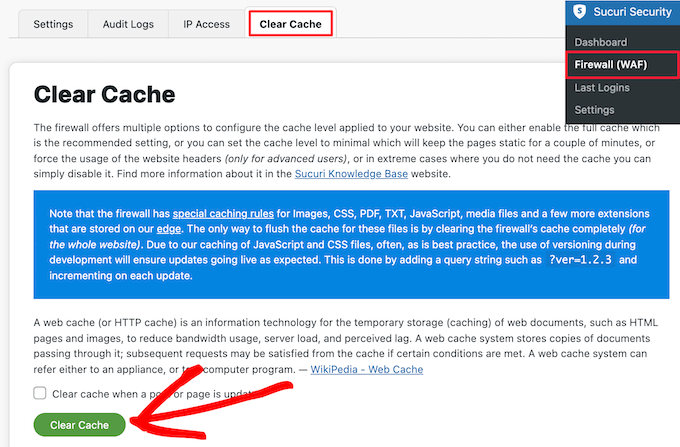
You can clear your Sucuri cache by going to Sucuri » Firewall (WAF) in your WordPress admin panel.
Then, select the ‘Clear Cache’ menu option and click the ‘Clear Cache’ button.
Bonus tip: If you have recently moved your WordPress site, then you may also need to clear your DNS cache. This ensures you’re getting updated DNS information and accessing the newest version of your site. For more details, see our guide on how to clear your DNS cache.
Expert Guides on the WordPress Cache
Now that you know how to clear your cache, you may like to see some other guides relating to the WordPress cache and caching plugins:
- What Is a Page Cache in WordPress?
- How to Easily Fix Leverage Browser Caching Warning in WordPress
- Best WordPress Caching Plugins to Speed Up Your Website
- LiteSpeed Cache vs. WP Rocket – Which One is Better?
- How to Install and Setup WP Super Cache for Beginners
- How to Install and Setup W3 Total Cache for Beginners
- How to Properly Install and Setup WP Rocket in WordPress
- The Ultimate Guide to Boost WordPress Speed & Performance
We hope this article helped you learn how to clear your cache in WordPress. You may also want to see our guide on how to create an email newsletter and our expert picks for the best live chat software for small businesses.
If you liked this article, then please subscribe to our YouTube Channel for WordPress video tutorials. You can also find us on Twitter and Facebook.


Benjamin
I have w3 TOTAL CACHE, and when i click emty all CACHE, it dos’nt delete the cache.
I have more than 5gb cache ? Should it delete it by it self =?
WPBeginner Support
The pages would have their cache cleared and then start generating a cached version of the pages again. If there is an issue with a large size cache, we would recommend reaching out to the plugin’s support directly and they should be able to assist!
Admin
Mrteesurez
Weldone for this guide, I have had an issue where new changes I made weren’t showing up because I forgot to clear the cache. Now, I make it a point to schedule regular cache clearings for all my sites. It’s such a simple step, but it ensures everything runs smoothly and updates appear as they should. Thanks for highlighting this, and for the detailed caching guide. it’s a great guide and a remainder for me.