We’ve learned the importance of WordPress backups the hard way, from losing blogs during server migrations to watching sites crash after updates.
Since then, we’ve made it our mission to help other website owners avoid these disasters that could have been prevented with proper backups. Trust us, there’s nothing worse than watching years of hard work disappear in seconds! 😨
Whether it’s a hacking attempt, a plugin conflict, or a hosting issue, these problems can strike when you least expect them. And the next thing you know, your entire site is gone without a trace.
That’s why we’ve created this complete guide on how to back up your WordPress site. We’ll show you the go-to methods and tools we use to keep our own websites safe. By the end of this article, you’ll know exactly how to protect your WordPress site from any disaster.

First Things First: Choose the Right WordPress Backup Method 🔎
If you’ve put time into building your WordPress website, then you need a way to keep it safe.
Creating backups is like making copies of your site in case of a disaster. If something breaks or gets hacked, you can quickly restore everything to how it was before.
Let’s look at the different ways you can back up your site:
- Using a WordPress backup plugin – These tools handle everything for you. They can save your site on a schedule and send copies straight to your preferred location. If you’re new to WordPress and have little technical knowledge, this is your best choice.
- Using your host’s backup system – Most WordPress hosting services include built-in backups with their plans. This works well if you’re on a budget since it’s usually included in your hosting plan. However, the backup features may be quite basic compared to a plugin.
- Manually through cPanel/FTP – While this requires more technical knowledge, it can be useful when you need to save specific files. Or when you don’t want to use a plugin and your hosting provider doesn’t have a backup system.
- Hiring a WordPress maintenance service – If you run a business website and don’t have time to manage backups yourself, a maintenance service can handle this and other tasks like updates and security monitoring.
💡 For most people, we recommend using a backup plugin. It offers the best mix of WordPress security and automation. Plus, it makes recovery straightforward if something goes wrong.
What’s more, it is usually much more affordable than hiring a maintenance service while offering more features than your host’s basic backup system.
Which WordPress files should I back up?
You’ll need to back up your database (which contains all your posts, pages, comments, and site settings), along with your themes, plugins, and uploaded files like images and videos. Your site’s core WordPress files and settings files are also important to save.
However, not all files need to be backed up at the same frequency. It depends on how often you update different parts of your site. For more details, check out our guide on which WordPress files you need to back up.
That said, let’s see how you can back up WordPress using the different methods we’ve mentioned. You can click the links below to jump to your preferred topic:
- How to Backup WordPress With a Plugin (Best for Beginners)
- How to Automatically Backup WordPress
- How to Backup WordPress Using Your Hosting Provider
- How to Backup WordPress Without a Plugin (cPanel Method)
- How to Backup WordPress Without a Plugin (FTP Method)
- How to Backup a WordPress Site Without FTP/cPanel Access
- How to Backup WordPress to a Cloud Storage Provider
- How to Backup WordPress Database
- How to Restore Your WordPress Site
- Alternative: Hire a WordPress Maintenance Service
How to Backup WordPress With a Plugin (Best for Beginners)
We’ve tried many backup tools over the years, and Duplicator is the one we keep coming back to. It’s so simple to use that everyone on our team, even those who aren’t tech-savvy, can easily save copies of their websites.
What we love about Duplicator is that it goes beyond basic backup features. It offers instant disaster recovery and the ability to restore your site without having the plugin pre-installed. That’s why Duplicator is an excellent choice for both beginners and professionals.
Want to see all of its features? Take a look at our complete Duplicator review.
🖐 Quick Note: We’ll be working with the premium version of Duplicator because it comes packed with everything you need for a complete backup solution. While it’s an investment, we think it’s worth every penny for the peace of mind it brings.
If you’re just getting started, you can begin with the free version to get a taste of what Duplicator can do.
Let’s start by installing and activating the Duplicator Pro backup plugin. If you need a hand with this step, we’ve got a helpful guide on how to install WordPress plugins.
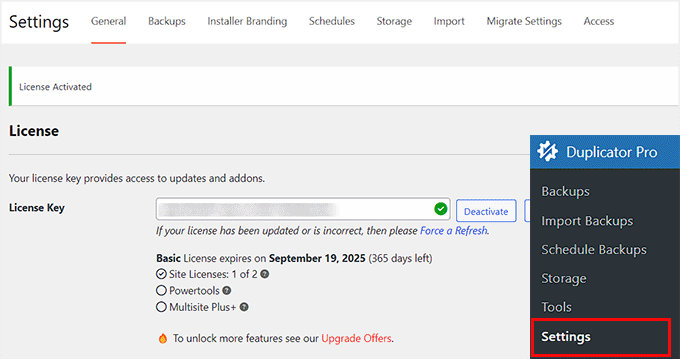
Once you’ve got the plugin activated, head over to Duplicator Pro » Settings and navigate to the ‘General’ tab. Go ahead and enter the license key, which you can find on your Duplicator Pro account page.
Simply click ‘Activate’ when done, and you’ll see a confirmation message when it’s successful.
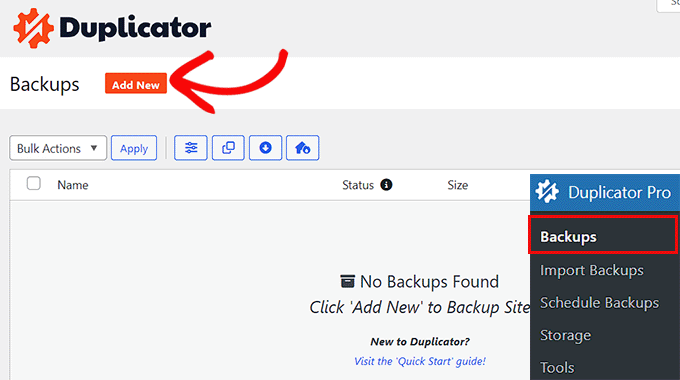
Next up, head to Duplicator Pro » Backups.
Look for and click on the ‘Add New’ button at the top. That’s your starting point for creating a fresh backup of your WordPress site.
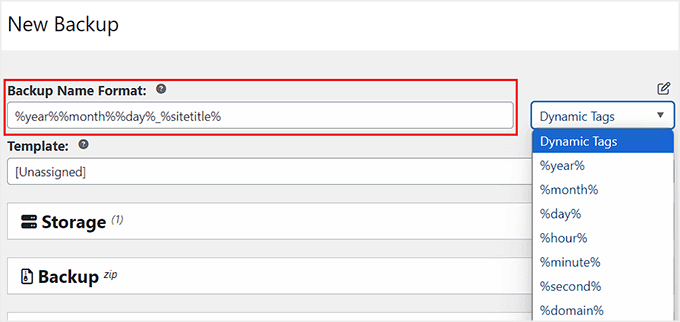
Now, let’s name your backup. Duplicator has a clever, dynamic tags feature that works like a smart labeling system.
You can use tags like %year% and %month% to automatically date your backups. So, for example, if you use 'site-backup-%year%-%month%,' Duplicator will create organized names like ‘site-backup-2024-12.’
This makes finding your backups later as simple as looking through a well-organized filing cabinet.
Let’s move on to the ‘Storage’ section, where you’ll choose where to keep your backup files safe.
For this tutorial, we’ll stick with the default local storage, which means your backup will be stored in your hosting server.

Next, go ahead and expand the ‘Backups’ tab. Here, select the ‘Full Site’ option as your preset. This ensures you’re creating a complete backup package.
You can also choose more specific options like Database Only (just your content and settings), Media Only (your images and files), or Custom if you want to pick exactly what to back up.
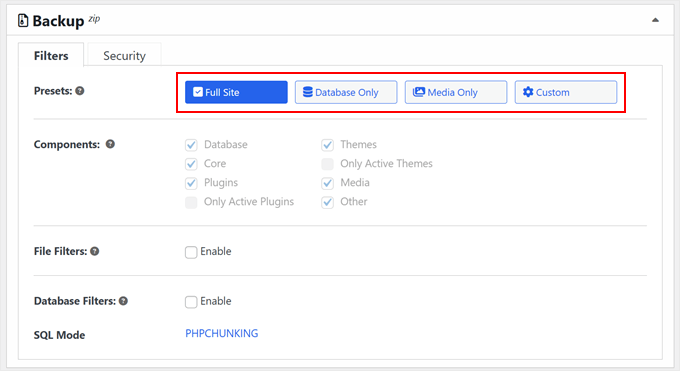
With the Custom option, you can select specific components for your backup, including:
- Database (your posts, pages, and settings)
- Core (WordPress system files)
- WordPress plugins (all or just active ones)
- WordPress themes (all or just your current theme)
- Media (images, videos, documents)
- Other (any non-WordPress files in your directory)
Here’s an example:

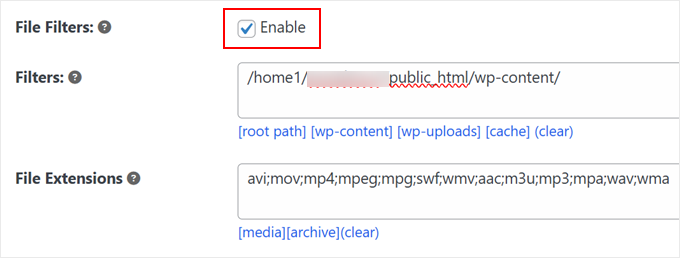
Need to be more selective? Check the ‘File Filter’ option. This lets you exclude specific files from your backup – perfect for leaving out temporary files or large media items you don’t need to back up.
Just enter the path to any file you want to exclude. Not sure where to find file paths? Check our WordPress file and directory structure guide for help.
You can also exclude entire file types at once by specifying extensions.
For example, excluding ‘mp4’ or ‘mov’ will skip all video files, helping create smaller, faster backups if you store these files elsewhere. Just make sure to separate the extension names with the semicolon mark (;).
If you want to add an extra layer of protection to your backup, then you can switch to the ‘Security’ tab.
Here, you can set up a password to protect your backup files. This is particularly important if your website contains sensitive information that needs extra safeguarding.

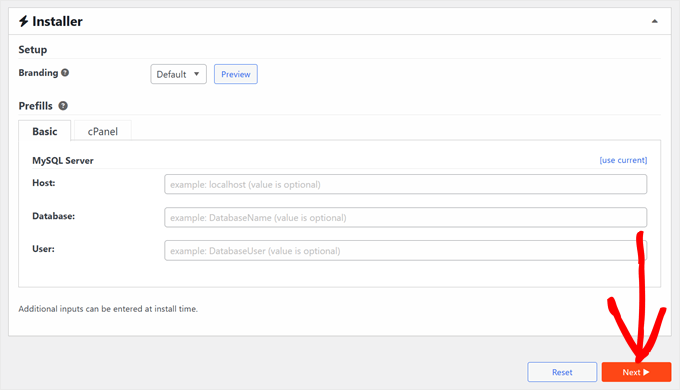
Moving on to the ‘Installer’ section. These settings are responsible for the installer file that you will use to restore your website.
For now, you can leave these settings as they are and simply click ‘Next.’
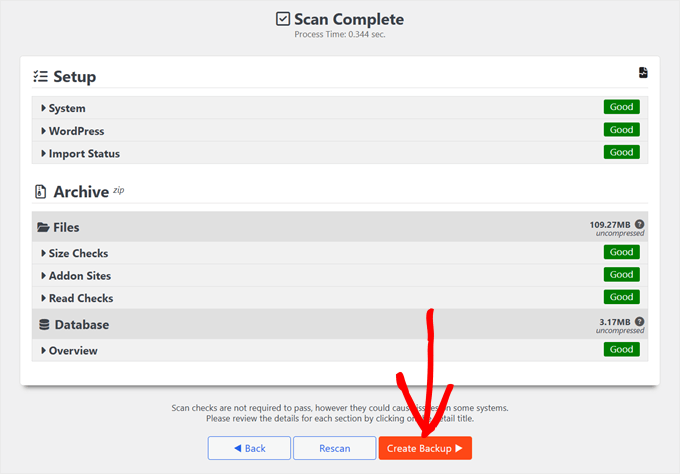
Now Duplicator will run a quick scan of your site to make sure everything’s ready for backup. Think of it as a pre-flight check. The plugin will show you a ‘Good’ status if everything’s in order or warn you about any WordPress errors that need attention before proceeding.
When everything looks good, click on the ‘Create Backup’ button at the bottom to start the process.
Once Duplicator finishes creating your backup, head back to Duplicator Pro » Backups.
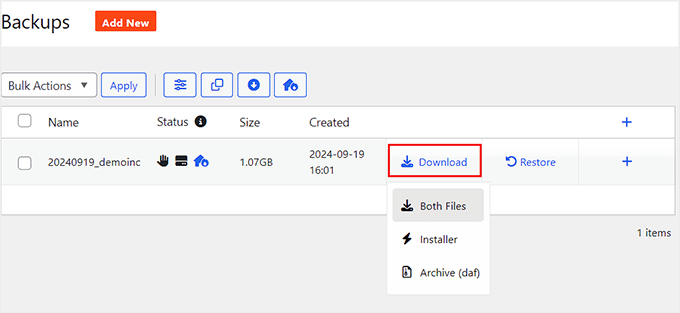
Click the ‘Download’ option and select ‘Both Files.’ This will give you two essential files: the backup itself and the installer file you’ll need if you ever have to restore your site.
📌 Not a fan of Duplicator? We also like UpdraftPlus, another popular WordPress backup plugin. Check out our guide on how to back up and restore WordPress using UpdraftPlus to see how it works.
Bonus Tip: Create a Disaster Recovery Link for Quick Website Restoration
What makes Duplicator an exceptional backup solution is its disaster recovery feature, which acts as your website’s safety net. This feature lets you quickly restore your WordPress site even if it completely breaks down.
We talk more about preparing for unexpected website errors in our guide on creating a WordPress disaster recovery plan.
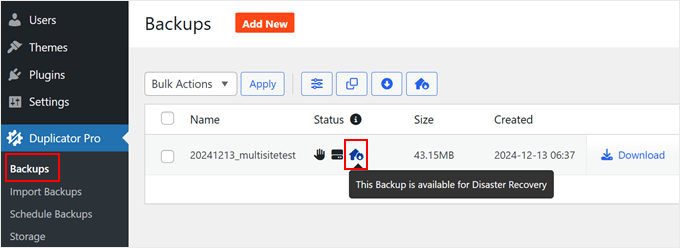
To set up this backup system, first ensure you have a complete website backup stored on your server. Check this by visiting Duplicator Pro » Backups.
Look for your most recent backup file and click the disaster recovery icon next to it.
In the popup window, simply click ‘Set Disaster Recovery.’
This will enable the backup restoration feature.
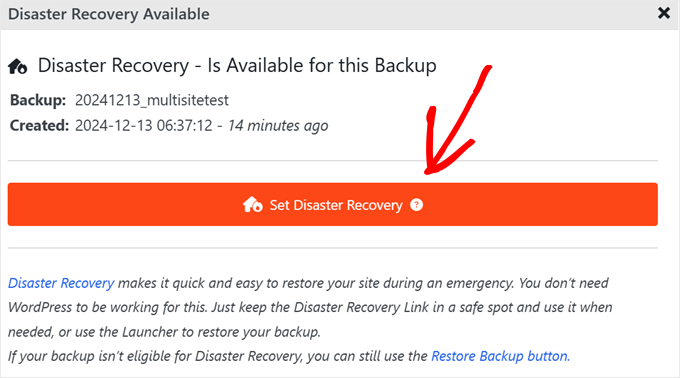
Duplicator then gives you two backup recovery options: a secure recovery link or a launcher file. Both serve as your emergency backup restoration tools.
If your WordPress website ever encounters serious problems, either option lets you quickly restore your backup. Simply use the recovery link in your browser or run the launcher file to start the restoration process.

How to Automatically Backup WordPress
While creating manual backups works, it’s not the most efficient way to protect your WordPress blog. Instead, let’s look at how to set up automatic backups that run on schedule to give you peace of mind without the constant manual work.
With scheduled backups, your backup plugin handles everything automatically. Whether you need daily, weekly, or monthly website backups, Duplicator Pro can manage your backup strategy seamlessly.
That said, if you prefer a non-plugin solution, check out our guide on setting up automatic WordPress backups with CodeGuard. CodeGuard is a cloud-based backup service that monitors your site 24/7 and automatically saves changes to your content.
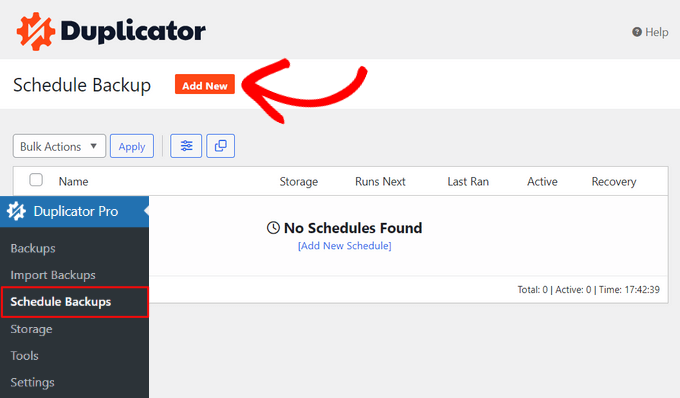
To set up automated backup scheduling in Duplicator, navigate to Duplicator Pro » Schedule Backups and click ‘Add New.’
First, give your backup schedule a name. Duplicator automatically selects the Default template, which creates a complete backup of your WordPress site, including all your files, databases, media, themes, and plugins.
Need to change this? Just click on the dropdown menu and select ‘<Choose a Template>.’ Then, click on ‘+’ button to open a new tab where you can create a new template.
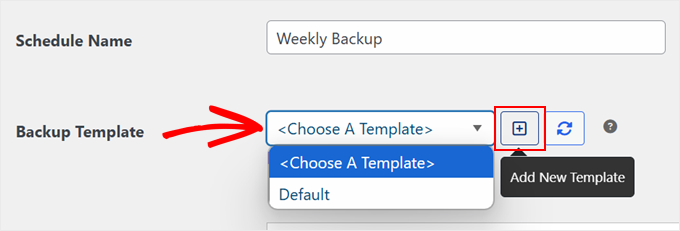
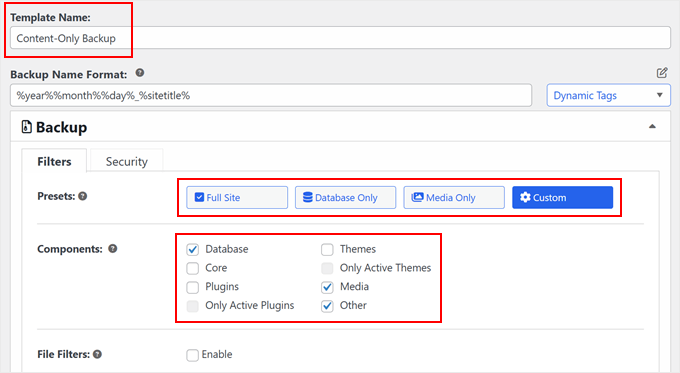
In this new tab, give your backup template a name. For example, use ‘Media Library Backup’ for your uploaded files.
Then, just like we showed you earlier, you can customize the backup naming format using dynamic tags and choose your backup type (full site, database only, media, or custom). You can also enable filters if you need to exclude specific files or folders.
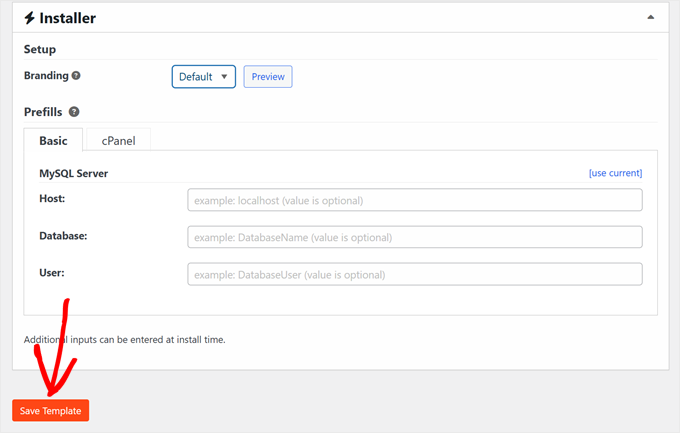
Once you’ve done that, scroll down. The default installer settings work fine for most users, so you can leave them as is.
Click ‘Save Template’ to save your changes.
Now, close this tab and return to your backup schedule tab.
Click the ‘Refresh Template List’ button to see your new template in the dropdown menu. You can now select it for your scheduled backup.

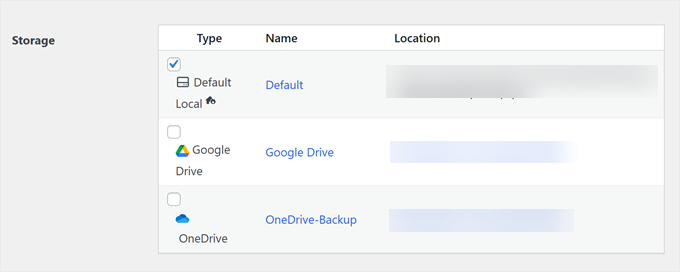
Next, choose where to store your backups.
You can use the ‘Default Local’ option to store backups on your web host or connect to cloud storage for additional security.
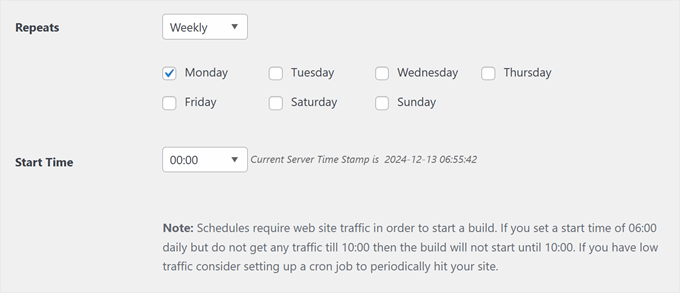
Now comes an important decision: setting your backup frequency. Duplicator lets you schedule automatic backups to run hourly, daily, weekly, or monthly. Choose a frequency that matches how often your site’s content changes.
You’ll also need to set a Start Time for your backups. Here’s a helpful tip: scheduled backups need website traffic to begin. For example, if you set a daily backup for 6:00 AM, but your site doesn’t get any visitors until 10:00 AM, the backup will start at 10:00 AM instead.
Because of this, we suggest setting your backup time during your website or online store‘s peak traffic hours.
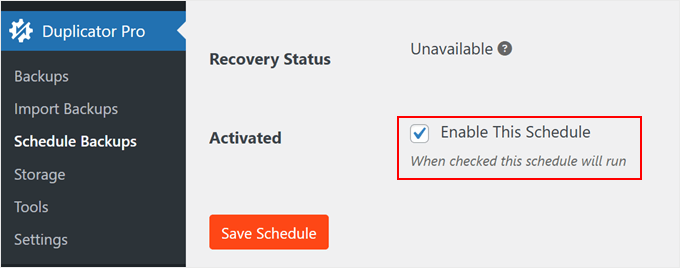
To finish setting up your automated backup system, make sure to check the ‘Enable this schedule’ box at the bottom of the page.
Then click ‘Save Schedule’ to activate your automatic backup plan.
How to Backup WordPress Using Your Hosting Provider
While backup plugins are excellent tools, many WordPress hosting providers include built-in backup solutions. The main advantage? These backups come at no extra cost and are already set up for you – no configuration needed.
For example, SiteGround, which hosts the WPBeginner website, offers manual and automated daily backups with all of its hosting plans. You can check out our article on why we switched to SiteGround to learn more about our experience.
Let’s look at how to use these hosting backup features. First, log in to your SiteGround account. In the ‘My websites and services’ section, click ‘Manage’ under Websites.

From your list of WordPress websites, locate the site you want to back up.
Then click ‘Site Tools’ to access its backup options.

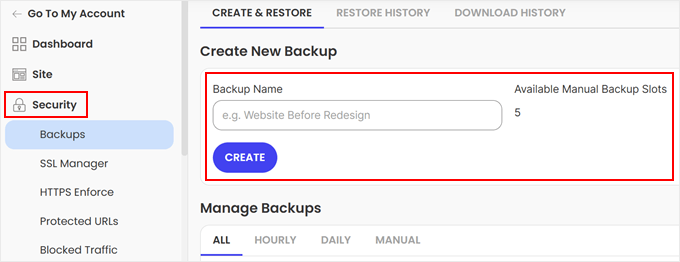
Next, navigate to ‘Security’ in the left sidebar and select ‘Backups.’
Here, you can create manual backup copies or manage your automatic backups. SiteGround has limits on the number of manual backups you can create. But don’t worry, because its automated backup system regularly creates website backup files for you.
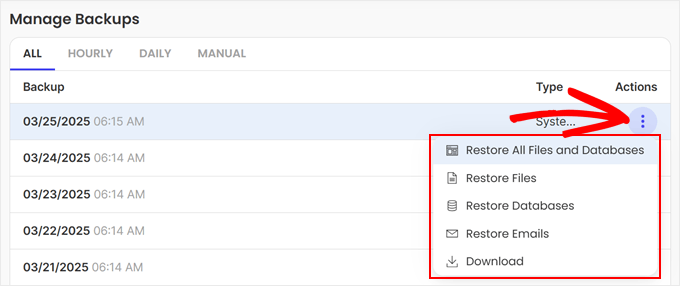
If you scroll down to the ‘Manage Backups’ section, you’ll find all your backup files organized under Hourly, Daily, and Manual tabs.
Go ahead and click the three-dot menu next to any backup to see your restoration options. You can perform a full backup restoration, selectively restore files or databases, or download the backup file for safekeeping.
Let’s look at Bluehost, another popular WordPress hosting provider. Rather than offering their own backup system, Bluehost partners with industry-leading backup services: CodeGuard and Jetpack, giving you professional backup tools for your WordPress website.
To access these backup options, start by logging in to your Bluehost dashboard. Head to the ‘Websites’ tab, then click ‘Settings’ for the site you want to manage.
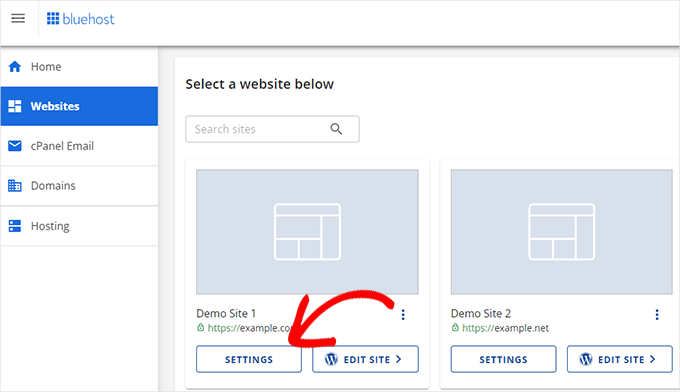
Navigate to the ‘Backups’ tab, where you’ll find two powerful backup solutions: CodeGuard and Jetpack.
Both services offer automated backup features and cloud backup storage to keep your WordPress files secure.

For detailed instructions on using these backup services, we’ve created comprehensive guides:
- How to Setup Automatic WordPress Backups with CodeGuard
- How to Create WordPress Backup Using JetPack (Formerly VaultPress)
How to Backup WordPress Without a Plugin (cPanel Method)
If you prefer not to use backup plugins, you can manually create a backup of your WordPress site directly through cPanel.
However, keep in mind that manual backups require more effort and attention than automated backup solutions. You’ll need to remember to create regular backups yourself, as this method does not offer automatic scheduling.
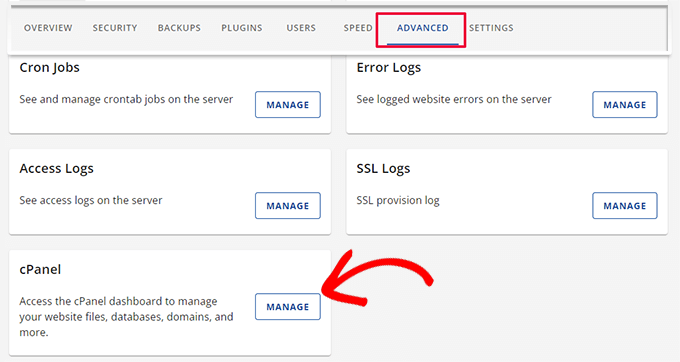
First, access your hosting provider’s cPanel. In Bluehost, you can do this by logging in to your Bluehost dashboard. Navigate to the ‘Websites’ tab and click ‘Settings’ for the site you want to back up.

Now, switch to the Advanced settings.
Then, find the ‘cPanel’ section and click ‘Manage.’
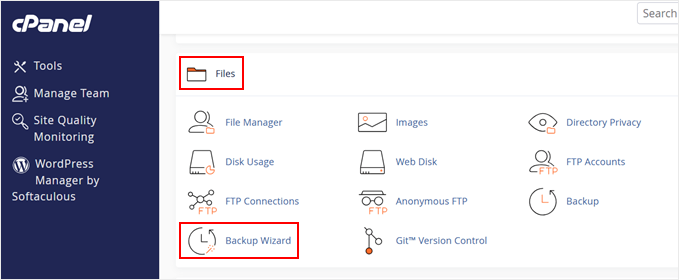
Next, go to the ‘Files’ section and select ‘Backup Wizard.’
This tool helps you create different types of website backups.
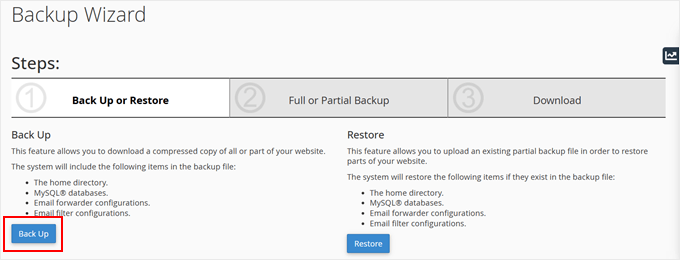
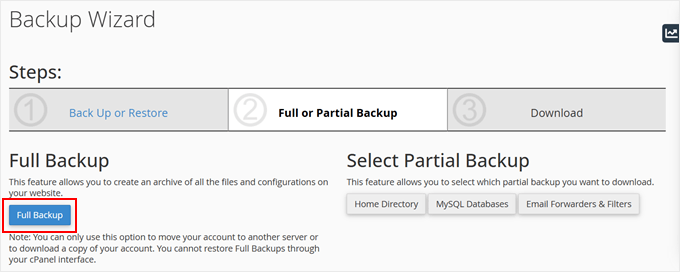
You’ll see two options: ‘Back Up’ or ‘Restore.’
Since we’re creating a backup, click ‘Back Up.’
Now you can choose between a full backup or a partial backup of your WordPress files. Here’s what each option includes:
- Full backup – Creates a complete copy of your entire website, but you can only use it to move your site to another server or download a backup copy. Note that you can’t restore full backups through cPanel.
- Partial backup – Lets you choose specific parts to backup: home directory (includes your WordPress files and emails), database backup (your content and settings), or email filters and forwarders.
For this tutorial, we’ll create a full backup.
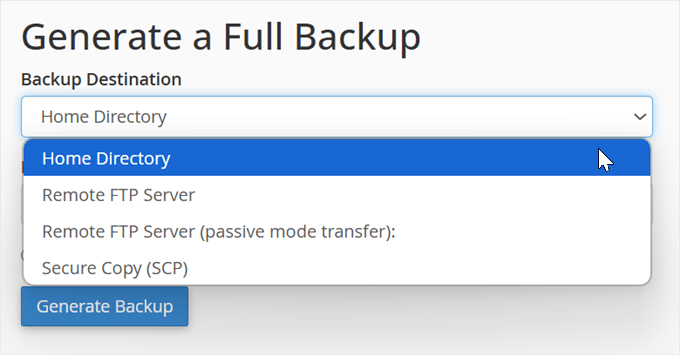
Next, choose where to save your backup file.
It can be in the home directory (which saves on your hosting server), a remote FTP server (which saves to another server), a remote FTP server with passive mode transfer, or a secure copy (which uses encrypted transfer).
Finally, you can enter your professional email address to get notified when your backup is ready, or skip the notification.
Click ‘Generate Backup’ to start the backup process.
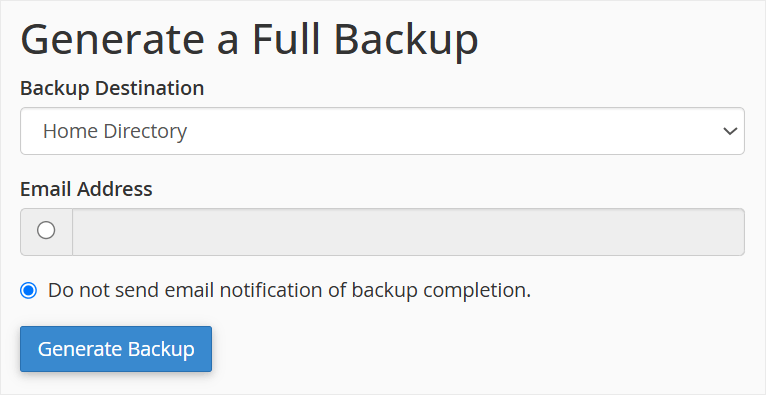
That’s it! Your WordPress website backup will now be created and stored in your chosen location.
How to Backup WordPress Without a Plugin (FTP Method)
Another reliable way to create a manual backup of your WordPress files is by using an FTP client.
FTP (File Transfer Protocol) lets you directly access and download your website files. This method is particularly useful when you can’t access your WordPress admin area. Or, when you need to quickly back up specific files rather than your entire site.
There are several excellent FTP clients available for both Mac and Windows computers. For this tutorial, we’ll demonstrate the backup process using FileZilla, a popular free FTP client.
First, you’ll need to connect to your site using the FTP software. If you’re new to FTP, check out our guide on what FTP is and how to use it for detailed connection instructions.
Once connected, navigate to your website’s root directory in the right panel. Here, you’ll find important WordPress files and folders like wp-content, wp-admin, and configuration files such as wp-config and .htaccess.
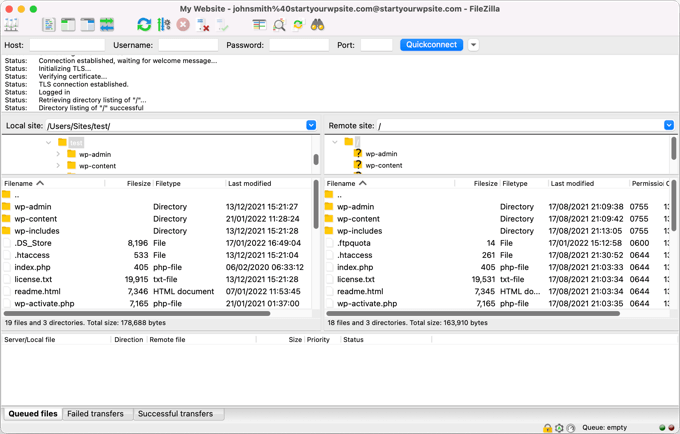
To create your backup, simply right-click on any folder or file you want to save.
After that, select the ‘Download’ option.
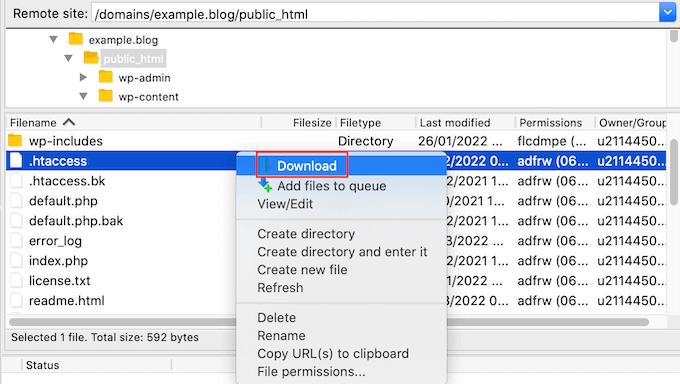
These downloaded files serve as your backup copy and can be stored safely on your computer. If you ever need to restore your website, you can easily upload these files back to your server using FTP.
How to Backup a WordPress Site Without FTP/cPanel Access
Sometimes you might not have access to FTP or cPanel, but that doesn’t mean you can’t create a backup of your WordPress website.
Here are several alternative backup methods you can use:
- Use a backup plugin – This is our recommended method because it works even when you can’t access FTP or cPanel. A good backup and migration plugin provides automated backups and easy restoration options, ensuring you’re always protected.
- Hosting dashboard backup – Many WordPress hosting providers offer their own backup tools through their dashboard, as we discussed in the hosting backup section above.
- Professional backup software – Services like CodeGuard provide independent backup solutions that work separately from your WordPress dashboard.
- WordPress export tool – While limited, WordPress’s built-in export feature can save your posts, pages, and other content. However, note that this won’t back up your themes, plugins, or media files. Learn more in our guide on how to export a WordPress site.
- Hosting file manager – Most hosting providers offer a file manager in their dashboard. Let’s look at how to use Bluehost’s file manager as an example.
To use Bluehost’s file manager, first log in to your Bluehost dashboard. Navigate to the ‘Websites’ tab and click ‘Settings’ for the site you want to back up.

In the ‘Overview’ tab, scroll down to find the Quick Links section.
Simply look for and click on the ‘File Manager’ button.
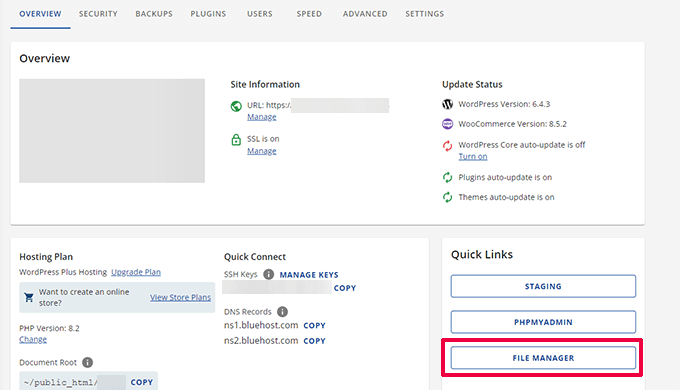
When the file manager opens in a new tab, look for the public_html folder in the left menu.
Click the ‘+’ symbol next to it to see your website files.
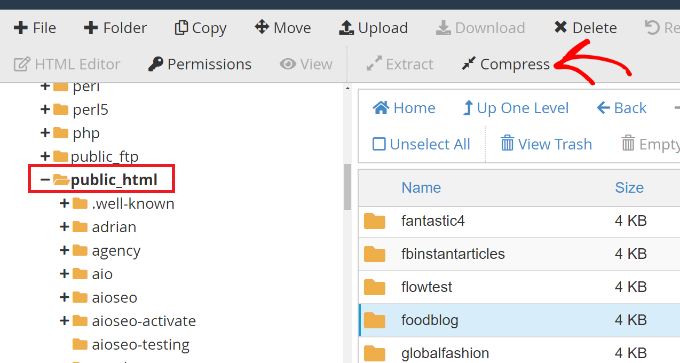
Select your website’s folder and click the ‘Compress’ option at the top.
In the popup window, choose ‘Zip Archive’ and click ‘Compress Files’ to create your backup file.
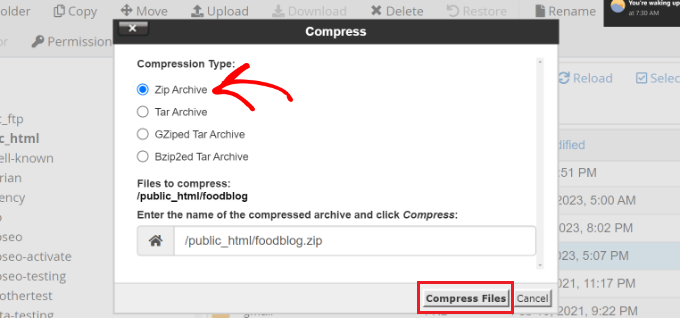
Once the compression is complete, you’ll see a confirmation message.
Click ‘Close’ to continue.
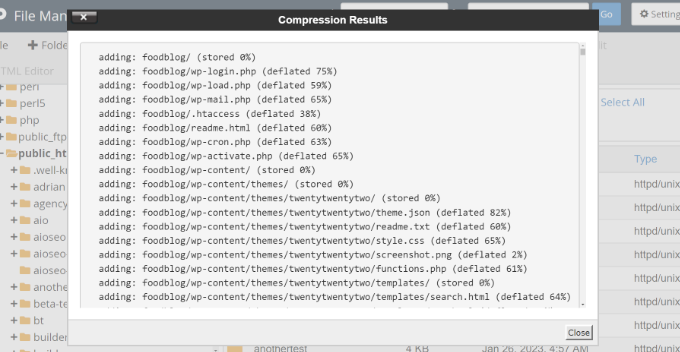
Now, find your newly created zip file in the public_html folder.
Then, click ‘Download’ at the top to save it to your computer.
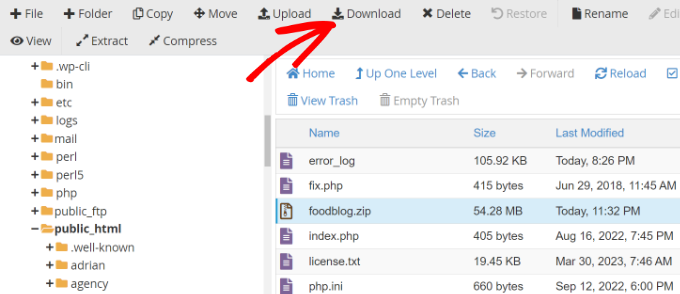
You can now store this backup file in a secure location. If your website ever experiences problems, you can use this backup to restore your content and get your site back online quickly.
How to Backup WordPress to a Cloud Storage Provider
Storing your WordPress backups in cloud storage adds an extra layer of security to your backup strategy.
If your hosting server experiences issues, you’ll still be able to access your backup files from anywhere. Plus, cloud storage providers often offer better file protection and redundancy than local storage.
The most efficient way to create cloud backups is by using a backup plugin like Duplicator or UpdraftPlus. These plugins can automatically connect to various cloud storage services and schedule regular backups, eliminating the need for manual uploads.
What’s more, they also handle file compression and can restore your site directly from cloud storage if needed.
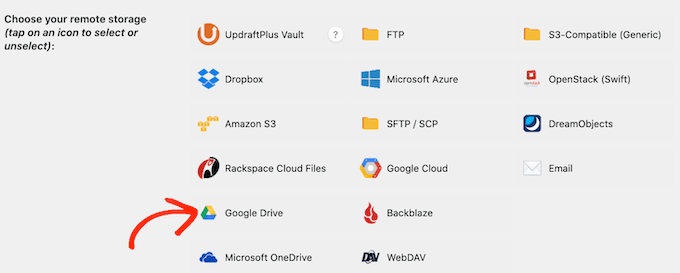
Alternatively, you can use any of the manual backup methods we discussed above and upload those backup files to your preferred cloud storage service.
We’ve created detailed guides for various cloud storage options. You can choose the one that best fits your needs:
- How to Back Up a WordPress Site to Dropbox (Step by Step)
- How to Backup Your WordPress Site to Google Drive (Free and Easy)
- How to Connect Google Drive to Your WordPress Media Library
- How to Backup WordPress to OneDrive (Free + Paid Options)
- How to Backup WordPress to Amazon S3 (Free + Paid Methods)
How to Backup WordPress Database
While full site backups are important, there are times when you only need to back up your WordPress database. Your database contains all your posts, pages, comments, and settings, making it the heart of your website’s content.
For example, you might want a database-only backup when:
- You’re about to update your WordPress core.
- Making significant changes to your site’s content.
- Moving your site to a new domain while keeping the same design.
- Testing new plugins that might affect your content.
- Creating a staging site with real content.
The good news is that there are several ways to create database backups.
If you’re using a backup plugin like Duplicator, you can easily create a database-only backup by selecting the ‘Database Only’ option.
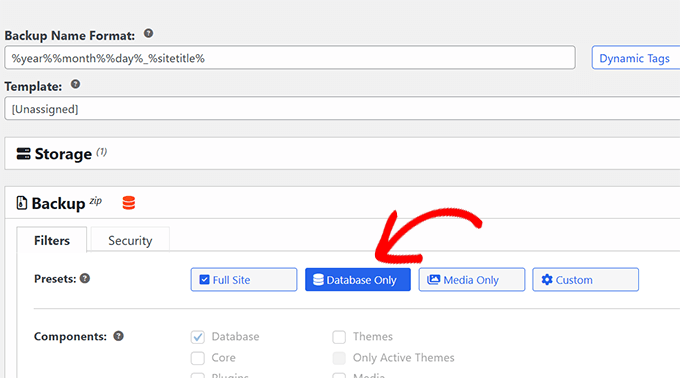
For those who prefer a manual approach, you can use phpMyAdmin, a powerful database management tool that comes with most hosting providers.
If your host uses cPanel, then you can access your cPanel dashboard and look for the ‘phpMyAdmin’ icon in the ‘Databases’ section.
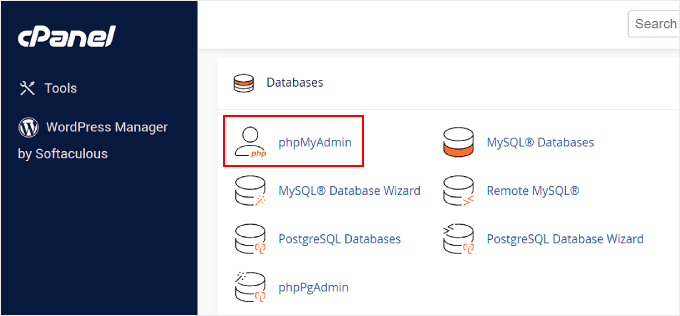
If your hosting provider has a custom dashboard, then the steps will be different.
For Bluehost users, you can click on the ‘Websites’ tab, and then select ‘Settings’ for your target site.

Now, in the Overview tab, just scroll down the page slightly.
After that, simply find ‘phpMyAdmin’ in the Quick Links section.
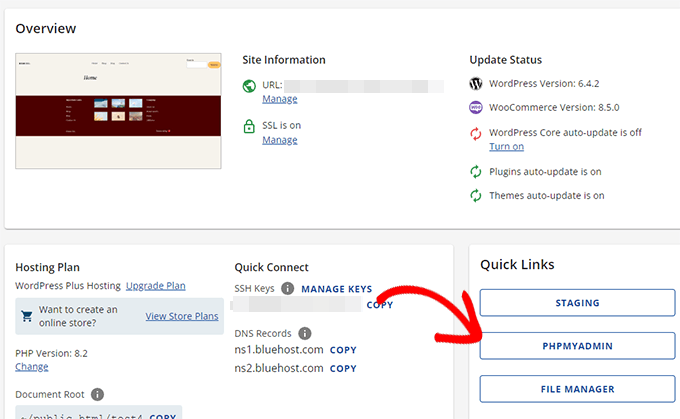
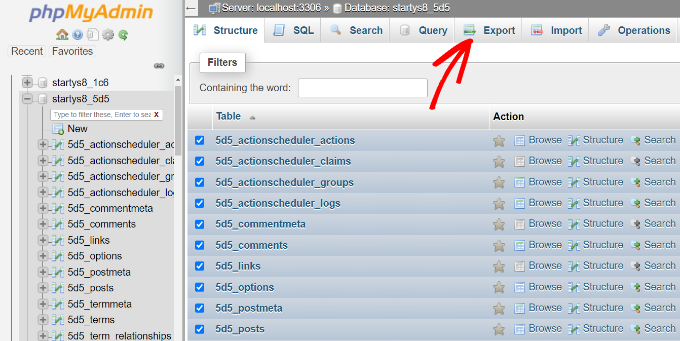
Once you’re in phpMyAdmin, you can manage and back up your database.
For a complete walkthrough of the process, check out our guide on how to make a WordPress database backup.
How to Restore Your WordPress Site
Now that you’ve created your backup, let’s talk about restoration. Before you begin the restoration process, you might want to preview your backup as a live website to ensure it’s the correct version you want to restore.
There are several ways to restore your WordPress site, depending on what type of backup you have. If you only have a database backup, don’t worry. You can still restore your site using just the database.
If you’re using Duplicator Pro, the process is very simple. Just go to Duplicator Pro » Import Backups and drag your backup file into the upload area.
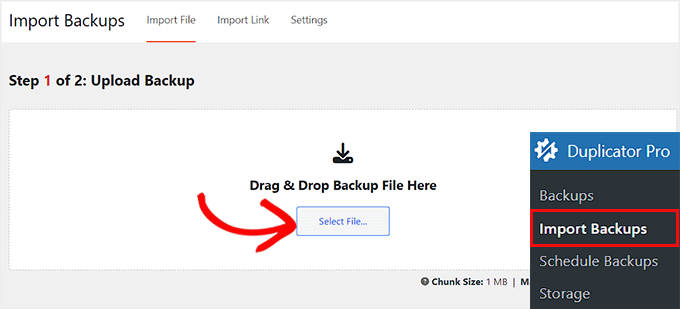
Even better, Duplicator offers a streamlined option where you don’t need to install WordPress first.
Using the Duplicator installer file, you can set up WordPress and restore your backup in one smooth process, saving you valuable time and effort. You can read our guide on how to clone a WordPress site for more information.
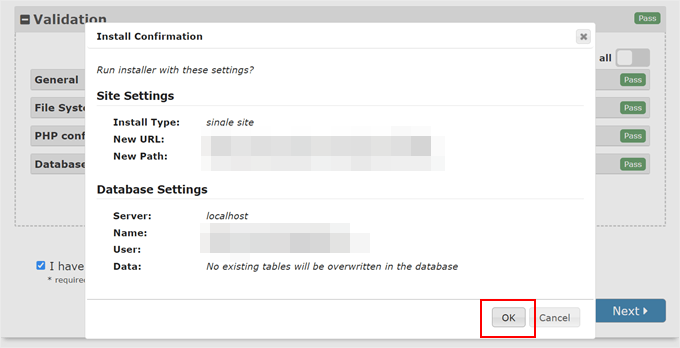
On the other hand, you can also follow the standard restoration method which requires you to first clean your existing WordPress installation. You can check out our guide on how to uninstall and reinstall WordPress for more information.
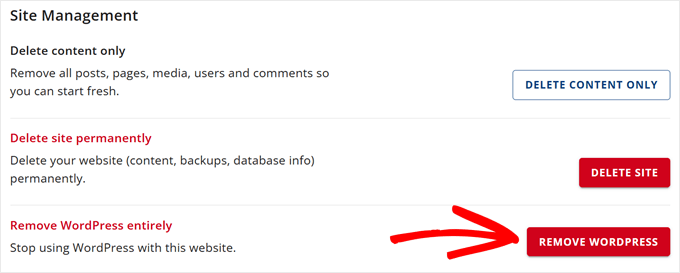
Alternatively, some hosting providers like Bluehost offer the option to delete your website, including the WordPress software. To do this, go to the ‘Websites’ tab on your dashboard and select ‘Settings’ on the website you’d like to restore.

After that, switch to the ‘Settings’ tab.
Make sure to scroll all the way to the bottom.

Now, select the ‘Remove WordPress’ option.
This will remove your WordPress website, including the software and the site files.
A popup will now appear.
Here, click on the confirmation checkbox and click ‘Remove WordPress.’
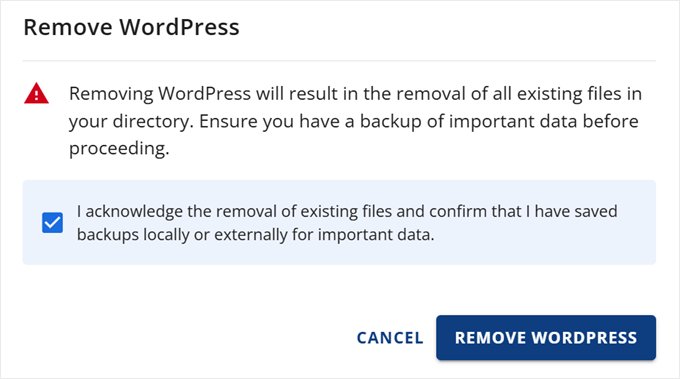
Wait a few minutes for your WordPress website to be deleted. Then, you can install a fresh copy of WordPress before restoring your backup.
For complete instructions on all restoration methods, check out our detailed guide on how to restore WordPress from a backup.
🚨 Alternative: Hire a WordPress Maintenance Service
Creating and managing WordPress backups requires consistent attention and regular maintenance. While the methods above work well, they mean that you have to remember to create backups, store them safely, and manage the entire backup process yourself.
This is why many business owners choose WPBeginner’s Maintenance Services. With over 16 years of experience in managing WordPress sites, our team can handle all your backup needs and many more.

We offer 24/7 support, continuous uptime monitoring, and regular updates to the WordPress core, themes, and plugins. Additionally, we regularly back up your site to the cloud, so if anything goes wrong, we can quickly restore it to a previous version.
Beyond backups, we remove malware, prevent slow loading times, and focus on optimizing your site’s performance. Our maintenance service provides peace of mind knowing that professionals are actively protecting and maintaining your website.
Ready to stop worrying about backups and website maintenance? Book a free consultation call with our team to learn how we can help protect and maintain your WordPress website.
We hope this article helped you learn how to back up your WordPress site. You may also want to see our guide on how to back up WordPress multisite and our expert picks of the best Dropbox plugins for WordPress.
If you liked this article, then please subscribe to our YouTube Channel for WordPress video tutorials. You can also find us on Twitter and Facebook.


Margie B.
I generally love your tutorials – they’ve helped me out quite a few times. I normally backup my sites manually, but I’m not as religious about it as I should be. I downloaded Duplicator and found your tutorial, but I really wish you’d given instructions for the free version as well, because it definitely looks different than the Pro version.
WPBeginner Support
Thank you for sharing your feedback!
Admin
Samuel
I’ve learned the hard way that regular WordPress backups are essential after experiencing a major site crash, I now prioritize backup testing. I restore backups on staging sites to ensure functionality and data integrity before pushing changes live.
I use UpdraftPlus to automatically backup my sites daily, and store them on Google Drive for added security.
David Lim
According to a survey, data loss is a serious problem and 54% of website owners have experienced data loss, while only 10% perform daily backups.
So, this is why you should create backups.
Absalom Singagwari
site backups are a critical function of any website. Its critical that one uses a reliable and easy to use method to backup their website because over and above the backing up, there is need to ensure the backup actually works, backup integrity as some call it. In my view, the best way to backup would be to use a reliable plugin that does all the dirty work for you. Its also critical to automate the process so that even when you forget, you are able to backup the site even when you are away!
THANKGOD JONATHAN
These methods such as plugins, manual backups, and cloud storage services are really good options.
However, for me, I refer the plugin method and then automat it with Gdrive.
Mrteesurez
Thanks for this post, it really helpful to saves years of hard work.
But, do backup using Cpanel included the media files like images or audio in the backed up files ??
Is exporting contents just from setting > tool > export can be considered as backup ??
WPBeginner Support
The cPanel backup would include the files in your media folder but using tools>Export would not backup the media files as that would store where to grab the files from and not the files themselves.
Admin
Mrteesurez
“as that would store where to grab the files from and not the files themselves”
What do you mean ??
because I have exported media files from a site and imported them into another and it worked well and showed those media files.
WPBeginner Support
The export file would point to where on the old site your new site would be able to download the files, the export file does not include the media files themselves.
Ralph
Thank you for this guide about such an important thing. Lack of backup can destroy years of work. Everybody should do backups!
Can this Duplicator plugin save and send the backup of my site to Google Drive automatically?
WPBeginner Support
You can set up an automatic backup with the plugin
Admin
Jiří Vaněk
Yes, and it works like magic. I’ve been using Duplicator for several months, and you can set up either manual or automatic backups to Google Drive. In the first step, you just need to link Google Drive with Duplicator, or rather with your website, but the process is really very simple. Then, on Google Drive, you select the folder where Duplicator will place the backups, either manually or automatically, as you set it up. You can also set the maximum number of backups that will be stored on the drive. As a bonus, you get weekly email reports about the backups.
Jiří Vaněk
Great! I’ve always been used to manually backing up data—downloading data via FTP, creating a MySQL dump, and storing it all somewhere on the cloud. The older I get and the more websites I manage, the more I consider it fantastic to automate this task and reduce the chance of human error. There’s nothing worse than something breaking and not having a backup.
Ahmed Omar
thank you for this post about this important part.
but here you explained about cPanel of blue host, is it the same on site ground.
and if there an option to back up the site regularly?
WPBeginner Support
SiteGround has a different interface than BlueHost but should still give access to a file manager. Plugins and some hosting providers have tools for scheduling backups to automate it for you.
Admin
Moinuddin waheed
I have used updraft plus for back up of almost all my websites and found it very easy and smooth.
This plugin takes care all of the things that needs to be taken into consideration.
The interface is beginners friendly and anyone can use it with ease.
I have not used duplicator so far but will give it a try in the future.
Linda Rogers
Your restoration piece seems to assume that the WP installation is still accessible. I had a site hacked and the installation was no longer accessible. After deleting the hacked site and doing a new Wordpress install. I couldn’t restore the site from either my Duplicator or Updraft backups. I think that was because I had a new database. Hopefully this never happens again but, what about that situation.
WPBeginner Support
This article is for backing up your site, for restoring your WordPress site you would want to follow our guide below for restoring a site from a backup.
https://www.wpbeginner.com/beginners-guide/beginners-guide-how-to-restore-wordpress-from-backup/
Admin