You know how sometimes an image just blends into your blog’s background? It can make things look a little flat. But here’s the thing: adding borders to WordPress images is such a simple fix, yet it makes a world of difference. It can really make your images pop.
At WPBeginner, we love adding a clean border around our images to separate them from the blog’s white background. This small change has made our site look much more polished.
And the best part? You don’t need to be a designer or mess with complicated code to do it. We’ve found a few super easy ways to add borders to WordPress images without the hassle.
In this guide, we’ll walk you through how to easily add a border around an image in WordPress. Get ready to make your blog look sharp in no time!

Why Add a Border Around an Image in WordPress?
Images are powerful tools for communication. They can share information quickly and make text-heavy pages more appealing.
However, sometimes images can blend into the website’s background. This is more likely if you use a background image or your site’s colors are similar to those of your pictures.
People with vision impairments or color blindness may also find it challenging to distinguish images from the background. If you’d like to learn more, we have a guide on improving WordPress website accessibility.
Adding a border around an image in WordPress clearly distinguishes the image from your site’s background. It’s also a great way to draw attention to your most important visuals.
With that in mind, we will walk you through how you can add a border around an image in your WordPress blog. Here’s a quick overview of all the methods we will cover in this article:
Ready? Let’s get started.
Method 1: Using Custom CSS Classes to Add a Border Around an Image in WordPress
Creating a custom CSS class is a smart and easy way to add borders to your images. This method lets you define your image border settings in one place.
Once you’ve created the class, you can easily apply it to any image. This is perfect if you plan to add borders to multiple images across your site.
There are a few ways to create a custom CSS class. You can use the theme customizer, the Full Site Editor, or the WPCode plugin.
We always recommend using the WPCode plugin as it’s very beginner-friendly. To learn more about it, see our WPCode review.

So let’s install and activate the WPCode plugin. If you need help, then you can refer to our guide on how to install a WordPress plugin.
You can use the free version of WPCode, but upgrading to WPCode Pro will unlock more features like code scheduling and complete revision history.
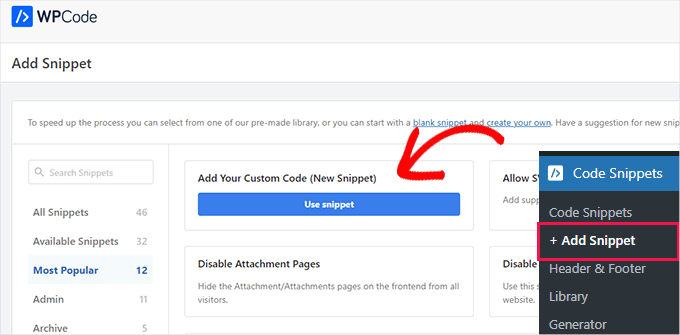
Upon activation, you’ll want to navigate to Code Snippets » + Add Snippet.
Then, you can hover over the ‘Add Your Custom Code (New Snippet) option and click on ‘Use snippet.’
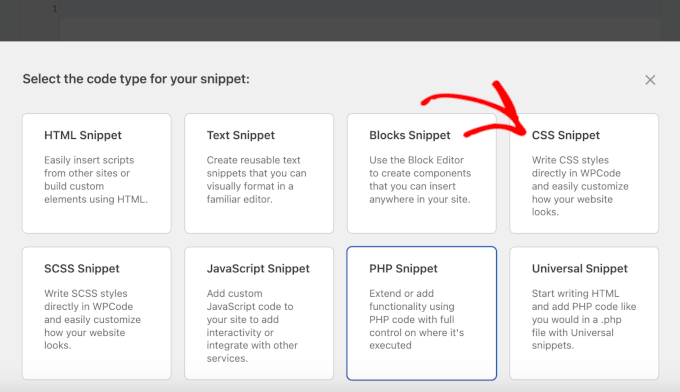
On the next screen, WPCode will ask you to choose a code type.
You might notice that WPCode’s default settings point to ‘PHP Snippet,’ but here, you’ll need to click on ‘CSS Snippet.’
This will open the WPCode editor. From here, you can first create a name for the custom snippet. For example, we use ‘border-black.’
Now, do note that when creating your CSS class, you’ll need to specify the border’s color and width.
For example, you can set pixels (px) for the width and a hex color code for the color. Don’t worry — it’s simpler than it sounds!
For example, in the following code snippet, we are creating a black border that’s 5 pixels wide:
.border-black {
    border: #000 solid 5px;
}
In the sample code above, border-black is the name of the CSS class (the same as our custom code snippet in WPCode, making it easier to stay organized.)
You can use any name that you want, but you’ll need to type in the CSS class name every time you want to create a border. With that in mind, you’ll want to make a CSS class name that’s short and easy to remember.
Now, all you need to do is copy that code snippet to WPCode’s ‘Code Preview’ field like this:
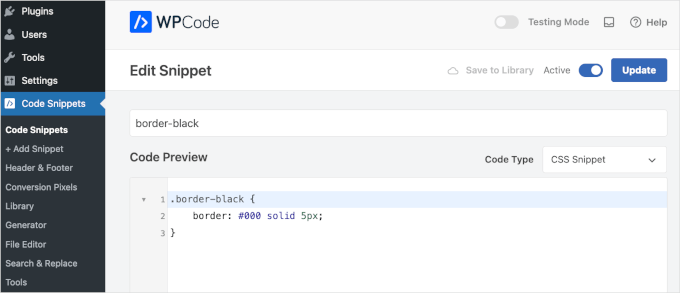
After that, you can switch the toggle to activate the snippet and hit the ‘Save Snippet’ or ‘Update’ button. For detailed instructions, you can see our guide on adding custom CSS to WordPress.
You can add as many CSS classes as you want. For example, you might create borders that have different colors.
Now, adding a border to an image is pretty straightforward.
To get started, go ahead and click on the image on your WordPress page or post. Next, you’ll want to look at the ‘Block’ tab on the right side of your screen and locate the ‘Advanced’ option there.
Give it a click to expand the section.
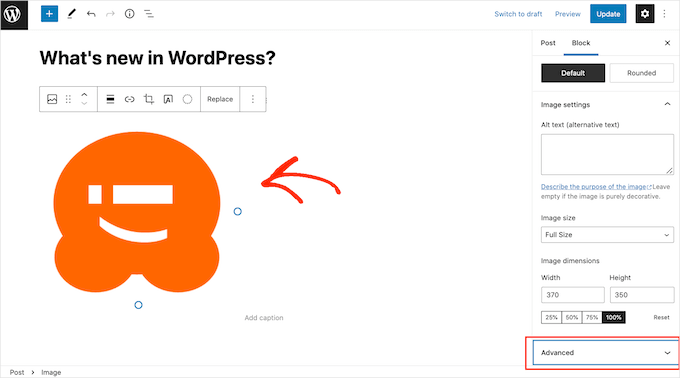
In the ‘ADDITIONAL CSS CLASS(ES)’ field, you can type in the name of the CSS class that you want to add to the image.
Note that, as you can see in the following image, the border won’t appear in the WordPress page editor.
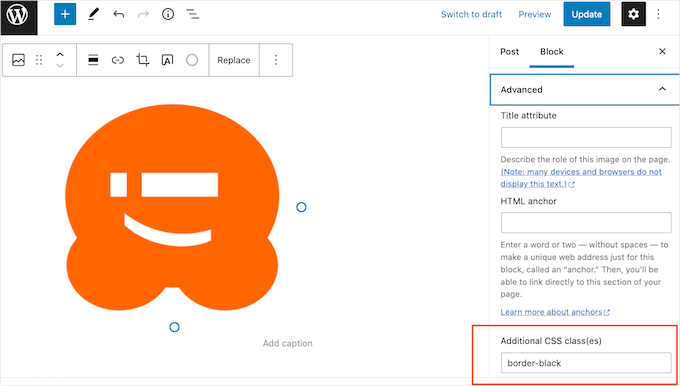
To see how the border will look to your visitors, go ahead and click on the ‘Preview’ button.
You will now see your image with the border applied.

If you are happy with how the border looks, then you just need to publish or update the page.
Method 2: Using a Page Builder to Add a Border Around an Image in WordPress
Another method is to use a page builder plugin.
Drag and drop page builders allow you to easily design and customize web pages, like login and landing pages. You can add text, images, and other elements without needing any coding skills.
These tools also let you easily create unique borders for each image. You can design them using a visual-based editor, which is easier for many people.
We recommend SeedProd, which is the best landing page builder for WordPress. It’s user-friendly and lets you easily create professional-looking pages.
Feel free to check out our full SeedProd review to see why we recommend this tool.
SeedProd has a special Image block with built-in border options. You can also easily add shadows and adjust spacing.
Note: In this guide, we’ll be using the free version of SeedProd so you can add borders to your images no matter what your budget is. There is also a SeedProd Pro version that gives you access to a library of 2 million stock photos, plus additional blocks.
First, you’ll need to install and activate the plugin. If you need help, then please see our guide on how to install a WordPress plugin.
Upon activation, let’s go to SeedProd » Landing Pages from your WordPress dashboard.
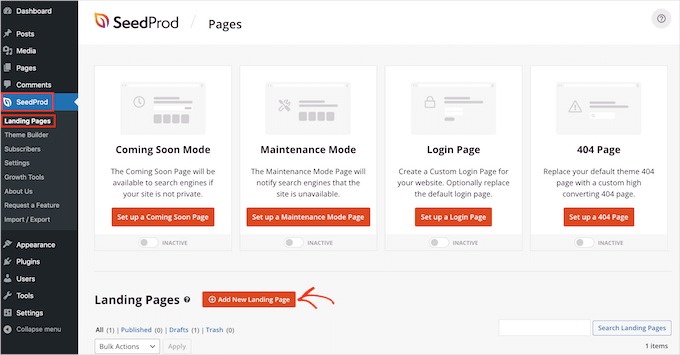
SeedProd comes with hundreds of professionally designed templates, which are grouped into categories. Along the top of the screen, you’ll see categories that you can use to:
- Build a 404 page
- Create a custom login page
- Design a beautiful coming soon page
- And more.
To take a look at a design, simply hover your mouse over a template and then click on the magnifying glass icon when it appears. This will show a preview of the template.

If you’re happy with how the template looks, then go ahead and click on ‘Choose This Template.’
In the ‘Page Name’ field, type in a name for the page. By default, SeedProd will use this name as the page’s URL.
If you want to change this automatically created URL, simply edit the text in the ‘Page URL’ field.

Once you’ve entered the information, you can click the ‘Save and Start Editing the Page’ button. This will open your chosen template in SeedProd’s drag-and-drop editor.
In the left-hand menu, you’ll see all the blocks that you can add to your WordPress page using drag and drop.
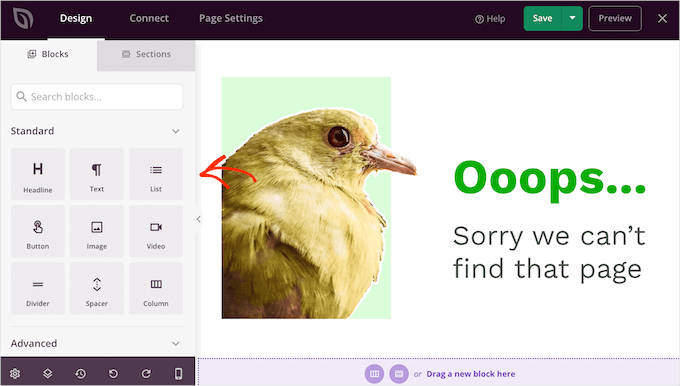
Simply find the ‘Image’ block, then drag it onto your page design.
Once you’ve done that, just click on the ‘Image’ block to see all the settings that you can use to customize the block.
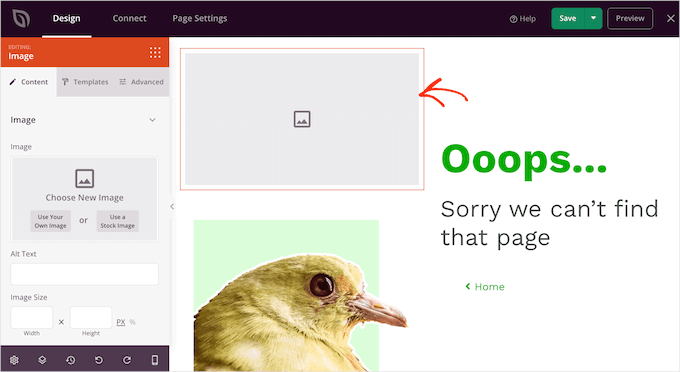
In the left-hand menu, you’ll want to click on ‘Use Your Own Image.’
You can now choose any image from the WordPress media library.
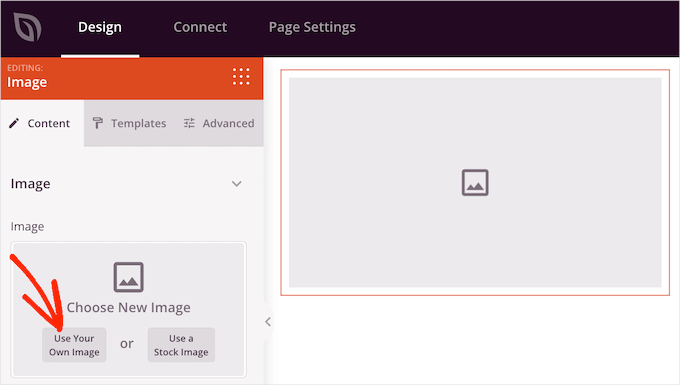
After that, click on the ‘Advanced’ tab in the left-hand menu.
Then, go ahead and click to expand the ‘Image Border’ section.

By default, all of SeedProd’s Border Width settings are 0, which means the image doesn’t have a border.
The first thing you’ll want to do is increase these values to 1 or higher. This will add a visible border to the image.
To get started, click on each of the ‘Border Width’ fields and then either type in a higher number or use the arrow buttons that appear.

When you’re happy with the border’s thickness, you can start to style it.
One option is to change the border’s color by clicking on the field next to ‘Border Color.’ This will open a popup where you can choose a new border color.
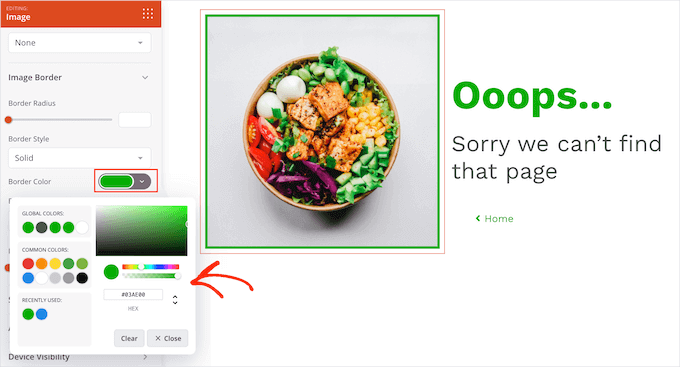
SeedProd offers three simple border styles: solid, dotted, and dashed. You can choose whichever suits your image best.
To try these different border styles, simply open the ‘Border Style’ dropdown and then choose an option from the list.
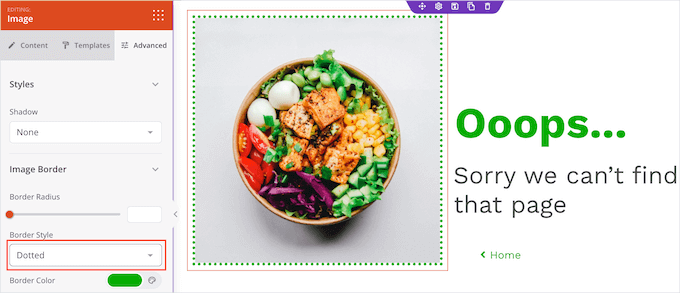
There you have it! And if you want to add a border to other images, just follow the same process described above.
Once you’re happy with your page design, you can click on the ‘Save’ button and then choose ‘Publish’ to make it live.
Method 3: Using HTML and CSS to Add a Border Around an Image in WordPress
You can also add borders using HTML and CSS. This method doesn’t require a plugin, which can be handy.
However, customizing the border’s appearance means writing some code, so it might not be the best choice for beginners. If you’re comfortable with a bit of coding, though, this method offers great flexibility.
To start, let’s add an image to any page or post.
Once you’ve done that, you can click on the three-dotted icon in the upper-right corner and then click ‘Code editor.’
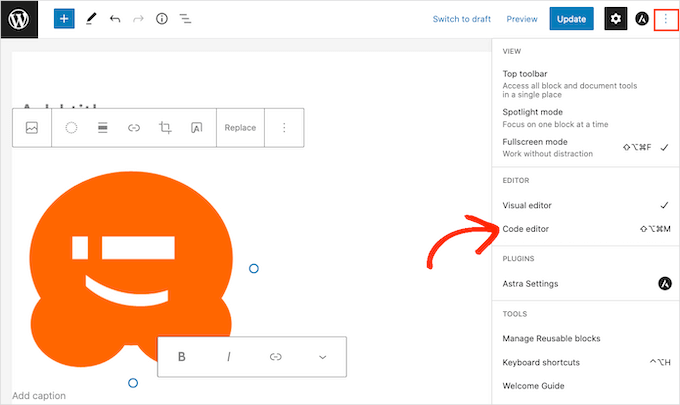
WordPress will now show all the code that makes up the page or post.
You can now find the section of code that adds the image to your page. This code will start with wp:image .
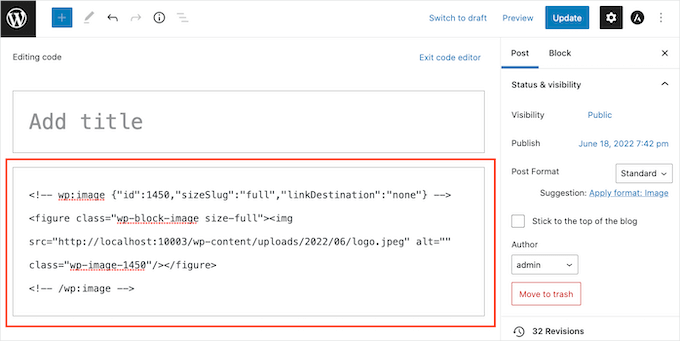
If the page has multiple images, then check the img src= value. This is the image’s URL in your WordPress media library, and it will be different for every image.
Once you’ve found the right section of code, the next step is writing a line of code that adds the border and controls how it’s styled.
For example, in the following code snippet, the border has a 3-pixel width. We’re also adding 3 pixels of padding and margin:
style="border:3px solid #000000; padding:3px; margin:3px;" />
In the sample code above, solid #000000 sets the border’s color. The #000000 value is the hex code for the color black.
If you don’t want to create a black border, then you can replace the value with any other hex code.
And if you don’t want to create a black border, then you can replace the value with any other hex code.
Once you’ve decided on the border code, you’ll need to find the /></figure> section and add your code directly before the first / character.
Let’s look at an example:
<!-- wp:image {"id":1450,"sizeSlug":"full","linkDestination":"none"} -->
<figure class="wp-block-image size-full"><img src="http://localhost:10003/wp-content/uploads/2022/06/logo.jpeg" alt="" class="wp-image-1450" style="border:3px solid #000000; padding:3px; margin:3px;" /></figure>
<!-- /wp:image -->
When you’re happy with your code, exit the code editor by clicking on ‘Exit code editor.’
You should now see a border around your image. Don’t worry if you get a warning about invalid HTML. This is normal and won’t affect how your image is displayed.
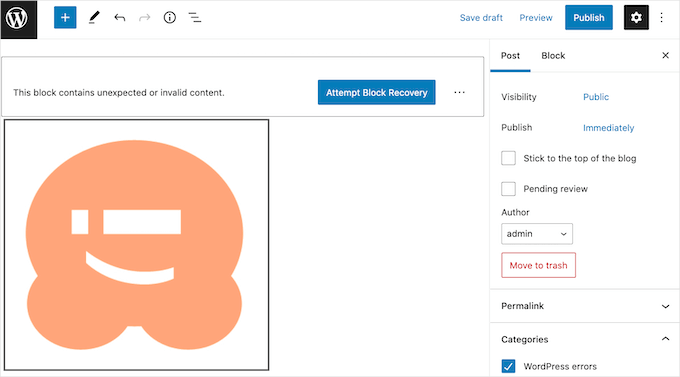
If you’re happy with how it looks, you can go ahead and either update or publish your page as normal.
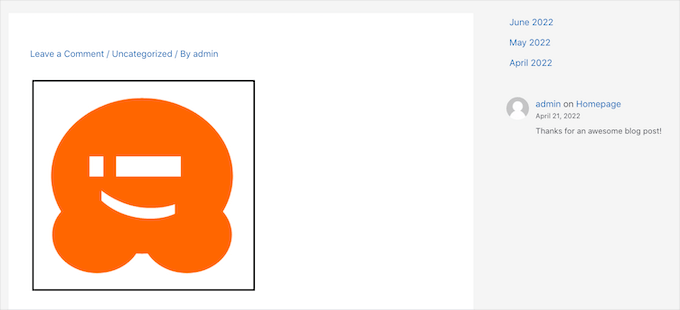
Now, if you visit your website, you’ll see a border around your image.
Bonus Tip: Using a Graphic Design Tool to Add a Border Around an Image
While WordPress offers several methods to add borders, these options can sometimes be limited in style and customization. So, why not edit your image first and then upload it to WordPress after?
This is where graphic design tools come in handy.
Adobe Photoshop is the big player here, with tons of fancy features for the pros. If you don’t want to break the bank, then Affinity Photo is a solid choice – it’s got similar tricks up its sleeve, but you only pay once.
And if you’re watching your wallet, GIMP (GNU Image Manipulation Program) can be your go-to. It’s totally free, open-source, and can do a lot of what the paid tools can.
GIMP is also a great option for beginners and experienced users alike. You can use it on Mac and Windows.
For this tutorial, we’ll demonstrate how you can add a border around an image using GIMP.

Upon installation, you’ll want to open the desktop application for GIMP. Next, you can click File » Open and choose an image to edit from your local drive. Or, you can drag and drop one to GIMP’s editor.
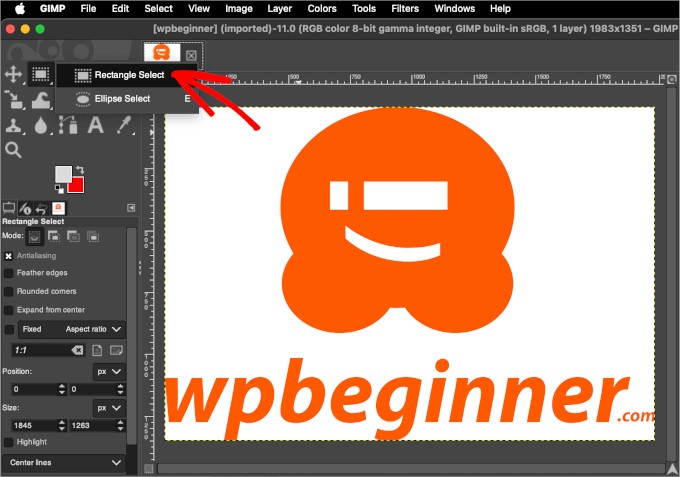
Once the image is loaded on the GIMP editor, let’s draw a border around the image using ‘Rectangle Select Tool.’ You can find this tool on the toolbar at the top left corner.
Next, you might want to check your foreground and background color settings.
This is because GIMP uses the foreground color to stroke the lines. So, if you need to use a specific color for your border, you can click on the foreground color to adjust it.
This will open the color picker, where you can move your mouse over the color selection area or insert the color’s hex code.
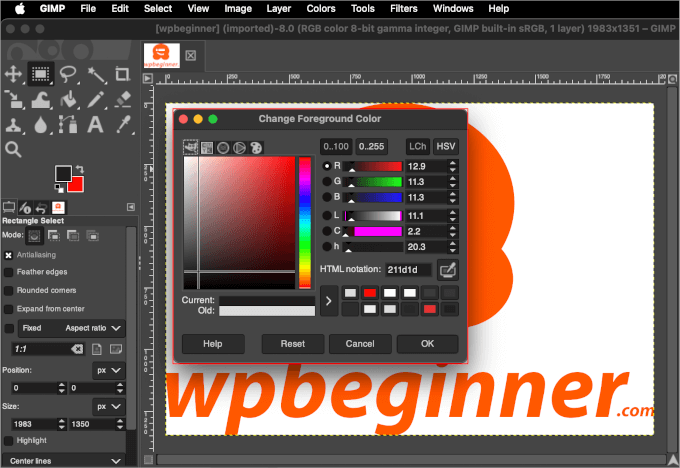
Once you’ve done this, you can click ‘OK.’
Now that you’ve set your border color, it’s time to apply it. You can navigate to Edit » Stroke Selection, and this will open the ‘Stroke Selection’ popup.
Here, you can adjust the stroke’s style, line width, and more. For example, we set our line width at 5 px.
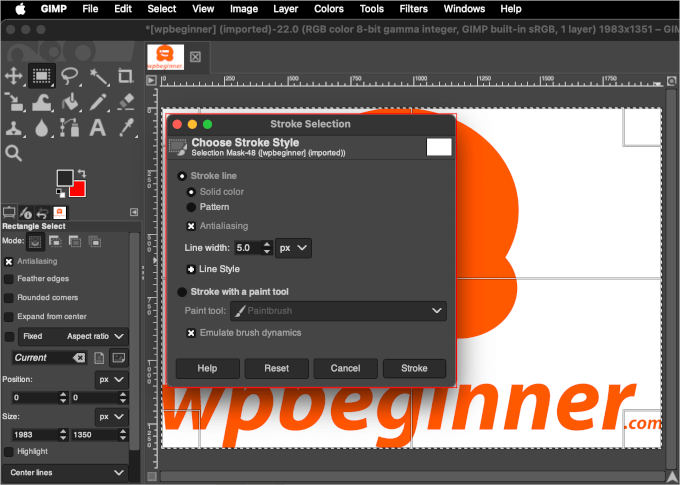
Once you’ve done it, go ahead and click ‘Stroke, and the border should now be added to your image.
Before uploading to WordPress, you might want to optimize the image to maintain excellent site speed and performance. Raw images are often large in size, so this step can be a massive help.
In GIMP, you can optimize your image by resizing it.
To get started, you’ll want to navigate to Image » Scale Image. This will open the ‘Scale Image’ popup, where you can adjust the ‘Image Size’ like so:
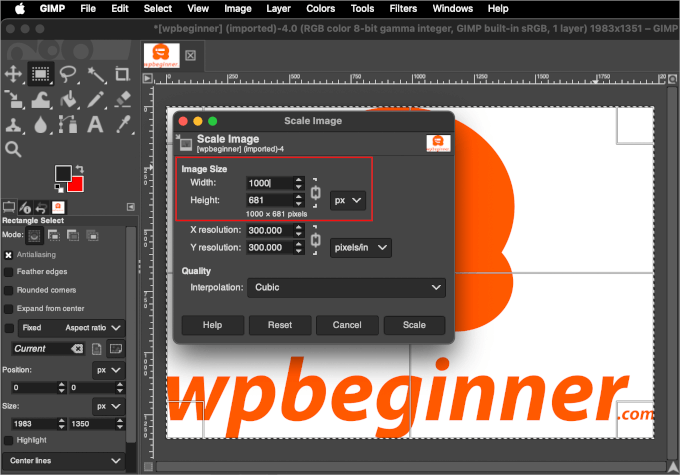
After adjusting the image size, you can click the ‘Scale’ button.
GIMP will then resize the image and display the new version in the editor.
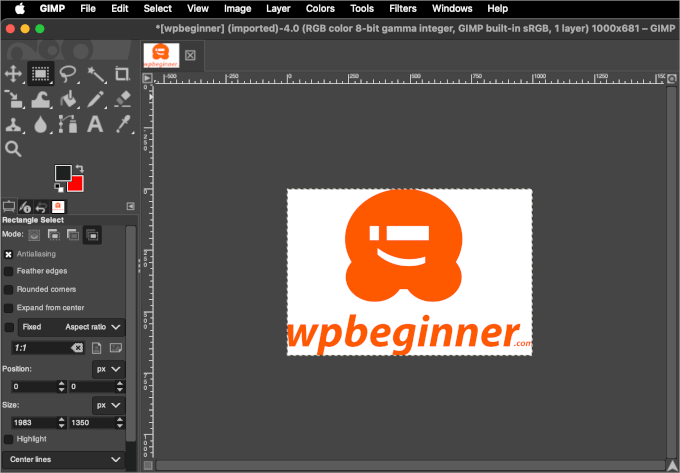
Once done, you can save the image by heading over to File » Export As.
Then, you can follow the prompt to choose a location and name the file. When everything is set, go ahead and click ‘Export.’
Now, you can upload your image to your WordPress post or page. Here’s what it might look like in the block editor:
That’s it – you’ve learned how to add a border around an image using a graphic design tool!
You can use this method whenever you want to upload an image to WordPress.
We hope this article helped you learn how to add a border around an image in WordPress. Next, you can also go through our guide on how to do basic image editing in WordPress or our expert pick of the best featured image plugins and tools for WordPress.
If you liked this article, then please subscribe to our YouTube Channel for WordPress video tutorials. You can also find us on Twitter and Facebook.


Reuben
Trying to get this to work using the Gutenberg editor and instead I get the following error: This block contains unexpected or invalid content.”
I know there’s no mistake. I’m adding a CSS class in the html but Gutenberg doesn’t like it.
Aboud Dandachi
The plugin you mentioned apparently hasnt been tested with the last 3 major releases of Wordpress. Would not be a good idea to use it then.
WPBeginner Support
We will be sure to look into updating our article when we are able. For not tested with the version of WordPress message you would want to take a look at our article below:
https://www.wpbeginner.com/opinion/should-you-install-plugins-not-tested-with-your-wordpress-version/
Admin
Michael Torres
Very informative. Thank you for helping us as beginners.
WPBeginner Support
Thank you, glad you like our content
Admin
Joey
Excellent. Thank you for the concise and informative post.
WPBeginner Support
You’re welcome
Admin
Eduardo
Hi, nice article!
Do you know any way to put a border with a “wood style”?
I’m making a wordpress site to show landscape photos and i want to use a wood style border so people couldsee how the picture will be as a real photo frame , can you help me with this?
Thanks!
david
Very very talented article not so many people on the net and in wp word know how to make thing simple and clear !
thanks i got my beautiful nice border set nicely
dav from france
Erin
This looks beautiful, so clean.
Is there any way to have images and text (with links) within a box on wordpress. Creating a book reviews site so will have to do this many times
Connor Rickett
Nice little article. There’s a plugin for every basic thing in WordPress, which is what makes it so friendly to beginners. But, you can dive right into the guts of it if you don’t want to run a plugin for something as small as borders (especially since your site is faster without them).
It was good of you to show the child theme option, since this will add the borders to all images, past, present, and future.
You might also mention that, by changing the border width and color, you can create “boxes” and “frames” around the images, using nothing but what you’ve got up here already.