When we first started WPBeginner, one of the most useful features on our site was the blogroll – a curated list of resources that helped our readers discover other valuable WordPress content.
Today, we still use blogrolls across our sites to share partner links and helpful resources with our audience.
While many WordPress users think they need a plugin to create a blogroll, there’s actually a much simpler solution built right into WordPress.
Let us show you the step-by-step process we use to add blogrolls to WordPress sites without installing any plugins. This method is perfect whether you’re a beginner or an experienced WordPress user.
What Is a Blogroll?
A blogroll is a list of links to other blogs related to your own WordPress blog. It could include links to your other websites, the blogs you like, or any websites you want users to check out.
In its early days, blogging was more personal and community-driven. Like-minded folks often linked to other blogs that they enjoyed.
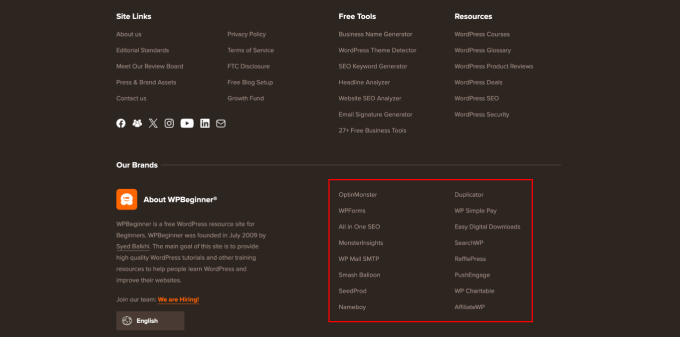
Here is how we use a blogroll on WPBeginner. You can see links to our free tools, resources, and other product sites.
Originally, many blogging platforms included blogrolls by default. However, as blogging grew more mainstream and competitive, the feature gradually disappeared.
WordPress has had a blogroll feature from the very beginning. It was first called Links and then renamed Blogroll in WordPress 2.1.
It was again changed to Links in WordPress 2.5 and remained that way until WordPress 3.5. At that time, the WordPress team removed the feature from the core altogether.
The feature was still available as a free plugin called ‘Link Manager.’ However, that WordPress plugin hasn’t been updated in years, and you no longer need it to add a blogroll in WordPress.
🌟 If you are interested in how WordPress has changed over time, you can read our in-depth article on the history of WordPress.
Why Add a Blogroll in WordPress?
A blogroll provides your users with the opportunity to visit other sites that you recommend.
Normally, these are blogs or websites that you or your company owns. However, you can also add links to other blogs you admire or want your users to check out.
This allows your users to discover other blogs you own or look at other sites you recommend.
📝 Related reading: See our tutorial on monitoring and fixing broken links in WordPress.
That being said, let’s look at how to easily add a blogroll in WordPress, manage links, and easily display it anywhere on your website. You can click the links below to jump ahead to any section:
Creating a Blogroll Menu in WordPress
WordPress has an awesome menu management feature, which was why the core team decided to remove the blogroll feature.
Normally, you will use navigation menus in WordPress to add links to your website’s navigation bar, footer links, or other places.
However, you can also use the same navigation menu to create and manage a blogroll in WordPress.
There are multiple ways to add a navigation menu in WordPress, depending on your WordPress theme.
If you can see a ‘Menus’ page in the WordPress admin area under Appearance » Menus, then you are using a classic theme.
On the other hand, if you only see the Appearance » Editor menu, you are using a full site editor (FSE) theme. You can jump to the full site editor instructions here.
We’ll start with the Classic themes and then show you how to add a Blogroll navigation menu in themes that use a full site editor.
Adding Blogroll Links in Classic Themes
Simply go to the Appearance » Menus page to create a new menu.
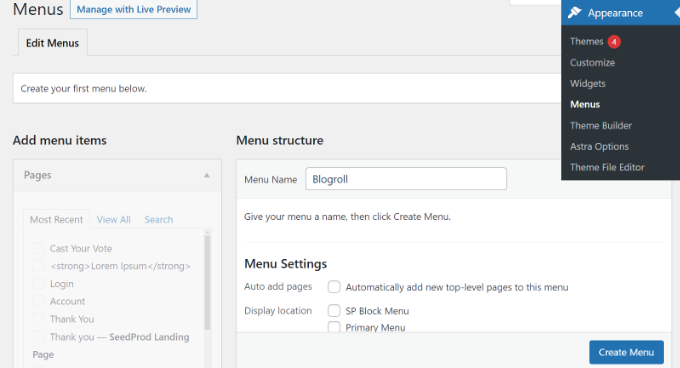
WordPress will now create a new blank menu for you and ask you to provide a name for it. You can name it Blogroll so that it is easy to identify when working on your WordPress website.
Don’t forget to click on the ‘Create menu’ button to save it.
After that, you can click to expand the ‘Custom Links’ tab under the ‘Add menu items’ column on the left.
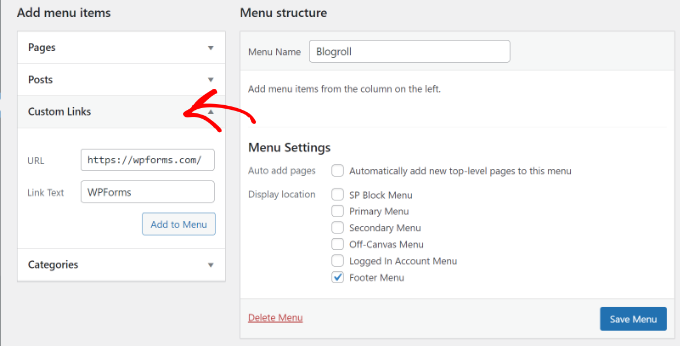
Here, you need to enter the URL of the blog or WordPress website and then add the blog title into the ‘Link Text’ field. After that, just click on the ‘Add to Menu’ button.
You will now see an item appear in the right column under your blank Blogroll menu.
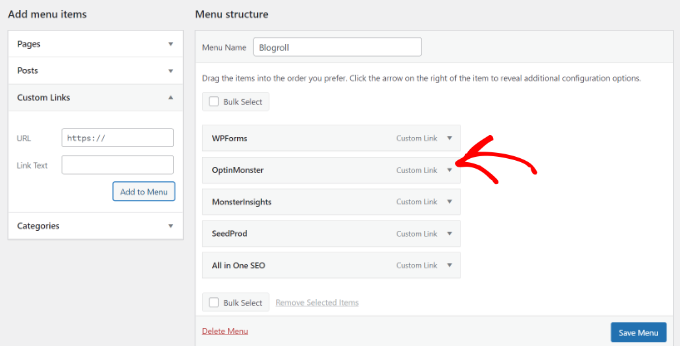
Now, you can repeat the process to add links you want to display in your blogroll. After you finish, don’t forget to click the ‘Save Menu’ button to store your blogroll links.
Open Blogroll Links in New Window and Make Them Nofollow
Blogroll links are external links, meaning they take users away from your website and pass along SEO link juice.
This is why you need to make internal linking a habit so that users and search engines spend more time on your site.
If you own all the links in your blogroll and don’t mind users leaving one of your websites to view another one, then you don’t need to add these.
However, if you don’t own those external links, then you may want to open them in a new window and mark them ‘nofollow’.
These additional options are hidden by default, but you can easily unhide them.
To do so, simply click on the ‘Screen Options’ button in the top right corner of your ‘Menus’ page. It will display a fly-down menu where you need to check the box next to the ‘Link Target’ and ‘Link Relationship (XFN)’ options.

After that, scroll down to the links you added earlier and click on the ‘Custom Link’ option to expand it.
You can now check the box next to the ‘Open link in a new tab’ option and then enter ‘nofollow’ into the ‘Link Relationship (XFN)’ field.
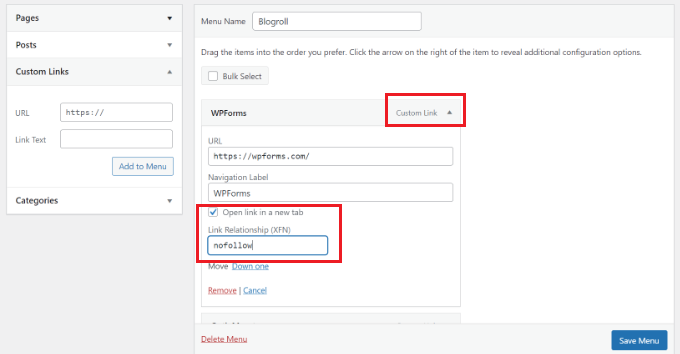
You can repeat the process for all the links that you want to nofollow or open in a new window. After that, don’t forget to click the ‘Save Menu’ button to save your changes.
You can learn more about nofollow links and when to use them in our detailed guide on how to add nofollow links in WordPress.
Displaying the Blogroll on Your WordPress Site
Now that you’ve created the blogroll, you can go ahead and add it to your WordPress blog.
The most common place to display a blogroll is your website’s sidebar. However, you can also create a blogroll page to display links to all the resources, blogs, and interesting websites that you recommend.
Simply go to the Appearance » Widgets page and click the ‘+’ button to add the Navigation Menu widget block to your sidebar.
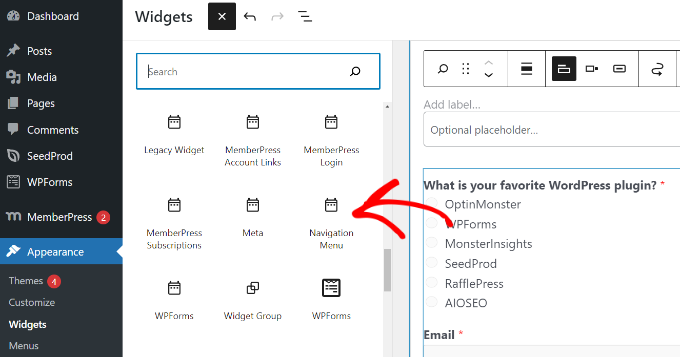
After that, enter the title you want to display for the blogroll, and then select the menu you created earlier from the dropdown menu.
Don’t forget to click the ‘Update’ button to store your widget settings.
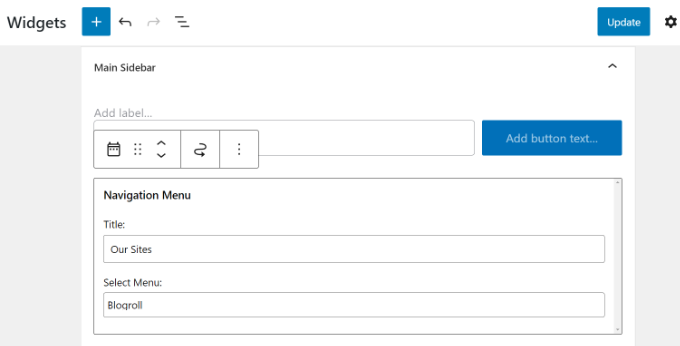
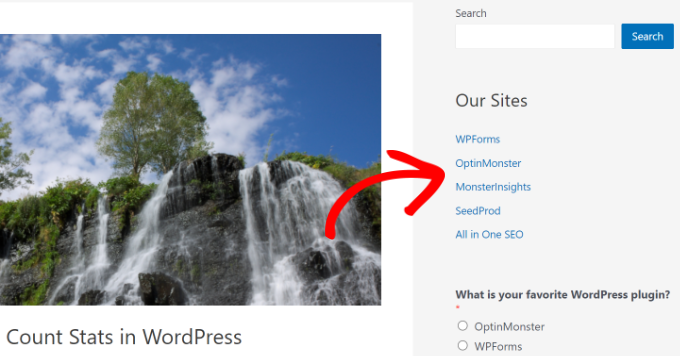
You can now visit your website to see your Blogroll displayed in the sidebar.
Here is how it looked on our test website.
You can also show the blogroll in the footer area if your WordPress theme has a Footer widget area.
You can check that by going to the Appearance » Widgets page from your WordPress dashboard and scrolling to the Footer widget area.
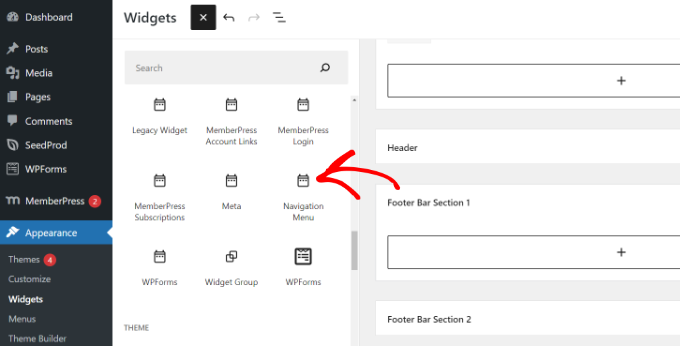
Simply add the Navigation Menu widget block to the footer widget area.
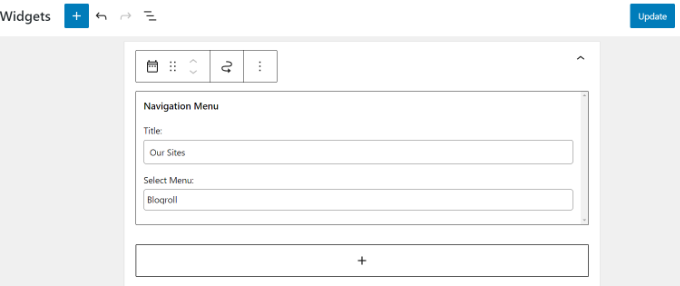
From here, you need to add a title for the menu and select the blogroll menu. Don’t forget to click on the ‘Update’ button to store your changes.
You can now visit your website to see the blogroll links in action.
Here’s how the blogroll menu looks in the footer section on our test site.

Displaying Blogroll Menu in Full Site Editor (FSE)
The full site editor (FSE) is a block-based WordPress theme editor. It lets you customize your theme using blocks, just like editing a blog post.
The full site editor is limited to specific themes. For more details, please see our article on the best WordPress full site editing themes.
First, you will need to go to Appearance » Editor from your WordPress dashboard. After that, click the ‘Customize’ button to open the full site editor. For this tutorial, we will be using the Twenty Twenty-Two theme.
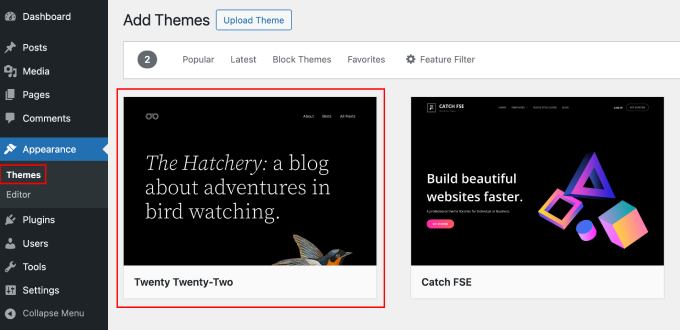
Once you are in the full site editor, you will see your website’s homepage.
Go ahead and click on the template details dropdown menu at the top. From here, select the ‘Footer’ section.
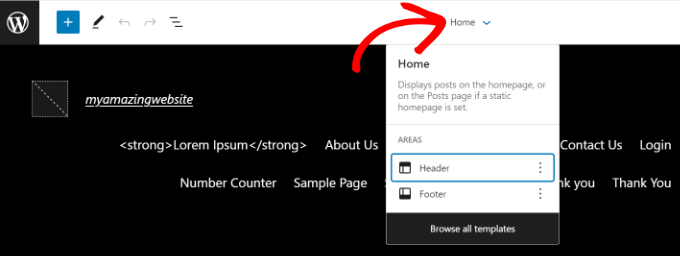
After that, you must add a Navigation block to the footer.
Simply click the ‘+’ button at the top to add the block.
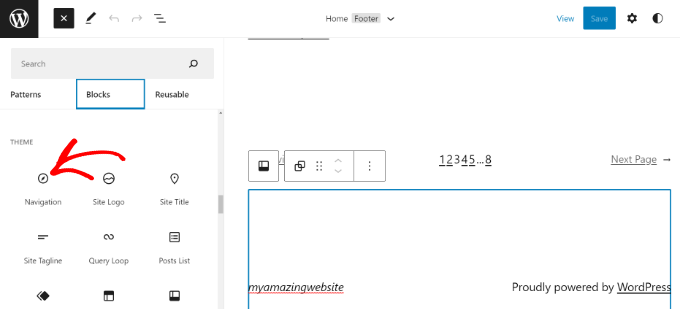
Next, your navigational menu will appear in the footer area.
You can click the ‘Menu’ dropdown menu from the Settings panel on your right and select the blogroll menu you created earlier.
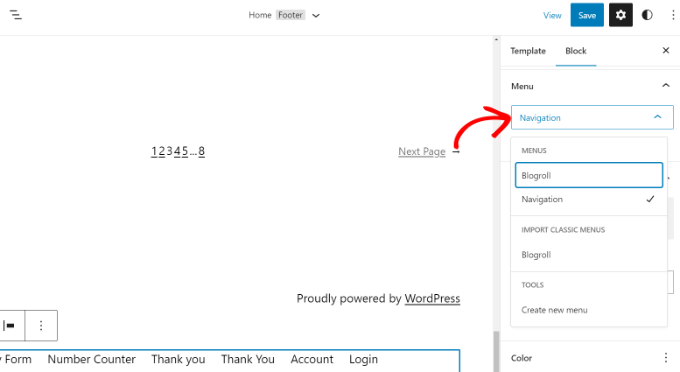
There are options to change the layout and orientation of your custom links.
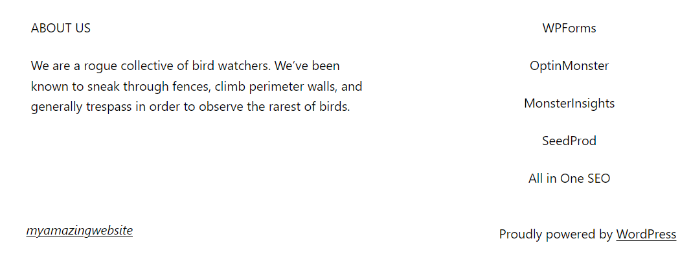
Once you are done, don’t forget to save your changes. You can now visit your website to see the blogroll in action.
Displaying Blogroll Using a WordPress Theme Builder
If you are using a WordPress theme builder like SeedProd, then you can also showcase your blogroll.
SeedProd is the best drag-and-drop WordPress website builder. It lets you create custom themes, offers pre-built templates, and offers many customization options. To learn more, check out our full SeedProd review.
📝 We will use the SeedProd Pro version for this tutorial because it includes a theme builder. There is also a SeedProd Lite version you can use for free.
First, you will need to install and activate the SeedProd plugin. If you need help, then please see our guide on how to install a WordPress plugin.
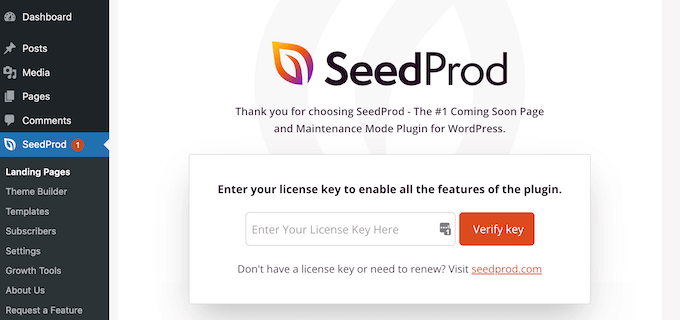
Upon installation, you will see the SeedProd welcome page. Enter the license key and click the ‘Verify key’ button. You can find the license key in your SeedProd account area.
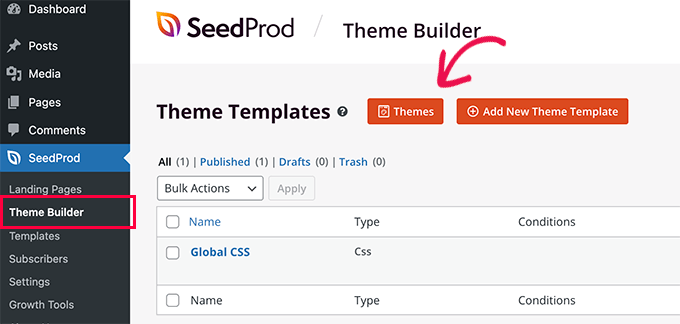
After that, you will need to go to SeedProd » Theme Builder from your WordPress dashboard.
Next, go ahead and click the ‘Theme’ button at the top.
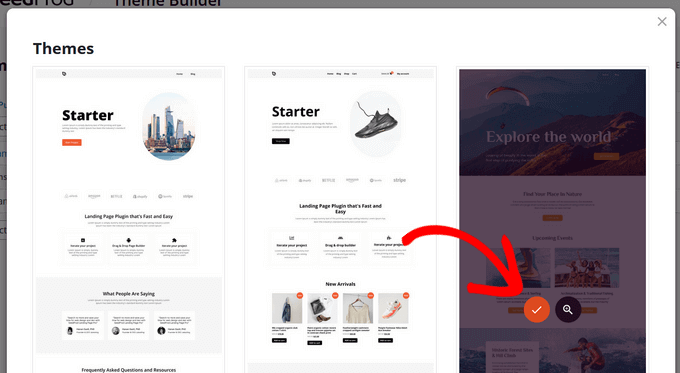
SeedProd offers pre-built theme templates from which to choose.
Simply hover over a template and click the orange tick button to select a theme.
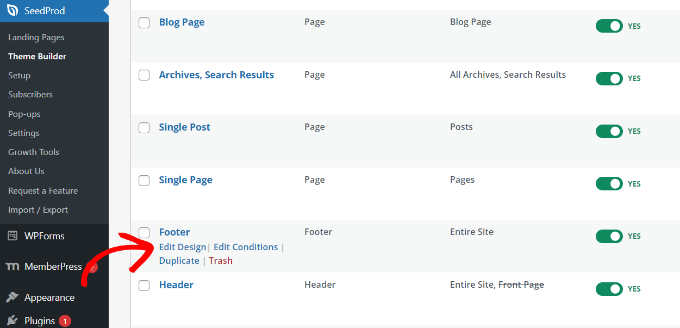
Next, you will see different theme templates.
Scroll down to the ‘Footer’ template and click the ‘Edit Design’ option.
This will launch the drag-and-drop website builder.
You can customize the footer section of your WordPress theme by adding different blocks. To add the blogroll, go ahead and add the Navigation Menu block to the footer area.
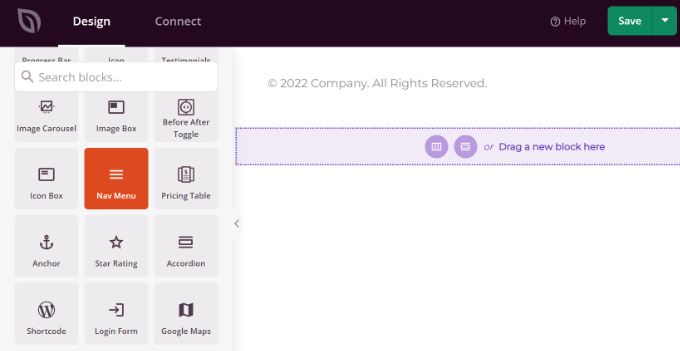
After adding the Nav Menu block, you will see the default Simple menu type.
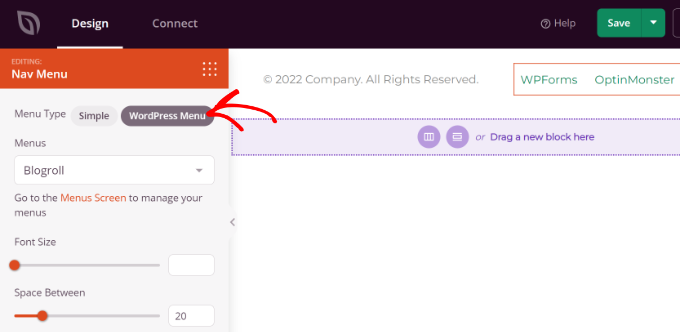
From the menu on your left, simply select ‘WordPress Menu’ as the menu type. Next, choose Blogroll as the menu from the dropdown menu.
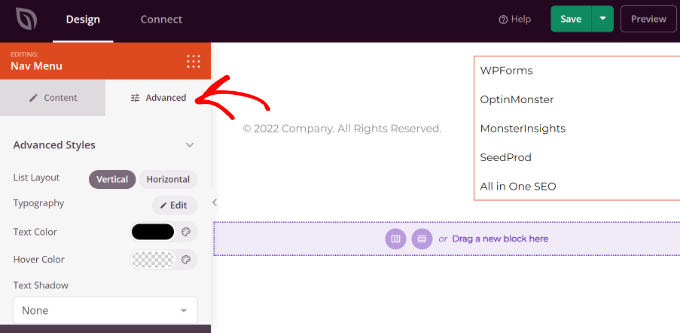
After that, you can switch to the ‘Advanced’ tab from the left menu to further customize the blogroll navigational menu.
You can change the list layout to vertical or horizontal, edit the typography, text color, hover color, and more.
Once you are done, simply click the ‘Save’ button at the top and exit the website builder.
Next, you need to make sure that your SeedProd theme is active.

Simply go to SeedProd » Theme Builder from your WordPress dashboard and click the ‘Enable SeedProd Theme’ toggle.
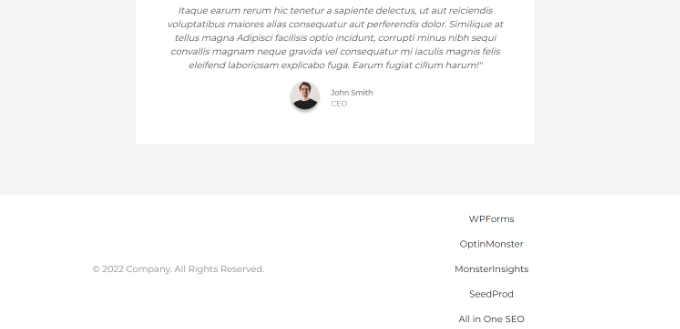
You can now visit your website to see the blogroll menu in the custom theme.
For more details, please see our guide on how to easily create a custom WordPress theme without any code.
We hope this article helped you learn how to easily add a blogroll in WordPress. You may also want to see our guide on writing a great blog post or take a look at the best examples of successful blogs.
If you liked this article, then please subscribe to our YouTube Channel for WordPress video tutorials. You can also find us on Twitter and Facebook.


Lisa Hill
I’m sorry, I appreciate all the work that has gone into this advice, but the whole thing is a classic example of Wordpress fixing something that wasn’t broken.
Previously, if I wanted a widget, I simply selected it .e.g a blogroll widget and moved from the LHS to the RHS of the Widgets. Then I would simply add a blog name and its URL and that was it. I never really appreciated how user-friendly WP was until they started ‘improving’ it.
Somehow WP saw fit to eat my blogroll, so I tried following this advice and ended up with a whole new unwanted menu of pages and sub-pages across the top of my blog.
Jiří Vaněk
Thank you for the guide. What you think is better, I decide. Like a blogroll, or put it on the RSS page of their website and take excerpts of their article?
WPBeginner Support
It depends on the site, some sites would prefer you not use their RSS on external sites in which case we recommend using the Blogroll method.
Admin
Jiří Vaněk
I understand and thank you for your response. I recently encountered stolen content from my website through RSS. Based on that and your response, I decided to abandon the RSS method because I wouldn’t want to harm anyone’s SEO or cause damage. The blogroll method seems much better and more friendly in this regard, both in terms of backlinks for their websites and in not damaging their SEO. Thank you for pointing me in the right direction.
Jonathan Matos
This was most helpful, thank you! Very concise and to the point. I utilized the video with ease, and it got the job done; perfectly. I appreciate you.
Happy holidays!
WPBeginner Support
Glad our guide was helpful
Admin
Pramod Kumar
Why should we use “no follow” links. Will it matter ?
WPBeginner Support
For understanding nofollow better, you would want to take a look at our article below:
https://www.wpbeginner.com/beginners-guide/how-to-add-nofollow-links-in-wordpress/
Admin
Rohit Thakur
Sounds interesting, Right now I’m going to add into my blog. Might be this will help my audience to explore more.
WPBeginner Support
Glad you found our content helpful
Admin