Every WordPress site owner should know how to restore from backup – it’s one of those essential skills that can save your website when you need it most.
Whether you’re moving to a new host, recovering from a problem, or just want to revert to an earlier version of your site, backup restoration is your safety net.
The challenge is that most backup tutorials focus on creating backups, but very few explain the restoration process clearly.
Through our experience managing numerous WordPress sites, we’ve learned that having a simple, reliable restoration process makes all the difference when you’re under pressure.
That’s exactly what this guide provides. We’ll show you the most effective ways to restore your WordPress site from backup, with step-by-step instructions that work regardless of your technical background.
Understanding Backups and Restoring WordPress
There are different ways to create backups for your WordPress site. In our opinion, the best way to do this is using a WordPress backup plugin.
That said, you can also create a manual backup of your WordPress database and download your WordPress files using an FTP client.
Restoring WordPress from backups depends entirely on how you created the backup. For example, backups created using Duplicator Pro can be restored using the same plugin. Similarly, manual backups need to be manually restored.
A lot of WordPress users don’t back up their entire websites. Instead, they only back up their WordPress theme, uploads directory, and WordPress database. This reduces their backup size but increases the steps needed to restore the site.
No matter how you create your backup, the basic steps are the same.
Now, let’s take a look at how to restore your WordPress site from backup. Here’s a quick overview of what we will be explaining in this article:
- What to Do Before You Restore WordPress From Backup
- Restoring WordPress Using Duplicator Pro
- Restoring WordPress From UpdraftPlus Backup File
- Restoring WordPress From All-in-One WP Migration .wpress File
- Restoring WordPress Database From Backup Using phpMyAdmin
- Restoring WordPress Database Backup Using cPanel
- Manually Restoring WordPress Files Using FTP
- Troubleshooting WordPress Backup Restore Issues
- Things to Do After Restoring Your WordPress Site
- FAQs About Restoring WordPress Backups
Note: This guide is about restoring a WordPress site from a backup. If you are trying to move your website to a new domain, then you should check out our guide on moving WordPress to a new domain without losing SEO.
Or, if you are trying to move from localhost to a live web hosting account, then follow this guide on how to move WordPress from a local server to a live site.
What to Do Before You Restore WordPress From Backup
Before we go over the different ways you can restore WordPress from a backup, let’s discuss the steps you need to take first.
Naturally, you should already have a pre-existing backup of your WordPress website ready to go. You can learn more by following our guide on how to back up a WordPress site.
If your backups are stored in a remote storage location like Dropbox, Google Drive, or OneDrive, then you can download your backup files from those locations to your computer.
Besides that, you may also need to delete old WordPress files and do a fresh install. This way, if your site was infected by malware, had corrupt files, or something was missing, then it will be automatically removed and cleaned.
Keep in mind that you should only do this if you are sure your backup is up to date and you have all your customizations and uploads saved.
You can delete files using cPanel or FTP. If you have the option, we recommend using cPanel because it’s faster.
Simply log in to the cPanel of your hosting dashboard. Then, under the ‘Files’ section, click the ‘File Manager’ icon.
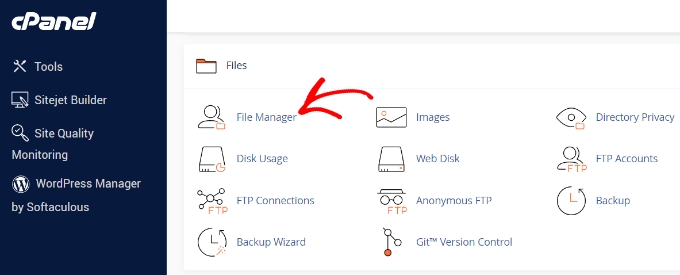
The file manager interface will now open in a new browser tab.
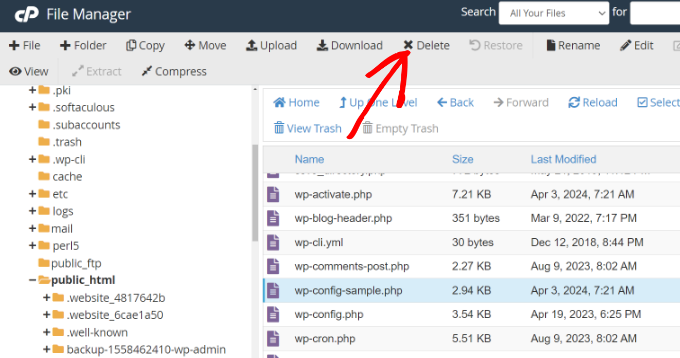
You will need to select all WordPress files and delete them. Once all the files are selected, simply click the ‘Delete’ option.
You can also delete files using FTP clients, but this process is much slower.
If you haven’t used FTP before, then please see our guide on how to use FTP to upload files to WordPress.
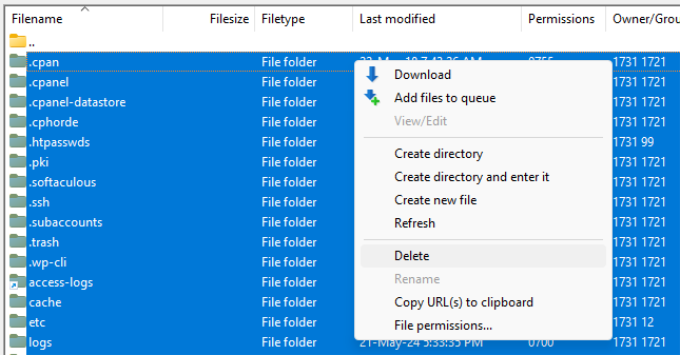
For this approach, simply connect to your website using an FTP client. Next, select all files in your WordPress root directory, then right-click on the screen and select the ‘Delete’ option to remove them.
After your files are deleted, you need to install WordPress again and log in to your website. The installation process depends on your hosting provider. For more details, please see our guide on how to install WordPress the right way.
Keep in mind that the installation process will depend on which method you are using, but it should be very straightforward for any non-manual approach. We will briefly go over the steps for installing WordPress when restoring your backup manually later on.
Now, you’re ready to restore WordPress backups.
Restoring WordPress Using Duplicator Pro
Duplicator Pro is one of the best WordPress backup plugins. It makes it very easy to migrate and back up your site.
First, you need to make sure that you have a complete backup of your WordPress site created by Duplicator.
Next, you have to download the backup archive file to your computer. This will be a complete copy of your WordPress files, which includes themes, plugins, settings, and more.
Once your backup files are ready, the next thing to do is install and activate the Duplicator Pro plugin. For more details, please see our guide on how to install a WordPress plugin.
Important Note: There is also a more basic Duplicator plugin that gives you useful backup and migration features for free. However, in order to use the plugin to restore these backups and follow along with this tutorial, you need a premium Duplicator Pro plan.
Upon activation, you can head to Duplicator Pro » Import Backups from your WordPress dashboard. Next, you can upload the archive file by simply dragging and dropping or clicking the ‘Select File’ button.
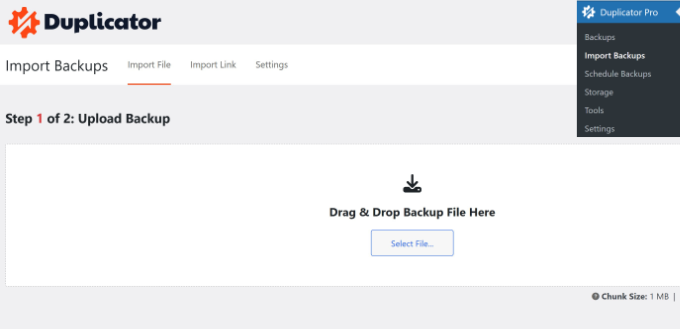
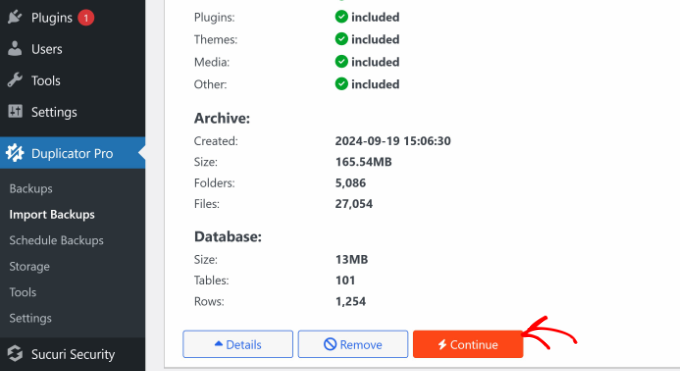
The plugin will now upload the archive file and show you the details.
You can review the details and then click the ‘Continue’ button.
Next, you’ll need to set a recovery point to quickly restore your site to a prior date.
Once that’s done, you can click the ‘Set’ button.
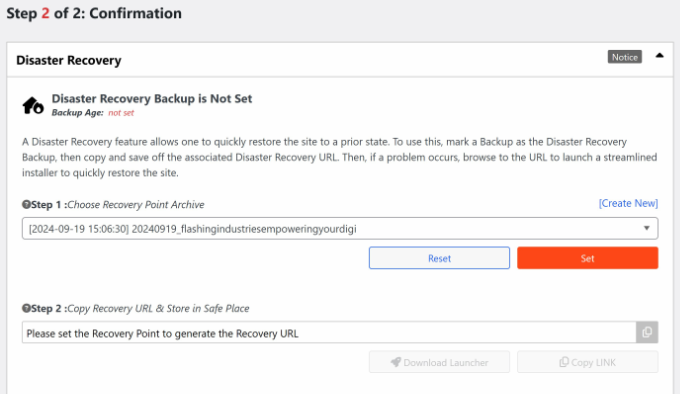
After that, you’ll get a recovery URL that you can store for safekeeping to use anytime in the future.
From here, you can scroll down and click the ‘Launch Installer’ button.
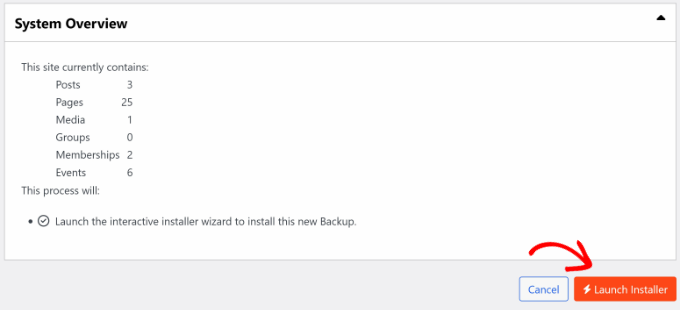
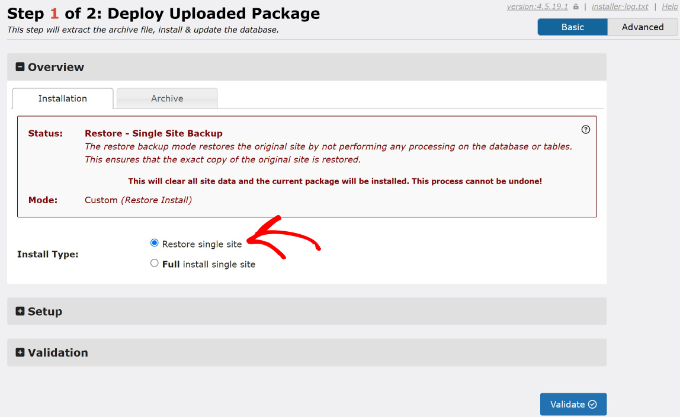
Next, you will need to deploy the package. The plugin will give an overview of the installation details, and it will let you choose between ‘Full install single site’ and ‘Restore single site.’
You can select the ‘Restore single site’ option and scroll down to click the ‘Validate’ button.
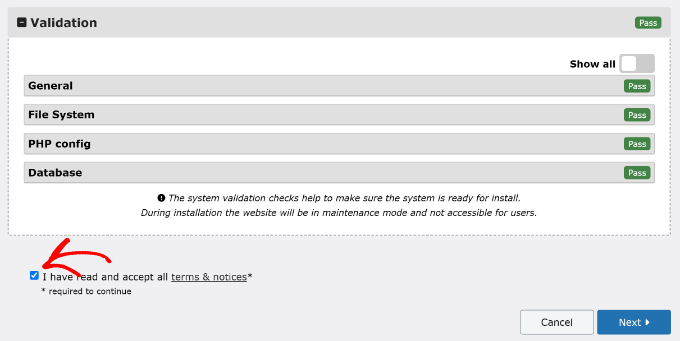
Once the validation is complete, you’ll need to click the checkbox to accept the terms & notices.
After that, simply click the ‘Next’ button.
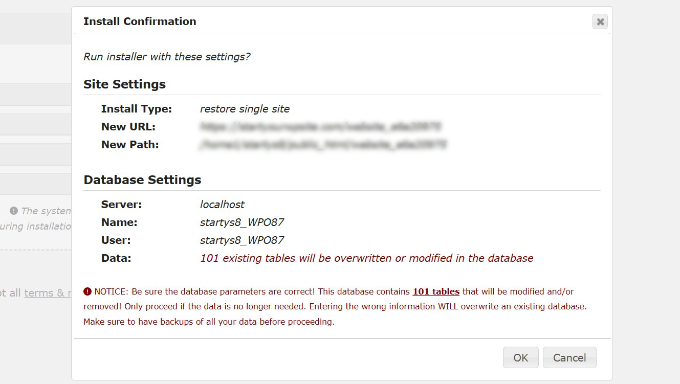
A new window will now pop up with installation confirmation.
You can click the ‘OK’ button to continue.
The installer will now extract your backup archive files. Once it’s done, you should see the install results.
You can simply click the ‘Admin Login’ button to finalize the installation of your backup.
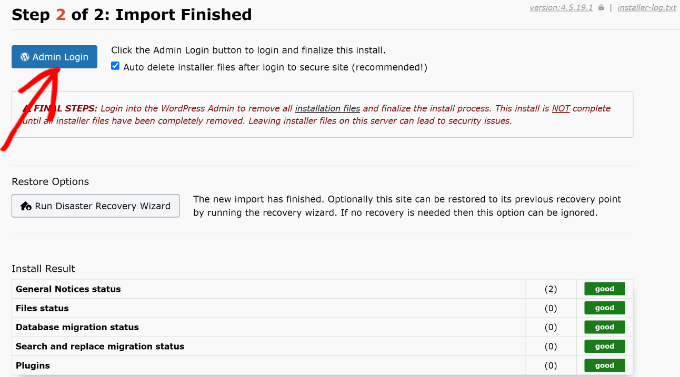
Go ahead and log in to your WordPress dashboard.
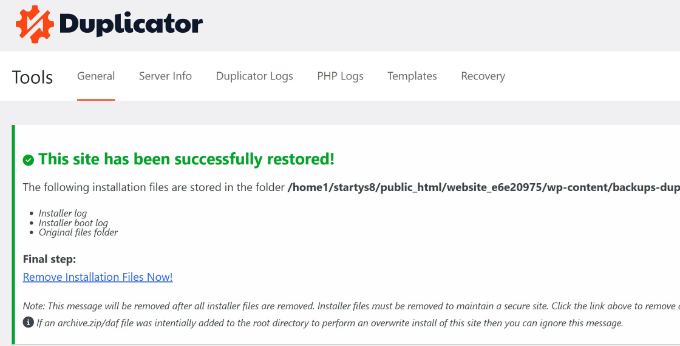
That’s it! You have now successfully restored your WordPress site from a Duplicator backup.
Restoring WordPress From UpdraftPlus Backup File
UpdraftPlus is another popular premium WordPress backup plugin. If you used UpdraftPlus to create backups, then this section is for you.
UpdraftPlus offers a very convenient way to restore WordPress from a backup. You need to log in to your WordPress website and go to the Settings » UpdraftPlus Backups page.
From here, you can go to the ‘Backup / Restore’ tab in the plugin settings.
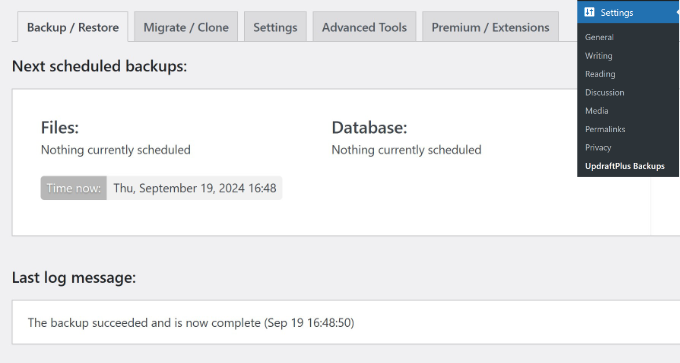
Next, you’ll need to scroll down to the ‘Existing backups’ section.
If you already have a backup file from UpdraftPlus, then you should see it in this section. Simply click the ‘Restore’ button for the backup you wish to install. Alternatively, you can also select upload backup files from your computer or cloud storage.

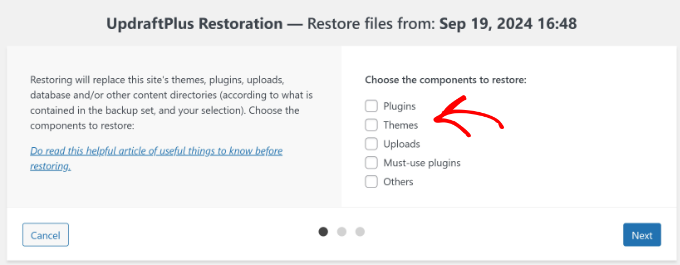
After that, you’ll need to select the components you want to restore. These options include plugins, themes, uploads, must-use plugins, and others.
Simply click the ‘Next’ button after you make your selections.
The plugin will then process the backup file.
Once it’s ready, you can click the ‘Restore’ button.

The plugin will then start to restore the components you selected previously.
Once the process is complete, you will see a ‘Restore successful!’ message. The plugin will also show an activity log so you can track the restored files.
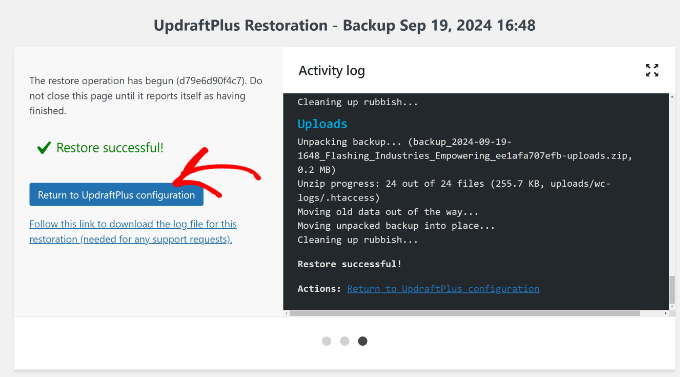
Simply click the ‘Return to UpdraftPlus configuration’ button to continue.
When you return to the plugin page in the WordPress dashboard, you’ll see that the backup has been restored.
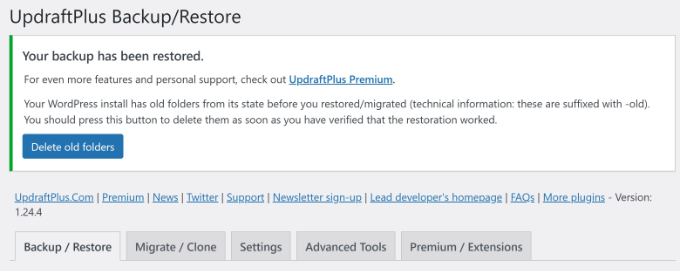
UpdraftPlus will also give you the option to delete old folders from the previous WordPress install. You can simply remove these folders by clicking the ‘Delete old folders’ button if you haven’t already done so.
Restoring WordPress From All-in-One WP Migration .wpress File
All-in-One WP Migration makes it easy to back up and restore your entire WordPress site.
One of its key features is the ability to export it as a .wpress file. It is a proprietary file format that includes everything from your WordPress database to themes, plugins, media files, and settings.
You can save it to your computer and use it later to restore your site or migrate it to a new location.
Simply go to the All-in-One WP Migration » Export page and select ‘File’ from the ‘Export Site To’ dropdown menu.
The plugin will package your site into a .wpress file and automatically download it to your computer.
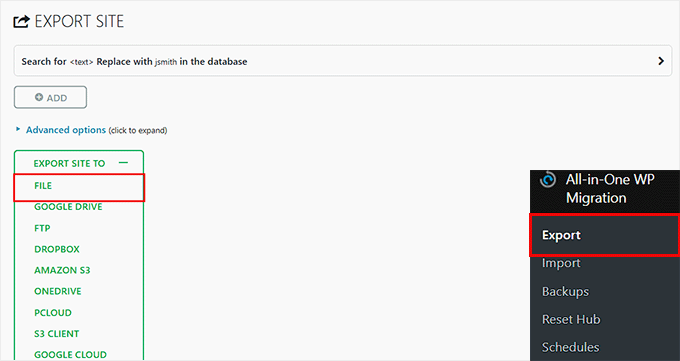
Next, install and activate the All-in-One WP Migration plugin on the WordPress site where you want to perform the restore.
If you’re unsure how to do that, check out our beginner’s guide on how to install a WordPress plugin.
Upon activation, head over to the All-in-One WP Migration » Import page in your WordPress dashboard. Here, expand the ‘Import From’ dropdown menu and select the ‘File’ option.
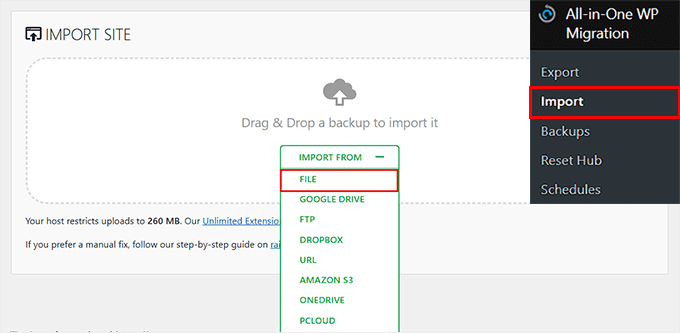
Then choose the .wpress file you want to upload from your computer.
The plugin will now start uploading the backup file. This process may take some time, depending on your file size and server performance.
After the upload is complete, you’ll see a warning that restoring the backup will overwrite your existing site content — including your database, themes, plugins, and media.
Simply click the ‘Proceed’ button to confirm.
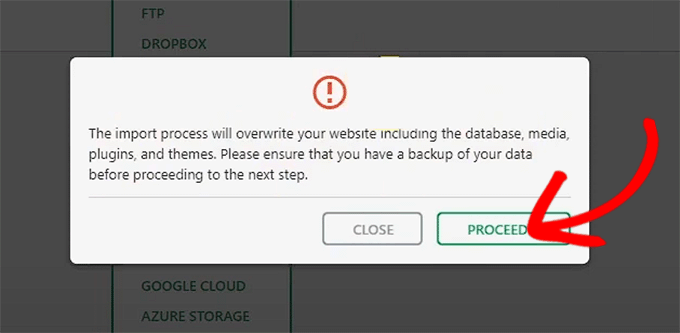
All-in-One WP Migration will now extract the .wpress file and restore your website.
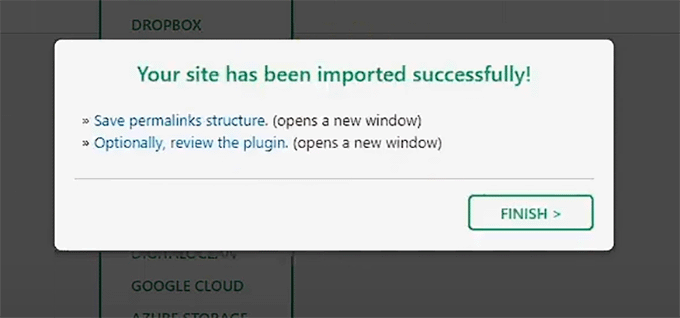
Once it’s done, you’ll see a success message. You can now click the ‘Finish’ button to complete the process.
Keep in mind that you may be asked to log in again using your old site’s admin credentials, since those were included in the backup.
Restoring WordPress Database From Backup Using phpMyAdmin
When restoring a backup you created manually, you may come across two possible choices. You can either create a new database and import your backup into it, or you can empty your existing database and import the backup.
If you are cleaning a hacked WordPress website, then it is very important to change your MySQL username and password before creating a new database or importing it into an existing database.
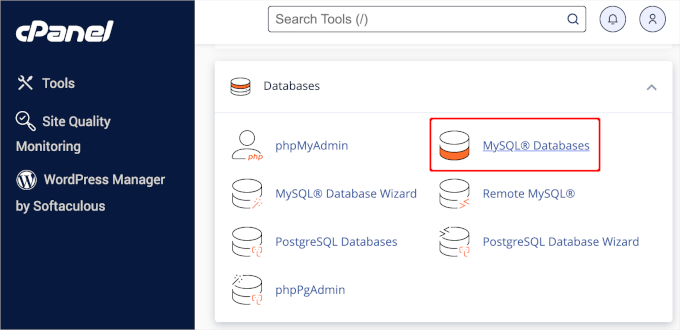
To create a new database, log in to the cPanel dashboard of your WordPress hosting account and click on the ‘MySQL Databases’ icon.
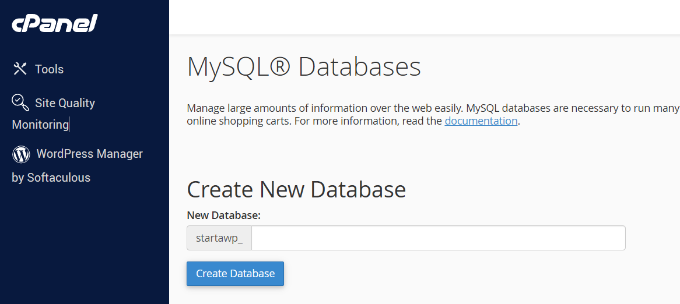
Next, you will be asked to provide a name for your database.
Once that’s done, click the ‘Create Database’ button.
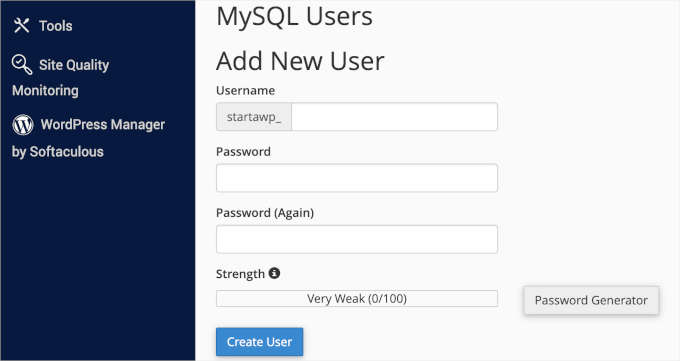
After creating the new database, you need a MySQL user associated with that new database.
Simply scroll down to the ‘MySQL Users’ section and add a new user.
Next, you need to add this user to the MySQL database.
Scroll down to the ‘Add User To Database’ section, select the user along with the database from the dropdown menus, and then click on the ‘Add’ button.
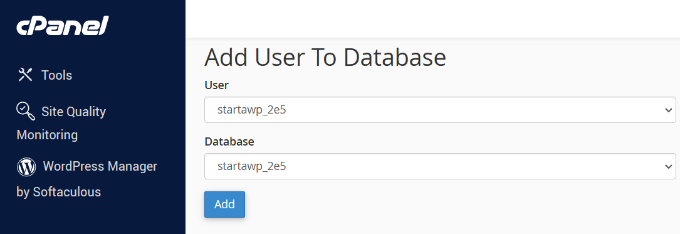
Now your new database is ready. You can use it to restore your WordPress database backup.
Head over to the cPanel dashboard again and then click on ‘phpMyAdmin‘ under ‘Databases.’
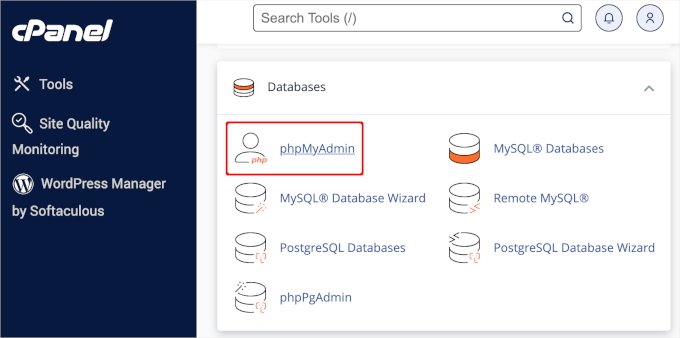
Next, you will see the phpMyAdmin screen.
Go ahead and click on the ‘Import’ tab at the top of the screen.
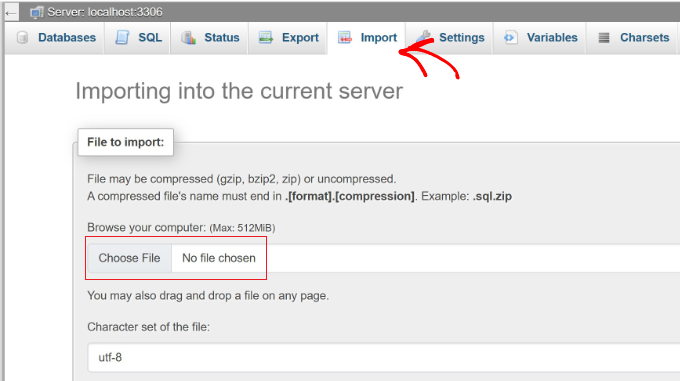
Then, simply click on the ‘Choose File’ button to select your WordPress database backup file. After that, click on the ‘Go’ button at the bottom of the page to continue.
phpMyAdmin will now upload your backup and import it into your database. You will see a success message upon completion.
That’s it! You have successfully imported your WordPress database.
The next step is to install WordPress using your new database. If you have already installed WordPress, then just add your new database settings to your wp-config.php file, and you will be good to go.
Restoring WordPress Database Backup Using cPanel
If you manually create a WordPress database backup using the cPanel in your shared hosting, then you can also restore that database using cPanel itself.
To get started, log into your cPanel account. Under the ‘Files’ section, click on ‘Backup.’
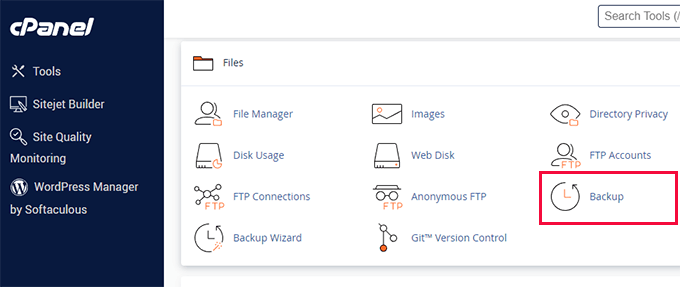
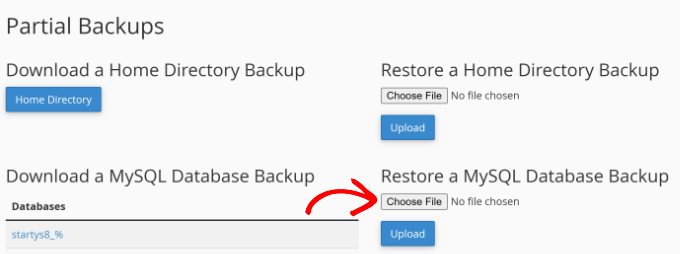
On the backups page, scroll down to ‘Restore a MySQL database backup.’
Next, click on the ‘Choose File’ button and select the backup file from your hard drive. Once done, just click on the ‘Upload’ button.
It’s as simple as that!
Manually Restoring WordPress Files Using FTP
To manually restore WordPress using FTP, you need to download a fresh copy of WordPress from WordPress.org and extract it to your hard disk.
After that, you can launch your FTP client and then upload all WordPress files to your server.
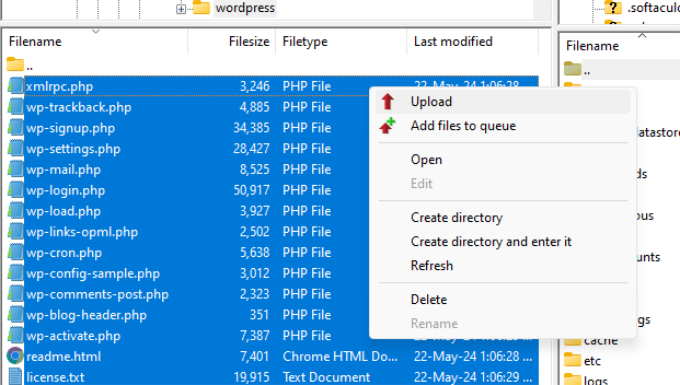
Once you have uploaded WordPress files, you can upload a wp-config.php file from your backup (only if you are sure that it is clean and not compromised).
Alternatively, you can rename the wp-config-sample.php file in your freshly uploaded WordPress files to wp-config.php file. After that, you will need to edit the wp-config.php file and enter your database information.
Don’t forget to save the file and upload it back to your website.
Next, you need to upload other files from your backup. We recommend that you only upload your images in the /wp-content/uploads/ directory.
After you have uploaded these, visit your website to check that everything is working fine.
Next, you need to log in to your WordPress admin area and start installing the plugins you had on your site.
Now, you can move on to installing your theme. If you have customized your WordPress theme or were using a child theme, then you can restore it from a backup. However, make sure that those files are clean.
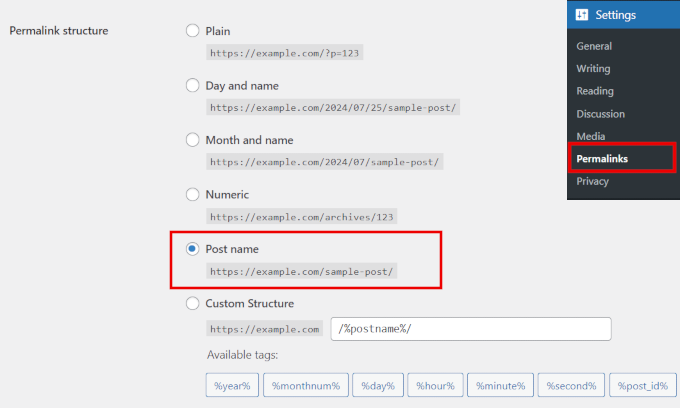
Lastly, go to Settings » Permalinks and adjust permalinks settings to match your site, and then update permalinks.
Troubleshooting WordPress Backup Restore Issues
If you carefully follow the instructions we outlined above, you hopefully won’t have any issues restoring your WordPress backup.
However, there are some common problems that you may come across when restoring your WordPress website. Here are our guides on how to fix a few of them:
- How to Fix the Error Establishing a Database Connection in WordPress
- How to Fix the WordPress White Screen of Death (Step by Step)
- How to Fix the 500 Internal Server Error in WordPress
- How to Fix WordPress Login Page Refreshing and Redirecting Issue
- How to Fix WordPress Posts Returning 404 Error (Step by Step)
Otherwise, you may want to check out our ultimate guide to the most common WordPress errors and how to fix them.
Things to Do After Restoring Your WordPress Site
Once you have successfully restored your website, we strongly recommend that you improve your website security.
If you haven’t done so already, make sure that you regularly create a backup with one of these WordPress backup plugins.
To secure your website after a hacking incident, we also recommend that you immediately change your WordPress password. If you are running a multi-user website, then it’s also a good idea to ask all users to update their passwords as soon as possible.
You can also install a website firewall to protect your site from future cyber attacks.
At WPBeginner, we use Cloudflare to protect our website, but if you run a smaller site, then Sucuri might be able to get the job done.

For more details, you can see our guide on why we switched from Sucuri to Cloudflare.
FAQs About Restoring WordPress Backups
Here are some common questions users have about restoring WordPress backups:
1. How do I restore my WordPress site from a backup?
This will depend on how you created your WordPress backup. If you used a backup plugin like Duplicator Pro, and you have access to the WordPress admin dashboard, you should be able to restore it in just a few clicks.
However, if you created the back up manually or you don’t have access to your site’s back end, you will need to restore it manually using your hosting provider’s control panel or the file transfer protocol (FTP).
If you are restoring your website after a hacking event or cyber attack, you may also need to delete all your website’s corrupt files and re-install WordPress before restoring a clean backup.
2. Where are my WordPress backups stored?
If you are using a backup plugin, then it will create a default location on your hosting server where the files will be stored. Usually, this is in the wp-content folder. However, depending on your backup tool, you can sometimes choose different cloud storage services like Google Cloud, Dropbox, or One Drive to save your backups.
3. Does WordPress save backups?
Unfortunately, WordPress doesn’t offer any automatic backups. You can manually create WordPress backups using your hosting provider’s cPanel or an FTP client. Or, if you’re looking for a simpler approach, you can use a backup plugin. Some hosting providers also offer the option to automatically create backups.
4. Can I recover an old WordPress website?
Yes, you can restore specific parts of your WordPress site, such as individual pages or the database. If you regularly create complete website backups using a plugin, then you can even restore an old version of your entire site. You’ll simply need to choose the specific time and date for when you’d like to restore WordPress.
We hope this article helped you learn how to restore WordPress from backup. You may also want to see our ultimate step-by-step guide on how to back up a WordPress site to Dropbox and how to connect Google Drive to your WordPress media library.
If you liked this article, then please subscribe to our YouTube Channel for WordPress video tutorials. You can also find us on Twitter and Facebook.


Olaf
I have always performed backups manually, which involves deleting data on FTP, clearing the database, and then uploading backup data both on FTP and importing the backup SQL file. This process works great but isn’t easy for beginners. Duplicator opens up a whole new dimension of usability, allowing many people to secure their websites because backups using Duplicator are really easy to implement. The same goes for restoration. The easier the backup and restoration process is, the more people will do it. That’s what’s great about Duplicator; it indirectly makes the internet on WordPress a bit safer. Plus, with a fantastic community like the team behind this site supporting Duplicator, they can guide users through the entire process step by step.
Oyatogun Oluwaseun Samuel
Restoring a WordPress site from backup can be a stressful experience, but this guide makes it a breeze! One crucial step I’d like to emphasize is verifying the integrity of your backup files before restoring. A corrupted backup can lead to more issues down the line. Thanks for this detailed guide – it’s a lifesaver for me today!
Jiří Vaněk
Thank you for the guide using Duplicator. I started using it, set up automatic backups to Google Drive, and I was still unclear on how to perform a restoration in case of a problem. This is described perfectly here, and now I can finally be at ease knowing my website backups are taken care of.
Moinuddin Waheed
it is good to have a cloud backup like Google drive so that in case restoration can be done easily.
But I think it is always wise to have offline backups at multiple locations as well.
And the backup should be tested on local installations even before something bad happens.
This will ensure that the backup is already in place to take care of the unforseen circumstances.
Bajrang
Let’s suppose, I am restoring 2 days ago file backup, then is it mandatory to restore database backup of the same date also in order to sync both??
WPBeginner Support
It would depend on what file you’re restoring from and for what reason as some backup plugins include database information.
Admin
Daniela
Hello. If I install a backup, will I lose all the changes I made and plugins I installed after the backup? Thanks!
WPBeginner Support
It depends on the backup tool used but normally, yes you would lose any changes not backed up.
Admin
Neha
Hey. Can i restore my site backup if i have only sql file?
WPBeginner Support
You will be missing some things but you will have the ability to restore a good amount of your content.
Admin
KylieM
We’ve only just realised that a page was permanently deleted (not in trash) that we need to recover. We completely updated our website a few months back and believe the page was deleted then. We did do a full back up before changes. Only want to recover the one page and not do a full restore which would replace all of our new content.
How would we do this?
WPBeginner Support
It would depend on what you used to create the backup but the simplest method may be to create a local installation for your site, restore your site on to your local install, then export the page you want on your live site so you can import it.
Admin
Siraj
Very useful tips. Restoring wordpress site through Cpanel is illustrated well. Thanks for sharing.
WPBeginner Support
You’re welcome, glad you like our guide
Admin