A WordPress social network allows users to sign up, connect with each other, post messages, and more. These features can create a sense of community and turn one-time visitors into loyal, long-term users.
We have years of experience building our own online WordPress communities, and we have also done a lot of research into how to create and manage social networks. And in this tutorial, we will show you how to easily turn your WordPress site into a social network.
Our clear, step-by-step instructions are user-friendly and can easily be implemented even if you are a beginner.

Why Turn Your WordPress Site Into a Social Network?
Social networking platforms like Facebook and Twitter are some of the most popular websites in the world, and most people have multiple social networks.
In fact, according to our marketing research, the average user has accounts on over 8 social media platforms.
With that in mind, you may want to start your own social networking website.
Social features can help build a sense of community and keep people coming back to your website. For example, you might add a social network to your food blog so that readers can connect with other food lovers and share recipes.
You can even create a private social network. For example, if you sell online courses, then social features allow students to connect with their classmates. This will differentiate your website from your competitors and may boost conversions.
That being said, let’s see how you can turn your WordPress website into a social network. We will share two methods, and you can choose the one that you like the best:
- Method 1: Turn Your WordPress Site into a Social Network With BuddyBoss (Recommended)
- Method 2: Turn Your WordPress Site Into a Social Network With BuddyPress (Free)
- Bonus: Add Social Share Buttons on Your Website
Method 1: Turn Your WordPress Site into a Social Network With BuddyBoss (Recommended)
If you are looking to convert your website into an interactive social network with just a few clicks, then this method is for you.
BuddyBoss is the best community platform for WordPress that allows you to build a social media platform, add forums, create activities, and use popular LMS and membership plugins. It is an ideal choice if you want to create a social network for your members or online course students.
Related: See our detailed BuddyBoss review to learn more.
First, you need to visit the BuddyBoss website to sign up for an account and purchase the plugin. Keep in mind that BuddyBoss has a free plan, but you will need the pro version to unlock most of the features.
Similarly, even if you opt for the pro plan, you will still need to install and activate the BuddyBoss Platform plugin on your website. This is because the free plugin works as a base for the pro version. For details, see our tutorial on how to install a WordPress plugin.
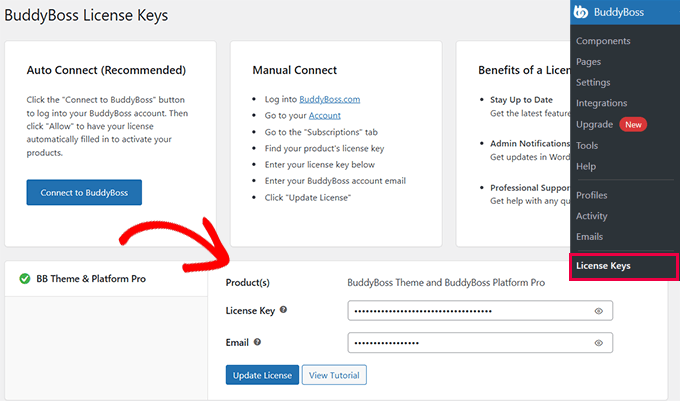
Upon activation, visit the BuddyBoss » License Keys page from the admin sidebar and enter your key. You can get this information from your account on the BuddyBoss website.
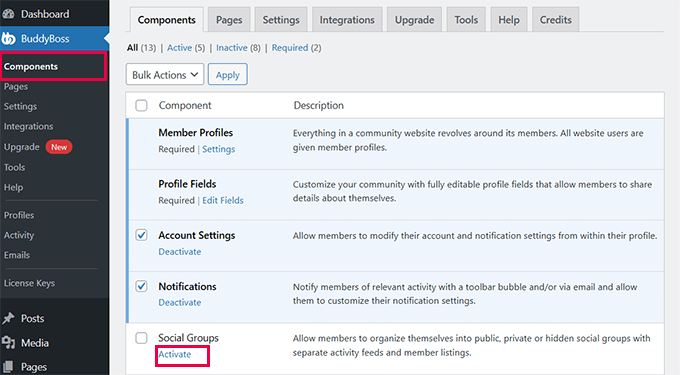
After that, head over to the BuddyBoss » Components page from the WordPress dashboard. Here, you will see a list of core features that you can add or remove to your social network site.
For instance, you can add member profiles, social groups, activity feeds, forum discussions, media uploading, and private messaging features. To activate a functionality, just click the ‘Activate’ link.
Once you have done that, click the ‘Settings’ link under the feature’s name.
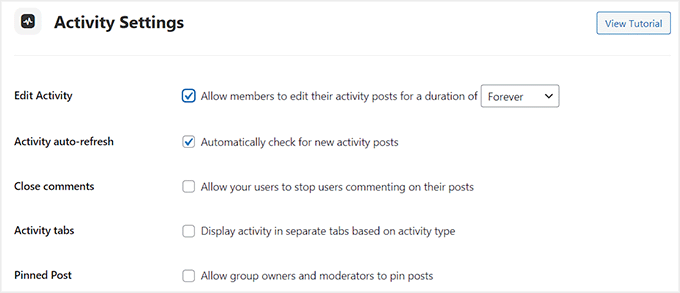
This will take you to a new screen where you can configure its settings. For example, you might want to add an activity feed to your social network and open its settings for configuration.
In that case, you can check boxes to allow members to go back and edit their activity posts, prevent comments, display activity tabs, schedule posts, and more. Once you are done, just click the ‘Save Settings’ button to store your changes.
You can repeat the process for all the other features that you have added as well.
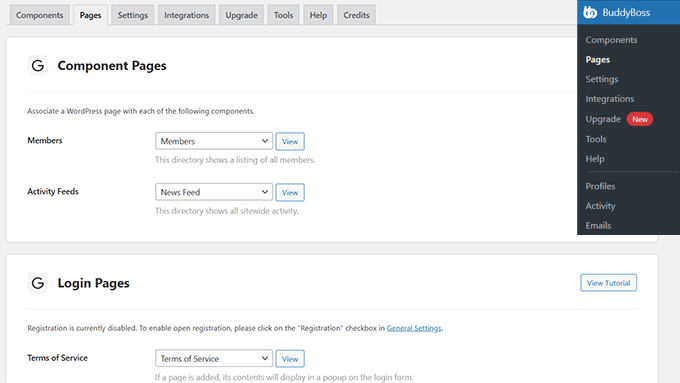
Next, switch to the ‘Pages’ tab from the top. You can now choose the pages that you want to use to show a list of your members, display sitewide activity, social network registration, and more.
Keep in mind that the plugin doesn’t create dedicated pages by itself. If you don’t want to use any of the pages already published on your website, then you will need to create a new one in the block editor first. Once you do that, you can choose that page from the dropdown menu in the BuddyBoss settings.
For details, see our tutorial on how to create a page in WordPress. Next, click the ‘Save Settings’ button.
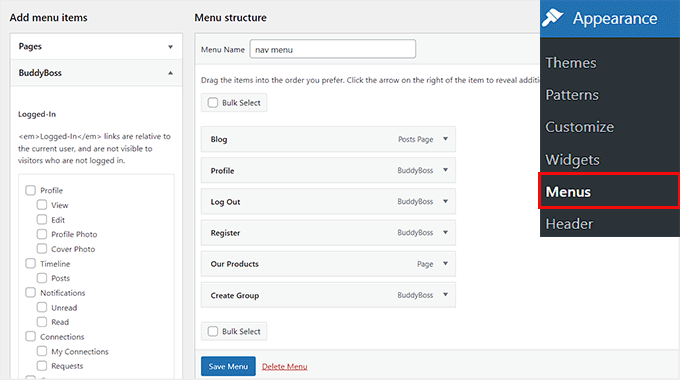
Now, you must visit the Appearance » Menu page from the WordPress admin sidebar. Here, you will need to add the pages you created to the navigation menu on your website. This will make it easier for visitors to sign up and explore your social network.
You can also expand the ‘BuddyBoss’ tab from the left column to add pages like Posts, Notifications, Create Groups, and Log Out.
Once you are done, click the ‘Save Menu’ button to store your changes.
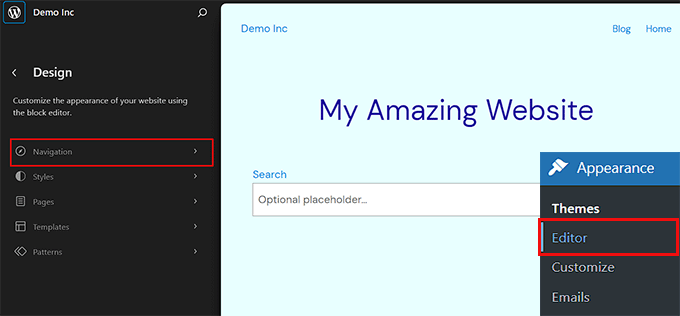
However, if you are using a block theme, then this option won’t be available for you. In that case, you must visit the Appearance » Editor page from the WordPress dashboard and choose the ‘Navigation’ option from the left column.
This will open the full site editor where you have to click the ‘+’ button next to the navigation menu links at the top.
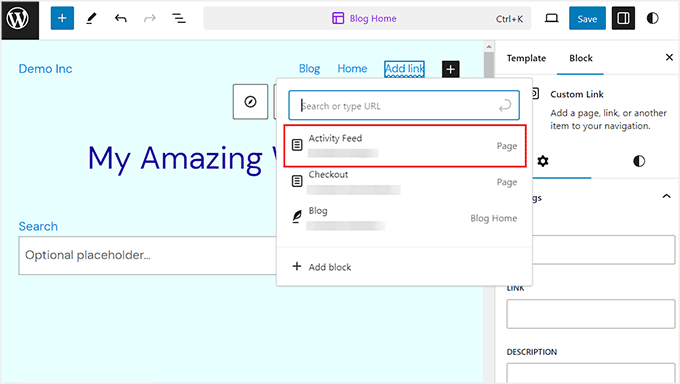
Once a prompt opens up, simply type the name of the page you want to add and click the option when it appears. After adding all the pages, just click the ‘Save’ button at the top to store your settings.
For more information, see our tutorial on how to create a navigation menu in WordPress.
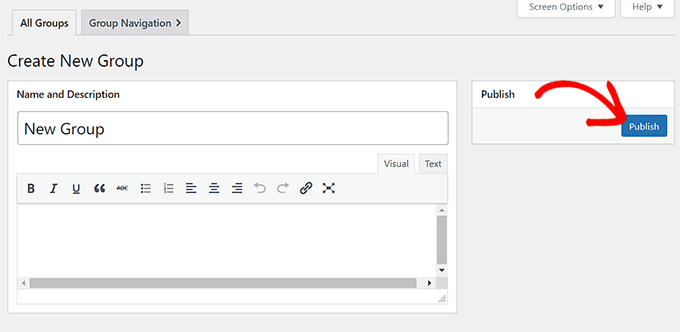
Then, head to the BuddyBoss » Groups page from the WordPress dashboard and click the ‘New Group’ button. This feature can come in handy if you want to create separate discussion forums for members part of different subscription levels or each course that you sell.
This will direct you to a new screen where you must add a group name and description. After that, click the ‘Publish’ button.
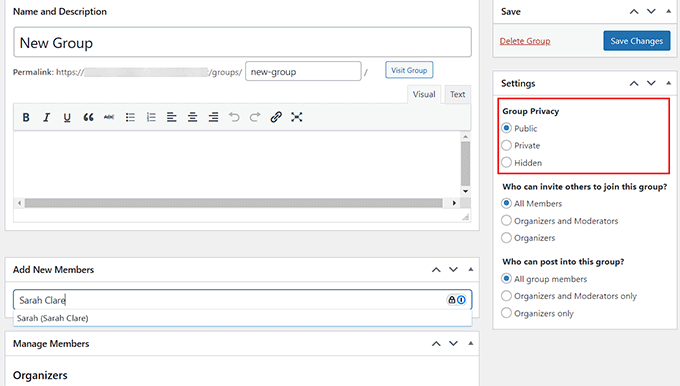
This will load some new settings on the page, where you can start by adding a permalink for the group. Next, choose if you want to keep your group public or private from the right column.
Then, add the username for the members and click the ‘Save Changes’ button.
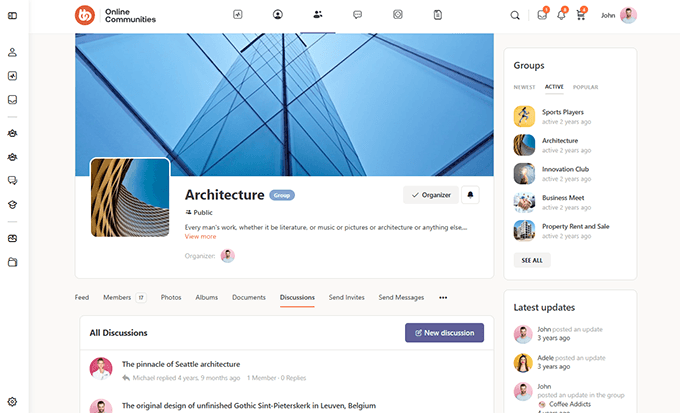
Finally, visit your WordPress site to see the social network in action. Users can now register on your platform, create groups, send messages to each other, and share some content.
Once they do that, you will be able to view all the activities, created groups, email templates, and new members right from your dashboard.
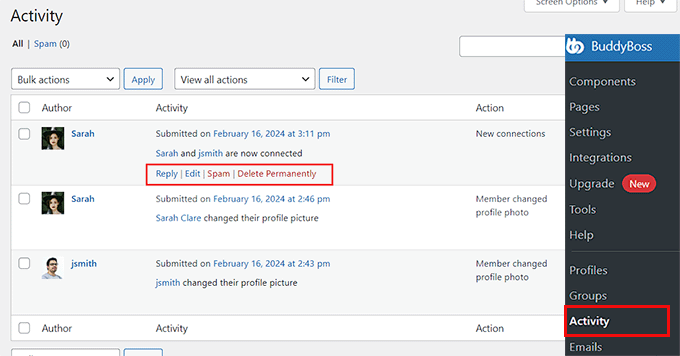
For example, to view all the user activity, visit the BuddyBoss » Activity page from the WordPress dashboard.
From here, you can use different options to reply to user activities, edit them, flag them as spam, or delete them according to your liking.
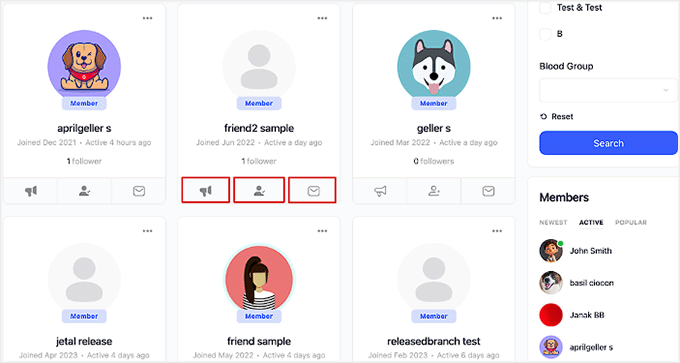
You can also view all the members on your social network by visiting the Members page on your WordPress site.
From here, you can send private messages, follow requests, and connect with different users by clicking the buttons under their profiles.
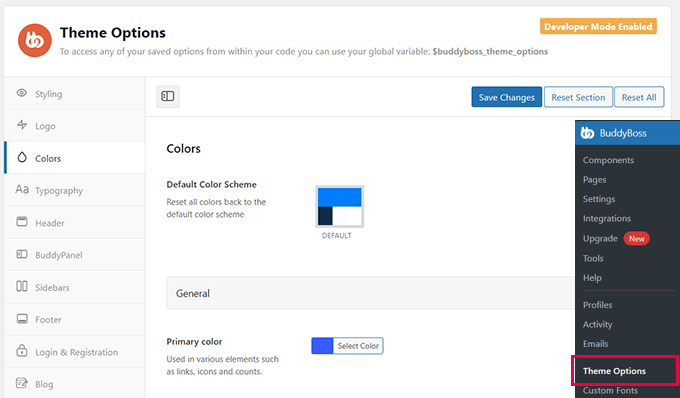
In addition, BuddyBoss comes with its own WordPress theme to give your website a professional community look and attract visitors.
You can find it in your account on the BuddyBoss website and customize all the elements by visiting the BuddyBoss » Theme Options page upon installation.
For details on all of this, you can see our beginner’s guide on how to create your own private community with WordPress.
Method 2: Turn Your WordPress Site Into a Social Network With BuddyPress (Free)
The easiest way to add social features to WordPress is by using BuddyPress. This free plugin is an ideal choice if you are on a budget. It lets you build an online community, including allowing visitors to register on your website and create a detailed user profile.
Once they are signed up, users will be able to send messages, add other people as friends, create specialist online groups, and more.
First, you need to install and activate the BuddyPress plugin. For more details, see our step-by-step guide on how to install a WordPress plugin.
Upon activation, visit the Settings » BuddyPress page to configure the plugin settings.
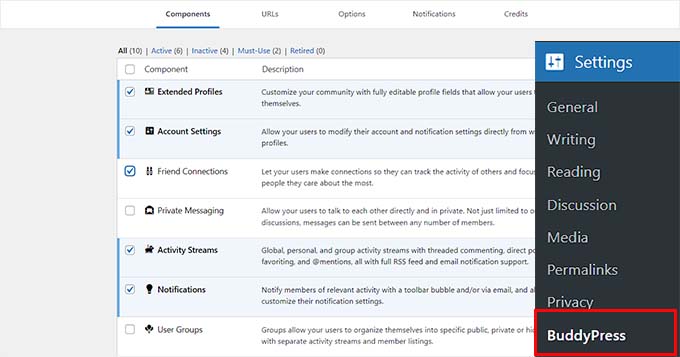
The settings page is divided into different tabs. The first tab is ‘Components,’ which shows all the BuddyPress components that are currently active on your site.
The default components should work well for most websites and WordPress blogs. However, you can activate or deactivate any component by clicking its checkbox.
If you make any changes to the default components, then don’t forget to click on ‘Save Settings’ to store your changes.
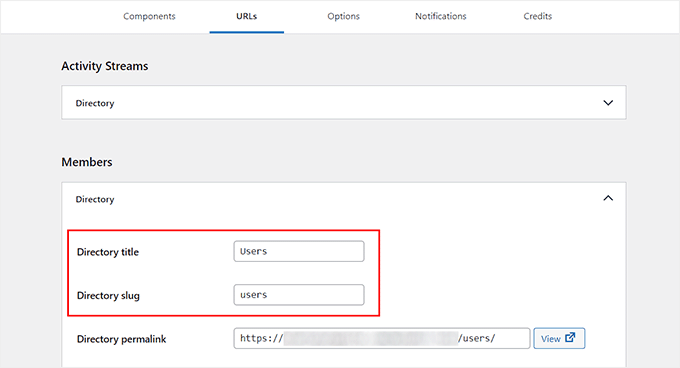
Next, switch to the ‘URLs’ tab to configure the slugs and titles for the pages that will be created with BuddyPress.
For instance, to call the members of your site ‘users’, you must add that slug next to the ‘Directory Slug’ option after expanding the ‘Members’ tab. Keep in mind that you can’t edit the permalinks created by the plugin. Then, click the ‘Save Settings’ button.
Now, go ahead and switch to the ‘Options’ tab.
Here are all the different settings that you can turn on and off in BuddyPress. For example, you can allow users to set a custom avatar, invite other people to join the network, and more.
The default settings will work for most websites, but you can look through them and make any changes you want.
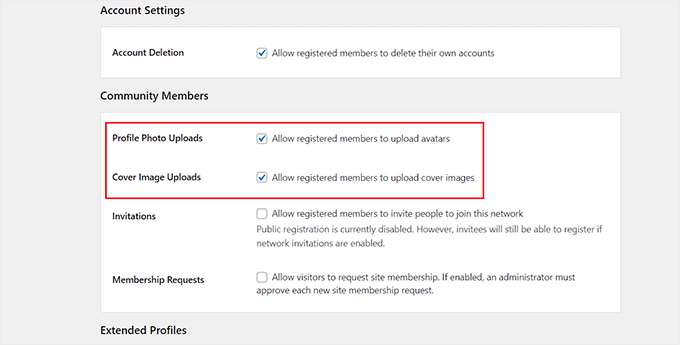
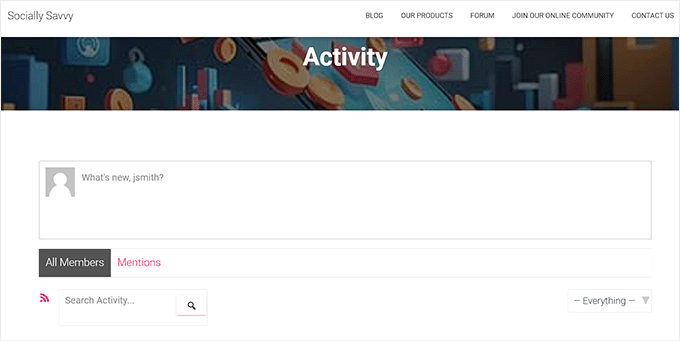
BuddyPress will now create a Members and Activity Streams page on your website. This is similar to the home feed on a site like Facebook or Twitter.
This is how the ‘Activity’ page looked on our website.
Note: If you don’t see Register and Activate settings on this page, then you will need to enable user registration on your WordPress site.
When you are happy with how BuddyPress is set up, don’t forget to click on the ‘Save Settings’ button.
Now, you need to create a navigation menu with BuddyPress pages to make it easier for visitors to explore your site. To do this, visit the Appearance » Menu page. Here, you can expand the ‘BuddyPress Member’ tab from the left column and check the boxes for the pages that you want to add.
Then, click the ‘Add to Menu’ button. Next, you can arrange the pages in your menu using drag and drop.
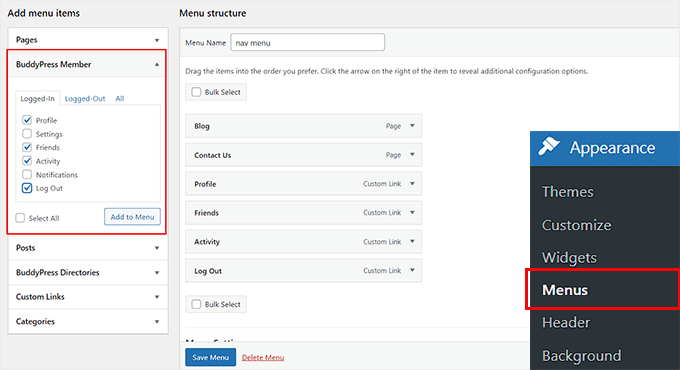
When you are happy with how the menu is set up, just click on the ‘Save Menu’ button. With that done, you can visit your website to see the updated menu in action.
On the other hand, if you are using a block theme, then the method above won’t work for you. To create a navigation menu, head to the Appearance » Editor page from the admin sidebar. This will open a page where you must choose the ‘Navigation’ option from the left.

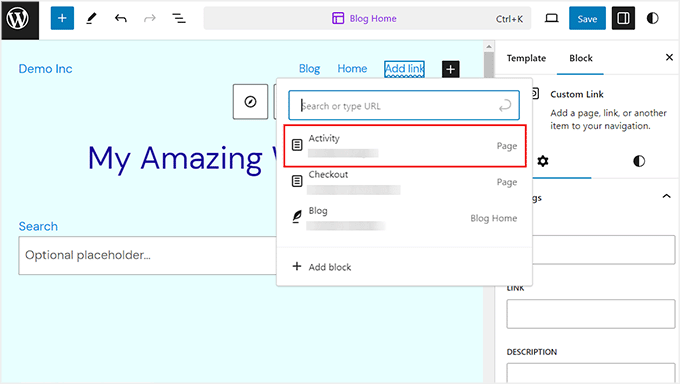
The full site editor will now be launched on your screen. To add a page to the navigation menu, click the ‘Add Link’ (+) button at the top left. Then type the page’s name.
Once some results are shown in the prompt, choose a page of your liking and repeat the process to add other pages as well. Then, click the ‘Save’ button at the top to store your settings.
Pro Tip: BuddyPress works with all the best WordPress themes. It also has its own templates that you can use in case your theme doesn’t come with any built-in BuddyPress templates. If your theme doesn’t work well with BuddyPress, then you can check out our list of the best WordPress themes for BuddyPress.
You have now successfully created a social network with BuddyPress.
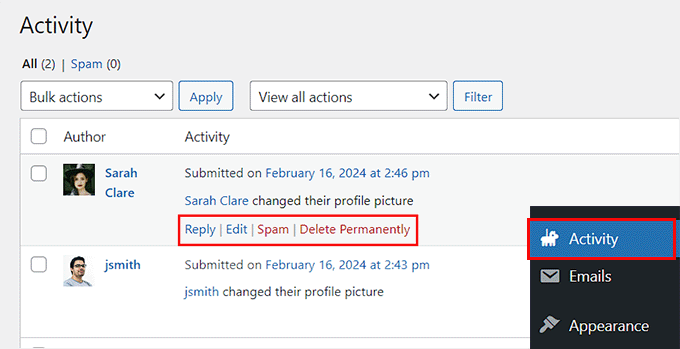
Users will now start registering on your site and become a part of your community. To take a look at all their activities, visit the Activity page in the WordPress dashboard.
If you find a suspicious or unwanted action, then hover over it and then click on either the ‘Spam’ or ‘Delete permanently’ link when it appears.
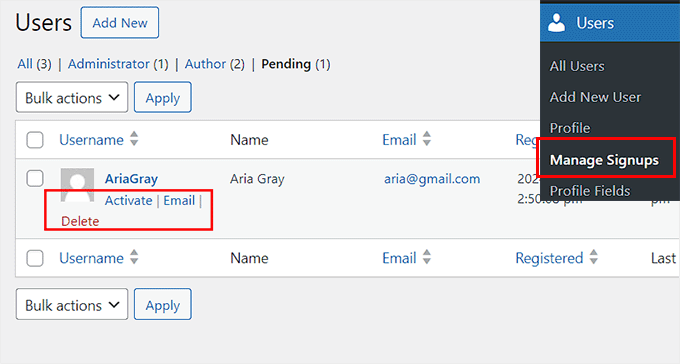
Similarly, you can activate an account, send an email for verification, or delete it by visiting the Users » Manage Signups page from the WordPress dashboard.
Here, simply hover over any user and then select the ‘Delete’, ‘Email’, or ‘Activate’ option.
BuddyPress allows you and your users to create groups, which act as sub-communities on your website. Each group has its own members and activity streams. Users can join these groups, invite other people, post messages, and more.
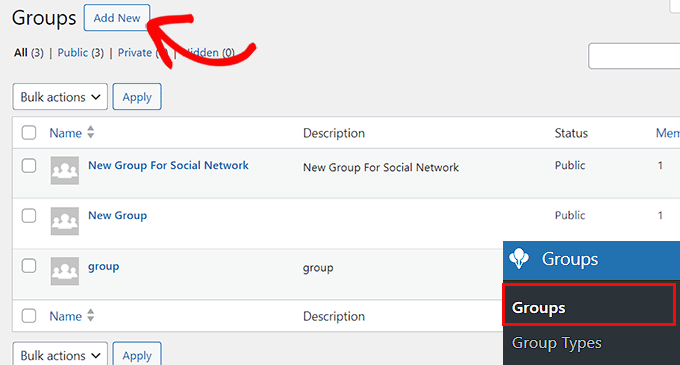
To create a new group, select Groups from the left-hand menu and then click on the ‘Add New’ button.
Tip: If you don’t see a Groups option, then you need to go to Settings » BuddyPress and activate the ‘User Groups’ component following the same process described above.
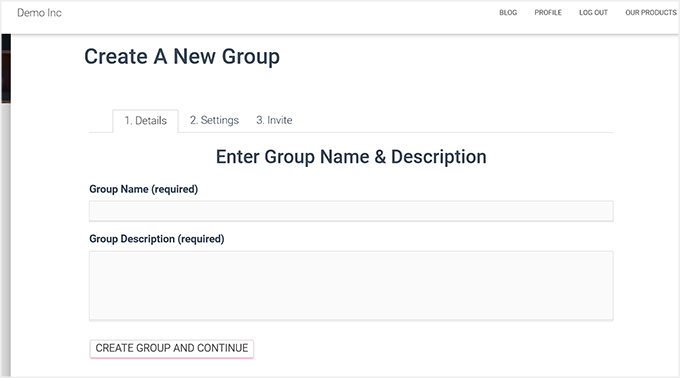
After clicking on the ‘Add New’ button, BuddyPress will take you to the ‘Enter Group Name & Description’ page.
This will direct you to a new page on your WordPress site, where you need to type in a name and description for the group. After that, click on the ‘Create group and continue’ button.
On the next page, you can choose between public, private, and hidden privacy settings.
Anyone can join a public group and make posts. Meanwhile, private groups appear in the BuddyPress groups directory, but users have to send a request to join. Only approved users can see the group’s contents.
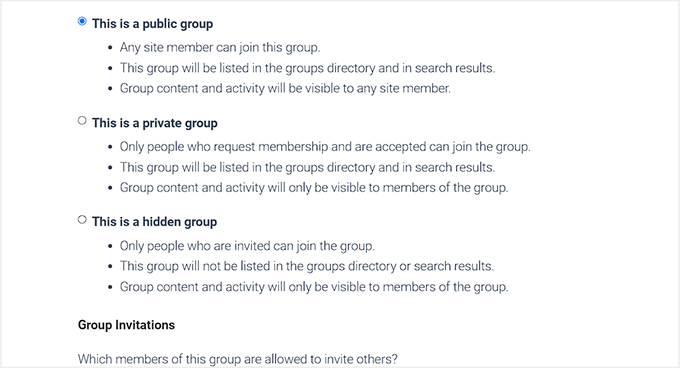
Finally, hidden groups are only visible to members. These groups won’t appear in the BuddyPress groups directory or search results.
After setting up the privacy options, click on the ‘Next Step’ button.
This will take you to the final step, where you can invite some people to join the new group so that it isn’t completely empty. Just be aware that you can only invite users who you have added as friends.
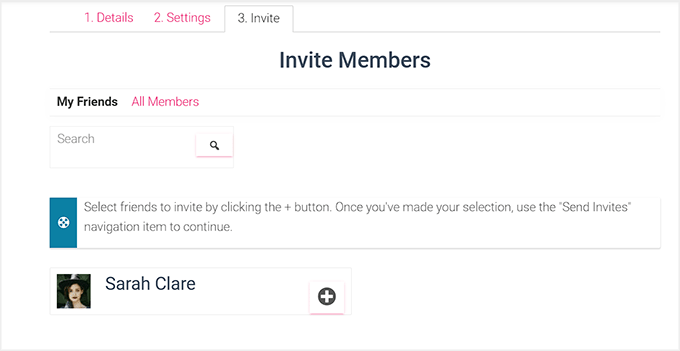
When you are happy with how the group is set up, click on the ‘Finish’ button to go ahead and create the group.
Now, users can simply visit the BuddyPress Groups page to see all the different communities they can join. Your social network is now ready to be used.
If you need some more instructions, then you can check out our guide on how to make a social media website.
Bonus: Add Social Share Buttons on Your Website
Once you have created a social network, it is a good idea to add share buttons for other social media platforms like Facebook, Instagram, and Twitter. This will encourage cross-platform sharing, increase content reach, and promote user engagement.
To do this, install and activate the Social Snap plugin. For details, see our tutorial on how to install a WordPress plugin.
Upon activation, visit the Social Snap » Settings page and expand the ‘Social Sharing’ tab from the left column.
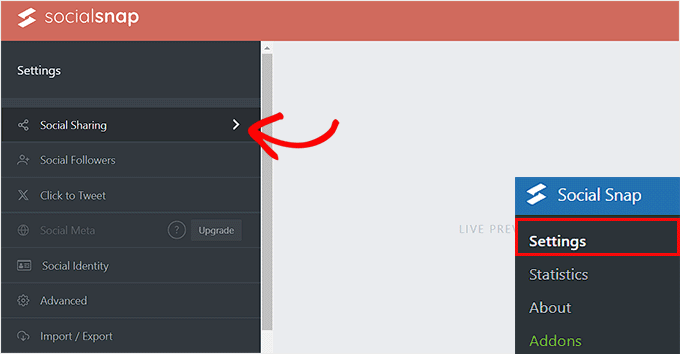
This will open new settings in the sidebar, where you have to select the ‘Manage Networks’ tab.
Next, click the ‘+ Add Networks’ button to add a social media network of your choice from the prompt. You can add platforms like Facebook, Twitter, LinkedIn, and email.
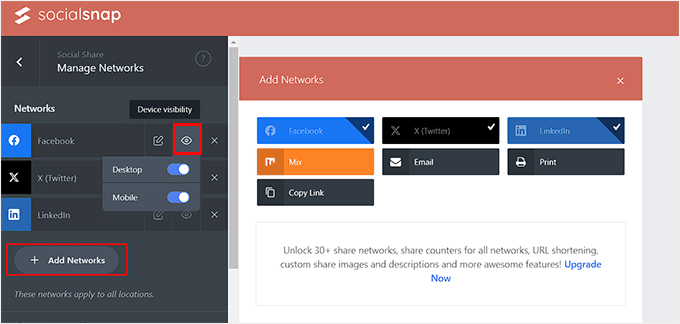
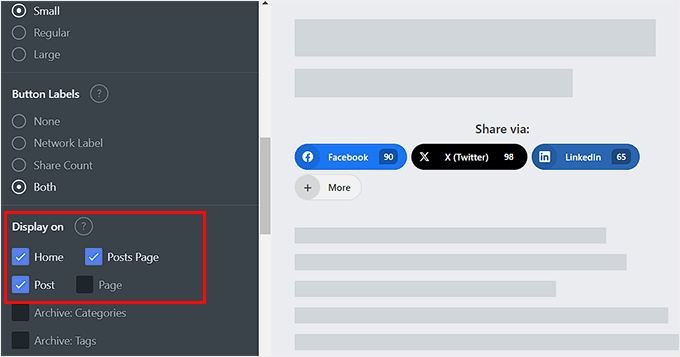
Once you have done that, go back and expand the ‘Inline Buttons’ tab. After some new settings open up, scroll down to the ‘Display On’ section and check the ‘Page’ box.
Now, the social sharing buttons will be displayed on all the pages of your social network.
For details, see our tutorial on how to add social sharing buttons in WordPress.
We hope this article helped you turn your WordPress site into a social network using BuddyBoss and BuddyPress. You may also want to see our complete social media cheat sheet for WordPress or see our expert picks for the best social media plugins for WordPress.
If you liked this article, then please subscribe to our YouTube Channel for WordPress video tutorials. You can also find us on Twitter and Facebook.


Jiří Vaněk
The idea of creating my own social network in the form of my website once occurred to me as well. Unfortunately I didn’t read this article before so I ended up creating a community using the discussion board. However, it is very similar to discord, so it also has certain parameters of a social network. If I had read this article earlier, I probably would have followed your procedure.
Mrteesurez
Please, can WordPress really be used to build a social network websites like Facebook and Twitter or Instagram ??
Although, I once created some like that using Anspress plugin with buddyx theme.
Let be honest, provided I used standard host like managed one or private server. Can WordPress accommodate that large type of traffics ?? or it’s totally depends non the hosting ??
WPBeginner Support
It would depend on your site traffic but most hosts would have a plan level to help you handle most traffic.
Admin
Jiří Vaněk
I probably wouldn’t use classic shared web hosting for this. However, today’s virtual servers are really quite cheap and have high performance. There, I think such a project would make sense. In my opinion, a custom server is also suitable because of the configuration that you can make exactly according to your needs (PHP limits, memory size, performance, Apache or MySQL settings …).
Moinuddin Waheed
Creating a social network of our website is an interesting idea and it would be helpful in increased traffic and engagement with the community.
I am working on an educational website where we would be providing premium content as well to students.
I want to have a discussion form page and not want to create entire website as a social network.
is there a way we can dedicate one page for discussion and make threads our of that?
So that other website activities remains intact.
WPBeginner Support
If we understand what you’re wanting correctly, that would be a forum which we have a guide on how to create below!
https://www.wpbeginner.com/wp-tutorials/how-to-add-a-forum-in-wordpress-with-bbpress/
Admin
Chris Hechler
Hi,
is it possible to change the background colour to a picture/image pattern? The greyish background looks kinda boring for a social platform.
WPBeginner Support
IT would depend on the pattern you are using for the method but most if not all patterns should be able to be edited to fit your site’s design or your preferences.
Admin
Pablo
How do I remover the wordpress bar up the website where is written “Login and Register”? Please?
WPBeginner Support
Unless BuddyPress changes its interface, you should be able to go under Settings>BuddyPress and uncheck the “Show the Toolbar for logged out users”.
Admin
Eris
What is the difference between BuddyPress and a membership plugin like MemberPress?
WPBeginner Support
MemberPress would be for membership sites and things like courses while BuddyPress would be for creating a social network as we show in this post
Admin
Nigel Stratton
Would BuddyPress be a good choice if I wanted to build a social media that also required users to be able to upload audio and video files as part of their profiles?
Thank you!
WPBeginner Support
BuddyPress should be able to handle that but for uploading videos, you would want to take a look at our article here: https://www.wpbeginner.com/beginners-guide/why-you-should-never-upload-a-video-to-wordpress/
Admin
Tunde Sanusi (Tuham)
As a Web Designer, am currently building a social networking site for a client of mine and we were initially using Buddypress..
However along the line, we discover the profile photo part seems like an issue as people would have to crop their photo (which is a pain) before it works
Any code on how to skip the cropping photo part?
WPBeginner Support
You would want to reach out to BuddyPress for what customizations are available.
Admin
Antony Finney
Some times its a pain to read what blog owners wrote but this web site is real user pleasant!
WPBeginner Support
Glad you like our content
Admin
Onyela liberty
Hi am from nigeria and I want to build a social network for farmers how do I go is buddypress great which other plug ins do u recommend for bp
WPBeginner Support
You should be able to do what you are wanting with BuddyPress
Admin
John Richards
Which theme is used along with Buddypress in the images shown here?
sergio
I’m no expert, but I try to dig as deep as I can when using WordPRess and plugins… HAving said so, BP is great and has a lot of functionlaity extended with plugins… Perhaps too much?
I am in the (nightmarish) process of researching options to create a social network, and I can say that I ended up letting go BP to favor a little awesome one who’s giving me some pretty good results in terms of flexibility and ease of use: Ultimate Member… Maybe less extended / less features than BP (not than core BP) but it’s such a pleasure to work with!
Joshua Orekhie
This is really great. With this plugin, I can create a successful group channel for my website. Does it comes with a pay version or free?
Dale Reardon
Hi,
BuddyPress is a good solution for a social community but we have recently had problems when expanding its capabilities because you need so many extra feature plugins from different authors and hence conflicts and bugs arise.
We hare just in the process of moving our community over to Peepso and when you add the power of all the addon plugins it is way more powerful than BP.
If you would like us to write about our experience then let us know.
Dale.
Susan smith
Hi Dale. Visited your website and it’s really cool.would love to know the plug in you ended up using.Thank you
Bonny
Good day, Im based in South Africa, and in process of building a classified social media website, what will you recommend to use buddypress or Peepso.
thanks