Manually posting on social media can take up a lot of time and energy. That’s why we have been using social media automation tools across our business websites for a long time.
Social media automation can save you a lot of time by handling repetitive tasks. A consistent posting schedule keeps your audience engaged and increases your reach by sharing content across multiple platforms.
Fortunately, tools like IFTTT, Zapier, Uncanny Automator, and ClickSocial let you automatically share your WordPress blog posts on platforms like Facebook, Twitter, LinkedIn, Instagram, and more.
That said, navigating these tools can be daunting. And that’s why we’re here.
In this article, we’ll explore how to set up these automation tools so you can automate your social media marketing and free up some headspace for other tasks.
Why Automate WordPress and Social Media?
Automating your WordPress website and social media accounts eliminates the need to manually share content on these platforms.
You can easily schedule posts to be published on various social media platforms at the same time without having to log in and share them individually.
For instance, if you have an important announcement to make on your website, you can automate WordPress and social media so that the announcement goes live on all social platforms at a scheduled time.
This saves time and effort, boosts your social media presence, and can increase website visibility.
Additionally, automating WordPress with social media can also improve your site’s SEO by increasing social media signals such as likes, shares, and comments.
With that in mind, we will show you how to easily automate WordPress with social media using IFTT, Zapier, and Uncanny Automator. You can use the quick links below to jump to the method you want to use:
Ready? Let’s jump right in.
Method 1: Automate WordPress and Social Media With IFTTT (Free)
IFTTT (If This Then That) is a free web service that helps users automate web-based tasks. It uses applets to connect two or more apps and devices.
For example, you can use a Twitter applet to connect your Twitter account to your WordPress website.
If you are looking for a free way to automate social media and WordPress, then this method is for you.
Create an IFTTT Account
To automate your WordPress website and social media, you will need to create an account on IFTTT.
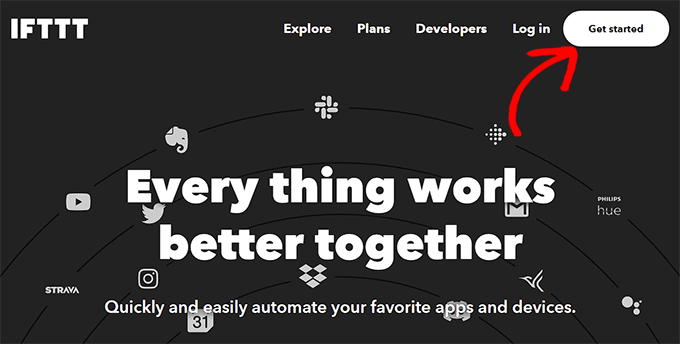
First, you must visit the IFTTT website and click on the ‘Get Started’ button in the top right corner of the screen.
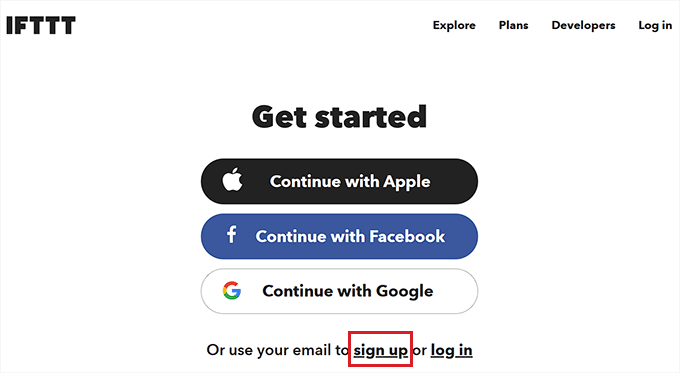
This will direct you to a new page, where you have to click on the ‘Sign up’ link.
Next, provide your email credentials to create an account on IFTTT.
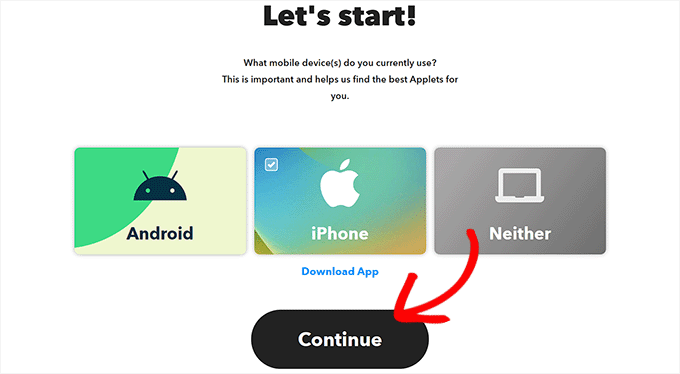
Once you have done that, you will see the ‘Let’s Start’ page, where you need to select the type of mobile device you currently use.
Simply choose an option and click the ‘Continue’ button.
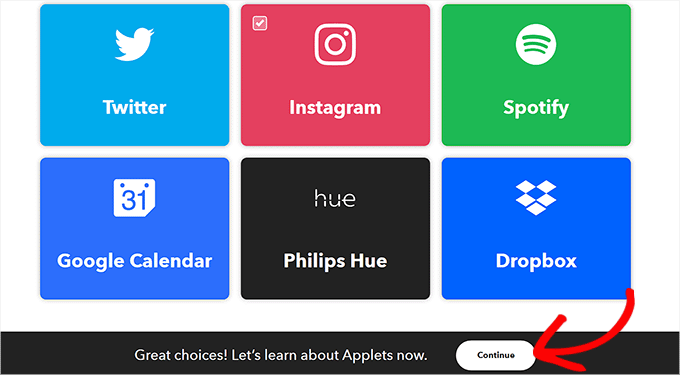
After that, you must select the social media platforms that you frequently use to better customize your ‘Explore’ page.
Once you are done, click the ‘Continue’ button to move forward.
Set Up an IFTTT Applet
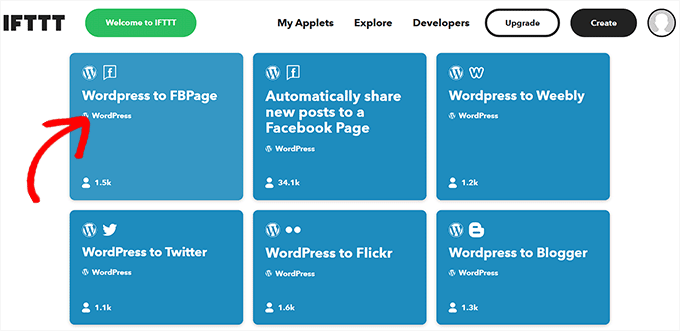
Now that your account is ready, you will be taken to the ‘Explore’ page, where you can select an applet that works for you.
For this tutorial, we will automate WordPress and Facebook.
To do this, go ahead and click on the ‘WordPress to FB Page’ applet from the list.
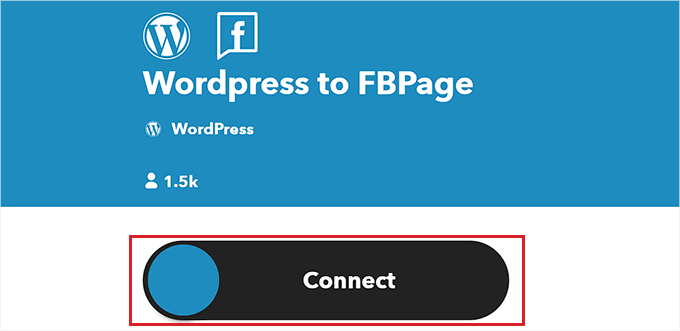
You will now be directed to the ‘WordPress to FB Page’ screen.
Next, simply toggle on the ‘Connect’ switch.
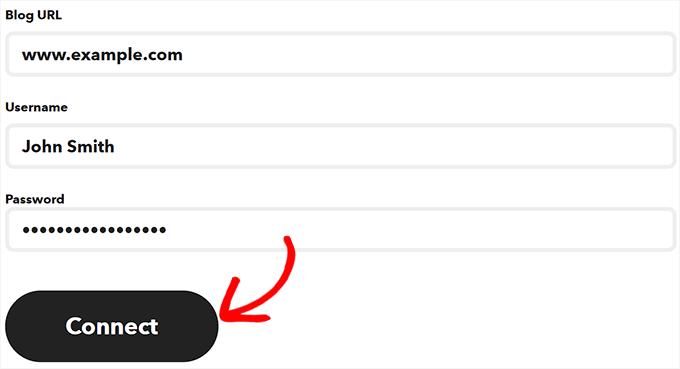
This will take you to a new page, where you have to provide your WordPress blog URL, username, and password.
Once you are done, click the ‘Connect’ button to integrate WordPress with IFTTT.
After your WordPress website is connected, you will be redirected to the ‘WordPress to FBPage’ screen.
Here, simply toggle the ‘Connect’ switch again. This will direct you to the Facebook platform, where you must give permission to connect your Facebook account with IFTTT.
Simply click the ‘Continue’ button if you are sure.
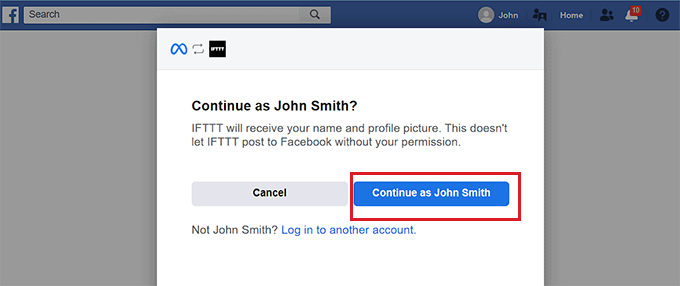
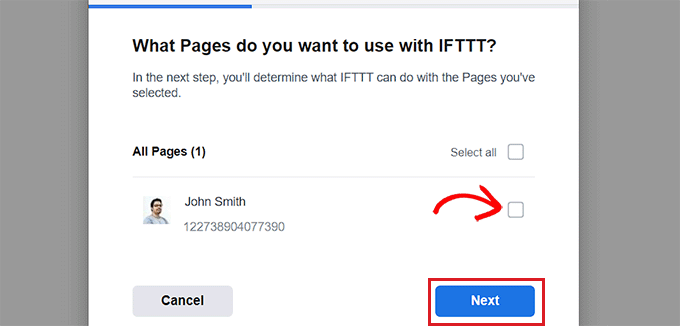
You will then be asked about the pages you want to connect with IFTTT. Go ahead and select the Facebook page where you will share your WordPress blog posts.
Once you have done that, click the ‘Next’ button.
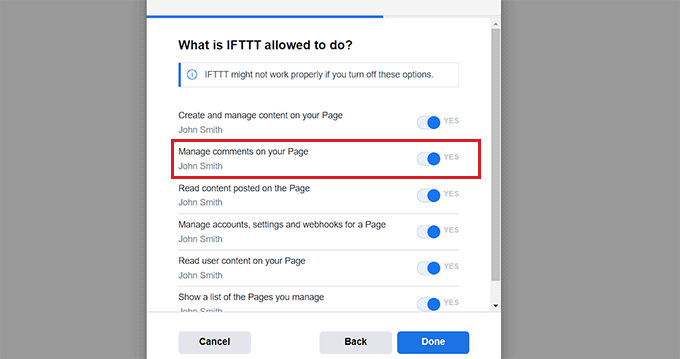
Next, simply select all the actions that IFTTT is allowed to do on your Facebook page.
For instance, if you want IFTTT to manage comments on your page, toggle the switch next to the option to ‘Yes’. Then, simply click ‘Done’.
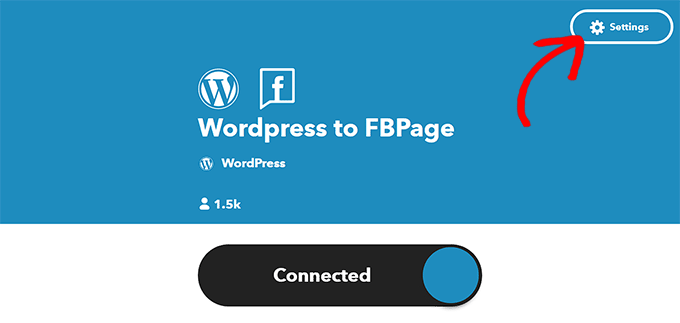
You will now see the ‘WordPress to FBPage’ screen, where the toggle will show that your WordPress website and Facebook pages are connected.
From here, simply click the ‘Settings’ button at the top.
You will be now taken to the ‘Create’ page.
Set Up ‘If This’ and ‘Then That’
Here, you can configure the actions you want IFTTT to take on your Facebook page when something happens on your WordPress website.
Go ahead and click on the ‘Add’ button next to the ‘If This’ option.
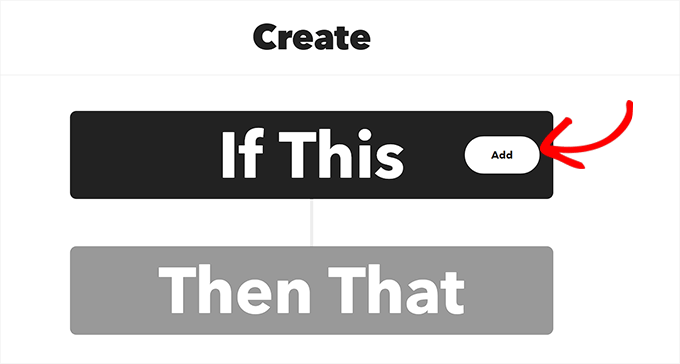
Next, simply choose WordPress as the service from the ‘Choose a Service’ page.
This will direct you to the ‘Choose a Trigger’ page. Here, just select when you want the Trigger to go off. This Trigger will alert IFTTT when an action is taking place on your website.
For instance, if you want a Trigger to go off every time you add a new post, simply choose that option.
You can also create your own Trigger. After that, simply click the ‘Create Trigger’ button.
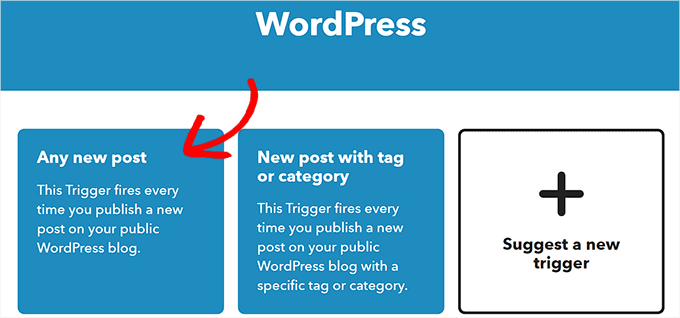
Now that the Trigger is ready, you will be redirected to the ‘Create’ page.
Go ahead and click the ‘Add’ button next to the ‘Then That’ option.
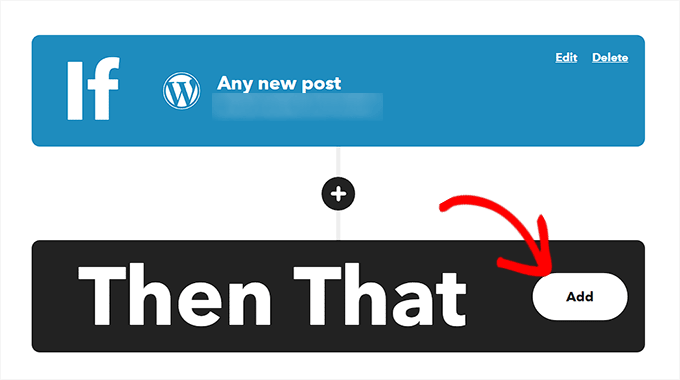
Next, simply choose ‘Facebook Pages’ from the ‘Choose a Service’ page.
You must now select an Action. This is what IFTTT will do on your Facebook page when a particular action happens on your WordPress website.
For example, you can tell IFTTT to share the WordPress post link on your Facebook page once a new post has been published on your website.
After that, click the ‘Create Action’ button.
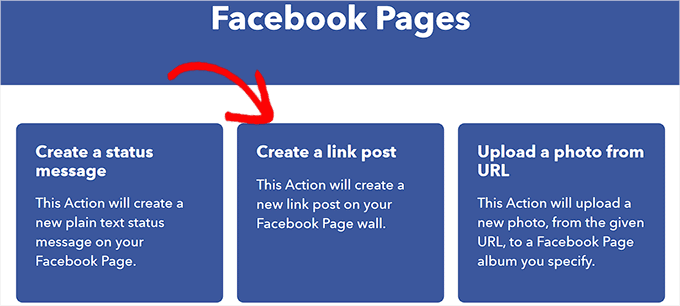
Once you have successfully created an IFTTT action, you will see the ‘Create’ page.
Go ahead and click the ‘Save’ button to store your settings.
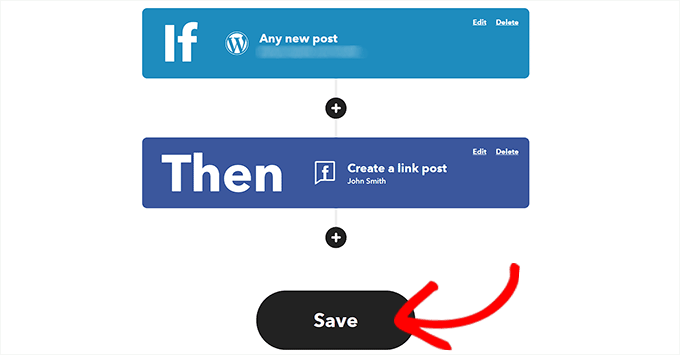
You have now successfully automated WordPress and Facebook with IFTTT.
Method 2: Use Zapier to Automate WordPress and Social Media
If you want to automate social media and WordPress using Zapier, then this method is for you.
Zapier is a cloud-based automation tool that allows users to connect various web applications, including Gmail, Trello, Slack, Facebook, Twitter, and more.
It also offers a library of pre-built automation workflows, known as ‘Zaps,’ that you can customize further to suit your needs.
Set Up Zapier
To automate WordPress and social media, you will first need to install and activate the Zapier for WordPress plugin on your website. For more instructions, please see our step-by-step guide on how to install a WordPress plugin.
After that, you must visit the Zapier website and click the ‘Sign Up’ button in the top right corner of the screen to start creating an account.
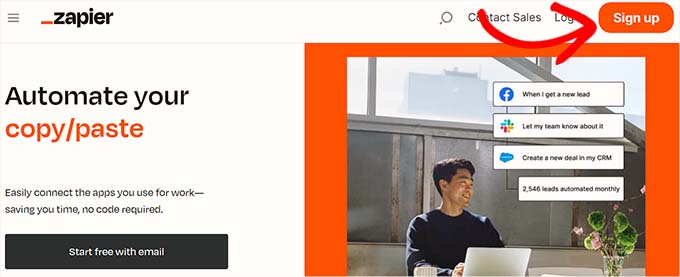
Once you have provided the credentials, you will see the ‘What apps do you use?’ page.
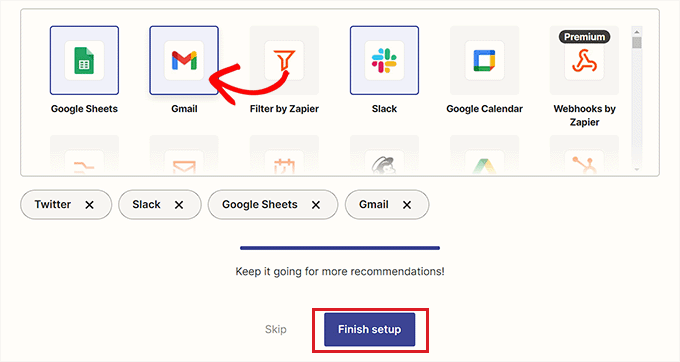
Here, simply select the apps that you use and click on the ‘Finish Setup’ button. At a minimum, you will need to choose WordPress and the social media platforms that you want to connect to your website.
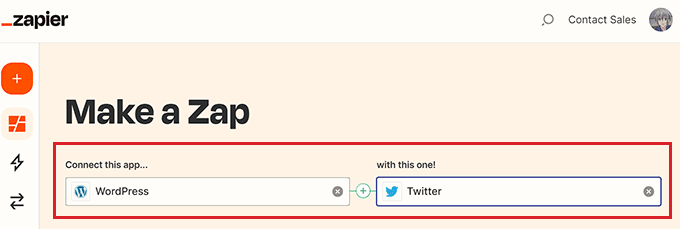
You will now be taken to your Zapier dashboard. Here, simply search for and add WordPress under the ‘Connect this app…’ option.
Next, add the social media platform that you want to connect with WordPress under the ‘with this one!’ option.
For this tutorial, we will be connecting WordPress with Twitter.
Make a Zap
Next, you must select a trigger for WordPress from the dropdown menu. When a particular action happens on your WordPress website, this trigger will tell Zapier to perform an action on Twitter.
After you have done that, choose the action you want Zapier to perform from the ‘then do this!’ dropdown menu.
For instance, if you want to create a tweet every time you publish a new post in WordPress, then you need to select these options.
Once you are done, click the ‘Try it’ button to create a Zap.

Connect Your WordPress Site and Twitter Account to Zapier
Next, you will see the Zapier editor.
You must expand the ‘WordPress Trigger’ tab and then click the ‘Sign in’ button to connect WordPress and Zapier.
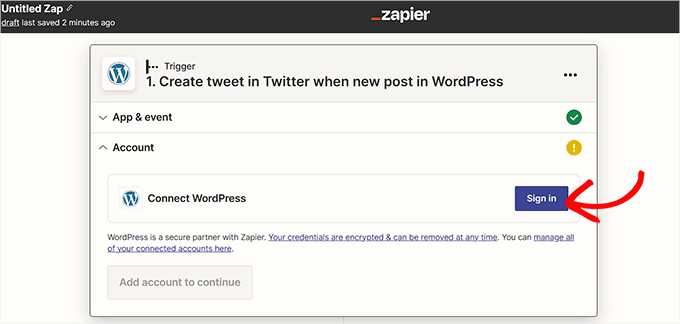
This will open up the ‘Connect an Account’ page in a new window.
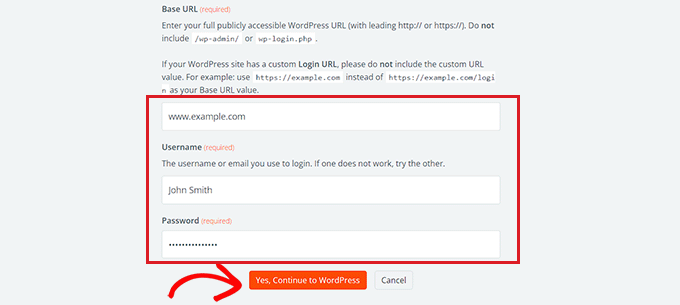
Go ahead and provide your WordPress site’s username, password, and URL. After that, click the ‘Yes, Continue to WordPress’ button to move forward.
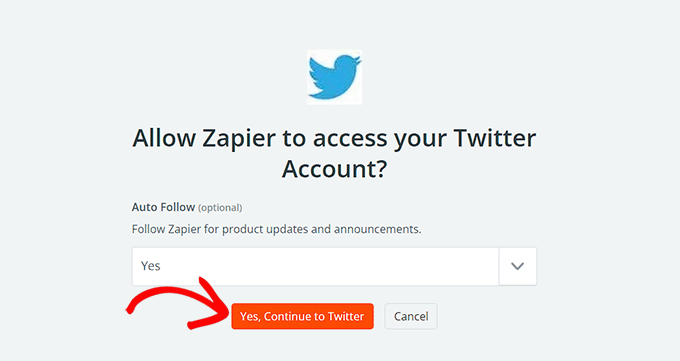
Once your WordPress website is connected, expand the ‘Twitter’ tab and click the ‘Sign In’ button.
You will see the ‘Connect an Account’ page again, where you need to give Zapier permission to connect to your Twitter account.
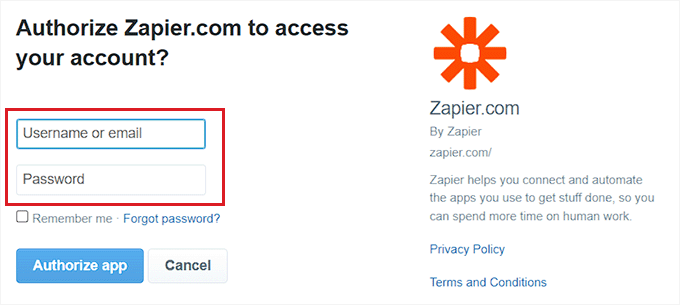
Simply provide the username and password for your Twitter account and click the ‘Authorize app’ button.
Zapier will now connect your Twitter account with your WordPress website.
Personalize Your Zap
Next, you can use the ‘Message’ dropdown menu to select the content for the tweet that will be posted every time you publish a new article.
For instance, if you want to add the post link, date, and author name in the tweet, simply choose these options from the dropdown menu.
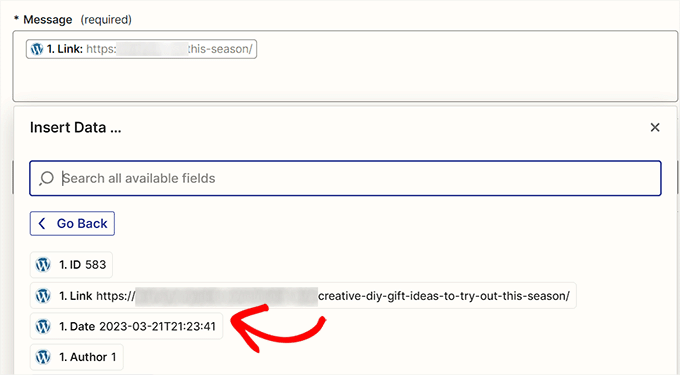
Next, click the ‘Continue’ button to move forward.
After that, switch to the ‘Settings’ tab from the sidebar on the left. You can start by entering a name for the Zap you created.
Next, type a description and choose a timezone for the Zap.
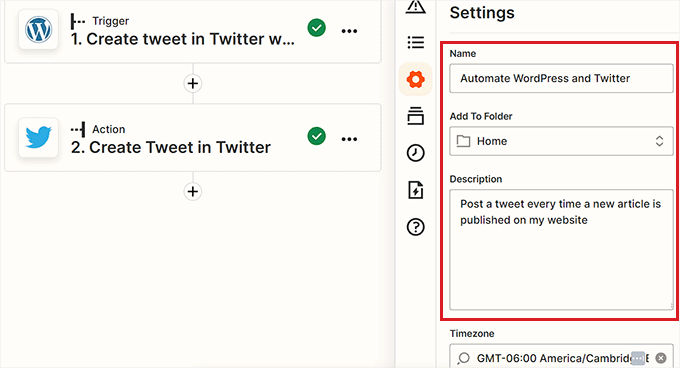
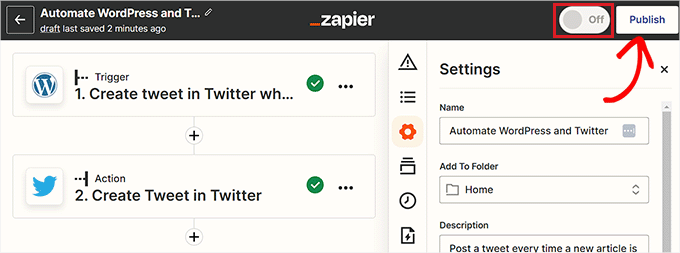
Finally, toggle the switch at the top to ‘On’ and then click the ‘Publish’ button to create and activate your Zap.
You have now successfully automated WordPress and Twitter.
Related: See our list of the best WordPress Zapier plugins.
Method 3: Automate WordPress and Social Media With Uncanny Automator (Recommended)
Set Up Uncanny Automator
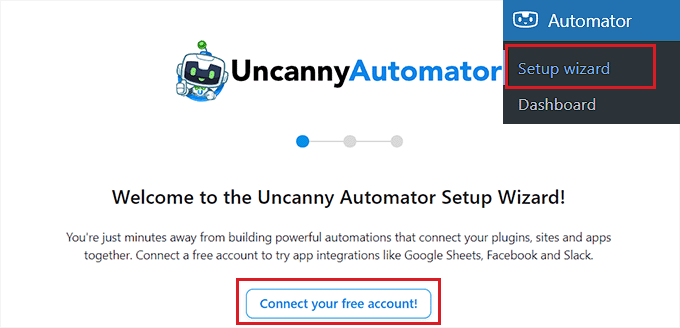
This will open up the ‘Sign In’ page in a new window.
Here, simply provide your credentials to create a free Uncanny Automator account and then click the ‘Sign up’ button at the bottom.
Choose an Uncanny Automator Trigger
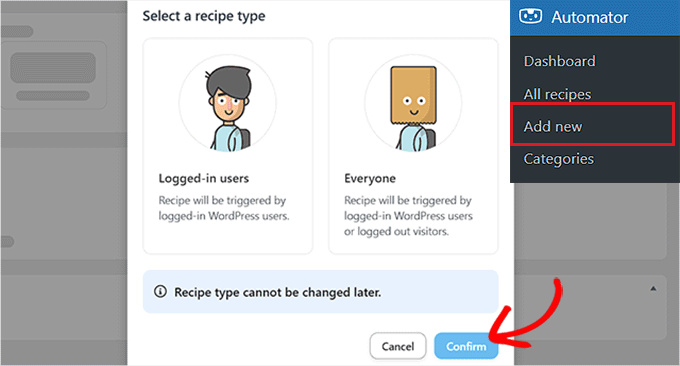
Next, visit the Automator » Add New page from the WordPress admin sidebar. Automator will ask you if the recipe you want to create should be triggered only by logged-in users or by everyone visiting your site.
Go ahead and click the ‘Confirm’ button after choosing an option.
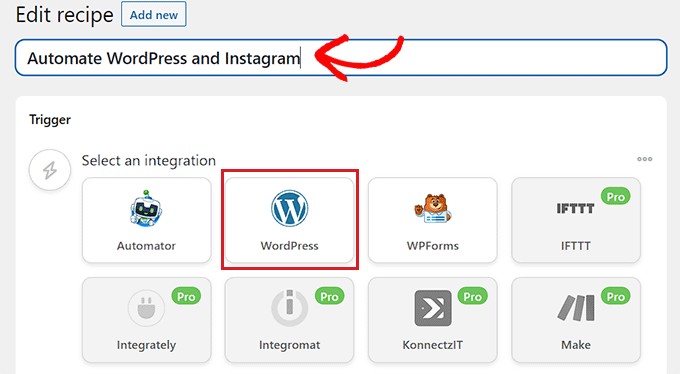
After that, you can start by adding a title for the recipe. For instance, if you want to automate WordPress and Instagram, then you can use that as a recipe name.
Next, simply select the ‘WordPress’ option in the ‘Trigger’ section.
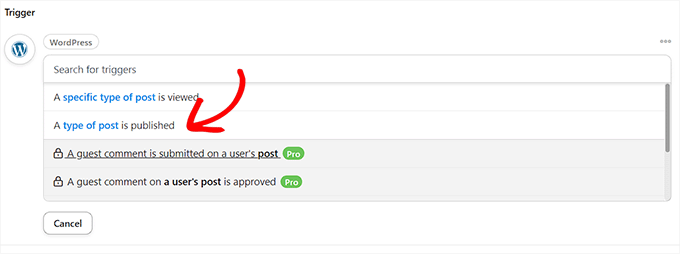
Now, you need to select a Trigger for WordPress.
For example, if you want an Instagram post to go live every time you publish a new WordPress post, choose the ‘A type of post is published’ option from the dropdown menu.’
Connect Uncanny Automator to Instagram
After selecting a Trigger, click on the ‘Add action’ button to open up the list of integrations.
For this tutorial, we will be automating WordPress and Instagram.
Go ahead and choose the ‘Instagram’ option from the list.
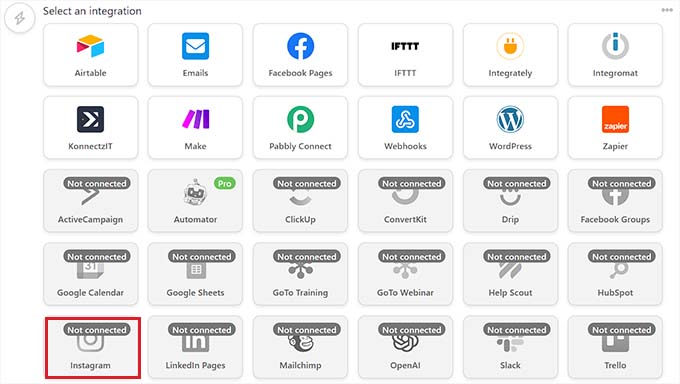
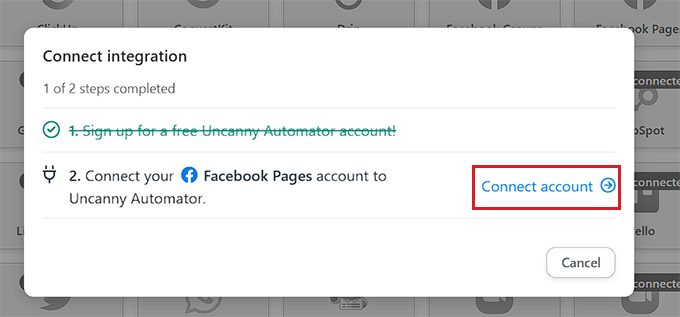
A popup will now display on your screen.
Keep in mind that you can only connect an Instagram business account that is already linked to a Facebook page. You won’t be able to connect to a personal Instagram account, either.
Now, go ahead and click the ‘Connect account’ link to integrate Instagram with Uncanny Automator.
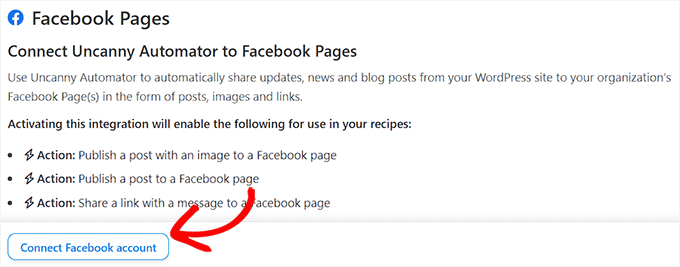
This will open up the ‘Connect an Account’ page in a new window.
Here, simply click the ‘Connect Facebook account’ button to move forward.
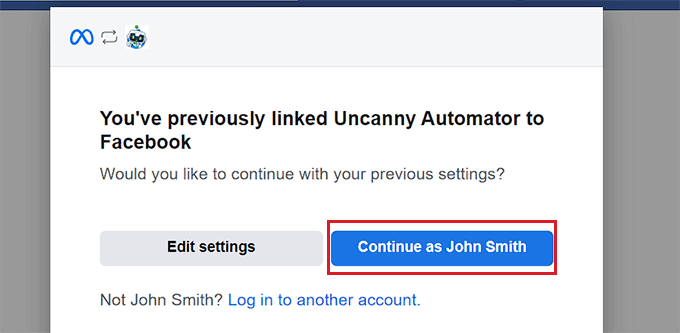
You will now be directed to the Facebook website, where you need to provide your login credentials. You will be asked if you want to continue with the same ID.
Simply click the ‘Continue’ button to connect Facebook to Uncanny Automator.
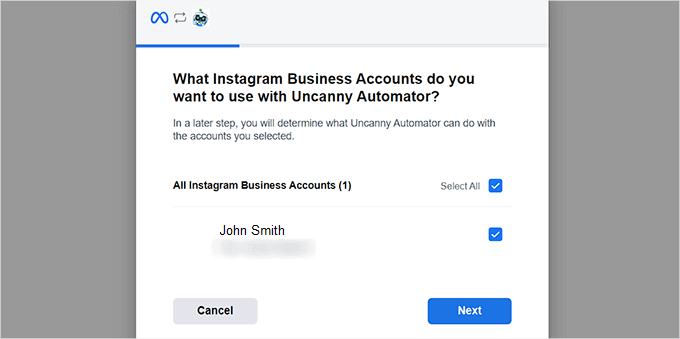
Next, you need to select the business Instagram account linked to your Facebook account.
Then, click the ‘Next’ button to continue.
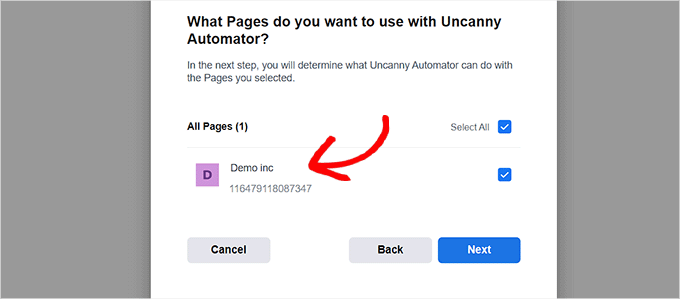
After that, you must select a Facebook page. Simply choose one and click the ‘Next’ button.
Make sure to choose the page connected to your Instagram business account. Otherwise, the process won’t work.
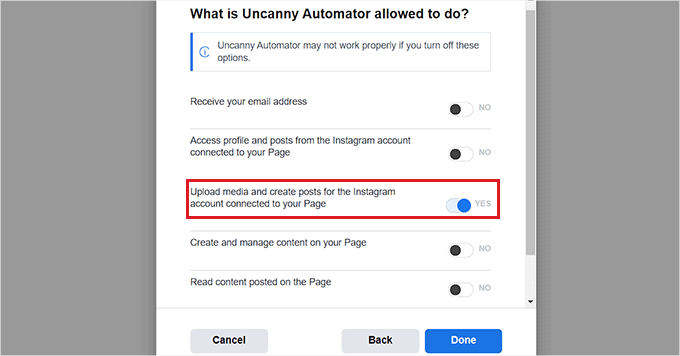
You will then need to choose all the actions that Uncanny Automator is allowed to perform on your Instagram page.
For example, if you want to give it permission to create posts on your Instagram account, then just toggle the switch next to that option.
Now go ahead and click the ‘Done’ button.
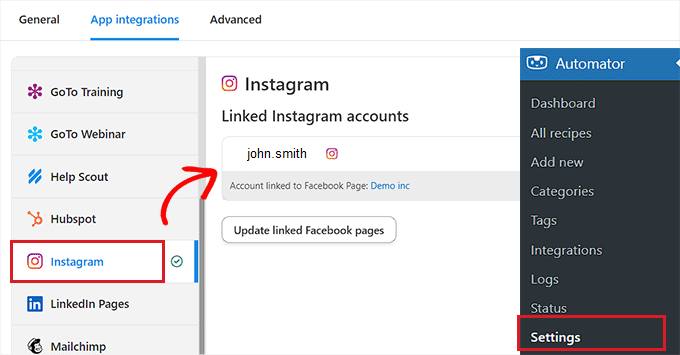
You will now be redirected to the Automator » Settings page on your WordPress admin dashboard. Once you are there, switch to the ‘Instagram’ tab in the left column.
Here, you will see the Instagram business account connected to your Facebook page.
If the Instagram account isn’t displayed on the screen, this means that something went wrong, and you need to go through the process again.
You can now exit this window and head over to the ‘Connect integration’ popup page, and click the ‘Connect Account’ link again. This will integrate Instagram with Uncanny Automator and your WordPress website.
Choose an Uncanny Automator Action
Now, it’s time to choose the action you want Uncanny Automator to perform on Instagram when something happens on your WordPress website.
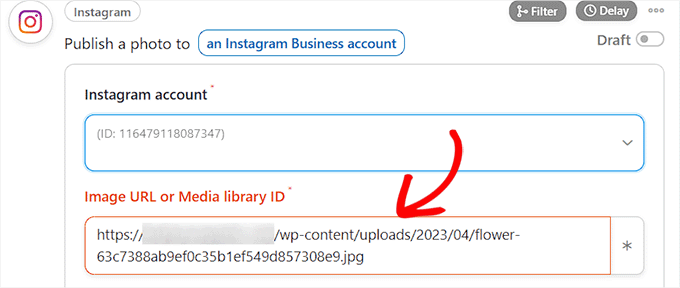
For instance, if you want to publish a photo on Instagram every time an article goes live, then choose the ‘Publish a photo to an Instagram Business account’ option.

Next, type the URL or the media library ID of the photo that you want to post on Instagram.
You can change the photo URL from the WordPress dashboard every time you publish a new WordPress post.
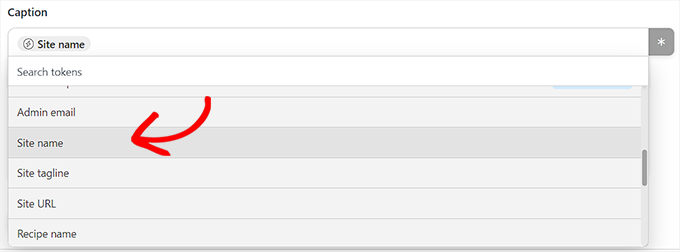
Next, you must draft a caption that will be published along with your posts. Simply choose the options you like from the dropdown menu.
You can add a site name, email address, website URL, date, and more from the list of options.
Once you are done, click the ‘Save’ button to store the changes.
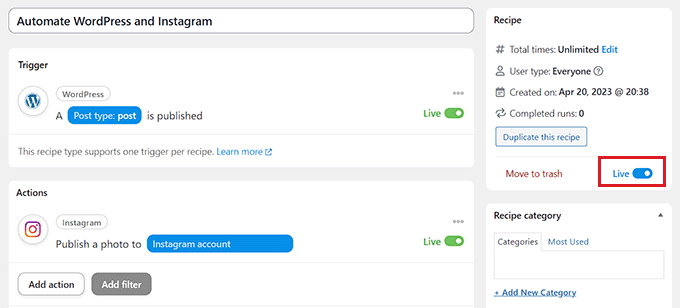
Finally, head over to the ‘Recipe’ section in the right corner of the screen and toggle the switch to ‘Live.’
You have now successfully automated WordPress and Instagram.
Method 4: Use ClickSocial to Automate WordPress and Social Media
If you’re looking for a more simple method to automate WordPress and social media, you can also use ClickSocial.
ClickSocial is one of the best social media scheduling tools. You can use it to easily schedule social media posts right from the WordPress dashboard. It also comes with a feature to automatically share your old WordPress posts on a regular basis.
Set Up ClickSocial
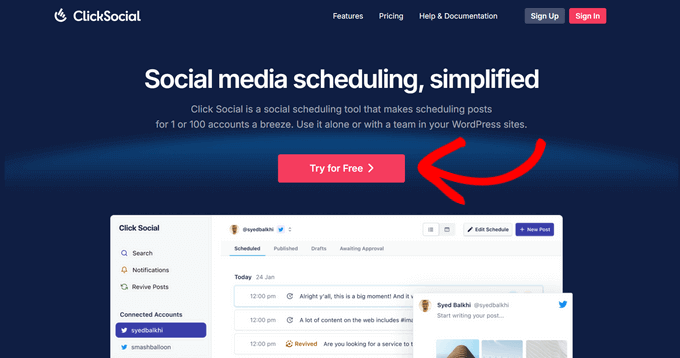
First, you need to visit the ClickSocial website and click the ‘Try for Free’ button to sign up for an account.
Next, you need to install and activate the free ClickSocial plugin on your WordPress site. If you need help, see our guide on how to install a WordPress plugin.
Once the plugin is activated, you need to return to your account on the ClickSocial website to generate an API key.
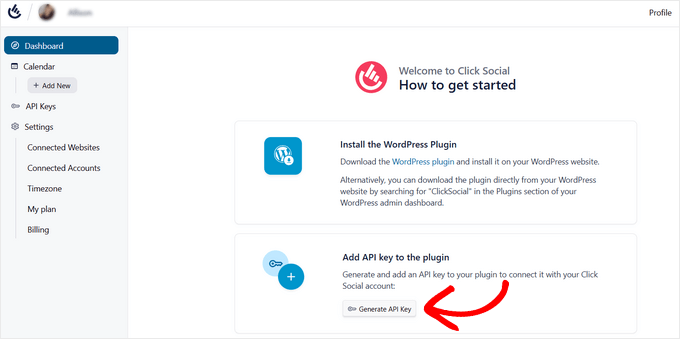
To do that, click on the ‘Generate API Key’ button from the ClickSocial dashboard.
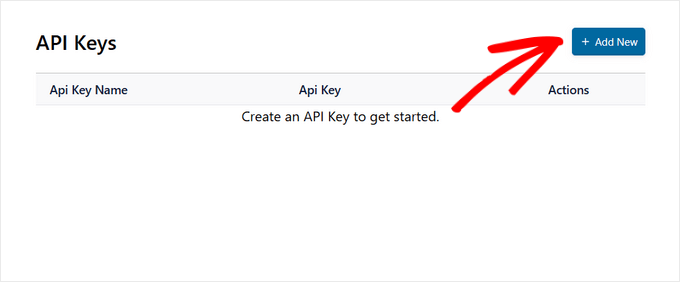
On the next page, you need to click the ‘Add New’ button.
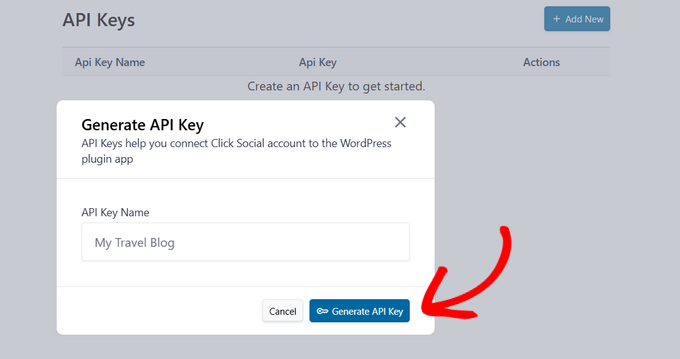
This will open up a popup where you can enter a name for your API key, like the name of your website, for example.
After that, click on the ‘Generate API Key’ button.
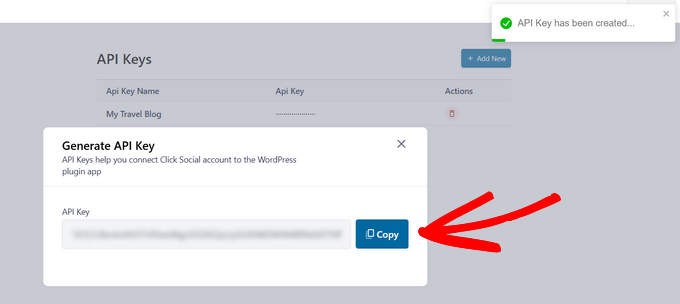
You’ve now successfully created an API key. Remember to keep this secure because it’s essential for connecting your WordPress site.
Click the ‘Copy’ button to copy the API key and then return to your WordPress site.
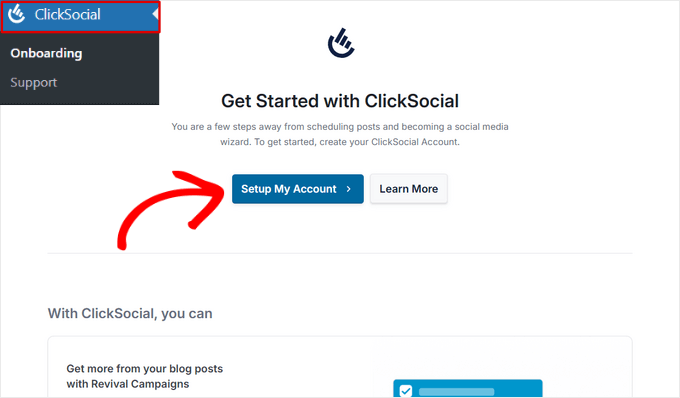
From the WordPress dashboard, click on the ClickSocial menu item and then click the ‘Setup My Account’ button.
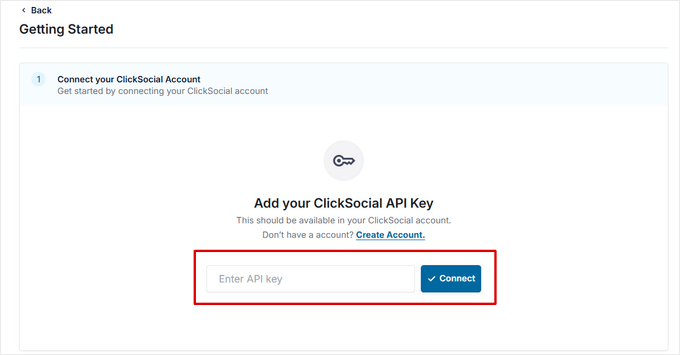
Next, simply paste the API key that you copied earlier into the field and click on the ‘Connect’ button.
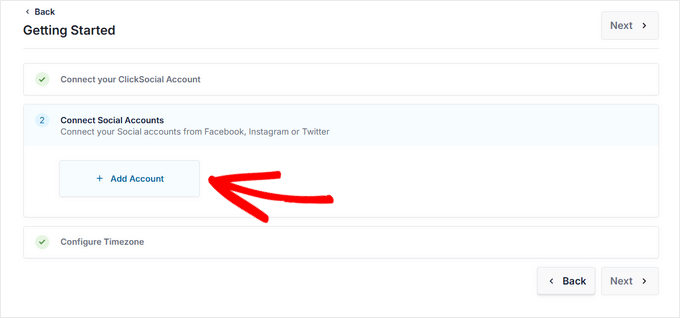
Once that’s done, you can start connecting your social media accounts by hitting the ‘Add Account’ button.
With ClickSocial, you can connect your website with the most popular social media networks, including Facebook, Instagram, and Twitter/X.
For this tutorial, we’ll select the Twitter option to connect it.
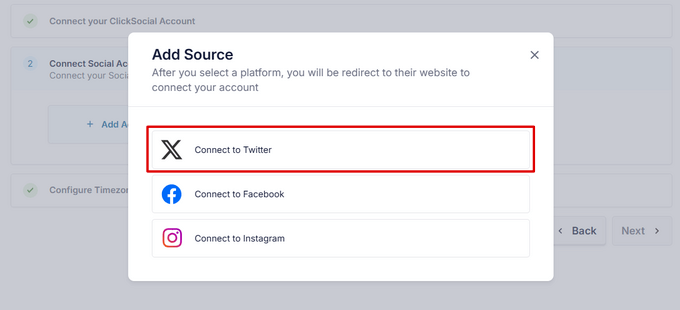
The plugin will then redirect you to the Twitter website where you need to login to your account and click the ‘Authorize App’ button.
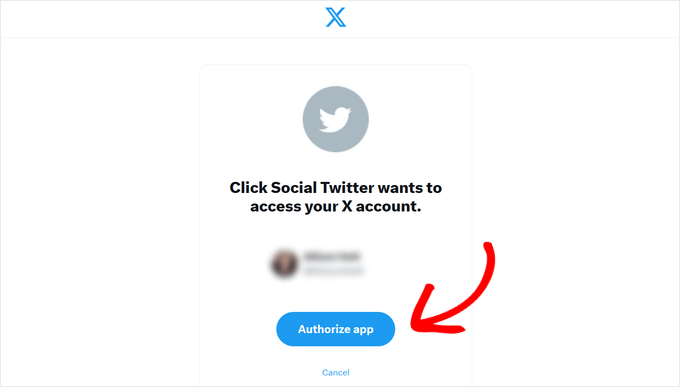
After that, you’ll be redirected back to your website. You can repeat the process to connect additional social media accounts if you want.
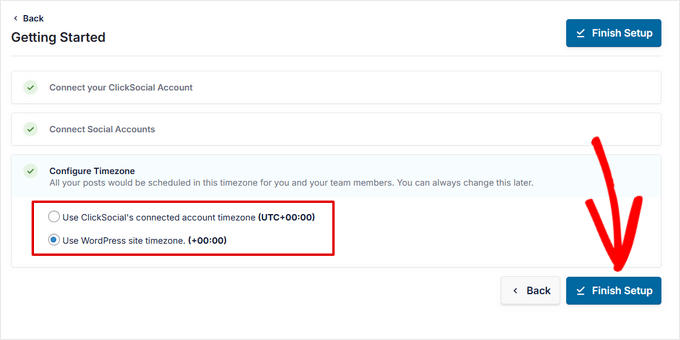
Once your social media accounts are connected, you can choose the timezone that your posts will be scheduled in. For this tutorial, we’ll use our WordPress site’s timezone.
Then, click the ‘Finish Setup’ button.
Create a Revival Campaign in ClickSocial
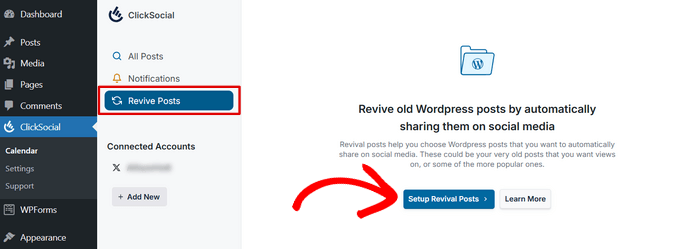
Now that ClickSocial is set up, you can create a revival campaign to automatically share your old WordPress posts.
To do that, go to the ‘Revive Posts’ tab and click on the ‘Setup Revival Posts’ button.
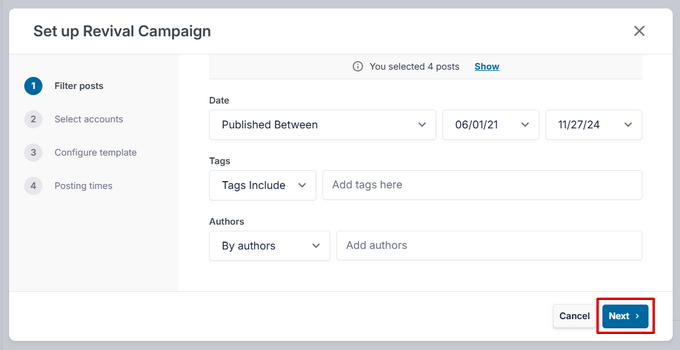
In the first step, you can set up filters to decide which posts you want to automatically share on social media.
You can filter by date, tags, and authors. When you’re happy with the filters, click the ‘Next’ button to continue.
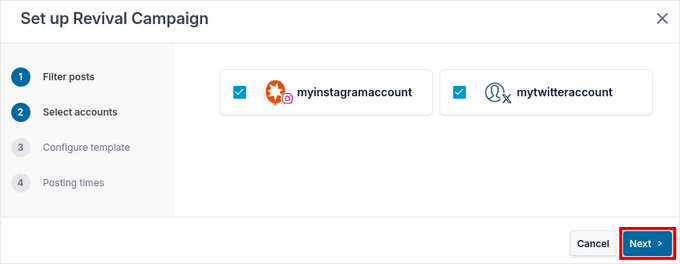
Next, select the social media accounts you want to post to. You can select multiple accounts if you want.
Click the ‘Next’ button to continue.
After that, you can create a post template, which is the text that will accompany your social media posts.
You can manually type the post content as well as insert dynamic content like post title, excerpt, short post link, and categories as hashtags.
Once your template is ready, click the ‘Next’ button.
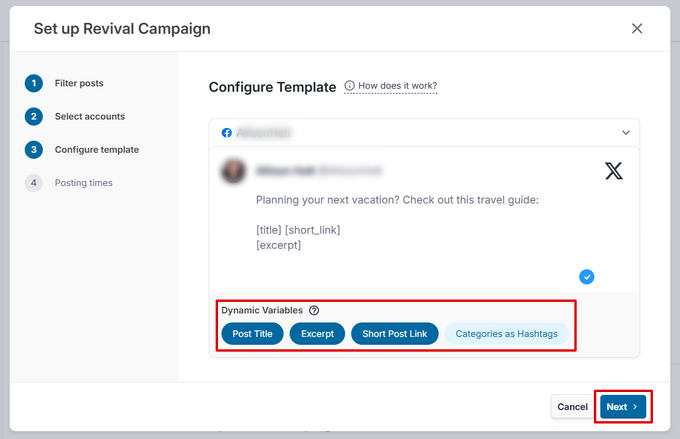
Note: If you selected multiple accounts to post to, you need to create a separate template for each platform. To do that, click the down arrow next to the account name.
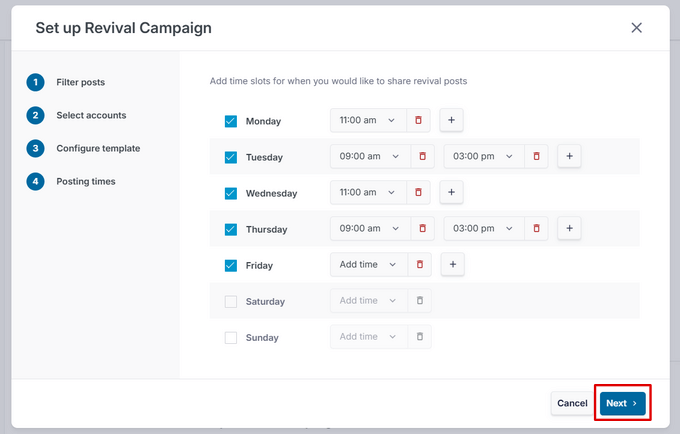
Lastly, you can select the specific days and times when you want your posts to be shared. You can add multiple posting times per day by clicking the ‘+ Add’ icon.
When you’re happy with your posting schedule, click the ‘Next’ button.
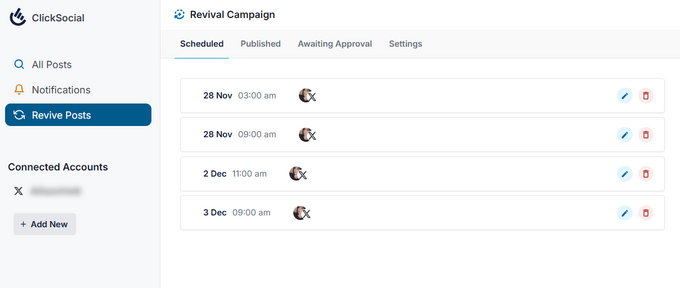
Now, you’ll be taken to the ‘Scheduled’ tab where you can see the posts that will be automatically shared on social media.
We hope this article helped you learn how to automate WordPress and social media platforms using IFTTT, Zapier, Uncanny Automator, and ClickSocial. Next, you may also want to see our tutorial on how to add social logins to your WordPress website or our expert picks of the best social media plugins for WordPress.
If you liked this article, then please subscribe to our YouTube Channel for WordPress video tutorials. You can also find us on Twitter and Facebook.


Umayr Agha
Thank you for the process.
Mrteesurez
Website Automation is worth give an attention. It helps one automation and share website contents to your different social handles, this will save your time and energy.
Can this also work for custom post type ??
WPBeginner Support
It can, you would want to ensure you include the custom post type in an RSS feed for IFTTT to be able to see it.
Admin
THANKGOD JONATHAN
I have been using free Zapier to automate my social media post but today I have get an alternative.
I will need to try IFTTT. Base on this tutorial as I see it will be easier to use than Zapier.
Moinuddin Waheed
This is so powerful and easy to use in yet free. IFTTT is hands down the best social media automator free plugin to use.
Others are paid options and are of course worth having but for beginners who are just starting out and have a tight budget, this ifttt is the best option to go with to automate the social media posts and pages.
Matthew Carney
I have set everything up but I want ifttt to pull posts from a categorie but when i use the link “https://domain.name/local-news/feed/” it doesn’t pull but if i ask it to pull site wide “https://domain.name/feed/” it pulls everything. im so confused i dont know why it wont work
Andrew B.
Ok so just the normal site URL mysitename.com nothing special like the link to the backend for it to log in correct? Im new to all this stuff only had website for just over a month. Thanks again for your time and assistance.
WPBeginner Support
Unless it asks for a specific URL then you would go to your primary site URL
Admin
Andrew B.
Awesome thank you for the help greatly appreciated.
Andrew B.
I have a bluehost wordpress website. I just created my if this then that account. I want to connect my website blog to post on social media.
It said to enter the blog URL. So i used mysitename.com/blog/ and it said it was not a valid blog URL.
What other URL would it be if not my site name/blog?
WPBeginner Support
IFTTT would normally need the URL for your site and not the blog page of your site.
Admin
Emmanuel Ajayi
NIce one. Thank you.
WPBeginner Support
You’re welcome
Admin
Jen
Hi,
Is there a way to set up IFTT with a third party plugin? For instance my calendar plugin. Everytime I Post, I would like for it to post to my socials .Just like it does for my Wordpress Posts currently.
Thanks!
WPBeginner Support
You would want to check with that plugin’s support for if it has the ability to work with IFTTT
Admin
Chinecherem Somto
this is great! i have searched for this for a long time, thanks to WPBeginner
WPBeginner Support
You’re welcome, glad our article could help
Admin
Rohit Singh
Hello admin.
I’ve read this article but i wanted to know that i own a website but whenever i am checking the seo stats it’s showing me that social count 0. How to increase the social count. Kindly reply me please.
WPBeginner Support
Your users may not be sharing your content yet, you can add social icons on your site using one of the plugins in: https://www.wpbeginner.com/plugins/best-social-media-plugins-for-wordpress/
if you do not have shares currently.
Admin
Terri Scheffler
I set up IFTTT to post my Wordpress blog entries to the FB page. It works great, and was so easy to do!
One problem. The ‘logo’ appearing with each post comes from my WP page. It’s far too big, and gets truncated, and looks stupid. I went into the media library, created a thumbnail on my ‘logo’ graphic, and hoped it would pick that up instead. It didn’t.
Is there any way I can get IFTTT to pick up the thumbnail graphic instead of the larger one that appears at the top of the blog? Please be gentle, I am a newbie. But I have gotten so much good info from this site, appreciate it!
marc
why do the wordpress apps in ifttt not post the featured image from the wordpress post in the social media you chose. I have so many posts that will post to lnkedin or facebook but do not post the image along with it. Am I doing something wrong?
Simran
Thank you for the tips. It took a while for the ifttt to work for my wordpress but Finally it did.
Tom
Does anyone know how to post a bunch of already published wordpress posts on facebook ?
I have a lot of old posts on a blog that I would like to gradually post on FB (with a pace of 2-5 a day).
Daretoeatapeach
Though ITTT has many services the problem is few of them are detailed enough to be useful. For example, there’s no way to tell it which of my Tumblr blogs to post to, nor can I have it send only certain categories to Tumblr, so the Tumblr option is useless, even though I’ve been seeking a solution to send my posts to Tumblr. Every other time I try to use ITTT I find the lack of detailed options for the services they provide doesn’t meet my needs.
Sadiq Ali Baloch
Hello
please tell me
how to connect twitter accounts to my f.b pages?
Benson
Very terrible to connect self hosted WordPress blog with IFTTT. And suggestion will be greatly appreciated. Only WordPress.com is connecting. Ah! My head is heavy.
markwoff
Trying to use IFTTT to push WP posts to tumblr. I get ‘external image/image not found’ message on tumblr. How might I fix this? Thanks in advance…
Ann Murugi
I have a blog,when i try sharing my links on twitter it states’ the site might be automated’
How can i fix this?
Katia
thanks! very helpful!
Tony
Thank you so much for this post. I’ve heard that plugins for auto sharing to social media can slow down a WordPress site pretty badly, so this is way better. IFTTT is brilliant, and the video combined with the instructions were extremely helpful.
WPBeginner Staff
It actually depends on what CMS or software the other website is using to publish content.
poonam
This is really a awesome article but my question is how can I automatically post to some non wordpress sites every time I publish a new blog post in my wordpress site. Is that possible to do. Its really helpful for me if you will write about this. thanks
Marco Miomac
How to post old WordPress posts to twitter using IFTTT?
Fabula
Hej there.
I am using the IFTTT now for some time. Thanks for telling me that this exists! =)
But I have a problem, when it comes to posting images on Facebook or Twitter from my Wordpress-Blog. I always have a featured image set for my posts, but if I want to create an image post on the social media, it always tells me there that the image does not exit.. Is there a trick to make it work?
I even tried making my blog post an image post, but that did not work either.
And can I adjust the recipes so that I just type in what he should show, or is that limited to what they give me (For example what I want to post in my posts, like imageURL and so on)
Thanks for the help!
WPBeginner Staff
You will enter your website’s url in IFTTTT
http://www.example.com
IFTTT will still get your blog feed. Make sure you have activated Twitter channel and given IFTTT permission to tweet on your behalf. After that try publishing a post and then come back to IFTTT and manually run the recipe. See if it shows you any error.
darkhorse85
I can’t activate my WordPress BLOG as a channel:
[On IFTTT.com]
When I attempt activate WordPress posts as channel from my blog URL “mywebsite.co.uk/blog” it will not work.
IFTTT.com activate on WordPress posts as channel by typing “mywebsite.co.uk” it does indeed activate (but does not tansfer the posts from my blog page to Twitter).
Please
let me know I know if you have good idea what going wrong here thanks.
WPBeginner Staff
Seems like your site is setup with a static front page and a separate page for blog posts. In cases like this, your blog’s URL is still the root domain not the blog page. Sometimes it may take IFTTT a while to get your new post and tweet it. You can also try running a recipe manually and see if it triggers the action or shows any error.
You will also need to activate the Twitter channel and give IFTTT permission to post on your behalf.
darkhorse85
Yes I do have a mutli-page site where my blog is not the font page. My front page is my Home page should be a static page and page named Blog should be categorised as a blog.
I must admit I don’t fully follow what it is you are saying and am unsure where to go from here.
Q1: What address should enter use activate and use my WP blog?
Q2: How would I run a recipe “manually”
Please kindly advise. Thanks
Adam Kaan
I had a nightmare for weeks trying to resolve this problem in the end I found out to use my feed to set it up. For example mine is put whatever your site url is and then add forward slash feed try and use that address to set it up on ifttt
Sheridan
Hi really cool post !
is it possible for IFTTT to make a bitly link (shotend link) under the sent post, so the readers come back to my site, or does this tool do such a thing – maybe I just have to make the bitly link (shotend link) in my WP POST before letting IFTTT send to the social platforms – somebody know if I am right or wrong?
thanks for answering !
Sheridan
Tim Buttle
I’ve recently created a ‘recipe’ on IFTTT that means whenever I retweet, it comes up on the blog on my Wordpress site. However if I click on the link that comes up on Wordpress, it doesn’t take me to the original Twitter feed (rather to a sub-page on my Wordpress site). How can I get the link to take me from my site back to Twitter?
Might be a stupid question, and many thanks for any help! Tim.
Lav Singh
How to post old WordPress posts to twitter using IFTTT? (Twitter account created after publishing some WordPress posts)
toddbot
I recently set up ifttt to post to wordpress whenever I load a video to youtube. Is there a way to build the short code [publicize off] into the recipe so it will not post to the other sites I have linked to wordpress?
Pundi
I almost pull my hair with my wp plugin.. thank you for this article. I have to join IFTTT
Robin Rico
I just discovered this little gem of a site. Love it! One recipe I used was fb fan page to wordpress. I have a client who prefers to post everything in fb vs. her blog. Problem solved!!
Joanne Marcinek
Great post. Thank you.
I love IFTTT but I am trying to use it with a Wordpress.com blog that I have marked as private (using it as a personal journal). However, I would like to access the RSS via IFTTT for backup.
I am getting this error when I try to link to the blog RSS: Not a valid feed url, missing feed title
Do you think this is because the blog is marked private? Or is there something else going wrong? (I tried your suggestion to enable XML-RPC, but I don’t see that option in my settings.
Thank you!
Editorial Staff
Yes it is because your blog is set to private.
Admin
B
Then why does it ask for the Wordpress username and password. Privacy settings shouldn’t matter…
darkhorse85
Acutally I think it may just be because you version of WordPress has XML-RPC automatically enabled. Google search this to check: “WordPress (enter the version you use)” followed by “XML-RPC automatically enabled” and see what
comes up!
I use WordPress 4.0 on a wordpress.org site and that solved my
XML-RPC dilema.
Mattia
When I try to connect WordPress to IFTTT it says:
Live channel fields value is not a valid Wordpress url
Unable to verify Wordpress credentials. Please try again.
Am I missing something? Thanks
Dan Deeble
It doesn’t seem to work with my wordpress.com blog, unless of course I am doing something completely retarded.
Can anyone verify this please?
Thanks
Dan
Editorial Staff
It should work fine. You can also use the RSS method.
Admin
Julien Maury
Thanks a lot for making my blogging life easier !
Zimbrul
This is quite cool. The backup to Dropbox or Google drive is good but my question is: how the backup of any post looks like? I think I should try for myself, shouldn’t I.
The problem (at least until recently) was for the Facebook to work nicely with WordPress and grab the featured image or the image in the post as well as the excerpt. I wonder how this service pulls out the excerpt and the post image?
Editorial Staff
If you have the proper og: tags defined, then Facebook will pull the image. As for per post backup, it stores the post as PDF.
Admin
Tom Hermans
The other way around it’s even more useful, that it fetches yr social media blurbs, and archive them in YOUR own space. WordPress is all about owning and controlling your own content, and that way you can preserve, bundle, and display all yr tweets, fb status updates etc. in one centrally managed hub.
For a personal blog, it doesn’t get any more personal than that.
Editorial Staff
Totally agreed. It pulls from RSS, FB, Twitter, and all sorts of places.
Admin
Charles
I use IFTTT to auto tweet and facebook all my new posts on my blog. It’s good, but my only complaint is that it only activates once every 30 minutes.
Manveet Singh
I already use IFTTT with Google Drive to backup my blog posts, and it works amazingly.
There’s only one thing that I have been trying to find a solution though. When I update an already published post, how to get a backup of that! Still trying to figure out
Shea Bunge
At this time, IFTTT does not support Google+, and therefore your “WordPress to Google+” recipe suggestion is invalid.
Birgit
This is really AWESOME, wow! Thanks for that great tip!
I wonder whether it’s possible to replace the good old feedburner mail subscription with IFTTT?
I’ve only found the possibility, to create a receipe at IFTTT to send my/any feed to my (!) e-mail address. But how to offer the own blog visitors the possibility for a mail subscription to get the newest posts (as in normal RSS)? Isn’t that possible with IFTTT or has anybody another suggestion?
Editorial Staff
No that is not possible with IFTTT. You would have to use a service like MailChimp or Aweber.
Admin
Shea Bunge
While email subscriptions are not possible with IFTTT, you can use the Jetpack Email Subscriptions plugin.
Lawrence
For Twitter, Facebook, LinkedIn, and Tumbler, I’ve found that Jetpack’s Publicize tool has worked very well.
I had been using IFTTT for all of the above and switched over to Jetpack.
Editorial Staff
Yes, there are cool plugins in WordPress that can do the job as well. But if you are only going to use Jetpack for that feature, then you might as well just use IFTTT. Again, Jetpack offers a lot more that everyone might not need/want.
Admin
zimbrul
I heard that Jetpack is quite “heavy” on a WordPress site…
Matt Litherland
I have literally skim read this, and it looks great. I’m hoping when i get time later tonight to read it fully that it fulfils what im after. Posting blog posts to facebook or twitter automatically is something i’ve wanted to build into my themes for a while