Do you want to style each WordPress post on your website differently?
You may have come across some websites that highlight sticky posts with a custom background or style each category post with a unique look. You can do this, too, to reflect different content types and create a visually appealing experience for users.
In this article, we will show you how to easily style each WordPress post differently.
Note: This tutorial requires you to add custom CSS in WordPress. You will also need to be able to use the Inspect tool and have some basic CSS knowledge, so it may not be suitable for complete beginners.
Pros and Cons of Styling Each WordPress Post Differently
If you have a WordPress blog, styling each post differently can create a unique visual experience where different colors are associated with different content categories or types.
For instance, you might use a different background color for all the listicles, blog posts, and how-to tutorials on your website. This can grab users’ attention instantly and boost engagement.
Keep in mind that doing this can also have some major cons. For example, you will have to regularly maintain the design of each WordPress post, which can be time-consuming.
Plus, it can provide an inconsistent user experience and won’t help with your brand identity. This is because you need to use the same colors across your website to establish your business’s image.
If you are a beginner, then adding custom CSS to style each post can also be difficult. Having said that, let’s see how you can easily style each WordPress post differently.
How to Style Individual Posts in WordPress
WordPress adds default CSS classes to various elements on your website. Themes use a core WordPress function called post_class() to tell WordPress where to add those default CSS classes for posts.
If you visit your website and use the Inspect tool in your browser, then you will be able to see those classes added for each post.
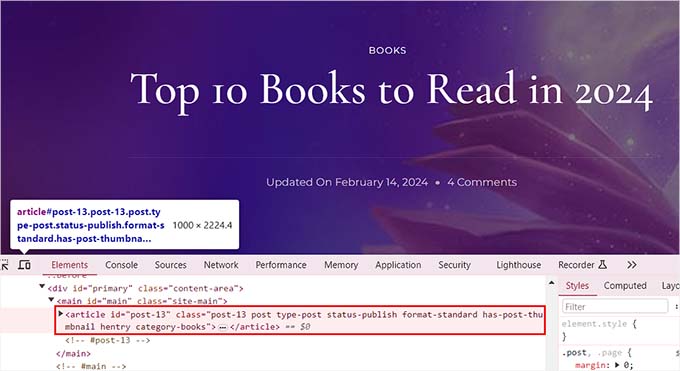
The following are the CSS classes added by default based on which page a user is viewing:
- .post-id
- .post
- .attachment
- .sticky
- .hentry (hAtom microformat pages)
- .category-ID
- .category-name
- .tag-name
- .format-{format-name}
- .type-{post-type-name}
- .has-post-thumbnail
An example output would look like this:
<article id="post-412" class="post-412 post type-post status-publish format-standard hentry category-news">
You can style each WordPress post differently using these respective CSS classes or IDs. To do this, you will first need to find the post ID for an individual post.
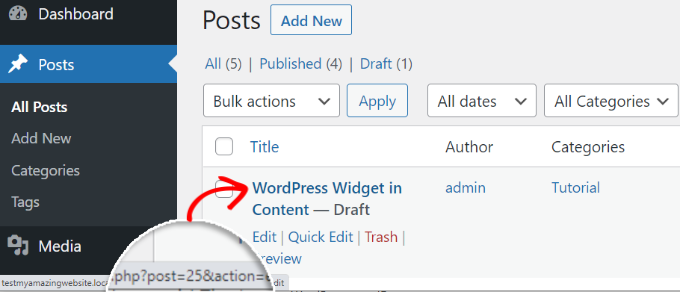
For that, you must visit the Posts » All Posts page from the WordPress dashboard and hover your mouse over a post.
A post-edit URL will now appear at the bottom left corner of your screen. Here, you can find the post ID by looking at the number between ‘post=’ and ‘&action.’
In the example below, the post ID is 25.
Once you have done that, you must add the CSS class along with the custom code to your theme files or in the theme customizer. However, that can be risky and break your site with just one error.
That is why we recommend using WPCode instead. It is the best WordPress code snippets plugin and the safest way to add custom code to your site.
First, you need to install and activate the free WPCode plugin. For details, see our beginner’s guide on how to install a WordPress plugin.
Upon activation, visit the Code Snippets » + Add Snippet page from the WordPress dashboard. Here, click the ‘Use Snippet’ button under the ‘Add Your Custom Code (New Snippet)’ option.

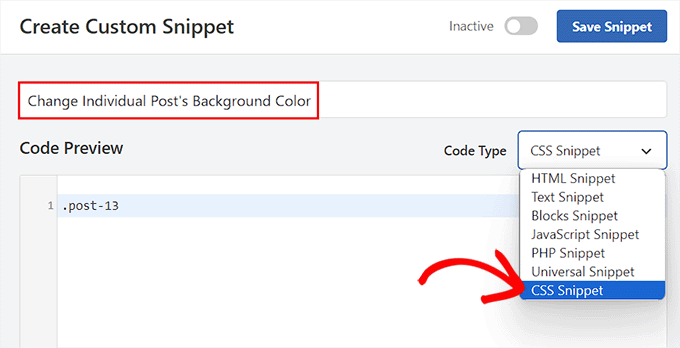
This will take you to the ‘Create Custom Snippet’ page, where you can start by adding a name for your code snippet. After that, select ‘CSS Snippet’ as the code type from the dropdown menu on the right.
Then, you must add your individual post’s CSS class and ID into the ‘Code Preview’ box like this:
.post-13 { }
After that, you can add any kind of custom CSS code between the brackets to style your post.
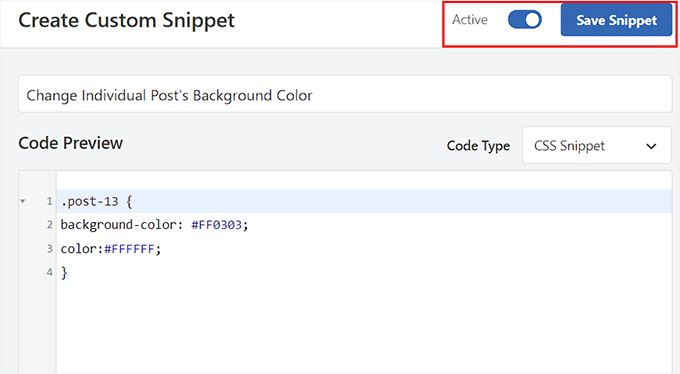
For instance, if you want to change the background color of an individual post, then you can add the following custom CSS code. Keep in mind that you must replace the post ID in this code with your own ID. Where this is .post-13, yours might be .post-23873.
You can also change the hex code for the background color to any color of your choice:
.post-13 {
background-color: #FF0303;
color:#FFFFFF;
}
Next, toggle the ‘Inactive’ switch at the top to ‘Active’ and click the ‘Save Snippet’ button to store your settings.
The custom CSS code will now be automatically executed on your individual post upon snippet activation.
Go ahead and visit your WordPress blog post to see the changes in real-time.
You can also add other custom CSS code snippets in the ‘Code Preview’ box to change the text selection color, text color, internal links color, and so much more.

For more information, see our beginner’s guide on how to customize colors in WordPress.
How to Style Posts in a Specific Category
If you want to style all the posts that belong to a specific category, then you can also do that with WPCode.
You must visit the Code Snippets » + Add Snippet page and select the ‘Add Your Custom Code (New Snippet)’ option.
Then, add a code snippet name on the new page and choose ‘CSS Snippet’ as the code type. After that, type a specific category’s CSS class in the code preview box like this, using the category’s permalink slug after the dash:
.category-books { }
Once you have done that, you can add any custom CSS snippet in the box to apply it to all the posts in different categories.
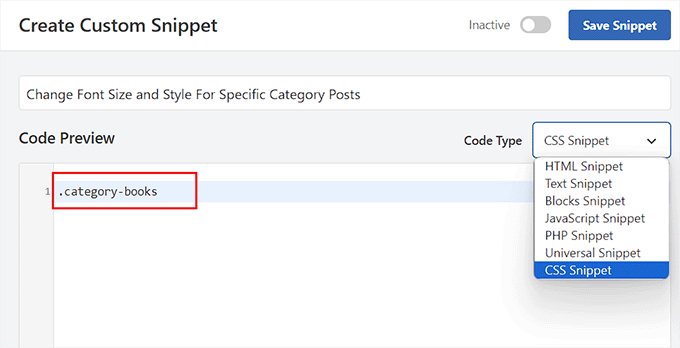
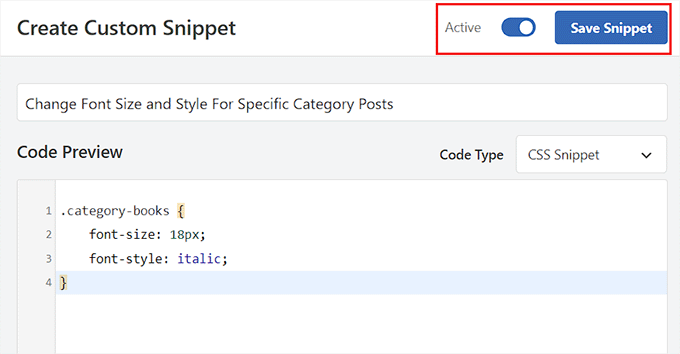
For instance, if you want to change the font size and style for all the posts in a specific category, then you can use the following code snippet. Just remember to replace the category name according to your website.
category-books {
    font-size: 18px;
    font-style: italic;
}
Next, toggle the ‘Inactive’ switch to ‘Active’ at the top.
Then, go ahead and click the ‘Save Snippet’ button to store your settings.
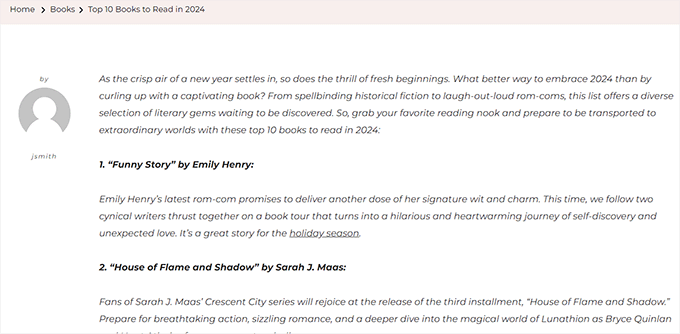
You can now visit all the posts in a specific category to see the changes that have been applied with CSS code.
This is what it looked like on our demo site.
How to Style Posts Differently Based on Author
The default CSS classes generated by the_posts() function do not include the author name as a CSS class.
If you want to customize the style of each post based on the author, then you will first need to add the author’s name as a CSS class.
To do this with WPCode, select the ‘Add Your Custom Code (New Snippet)’ option.
This will take you to the ‘Create Custom Snippet’ page, where you must add a code snippet name and select ‘PHP Snippet’ as the code type.
After that, add the following custom code into the ‘Code Preview’ box and replace ‘user_nicename’ with the author’s name.
$author = get_the_author_meta('user_nicename'); ?>
<article id="post-<?php the_ID(); ?>" <?php post_class( $author );
Finally, toggle the ‘Inactive’ switch to ‘Active’ and click the ‘Save Snippet’ button to store your settings.
It should look like this.
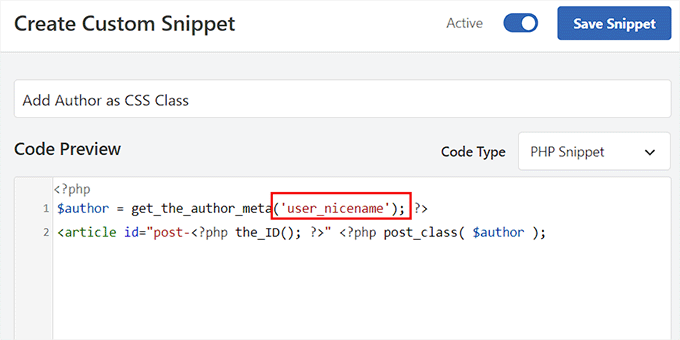
This code will now add the user’s nicename as a CSS class. Nicename is a URL-friendly name used by WordPress. It does not have spaces, and all characters are in lowercase, which makes it perfect to use as a CSS class.
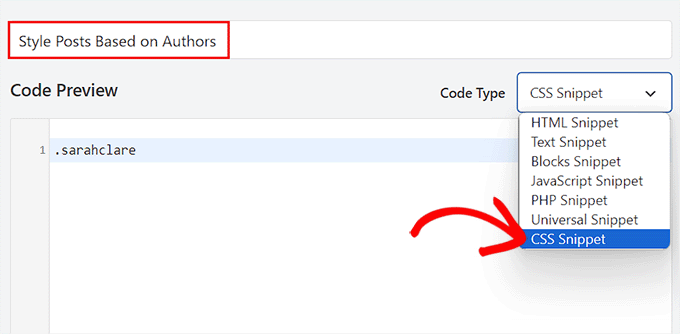
Now you must visit the Code Snippets » + Add Snippet page again and choose the ‘Add Your Custom Code (New Snippet)’ option. On the next screen, add a name for your custom code and choose ‘CSS Snippet’ as the code type from the dropdown menu on the right.
You can then add the specific author’s name in the ‘Code Preview’ box like this:
.sarahclare
After that, you can add the custom CSS code to change the background color, border size, text color, and more.
You can use the code below to change the background color of an author’s posts and add a border to the content area.
.sarahclare {
background-color:#EEE;
border:1px solid #CCC;
}
Once you are done, click the ‘Save Snippet’ button at the top.
Then, toggle the ‘Inactive’ switch to ‘Active’.
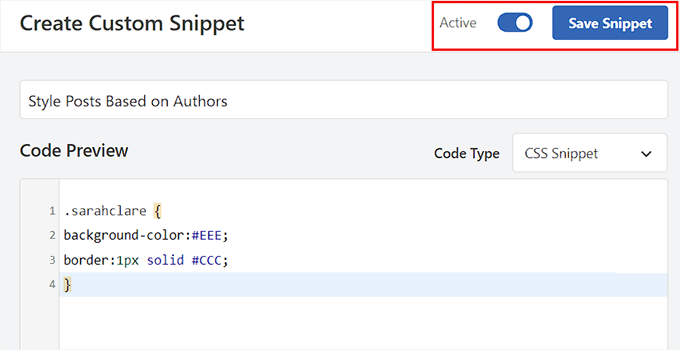
The custom code will be automatically executed upon activation.
You can now visit the post of a specific author to see the changes.

How to Style Posts Based on Popularity Using Comment Count
You may have seen sites with popular post widgets, which are sometimes based on comment counts. In this example, we will show you how to style posts differently using the comment count.
First, we need to get the comment count and associate a class with it.
To get the comment count, you will need to add the following code to your theme files, or you can use a code snippets plugin like WPCode.
Simply choose the ‘Add Your Custom Code (New Snippet)’ option to launch the ‘Create Custom Snippet’ page in WPCode.
Here, select ‘PHP Snippet’ as the Code Type and then copy and paste the following code into the Code Preview box:
<?php
    $postid = get_the_ID();
    $total_comment_count = wp_count_comments($postid);
        $my_comment_count = $total_comment_count->approved;
    if ($my_comment_count <10) {
        $my_comment_count = 'new';
    } elseif ($my_comment_count >= 10 && $my_comment_count <20) {
        $my_comment_count = 'emerging';
    } elseif ($my_comment_count >= 20) {
        $my_comment_count = 'popular';
    }
?>
After that, click the ‘Save Snippet’ button and toggle the ‘Inactive’ switch to ‘Active’ to store your settings.
This code checks the comment count for the post being displayed and assigns them a value based on the count. For example, posts with fewer than 10 comments get a class called new, fewer than 20 are referred to as emerging, and anything over 20 comments is popular.
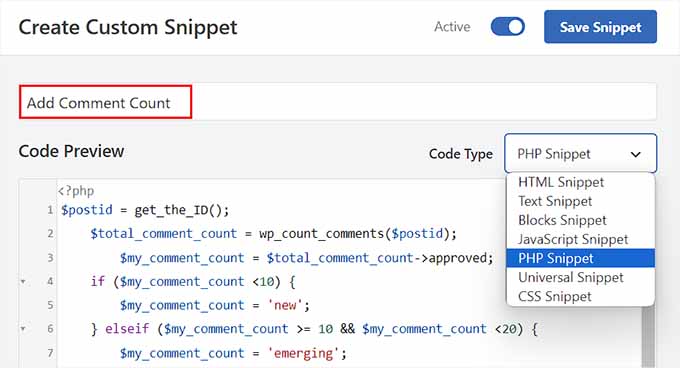
Now, you must add the comment count as a CSS class to the post_class function. To do this, you have to open the ‘Create Custom Snippet’ page again and choose the ‘PHP Snippet’ option from the dropdown menu.
Then, add the following custom code into the preview box:
<article id="post-<?php the_ID(); ?>" <?php post_class( $my_comment_count ); ?>>
After that, click the ‘Save Snippet’ button.
You can now toggle the ‘Inactive’ switch to ‘Active’.
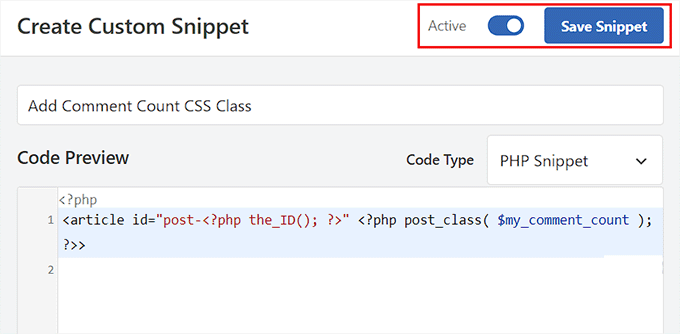
This will add new, emerging, and popular CSS classes to all posts based on the number of comments each post has. You can now add custom CSS to style each post based on its popularity.
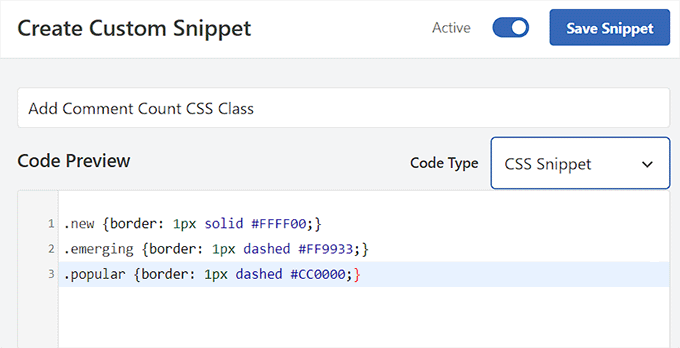
For instance, you can use the following code to add different border colors for posts based on the number of comments posted on them.
.new {border: 1px solid #FFFF00;}
.emerging {border: 1px dashed #FF9933;}
.popular {border: 1px dashed #CC0000;}
Once you are done, don’t forget to click the ‘Save Snippet’ button to store your settings.
Bonus: Display a Different Sidebar for Each Post in WordPress
After styling each post differently, you may also want to add a unique sidebar for each post. This will allow you to showcase specific content related to that article that users may be interested in.
For instance, if you have a travel blog and have published a blog post about places to visit in Florida, then you can create a specific sidebar displaying Florida travel packages. Alternatively, you might show a registration form for a Florida trip that you are organizing.
To display a different sidebar for each post, you can use SeedProd, which is the best page builder plugin for WordPress.

It has a drag-and-drop interface, 320+ premade templates, and integrations with email marketing services, making it a great choice.
Upon plugin activation, you can select a custom page as your landing page design and then a layout with a sidebar.
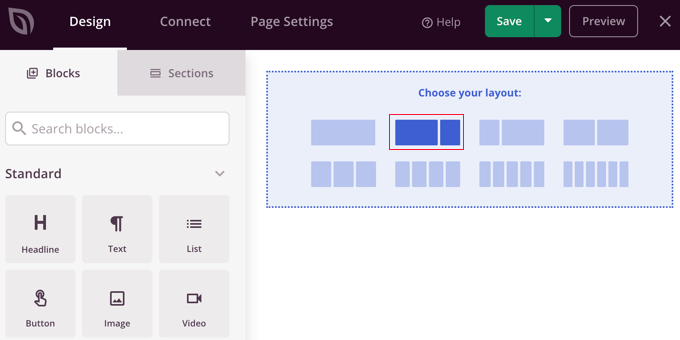
After that, you can easily drag and drop blocks of your choice from the left column, including contact forms, archives, giveaways, search box, comments, and more.
Once you are done, just click the ‘Save’ and ‘Publish’ buttons from the dropdown menu at the top. You have now successfully designed a specific sidebar for a WordPress post or page.
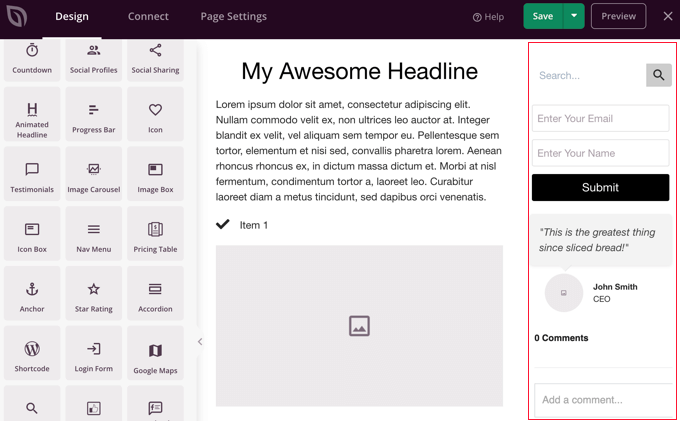
For details, see our tutorial on how to display a different sidebar for each post and page in WordPress.
We hope this article helped you learn how to style each WordPress post differently. You may also want to see our beginner’s guide on how to style tags in WordPress and our list of the most wanted WordPress tips, tricks, and hacks.
If you liked this article, then please subscribe to our YouTube Channel for WordPress video tutorials. You can also find us on Twitter and Facebook.


Rafael
Nice article. I guess I could use something like this to check the category of a post and place a custom CSS to change the style of part of the website according to the category, right?
I’m looking to set different colors only to the background of the Title of the Post for each Category in a Blog.
Kany
Hi, great article. How to custom css style latest blog news? Just the latest one, any idea? Tnx.
WPBeginner Support
Your theme would need to add something that can be targeted by CSS, at the moment we do not have a recommended method for adding that.
Admin
Les
Great article. I wanted to set the default Font size per category and followed the instruction by adding the code to the Style.css file but when I added a new post the font was the old size. See code? What am I missing?
/* Begin Additional CSS Styles */
.art-blockheader .t, .art-vmenublockheader .t {white-space: nowrap;}
.desktop .art-nav-inner{width: 1200px!important;}
.category-firstg {
font-size: 18px;
font-style: bold;
}
/* End Additional CSS Styles */
William D
Great article, thank you very much. Could the read more button color/text color also be changed in a similar manner? Something (I probably did) has changed my buttons in a very unpleasant way and I’m having a heck of a time trying to figure out how to make them pleasant again.
Thanks in advance for any help you might provide!
Matus
Great tutorial. Simple and clear explanation.
Neon Emmanuel
Hello, if i include this in single.php it echo back the current post title, but works fine in index.php, any suggestion to this?
MayMyatKhine
Hello,Please send to me the new event to use the wordpress.
marisa
This is a great article but I’m having trouble with placing
ID, ‘post-class’); ?>
Where exactly in the loop do I put it? I am using underscore.me with foundation 5 and my new class isn’t appearing.
Alberto Hartzet
Perfect!, ty. What about the first and “the last” post? any ideas?
Nadeem
Thanx alot bro..its very helpful
RW
yet another bookmark! great post! thank you…
Payal
Very informative, thank you. I’ve bookmarked this page.
I also have a question: What if I wanted to style the first (latest) post differently — so that the post displayed at the top of my index page shows up differently?
James
Hey there, I’m struggling with this atm..
My post loop doesnt seem to have a post_class function so I cant figure out where to place the above code…
This is the loop I use for posts, where would I place the above code? Or how could I get custom fields to work using this?
Editorial Staff
You have to add something like this on your post loop:
1-click Use in WordPress
Admin
Jon Fuller
Hello, I am quite new to making WordPress themes and I am looking for a way to display each post in a box of its own which is seperated by a margin top and bottom. Please explain how this is possible.
Thanks
Editorial Staff
By default each post is inside its own div element. You just have to use CSS to add margin-top and bottom.
Admin
Shaun
Curious, how could this be applied to adding a CSS class to only posts posted that have the same “meta value” or “meta value number”?
Thanks for the great tutorial by the way!
Best
Editorial Staff
We showed how to do it with custom fields, but that’s being done by key. But if you have the same key with multiple values, then you should get_post_custom_values function.
Admin
Em
Just found this post and it is great, clear, succinct and spot on, many thanks
Jim
I would like to do something where post one gets the class “1”, post two gets “2” post three gets “3”, and then it repeats this order, so post four gets “1” again.
Any tips? it’s just repeating three different classes every three posts.
Editorial Staff
You would have to use the super loop option.
Admin
Brit
What I’m trying to do specifically is just make it so when someone lands on my blog, that the thumbnail (which is just a circle with the post title) is a different color for ONLY the most recent post. I’m at a loss of how to make this happen. Everything I’ve found is category or order specific. Thoughts?
Editorial Staff
Brit, you would have to use the last method “Super Loop”. That is probably the only way of doing it because all what you would do is on the first post, you add a unique class such as “first-post” , and then style that using your CSS file.
Admin
Jayaseelan Arumugam
It is very Nice and useful post. Especially I like the way to Style Posts based on Custom Fields. Thanks.
Kathleen
Thanks for this great article! It’s exactly what I searched for and so much helpful!
dina
How do I add unique class to the 3rd, 6th, 9th, and 12nd posts in super loop. Thanks!
vajrasar
Well, that is a very good piece. I got what you said, but can you shed some light on how am gonna implement this on my Genesis driven News Child theme, as I am supposed to do all this with function.php
I would like to style category specific posts differently. Thanks a lot for this piece. very informative.
Editorial Staff
So if you are just using the post class method, then Genesis has the field under their Layout settings for each post. You can enter a custom class and style it that way. The rest can get pretty complicated depending on all the hooks and such. We don’t necessary do genesis specific articles here.
Admin
jim
What do you mean index.php in the loop. which index.php. Mine has nothing like yours. This is the 10th post I’ve read where no one has explained this basic concept properly. And what about the CSS. Last 10 posts didn’t explain that either. Internet is getting worse and worse.
Editorial Staff
Hey Jim,
Every WordPress theme does things differently. The concept of loop is pretty well explained in the WordPress Codex. It requires a simple google search: Loop WordPress which will take you to: http://codex.wordpress.org/The_Loop
Because every theme varies, some utilize a separate loop.php file others are child themes which don’t even have index.php files. It is really hard to explain all of those concepts. When we put tutorials in a theme category, we expect the users to have a fair knowledge of how WordPress themes work (even if you don’t know PHP).
Admin
Haider E Karrar
I think you should be using filters instead in combination with the template tags here http://codex.wordpress.org/Conditional_Tags
For example
function my_post_css_filters($content) {
if(is_category(…))
return ” $content “;
else if (something else)
….
}
add_filter(‘the_content’, ‘my_post_css_filters’, 1) — (priority 1, not sure what else it may affect).
Hossein
Hi..
How i can wrap every 4 posts in a div ?
gashface
Nevermind got that working, but NOW it doesn’t style each post differently, it just styles them all according to the first post author it finds?
gashface
Is there a way to specificy a tag like H2 is styled by author I am trying .username h2{} for example but it won’t work?
gashface
This doesn’t show the author with me just a blank space, pasted your exact code, any ideas? posts made by admin and are private, does that make a difference?
wpbeginner
@gashface not it doesn’t make a difference whether the post is private or public… If it is returning a white page, then you are pasting the code in a wrong place.
gashface
I realised it was because I was putting the code before the call to the loop, I thought you meant before the if have posts etc.. when it needs to go after that, thanks for the heads up
KimeeDoherty
This was a little helpful, but I am still lost Not sure how to include the loop file in order to override the template. You started the <div> tag but not ended them, what’s inside the div? I’m lost
kristelvdakker
Thank you so much for this post! It has been very helpful.
Stuart
Hi, thanks for the ideas – especially the super loop – pleased to have got it working on my site.
But I wonder, complete php beginner here, so is there a way to adapt the code so each subsequent page of posts doesn’t get the styling that posts 1, 2, 3, & 4 get on the first page.
In other words, I only want the first four posts on the first page to look any different to the rest.
Cheers,
Stu
Editorial Staff
Yes. You can use is_paged() conditional tag, so it only shows up on the first page, but not the others. You can also use is_home() … so only on the homepage.
Admin
Stuart
Cool – thank you. Looks like is_paged() is the one for me – but unfortunately, my novice abilities mean I’m struggling to work out how to integrate it in to the code.
Stuart
Got there in the end…
Michael
If you wanted to use this approach to separate posts visually based on their published date. How would you go about it? For example: style the 5 posts published on the 1st with a black background, and then style the posts published on the 2nd with a red background? Thanks in advance!
Editorial Staff
The best way to do this is using the superloop method. Where you use the counter variable to set the post class values.
Admin
Dale
I am trying to style each authors name a different colour on our wordpress website and I have followed your code as below:
Whilst this code is kind of working on my wordpress theme it is putting end quotation marks after class-2 but before the authors name so the class is being closed without the name in it. I only found this out by putting that php inside the body where you can see the full string.
Does anyone have any ideas why this is happening?
Dale
Sorry it stripped out the php I posted but here is the class output of styling my posts by the authors name. The author here is called admin, and as you can see the closing tag is before the author name admin.
“post-395 post type-post hentry category-uncategorized class-1 class-2″admin
Bec
Great post! That info is awesome for adding those extra special custom features to your design.
Adam W. Warner
Indeed a great post, hats off! However, I couldn’t help but keep thinking about when it’s time to upgrade the theme you’re making all these custom edits to. I try to use the functions file whenever possible to avoid overwrites.
I would think it would be better to roll these loop edits into a function. I know that with Parent Themes like Thematic, Hybrid, Genesis, etc…that it’s possible (and advisable) to filter the loop and thus add these changes.
@Ken – Maybe your plugin would negate the need for any functions altogether?
Anyway, just my two cents and congrats Syed and the team on your continuing excellence on this site!
Azad Shaikh
Very useful post indeed. Why don’t you publish some wordpress themes with your awesome ideas and functionality. I would be great success.
Thanks!
Ken
Your article has giving me a few ideas on how to improve my plugin, thanks for that!
I just wrote a plugin (Scripts n Styles) for adding CSS directly to the head element from the post/page editing screen. (Only admin users can do this though.) It’s not as robust (or rather, doesn’t address the same thing) as your solution because the CSS only appears on the single view, not in the lists (archives).
I’m considering adding the functionality to include a class name into post_class, but via a meta box on the admin screen. Then, the admin would only have to add the css to his theme. (Or, perhaps a setting screen to facilitate this?)
Anyway, the Super Loop seems useful for theming in general, I’ll have to include that in my next one!
Connor Crosby
Wow, that is a great post! Perfect timing since I am making a new Wordpress theme