Do you want to learn how to improve WordPress search by using Amazon CloudSearch?
Amazon CloudSearch is a platform powered by Amazon AWS that gives you more control over WordPress search and provides you with faster and better results.
In this article, we will show you how you can improve the default WordPress search by using Amazon CloudSearch.

Why Improve the Default WordPress Search?
WordPress has a built-in search feature, but it’s pretty limited and doesn’t do the best job of finding relevant content for your visitors.
If you have a smaller WordPress website, then you might not need more advanced search features right away.
But, as your site grows, you’ll want a way to improve content discoverability so your users can find what they’re looking for quickly.
When it’s easy for users to find what they want, you’ll increase pageviews and reduce the bounce rate, making it more likely they’ll become customers or join your email list.
With Amazon CloudSearch, you’ll get a ton of benefits such as:
- Improved Search Accuracy: Amazon CloudSearch provides advanced search capabilities, including fuzzy matching, partial word matching, and stemming. This helps to ensure that users find the most relevant content even if they misspell words or use alternative phrasing.
- Scalability: Amazon CloudSearch is a scalable solution that can handle large amounts of data and traffic. As your WordPress site grows, CloudSearch can easily scale to accommodate increased search queries without impacting performance.
- Speed: CloudSearch is designed for fast and real-time search performance. It uses distributed infrastructure to deliver low-latency search results, ensuring that users get instant responses to their search queries.
- Customization: CloudSearch allows you to customize search relevance ranking and fine-tune search results according to your specific requirements. You can define custom search fields, adjust weights for different attributes, and configure search parameters to optimize the search experience for your users.
There are many ways to do this, like using Amazon CloudSearch, but we believe the best and most beginner-friendly solution is SearchWP.
It’s the best WordPress search plugin in the market used by over 30,000 websites.

It gives you complete control over your WordPress search results, lets you use multiple search forms, helps you make your WooCommerce search smarter, and much more.
To learn more, see our quick and easy guide on how to improve WordPress search with SearchWP.
With that said, let’s show you how you can still use Amazon CloudSearch to improve your WordPress search.
Create Your Amazon Web Services and CloudSearch Account
The first thing you need to do is sign up for an Amazon AWS account. This platform powers Amazon CloudSearch and makes it easy to set up and scale a better search solution on your WordPress blog.
There are several pricing and billing plans, but you can also take advantage of the free trial.
Simply head over to the Amazon AWS website and click the ‘Get Started for Free’ button.

Next, you’ll be asked to enter your login and billing information and complete your account registration.
After that, you can log in to the Amazon CloudSearch console using the same Amazon AWS login information.
This brings you to the CloudSearch dashboard, where you need to click the ‘Create a new Domain’ button.

This creates the initial search index that will power the search on your WordPress site.
Then, you need to enter your domain name into the ‘Search Domain Name’ box and click the ‘Next’ button. This will be your domain name without the .com, .net, etc, at the end.

After that, you’ll need to answer a few more questions about your search domain. You can keep the default settings unless you have very specific needs.
Once the initial index is completed, you’ll get a confirmation in your dashboard that includes your ‘Search Endpoint’. You need to copy this for the next step.

Set Up the CloudSearch Plugin to Improve WordPress Search
Now that you’ve created an account, you need to connect your Amazon CloudSearch account with WordPress by using the CloudSearch plugin.
The first thing you need to do is install and activate the plugin. For more details, see our guide on how to install a WordPress plugin.
After that, you need to go to CloudSearch » Settings in your WordPress admin panel and enter your ‘AWS Access key’ and ‘AWS Secret access key’ into the boxes.
You also need to select the region of your server from the dropdown.

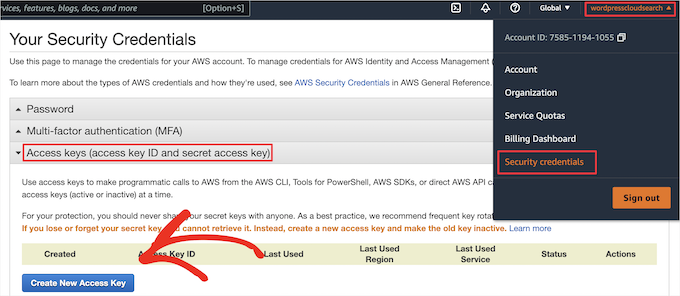
You can find this information by going to your Amazon Web Services account, clicking the username dropdown, and selecting the ‘Security credentials’ option.
Then, click the ‘Access keys’ dropdown and click the ‘Create New Access Key’ button.

This brings up a popup with your ‘Access Key ID’ and ‘Secret Access Key’.
You need to copy these and head back to the plugin settings page and add them.

After that, you need to enter both the ‘Search endpoint’ and the ‘Domain name’ into the ‘Index settings’ section.
These were what you created earlier after creating your first Amazon CloudSearch domain index.

Below that, you can change the ‘Schema settings‘. The settings here will control what elements you want to appear in the search results.
For example, if you only want posts and pages to appear, then simply check those boxes. There will also be options to display other custom post types you’ve added or that may have been created by WordPress plugins you have installed.

Note: If you want to use more advanced options like making your PDFs or shortcode output searchable, or excluding certain posts or pages, we recommend using SearchWP instead.
Next, you’ll have options for customizing the WordPress search page in the ‘Frontpage settings’ section.
We’ll leave the default options selected, but you can create a custom search page, enable search filters, and more.

Once you’ve done that, you can change how the individual search results display in the ‘Results settings’ section.
Here, we’ll keep the default settings again, but you can pick which post or page information you want listed, change the text length, choose the order of results, and more.

There are more sections that let you customize the color of the text and background, enable search suggestions, and add additional support for custom fields.
Once you’ve finished customizing the plugin settings, make sure to click the ‘Save’ button at the bottom of the page.
Now, when you use your WordPress search on your site, you’ll see much faster and more relevant results.
You may also want to see our guide on how to choose the best web design software and our expert picks of the best GoDaddy alternatives that are cheaper and more reliable.
If you liked this article, then please subscribe to our YouTube Channel for WordPress video tutorials. You can also find us on Twitter and Facebook.


Mr Alexander
Hi,
Its a nice example and perhaps a good introduction to Lift and CloudSearch.
The issue is that Lift’s documentation is almost non existent which makes it very difficult to figure it out initially.
For example, how to add a taxonomy as a search field? The documentation doesn’t brush on it at all but their git account hase some examples which are also very unclear.
Its a great software, otherwise, once you figure it out.
Joe C
I setup Amazon Cloudsearch at my website (www.omnimedfinancial.com)….The search capabilities are much much better than what I had…
Important: My prior search allowed me to exclude a category from searches….It appears that Amazon has indexed everything at my site….How can I exclude a category in Amazon CloudSearch using Lift for Wordpress???
Amazon has information about deleting files….not very clear….
Q: How do I delete documents from my search domain?
To delete documents you specify a delete operation in your SDF document that contains the id of the document you want to remove and a document version number greater than the current version number for that document.
You can submit data updates through the Amazon CloudSearch console, using the cs-post-sdf command, or by posting a request directly to the domain’s document service endpoint.
I do not want to have to delete one by one….I want to auto exclude category 36.
Thoughts?
Chris Scott
Joe, please send your questions over to the support forum (http://wordpress.org/support/plugin/lift-search) and we can help you out.
Nick Gernert
Thanks for the writeup on Lift!
We have much planned for the plugin here in the future, but any initial feedback and thoughts is hugely appreciated.
One point of clarification here is that the plugin doesn’t yet support the indexing of attachments, but that functionality is on our development roadmap for the plugin.
Joseph Chambers
Have you ever looked at apache solr? Can Lift do faceted searches?
Chris Scott
Lift can do faceted searches since CloudSearch supports them. We are going to update the docs and FAQs with the index schema to list which fields are faceted. This can be changed after Lift sets up the initial index if desired. We will also have some docs soon for customizing the front end to support facets and other customizations.
Bjørn Johansen
Are there any advantages at all on using Amazon over the excellent Relevanssi search plugin?
Editorial Staff
Amazon CloudSearch has their own powerhouse algorithm that it uses to organize searched content. At the end of the day, it comes down to your personal preference. Some will use Google Search, others will use Relevanssi, some will use Amazon cloud search, while others will leave the default search as is.
Admin
Scott
I’m curious to hear if there are options/customizations to include custom post types in the search – say for a WooCommerce implementation – or are all post types included by default?
Hamzah
+1 i need the answer for the saame
Gary
The defaults are ‘post’ and ‘page’ (line 36), and custom types can be added via the ‘lift_indexed_post_types’ filter (line 599).