If you work at a public library, then you may be wondering if you can use WordPress to set up a cost-effective solution to manage your collection and circulation digitally.
We’ve been looking into this thoroughly, and we’re here to tell you that with the right plugin, you can easily set up a library management system in WordPress.
What’s more, we did our research and tested different plugins for building a library collection. We found the Library Management System plugin to be the best option, which is why we are using it in our tutorial.
In this article, we will show you how to build a library collection and circulation system in WordPress.

Why Build a Library Collection and Circulation System in WordPress?
Often, WordPress is used as a blogging platform, but there are many other creative ways to use WordPress. You can even use it to build a library collection and circulation system.
That said, you won’t get this functionality by default. You’ll need a WordPress plugin to do it. But don’t worry. This process can be straightforward with the right tool.
Creating an online library collection and circulation system can be super helpful for many reasons.
First of all, it will help streamline your library processes. It can help you set up tracking for your book collection, including titles, authors, and availability.
You can also manage book borrowing and return. You’ll be able to set due dates and calculate fines more easily. A library management plugin will also help with user management. You can easily create and maintain user accounts, track borrowing history, and manage privileges.
Another advantage of building a library collection and circulation system in WordPress is that it reduces the manual workload for librarians, improves efficiency, and enhances the overall library experience for users.
That said, let’s take a look at how to run and manage a library collection and circulation system in WordPress. Here’s a quick overview of the steps we will go over:
Now, let’s get started!
Build a Library Collection and Circulation System in WordPress
The easiest way to create a system for managing library books and circulation is by using the Library Management System plugin. It is a free plugin that streamlines the process of managing libraries, organizing books, adding users, sorting bookcases, tracking transactions, and more.
Note: For this tutorial, we’re going to assume you already have a WordPress website set up. If you don’t, check out our guide on how to make a WordPress website.
The first thing you need to do is install and activate the Library Management System plugin. For more details, see our step-by-step guide on how to install a WordPress plugin.
Once the plugin is active, you can head to Library Management » Settings from the WordPress dashboard. Here, you can edit the plugin settings.
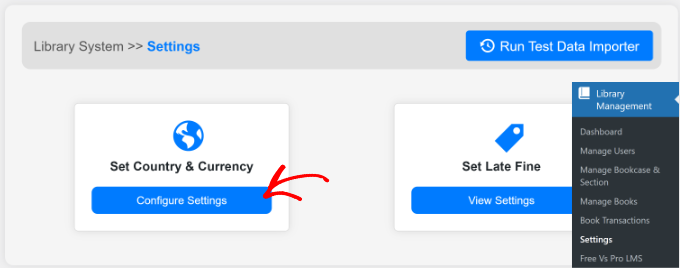
For instance, if you want to change the region and currency, then simply click the ‘Configure Settings’ button under the ‘Set Country & Currency’ section.
Next, you will need to click the ‘Update Data’ button at the top corner.

A new window will now open.
Go ahead and enter the country and currency you’d like to use on your library site.
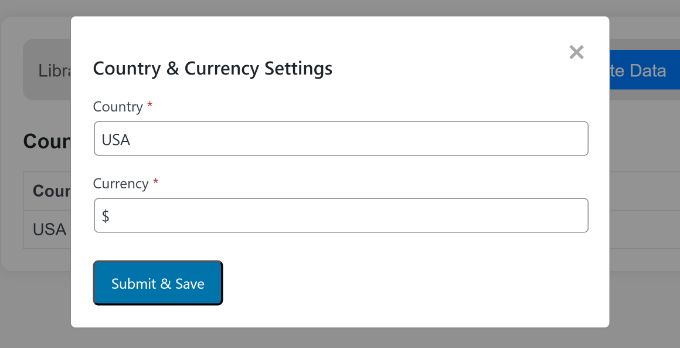
Once that’s done, simply click the ‘Submit & Save’ button.
Your WordPress site now has all the functionality you need to build your library collection and circulation system.
In the following sections, we’ll take a look at the different features the plugin offers for managing books and users.
Create Bookcases and Sections in WordPress
Next, you will need to add bookcases and sections for your library collection.
Bookcases are like bookshelves in a physical library, while sections are like categories or divisions on the shelves. For example, sports can be a bookcase, and types of sports like tennis, soccer, and football can be its sections.
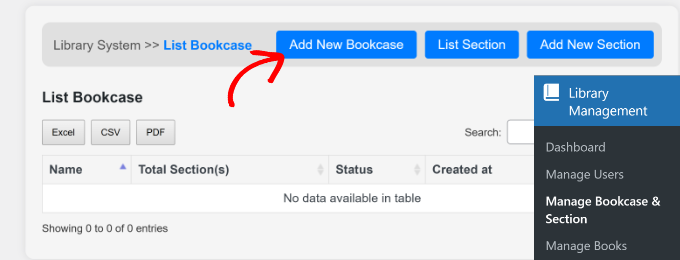
Simply head to Library Management » Manage Bookcase & Section from the WordPress admin panel and click the ‘Add New Bookcase’ button at the top.
Next, you will need to enter a name for your bookcase and select its status from the dropdown menu.
When you’re done, go ahead and click the ‘Submit & Save’ button.
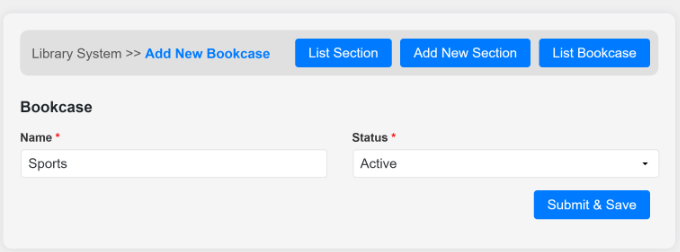
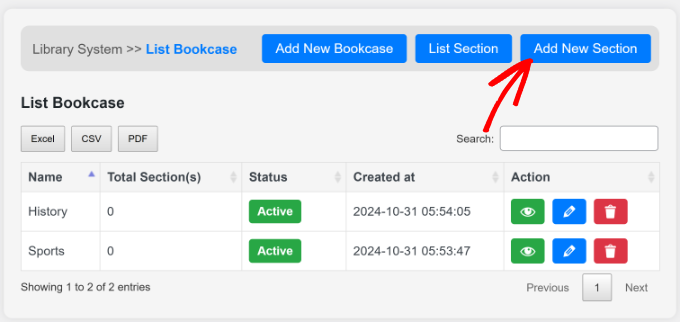
To add more bookcases, simply repeat this step. When you’re done, you can click the ‘List Bookcase’ button and view all the bookcases you just added.
From here, you can also create different sections by clicking the ‘Add New Section’ button.
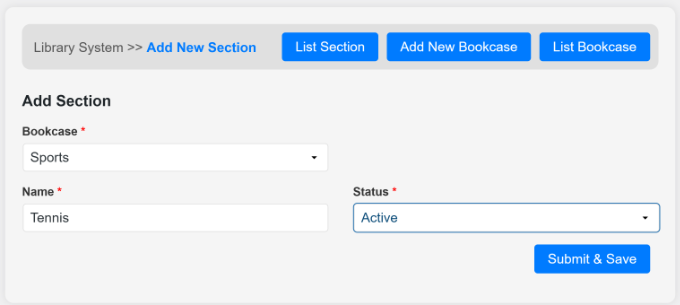
This will open a screen where you can enter the details of your section.
You’ll need to select the bookcase, enter a name for the section, and change its status. Once that’s done, you can click the ‘Submit & Save’ button.
If you want to add more sections to each bookcase, then simply repeat this process.
Add New Categories and Books to Your Library Collection
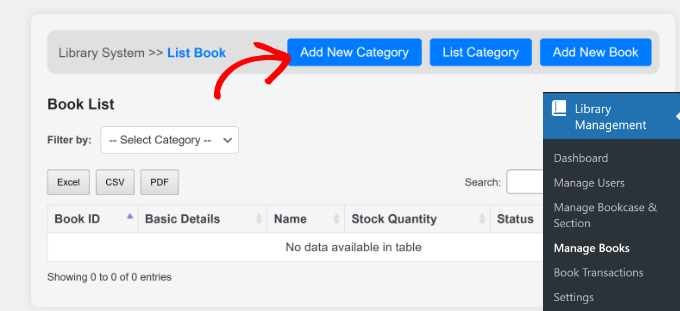
Next, you can add books to your library collection using the plugin. Simply head to Library Management » Manage Books from the WordPress admin panel.
First, you’ll need to add a category before adding a new book. Go ahead and click the ‘Add New Category’ button at the top.
On the next screen, you can enter a name for your book category. This can be something like history, sports, fiction, arts, politics, etc.
After entering a name, you’ll also need to click the ‘Status’ dropdown and select whether the category is ‘Active’ or ‘Inactive.’
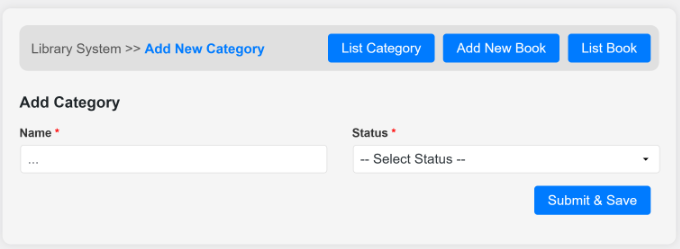
Once you’re done, simply click the ‘Submit & Save’ button.
You can now repeat this step to add as many categories as you want. If you head back to the ‘Manage Books’ section, you’ll see all the categories that you just added.
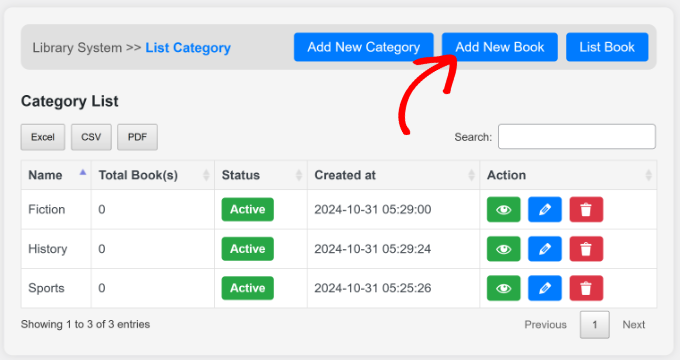
Next, you can click the ‘Add New Book’ button at the top.
After that, you will need to enter the details of the book and select a category.
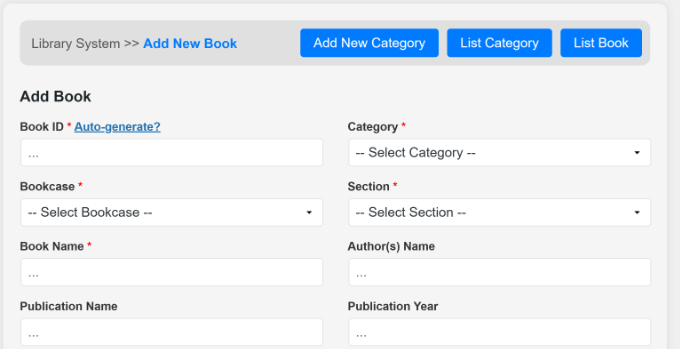
Some mandatory fields include a book ID, category, bookcase, section, name, and status.
Besides that, there are other optional fields like publication name, year, and location. If you scroll down, then you will also see an option to upload a cover image for the book.
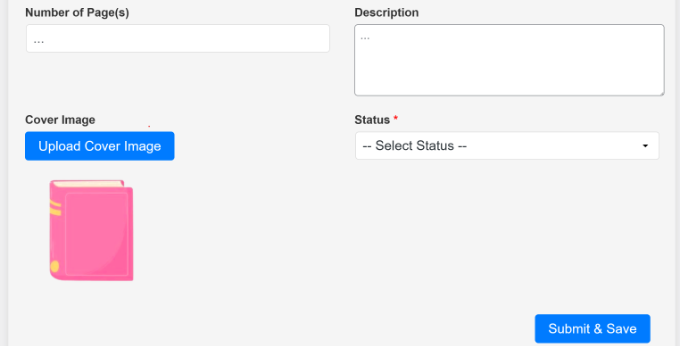
When you’re done, simply click the ‘Submit & Save’ button.
You can now repeat this step to add other books to your library collection.
Add New Branches and Library Users in WordPress
Another advantage of using the Library Management System plugin is that it makes it easy to manage users, even if your library has branches in multiple locations.
You can create different branches to categorize users and add them to your library database.
To start, simply go to Library Management » Manage Users from the WordPress admin dashboard. Here, you can click the ‘Add User Branch’ button.
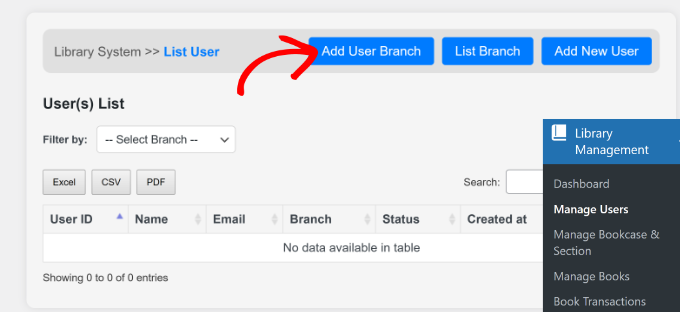
After that, you’ll need to enter the details for a new branch.
Go ahead and enter a branch name and select its status.
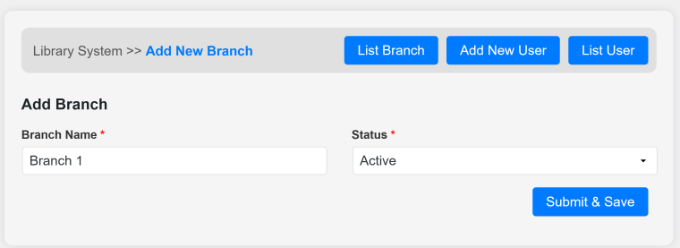
Once that’s done, go ahead and click the ‘Submit & Save’ button.
You can now head back to the ‘List Branch’ page and see the newly added branch.
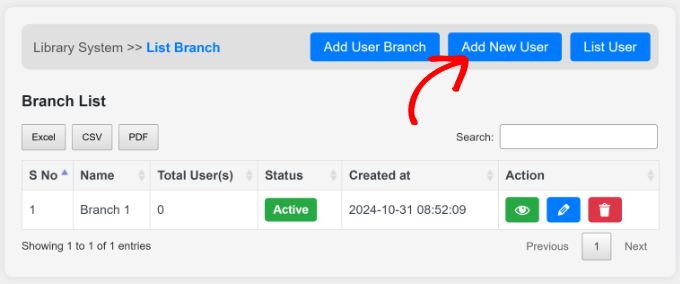
Next, you’re ready to add a new user to your library database. Simply click the ‘Add New User’ button at the top.
From here, you’ll need to enter the details of your new user.
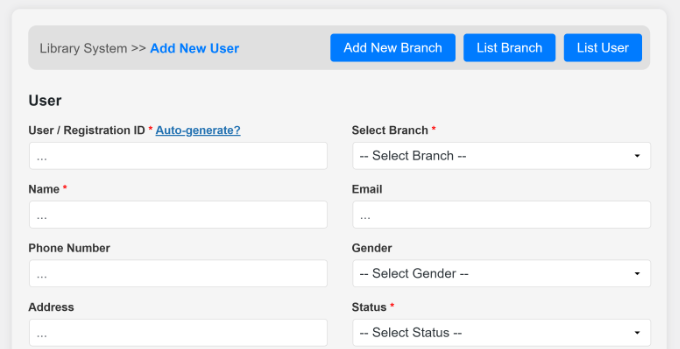
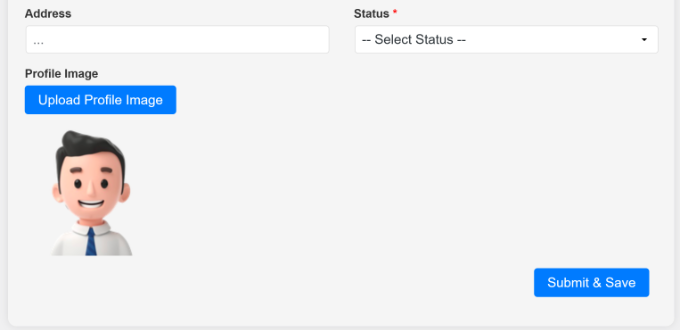
This will include a user ID, branch, name, email, address, phone number, status, profile picture, and more.
After entering the details, you can scroll down and click the ‘Submit & Save’ button.
Manage Book Borrowing and Returning in WordPress
Now that you have all the essential pieces set up, you are ready to start managing borrows and returns. You will be able to do this directly in your WordPress dashboard.
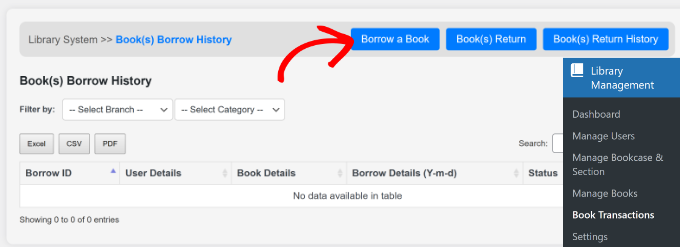
Simply head to Library Management » Book Transactions from the admin panel.
When someone needs to borrow a book, you can add it to your database by clicking the ‘Borrow a Book’ button.
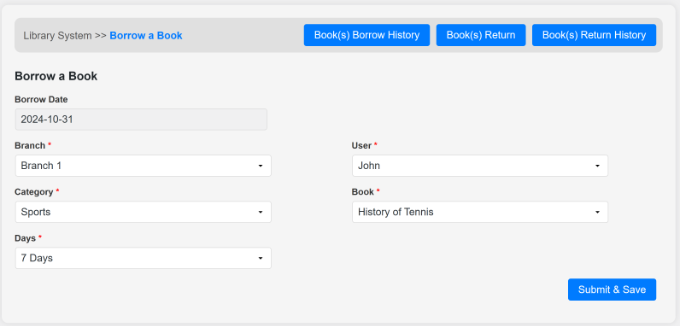
On the next screen, you’ll need to enter details like the branch, category, and number of days the user will borrow the book, select a user, and choose the book.
When you’re done, simply click the ‘Submit & Save’ button.
You can now head back to the ‘Book Transactions’ page or click the ‘Book Borrow History’ button at the top.
Here, you’ll see the details of the borrowed books, and the ‘Status’ will show ‘Return Pending.’
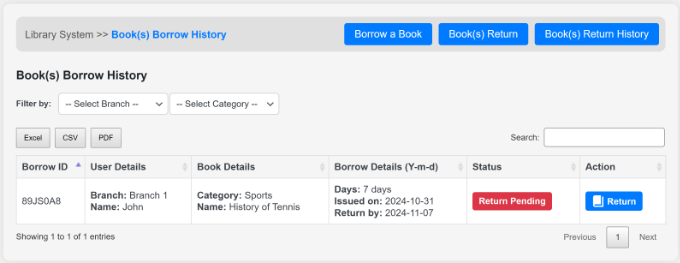
When the user returns the book, you can simply click the ‘Return’ button under the Action column.
Alternatively, you can also click the ‘Book Return’ button at the top. From here, you’ll need to select the branch and user. The plugin will then show the book the user borrowed.
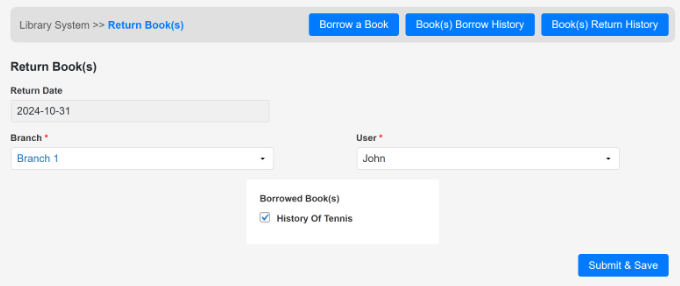
Go ahead and select the book and click the ‘Submit & Save’ button.
Now, when you return to the ‘Book Transactions’ page, you’ll see that the ‘Status’ will be changed to ‘Returned.’
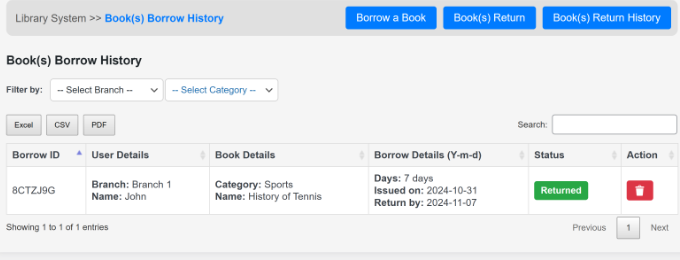
You can follow this step to manage all the books that users borrow and return from your library collection.
We hope this tutorial helped you learn how to build a library collection and circulation system in WordPress. You may also want to see our article on how much it really costs to build a WordPress website and our complete tutorial on how to install WordPress.
If you liked this article, then please subscribe to our YouTube Channel for WordPress video tutorials. You can also find us on Twitter and Facebook.


Begs
may I know which amazon plug-in you are referring to in your video?
keitai
Hello,
Would you recommend this plugin for a simple rental business of different product (approx 1000 items)? Or would you recommend another plugin?
I am able to produces my own custom functions / logic but I like to have a good plugin as a starting point.
Any tips, suggestions,
regards,
Barry
WPBeginner Support
It actually depends on the items you will be renting and how you want to manage your website. You can try the plugin to see if it matches your needs.
Admin
Olawale Daniel
Having a Library in my membership site has always been my headache. The task ahead is bigger than what I can face. But I think this plugin should help me out.
JOHN
i can find the short code for the plugin. please help me
Basanta Thapa
Thanks for the insight! I would love if you could post a few more screenshots of the actual interface, so we can get a grip on the look and feel of the plugin.
Jesinth
It was really Helpful. Thank you for the information. But how will the information of the book be produced when typed in the search box? Can you help me out?
anil
Hi, nice article. I installed this plugin and followed the steps explained above. But when I type something in the search box, nothing is coming up in the results. Can you help me out in this regard?
Editorial Staff
Use the support forum for the plugin.
Admin