One of the things we love about WordPress is that it comes with a simple but powerful user management system. Each user has different capabilities based on their assigned role, which makes it easy to control access across your site.
However, there are times when we need more flexibility than the default roles provide. For example, we’ve encountered situations where we wanted authors to be able to moderate comments but not publish posts.
If you’re facing this problem, this article will show you how to add or remove capabilities to user roles in WordPress.
Why Add or Remove User Role Capabilities in WordPress?
WordPress comes with a built-in user management system plus some ready-made user roles and permissions.
For example, as an Admin you can perform any action on your WordPress website. This includes adding new users and authors, deleting content, installing WordPress themes, and much more.
If you run a multi-author WordPress blog, then you can add other people to your site and give them roles such as Editor, Author, or Contributor. This lets them do different things on your website, but they can’t perform administrative tasks.
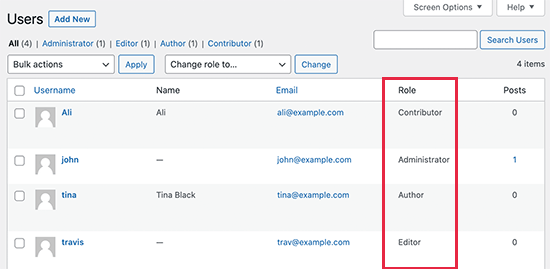
Some WordPress plugins add their own user roles with custom permissions. For example, eCommerce plugins often create a Customer role or a membership plugin might add a custom Member role to your site.
But what if you want to edit the user roles in WordPress?
You may make your site more secure by removing unnecessary permissions from certain roles. For example, you might remove publishing permission from the Author user role, so Editors always have a chance to review new blogs before they go live.
That being said, let’s take a look at how to easily modify user role capabilities and even add new user roles to your WordPress website. You can use the quick links below to navigate through this tutorial:
Option 1: Add or Remove User Role Capabilities in WordPress
The easiest way to edit user permissions in WordPress is by using the free Members plugin. This plugin allows you to customize the permissions for every user role, and even create completely new roles.
The first thing you need to do is install and activate Members. For more details, see our step-by-step guide on how to install a WordPress plugin.
Upon activation, go to the Members » Roles page to see all the different user roles on your WordPress website.
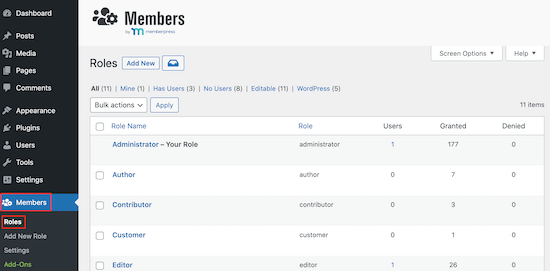
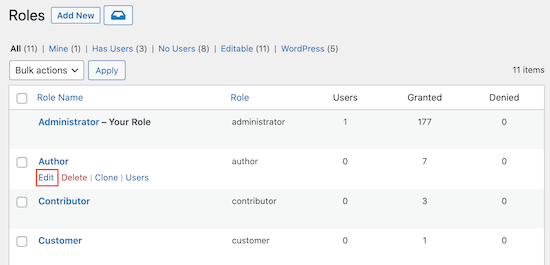
Here, simply find the role you want to modify and click on its ‘Edit’ link.
This opens the user role editor.
The left column shows all the different types of content that the user role can edit, read, delete, and more.
Simply click on a tab, and you’ll see all the permissions for that content type.
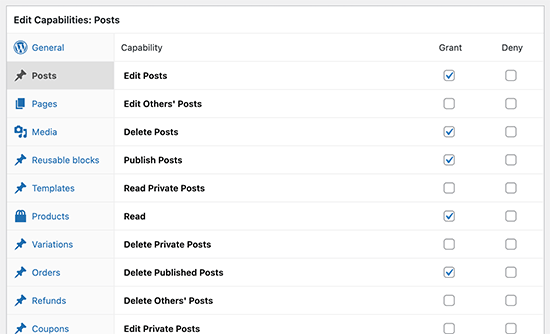
To add or remove permissions for that content type, simply check the Grant or Deny boxes.
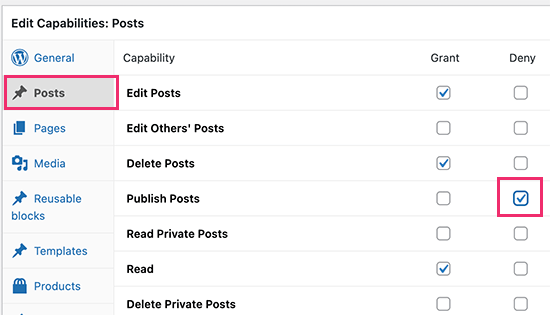
For example, if you want to stop Authors from publishing blog posts, then you can select the ‘Posts’ tab in the left-hand column. Then, just check the ‘Deny’ box next to ‘Publish Posts.’ You can also prevent authors from deleting posts if needed.
Similarly, you can give a role extra permissions.
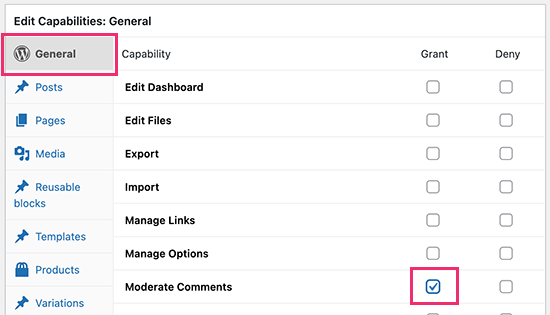
For instance, let’s suppose your Authors need a way to moderate comments. To do this, simply click on the ‘General’ tab and then check the ‘Grant’ box next to the ‘Moderate Comments’ option.
You can now continue adding and removing permissions by following the same process described above.
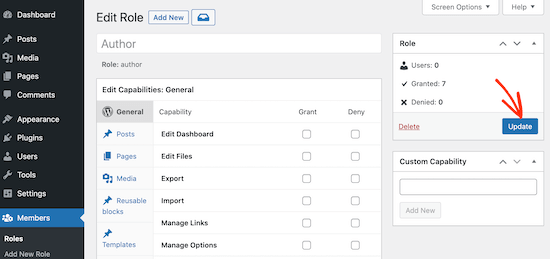
When you’re happy with how the user role is set up, click ‘Update’ to save your changes.
You can now repeat the process to edit other roles on your WordPress blog.
Option 2: Add a New User Role With Custom Permissions
The Members plugin also lets you add new user roles to your website.
Let’s imagine you’ve created a ‘Movies’ custom post type and want to allow users to submit posts on your WordPress site, including movie reviews.
To create a custom user role, simply go to Members » Add New Role.
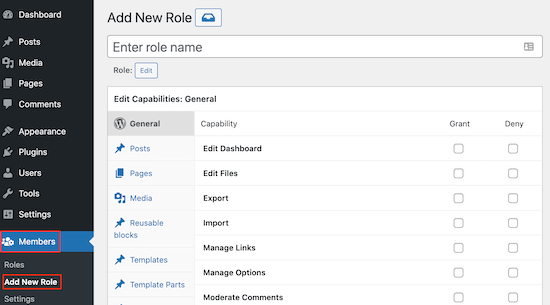
To start, you’ll need to type in a title for the new role.
This will appear next to each user’s name in the Users » All Users page and other areas of the WordPress dashboard, so it’s a good idea to use something that helps you clearly identify the role.
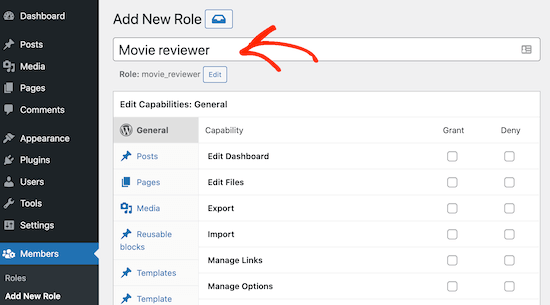
After that, you can start adding permissions to the new role by checking the different boxes.
When you are happy with the custom role, click on the ‘Add Role’ button to save your changes. Now, you’ll be able to assign this custom role to new users.
You can also add the new role to any existing user’s account.
To do this, go to Users » All Users. Then, simply find the account that you want to modify and click on the ‘Edit’ link.
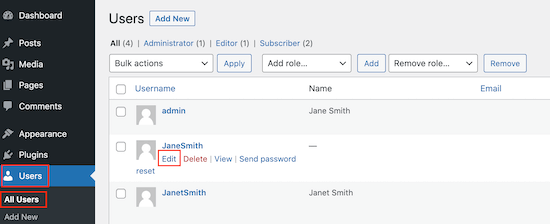
Once you’ve done that, scroll to ‘Roles’ and check the box next to the role you just created.
You can assign multiple roles to the same user, as you can see in the following image.
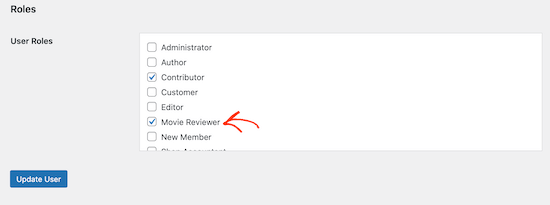
Once you’ve finished, don’t forget to scroll to the bottom of the screen and click on ‘Update User’ to save your changes.
How to Securely Manage User Accounts in WordPress
By adding and removing capabilities, you can control the actions users can take on your website. This helps keep your site safe, but extra users are still a vulnerability that hackers can exploit.
With that in mind, here are some tips on how to protect your multi-author WordPress site.
1. Force Everyone to Use Strong Passwords
WordPress comes with a built-in password generator that can automatically create strong passwords for your users.
However, many people skip the password generator. With that in mind, it’s a good idea to force people to use a strong password generator.
For more information, see our guide on how to force strong passwords on users and how to force users to change passwords in WordPress.
2. Enforce Two-Step Authentication
Some hackers use automated scripts to try and guess the user’s name and password.
Two-step authentication can protect your site against automated attacks by asking users to enter a one-time code in addition to their password.
Users typically generate this code using an authenticator app on either their computer or phone. To break into their account, a hacker would need access to the user’s password plus their computer or phone. This makes your site much more secure.
For more details, see our guide on how to add two-step authentication in WordPress.
3. Install a WordPress Security Plugin
WordPress security plugins help protect your website by watching for suspicious activity and login attempts.
There are lots of security plugins to choose from, but we recommend Sucuri as it’s the best WordPress security plugin on the market. Sucuri filters out bad traffic even before it reaches your server and will scan your website for common threats.
For more information, please see our complete Sucuri review.
4. Install and Set Up a WordPress Backup Plugin
If all else fails, then backups make it easy to restore your website and all your user accounts. Most WordPress hosting companies offer a basic backup option, but you often need to configure, create, and maintain those backups manually.
A good backup plugin can do all the hard work for you, including performing automated backups. This leaves you more time to concentrate on running your site.
We recommend using Duplicator as it’s the best WordPress backup plugin. It is beginner-friendly and allows you to quickly set up automatic backups and store them in remote locations including Google Drive, Amazon S3, and Dropbox.
Explore More Ways to Customize User Roles and Permissions
Need some inspiration on what you can do by editing or adding new user roles and capabilities?
With the Members plugin, you can create a custom user role for your clients and disable their access to deactivate plugins. This will be handy to prevent errors on your client sites.
Alternatively, you can use the PublishPress plugin to manage roles and permissions related to your editorial workflow. Here are some articles you can check out:
- How to Let Contributors Edit Their WordPress Posts After Being Approved
- How to Limit Authors to Their Own Posts in WordPress Admin
- How to Restrict Authors to Specific Category in WordPress
We hope this article helped you learn how to add or remove capabilities to user roles in WordPress. You may also want to see our guide on how to protect content in WordPress and our expert picks of the best WordPress paywall plugins.
If you liked this article, then please subscribe to our YouTube Channel for WordPress video tutorials. You can also find us on Twitter and Facebook.


Mrteesurez
Thanks for sharing this.
I have some writers I want to give custom permission that is different for the subscriber or authors.
But is there any way to show specific category to specific authors or user role.
WPBeginner Support
IF you mean you wanted to limit authors to a specific category then we have our guide below for how to set that up:
https://www.wpbeginner.com/plugins/how-to-restrict-authors-specific-category-in-wordpress/
Admin
Jude Dille
Very helpful website!
WPBeginner Support
Thank you
Admin
Vicky Bower
Hi
I’m having an admin user issue after migrating my site from development to live.
WPBeginner Support
It would depend on the error you are receiving, for a starting point you could take a look at our article here: https://www.wpbeginner.com/beginners-guide/beginners-guide-to-troubleshooting-wordpress-errors-step-by-step/
Admin
Mary Hill
Hi, I thought users were subscribers to my newsletter. I have 7000+. Can I import them to my mailchimp?
WPBeginner Support
Hi Marry,
Yes you can, here is a tutorial to export user data, once you have the data you can open it in a spreadsheet program and keep the columns you need. However, when you add them to MailChimp they will be asked to verify their subscription.
Admin
James
This article is very old. Is Capability Manager Enhanced still the WP-Beginner recommended plugin for managing user roles? Thanks!
muaz farooq
I really like this plugin.really helped me.but there is a problem.I want to show author my only one plugin setting.and in your pllugin Capability Manager Enhanced i cannot see my plugin option here.I there any solution?
DannyMe
Just wondering, I want my Authors to be able to create posts, and the STATUS of these posts will automatically be: Pending Review OR Draft.
I want the posts made by Authors to be verified and approved by Editor who can publish.
Is this possible with this app?
If so how pls?
Debbie N.
If a user cannot see everything in the admin menu is there a way they can use only one of the features? For instance, I’d like them to only be able to backup their website. Is there a way to add that to a role?
Ryan
Thank you very much1 this is what I exactly looked for
Conni Stock
I would like to grant access to a subscriber ONLY to the entries of a specific gravity form on my site to read live and export but not edit the form or the settings and/ or be able to view any other backend admin areas.
The data input into the form is needed as well as the files that will uploaded on the form submission.by the subsciber. I am trying to find a secure way to give access for a designated period of time. I have one web site and it is Not set up for multi site functions
Please advise. Any direction would be greatly appreciated.
Maritza
Thank you so much! The best answer of what I was looking for. I am glad I found you
Alex Alonso
Thank you. Much better than the documentation.
ankur khanna
Thanks.. Its great… you made my week.. Cheerss.. keep clam and happy coding..
Hadi Omary
i want to specify one of my taxonomy to be editable by one person
is there a way to do this ??
http://wordpress.stackexchange.com/questions/161089/how-to-specifies-an-author-editor-to-edit-one-category-only
Simon Lange
any chance you release or test it for 3.9.2 and higher? 3.7.1 is more than 10months old. so you nice plugin wont be used anymore if its a risk to use.
Devanshu M
I’m the admin of a blog . I have a author also . I disabled publish for author so that i can review posts before publishing but , as author click on submit for review , i am not getting any notification to review that ? Pls Help
WPBeginner Support
We use Edit Flow plugin for that.
Admin
Tony Franco
Dear Sirs,
Thanks by the post!
I have this plugin installed, is there a way to make the subscribers upload images, and see just their images?
Now subscribers here just can edit their profile and upload images, but they can see other images of gallery too.. I think it is better to them see just their images….
Thanks and Regards,
Tony
hopeful
how come no reply? i think it’s not possible because it’s a wordpress feature.
Faiz Akhtar
Thanks !
Michael Rapino
How about adding and removing permissions for installed plugins and specific menu items in the left WP navigation?
kristina suh
Hi. I am interested in finding out that as well.
How do you give access to a new plugin/menu option eg. Calendar / staffing
thanks
Mozart Rocha
What if I don’t have permission to install plugins?
WPBeginner Support
Then you can not install plugins.
Admin
Piet
I think that Justin Tadlock’s Members is a far more comprehensive (read: useful) plugin than the one featured in this article
Correen
Piet I have to agree. The Members plugin lays it all out and as an admin all you have to do is check/uncheck permission boxes. So far, so good for me.
Srihari Thalla
Thanks a lot