If you frequently add website screenshots to your WordPress posts or pages, then automating the process will save you time spent on capturing screenshots manually.
At WPBeginner, we regularly create and include screenshots in our articles to guide our readers effectively. With over 16 years of experience in building, editing, and automating screenshots, we have developed a strong understanding of the best practices for creating clear images.
This experience has taught us how important well-crafted screenshots are in improving the reader’s understanding and engagement with our content.
In this article, we will show you how to easily create automated website screenshots in WordPress.
Why Create Automated Website Screenshots in WordPress?
If you have a WordPress website, then you may want to create and add automated site screenshots to your posts to give potential readers a quick way to see what your content is about.
This can increase engagement and even help improve website SEO, as search engines usually use images and screenshots to understand and index your content.
Similarly, you can use automated website screenshots to create a visual backup of your site before updating a theme or making any other changes. This can help you compare and see the difference between your website’s new and old styles.
Automated screenshots can also compare different services or websites, guide your reader through a step-by-step tutorial, and track website progress over time.
That being said, let’s take a look at how to easily create automated website screenshots in WordPress:
Method 1: Create Automatic Website Screenshots in WordPress using a Plugin
This method is easier and thus recommended for beginners and users who don’t want to deal with code.
First, you need to install and activate the Browser Screenshots plugin. For more details, see our step-by-step guide on how to install a WordPress plugin.
Upon activation, the plugin will work out of the box, and there are no settings to configure.
Now, simply visit a page or post where you want to add an automated website screenshot from the WordPress admin sidebar.
Here, click the ‘Add Block’ (+) button at the top left corner of the screen to open the block menu. Next, add the ‘Browser Shots’ block in the editor.
Once you have done that, add the URL for the website that you want to acquire an automated screenshot for and click the ‘Load Image’ button.
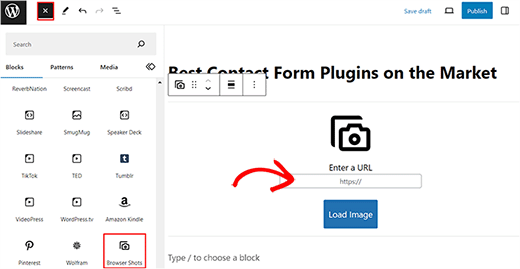
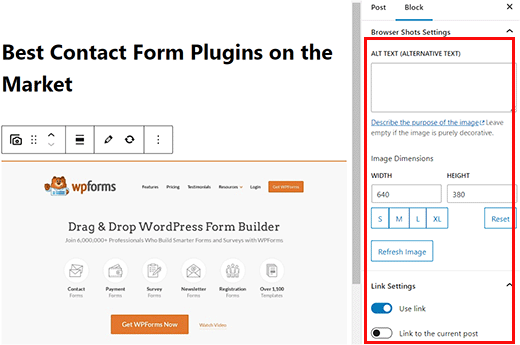
The plugin will now automatically add a screenshot for the website that you chose. You can now add an alt text for the image and change its’ width and height from the block panel on the right.
Toggling the’ Use link’ switch in the panel allows you to add a link to the screenshot that directs you to the website.
You can also toggle the ‘Link to the current post’ switch if you want to add the post link to the screenshot.
Finally, click the ‘Update’ or ‘Publish’ button to store your settings.
You can now visit your WordPress site to view the automated screenshot.
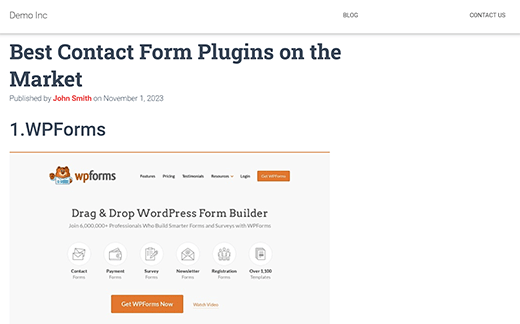
Note: Browser Shots plugin uses WordPress.com’s mshots API to generate screenshots on the fly. These images are not stored in your WordPress media library. They are served directly from WordPress.com servers. See our guide on the difference between WordPress.com and WordPress.org.
Method 2: Create Automated Screenshots by Adding Code to WordPress
This method requires you to add code to your WordPress files. To create automated screenshots, you must add custom code to your theme’s functions.php file.
However, remember that the smallest error in the code can break your site and make it inaccessible.
That is why we recommend using WPCode. It is the best WordPress code snippets plugin on the market that makes it super safe and easy to add custom code.
First, you need to install and activate the WPCode plugin. For detailed instructions, please see our step-by-step guide on how to install a WordPress plugin.
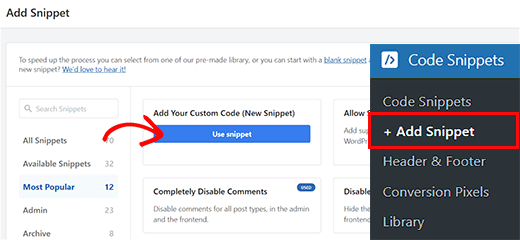
Upon activation, visit the Code Snippets » + Add Snippet page from the WordPress dashboard.
Once you are there, click the ‘Use Snippet’ button under the ‘Add Your Custom Code (New Snippet)’ option.
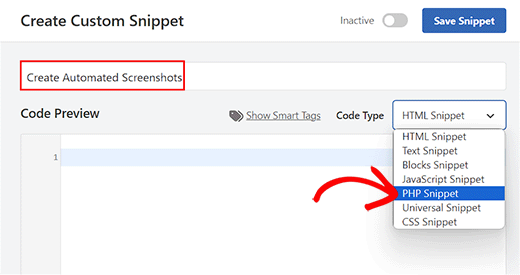
You will now be taken to the ‘Create Custom Snippet’ page, where you can start by typing a name for your snippet. The name can be anything that will help you identify the code.
Next, select ‘PHP Snippet’ as the code type from the dropdown menu on the right.
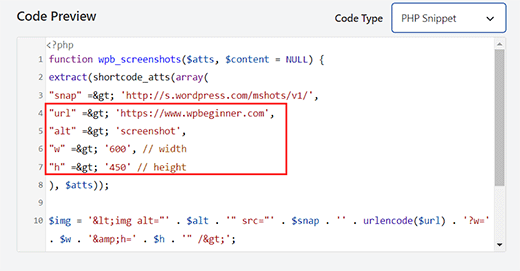
After that, simply copy and paste the following code into the ‘Code Preview’ box:
function wpb_screenshots($atts, $content = NULL) {
extract(shortcode_atts(array(
"snap" => 'http://s.wordpress.com/mshots/v1/',
"url" => 'https://www.wpbeginner.com',
"alt" => 'screenshot',
"w" => '600', // width
"h" => '450' // height
), $atts));

$img = '<img alt="' . $alt . '" src="' . $snap . '' . urlencode($url) . '?w=' . $w . '&h=' . $h . '" />';

return $img;
}
add_shortcode("screen", "wpb_screenshots");
Similar to the plugin we mentioned earlier, this code also uses the WordPress.com Mshots API to generate screenshots on the fly.
Now, you can add the URL for the website whose automated screenshots you want to take next to the "url" =$gt; line in the code.
You can also add your preferred width and height for the screenshots next to the "w" => and the "h"=> lines in the code.
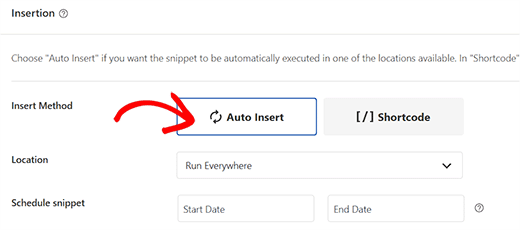
Next, scroll down to the ‘Insertion’ section and choose the ‘Auto Insert’ mode.
The code will now be automatically executed upon activation.
Finally, scroll back to the top of the page and toggle the ‘Inactive’ switch to ‘Active’.
Next, click the ‘Save Snippet’ button to store your settings and activate the snippet.
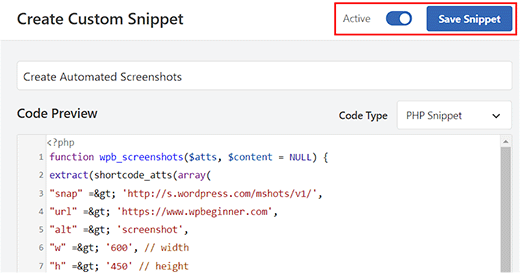
Now, to display a website screenshot in your WordPress posts and pages, you will need to enter the shortcode like this:
[screen url="http://wpbeginner.com" alt="WPBeginner"]
You can replace the URL and Alt fields with your own values.
First, open the page/post in the block editor from the WordPress dashboard and click the ‘Add Block’ (+) button.
From here, add the ‘Shortcode’ block to the page/post. Then, add the shortcode above and replace it with your own values.
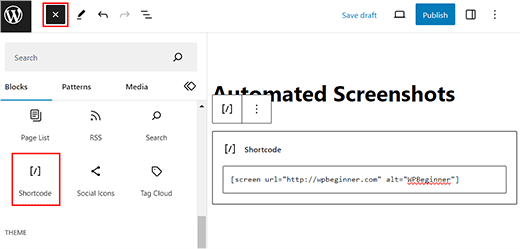
Finally, click the ‘Update’ or’ Publish’ button to store your settings.
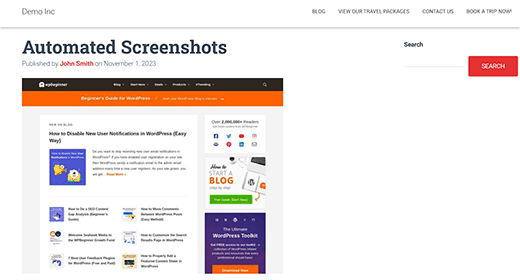
Now, visit your WordPress site to view the automated screenshot in action.
Bonus: Take Screenshots Manually For Your Website
If you don’t want to use automated screenshots, then you can take screenshots manually with different tools like Droplr.
This gives you more freedom to choose a specific area for an image as compared to automated screenshots. Plus, you can edit these images in Adobe Photoshop and add other elements like arrows or red boxes to them.
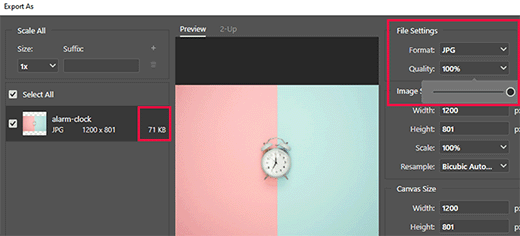
This feature isn’t available for automated screenshots where plugins or code automatically fetches the image for you.
To take a screenshot with Droplr, you must first install the app on your computer. Once you do that, click the Droplr icon in the Windows or Mac taskbar and select the ‘Screenshot’ option.
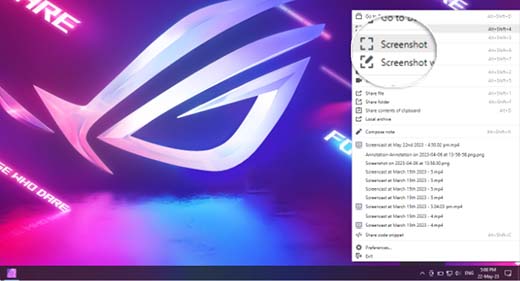
Next, you can select the area where you want to take the screenshot.
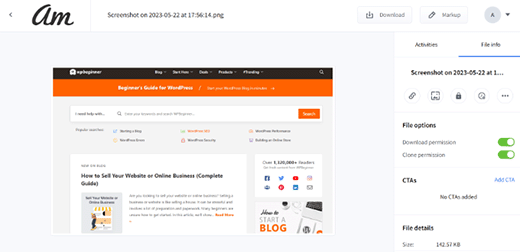
Droplr will then open that image in a browser where you can download it or share the link with others. For more information, see our tutorial on how to take a screenshot in WordPress.
We hope this article helped you learn how to create automated website screenshots in WordPress. You may also want to see our beginner’s guide to image SEO and our expert picks for the best tools to create better images for your blog posts.
If you liked this article, then please subscribe to our YouTube Channel for WordPress video tutorials. You can also find us on Twitter and Facebook.


Samuel Kaffy
Pls, how can I make the screenshots downloadable as an image file?
WPBeginner Support
You would need to reach out to the plugin’s support for adding that functionality
Admin
Nigel Billam
I’ve used this plugin but it stops on the third use of the short code and reports ‘too many requests’ – i was hoping to display 45 URLs. Do you have any suggestions to avoid this?
WPBeginner Support
You would want to reach out to the plugin’s support if you haven’t already for what options they have available for avoiding that issue.
Admin
Cory Goodwin
Does this browser shot plugin check for updates to the site, or do you have to manually redo to get the latest look of the target website? Thanks:)
WPBeginner Support
You would want to reach out to the plugin’s support for the current refresh rate
Admin
Karin
Your code is just what I was looking for. The only thing is that I want the url not prefilled in the code but generated from a custom field ‘wpcf_websitelink’.
How can I add the code to get the content from the field.
So this line
“url” => ‘https://www.wpbeginner.com’,
should have something to get the content of the field wpcf_websitelink in stead of the wpbeginner.com link
WPBeginner Support
If you are using a plugin to create that custom field then you would want to reach out to the support for that plugin for how to access that information and replace the url value with what they tell you.
Admin
Tien Le
Thank you so much <3
Now i can make more image from capture screen image
Steve Renow
This is a wonderfully simple plugin to use. Great job! Is there any way to crop the images? Some sites show with the cookie warning t the top or bottom and it would be good to be able to crop that off.
Daniel
Where do the screenshot get saved too?
WPBeginner Support
These images are not stored in your WordPress media library. They are served directly from WordPress.com servers.
Admin
Bernd
Is it possible to get screenshots with https ?
Dumitru Brinzan
Helpful tutorial and information, but it feels a little incomplete.
If it contained info on how to save the images to the library then it would be perfect
Annapurna
Did you get how to do this?
Damith
It is possible to save screenshot in media library and make that as featured image. Thanks.
Obeng blankson
Great info. I will surely test the plugin on my website to actually have a feel of it.
Ankit Agarwal
With any of these methods, what will be the side effect on the speed of the website? As a plugin, there will be some addition to load time. If the images are not stored on the media library, there will again be some addition to website load times.
So from the methods given, which one is recommended considering website load speed?